Gemini Robotics-ER 1.6은 Gemini의 에이전트 기능을 로봇공학에 도입하는 비전 언어 모델 (VLM)입니다. 물리적 세계에서 고급 추론을 할 수 있도록 설계되어 로봇이 복잡한 시각적 데이터를 해석하고, 공간 추론을 실행하고, 자연어 명령에서 작업을 계획할 수 있습니다.
Gemini Robotics-ER 1.5를 사용한 경우 API 호출에서 모델 이름을 model="gemini-robotics-er-1.5-preview"에서 model="gemini-robotics-er-1.6-preview"로 바꿔 1.6 모델을 사용할 수 있습니다.
주요 기능 및 혜택:
- 자율성 향상: 로봇이 개방형 환경의 변화에 추론하고 적응하며 대응할 수 있습니다.
- 자연어 상호작용: 자연어를 사용하여 복잡한 작업 할당을 지원하여 로봇을 더 쉽게 사용할 수 있습니다.
- 작업 오케스트레이션: 자연어 명령을 하위 작업으로 분해하고 기존 로봇 컨트롤러 및 동작과 통합하여 장기적인 작업을 완료합니다.
- 다재다능한 기능: 객체를 찾아 식별하고, 객체 관계를 이해하고, 잡기 및 궤적을 계획하고, 동적 장면을 해석합니다.
이 문서에서는 모델이 하는 일을 설명하고 모델의 에이전트 기능을 강조하는 여러 예를 살펴봅니다.
바로 시작하려면 Google AI Studio에서 모델을 사용해 보세요.
안전
Gemini Robotics-ER 1.6은 안전을 고려하여 제작되었지만 로봇 주변의 안전한 환경을 유지하는 것은 사용자의 책임입니다. 생성형 AI 모델은 실수를 할 수 있으며, 물리적 로봇은 손상을 일으킬 수 있습니다. 안전은 최우선 과제이며, 실제 로봇 공학에서 사용할 때 생성형 AI 모델을 안전하게 만드는 것은 Google 연구의 활발하고 중요한 분야입니다. 자세한 내용은 Google DeepMind 로봇 공학 안전 페이지를 참고하세요.
시작하기: 장면에서 객체 찾기
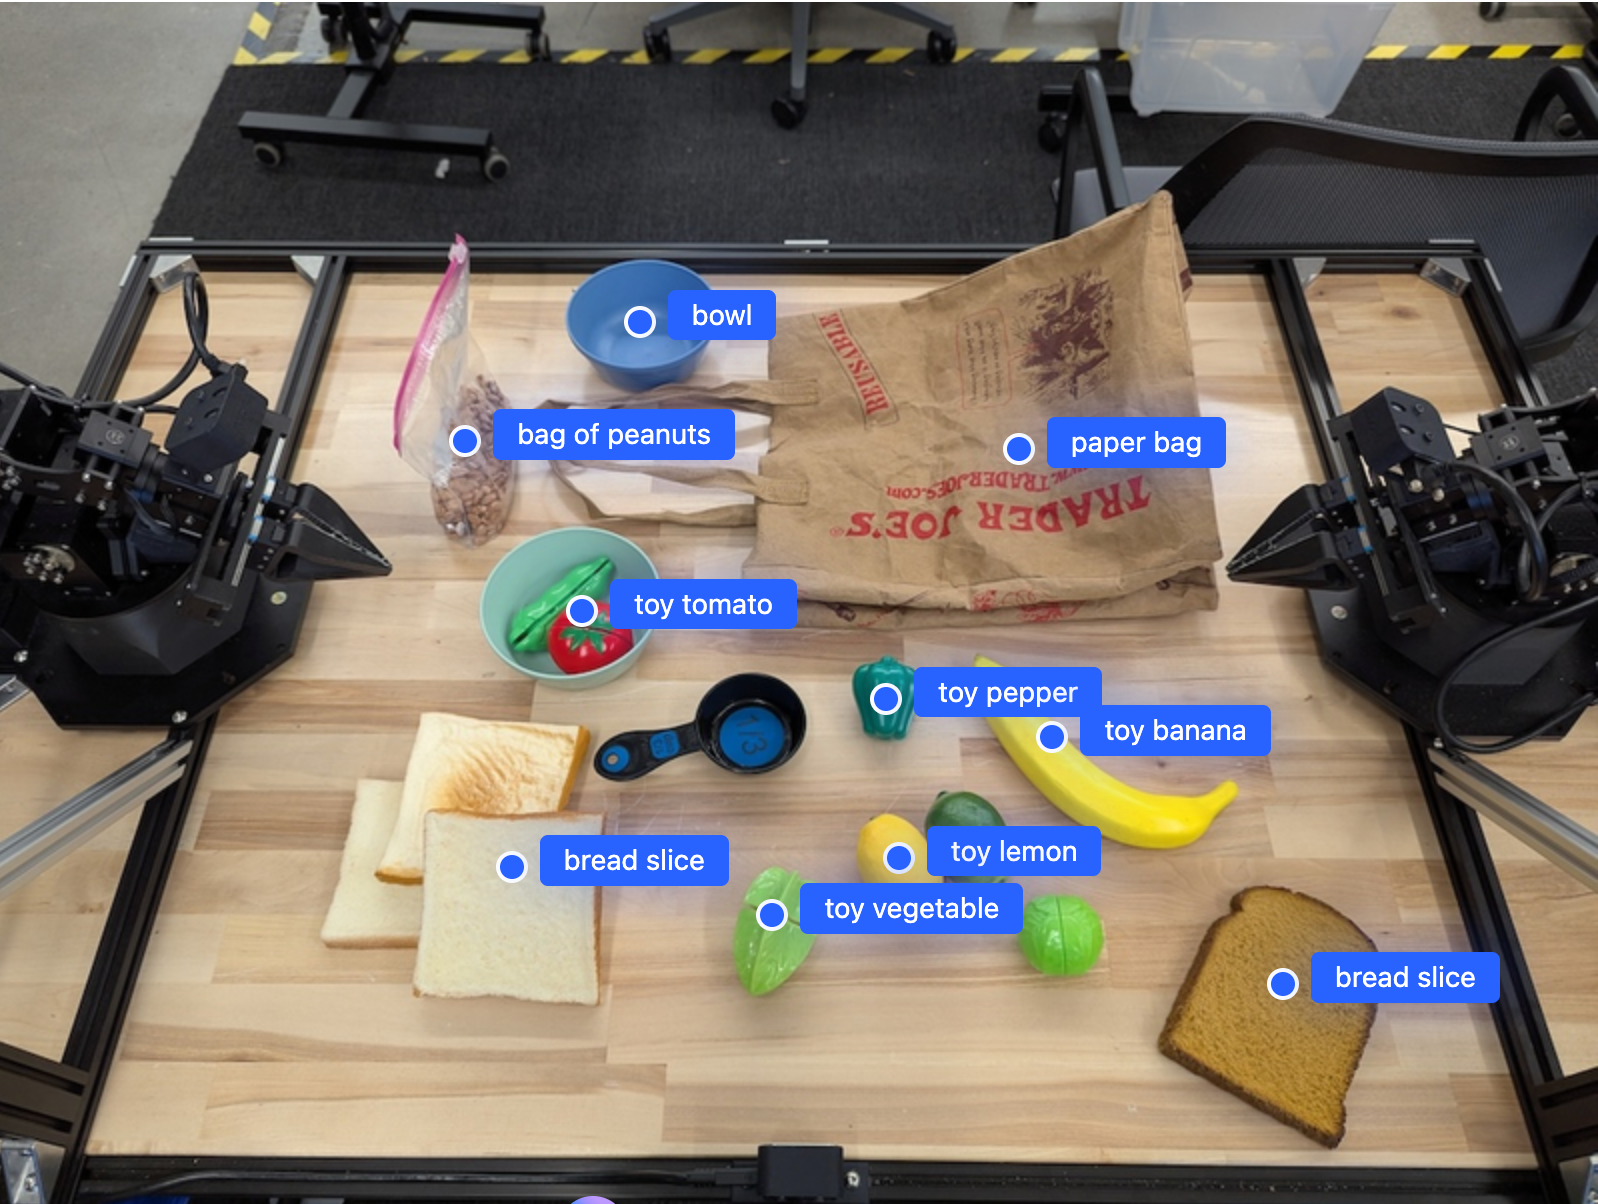
다음 예에서는 일반적인 로봇 공학 사용 사례를 보여줍니다. generateContent 메서드를 사용하여 이미지와 텍스트 프롬프트를 모델에 전달하여 식별된 객체와 해당 2D 포인트 목록을 가져오는 방법을 보여줍니다.
모델은 이미지에서 식별된 항목의 포인트를 반환하여 정규화된 2D 좌표와 라벨을 반환합니다.
이 출력을 로봇공학 API와 함께 사용하거나 시각-언어-행동(VLA) 모델 또는 기타 서드 파티 사용자 정의 함수를 호출하여 로봇이 실행할 작업을 생성할 수 있습니다.
Python
from google import genai
from google.genai import types

PROMPT = """
          Point to no more than 10 items in the image. The label returned
          should be an identifying name for the object detected.
          The answer should follow the json format: [{"point": <point>,
          "label": <label1>}, ...]. The points are in [y, x] format
          normalized to 0-1000.
        """
client = genai.Client()

# Load your image
with open("my-image.png", 'rb') as f:
    image_bytes = f.read()

image_response = client.models.generate_content(
    model="gemini-robotics-er-1.6-preview",
    contents=[
        types.Part.from_bytes(
            data=image_bytes,
            mime_type='image/png',
        ),
        PROMPT
    ],
    config = types.GenerateContentConfig(
        temperature=1.0,
        thinking_config=types.ThinkingConfig(thinking_budget=0)
    )
)

print(image_response.text)
REST
# First, ensure you have the image file locally.
# Encode the image to base64
IMAGE_BASE64=$(base64 -w 0 my-image.png)

curl -X POST \
  "https://generativelanguage.googleapis.com/v1beta/models/gemini-robotics-er-1.6-preview:generateContent \
  -H "x-goog-api-key: $GEMINI_API_KEY" \
  -H "Content-Type: application/json" \
  -d '{
    "contents": [
      {
        "parts": [
          {
            "inlineData": {
              "mimeType": "image/png",
              "data": "'"${IMAGE_BASE64}"'"
            }
          },
          {
            "text": "Point to no more than 10 items in the image. The label returned should be an identifying name for the object detected. The answer should follow the json format: [{\"point\": [y, x], \"label\": <label1>}, ...]. The points are in [y, x] format normalized to 0-1000."
          }
        ]
      }
    ],
    "generationConfig": {
      "temperature": 0.5,
      "thinkingConfig": {
        "thinkingBudget": 0
      }
    }
  }'
출력은 객체를 포함하는 JSON 배열이며, 각 객체에는 point(정규화된 [y, x] 좌표)와 객체를 식별하는 label가 있습니다.
JSON
[
  {"point": [376, 508], "label": "small banana"},
  {"point": [287, 609], "label": "larger banana"},
  {"point": [223, 303], "label": "pink starfruit"},
  {"point": [435, 172], "label": "paper bag"},
  {"point": [270, 786], "label": "green plastic bowl"},
  {"point": [488, 775], "label": "metal measuring cup"},
  {"point": [673, 580], "label": "dark blue bowl"},
  {"point": [471, 353], "label": "light blue bowl"},
  {"point": [492, 497], "label": "bread"},
  {"point": [525, 429], "label": "lime"}
]
다음 이미지는 이러한 포인트를 표시하는 방법을 보여주는 예입니다.
작동 방식
Gemini Robotics-ER 1.6을 사용하면 로봇이 공간 이해를 통해 실제 환경에서 맥락을 파악하고 작업할 수 있습니다. 이미지/동영상/오디오 입력과 자연어 프롬프트를 사용하여 다음 작업을 실행합니다.
- 객체 및 장면 컨텍스트 이해: 객체를 식별하고 어포던스를 비롯한 장면과의 관계를 추론합니다.
- 작업 요청 사항 이해: '바나나 찾아줘'와 같은 자연어로 제공된 작업을 해석합니다.
- 공간적, 시간적 추론: 일련의 작업과 시간이 지남에 따라 객체가 장면과 상호작용하는 방식을 이해합니다.
- 구조화된 출력 제공: 객체 위치를 나타내는 좌표 (점 또는 경계 상자)를 반환합니다.
이를 통해 로봇은 프로그래매틱 방식으로 환경을 '보고' '이해'할 수 있습니다.
Gemini Robotics-ER 1.6은 에이전트형이기도 합니다. 즉, '사과를 그릇에 넣어'와 같은 복잡한 작업을 하위 작업으로 분류하여 장기 작업을 조정할 수 있습니다.
- 하위 작업 순서 지정: 명령어를 논리적 단계 시퀀스로 분해합니다.
- 함수 호출/코드 실행: 기존 로봇 함수/도구를 호출하거나 생성된 코드를 실행하여 단계를 실행합니다.
Gemini의 함수 호출 작동 방식에 대한 자세한 내용은 함수 호출 페이지를 참고하세요.
Gemini Robotics-ER 1.6으로 사고 예산 사용
Gemini Robotics-ER 1.6에는 지연 시간과 정확도 간의 균형을 제어할 수 있는 유연한 사고 예산이 있습니다. 객체 감지와 같은 공간 이해 작업의 경우 모델은 작은 사고 예산으로 높은 성능을 달성할 수 있습니다. 더 큰 사고 예산은 개수 세기, 무게 추정과 같은 더 복잡한 추론 작업에 도움이 됩니다. 이를 통해 더 어려운 작업에 대해 지연 시간이 짧은 응답과 정확도가 높은 결과를 균형 있게 제공할 수 있습니다.
생각 예산에 대해 자세히 알아보려면 생각하기 핵심 기능 페이지를 참고하세요.
표준 공간 추론
다음 예에서는 이미지에서 객체를 가리키고 찾는 것부터 궤적을 계획하는 것까지 자연어 프롬프트를 사용한 로봇 인식 및 공간 추론 작업을 보여줍니다. 간단하게 하기 위해 이 예의 코드 스니펫은 프롬프트와 generate_content API 호출만 표시하도록 축소되었습니다.
실행 가능한 전체 코드와 추가 예는 로보틱스 쿡북에서 확인할 수 있습니다.
객체 가리키기
이미지 또는 동영상 프레임에서 객체를 가리키고 찾는 것은 로봇 공학에서 비전-언어 모델 (VLM)의 일반적인 사용 사례입니다. 다음 예에서는 모델에 이미지 내의 특정 객체를 찾아 좌표를 반환하도록 요청합니다.
Python
from google import genai
from google.genai import types

client = genai.Client()

# Load your image and set up your prompt
with open('path/to/image-with-objects.jpg', 'rb') as f:
    image_bytes = f.read()

queries = [
    "bread",
    "starfruit",
    "banana",
]

prompt = f"""
    Get all points matching the following objects: {', '.join(queries)}. The
    label returned should be an identifying name for the object detected.
    The answer should follow the json format:

    [{{"point": , "label": }}, ...]. The points are in

    [y, x] format normalized to 0-1000.
    """

image_response = client.models.generate_content(
  model="gemini-robotics-er-1.6-preview",
  contents=[
    types.Part.from_bytes(
      data=image_bytes,
      mime_type='image/jpeg',
    ),
    prompt
  ],
  config = types.GenerateContentConfig(
      temperature=1.0,
      thinking_config=types.ThinkingConfig(thinking_budget=0)
  )
)

print(image_response.text)
출력은 시작하기 예와 유사하며, 발견된 객체의 좌표와 라벨이 포함된 JSON입니다.
[
  {"point": [671, 317], "label": "bread"},
  {"point": [738, 307], "label": "bread"},
  {"point": [702, 237], "label": "bread"},
  {"point": [629, 307], "label": "bread"},
  {"point": [833, 800], "label": "bread"},
  {"point": [609, 663], "label": "banana"},
  {"point": [770, 483], "label": "starfruit"}
]
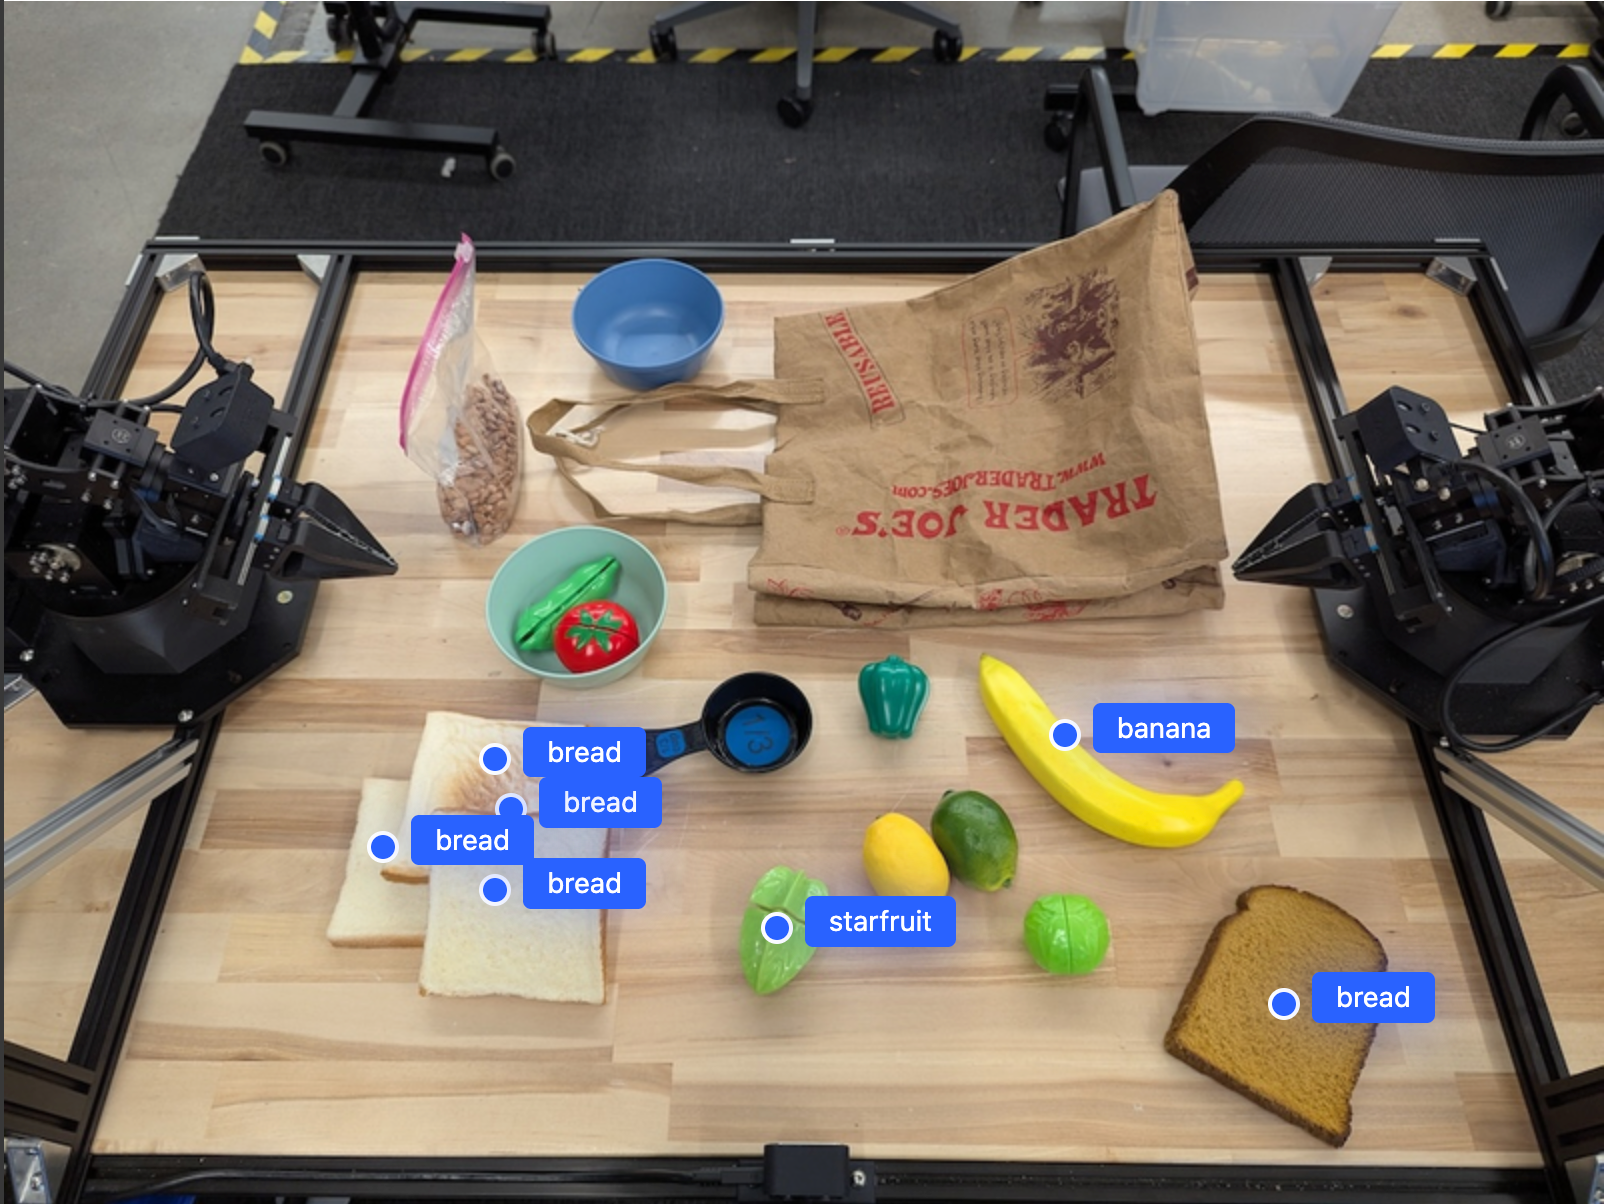
다음 프롬프트를 사용하여 모델이 구체적인 객체 대신 '과일'과 같은 추상적인 카테고리를 해석하고 이미지의 모든 인스턴스를 찾도록 요청합니다.
Python
prompt = f"""
        Get all points for fruit. The label returned should be an identifying
        name for the object detected.
        """ + """The answer should follow the json format:
        [{"point": <point>, "label": <label1>}, ...]. The points are in
        [y, x] format normalized to 0-1000."""
다른 이미지 처리 기법은 이미지 이해 페이지를 참고하세요.
동영상에서 객체 추적
Gemini Robotics-ER 1.6은 동영상 프레임을 분석하여 시간 경과에 따른 객체를 추적할 수도 있습니다. 지원되는 동영상 형식 목록은 동영상 입력을 참고하세요.
다음은 모델이 분석하는 각 프레임에서 특정 객체를 찾는 데 사용되는 기본 프롬프트입니다.
Python
# Define the objects to find
queries = [
    "pen (on desk)",
    "pen (in robot hand)",
    "laptop (opened)",
    "laptop (closed)",
]

base_prompt = f"""
  Point to the following objects in the provided image: {', '.join(queries)}.
  The answer should follow the json format:

  [{{"point": , "label": }}, ...].

  The points are in [y, x] format normalized to 0-1000.
  If no objects are found, return an empty JSON list [].
  """
출력에는 동영상 프레임에서 추적되는 펜과 노트북이 표시됩니다.
![]()
실행 가능한 전체 코드는 로보틱스 쿡북을 참고하세요.
객체 감지 및 경계 상자
단일 지점 외에도 모델은 객체를 둘러싸는 직사각형 영역을 제공하는 2D 경계 상자를 반환할 수 있습니다.
이 예에서는 테이블에서 식별 가능한 객체의 2D 경계 상자를 요청합니다. 모델은 출력을 25개 객체로 제한하고 여러 인스턴스의 이름을 고유하게 지정하도록 지시받습니다.
Python
from google import genai
from google.genai import types

client = genai.Client()

# Load your image and set up your prompt
with open('path/to/image-with-objects.jpg', 'rb') as f:
    image_bytes = f.read()

prompt = """
      Return bounding boxes as a JSON array with labels. Never return masks
      or code fencing. Limit to 25 objects. Include as many objects as you
      can identify on the table.
      If an object is present multiple times, name them according to their
      unique characteristic (colors, size, position, unique characteristics, etc..).
      The format should be as follows: [{"box_2d": [ymin, xmin, ymax, xmax],
      "label": <label for the object>}] normalized to 0-1000. The values in
      box_2d must only be integers
      """

image_response = client.models.generate_content(
  model="gemini-robotics-er-1.6-preview",
  contents=[
    types.Part.from_bytes(
      data=image_bytes,
      mime_type='image/jpeg',
    ),
    prompt
  ],
  config = types.GenerateContentConfig(
      temperature=1.0,
      thinking_config=types.ThinkingConfig(thinking_budget=0)
  )
)

print(image_response.text)
다음은 모델에서 반환된 상자를 보여줍니다.
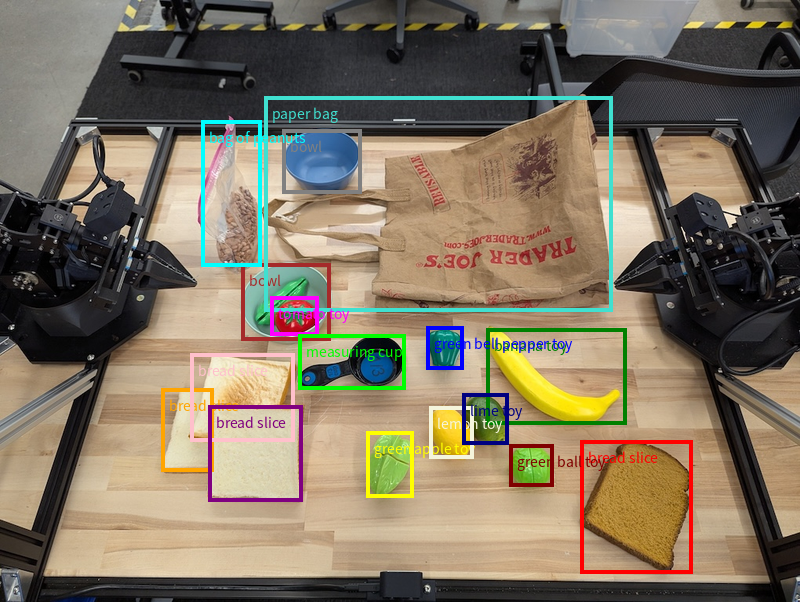
실행 가능한 전체 코드는 로보틱스 쿡북을 참고하세요. 이미지 이해 페이지에는 객체 감지, 경계 상자 예시와 같은 시각적 작업의 추가 예도 있습니다.
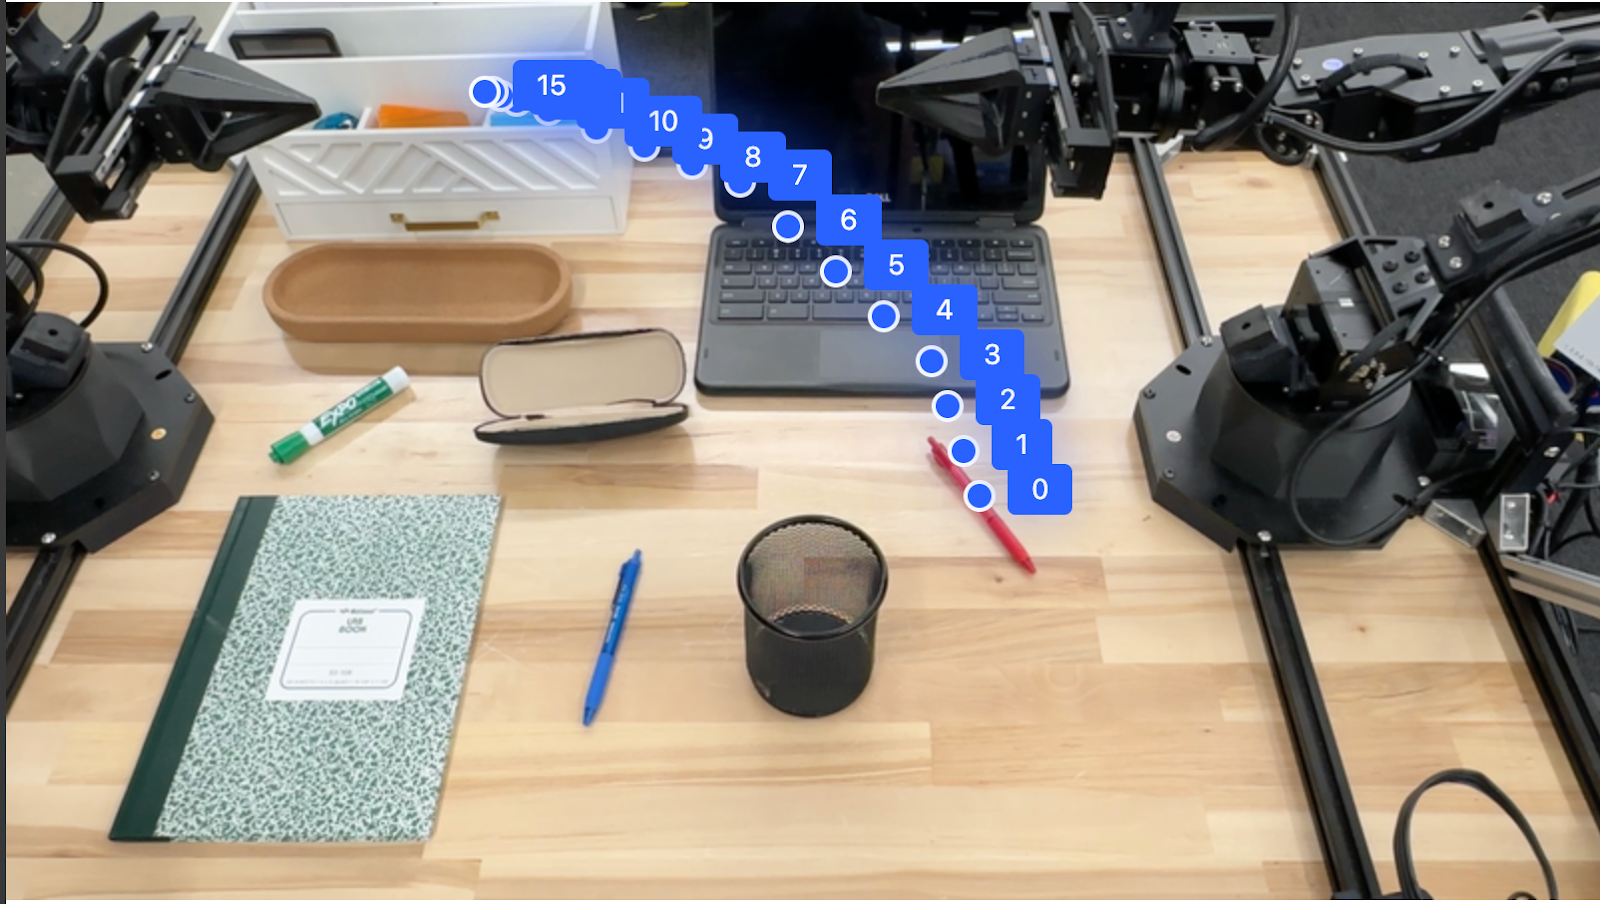
궤적
Gemini Robotics-ER 1.6은 로봇 움직임을 안내하는 데 유용한 궤적을 정의하는 점의 시퀀스를 생성할 수 있습니다.
이 예시에서는 시작점과 일련의 중간 지점을 포함하여 빨간색 펜을 정리함으로 이동하는 궤적을 요청합니다.
Python
from google import genai
from google.genai import types

client = genai.Client()

# Load your image and set up your prompt
with open('path/to/image-with-objects.jpg', 'rb') as f:
    image_bytes = f.read()

points_data = []
prompt = """
        Place a point on the red pen, then 15 points for the trajectory of
        moving the red pen to the top of the organizer on the left.
        The points should be labeled by order of the trajectory, from '0'
        (start point at left hand) to <n> (final point)
        The answer should follow the json format:
        [{"point": <point>, "label": <label1>}, ...].
        The points are in [y, x] format normalized to 0-1000.
        """

image_response = client.models.generate_content(
  model="gemini-robotics-er-1.6-preview",
  contents=[
    types.Part.from_bytes(
      data=image_bytes,
      mime_type='image/jpeg',
    ),
    prompt
  ],
  config = types.GenerateContentConfig(
      temperature=1.0,
  )
)

print(image_response.text)
대답은 빨간색 펜이 주최자 위로 이동하는 작업을 완료하기 위해 따라야 하는 경로의 궤적을 설명하는 좌표 집합입니다.
[
  {"point": [550, 610], "label": "0"},
  {"point": [500, 600], "label": "1"},
  {"point": [450, 590], "label": "2"},
  {"point": [400, 580], "label": "3"},
  {"point": [350, 550], "label": "4"},
  {"point": [300, 520], "label": "5"},
  {"point": [250, 490], "label": "6"},
  {"point": [200, 460], "label": "7"},
  {"point": [180, 430], "label": "8"},
  {"point": [160, 400], "label": "9"},
  {"point": [140, 370], "label": "10"},
  {"point": [120, 340], "label": "11"},
  {"point": [110, 320], "label": "12"},
  {"point": [105, 310], "label": "13"},
  {"point": [100, 305], "label": "14"},
  {"point": [100, 300], "label": "15"}
]
에이전트 기능
다음 예에서는 모델의 에이전트 기능, 특히 코드 실행을 사용하여 고급 로봇 추론을 보여줍니다. 이러한 시나리오에서 모델은 대답하기 전에 모호성을 해결하거나 정확도를 높이기 위해 이미지를 조작 (예: 확대, 자르기, 회전)하는 Python 코드를 작성하고 실행할 수 있습니다.
객체 감지 (확대/축소 및 자르기)
다음 예에서는 객체를 감지하고 경계 상자를 반환할 때 코드 실행을 사용하여 이미지를 확대/축소하고 자르는 방법을 보여줍니다.
Python
from google import genai
from google.genai import types

client = genai.Client()

# Load your image
with open('sorting.jpeg', 'rb') as f:
    image_bytes = f.read()

prompt = """
Return JSON in the format {label: val, y: val, x: val, y2: val, x2: val} for
the compostable objects in this scene. Please Zoom and crop the image for a
clearer view. Return an annotated image of the final result with the bounding
boxes drawn on it to the API caller as a part of your process.
"""

response = client.models.generate_content(
    model="gemini-robotics-er-1.6-preview",
    contents=[
        types.Part.from_bytes(
            data=image_bytes,
            mime_type='image/jpeg',
        ),
        prompt
    ],
    config = types.GenerateContentConfig(
        temperature=1.0,
        tools=[types.Tool(code_execution=types.ToolCodeExecution)],
    )
)

print(response.text)
모델 출력은 다음과 비슷합니다.
[
  {"label": "compostable", "y": 256, "x": 482, "y2": 295, "x2": 546},
  {"label": "compostable", "y": 317, "x": 478, "y2": 350, "x2": 542},
  {"label": "compostable", "y": 586, "x": 556, "y2": 668, "x2": 595},
  {"label": "compostable", "y": 463, "x": 669, "y2": 511, "x2": 718},
  {"label": "compostable", "y": 178, "x": 565, "y2": 250, "x2": 609}
]
다음은 모델에서 반환된 상자를 보여줍니다.
아날로그 게이지를 읽고 로직 적용
다음 예에서는 모델을 사용하여 아날로그 게이지를 읽고 시간 계산을 실행하는 방법을 보여줍니다. 시스템 명령어를 사용하여 JSON 출력을 강제 적용합니다.
Python
from google import genai
from google.genai import types

client = genai.Client()

# Load your image
with open('clock.jpg', 'rb') as f:
    image_bytes = f.read()

q_time = """
Tell me what the value is. Please respond in the following JSON format:\n {\n "hours": X,\n  "minutes": Y,\n}. Zoom in or crop as necessary to confirm location of the clock hands.
"""

system_instruction = "Be precise. When JSON is requested, reply with ONLY that JSON (no preface, no code block)."

response = client.models.generate_content(
    model="gemini-robotics-er-1.6-preview",
    contents=[
        types.Part.from_bytes(
            data=image_bytes,
            mime_type='image/jpeg',
        ),
        system_instruction + " " + q_time
    ],
    config = types.GenerateContentConfig(
        temperature=1.0,
    )
)

print(response.text)
다음은 이미지 입력의 예입니다.
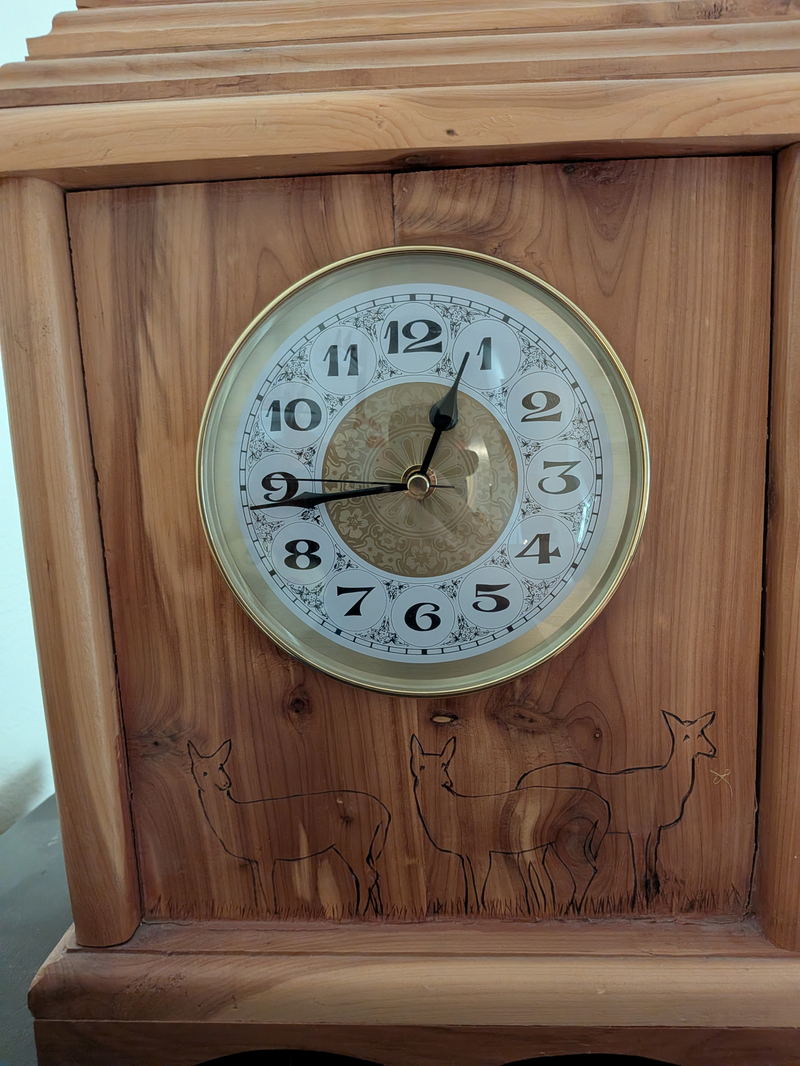
모델 출력은 다음과 비슷합니다.
Time Response:  {
  "hours": 12,
  "minutes": 44
 }
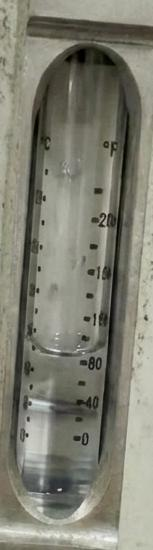
컨테이너의 유체 측정
다음 예에서는 코드 실행을 사용하여 미터를 읽고 액체 수준을 백분율로 계산하는 방법을 보여줍니다.
Python
from google import genai
from google.genai import types

client = genai.Client()

# Load your image
with open('meter.jpeg', 'rb') as f:
    image_bytes = f.read()

prompt = """
How full is the meter of liquid?
To read it,
1) Find the points for the top of the sight window, bottom of the sight window and the liquid level, formatted as [y, x] with values ranging from 0-1000;
2) Use math to determine the liquid level as a percentage;
3) Output "Answer: ??" on a separate line, where ?? is a number without % or unit.
"""

response = client.models.generate_content(
    model="gemini-robotics-er-1.6-preview",
    contents=[
        types.Part.from_bytes(
            data=image_bytes,
            mime_type='image/jpeg',
        ),
        prompt
    ],
    config = types.GenerateContentConfig(
        temperature=1.0,
        tools=[types.Tool(code_execution=types.ToolCodeExecution)],
    )
)

print(response.text)
다음은 입력의 확대 이미지입니다.
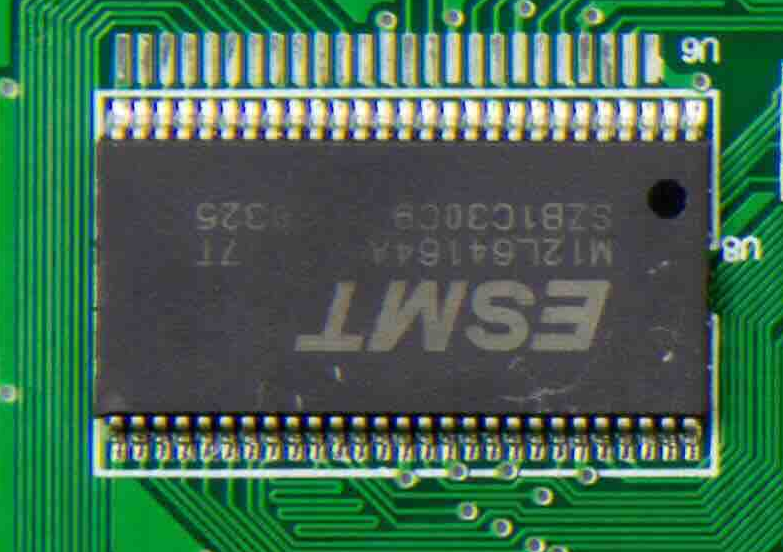
회로판의 표시 읽기
다음 예에서는 코드 실행을 사용하여 회로판 칩의 텍스트를 읽는 방법을 보여줍니다. 이렇게 하면 모델이 필요에 따라 이미지를 확대/축소하고 자르고 회전할 수 있습니다.
Python
from google import genai
from google.genai import types

client = genai.Client()

# Load your image
with open('circuit_board.jpeg', 'rb') as f:
    image_bytes = f.read()

prompt = "What is the number on the ESMT chip? Zoom, crop, and rotate if needed."

response = client.models.generate_content(
    model="gemini-robotics-er-1.6-preview",
    contents=[
        types.Part.from_bytes(
            data=image_bytes,
            mime_type='image/jpeg',
        ),
        prompt
    ],
    config = types.GenerateContentConfig(
        temperature=1.0,
        tools=[types.Tool(code_execution=types.ToolCodeExecution)],
    )
)

print(response.text)
다음은 입력의 확대 이미지입니다.
이미지 주석
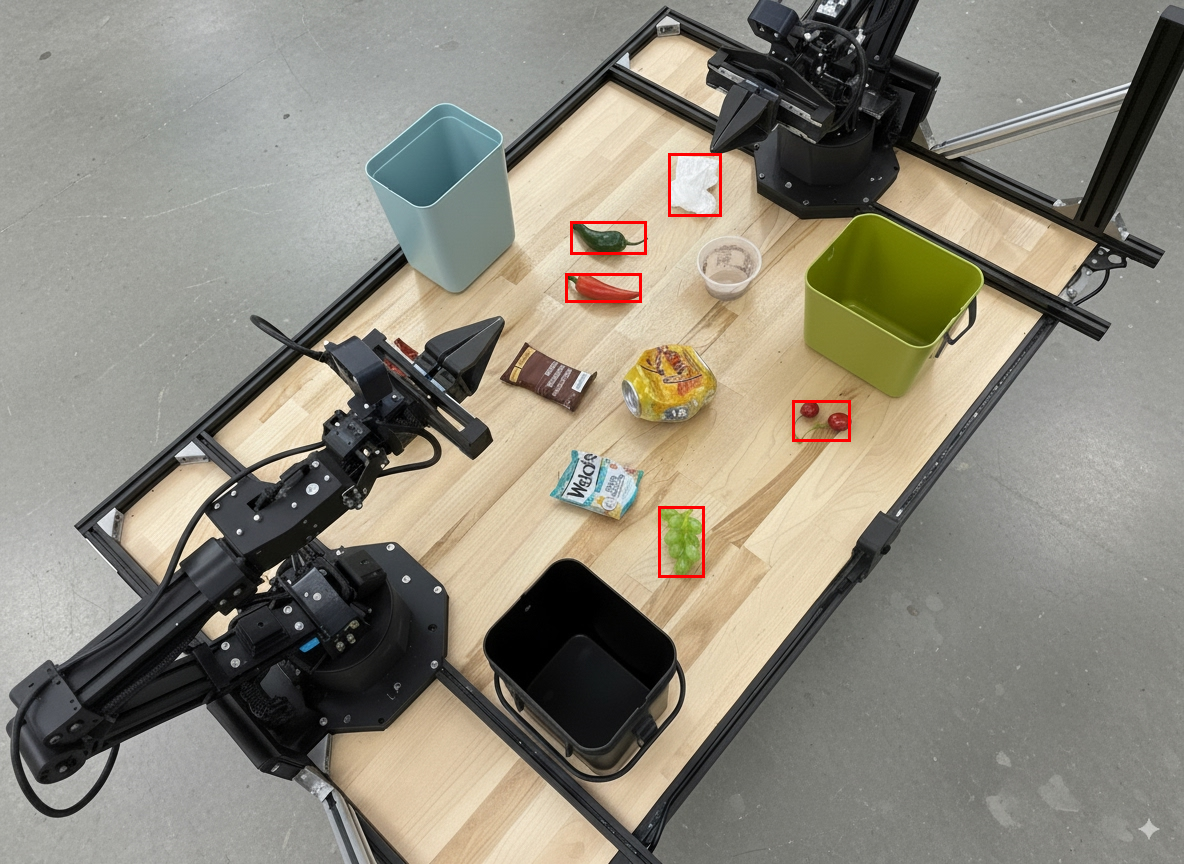
다음 예에서는 코드 실행을 사용하여 이미지에 주석을 달고 (예: 폐기 안내 화살표 그리기) 수정된 이미지를 반환하는 방법을 보여줍니다.
Python
from google import genai
from google.genai import types

client = genai.Client()

# Load your image
with open('sorting.jpeg', 'rb') as f:
    image_bytes = f.read()

prompt = """
Look at this image and return it as an annotated version using arrows of
different colors to represent which items should go in which bins for
disposal. You must return the final image to the API caller.
"""

response = client.models.generate_content(
    model="gemini-robotics-er-1.6-preview",
    contents=[
        types.Part.from_bytes(
            data=image_bytes,
            mime_type='image/jpeg',
        ),
        prompt
    ],
    config = types.GenerateContentConfig(
        temperature=1.0,
        tools=[types.Tool(code_execution=types.ToolCodeExecution)],
    )
)

print(response.text)
다음은 이미지 입력의 예입니다.
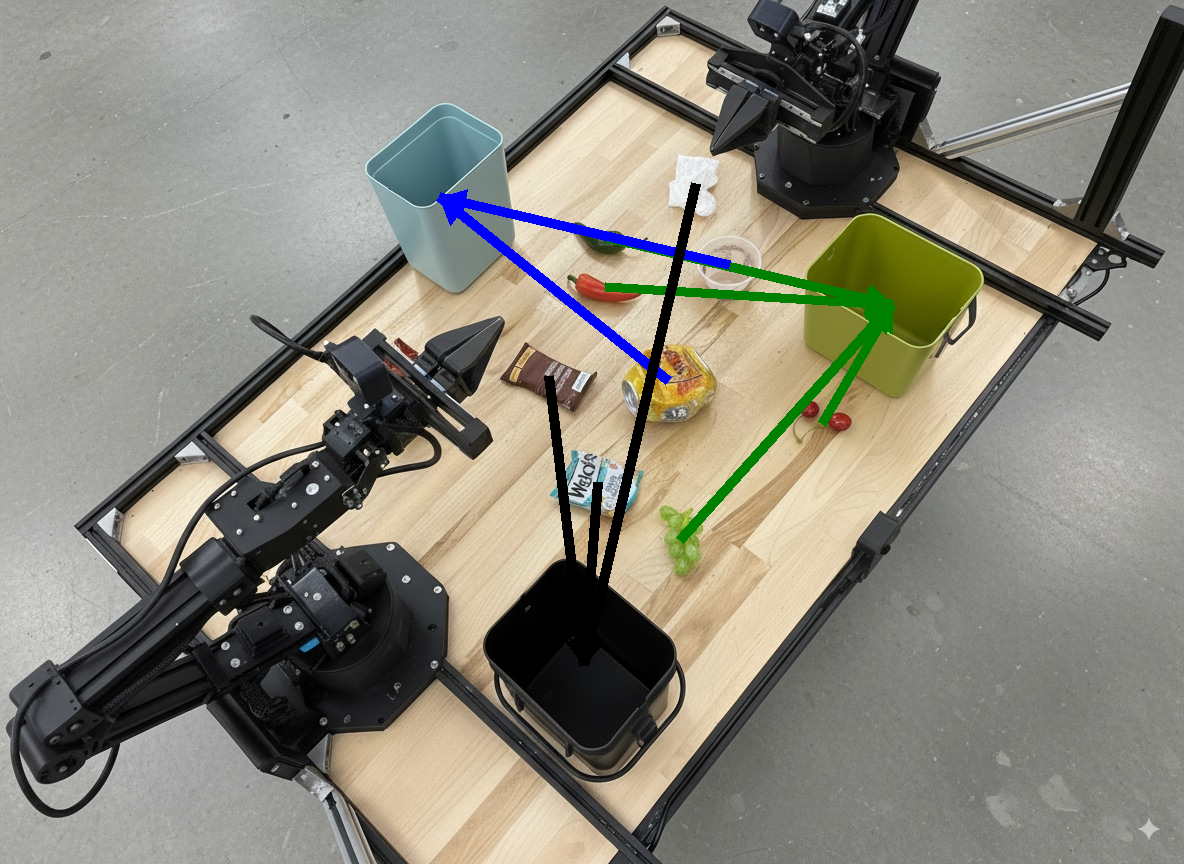
모델 출력은 다음과 비슷합니다.
The annotated image shows the suggested disposal locations for the items on the table:
- **Green bin (Compost/Organic)**: Green chili, red chili, grapes, and cherries.
- **Blue bin (Recycling)**: Yellow crushed can and plastic container.
- **Black bin (Trash)**: Chocolate bar wrapper, Welch's packet, and white tissue.
조정
Gemini Robotics-ER 1.6은 작업 계획 및 상위 수준의 공간 추론을 실행하여 컨텍스트 이해를 기반으로 작업을 추론하거나 최적의 위치를 식별하여 장기 작업을 조정할 수 있습니다.
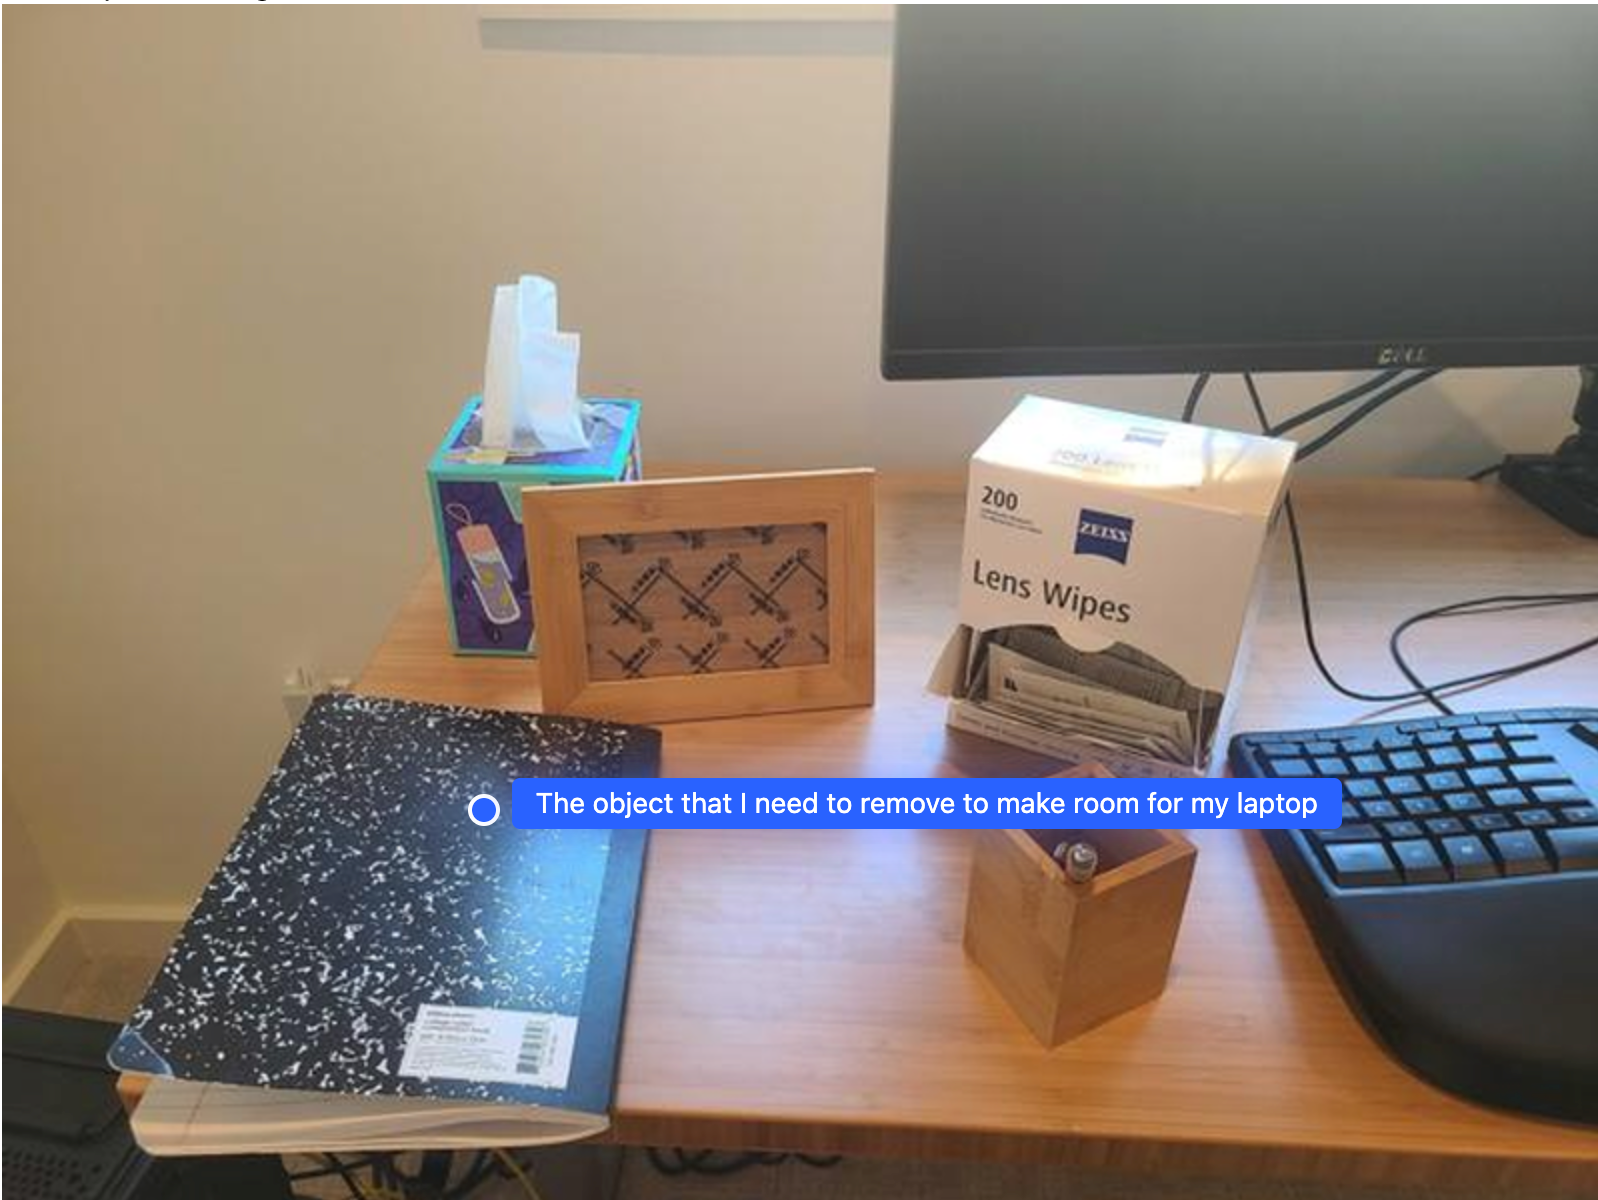
노트북을 위한 공간 만들기
이 예시에서는 Gemini Robotics-ER이 공간에 대해 추론하는 방법을 보여줍니다. 프롬프트는 다른 항목을 위한 공간을 만들기 위해 이동해야 하는 객체를 식별하도록 모델에 요청합니다.
Python
from google import genai
from google.genai import types

client = genai.Client()

# Load your image and set up your prompt
with open('path/to/image-with-objects.jpg', 'rb') as f:
    image_bytes = f.read()

prompt = """
          Point to the object that I need to remove to make room for my laptop
          The answer should follow the json format: [{"point": <point>,
          "label": <label1>}, ...]. The points are in [y, x] format normalized to 0-1000.
        """

image_response = client.models.generate_content(
  model="gemini-robotics-er-1.6-preview",
  contents=[
    types.Part.from_bytes(
      data=image_bytes,
      mime_type='image/jpeg',
    ),
    prompt
  ],
  config = types.GenerateContentConfig(
      temperature=1.0,
      thinking_config=types.ThinkingConfig(thinking_budget=0)
  )
)

print(image_response.text)
대답에는 사용자의 질문에 대한 답이 되는 객체의 2D 좌표가 포함됩니다. 이 경우 노트북을 놓을 공간을 만들기 위해 이동해야 하는 객체입니다.
[
  {"point": [672, 301], "label": "The object that I need to remove to make room for my laptop"}
]
점심 도시락 싸기
또한 모델은 여러 단계로 구성된 작업에 대한 안내를 제공하고 각 단계와 관련된 객체를 가리킬 수 있습니다. 이 예시에서는 모델이 점심 가방을 싸기 위한 일련의 단계를 계획하는 방법을 보여줍니다.
Python
from google import genai
from google.genai import types

client = genai.Client()

# Load your image and set up your prompt
with open('path/to/image-of-lunch.jpg', 'rb') as f:
    image_bytes = f.read()

prompt = """
          Explain how to pack the lunch box and lunch bag. Point to each
          object that you refer to. Each point should be in the format:
          [{"point": [y, x], "label": }], where the coordinates are
          normalized between 0-1000.
        """

image_response = client.models.generate_content(
  model="gemini-robotics-er-1.6-preview",
  contents=[
    types.Part.from_bytes(
      data=image_bytes,
      mime_type='image/jpeg',
    ),
    prompt
  ],
  config = types.GenerateContentConfig(
      temperature=1.0,
      thinking_config=types.ThinkingConfig(thinking_budget=0)
  )
)

print(image_response.text)
이 프롬프트의 대답은 이미지 입력에서 점심 가방을 포장하는 방법에 관한 단계별 안내입니다.
입력 이미지
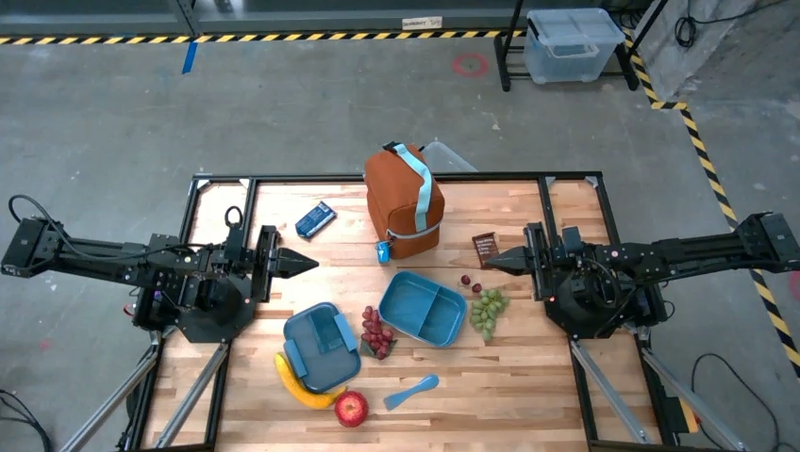
모델 출력
Based on the image, here is a plan to pack the lunch box and lunch bag:

1.  **Pack the fruit into the lunch box.** Place the [apple](apple), [banana](banana), [red grapes](red grapes), and [green grapes](green grapes) into the [blue lunch box](blue lunch box).
2.  **Add the spoon to the lunch box.** Put the [blue spoon](blue spoon) inside the lunch box as well.
3.  **Close the lunch box.** Secure the lid on the [blue lunch box](blue lunch box).
4.  **Place the lunch box inside the lunch bag.** Put the closed [blue lunch box](blue lunch box) into the [brown lunch bag](brown lunch bag).
5.  **Pack the remaining items into the lunch bag.** Place the [blue snack bar](blue snack bar) and the [brown snack bar](brown snack bar) into the [brown lunch bag](brown lunch bag).

Here is the list of objects and their locations:
*   [{"point": [899, 440], "label": "apple"}]
*   [{"point": [814, 363], "label": "banana"}]
*   [{"point": [727, 470], "label": "red grapes"}]
*   [{"point": [675, 608], "label": "green grapes"}]
*   [{"point": [706, 529], "label": "blue lunch box"}]
*   [{"point": [864, 517], "label": "blue spoon"}]
*   [{"point": [499, 401], "label": "blue snack bar"}]
*   [{"point": [614, 705], "label": "brown snack bar"}]
*   [{"point": [448, 501], "label": "brown lunch bag"}]
맞춤 로봇 API 호출
이 예시에서는 맞춤 로봇 API를 사용한 작업 오케스트레이션을 보여줍니다. 픽앤플레이스 작업을 위해 설계된 모의 API를 도입합니다. 파란색 블록을 집어 주황색 그릇에 넣는 것이 작업입니다.
이 페이지의 다른 예와 마찬가지로 실행 가능한 전체 코드는 로보틱스 쿡북에서 확인할 수 있습니다.
첫 번째 단계는 다음 프롬프트로 두 항목을 모두 찾는 것입니다.
Python
prompt = """
            Locate and point to the blue block and the orange bowl. The label
            returned should be an identifying name for the object detected.
            The answer should follow the json format: [{"point": <point>, "label": <label1>}, ...].
            The points are in [y, x] format normalized to 0-1000.
          """
모델 응답에는 블록과 그릇의 정규화된 좌표가 포함됩니다.
[
  {"point": [389, 252], "label": "orange bowl"},
  {"point": [727, 659], "label": "blue block"}
]
이 예시에서는 다음 모의 로봇 API를 사용합니다.
Python
def move(x, y, high):
  print(f"moving to coordinates: {x}, {y}, {15 if high else 5}")

def setGripperState(opened):
  print("Opening gripper" if opened else "Closing gripper")

def returnToOrigin():
  print("Returning to origin pose")
다음 단계는 작업을 실행하는 데 필요한 논리로 API 함수 시퀀스를 호출하는 것입니다. 다음 프롬프트에는 모델이 이 작업을 오케스트레이션할 때 사용해야 하는 로봇 API에 대한 설명이 포함되어 있습니다.
Python
prompt = f"""
    You are a robotic arm with six degrees-of-freedom. You have the
    following functions available to you:

    def move(x, y, high):
      # moves the arm to the given coordinates. The boolean value 'high' set
      to True means the robot arm should be lifted above the scene for
      avoiding obstacles during motion. 'high' set to False means the robot
      arm should have the gripper placed on the surface for interacting with
      objects.

    def setGripperState(opened):
      # Opens the gripper if opened set to true, otherwise closes the gripper

    def returnToOrigin():
      # Returns the robot to an initial state. Should be called as a cleanup
      operation.

    The origin point for calculating the moves is at normalized point
    y={robot_origin_y}, x={robot_origin_x}. Use this as the new (0,0) for
    calculating moves, allowing x and y to be negative.
    Perform a pick and place operation where you pick up the blue block at
    normalized coordinates ({block_x}, {block_y}) (relative coordinates:
    {block_relative_x}, {block_relative_y}) and place it into the orange
    bowl at normalized coordinates ({bowl_x}, {bowl_y})
    (relative coordinates: {bowl_relative_x}, {bowl_relative_y}).
    Provide the sequence of function calls as a JSON list of objects, where
    each object has a "function" key (the function name) and an "args" key
    (a list of arguments for the function).
    Also, include your reasoning before the JSON output.
    For example:
    Reasoning: To pick up the block, I will first move the arm to a high
    position above the block, open the gripper, move down to the block,
    close the gripper, lift the arm, move to a high position above the bowl,
    move down to the bowl, open the gripper, and then lift the arm back to
    a high position.
"""
다음은 프롬프트와 모의 로봇 API를 기반으로 한 모델의 가능한 출력을 보여줍니다. 출력에는 모델의 사고 과정과 그 결과로 계획한 작업이 포함됩니다. 또한 모델이 함께 시퀀싱한 로봇 함수 호출의 출력도 표시됩니다.
Reasoning: To perform the pick and place operation, I will first move the
robotic arm to a high position above the blue block to ensure clearance. Then, I
will open the gripper in preparation for grasping. Next, I will lower the arm to
the surface level to position the gripper around the block and close the gripper
to secure it. After picking up the block, I will lift the arm to clear the
surface and move towards the orange bowl, maintaining a high position to avoid
collisions. Once positioned above the bowl, I will lower the arm to place the
block inside. I will then open the gripper to release the block. Finally, I will
lift the arm out of the bowl and call `returnToOrigin` to reset the robot's
state.

[
  {
    "function": "move",
    "args": [
      163,
      427,
      true
    ]
  },
  {
    "function": "setGripperState",
    "args": [
      true
    ]
  },
  {
    "function": "move",
    "args": [
      163,
      427,
      false
    ]
  },
  {
    "function": "setGripperState",
    "args": [
      false
    ]
  },
  {
    "function": "move",
    "args": [
      163,
      427,
      true
    ]
  },
  {
    "function": "move",
    "args": [
      -247,
      90,
      true
    ]
  },
  {
    "function": "move",
    "args": [
      -247,
      90,
      false
    ]
  },
  {
    "function": "setGripperState",
    "args": [
      true
    ]
  },
  {
    "function": "move",
    "args": [
      -247,
      90,
      true
    ]
  },
  {
    "function": "returnToOrigin",
    "args": []
  }
]

Executing Function Calls:
moving to coordinates: 163, 427, 15
Opening gripper
moving to coordinates: 163, 427, 5
Closing gripper
moving to coordinates: 163, 427, 15
moving to coordinates: -247, 90, 15
moving to coordinates: -247, 90, 5
Opening gripper
moving to coordinates: -247, 90, 15
Returning to origin pose
권장사항
로봇 공학 애플리케이션의 성능과 정확도를 최적화하려면 Gemini 모델과 효과적으로 상호작용하는 방법을 이해하는 것이 중요합니다. 이 섹션에서는 가장 신뢰할 수 있는 결과를 얻기 위해 프롬프트를 작성하고, 시각적 데이터를 처리하고, 작업을 구조화하는 데 필요한 권장사항과 주요 전략을 간략히 설명합니다.
명확하고 간단한 표현을 사용합니다.
자연어 사용: Gemini 모델은 자연스러운 대화형 언어를 이해하도록 설계되었습니다. 의미적으로 명확하고 사람이 자연스럽게 지시하는 방식을 반영하는 방식으로 프롬프트를 구성하세요.
일상적인 용어 사용: 기술적 또는 전문 용어보다는 일반적인 일상 언어를 선택하세요. 모델이 특정 용어에 예상대로 응답하지 않으면 더 일반적인 동의어로 바꿔 보세요.
시각적 입력을 최적화합니다.
세부정보를 위해 확대: 작은 객체나 넓은 샷에서 식별하기 어려운 객체를 다룰 때는 경계 상자 기능을 사용하여 관심 객체를 분리합니다. 그런 다음 이미지를 이 선택 영역으로 자르고 새로운 초점 이미지를 모델에 보내 더 자세한 분석을 받을 수 있습니다.
조명 및 색상 실험: 모델의 인식은 어려운 조명 조건과 열악한 색상 대비의 영향을 받을 수 있습니다.
복잡한 문제를 더 작은 단계로 나눕니다. 각 작은 단계를 개별적으로 처리하면 모델이 더 정확하고 성공적인 결과를 도출하도록 안내할 수 있습니다.
합의를 통해 정확성 개선 높은 수준의 정확도가 필요한 작업의 경우 동일한 프롬프트로 모델을 여러 번 쿼리할 수 있습니다. 반환된 결과를 평균화하면 더 정확하고 신뢰할 수 있는 '컨센서스'에 도달할 수 있습니다.
제한사항
Gemini Robotics-ER 1.6으로 개발할 때는 다음 제한사항을 고려하세요.
- 미리보기 상태: 모델이 현재 미리보기 상태입니다. API와 기능이 변경될 수 있으며, 철저한 테스트 없이 프로덕션에 중요한 애플리케이션에 적합하지 않을 수 있습니다.
- 지연 시간: 복잡한 질문, 고해상도 입력 또는 광범위한
thinking_budget로 인해 처리 시간이 늘어날 수 있습니다. - 할루시네이션: 모든 대규모 언어 모델과 마찬가지로 Gemini Robotics-ER 1.6도 때때로 '할루시네이션'을 일으키거나 잘못된 정보를 제공할 수 있습니다. 특히 모호한 프롬프트나 분포에서 벗어난 입력의 경우 이러한 문제가 발생할 수 있습니다.
- 프롬프트 품질에 대한 의존성: 모델 출력의 품질은 입력 프롬프트의 명확성과 구체성에 크게 좌우됩니다. 모호하거나 구조가 좋지 않은 프롬프트는 최적의 결과를 얻지 못할 수 있습니다.
- 계산 비용: 특히 동영상 입력 또는 높은
thinking_budget로 모델을 실행하면 컴퓨팅 리소스가 소비되고 비용이 발생합니다. 자세한 내용은 생각하기 페이지를 참고하세요. - 입력 유형: 각 모드의 제한사항에 관한 자세한 내용은 다음 주제를 참고하세요.
개인정보처리방침
귀하는 이 문서에 언급된 모델('로봇 공학 모델')이 귀하의 지시에 따라 하드웨어를 작동하고 이동하기 위해 동영상 및 오디오 데이터를 활용한다는 점을 인정합니다. 따라서 음성, 이미지, 유사성 데이터 ('개인 정보')와 같은 식별 가능한 개인의 데이터가 로봇 모델에 의해 수집되도록 로봇 모델을 작동할 수 있습니다. 귀하가 개인 정보를 수집하는 방식으로 로봇 모델을 운영하기로 선택한 경우, 식별 가능한 개인이 https://ai.google.dev/gemini-api/terms에 있는 Gemini API 추가 서비스 약관('약관')에 설명된 대로, 'Google에서 데이터를 사용하는 방식' 섹션에 따라 Google에 개인 정보가 제공되고 사용될 수 있다는 사실을 충분히 통지받고 이에 동의하지 않는 한, 식별 가능한 개인이 로봇 모델과 상호작용하거나 로봇 모델 주변에 있는 것을 허용하지 않는 데 동의합니다. 귀하는 이러한 알림이 '약관'에 명시된 대로 '개인 정보'의 수집 및 사용을 허용하도록 보장하며, 얼굴 흐리게 처리와 같이 식별 가능한 사람이 포함되지 않은 영역에서 '로봇 모델'을 운영하는 등의 기법을 사용하여 '개인 정보'의 수집 및 배포를 최소화하기 위해 상업적으로 합당한 노력을 기울입니다.
가격 책정
가격 및 사용 가능한 지역에 관한 자세한 내용은 가격 페이지를 참고하세요.
모델 버전
Robotics-ER 1.6 프리뷰
| 속성 | 설명 |
|---|---|
| 모델 코드 | gemini-robotics-er-1.6-preview |
| 지원되는 데이터 유형 |
입력 텍스트, 이미지, 동영상, 오디오 출력 텍스트 |
| 토큰 한도[*] |
입력 토큰 한도 131,072 출력 토큰 한도 65,536 |
| 기능 | 지원되지 않음 지원됨 지원됨 지원됨 지원됨 지원됨 지원됨 지원되지 않음 지원되지 않음 지원됨 지원됨 지원됨 지원됨 |
| 소비 옵션 |
지원됨 지원됨 지원됨 |
| 버전 |
|
| 최신 업데이트 | 2025년 12월 |
| 지식 단절 | 2025년 1월 |
다음 단계
- 다른 기능을 살펴보고 다양한 프롬프트와 입력을 계속 실험하여 Gemini Robotics-ER 1.6의 더 많은 애플리케이션을 알아보세요. 더 많은 예는 로보틱스 시작하기 Colab을 참고하세요.
- 안전을 고려하여 Gemini Robotics 모델이 빌드된 방식을 알아보려면 Google DeepMind 로봇 공학 안전 페이지를 방문하세요.
- Gemini Robotics 방문 페이지에서 Gemini Robotics 모델의 최신 업데이트에 대해 알아보세요.