Vercel का एआई एसडीके, TypeScript में एआई की मदद से काम करने वाले ऐप्लिकेशन, यूज़र इंटरफ़ेस, और एजेंट बनाने के लिए , एक बेहतरीन ओपन-सोर्स लाइब्रेरी है.
इस गाइड में, TypeScript की मदद से Node.js ऐप्लिकेशन बनाने का तरीका बताया गया है. यह ऐप्लिकेशन, Google Generative AI Provider के ज़रिए Gemini API से कनेक्ट होने और मार्केट ट्रेंड का विश्लेषण ऑटोमेट करने के लिए, एआई एसडीके का इस्तेमाल करता है. फ़ाइनल ऐप्लिकेशन:
- मार्केट के मौजूदा ट्रेंड के बारे में रिसर्च करने के लिए, Google Search के साथ Gemini का इस्तेमाल करेगा.
- चार्ट जनरेट करने के लिए, रिसर्च से स्ट्रक्चर्ड डेटा एक्सट्रैक्ट करेगा.
- रिसर्च और चार्ट को मिलाकर, एचटीएमएल फ़ॉर्मैट में एक पेशेवर रिपोर्ट बनाएगा और उसे PDF के तौर पर सेव करेगा.
ज़रूरी शर्तें
इस गाइड में दिए गए निर्देशों को पूरा करने के लिए, आपको इनकी ज़रूरत होगी:
- Gemini API पासकोड. इसे Google AI Studio में मुफ़्त में बनाया जा सकता है.
- Node.js का वर्शन 18 या इसके बाद का वर्शन.
- कोई पैकेज मैनेजर, जैसे कि
npm,pnpm, याyarn.
अपना ऐप्लिकेशन सेट अप करना
सबसे पहले, अपने प्रोजेक्ट के लिए एक नई डायरेक्ट्री बनाएं और उसे शुरू करें.
npm
mkdir market-trend-appcd market-trend-appnpm init -y
pnpm
mkdir market-trend-appcd market-trend-apppnpm init
yarn
mkdir market-trend-appcd market-trend-appyarn init -y
डिपेंडेंसी इंस्टॉल करना
इसके बाद, एआई एसडीके, Google Generative AI Provider, और अन्य ज़रूरी डिपेंडेंसी इंस्टॉल करें.
npm
npm install ai @ai-sdk/google zodnpm install -D @types/node tsx typescript && npx tsc --init
TypeScript कंपाइलर की गड़बड़ी से बचने के लिए, जनरेट की गई tsconfig.json में यह लाइन जोड़ें:
//"verbatimModuleSyntax": true,
pnpm
pnpm add ai @ai-sdk/google zodpnpm add -D @types/node tsx typescript
yarn
yarn add ai @ai-sdk/google zodyarn add -D @types/node tsx typescript && yarn tsc --init
TypeScript कंपाइलर की गड़बड़ी से बचने के लिए, जनरेट की गई tsconfig.json में यह लाइन जोड़ें:
//"verbatimModuleSyntax": true,
यह ऐप्लिकेशन, चार्ट रेंडर करने और PDF बनाने के लिए, तीसरे पक्ष के Puppeteer और Chart.js पैकेज का भी इस्तेमाल करेगा:
npm
npm install puppeteer chart.jsnpm install -D @types/chart.js
pnpm
pnpm add puppeteer chart.jspnpm add -D @types/chart.js
yarn
yarn add puppeteer chart.jsyarn add -D @types/chart.js
puppeteer पैकेज के लिए, Chromium ब्राउज़र डाउनलोड करने के लिए एक स्क्रिप्ट चलाने की ज़रूरत होती है. आपका पैकेज मैनेजर, अनुमति मांग सकता है. इसलिए, स्क्रिप्ट के लिए अनुमति दें.
अपना एपीआई पासकोड कॉन्फ़िगर करना
GOOGLE_GENERATIVE_AI_API_KEY एनवायरमेंट वैरिएबल को अपने Gemini API पासकोड के साथ सेट करें. Google Generative AI Provider, इस एनवायरमेंट वैरिएबल में आपके एपीआई पासकोड को अपने-आप ढूंढ लेता है.
MacOS/Linux
export GOOGLE_GENERATIVE_AI_API_KEY="YOUR_API_KEY_HERE"Powershell
setx GOOGLE_GENERATIVE_AI_API_KEY "YOUR_API_KEY_HERE"अपना ऐप्लिकेशन बनाना
अब अपने ऐप्लिकेशन के लिए, मुख्य फ़ाइल बनाते हैं. अपने प्रोजेक्ट की डायरेक्ट्री में, main.ts नाम की एक नई फ़ाइल बनाएं. इस फ़ाइल में, लॉजिक को चरण दर चरण बनाया जाएगा.
यह पक्का करने के लिए कि सब कुछ सही तरीके से सेट अप किया गया है, main.ts में यह कोड जोड़ें. इस बुनियादी उदाहरण में, Gemini से सामान्य जवाब पाने के लिए generateText का इस्तेमाल किया गया है.
import { google } from "@ai-sdk/google";
import { generateText } from "ai";

async function main() {
  const { text } = await generateText({
    model: google("gemini-3.5-flash"),
    prompt: 'What is plant-based milk?',
  });

  console.log(text);
}

main().catch(console.error);
ज़्यादा जटिलता जोड़ने से पहले, यह स्क्रिप्ट चलाकर देखें कि आपका एनवायरमेंट सही तरीके से कॉन्फ़िगर किया गया है या नहीं. अपने टर्मिनल में यह कमांड चलाएं:
npm
npx tsc && node main.jspnpm
pnpm tsx main.tsyarn
yarn tsc && node main.jsअगर सब कुछ सही तरीके से सेट अप किया गया है, तो आपको कंसोल में Gemini का जवाब दिखेगा.
Google Search की मदद से मार्केट रिसर्च करना
अप-टू-डेट जानकारी पाने के लिए, Gemini के लिए Google Search टूल चालू किया जा सकता है. यह टूल चालू होने पर, मॉडल, प्रॉम्प्ट का जवाब देने के लिए वेब पर खोज कर सकता है. साथ ही, यह उन सोर्स को भी दिखाएगा जिनका इस्तेमाल किया गया है.
अपने विश्लेषण का पहला चरण पूरा करने के लिए, main.ts के कॉन्टेंट की जगह यह कोड डालें.
import { google } from "@ai-sdk/google";
import { generateText } from "ai";

async function main() {
  // Step 1: Search market trends
  const { text: marketTrends, sources } = await generateText({
    model: google("gemini-3.5-flash"),
    tools: {
      google_search: google.tools.googleSearch({}),
    },
    prompt: `Search the web for market trends for plant-based milk in North America for 2024-2025.
          I need to know the market size, key players and their market share, and primary consumer drivers.
          `,
  });

  console.log("Market trends found:\n", marketTrends);
  // To see the sources, uncomment the following line:
  // console.log("Sources:\n", sources);
}

main().catch(console.error);
चार्ट का डेटा एक्सट्रैक्ट करना
इसके बाद, चार्ट के लिए सही स्ट्रक्चर्ड डेटा एक्सट्रैक्ट करने के लिए, रिसर्च के टेक्स्ट को प्रोसेस करते हैं. डेटा के स्ट्रक्चर को तय करने के लिए, एआई एसडीके के generateObject फ़ंक्शन के साथ-साथ zod स्कीमा का इस्तेमाल करें.
साथ ही, इस स्ट्रक्चर्ड डेटा को ऐसे कॉन्फ़िगरेशन में बदलने के लिए एक हेल्पर फ़ंक्शन बनाएं जिसे Chart.js समझ सके.
main.ts में यह कोड जोड़ें. नए इंपोर्ट और जोड़े गए "Step 2" पर ध्यान दें.
import { google } from "@ai-sdk/google";
import { generateText, generateObject } from "ai";
import { z } from "zod/v4";
import { ChartConfiguration } from "chart.js";

// Helper function to create Chart.js configurations
function createChartConfig({labels, data, label, type, colors,}: {
  labels: string[];
  data: number[];
  label: string;
  type: "bar" | "line";
  colors: string[];
}): ChartConfiguration {
  return {
    type: type,
    data: {
      labels: labels,
      datasets: [
        {
          label: label,
          data: data,
          borderWidth: 1,
          ...(type === "bar" && { backgroundColor: colors }),
          ...(type === "line" && colors.length > 0 && { borderColor: colors[0] }),
        },
      ],
    },
    options: {
      animation: { duration: 0 }, // Disable animations for static PDF rendering
    },
  };
}

async function main() {
  // Step 1: Search market trends
  const { text: marketTrends, sources } = await generateText({
    model: google("gemini-3.5-flash"),
    tools: {
      google_search: google.tools.googleSearch({}),
    },
    prompt: `Search the web for market trends for plant-based milk in North America for 2024-2025.
          I need to know the market size, key players and their market share, and primary consumer drivers.
          `,
  });

  console.log("Market trends found.");

  // Step 2: Extract chart data
  const { object: chartData } = await generateObject({
    model: google("gemini-3.5-flash"),
    schema: z.object({
      chartConfigurations: z
        .array(
          z.object({
            type: z.enum(["bar", "line"]).describe('The type of chart to generate. Either "bar" or "line"',),
            labels: z.array(z.string()).describe("A list of chart labels"),
            data: z.array(z.number()).describe("A list of the chart data"),
            label: z.string().describe("A label for the chart"),
            colors: z.array(z.string()).describe('A list of colors to use for the chart, e.g. "rgba(255, 99, 132, 0.8)"',),
          }),
        )
        .describe("A list of chart configurations"),
    }),
    prompt: `Given the following market trends text, come up with a list of 1-3 meaningful bar or line charts
    and generate chart data.

Market Trends:
${marketTrends}
`,
  });

  const chartConfigs = chartData.chartConfigurations.map(createChartConfig);

  console.log("Chart configurations generated.");
}

main().catch(console.error);
फ़ाइनल रिपोर्ट जनरेट करना
आखिरी चरण में, Gemini को रिपोर्ट लिखने वाले विशेषज्ञ के तौर पर काम करने का निर्देश दें. उसे मार्केट रिसर्च, चार्ट के कॉन्फ़िगरेशन, और एचटीएमएल रिपोर्ट बनाने के लिए निर्देशों का एक साफ़ सेट दें. इसके बाद, इस एचटीएमएल को रेंडर करने और इसे PDF के तौर पर सेव करने के लिए, Puppeteer का इस्तेमाल करें.
अपनी main.ts फ़ाइल में, puppeteer का फ़ाइनल इंपोर्ट और "Step 3" जोड़ें.
// ... (imports from previous step)
import puppeteer from "puppeteer";

// ... (createChartConfig helper function from previous step)

async function main() {
  // ... (Step 1 and 2 from previous step)

  // Step 3: Generate the final HTML report and save it as a PDF
  const { text: htmlReport } = await generateText({
    model: google("gemini-3.5-flash"),
    prompt: `You are an expert financial analyst and report writer.
    Your task is to generate a comprehensive market analysis report in HTML format.

    **Instructions:**
    1.  Write a full HTML document.
    2.  Use the provided "Market Trends" text to write the main body of the report. Structure it with clear headings and paragraphs.
    3.  Incorporate the provided "Chart Configurations" to visualize the data. For each chart, you MUST create a unique <canvas> element and a corresponding <script> block to render it using Chart.js.
    4.  Reference the "Sources" at the end of the report.
    5.  Do not include any placeholder data; use only the information provided.
    6.  Return only the raw HTML code.

    **Chart Rendering Snippet:**
    Include this script in the head of the HTML: <script src="https://cdn.jsdelivr.net/npm/chart.js"></script>
    For each chart, use a structure like below, ensuring the canvas 'id' is unique for each chart, and apply the correspinding config:

    ---
    <div style="width: 800px; height: 600px;">
      <canvas id="chart1"></canvas>
    </div>
    <script>
      new Chart(document.getElementById('chart1'), config);
    </script>
    ---
    (For the second chart, use 'chart2' and the corresponding config, and so on.)

    **Data:**
    - Market Trends: ${marketTrends}
    - Chart Configurations: ${JSON.stringify(chartConfigs)}
    - Sources: ${JSON.stringify(sources)}
    `,
  });

  // LLMs may wrap the HTML in a markdown code block, so strip it.
  const finalHtml = htmlReport.replace(/^```html\n/, "").replace(/\n```$/, "");

  const browser = await puppeteer.launch();
  const page = await browser.newPage();
  await page.setContent(finalHtml);
  await page.pdf({ path: "report.pdf", format: "A4" });
  await browser.close();

  console.log("\nReport generated successfully: report.pdf");
}

main().catch(console.error);
अपना ऐप्लिकेशन चलाना
अब ऐप्लिकेशन चलाने के लिए तैयार हैं. अपने टर्मिनल में यह कमांड चलाएं:
npm
npx tsc && node main.jspnpm
pnpm tsx main.tsyarn
yarn tsc && node main.jsस्क्रिप्ट का हर चरण पूरा होने पर, आपको अपने टर्मिनल में लॉगिंग दिखेगी.
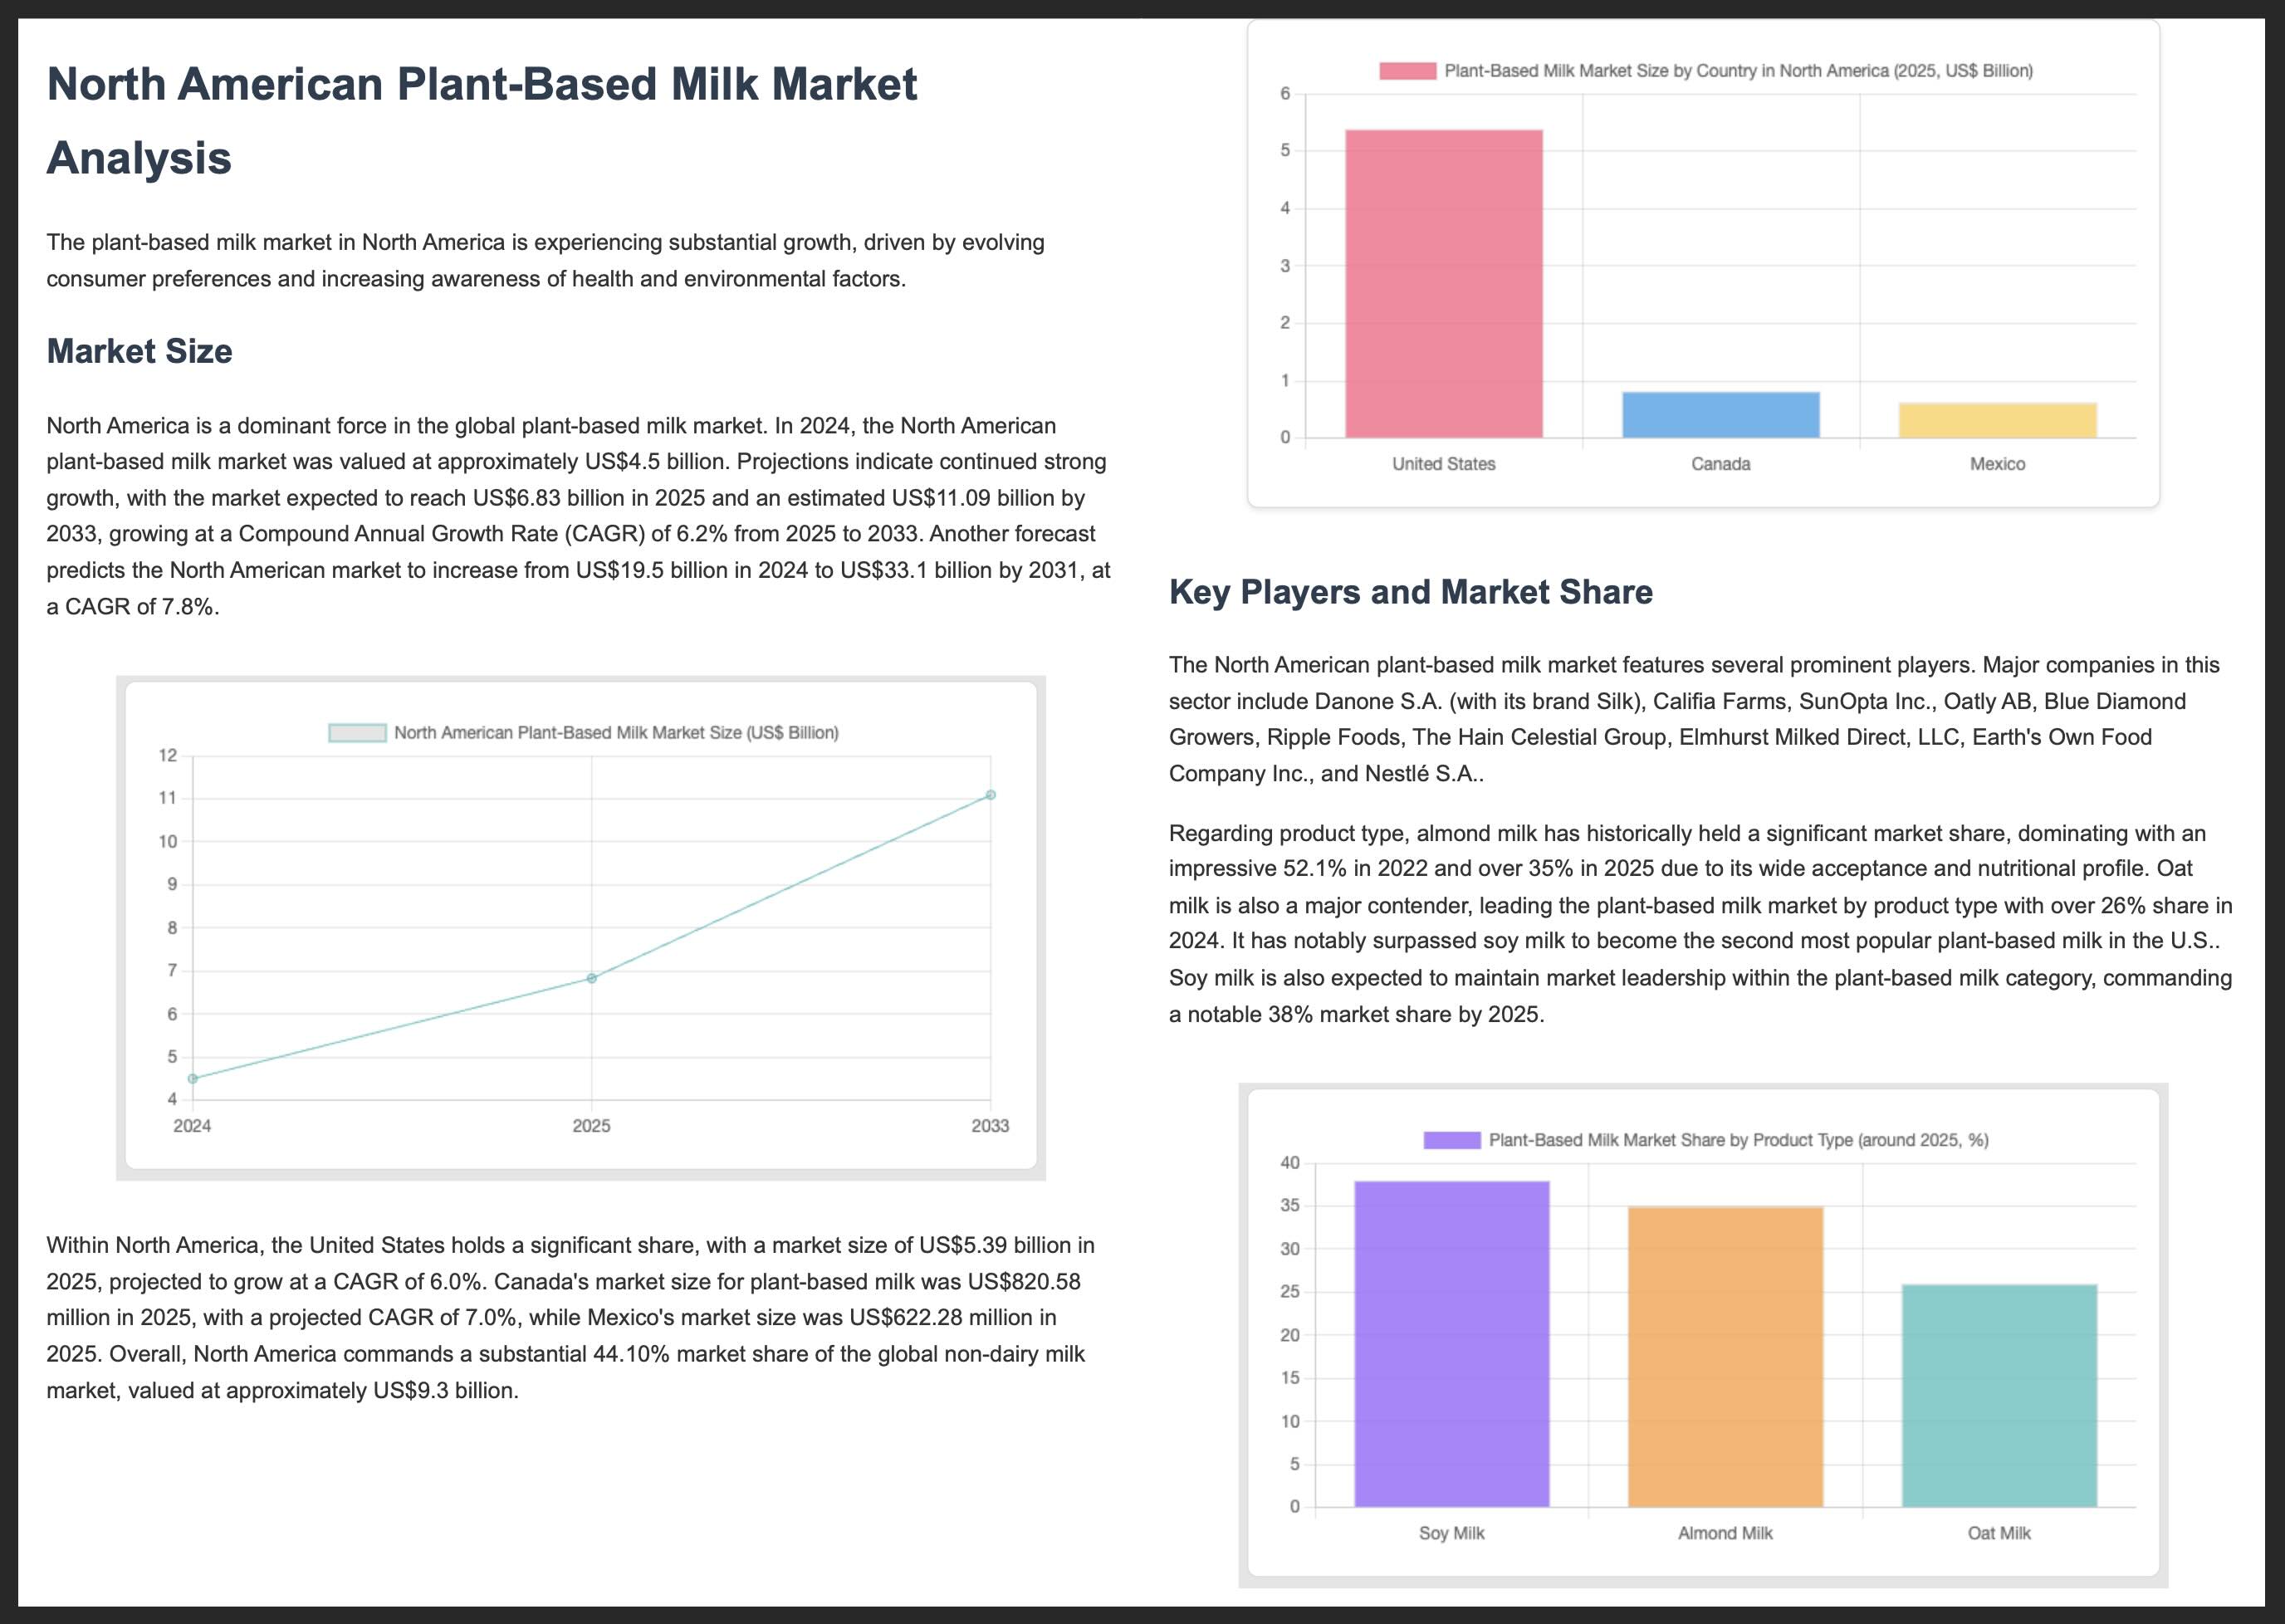
पूरा होने के बाद, आपकी प्रोजेक्ट डायरेक्ट्री में report.pdf फ़ाइल बनेगी. इसमें मार्केट के विश्लेषण की जानकारी होगी.
यहां, आपको PDF फ़ॉर्मैट में बनी रिपोर्ट के पहले दो पेज दिखेंगे:
अतिरिक्त संसाधन
Gemini और एआई एसडीके की मदद से ऐप्लिकेशन बनाने के बारे में ज़्यादा जानने के लिए, ये संसाधन देखें: