The MediaPipe Interactive Image Segmenter task takes a location in an image, estimates the boundaries of an object at that location, and returns the segmentation for the object as image data. These instructions show you how to use the Interactive Image Segmenter for Node and web apps. For more information about the capabilities, models, and configuration options of this task, see the Overview.
Code example
The example code for Interactive Image Segmenter provides a complete implementation of this task in JavaScript for your reference. This code helps you test this task and get started on building your own interactive image segmentation app. You can view, run, and edit the Interactive Image Segmenter example code using just your web browser. You can also review the code for this example on GitHub.
Setup
This section describes key steps for setting up your development environment and code projects specifically to use Interactive Image Segmenter. For general information on setting up your development environment for using MediaPipe tasks, including platform version requirements, see the Setup guide for web.
JavaScript packages
Interactive Image Segmenter code is available through the MediaPipe @mediapipe/tasks-vision
NPM package. You can
find and download these libraries from links provided in the platform
Setup guide.
You can install the required packages with the following code for local staging using the following command:
npm install --save @mediapipe/tasks-vision
If you want to import the task code via a content delivery network (CDN) service, add the following code in the
tag in your HTML file:<head>
<script src="https://cdn.jsdelivr.net/npm/@mediapipe/tasks-vision/vision_bundle.mjs"
crossorigin="anonymous"></script>
</head>
Model
The MediaPipe Interactive Image Segmenter task requires a trained model that is compatible with this task. For more information on available trained models for Interactive Image Segmenter, see the task overview Models section.
Select and download a model, and then store it within your project directory:
<dev-project-root>/app/shared/models/
Create the task
Use one of the Interactive Image Segmenter createFrom...() functions to
prepare the task for running inferences. Use the createFromModelPath()
function with a relative or absolute path to the trained model file.
If your model is already loaded into memory, you can use the
createFromModelBuffer() method.
The code example below demonstrates using the createFromOptions() function to
set up the task. The createFromOptions function allows you to customize the
Interactive Image Segmenter with configuration options. For more information on configuration
options, see Configuration options.
The following code demonstrates how to build and configure the task with custom options:
async function createSegmenter() {
  const vision = await FilesetResolver.forVisionTasks(
    "https://cdn.jsdelivr.net/npm/@mediapipe/tasks-vision@latest/wasm"
  );

  interactiveSegmenter = await InteractiveSegmenter.createFromOptions(vision, {
    baseOptions: {
      modelAssetPath:
        "https://storage.googleapis.com/mediapipe-tasks/interactive_segmenter/ptm_512_hdt_ptm_woid.tflite"
    },
  });
}
createSegmenter();
Configuration options
This task has the following configuration options for Web applications:
| Option Name | Description | Value Range | Default Value |
|---|---|---|---|
outputCategoryMask |
If set to True, the output includes a segmentation mask
as a uint8 image, where each pixel value indicates if the pixel is part of
the object located at the area of interest. |
{True, False} |
False |
outputConfidenceMasks |
If set to True, the output includes a segmentation mask
as a float value image, where each float value represents the confidence
that the pixel is part of the object located at the area of interest. |
{True, False} |
True |
displayNamesLocale |
Sets the language of labels to use for display names provided in the
metadata of the task's model, if available. Default is en for
English. You can add localized labels to the metadata of a custom model
using the TensorFlow Lite Metadata Writer API
| Locale code | en |
Prepare data
Interactive Image Segmenter can segment objects in images in any format supported by the host browser. The task also handles data input preprocessing, including resizing, rotation and value normalization.
Calls to the Interactive Image Segmenter segment() and segmentForVideo() methods run
synchronously and block the user interface thread. If you segment objects in
video frames from a device's camera, each segmentation task blocks the main
thread. You can prevent this by implementing web workers to run
segment() and segmentForVideo() on another thread.
Run the task
The Interactive Image Segmenter uses the segment() method to trigger inferences. The
Interactive Image Segmenter returns the detected segments as image data to a callback
function you set when running an inference for the task.
The following code demonstrates how to execute processing with the task model:
const image = document.getElementById("image") as HTMLImageElement;
interactiveSegmenter.segment(
  image,
  {
    keypoint: {
      x: event.offsetX / event.target.width,
      y: event.offsetY / event.target.height
    }
  },
  callback);
For a more complete implementation of running an Interactive Image Segmenter task, see the code example.
Handle and display results
Upon running inference, the Interactive Image Segmenter task returns segment image data to a callback function. The content of the output is image data and may include a category mask, confidence masks, or both, depending on what you set when you configured the task.
The following sections further explain the output data from this task:
Category mask
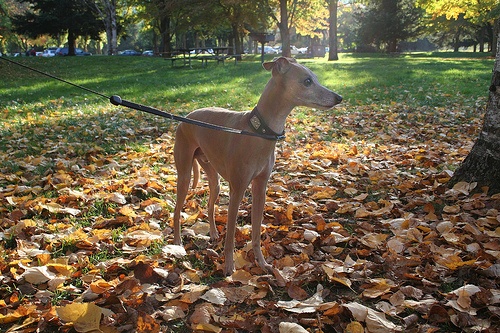
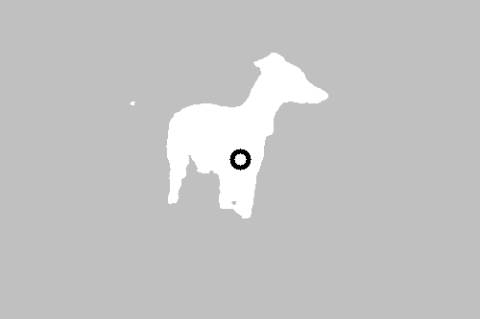
The following images show a visualization of the task output for a category
value mask with a point area of interest indicated. Each pixel is a uint8
value indicating if the pixel is part of the object located at the area of
interest. The black and white circle on the second image indicates the selected
area of interest.


Original image and category mask output. Source image from the Pascal VOC 2012 dataset.
Confidence mask
The output for a confidence mask contains float values between [0, 1] for
each image input channel. Higher values indicate a higher confidence that
the image pixel is part of the object located at the area of interest.
The Interactive Image Segmenter example code demonstrates how to display the classification results returned from the task, see the code example for details.
