Lo strumento Utilizzo del computer ti consente di creare agenti di controllo per browser, dispositivi mobili e computer che interagiscono con le attività e le automatizzano. Utilizzando gli screenshot, il modello può "vedere" uno schermo del computer e "agire" generando azioni specifiche della UI come clic del mouse e input da tastiera. Come per la chiamata di funzioni, devi implementare l'ambiente di esecuzione lato client per ricevere ed eseguire le azioni di Utilizzo del computer.
Gemini 3.5 Flash è il modello consigliato per l'utilizzo del computer e introduce diverse nuove funzionalità:
- Supporto multi-ambiente:crea agenti per ambienti browser, mobile e desktop.
- Le azioni semplificate con intent includono un campo
intentche spiega il ragionamento del modello alla base di ogni passaggio. - Policy di sicurezza configurabili:perfeziona il comportamento di sicurezza con categorie e override delle policy integrate.
- Rilevamento di prompt injection:attiva la scansione degli screenshot per rilevare istruzioni avversarie nascoste.
Con Utilizzo del computer, puoi creare agenti che:
- Automatizza l'inserimento di dati ripetitivi o la compilazione di moduli sui siti web.
- Esegui test automatici di applicazioni web e flussi utente
- Condurre ricerche su vari siti web (ad es. raccogliere informazioni, prezzi e recensioni sui prodotti da siti di e-commerce per informare un acquisto)
Ecco un esempio minimo di inizializzazione del client e invio di un prompt al modello con lo strumento computer_use abilitato per un ambiente browser:
Python
from google import genai

client = genai.Client()

interaction = client.interactions.create(
    model="gemini-3.5-flash",
    input="Search for 'Gemini API' on Google.",
    tools=[{"type": "computer_use", "environment": "browser"}]
)

print(interaction)
JavaScript
import { GoogleGenAI } from '@google/genai';

const ai = new GoogleGenAI();

const interaction = await ai.interactions.create({
  model: 'gemini-3.5-flash',
  input: "Search for 'Gemini API' on Google.",
  tools: [{ type: "computer_use", environment: "browser" }]
});

console.log(interaction);
Come funziona Uso del computer
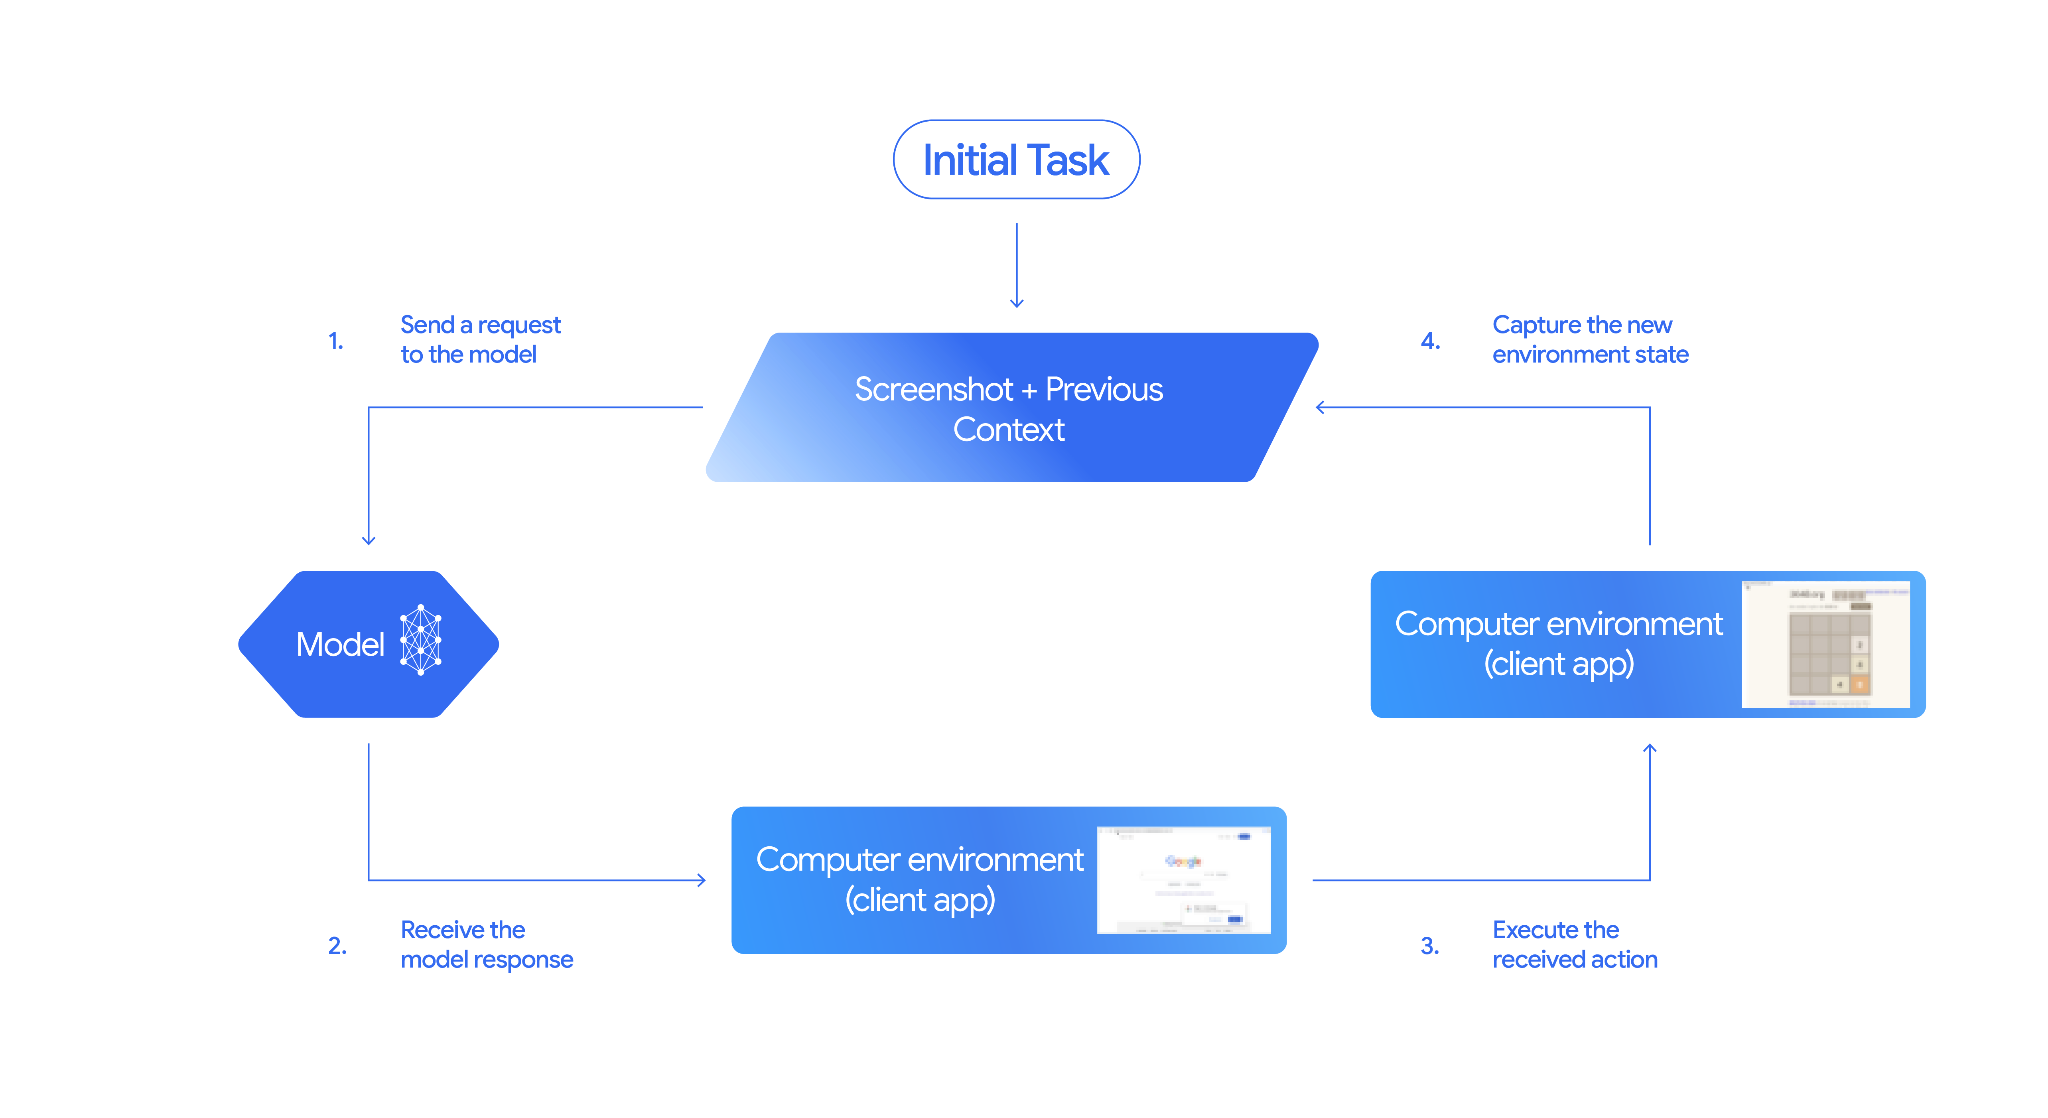
Per creare un agente con il modello Computer Use, devi configurare un ciclo continuo tra l'applicazione e l'API. Ecco cosa farà il tuo codice in ogni passaggio:
- Invia una richiesta al modello
- La tua applicazione invia una richiesta API contenente lo strumento Utilizzo del computer, le impostazioni di configurazione (come l'ambiente di destinazione), il prompt dell'utente e uno screenshot della schermata corrente.
- Ricevi la risposta del modello
- Il modello analizza lo schermo e il prompt, restituendo una risposta
che include un
function_callsuggerito che rappresenta un'azione dell'interfaccia utente (ad esempio un clic, uno scorrimento o una sequenza di tasti). - Per Gemini 3.5 Flash, la risposta include anche un ragionamento
intentche spiega perché il modello ha scelto quell'azione. - Per i modelli legacy (come
gemini-2.5-computer-use-preview-10-2025), la risposta può includere unsafety_decisiondi un sistema di sicurezza interno che classifica l'azione come regolare/consentita,require_confirmation(che richiede l'approvazione dell'utente) o bloccata.
- Il modello analizza lo schermo e il prompt, restituendo una risposta
che include un
- Esegui l'azione ricevuta
- Se l'azione è consentita (o l'utente la conferma), il codice lato client analizza
function_call, ridimensiona le coordinate normalizzate in modo che corrispondano alla finestra e esegue l'azione nell'ambiente di destinazione utilizzando strumenti di automazione (come Playwright). Se l'azione è bloccata, il client deve interrompere l'esecuzione o gestire l'interruzione.
- Se l'azione è consentita (o l'utente la conferma), il codice lato client analizza
- Acquisizione del nuovo stato dell'ambiente
- Al termine dell'esecuzione dell'azione, l'applicazione acquisisce un nuovo
screenshot e lo invia di nuovo al modello in un
function_resultper richiedere il passaggio successivo.
- Al termine dell'esecuzione dell'azione, l'applicazione acquisisce un nuovo
screenshot e lo invia di nuovo al modello in un
Questo processo si ripete quindi dal passaggio 2, sollecitando continuamente l'azione successiva dal modello finché l'attività non viene completata o interrotta.
Come implementare l'uso del computer
Prima di creare con lo strumento Utilizzo del computer, devi configurare:
- Ambiente di esecuzione sicuro:esegui l'agente in una VM o in un container sandbox per isolarlo dal sistema host e limitarne il potenziale impatto. L'implementazione di riferimento include una sandbox basata su Docker pronta all'uso che puoi utilizzare come punto di partenza.
- Gestore di azioni lato client: implementa la logica lato client per eseguire le coordinate, digitare il testo e acquisire screenshot.
Gli esempi riportati di seguito utilizzano un browser web come ambiente di esecuzione e Playwright come gestore lato client.
0. Configurare Playwright
Innanzitutto, installa i pacchetti richiesti:
pip install google-genai playwright
playwright install chromium
Quindi, inizializza un'istanza del browser Playwright da utilizzare per l'esecuzione:
from playwright.sync_api import sync_playwright

# 1. Configure screen dimensions for the target environment
SCREEN_WIDTH = 1440
SCREEN_HEIGHT = 900

# 2. Start the Playwright browser
# In production, utilize a sandboxed environment.
playwright = sync_playwright().start()
# Set headless=False to see the actions performed on your screen
browser = playwright.chromium.launch(headless=False)

# 3. Create a context and page with the specified dimensions
context = browser.new_context(
    viewport={"width": SCREEN_WIDTH, "height": SCREEN_HEIGHT}
)
page = context.new_page()

# 4. Navigate to an initial page to start the task
page.goto("https://www.google.com")

# The 'page', 'SCREEN_WIDTH', and 'SCREEN_HEIGHT' variables
# will be used in the steps below.
1. Inviare una richiesta al modello
Inizializza la libreria client e configura lo strumento Utilizzo del computer. Tieni presente che non è necessario specificare le dimensioni di visualizzazione quando invii una richiesta. Il modello prevede le coordinate dei pixel scalate in base all'altezza e alla larghezza dello schermo.
Gemini 3.5 Flash (consigliato)
Python
Utilizza l'SDK Python google-genai (versione 2.7.0 o successive) per configurare una richiesta che ha come target l'ambiente del browser:
from google import genai

client = genai.Client()

interaction = client.interactions.create(
    model='gemini-3.5-flash',
    input="Find a flight from SF to Hawaii on Jun 30th, coming back on Jul 6th",
    tools=[
        {
            "type": "computer_use",
            "environment": "browser",
            "enable_prompt_injection_detection": True
        }
    ]
)

print(interaction)
JavaScript
Utilizza l'SDK Node.js @google/genai per configurare una richiesta che ha come target l'ambiente browser:
import { GoogleGenAI } from '@google/genai';

const ai = new GoogleGenAI();

const interaction = await ai.interactions.create({
  model: 'gemini-3.5-flash',
  input: "Find a flight from SF to Hawaii on Jun 30th, coming back on Jul 6th",
  tools: [
    {
      type: "computer_use",
      environment: "browser",
      enable_prompt_injection_detection: true
    }
  ]
});

console.log(interaction);
REST
Utilizza curl per inviare una richiesta:
curl -X POST \
  "https://generativelanguage.googleapis.com/v1beta/interactions" \
  -H "x-goog-api-key: $GEMINI_API_KEY" \
  -H "Content-Type: application/json" \
  -d '{
    "model": "gemini-3.5-flash",
    "input": "Find me a flight from SF to Hawaii on Jun 30th, coming back on Jul 6th. Start by navigating directly to flights.google.com",
    "tools": [
      {
        "type": "computer_use",
        "environment": "browser",
        "enable_prompt_injection_detection": true
      }
    ]
  }'
Gemini 2.5 (legacy)
Python
from google import genai

client = genai.Client()

# Specify predefined functions to exclude (optional)
excluded_functions = ["drag_and_drop"]

interaction = client.interactions.create(
    model='gemini-2.5-computer-use-preview-10-2025',
    input="Search for highly rated smart fridges on Google Shopping.",
    tools=[
        {
            "type": "computer_use",
            "environment": "browser",
            "excluded_predefined_functions": excluded_functions
        }
    ]
)

print(interaction)
JavaScript
import { GoogleGenAI } from '@google/genai';

const ai = new GoogleGenAI();

// Specify predefined functions to exclude (optional)
const excludedFunctions = ["drag_and_drop"];

const interaction = await ai.interactions.create({
  model: 'gemini-2.5-computer-use-preview-10-2025',
  input: "Search for highly rated smart fridges on Google Shopping.",
  tools: [
    {
      type: "computer_use",
      environment: "browser",
      excluded_predefined_functions: excludedFunctions
    }
  ]
});

console.log(interaction);
2. Ricevere la risposta del modello
Il modello di risposta suggerisce una chiamata di funzione. Per Gemini 3.5 Flash, la risposta contiene un intento di ragionamento personalizzato insieme alle coordinate. Di seguito sono riportati esempi di entrambe le risposte:
Gemini 3.5 Flash
{
  "steps": [
    {
      "type": "function_call",
      "name": "click",
      "arguments": {
        "x": 450,
        "y": 120,
        "intent": "Click the search box to type the destination."
      }
    }
  ]
}
Gemini 2.5 (legacy)
{
  "steps": [
    {
      "type": "model_output",
      "content": [
        {
          "type": "text",
          "text": "I will type the search query into the search bar."
        }
      ]
    },
    {
      "type": "function_call",
      "name": "type_text_at",
      "arguments": {
        "x": 371,
        "y": 470,
        "text": "highly rated smart fridges",
        "press_enter": true
      }
    }
  ]
}
3. Esegui le azioni ricevute
L'applicazione deve analizzare le coordinate della risposta, eseguire l'azione e ridimensionarle dalle coordinate normalizzate 1000x1000.
Il codice riportato di seguito gestisce sia i comandi degli strumenti legacy (click_at, type_text_at) sia i comandi semplificati di Gemini 3.5 Flash (click, type).
Python
from typing import Any, List, Tuple
import time

def denormalize_x(x: int, screen_width: int) -> int:
    """Convert normalized x coordinate (0-1000) to actual pixel coordinate."""
    return int(x / 1000 * screen_width)

def denormalize_y(y: int, screen_height: int) -> int:
    """Convert normalized y coordinate (0-1000) to actual pixel coordinate."""
    return int(y / 1000 * screen_height)

def execute_function_calls(interaction, page, screen_width, screen_height):
    results = []
    function_calls = [
        step for step in interaction.steps if step.type == "function_call"
    ]

    for function_call in function_calls:
        action_result = {}
        fname = function_call.name
        args = function_call.arguments
        print(f"  -> Executing: {fname} (Intent: {args.get('intent', 'N/A')})")

        try:
            if fname in ("open_web_browser", "open_app"):
                pass # Handled / already open
            elif fname in ("click", "click_at", "double_click", "triple_click", "middle_click", "right_click", "move", "long_press"):
                actual_x = denormalize_x(args["x"], screen_width)
                actual_y = denormalize_y(args["y"], screen_height)

                if fname in ("click", "click_at"):
                    page.mouse.click(actual_x, actual_y)
                elif fname == "double_click":
                    page.mouse.dblclick(actual_x, actual_y)
                elif fname == "right_click":
                    page.mouse.click(actual_x, actual_y, button="right")
                elif fname == "middle_click":
                    page.mouse.click(actual_x, actual_y, button="middle")
                elif fname == "move":
                    page.mouse.move(actual_x, actual_y)
            elif fname in ("type", "type_text_at"):
                actual_x = denormalize_x(args["x"], screen_width) if "x" in args else None
                actual_y = denormalize_y(args["y"], screen_height) if "y" in args else None
                text = args["text"]
                press_enter = args.get("press_enter", False)

                if actual_x is not None and actual_y is not None:
                    page.mouse.click(actual_x, actual_y)
                # Clear field first
                page.keyboard.press("Meta+A")
                page.keyboard.press("Backspace")
                page.keyboard.type(text)
                if press_enter:
                    page.keyboard.press("Enter")
            elif fname == "navigate":
                page.goto(args["url"])
            elif fname == "go_back":
                page.go_back()
            elif fname == "go_forward":
                page.go_forward()
            elif fname == "wait":
                time.sleep(args.get("seconds", 1))
            else:
                print(f"Warning: Custom or unhandled function {fname}")

            page.wait_for_load_state(timeout=5000)
            time.sleep(1)

        except Exception as e:
            print(f"Error executing {fname}: {e}")
            action_result = {"error": str(e)}

        results.append((fname, function_call.id, action_result))

    return results
JavaScript
function denormalizeX(x, screenWidth) {
    // Convert normalized x coordinate (0-1000) to actual pixel coordinate.
    return Math.floor((x / 1000) * screenWidth);
}

function denormalizeY(y, screenHeight) {
    // Convert normalized y coordinate (0-1000) to actual pixel coordinate.
    return Math.floor((y / 1000) * screenHeight);
}

async function executeFunctionCalls(interaction, page, screenWidth, screenHeight) {
    const results = [];
    const functionCalls = interaction.steps.filter(step => step.type === "function_call");

    for (const functionCall of functionCalls) {
        const actionResult = {};
        const fname = functionCall.name;
        const args = functionCall.arguments;
        console.log(`  -> Executing: ${fname} (Intent: ${args.intent || 'N/A'})`);

        try {
            if (fname === "open_web_browser" || fname === "open_app") {
                // Handled / already open
            } else if (["click", "click_at", "double_click", "triple_click", "middle_click", "right_click", "move", "long_press"].includes(fname)) {
                const actualX = denormalizeX(args.x, screenWidth);
                const actualY = denormalizeY(args.y, screenHeight);

                if (fname === "click" || fname === "click_at") {
                    await page.mouse.click(actualX, actualY);
                } else if (fname === "double_click") {
                    await page.mouse.dblclick(actualX, actualY);
                } else if (fname === "right_click") {
                    await page.mouse.click(actualX, actualY, { button: "right" });
                } else if (fname === "middle_click") {
                    await page.mouse.click(actualX, actualY, { button: "middle" });
                } else if (fname === "move") {
                    await page.mouse.move(actualX, actualY);
                }
            } else if (fname === "type" || fname === "type_text_at") {
                const actualX = args.x !== undefined ? denormalizeX(args.x, screenWidth) : null;
                const actualY = args.y !== undefined ? denormalizeY(args.y, screenHeight) : null;
                const text = args.text;
                const pressEnter = args.press_enter || false;

                if (actualX !== null && actualY !== null) {
                    await page.mouse.click(actualX, actualY);
                }
                // Clear field first
                await page.keyboard.press("Meta+A");
                await page.keyboard.press("Backspace");
                await page.keyboard.type(text);
                if (pressEnter) {
                    await page.keyboard.press("Enter");
                }
            } else if (fname === "navigate") {
                await page.goto(args.url);
            } else if (fname === "go_back") {
                await page.goBack();
            } else if (fname === "go_forward") {
                await page.goForward();
            } else if (fname === "wait") {
                await new Promise(resolve => setTimeout(resolve, (args.seconds || 1) * 1000));
            } else {
                console.log(`Warning: Custom or unhandled function ${fname}`);
            }

            await page.waitForLoadState('load', { timeout: 5000 }).catch(() => {});
            await new Promise(resolve => setTimeout(resolve, 1000));
        } catch (e) {
            console.log(`Error executing ${fname}: ${e}`);
            actionResult.error = e.message;
        }

        results.push([fname, functionCall.id, actionResult]);
    }

    return results;
}
4. Acquisire il nuovo stato dell'ambiente
Dopo aver eseguito le azioni, invia il risultato dell'esecuzione della funzione al modello in modo che possa utilizzare queste informazioni per generare l'azione successiva. Se
sono state eseguite più azioni (chiamate parallele), devi inviare un
function_result per ciascuna nel turno successivo dell'utente.
Python
import json
import base64

def get_function_responses(page, results):
    screenshot_bytes = page.screenshot(type="png")
    current_url = page.url
    function_responses = []
    for name, call_id, result in results:
        function_responses.append({
            "type": "function_result",
            "name": name,
            "call_id": call_id,
            "result": [
                {
                    "type": "text",
                    "text": json.dumps({"url": current_url, **result})
                },
                {
                    "type": "image",
                    "data": base64.b64encode(screenshot_bytes).decode("utf-8"),
                    "mime_type": "image/png"
                }
            ]
        })
    return function_responses
JavaScript
async function getFunctionResponses(page, results) {
    const screenshotBuffer = await page.screenshot({ type: 'png' });
    const screenshotBase64 = screenshotBuffer.toString('base64');
    const currentUrl = page.url();
    const functionResponses = [];

    for (const [name, callId, result] of results) {
        functionResponses.push({
            type: "function_result",
            name: name,
            call_id: callId,
            result: [
                {
                    type: "text",
                    text: JSON.stringify({ url: currentUrl, ...result })
                },
                {
                    type: "image",
                    data: screenshotBase64,
                    mime_type: "image/png"
                }
            ]
        });
    }
    return functionResponses;
}
Una volta definito come acquisire e formattare lo stato dell'ambiente, puoi combinare tutti questi passaggi in un ciclo di esecuzione continuo.
Crea un loop dell'agente
Per abilitare le interazioni in più passaggi, combina i quattro passaggi della sezione Come implementare l'utilizzo del computer in un unico ciclo. Questo ciclo continua a richiedere azioni e a restituire i risultati al modello finché l'attività non è completata.
Ricorda di gestire correttamente la cronologia della conversazione aggiungendo sia le risposte del modello sia le risposte della funzione alla cronologia a ogni passaggio.
Python
import time
from typing import Any, List, Tuple
from playwright.sync_api import sync_playwright

from google import genai

client = genai.Client()

# Constants for screen dimensions
SCREEN_WIDTH = 1440
SCREEN_HEIGHT = 900

# Setup Playwright
print("Initializing browser...")
playwright = sync_playwright().start()
browser = playwright.chromium.launch(headless=False)
context = browser.new_context(viewport={"width": SCREEN_WIDTH, "height": SCREEN_HEIGHT})
page = context.new_page()

# Define helper functions. Copy/paste from steps 3 and 4
# def denormalize_x(...)
# def denormalize_y(...)
# def execute_function_calls(...)
# def get_function_responses(...)

try:
    # Go to initial page
    page.goto("https://ai.google.dev/gemini-api/docs")

    # Take initial screenshot
    initial_screenshot = page.screenshot(type="png")
    USER_PROMPT = "Go to ai.google.dev/gemini-api/docs and search for pricing."
    print(f"Goal: {USER_PROMPT}")

    # First interaction
    interaction = client.interactions.create(
        model='gemini-3.5-flash',
        input=[
            {"type": "text", "text": USER_PROMPT},
            {"type": "image", "data": base64.b64encode(initial_screenshot).decode("utf-8"), "mime_type": "image/png"}
        ],
        tools=[{
            "type": "computer_use",
            "environment": "browser",
            "enable_prompt_injection_detection": True
        }]
    )

    # Agent Loop
    turn_limit = 5
    for i in range(turn_limit):
        print(f"\n--- Turn {i+1} ---")

        has_function_calls = any(
            step.type == "function_call"
            for step in interaction.steps
        )
        if not has_function_calls:
            text_response = " ".join([
                content_block.text for step in interaction.steps if step.type == "model_output"
                for content_block in step.content if content_block.type == "text"
            ])
            print("Agent finished:", text_response)
            break

        print("Executing actions...")
        results = execute_function_calls(interaction, page, SCREEN_WIDTH, SCREEN_HEIGHT)

        print("Capturing state...")
        function_responses = get_function_responses(page, results)

        # Continue conversation with function responses
        interaction = client.interactions.create(
            model='gemini-3.5-flash',
            previous_interaction_id=interaction.id,
            input=function_responses,
            tools=[{
                "type": "computer_use",
                "environment": "browser",
                "enable_prompt_injection_detection": True
            }]
        )

finally:
    # Cleanup
    print("\nClosing browser...")
    browser.close()
    playwright.stop()
JavaScript
import { chromium } from 'playwright';
import { GoogleGenAI } from '@google/genai';

const ai = new GoogleGenAI();

// Constants for screen dimensions
const SCREEN_WIDTH = 1440;
const SCREEN_HEIGHT = 900;

console.log("Initializing browser...");
const browser = await chromium.launch({ headless: false });
const context = await browser.newContext({
    viewport: { width: SCREEN_WIDTH, height: SCREEN_HEIGHT }
});
const page = await context.newPage();

// Define helper functions. Copy/paste from steps 3 and 4:
// function denormalizeX(...)
// function denormalizeY(...)
// async function executeFunctionCalls(...)
// async function getFunctionResponses(...)

try {
    // Go to initial page
    await page.goto("https://ai.google.dev/gemini-api/docs");

    // Take initial screenshot
    const initialScreenshotBuffer = await page.screenshot({ type: 'png' });
    const initialScreenshotBase64 = initialScreenshotBuffer.toString('base64');
    const USER_PROMPT = "Go to ai.google.dev/gemini-api/docs and search for pricing.";
    console.log(`Goal: ${USER_PROMPT}`);

    // First interaction
    let interaction = await ai.interactions.create({
        model: 'gemini-3.5-flash',
        input: [
            { type: 'text', text: USER_PROMPT },
            { type: 'image', data: initialScreenshotBase64, mime_type: 'image/png' }
        ],
        tools: [{
            type: 'computer_use',
            environment: 'browser',
            enable_prompt_injection_detection: true
        }]
    });

    // Agent Loop
    const turnLimit = 5;
    for (let i = 0; i < turnLimit; i++) {
        console.log(`\n--- Turn ${i + 1} ---`);

        const hasFunctionCalls = interaction.steps.some(step => step.type === "function_call");
        if (!hasFunctionCalls) {
            const textResponses = [];
            for (const step of interaction.steps) {
                if (step.type === "model_output") {
                    for (const contentBlock of step.content || []) {
                        if (contentBlock.type === "text") {
                            textResponses.push(contentBlock.text);
                        }
                    }
                }
            }
            console.log("Agent finished:", textResponses.join(" "));
            break;
        }

        console.log("Executing actions...");
        const results = await executeFunctionCalls(interaction, page, SCREEN_WIDTH, SCREEN_HEIGHT);

        console.log("Capturing state...");
        const functionResponses = await getFunctionResponses(page, results);

        // Continue conversation with function responses
        interaction = await ai.interactions.create({
            model: 'gemini-3.5-flash',
            previous_interaction_id: interaction.id,
            input: functionResponses,
            tools: [{
                type: 'computer_use',
                environment: 'browser',
                enable_prompt_injection_detection: true
            }]
        });
    }
} finally {
    // Cleanup
    console.log("\nClosing browser...");
    await browser.close();
}
Ambienti supportati (Gemini 3.5 Flash)
Gemini 3.5 Flash supporta tre ambienti specificati nelle configurazioni computer_use:
Ambiente browser (ENVIRONMENT_BROWSER)
Azioni disponibili nello strumento del browser:
| Nome comando | Descrizione | Argomenti (nella chiamata di funzione) |
|---|---|---|
| fare clic | I clic sinistri in corrispondenza della coordinata. | y: int (0-999)x: int (0-999)intent: str |
| double_click | Doppio clic sulla coordinata. | y: int (0-999)x: int (0-999)intent: str |
| triple_click | Tre clic in corrispondenza delle coordinate. | y: int (0-999)x: int (0-999)intent: str |
| middle_click | Il cursore fa clic al centro delle coordinate. | y: int (0-999)x: int (0-999)intent: str |
| right_click | Fai clic con il tasto destro del mouse sulla coordinata. | y: int (0-999)x: int (0-999)intent: str |
| mouse_down | Premere e tenere premuto il tasto del mouse in corrispondenza della coordinata. | y: int (0-999)x: int (0-999)intent: str |
| mouse_up | Rilascia il tasto del mouse in corrispondenza della coordinata. | y: int (0-999)x: int (0-999)intent: str |
| move | Sposta il cursore nella posizione specificata. | y: int (0-999)x: int (0-999)intent: str |
| type | Digita il testo. | text: strpress_enter: bool (facoltativo, valore predefinito false)intent: str |
| drag_and_drop | Trascina un elemento dalla coordinata iniziale a quella finale. | start_y: int (0-999)start_x: int (0-999)end_y: int (0-999)end_x: int (0-999)intent: str |
| wait | Mette in pausa l'esecuzione per un numero specificato di secondi. | seconds: int (facoltativo, valore predefinito 1)intent: str |
| press_key | Premi il tasto specificato e lo rilascia. | key: strintent: str |
| key_down | Premere e tenere premuto il tasto specificato. | key: strintent: str |
| key_up | Rilascia la chiave specificata. | key: strintent: str |
| tasto di scelta rapida | Premi la combinazione di tasti specificata. | keys: List[str]intent: str |
| take_screenshot | Restituisce uno screenshot della schermata corrente. | intent: str |
| scroll | Scorre verso l'alto, verso il basso, a sinistra o a destra in una coordinata di una distanza in pixel. | y: int (0-999)x: int (0-999)direction: str ("up", "down", "left", "right")magnitude_in_pixels: int (0-999, facoltativo, valore predefinito 300)intent: str |
| go_back | Torna alla pagina web precedente nella cronologia del browser. | intent: str |
| navigate | Consente di andare direttamente a un URL specificato. | url: strintent: str |
| go_forward | Passa alla pagina web successiva nella cronologia del browser. | intent: str |
Ambiente mobile (ENVIRONMENT_MOBILE)
Azioni dell'ambiente ottimizzate per Android:
| Nome comando | Descrizione | Argomenti (nella chiamata di funzione) |
|---|---|---|
| open_app | Apre un'applicazione in base al nome. | app_name: strintent: str |
| fare clic | I clic sinistri in corrispondenza della coordinata. | y: int (0-999)x: int (0-999)intent: str |
| list_apps | Elenca le applicazioni disponibili sul dispositivo, restituendone i nomi e i nomi dei pacchetti. | intent: str |
| wait | Mette in pausa l'esecuzione per un numero specificato di secondi. | seconds: int (facoltativo, valore predefinito 1)intent: str |
| go_back | Torna alla schermata o alla pagina web precedente. | intent: str |
| type | Digita il testo. | text: strpress_enter: bool (facoltativo, valore predefinito false)intent: str |
| drag_and_drop | Trascina un elemento dalla coordinata iniziale a quella finale. | start_y: int (0-999)start_x: int (0-999)end_y: int (0-999)end_x: int (0-999)intent: str |
| long_press | Esegue una pressione prolungata in una coordinata sullo schermo. | y: int (0-999)x: int (0-999)seconds: int (facoltativo, valore predefinito 2)intent: str |
| press_key | Premi il tasto specificato e lo rilascia. | key: strintent: str |
| take_screenshot | Restituisce uno screenshot della schermata corrente. | intent: str |
Ambiente desktop (ENVIRONMENT_DESKTOP)
Comandi del cursore a livello di sistema operativo degli ambienti desktop:
| Nome comando | Descrizione | Argomenti (nella chiamata di funzione) |
|---|---|---|
| fare clic | I clic sinistri in corrispondenza della coordinata. | y: int (0-999)x: int (0-999)intent: str |
| double_click | Doppio clic sulla coordinata. | y: int (0-999)x: int (0-999)intent: str |
| triple_click | Tre clic in corrispondenza delle coordinate. | y: int (0-999)x: int (0-999)intent: str |
| middle_click | Il cursore fa clic al centro delle coordinate. | y: int (0-999)x: int (0-999)intent: str |
| right_click | Fai clic con il tasto destro del mouse sulla coordinata. | y: int (0-999)x: int (0-999)intent: str |
| mouse_down | Premere e tenere premuto il tasto del mouse in corrispondenza della coordinata. | y: int (0-999)x: int (0-999)intent: str |
| mouse_up | Rilascia il tasto del mouse in corrispondenza della coordinata. | y: int (0-999)x: int (0-999)intent: str |
| move | Sposta il cursore nella posizione specificata. | y: int (0-999)x: int (0-999)intent: str |
| type | Digita il testo. | text: strpress_enter: bool (facoltativo, valore predefinito false)intent: str |
| drag_and_drop | Trascina un elemento dalla coordinata iniziale a quella finale. | start_y: int (0-999)start_x: int (0-999)end_y: int (0-999)end_x: int (0-999)intent: str |
| wait | Mette in pausa l'esecuzione per un numero specificato di secondi. | seconds: int (facoltativo, valore predefinito 1)intent: str |
| press_key | Premi il tasto specificato e lo rilascia. | key: strintent: str |
| key_down | Premere e tenere premuto il tasto specificato. | key: strintent: str |
| key_up | Rilascia la chiave specificata. | key: strintent: str |
| tasto di scelta rapida | Premi la combinazione di tasti specificata. | keys: List[str]intent: str |
| take_screenshot | Restituisce uno screenshot della schermata corrente. | intent: str |
| scroll | Scorre verso l'alto, verso il basso, a sinistra o a destra in una coordinata di una distanza in pixel. | y: int (0-999)x: int (0-999)direction: str ("up", "down", "left", "right")magnitude_in_pixels: int (0-999, facoltativo, valore predefinito 300)intent: str |
Azioni dell'interfaccia utente supportate legacy (Gemini 2.5)
Per i modelli legacy (gemini-2.5-computer-use-preview-10-2025), sono supportate le seguenti azioni:
| Nome comando | Descrizione | Argomenti (nella chiamata di funzione) | Esempio di chiamata di funzione |
|---|---|---|---|
| open_web_browser | Apre il browser web. | Nessuno | {"name": "open_web_browser", "arguments": {}} |
| wait_5_seconds | Mette in pausa l'esecuzione per 5 secondi. | Nessuno | {"name": "wait_5_seconds", "arguments": {}} |
| go_back | Conduce alla pagina precedente della cronologia. | Nessuno | {"name": "go_back", "arguments": {}} |
| go_forward | Conduce alla pagina successiva della cronologia. | Nessuno | {"name": "go_forward", "arguments": {}} |
| search | Viene visualizzato il motore di ricerca predefinito. | Nessuno | {"name": "search", "arguments": {}} |
| navigate | Il browser passa direttamente all'URL specificato. | url: str |
{"name": "navigate", "arguments": {"url": "https://www.wikipedia.org"}} |
| click_at | Clic a una coordinata specifica. | y: int (0-999), x: int (0-999) |
{"name": "click_at", "arguments": {"y": 300, "x": 500}} |
| hover_at | Passa il mouse su una coordinata specifica. | y: int (0-999), x: int (0-999) |
{"name": "hover_at", "arguments": {"y": 150, "x": 250}} |
| type_text_at | Digita il testo in una coordinata. | y: int (0-999), x: int (0-999), text: str, press_enter: bool (facoltativo, valore predefinito True), clear_before_typing: bool (facoltativo, valore predefinito True) |
{"name": "type_text_at", "arguments": {"y": 250, "x": 400, "text": "search", "press_enter": false}} |
| key_combination | Premi i tasti o le combinazioni. | keys: str |
{"name": "key_combination", "arguments": {"keys": "Control+A"}} |
| scroll_document | Scorre l'intera pagina web. | direction: str |
{"name": "scroll_document", "arguments": {"direction": "down"}} |
| scroll_at | Scorre alla coordinata (x,y). | y: int, x: int, direction: str, magnitude: int (facoltativo, valore predefinito 800) |
{"name": "scroll_at", "arguments": {"y": 500, "x": 500, "direction": "down"}} |
| drag_and_drop | Trascina tra due coordinate. | y: int, x: int, destination_y: int, destination_x: int |
{"name": "drag_and_drop", "arguments": {"y": 100, "destination_y": 500, "destination_x": 500, "x": 100}} |
Funzioni definite dall'utente personalizzate
Puoi estendere la funzionalità del modello includendo funzioni personalizzate definite dall'utente. Ad esempio, negli scenari human-in-the-loop (HITL) puoi escludere le azioni predefinite predefinite e registrare azioni personalizzate.
Strumenti personalizzati Gemini 3.5 Flash
Python
Escludi le azioni predefinite standard del browser (ad esempio click) e registra uno strumento yield_to_user personalizzato:
from google import genai

client = genai.Client()

yield_to_user_tool = {
    "type": "function",
    "name": "yield_to_user",
    "description": "Yields control back to the user for assistance or verification when an automated action is unsafe or ambiguous.",
    "parameters": {
        "type": "object",
        "properties": {
            "reason": {
                "type": "string",
                "description": "The reason why the agent is yielding control to the human."
            }
        },
        "required": ["reason"]
    }
}

interaction = client.interactions.create(
    model="gemini-3.5-flash",
    input="Click the submit button. If you need a second factor authentication code, ask me.",
    tools=[
        {
            "type": "computer_use",
            "environment": "mobile",
            "excluded_predefined_functions": ["click"]
        },
        yield_to_user_tool
    ]
)
JavaScript
Escludi le azioni predefinite standard del browser (ad esempio click) e registra uno strumento yield_to_user personalizzato:
import { GoogleGenAI } from '@google/genai';

const ai = new GoogleGenAI();

const yieldToUserTool = {
    type: "function",
    name: "yield_to_user",
    description: "Yields control back to the user for assistance or verification when an automated action is unsafe or ambiguous.",
    parameters: {
        type: "object",
        properties: {
            reason: {
                type: "string",
                description: "The reason why the agent is yielding control to the human."
            }
        },
        required: ["reason"]
    }
};

const interaction = await ai.interactions.create({
    model: "gemini-3.5-flash",
    input: "Click the submit button. If you need a second factor authentication code, ask me.",
    tools: [
        {
            type: "computer_use",
            environment: "mobile",
            excluded_predefined_functions: ["click"]
        },
        yieldToUserTool
    ]
});
Strumenti personalizzati Gemini 2.5 (legacy)
Python
from google import genai

client = genai.Client()

# Define custom tools here
custom_functions = [...]  # Describe parameters as function declarations

excluded_functions = [
    "open_web_browser",
    "wait_5_seconds",
    "go_back",
    "go_forward",
    "search",
    "navigate",
    "hover_at",
    "scroll_document",
    "key_combination",
    "drag_and_drop",
]

interaction = client.interactions.create(
    model='gemini-2.5-computer-use-preview-10-2025',
    input="Open Chrome, then long-press at 200,400.",
    tools=[
        {
            "type": "computer_use",
            "environment": "browser",
            "excluded_predefined_functions": excluded_functions
        },
        *custom_functions
    ]
)

print(interaction)
JavaScript
import { GoogleGenAI } from '@google/genai';

const ai = new GoogleGenAI();

// Define custom tools here
const customFunctions = [...]; // Describe parameters as function declarations

const excludedFunctions = [
    "open_web_browser",
    "wait_5_seconds",
    "go_back",
    "go_forward",
    "search",
    "navigate",
    "hover_at",
    "scroll_document",
    "key_combination",
    "drag_and_drop",
];

const interaction = await ai.interactions.create({
    model: 'gemini-2.5-computer-use-preview-10-2025',
    input: "Open Chrome, then long-press at 200,400.",
    tools: [
        {
            type: "computer_use",
            environment: "browser",
            excluded_predefined_functions: excludedFunctions
        },
        ...customFunctions
    ]
});

console.log(interaction);
Gestire i livelli di pensiero (Gemini 3.5 Flash)
Per gli agenti di utilizzo del computer, puoi configurare diversi livelli di pensiero per bilanciare la qualità dell'azione e la velocità di esecuzione. I livelli di pensiero più bassi generalmente raggiungono un buon equilibrio per le attività di automazione standard.
Protezione e sicurezza
Configurazione delle policy di sicurezza (Gemini 3.5 Flash)
Il modello Gemini 3.5 Flash include categorie di servizi di sicurezza integrate che determinano automaticamente se è necessaria la conferma dell'utente.
| Categoria norma di sicurezza | Descrizione |
|---|---|
FINANCIAL_TRANSACTIONS |
Blocca o attiva la conferma per le azioni che riguardano pagamenti, acquisti al dettaglio o beni regolamentati. |
SENSITIVE_DATA_MODIFICATION |
Protegge i documenti sanitari, finanziari o governativi da modifiche non autorizzate. |
COMMUNICATION_TOOL |
Impedisce all'agente di inviare autonomamente email, messaggi di chat o bozze. |
ACCOUNT_CREATION |
Impedisce all'agente di registrare autonomamente nuovi account sui siti web. |
DATA_MODIFICATION |
Regola le modifiche complessive del file system, la condivisione dei dati e l'eliminazione dell'archiviazione. |
USER_CONSENT_MANAGEMENT |
Richiede l'intervento dell'utente per i banner del consenso all'uso dei cookie e le richieste di consenso alla privacy. |
LEGAL_TERMS_AND_AGREEMENTS |
Impedisce al modello di accettare autonomamente i Termini di servizio o i contratti legalmente vincolanti. |
Override di sicurezza
Puoi eseguire l'override di criteri selezionati passando gli override:
Python
from google import genai

client = genai.Client()

interaction = client.interactions.create(
    model="gemini-3.5-flash",
    input="Clean up the local folder by archiving old logs.",
    tools=[
        {
            "type": "computer_use",
            "environment": "desktop",
            "safety_policy_overrides": [
                {"category": "DATA_MODIFICATION"}
            ]
        }
    ]
)
JavaScript
import { GoogleGenAI } from '@google/genai';

const ai = new GoogleGenAI();

const interaction = await ai.interactions.create({
    model: "gemini-3.5-flash",
    input: "Clean up the local folder by archiving old logs.",
    tools: [
        {
            type: "computer_use",
            environment: "desktop",
            safety_policy_overrides: [
                { category: "DATA_MODIFICATION" }
            ]
        }
    ]
});
Rilevamento di prompt injection (Gemini 3.5 Flash)
Meccanismo di sicurezza di attivazione che analizza i pixel degli screenshot alla ricerca di istruzioni di prompt malevolo nascoste (ad es. "Ignora i comandi precedenti") e blocca l'esecuzione quando vengono rilevate.
Riconoscere la decisione di sicurezza (Gemini 2.5 Legacy)
Per i modelli legacy, la risposta potrebbe includere un parametro safety_decision:
{
  "steps": [
    {
      "type": "function_call",
      "name": "click_at",
      "arguments": {
        "x": 60,
        "y": 100,
        "safety_decision": {
          "explanation": "Must check check-box",
          "decision": "require_confirmation"
        }
      }
    }
  ]
}
Se safety_decision è require_confirmation, chiedi all'utente finale. Se l'utente conferma, imposta safety_acknowledgement in function_result.
Python
def get_safety_confirmation(safety_decision):
    # Prompt user
    return "CONTINUE" # Or TERMINATE

# Inside execute_function_calls:
if 'safety_decision' in function_call.arguments:
    decision = get_safety_confirmation(function_call.arguments['safety_decision'])
    if decision == "TERMINATE":
        break
    extra_fr_fields["safety_acknowledgement"] = True
Best practice per la sicurezza
L'utilizzo del computer presenta rischi operativi e di sicurezza unici, in quanto un modello che agisce per conto di un utente potrebbe imbattersi in contenuti non attendibili sugli schermi o commettere errori nell'esecuzione delle azioni. Implementa le seguenti best practice per proteggere i dati e i sistemi degli utenti:
Human-in-the-loop (HITL):
- Imponi la conferma dell'utente:quando la risposta di sicurezza indica
require_confirmation(o la decisione di sicurezza precedente lo richiede), chiedi l'approvazione all'utente. Fornisci istruzioni di sicurezza personalizzate:implementa un'istruzione di sistema personalizzata per definire e applicare i tuoi limiti di sicurezza. Ad esempio:
Python
from google import genai

client = genai.Client()

system_instruction = """
## **RULE 1: Seek User Confirmation (USER_CONFIRMATION)**

This is your first and most important check. If the next required action falls
into any of the following categories, you MUST stop immediately, and seek the
user's explicit permission.

**Procedure for Seeking Confirmation:**
* **For Consequential Actions:** Perform all preparatory steps (e.g., navigating,
  filling out forms, typing a message). You will ask for confirmation **AFTER**
  all necessary information is entered on the screen, but **BEFORE** you perform
  the final, irreversible action (e.g., before clicking "Send", "Submit",
  "Confirm Purchase", "Share").
* **For Prohibited Actions:** If the action is strictly forbidden (e.g., accepting
  legal terms, solving a CAPTCHA), you must first inform the user about the
  required action and ask for their confirmation to proceed.

**USER_CONFIRMATION Categories:**

*   **Consent and Agreements:** You are FORBIDDEN from accepting, selecting, or
    agreeing to any of the following on the user's behalf. You must ask the
    user to confirm before performing these actions.
    *   Terms of Service
    *   Privacy Policies
    *   Cookie consent banners
    *   End User License Agreements (EULAs)
    *   Any other legally significant contracts or agreements.
*   **Robot Detection:** You MUST NEVER attempt to solve or bypass the
    following. You must ask the user to confirm before performing these actions.
    *   CAPTCHAs (of any kind)
    *   Any other anti-robot or human-verification mechanisms, even if you are
        capable.
*   **Financial Transactions:**
    *   Completing any purchase.
    *   Managing or moving money (e.g., transfers, payments).
    *   Purchasing regulated goods or participating in gambling.
*   **Sending Communications:**
    *   Sending emails.
    *   Sending messages on any platform (e.g., social media, chat apps).
    *   Posting content on social media or forums.
*   **Accessing or Modifying Sensitive Information:**
    *   Health, financial, or government records (e.g., medical history, tax
        forms, passport status).
    *   Revealing or modifying sensitive personal identifiers (e.g., SSN, bank
        account number, credit card number).
*   **User Data Management:**
    *   Accessing, downloading, or saving files from the web.
    *   Sharing or sending files/data to any third party.
    *   Transferring user data between systems.
*   **Browser Data Usage:**
    *   Accessing or managing Chrome browsing history, bookmarks, autofill data,
        or saved passwords.
*   **Security and Identity:**
    *   Logging into any user account.
    *   Any action that involves misrepresentation or impersonation (e.g.,
        creating a fan account, posting as someone else).
*   **Insurmountable Obstacles:** If you are technically unable to interact with
    a user interface element or are stuck in a loop you cannot resolve, ask the
    user to take over.
---

## **RULE 2: Default Behavior (ACTUATE)**

If an action does **NOT** fall under the conditions for `USER_CONFIRMATION`,
your default behavior is to **Actuate**.

**Actuation Means:**  You MUST proactively perform all necessary steps to move
the user's request forward. Continue to actuate until you either complete the
non-consequential task or encounter a condition defined in Rule 1.

*   **Example 1:** If asked to send money, you will navigate to the payment
    portal, enter the recipient's details, and enter the amount. You will then
    **STOP** as per Rule 1 and ask for confirmation before clicking the final
    "Send" button.
*   **Example 2:** If asked to post a message, you will navigate to the site,
    open the post composition window, and write the full message. You will then
    **STOP** as per Rule 1 and ask for confirmation before clicking the final
    "Post" button.

    After the user has confirmed, remember to get the user's latest screen
    before continuing to perform actions.

# Final Response Guidelines:
Write final response to the user in the following cases:
- User confirmation
- When the task is complete or you have enough information to respond to the user
"""

interaction = client.interactions.create(
    model="gemini-3.5-flash",
    system_instruction=system_instruction,
    input="Prepare a draft but do not send.",
    tools=[{
        "type": "computer_use",
        "environment": "browser"
    }]
)
JavaScript
import { GoogleGenAI } from '@google/genai';

const ai = new GoogleGenAI();

const systemInstruction = `
## **RULE 1: Seek User Confirmation (USER_CONFIRMATION)**

This is your first and most important check. If the next required action falls
into any of the following categories, you MUST stop immediately, and seek the
user's explicit permission.

**Procedure for Seeking Confirmation:**
* **For Consequential Actions:** Perform all preparatory steps (e.g., navigating,
  filling out forms, typing a message). You will ask for confirmation **AFTER**
  all necessary information is entered on the screen, but **BEFORE** you perform
  the final, irreversible action (e.g., before clicking "Send", "Submit",
  "Confirm Purchase", "Share").
* **For Prohibited Actions:** If the action is strictly forbidden (e.g., accepting
  legal terms, solving a CAPTCHA), you must first inform the user about the
  required action and ask for their confirmation to proceed.

**USER_CONFIRMATION Categories:**

*   **Consent and Agreements:** You are FORBIDDEN from accepting, selecting, or
    agreeing to any of the following on the user's behalf. You must ask the
    user to confirm before performing these actions.
    *   Terms of Service
    *   Privacy Policies
    *   Cookie consent banners
    *   End User License Agreements (EULAs)
    *   Any other legally significant contracts or agreements.
*   **Robot Detection:** You MUST NEVER attempt to solve or bypass the
    following. You must ask the user to confirm before performing these actions.
    *   CAPTCHAs (of any kind)
    *   Any other anti-robot or human-verification mechanisms, even if you are
        capable.
*   **Financial Transactions:**
    *   Completing any purchase.
    *   Managing or moving money (e.g., transfers, payments).
    *   Purchasing regulated goods or participating in gambling.
*   **Sending Communications:**
    *   Sending emails.
    *   Sending messages on any platform (e.g., social media, chat apps).
    *   Posting content on social media or forums.
*   **Accessing or Modifying Sensitive Information:**
    *   Health, financial, or government records (e.g., medical history, tax
        forms, passport status).
    *   Revealing or modifying sensitive personal identifiers (e.g., SSN, bank
        account number, credit card number).
*   **User Data Management:**
    *   Accessing, downloading, or saving files from the web.
    *   Sharing or sending files/data to any third party.
    *   Transferring user data between systems.
*   **Browser Data Usage:**
    *   Accessing or managing Chrome browsing history, bookmarks, autofill data,
        or saved passwords.
*   **Security and Identity:**
    *   Logging into any user account.
    *   Any action that involves misrepresentation or impersonation (e.g.,
        creating a fan account, posting as someone else).
*   **Insurmountable Obstacles:** If you are technically unable to interact with
    a user interface element or are stuck in a loop you cannot resolve, ask the
    user to take over.
---

## **RULE 2: Default Behavior (ACTUATE)**

If an action does **NOT** fall under the conditions for `USER_CONFIRMATION`,
your default behavior is to **Actuate**.

**Actuation Means:**  You MUST proactively perform all necessary steps to move
the user's request forward. Continue to actuate until you either complete the
non-consequential task or encounter a condition defined in Rule 1.

*   **Example 1:** If asked to send money, you will navigate to the payment
    portal, enter the recipient's details, and enter the amount. You will then
    **STOP** as per Rule 1 and ask for confirmation before clicking the final
    "Send" button.
*   **Example 2:** If asked to post a message, you will navigate to the site,
    open the post composition window, and write the full message. You will then
    **STOP** as per Rule 1 and ask for confirmation before clicking the final
    "Post" button.

    After the user has confirmed, remember to get the user's latest screen
    before continuing to perform actions.

# Final Response Guidelines:
Write final response to the user in the following cases:
- User confirmation
- When the task is complete or you have enough information to respond to the user
`;

const interaction = await ai.interactions.create({
    model: "gemini-3.5-flash",
    system_instruction: systemInstruction,
    input: "Prepare a draft but do not send.",
    tools: [{
        type: "computer_use",
        environment: "browser"
    }]
});
- Imponi la conferma dell'utente:quando la risposta di sicurezza indica
Ambiente di esecuzione sicuro:esegui l'agente in un ambiente sandbox sicuro per limitarne il potenziale impatto. Può trattarsi di una macchina virtuale (VM) in sandbox, un container (ad es. Docker) o un profilo browser dedicato con autorizzazioni limitate. Consulta l'implementazione di riferimento di GitHub per indicazioni sulla configurazione del sandbox utilizzando Docker.
Sanitizzazione dell'input:sanitizza tutto il testo generato dagli utenti nei prompt per mitigare il rischio di istruzioni non intenzionali o di prompt injection. Si tratta di un livello di sicurezza utile, ma non sostituisce un ambiente di esecuzione sicuro.
Protezioni dei contenuti: utilizza le protezioni e le API Content Safety per valutare l'idoneità degli input dell'utente, degli input e degli output degli strumenti e delle risposte dell'agente, il prompt injection e il rilevamento del jailbreak.
Liste consentite e liste bloccate:implementa meccanismi di filtraggio per controllare dove il modello può navigare e cosa può fare. Una lista bloccata di siti web vietati è un buon punto di partenza, mentre una lista consentita più restrittiva è ancora più sicura.
Osservabilità e logging:mantieni log dettagliati per il debug, il controllo e la risposta agli incidenti. Il tuo cliente deve registrare i prompt, gli screenshot, le azioni suggerite dal modello (
function_call), le risposte di sicurezza e tutte le azioni eseguite dal cliente.Gestione dell'ambiente:assicurati che l'ambiente GUI sia coerente. Pop-up, notifiche o modifiche impreviste al layout possono confondere il modello. Se possibile, inizia ogni nuova attività da uno stato pulito e noto.
Versioni modello
Puoi utilizzare Computer Use con i seguenti modelli:
- Gemini 3.5 Flash (
gemini-3.5-flash): il modello consigliato per l'utilizzo del computer, con azioni semplificate con intent, supporto per ambienti browser, mobile e desktop, norme di sicurezza configurabili e rilevamento dell'iniezione di prompt. - Gemini 3 Flash (anteprima) (
gemini-3-flash-preview): modello di anteprima che supporta l'utilizzo del computer. - Gemini 2.5 (anteprima legacy) (
gemini-2.5-computer-use-preview-10-2025): modello di anteprima legacy ottimizzato per l'utilizzo del computer basato su browser.
Passaggi successivi
- Sperimenta con l'utilizzo del computer nell'ambiente demo di Browserbase.
- Consulta l'implementazione di riferimento per il codice di esempio.
- Scopri di più sugli altri strumenti dell'API Gemini: