Gemini는 텍스트, 이미지, 오디오 등 다양한 유형의 입력 데이터를 동시에 처리할 수 있습니다.
이 가이드에서는 Files API를 사용하여 미디어 파일을 사용하는 방법을 보여줍니다. 기본 작업은 오디오 파일, 이미지, 동영상, 문서, 기타 지원되는 파일 형식에서 동일합니다.
파일 프롬프트 안내는 파일 프롬프트 가이드 섹션을 참고하세요.
파일 업로드
Files API를 사용하여 미디어 파일을 업로드할 수 있습니다. 파일, 텍스트 프롬프트, 시스템 안내 등을 포함한 총 요청 크기가 100MB보다 큰 경우 항상 Files API를 사용하세요. PDF 파일의 경우 한도는 50MB입니다.
다음 코드는 파일을 업로드한 다음 interactions.create 호출에서 파일을 사용합니다.
Python
from google import genai

client = genai.Client()

myfile = client.files.upload(file="path/to/sample.mp3")

interaction = client.interactions.create(
    model="gemini-3.5-flash",
    input=[
        {"type": "text", "text": "Describe this audio clip"},
        {"type": "audio", "uri": myfile.uri, "mime_type": myfile.mime_type}
    ]
)

print(interaction.output_text)
자바스크립트
import { GoogleGenAI } from "@google/genai";

const client = new GoogleGenAI({});

async function main() {
  const myfile = await client.files.upload({
    file: "path/to/sample.mp3",
    config: { mime_type: "audio/mpeg" },
  });

  const interaction = await client.interactions.create({
    model: "gemini-3.5-flash",
    input: [
      { type: "text", text: "Describe this audio clip" },
      { type: "audio", uri: myfile.uri, mime_type: myfile.mimeType }
    ]
  });
  console.log(interaction.output_text);
}

await main();
Go
file, err := client.Files.UploadFromPath(ctx, "path/to/sample.mp3", nil)
if err != nil {
    log.Fatal(err)
}
defer client.Files.Delete(ctx, file.Name)

interaction, err := client.Interactions.Create(ctx, "gemini-3.5-flash", &genai.InteractionRequest{
    Input: []interface{}{
        genai.NewPartFromFile(*file),
        genai.NewPartFromText("Describe this audio clip"),
    },
}, nil)

if err != nil {
    log.Fatal(err)
}

// Print the model's text response
for _, step := range interaction.Steps {
    if step.Type == "model_output" {
        for _, part := range step.Content {
            if part.Type == "text" {
                fmt.Println(part.Text)
            }
        }
    }
}
REST
AUDIO_PATH="path/to/sample.mp3"
MIME_TYPE=$(file -b --mime-type "${AUDIO_PATH}")
NUM_BYTES=$(wc -c < "${AUDIO_PATH}")
DISPLAY_NAME=AUDIO

tmp_header_file=upload-header.tmp

# Initial resumable request defining metadata.
# The upload url is in the response headers dump them to a file.
curl "${BASE_URL}/upload/v1beta/files" \
  -H "x-goog-api-key: $GEMINI_API_KEY" \
  -D "${tmp_header_file}" \
  -H "X-Goog-Upload-Protocol: resumable" \
  -H "X-Goog-Upload-Command: start" \
  -H "X-Goog-Upload-Header-Content-Length: ${NUM_BYTES}" \
  -H "X-Goog-Upload-Header-Content-Type: ${MIME_TYPE}" \
  -H "Content-Type: application/json" \
  -d "{'file': {'display_name': '${DISPLAY_NAME}'}}" 2> /dev/null

upload_url=$(grep -i "x-goog-upload-url: " "${tmp_header_file}" | cut -d" " -f2 | tr -d "\r")
rm "${tmp_header_file}"

# Upload the actual bytes.
curl "${upload_url}" \
  -H "Content-Length: ${NUM_BYTES}" \
  -H "X-Goog-Upload-Offset: 0" \
  -H "X-Goog-Upload-Command: upload, finalize" \
  --data-binary "@${AUDIO_PATH}" 2> /dev/null > file_info.json

file_uri=$(jq ".file.uri" file_info.json)
echo file_uri=$file_uri

# Now create an interaction using the Interactions API
curl -X POST "https://generativelanguage.googleapis.com/v1beta/interactions" \
    -H "x-goog-api-key: $GEMINI_API_KEY" \
    -H 'Content-Type: application/json' \
    -d '{
      "model": "gemini-3.5-flash",
      "input": [
        {"type": "text", "text": "Describe this audio clip"},
        {"type": "audio", "uri": '$file_uri', "mime_type": "'${MIME_TYPE}'"}
      ]
    }' 2> /dev/null > response.json

cat response.json
echo

jq ".outputs[] | select(.type == \"text\") | .text" response.json
파일의 메타데이터 가져오기
files.get를 호출하여 API가 업로드된 파일을 성공적으로 저장했는지 확인하고 메타데이터를 가져올 수 있습니다.
Python
from google import genai

client = genai.Client()

myfile = client.files.upload(file='path/to/sample.mp3')
file_name = myfile.name
myfile = client.files.get(name=file_name)
print(myfile)
자바스크립트
import {
  GoogleGenAI,
} from "@google/genai";

const client = new GoogleGenAI({});

async function main() {
  const myfile = await client.files.upload({
    file: "path/to/sample.mp3",
    config: { mime_type: "audio/mpeg" },
  });

  const fileName = myfile.name;
  const fetchedFile = await client.files.get({ name: fileName });
  console.log(fetchedFile);
}

await main();
Go
file, err := client.Files.UploadFromPath(ctx, "path/to/sample.mp3", nil)
if err != nil {
    log.Fatal(err)
}

gotFile, err := client.Files.Get(ctx, file.Name)
if err != nil {
    log.Fatal(err)
}
fmt.Println("Got file:", gotFile.Name)
REST
# file_info.json was created in the upload example
name=$(jq -r ".file.name" file_info.json)
# Get the file of interest to check state
curl https://generativelanguage.googleapis.com/v1beta/$name \
-H "x-goog-api-key: $GEMINI_API_KEY" > file_info.json
# Print some information about the file you got
name=$(jq -r ".name" file_info.json)
echo name=$name
file_uri=$(jq -r ".uri" file_info.json)
echo file_uri=$file_uri
업로드된 파일 목록
다음 코드는 업로드된 모든 파일의 목록을 가져옵니다.
Python
from google import genai

client = genai.Client()

print('My files:')
for f in client.files.list():
    print(' ', f.name)
자바스크립트
import {
  GoogleGenAI,
} from "@google/genai";

const client = new GoogleGenAI({});

async function main() {
  const listResponse = await client.files.list({ config: { pageSize: 10 } });
  for await (const file of listResponse) {
    console.log(file.name);
  }
}

await main();
Go
for file, err := range client.Files.All(ctx) {
  if err != nil {
    log.Fatal(err)
  }
  fmt.Println(file.Name)
}
REST
echo "My files: "

curl "https://generativelanguage.googleapis.com/v1beta/files" \
  -H "x-goog-api-key: $GEMINI_API_KEY"
업로드된 파일 삭제
파일은 48시간 후에 자동으로 삭제됩니다. 업로드된 파일을 수동으로 삭제할 수도 있습니다.
Python
from google import genai

client = genai.Client()

myfile = client.files.upload(file='path/to/sample.mp3')
client.files.delete(name=myfile.name)
자바스크립트
import {
  GoogleGenAI,
} from "@google/genai";

const client = new GoogleGenAI({});

async function main() {
  const myfile = await client.files.upload({
    file: "path/to/sample.mp3",
    config: { mime_type: "audio/mpeg" },
  });

  const fileName = myfile.name;
  await client.files.delete({ name: fileName });
}

await main();
Go
file, err := client.Files.UploadFromPath(ctx, "path/to/sample.mp3", nil)
if err != nil {
    log.Fatal(err)
}
client.Files.Delete(ctx, file.Name)
REST
curl --request "DELETE" https://generativelanguage.googleapis.com/v1beta/$name \
  -H "x-goog-api-key: $GEMINI_API_KEY"
사용량 정보
Files API를 사용하여 미디어 파일을 업로드하고 상호작용할 수 있습니다. Files API를 사용하면 프로젝트당 최대 20GB의 파일을 저장할 수 있으며 파일당 최대 크기는 2GB입니다. 파일은 48시간 동안 저장됩니다. 이 기간 동안 API를 사용하여 파일에 관한 메타데이터를 가져올 수는 있지만 파일을 다운로드할 수는 없습니다. Files API는 Gemini API가 제공되는 모든 지역에서 무료로 사용할 수 있습니다.
파일 프롬프트 작성 전략
이 섹션에서는 Gemini API의 프롬프트와 함께 미디어 파일을 사용하는 방법에 관한 가이드와 권장사항을 제공합니다.
프롬프트에서 다양한 유형의 데이터를 사용할 수 있으면 Gemini API로 처리할 수 있는 작업의 유연성이 높아집니다. 예를 들어 모델에 맛있는 식사 사진을 보내고 식사에 관한 짧은 블로그를 작성해 달라고 요청할 수 있습니다.
| 프롬프트 | 응답 |
|
이 사진을 바탕으로 마음을 사로잡는 짧은 블로그 게시물을 작성합니다. 사진에 있는 음식에 대한 설명과 식사 준비 과정을 설명해야 합니다. 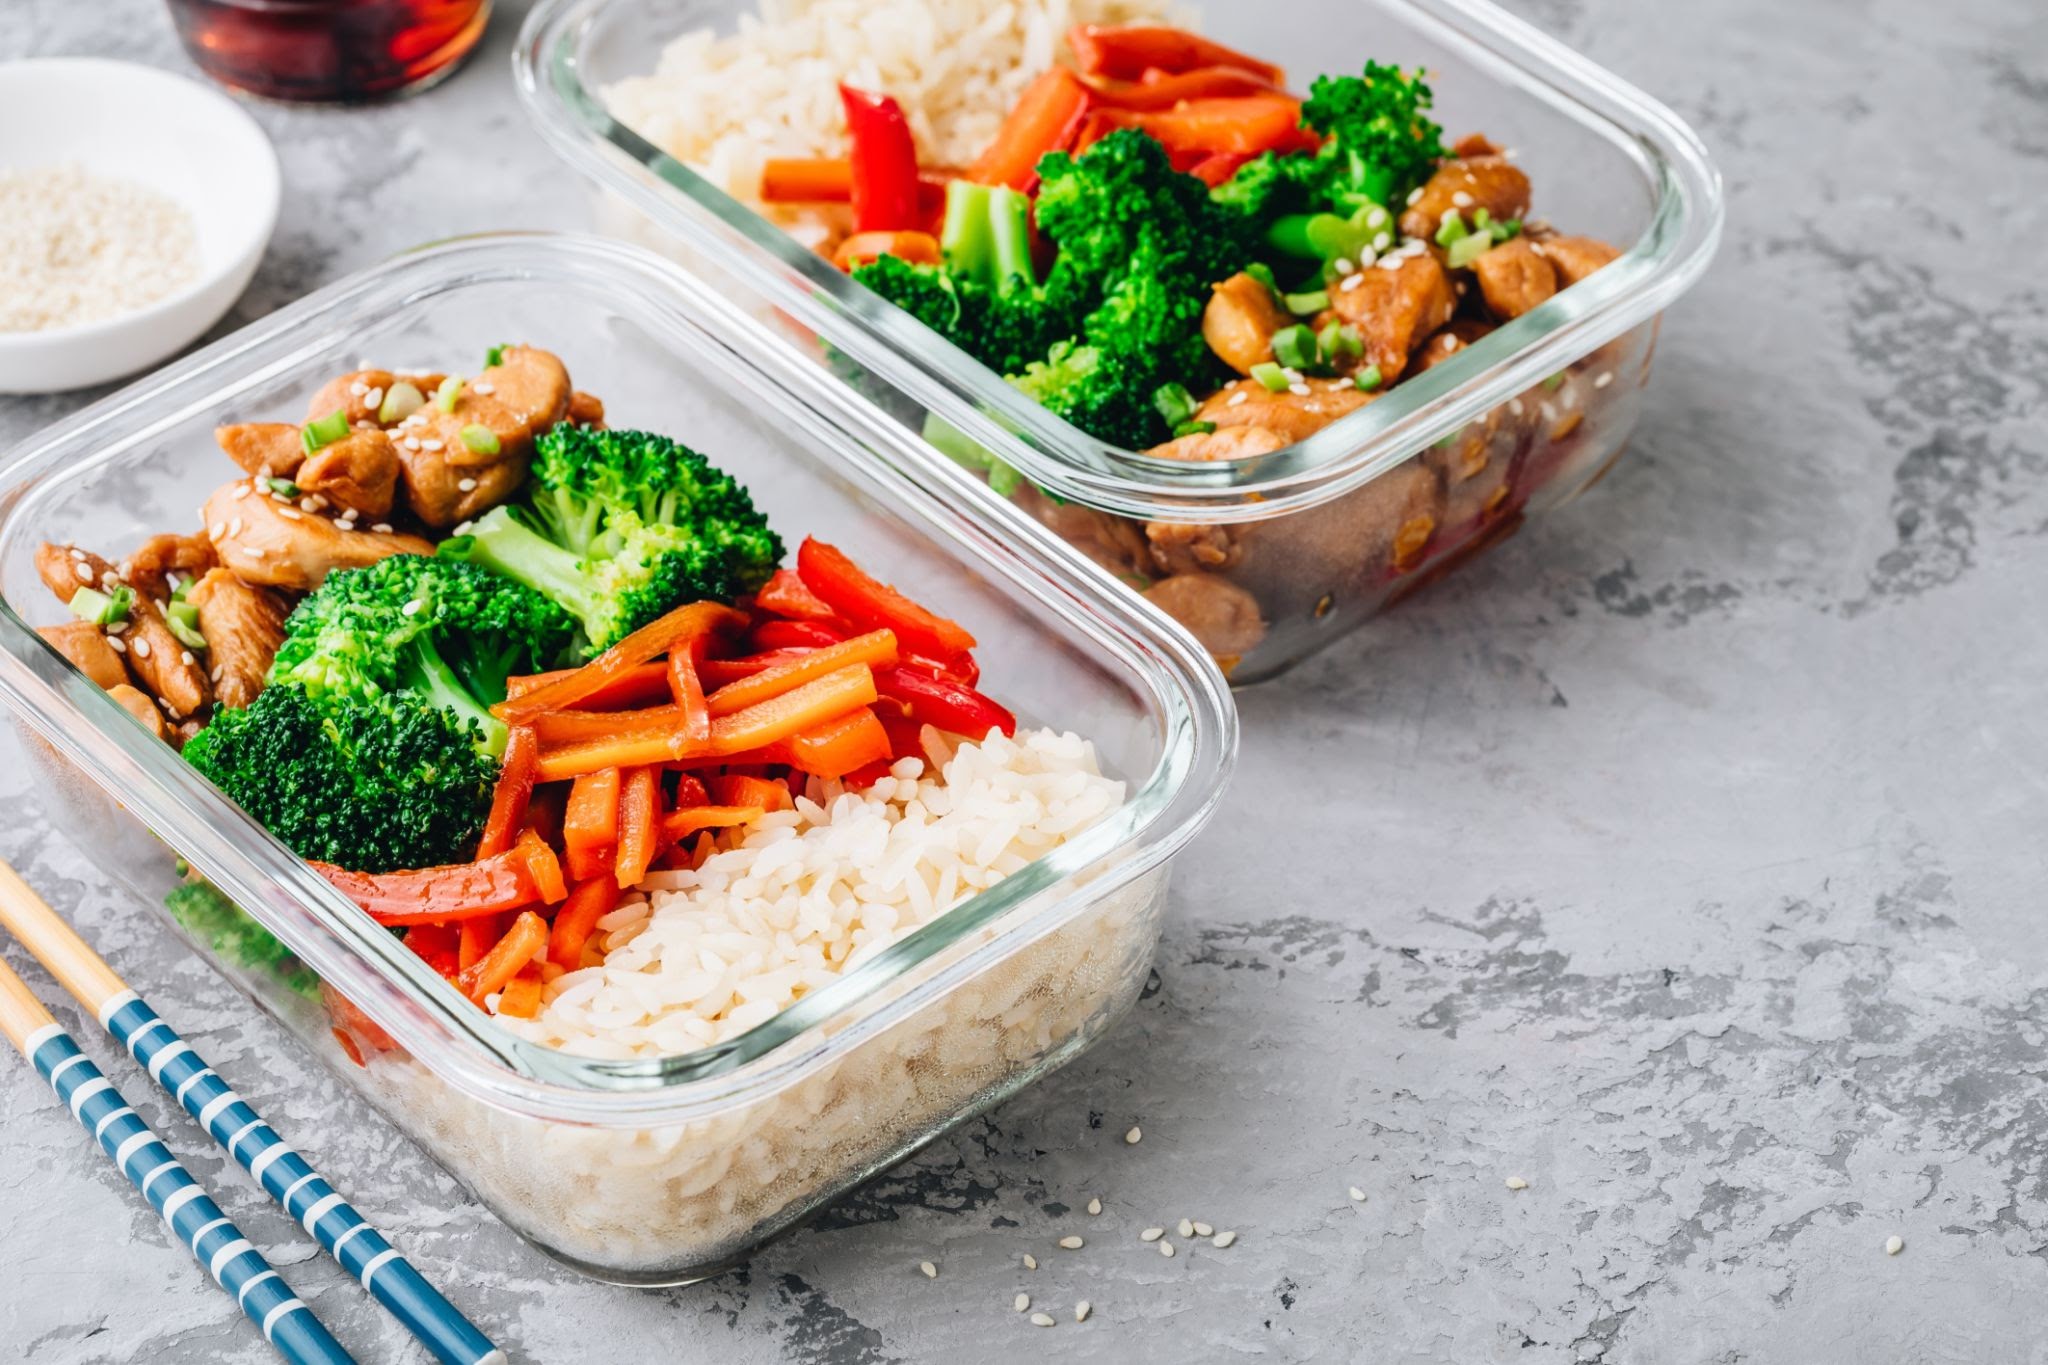
|
도시락 싸기는 시간과 비용을 절약하는 좋은 방법이며, 건강한 식습관을 기르는 데도 도움이 됩니다. 이 식사는 미리 준비할 수 있는 건강하고 맛있는 식사의 좋은 예입니다. 이 식사에는 현미, 구운 채소, 닭고기 데리야키가 포함되어 있습니다. 현미는 건강한 복합 탄수화물로 지속적인 에너지를 공급합니다. 구운 채소는 일일 비타민과 미네랄을 섭취하는 좋은 방법이며, 닭고기 데리야키는 맛있고 단백질이 풍부한 선택입니다. 이 식사는 준비하기도 간단합니다. 현미를 짓고, 채소를 구우며, 닭고기 데리야키를 요리하면 됩니다. 모든 재료가 익으면 식사 준비 용기에 나누어 담아 냉장고에 보관합니다. 그런 다음 용기를 들고 바쁜 아침을 시작할 수 있습니다. 미리 준비할 수 있는 건강하고 맛있는 식사를 찾고 있다면 이 식사가 좋은 선택입니다. 영양과 풍미가 가득하며 포만감과 만족감을 확실히 느낄 수 있습니다. 건강하고 맛있는 도시락을 만들어 보세요! |
미디어 파일을 사용하는 프롬프트에서 원하는 출력을 얻는 데 문제가 있는 경우 원하는 결과를 얻는 데 도움이 되는 몇 가지 전략이 있습니다. 다음 섹션에서는 멀티모달 입력을 사용하는 프롬프트를 개선하기 위한 설계 접근 방식과 문제 해결 팁을 제공합니다.
다음 권장사항에 따라 멀티모달 프롬프트를 향상시킬 수 있습니다.
-
프롬프트 설계 기초
- 구체적인 지침 설정: 오해의 소지가 거의 없도록 명확하고 간결한 지침을 제시합니다.
- 프롬프트에 몇 가지 예시 추가: 달성하려는 목표를 쉽게 이해할 수 있도록 실질적인 퓨샷 예시를 사용합니다.
- 단계별 분류: 복잡한 태스크를 관리 가능한 하위 목표로 분할하고 프로세스 전반에 걸쳐서 모델을 안내합니다.
- 출력 형식 지정: 프롬프트에서 마크다운, JSON, HTML 등 원하는 형식으로 출력을 요청합니다.
- 단일 이미지 프롬프트의 경우 이미지를 먼저 배치: Gemini는 어떤 순서로든 이미지 및 텍스트 입력을 처리할 수 있지만 단일 이미지가 포함된 프롬프트의 경우 해당 이미지(또는 동영상)를 텍스트 프롬프트 앞에 배치할 경우 성능이 향상될 수 있습니다. 그러나 상황에 따라 이미지와 텍스트를 밀접하게 혼합해야 할 경우에는 무엇이든 가장 자연스러운 순서를 따릅니다.
-
멀티모달 프롬프트 문제 해결
- 모델이 관련 이미지 부분에서 정보를 가져오지 않는 경우: 프롬프트로 정보를 가져오려는 이미지 부분에 대한 힌트를 제공합니다.
- 모델 출력이 너무 일반적인 경우(이미지/동영상 출력에 맞게 충분히 맞춤화되지 않은 경우): 프롬프트 시작 시 태스크 지침을 제공하기 전 이미지 또는 동영상을 기술하도록 모델에 요청하거나 이미지에 포함된 항목을 참조하도록 모델에 요청합니다.
- 실패한 부분 문제 해결: 이미지를 기술하거나, 이유를 설명하거나, 모델의 초기 이해 수준을 측정하도록 모델에 요청합니다.
- 프롬프트 결과 비현실적인 콘텐츠가 발생하는 경우: 강도 설정을 낮추거나 추가 세부정보를 추정할 가능성이 적도록 모델에 더 짧은 설명을 요청합니다.
- 샘플링 매개변수 조정: 여러 다른 강도 설정 및 최상위 K 선택으로 실험해서 모델 창의성을 조정합니다.
구체적인 지침 설정
프롬프트는 명확하고 세부적일 때 가장 성공적입니다. 특정 출력이 필요하다면 해당 요구사항을 프롬프트에 직접 포함하여 원하는 출력을 얻을 가능성을 높이세요.
공항 보드 이미지의 경우 "이미지 설명"이라고만 모델에 요청하면 일반적인 설명이 생성될 수 있습니다. 모델이 이미지에서 시간과 도시를 파싱하도록 하려면 프롬프트에 해당 요청을 직접 포함할 수 있습니다.
| 프롬프트 | 모델 응답 |
|---|---|

이 이미지를 설명해 주세요. |
이 이미지는 공항 도착 및 출발 보드를 보여줍니다. |
| 업데이트된 프롬프트 | 개선된 응답 |
|---|---|
이 이미지에 표시된 공항 보드에서 시간과 도시를 분석해서 목록으로 표시해 주세요. |
몇 가지 예시 추가
Gemini 모델은 원하는 출력을 이해하기 위해 예시로 사용할 수 있는 여러 입력을 수락할 수 있습니다. 이러한 예시를 추가하면 모델이 패턴을 식별하고 제공된 이미지와 응답 사이의 관계를 새 예시에 적용할 수 있습니다. 이를 '퓨샷' 학습이라고도 합니다.
다음 예시에서 초기 출력은 문장 형식으로 작성되었으며 국가 (브라질)를 포함합니다. 다른 형식 또는 스타일로 출력을 표시하고 국가가 아닌 도시만 포함한다고 가정해 보세요. 프롬프트에 퓨샷 예시를 추가하면 원하는 방식으로 응답하도록 모델을 조정할 수 있습니다.
| 프롬프트 | 모델 응답 |
|---|---|
 명소와 함께 도시를 설명해 주세요. |
이 랜드마크는 브라질 리우데자네이루에 있는 구세주 예수상입니다. |
| 업데이트된 프롬프트 | 개선된 응답 |
|---|---|
|
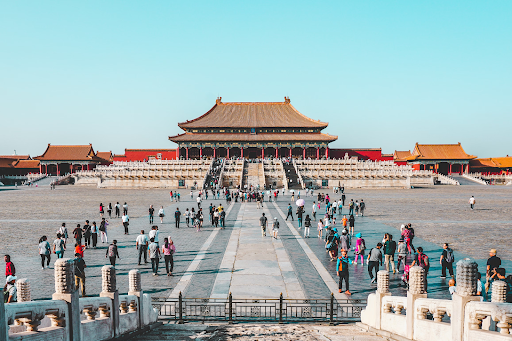
명소와 함께 도시를 설명해 주세요. 
|
도시: 로마, 랜드마크: 콜로세움 |
|
도시: 베이징, 랜드마크: 자금성 |
|
|
도시: 리우데자네이루, 랜드마크: 구세주 예수상 |
단계별 분류
시각적 이해와 추론이 모두 필요한 복잡한 태스크의 경우 태스크를 더 작고 직관적인 단계로 나누는 것이 유용할 수 있습니다. 또는 프롬프트에서 '단계별로 생각'하도록 모델에 직접 요청하는 것도 효과적일 수 있습니다.
| 프롬프트 | 모델 응답 |
|---|---|

화장지가 언제 다 떨어질까요? |
이제 3개 밖에 없으니 곧 떨어집니다. |
| 업데이트된 프롬프트 | 개선된 응답 |
|---|---|
|
|
수학 문제나 기타 유형의 단어 문제는 모델이 단계별로 생각하도록 요청하기에 적합한 후보입니다.
| 프롬프트 | 응답 |
|---|---|
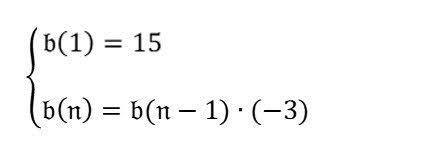
이 시퀀스에서 네 번째 항은 무엇인가요? |
-135 |
모델의 응답은 잘못되었습니다. 이를 개선하기 위한 몇 가지 방법은 모델이 프롬프트에 답변하기 전 문제를 파싱하도록 요청하는 것입니다.
| 프롬프트 | 응답 |
|---|---|
|
먼저 이미지에서 수식을 분석해 주세요. 그런 후 수식을 기준으로 "시퀀스에서 네 번째 항은 무엇"인지 대답해 주세요. |
클릭하여 결과 확장$$ b(n) = b(n-1) * (-3) $$ $$ b(1) = 15 $$
따라서 시퀀스에서 네 번째 항은 -405입니다. |
이번에는 모델 응답이 올바릅니다. 이제 응답을 보다 효율적으로 만들기 위해 모델에 단계별로 생각하도록 요청할 수 있습니다.
| 업데이트된 프롬프트 | 개선된 응답 |
|---|---|
|
이 시퀀스에서 네 번째 항은 무엇인가요? 단계별로 생각해 주세요. |
첫 번째 항은 15입니다. 두 번째 항은 b(1) * (-3) = 15 * (-3) = -45입니다. 세 번째 항은 b(2) * (-3) = -45 * (-3) = 135입니다. 네 번째 항은 b(3) * (-3) = 135 * (-3) = -405입니다. |
출력 형식 지정
일반적인 문제는 모델 출력을 다운스트림 태스크로 수집해야 할 경우 특히 모델 출력을 특정 형식(예: 마크다운, JSON, HTML)으로 지정해야 한다는 것입니다. 프롬프트 내에서 이를 수행하도록 모델을 안내하여 해당 형식으로 출력을 생성할 수 있습니다. 다음은 두 가지 예시입니다.
| 프롬프트 | 모델 응답 |
|---|---|
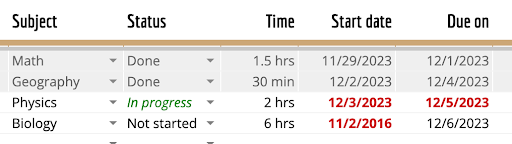
이 이미지의 표를 마크다운 형식으로 분석해 주세요. |
```none | 과목 | 상태 | 시간 | 시작일 | 만료일 | | ------- | ------ | ---- | ---------- | ------ | | 수학 | 완료 | 1.5시간 | 2023/11/29 | 2023/12/1 | | 지리 | 완료 | 30분 | 2023/12/2 | 2023/12/4 | | 물리 | 진행 중 | 2시간 | 2023/12/3 | 2023/12/5 | | 생물 | 시작 안 함 | 6시간 | 2016/11/2 | 2023/12/6 | ``` |
| 프롬프트 | 모델 응답 |
|---|---|
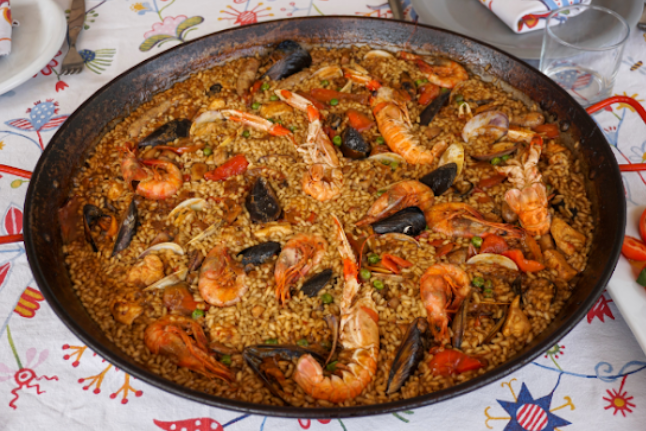
다음 모든 속성: 재료, 요리 종류, 채식주의 식단 여부의 목록을 JSON 형식으로 제공해 주세요. |
```json { "ingredients": [ "rice", "shrimp", "clams", "mussels", "peas", "tomatoes", "onions", "garlic", "olive oil", "paprika", "salt", "pepper" ], "type of cuisine": "Spanish", "vegetarian": false } ``` |
단일 이미지 프롬프트에 이미지 먼저 배치
Gemini는 프롬프트 내에서 어떤 순서로든 이미지와 텍스트를 해석할 수 있지만 텍스트 프롬프트 앞에 단일 이미지를 배치하는 것이 더 나은 결과로 이어질 수 있습니다. 다음 샘플에서는 각 프롬프트에서 이미지가 텍스트 앞에 오는 것을 알 수 있습니다.
멀티모달 프롬프트 문제 해결
유용한 대답을 얻지 못할 경우 프롬프트를 문제 해결해야 할 수 있습니다. 이를 위해서는 몇 가지 전략을 시도해볼 수 있습니다.
모델이 관련 이미지 부분에서 정보를 가져오지 않는 경우
보다 구체적인 대답을 얻기 위해서는 해당 대답에 정보를 제공하도록 프롬프트가 정보를 가져올 이미지 특정 부분을 지적할 수 있습니다.
| 프롬프트 | 모델 응답 |
|---|---|

아기 한 명이 사용할 때 이 기저귀는 며칠이나 갈까요? |
기저귀가 모두 소진되려면 198일 걸립니다. |
| 업데이트된 프롬프트 | 개선된 응답 |
|---|---|
|
기저귀가 소진되려면 며칠이나 걸릴까요? 상자에 표시된 무게를 사용해서 아기의 나이를 확인하고 상자에 적힌 총 기저귀 개수를 사용해 주세요. 총 개수를 아기 한 명이 하루에 사용하는 기저귀 수로 나눠주세요. |
상자에는 198개의 기저귀가 있습니다. 상자에는 체중이 22-37lbs인 아기를 위한 기저귀라고 씌여져 있습니다. 이 몸무게 범위의 평균 아기는 만 1~2세 사이입니다. 만 2세 아기는 일반적으로 하루 6개 정도 기저귀를 사용합니다. 따라서 기저귀는 33일(198/6) 정도 지속됩니다. |
모델 출력이 너무 일반적이고 이미지 입력에 충분히 조정되지 않은 경우
모델이 이미지에 따라 응답을 조정할 수 있게 하려면 근거 태스크를 수행하기 전 이미지를 기술하도록 요청합니다.
| 프롬프트 | 모델 응답 |
|---|---|


이러한 이미지 사이의 공통점은 무엇인가요? |
4개 이미지 모두 풍경 사진을 보여줍니다. |
| 업데이트된 프롬프트 | 개선된 응답 |
|---|---|
|
첫째, 각 이미지에 무엇이 있는지 자세히 설명해 주세요. 이러한 이미지 사이의 공통점은 무엇인가요? |
첫 번째 이미지는 여행 가방을 싸고 있는 사람을 보여줍니다. 두 번째 이미지는 쇼핑몰의 빈 통로를 보여줍니다. 세 번째 이미지는 화장실 휴지 한 롤을 보여줍니다. 네 번째 이미지는 어둡고 거친 바다를 보여줍니다. 이러한 이미지 간의 공통점은 이미지가 모두 경계 공간의 예시라는 점입니다. 경계 공간은 두 가지 서로 다른 공간 또는 상황 사이에 있는 공간 또는 상황을 의미합니다. 경계 공간의 특성은 불확실성이나 모호한 감정에 있습니다. 첫 번째 이미지는 집과 여행 사이에 있는 사람을 보여줍니다. 두 번째 이미지는 두 매장 사이의 통로를 보여줍니다. 세 번째 이미지는 욕실을 나타낼 수 있는 화장실 휴지를 보여줍니다. 욕실은 전통적으로 개인성과 공공성을 모두 갖고 있는 공간입니다. 그리고 우리가 외부 세계로 들어오고 나가기 위해 스스로를 준비하는 장소이기도 합니다. 네 번째 이미지는 고요함과 거침 사이에 있는 바다를 보여줍니다. 경계 공간은 흥미로움과 불편함을 모두 일으킬 수 있습니다. 이러한 공간은 무언가 시작되는 장소이거나 끝나는 장소일 수 있습니다. 사색하는 장소이거나 행동하는 장소일 수도 있습니다. |
또한 모델이 이미지에 포함된 내용을 참조하도록 명확하게 요청할 수도 있습니다.
| 업데이트된 프롬프트 | 개선된 응답 |
|---|---|
|
이러한 이미지 사이의 공통점은 무엇인가요? 이미지에 포함된 내용을 참조해서 답변해 주세요. |
모든 이미지는 여행과 관련이 있습니다. 첫 번째 이미지는 여행 가방을 싸고 있는 사람을 보여줍니다. 두 번째 이미지는 쇼핑몰의 빈 통로를 보여줍니다. 세 번째 이미지는 쌓여 있는 화장실 휴지를 보여줍니다. 네 번째 이미지는 어둡고 거친 바다를 보여줍니다. 이러한 이미지는 모두 여행할 때 필요하거나 사용하는 것들이기 때문에 모두 여행과 관련이 있습니다. 첫 번째 이미지는 여행 가방을 싸고 있는 사람을 보여줍니다. 이것은 사람들이 여행을 떠날 때 하는 행동입니다. 두 번째 이미지는 쇼핑몰의 빈 통로를 보여줍니다. 이것은 사람들이 여행에 필요한 물건을 구입하기 위해 자주 이동하는 장소입니다. 세 번째 이미지는 쌓여 있는 화장실 휴지를 보여줍니다. 이것은 사람들이 여행할 때 자주 사용하는 물건입니다. 네 번째 이미지는 어둡고 거친 바다를 보여줍니다. 이것은 사람들이 여행할 때 가끔 만나게 되는 것입니다. |
이미지에서 창의적인 출력을 얻을 때도 동일한 팁이 사용됩니다. 토끼를 사용한 다음 예시에서 특히 모델에 이미지 특성을 포함하도록 요청하면 출력을 개선시킬 수 있습니다.
| 프롬프트 | 모델 응답 |
|---|---|
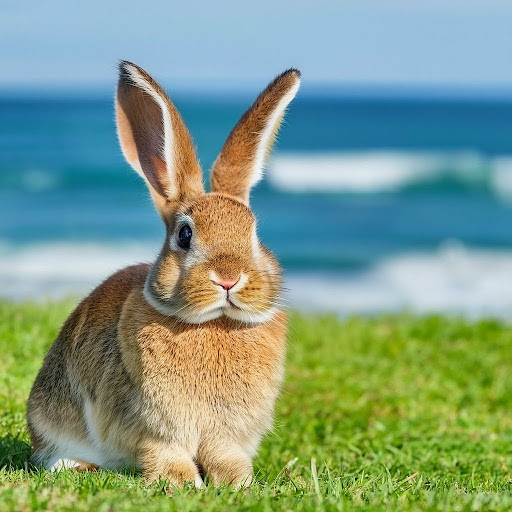
이 이미지에 관한 시를 지어줄 수 있나요? |
작은 토끼, 너무 부드럽고 갈색이야, 물고 뜯는 잔디 속, 너무 파랗고, 달콤해, |
| 업데이트된 프롬프트 | 개선된 응답 |
|---|---|
|
이 이미지에 대해 위치를 포함해서 설명적이고 극적인 시를 지어줄 수 있나요? |
초록 위 작은 토끼, 파란색 바다인가, 작은 토끼야, 사실을 말해줘, 어쩌면 그 모든 것을 품은 광활함일지도, 작은 토끼야, 네 꿈은 무엇일까, 그것이 무엇이든, 작은 토끼야, |
실패한 프롬프트 부분 문제 해결
모델이 처음에 이미지를 이해하지 못해서 프롬프트가 실패했는지, 아니면 이미지를 이해했지만 이후 올바른 추론 단계를 수행하지 못했는지 알기 어려울 수 있습니다. 이러한 이유들을 구분하기 위해서는 모델에 이미지에 포함된 것이 무엇인지 기술하도록 요청하세요.
다음 예시에서 모델이 차와 함께 할 때 어울리지 않는 간식 (예: 팝콘)으로 응답할 경우에는 먼저 모델이 이미지에 차가 포함된 것을 올바르게 인식했는지 확인하는 방식으로 문제 해결을 시작할 수 있습니다.
| 프롬프트 | 문제 해결을 위한 프롬프트 |
|---|---|
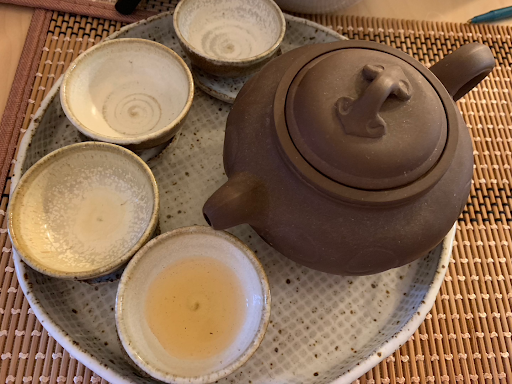
이 사진과 어울리는 것 중 1분 내에 만들 수 있는 간식은 무엇이 있나요? |
이 이미지의 내용을 설명해 주세요. |
또 다른 전략은 모델에 그 이유를 설명하도록 요청하는 것입니다. 이렇게 하면 (만약 있다면) 추론의 어떤 부분이 잘못되었는지를 좁혀 파악하는 데 도움이 될 수 있습니다.
| 프롬프트 | 문제 해결을 위한 프롬프트 |
|---|---|
|
이 사진과 어울리는 것 중 1분 내에 만들 수 있는 간식은 무엇이 있나요? |
이 사진과 어울리는 것 중 1분 내에 만들 수 있는 간식은 무엇이 있나요? 이유를 설명해 주세요. |
다음 단계
- Google AI Studio를 사용하여 나만의 멀티모달 프롬프트를 작성해 보세요.
- Gemini Files API를 사용하여 미디어 파일을 업로드하고 프롬프트에 포함하는 방법에 관한 자세한 내용은 Vision, 오디오, 문서 처리 가이드를 참고하세요.
- 샘플링 매개변수 조정과 같은 프롬프트 설계에 관한 자세한 안내는 프롬프트 전략 페이지를 참고하세요.