Nano Banana 图片生成
- 试用 Nano Banana 2 应用
- 或者,您也可以根据提示自行构建:
-


-
由 Nano Banana 2 生成 -
由 Nano Banana Pro 生成 -
由 Nano Banana 2 生成 -

由 Nano Banana Pro 生成 -
由 Nano Banana Pro 生成 -
由 Nano Banana Pro 生成 -
由 Nano Banana Pro 生成 提示:“一个代表可爱狗狗的图标。背景为白色。以色彩鲜艳且具有触感的 3D 风格制作图标。没有文字。"在 AI Studio 中使用 Nano Banana 制作图标、贴纸和素材资源 -
由 Nano Banana 2 生成
Nano Banana 是 Gemini 原生图片生成功能的名称。 Gemini 可以通过文本、图片或两者结合的方式以对话方式生成并处理图片。这让您能够以前所未有的精准度创建、修改和迭代视觉内容。
Nano Banana 是指 Gemini API 中提供的三种不同的模型:
- Nano Banana 2:Gemini 3.1 Flash Image 模型 (
gemini-3.1-flash-image)。此模型是 Gemini 3.1 Pro Image 的高效版本,针对速度和高容量开发者使用情形进行了优化。 - Nano Banana Pro:Gemini 3.1 Pro Image 模型 (
gemini-3-pro-image)。此模型专为专业资产制作而设计,可利用高级推理(“思考”)功能来遵循复杂的指令并呈现高保真文本。 - Nano Banana:Gemini 2.5 Flash Image 模型 (
gemini-2.5-flash-image)。此模型专为速度和效率而设计,经过优化,可处理海量低延迟任务。
生成的所有图片都包含 SynthID 水印。
图片生成(文生图)
Python
from google import genai
from google.genai import types
from PIL import Image

client = genai.Client()

prompt = ("Create a picture of a nano banana dish in a fancy restaurant with a Gemini theme")
response = client.models.generate_content(
    model="gemini-3.1-flash-image",
    contents=[prompt],
)

for part in response.parts:
    if part.text is not None:
        print(part.text)
    elif part.inline_data is not None:
        image = part.as_image()
        image.save("generated_image.png")
JavaScript
import { GoogleGenAI } from "@google/genai";
import * as fs from "node:fs";

async function main() {

  const ai = new GoogleGenAI({});

  const prompt =
    "Create a picture of a nano banana dish in a fancy restaurant with a Gemini theme";

  const response = await ai.models.generateContent({
    model: "gemini-3.1-flash-image",
    contents: prompt,
  });
  for (const part of response.candidates[0].content.parts) {
    if (part.text) {
      console.log(part.text);
    } else if (part.inlineData) {
      const imageData = part.inlineData.data;
      const buffer = Buffer.from(imageData, "base64");
      fs.writeFileSync("gemini-native-image.png", buffer);
      console.log("Image saved as gemini-native-image.png");
    }
  }
}

main();
Go
package main

import (
  "context"
  "fmt"
  "log"
  "os"
  "google.golang.org/genai"
)

func main() {

  ctx := context.Background()
  client, err := genai.NewClient(ctx, nil)
  if err != nil {
      log.Fatal(err)
  }

  result, _ := client.Models.GenerateContent(
      ctx,
      "gemini-3.1-flash-image",
      genai.Text("Create a picture of a nano banana dish in a " +
                 " fancy restaurant with a Gemini theme"),
  )

  for _, part := range result.Candidates[0].Content.Parts {
      if part.Text != "" {
          fmt.Println(part.Text)
      } else if part.InlineData != nil {
          imageBytes := part.InlineData.Data
          outputFilename := "gemini_generated_image.png"
          _ = os.WriteFile(outputFilename, imageBytes, 0644)
      }
  }
}
Java
import com.google.genai.Client;
import com.google.genai.types.GenerateContentConfig;
import com.google.genai.types.GenerateContentResponse;
import com.google.genai.types.Part;

import java.io.IOException;
import java.nio.file.Files;
import java.nio.file.Paths;

public class TextToImage {
  public static void main(String[] args) throws IOException {

    try (Client client = new Client()) {
      GenerateContentConfig config = GenerateContentConfig.builder()
          .responseModalities("TEXT", "IMAGE")
          .build();

      GenerateContentResponse response = client.models.generateContent(
          "gemini-3.1-flash-image",
          "Create a picture of a nano banana dish in a fancy restaurant with a Gemini theme",
          config);

      for (Part part : response.parts()) {
        if (part.text().isPresent()) {
          System.out.println(part.text().get());
        } else if (part.inlineData().isPresent()) {
          var blob = part.inlineData().get();
          if (blob.data().isPresent()) {
            Files.write(Paths.get("_01_generated_image.png"), blob.data().get());
          }
        }
      }
    }
  }
}
C#
using Google.GenAI;
using System;
using System.Collections.Generic;
using System.IO;
using System.Threading.Tasks;

public class TextToImage {
  public static async Task Main(string[] args) {
    var client = new Client();

    var response = await client.Models.GenerateContentAsync(
        model: "gemini-3.1-flash-image",
        contents: new List<Part>
        {
            new Part { Text = "Create a picture of a nano banana dish in a fancy restaurant with a Gemini theme" }
        }
    );

    foreach (var candidate in response.Candidates) {
        foreach (var part in candidate.Content.Parts) {
            if (part.Text != null) {
                Console.WriteLine(part.Text);
            } else if (part.InlineData != null) {
                var imageBytes = Convert.FromBase64String(part.InlineData.Data);
                await File.WriteAllBytesAsync("generated_image.png", imageBytes);
                Console.WriteLine("Image saved as generated_image.png");
            }
        }
    }
  }
}
REST
curl -s -X POST \
  "https://generativelanguage.googleapis.com/v1/models/gemini-3.1-flash-image:generateContent" \
  -H "x-goog-api-key: $GEMINI_API_KEY" \
  -H "Content-Type: application/json" \
  -d '{
    "contents": [{
      "parts": [
        {"text": "Create a picture of a nano banana dish in a fancy restaurant with a Gemini theme"}
      ]
    }]
  }'
图片编辑(文本和图片转图片)
提醒:请确保您对上传的所有图片均拥有必要权利。 请勿生成会侵犯他人权利的内容,包括会欺骗、骚扰或伤害他人的视频或图片。使用此生成式 AI 服务时须遵守我们的《使用限制政策》。
提供图片并使用文本提示添加、移除或修改元素、更改样式或调整色彩分级。
以下示例演示了如何上传 base64 编码的图片。
如需了解多张图片、更大的载荷和支持的 MIME 类型,请参阅图片理解页面。
Python
from google import genai
from google.genai import types
from PIL import Image

client = genai.Client()

prompt = (
    "Create a picture of my cat eating a nano-banana in a "
    "fancy restaurant under the Gemini constellation",
)

image = Image.open("/path/to/cat_image.png")

response = client.models.generate_content(
    model="gemini-3.1-flash-image",
    contents=[prompt, image],
)

for part in response.parts:
    if part.text is not None:
        print(part.text)
    elif part.inline_data is not None:
        image = part.as_image()
        image.save("generated_image.png")
JavaScript
import { GoogleGenAI } from "@google/genai";
import * as fs from "node:fs";

async function main() {

  const ai = new GoogleGenAI({});

  const imagePath = "path/to/cat_image.png";
  const imageData = fs.readFileSync(imagePath);
  const base64Image = imageData.toString("base64");

  const prompt = [
    { text: "Create a picture of my cat eating a nano-banana in a" +
            "fancy restaurant under the Gemini constellation" },
    {
      inlineData: {
        mimeType: "image/png",
        data: base64Image,
      },
    },
  ];

  const response = await ai.models.generateContent({
    model: "gemini-3.1-flash-image",
    contents: prompt,
  });
  for (const part of response.candidates[0].content.parts) {
    if (part.text) {
      console.log(part.text);
    } else if (part.inlineData) {
      const imageData = part.inlineData.data;
      const buffer = Buffer.from(imageData, "base64");
      fs.writeFileSync("gemini-native-image.png", buffer);
      console.log("Image saved as gemini-native-image.png");
    }
  }
}

main();
Go
package main

import (
 "context"
 "fmt"
 "log"
 "os"
 "google.golang.org/genai"
)

func main() {

 ctx := context.Background()
 client, err := genai.NewClient(ctx, nil)
 if err != nil {
     log.Fatal(err)
 }

 imagePath := "/path/to/cat_image.png"
 imgData, _ := os.ReadFile(imagePath)

 parts := []*genai.Part{
   genai.NewPartFromText("Create a picture of my cat eating a nano-banana in a fancy restaurant under the Gemini constellation"),
   &genai.Part{
     InlineData: &genai.Blob{
       MIMEType: "image/png",
       Data:     imgData,
     },
   },
 }

 contents := []*genai.Content{
   genai.NewContentFromParts(parts, genai.RoleUser),
 }

 result, _ := client.Models.GenerateContent(
     ctx,
     "gemini-3.1-flash-image",
     contents,
 )

 for _, part := range result.Candidates[0].Content.Parts {
     if part.Text != "" {
         fmt.Println(part.Text)
     } else if part.InlineData != nil {
         imageBytes := part.InlineData.Data
         outputFilename := "gemini_generated_image.png"
         _ = os.WriteFile(outputFilename, imageBytes, 0644)
     }
 }
}
Java
import com.google.genai.Client;
import com.google.genai.types.Content;
import com.google.genai.types.GenerateContentConfig;
import com.google.genai.types.GenerateContentResponse;
import com.google.genai.types.Part;

import java.io.IOException;
import java.nio.file.Files;
import java.nio.file.Path;
import java.nio.file.Paths;

public class TextAndImageToImage {
  public static void main(String[] args) throws IOException {

    try (Client client = new Client()) {
      GenerateContentConfig config = GenerateContentConfig.builder()
          .responseModalities("TEXT", "IMAGE")
          .build();

      GenerateContentResponse response = client.models.generateContent(
          "gemini-3.1-flash-image",
          Content.fromParts(
              Part.fromText("""
                  Create a picture of my cat eating a nano-banana in
                  a fancy restaurant under the Gemini constellation
                  """),
              Part.fromBytes(
                  Files.readAllBytes(
                      Path.of("src/main/resources/cat.jpg")),
                  "image/jpeg")),
          config);

      for (Part part : response.parts()) {
        if (part.text().isPresent()) {
          System.out.println(part.text().get());
        } else if (part.inlineData().isPresent()) {
          var blob = part.inlineData().get();
          if (blob.data().isPresent()) {
            Files.write(Paths.get("gemini_generated_image.png"), blob.data().get());
          }
        }
      }
    }
  }
}
C#
using Google.GenAI;
using System;
using System.Collections.Generic;
using System.IO;
using System.Threading.Tasks;

public class TextAndImageToImage {
  public static async Task Main(string[] args) {
    var client = new Client();

    var response = await client.Models.GenerateContentAsync(
        model: "gemini-3.1-flash-image",
        contents: new List<Part>
        {
            new Part { Text = "Create a picture of my cat eating a nano-banana in a fancy restaurant under the Gemini constellation" },
            new Part
            {
                FileData = new FileData { FileUri = "file:///path/to/cat_image.png" }
            }
        }
    );

    foreach (var candidate in response.Candidates) {
        foreach (var part in candidate.Content.Parts) {
            if (part.Text != null) {
                Console.WriteLine(part.Text);
            } else if (part.InlineData != null) {
                var imageBytes = Convert.FromBase64String(part.InlineData.Data);
                await File.WriteAllBytesAsync("gemini_generated_image.png", imageBytes);
                Console.WriteLine("Image saved as gemini_generated_image.png");
            }
        }
    }
  }
}
REST
curl -s -X POST \
  "https://generativelanguage.googleapis.com/v1/models/gemini-3.1-flash-image:generateContent" \
    -H "x-goog-api-key: $GEMINI_API_KEY" \
    -H 'Content-Type: application/json' \
    -d "{
      \"contents\": [{
        \"parts\":[
            {\"text\": \"'Create a picture of my cat eating a nano-banana in a fancy restaurant under the Gemini constellation\"},
            {
              \"inline_data\": {
                \"mime_type\":\"image/jpeg\",
                \"data\": \"<BASE64_IMAGE_DATA>\"
              }
            }
        ]
      }]
    }"
多轮图片修改
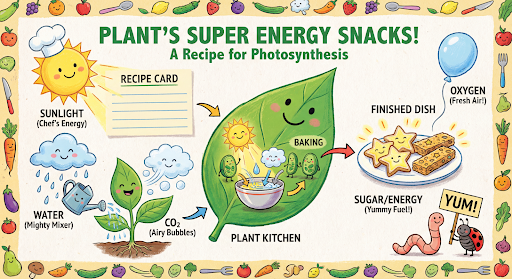
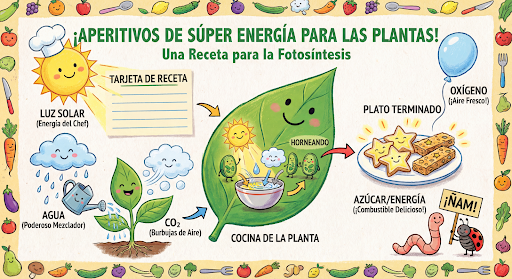
继续以对话方式生成和修改图片。建议使用聊天或多轮对话的方式来迭代图片。以下示例展示了生成有关光合作用的信息图表的提示。
Python
from google import genai
from google.genai import types

client = genai.Client()

chat = client.chats.create(
    model="gemini-3.1-flash-image",
    config=types.GenerateContentConfig(
        response_modalities=['TEXT', 'IMAGE'],
        tools=[{"google_search": {}}]
    )
)

message = "Create a vibrant infographic that explains photosynthesis as if it were a recipe for a plant's favorite food. Show the \"ingredients\" (sunlight, water, CO2) and the \"finished dish\" (sugar/energy). The style should be like a page from a colorful kids' cookbook, suitable for a 4th grader."

response = chat.send_message(message)

for part in response.parts:
    if part.text is not None:
        print(part.text)
    elif image:= part.as_image():
        image.save("photosynthesis.png")
JavaScript
import { GoogleGenAI } from "@google/genai";

const ai = new GoogleGenAI({});

async function main() {
  const chat = ai.chats.create({
    model: "gemini-3.1-flash-image",
    config: {
      responseModalities: ['TEXT', 'IMAGE'],
      tools: [{googleSearch: {}}],
    },
  });
}

await main();

const message = "Create a vibrant infographic that explains photosynthesis as if it were a recipe for a plant's favorite food. Show the \"ingredients\" (sunlight, water, CO2) and the \"finished dish\" (sugar/energy). The style should be like a page from a colorful kids' cookbook, suitable for a 4th grader."

let response = await chat.sendMessage({message});

for (const part of response.candidates[0].content.parts) {
    if (part.text) {
      console.log(part.text);
    } else if (part.inlineData) {
      const imageData = part.inlineData.data;
      const buffer = Buffer.from(imageData, "base64");
      fs.writeFileSync("photosynthesis.png", buffer);
      console.log("Image saved as photosynthesis.png");
    }
}
Go
package main

import (
    "context"
    "fmt"
    "log"
    "os"

    "google.golang.org/genai"
)

func main() {
    ctx := context.Background()
    client, err := genai.NewClient(ctx, nil)
    if err != nil {
        log.Fatal(err)
    }
    defer client.Close()

    model := client.GenerativeModel("gemini-3.1-flash-image")
    model.GenerationConfig = &pb.GenerationConfig{
        ResponseModalities: []pb.ResponseModality{genai.Text, genai.Image},
    }
    chat := model.StartChat()

    message := "Create a vibrant infographic that explains photosynthesis as if it were a recipe for a plant's favorite food. Show the \"ingredients\" (sunlight, water, CO2) and the \"finished dish\" (sugar/energy). The style should be like a page from a colorful kids' cookbook, suitable for a 4th grader."

    resp, err := chat.SendMessage(ctx, genai.Text(message))
    if err != nil {
        log.Fatal(err)
    }

    for _, part := range resp.Candidates[0].Content.Parts {
        if txt, ok := part.(genai.Text); ok {
            fmt.Printf("%s", string(txt))
        } else if img, ok := part.(genai.ImageData); ok {
            err := os.WriteFile("photosynthesis.png", img.Data, 0644)
            if err != nil {
                log.Fatal(err)
            }
        }
    }
}
Java
import com.google.genai.Chat;
import com.google.genai.Client;
import com.google.genai.types.Content;
import com.google.genai.types.GenerateContentConfig;
import com.google.genai.types.GenerateContentResponse;
import com.google.genai.types.GoogleSearch;
import com.google.genai.types.ImageConfig;
import com.google.genai.types.Part;
import com.google.genai.types.RetrievalConfig;
import com.google.genai.types.Tool;
import com.google.genai.types.ToolConfig;

import java.io.IOException;
import java.nio.file.Files;
import java.nio.file.Path;
import java.nio.file.Paths;

public class MultiturnImageEditing {
  public static void main(String[] args) throws IOException {

    try (Client client = new Client()) {

      GenerateContentConfig config = GenerateContentConfig.builder()
          .responseModalities("TEXT", "IMAGE")
          .tools(Tool.builder()
              .googleSearch(GoogleSearch.builder().build())
              .build())
          .build();

      Chat chat = client.chats.create("gemini-3.1-flash-image", config);

      GenerateContentResponse response = chat.sendMessage("""
          Create a vibrant infographic that explains photosynthesis
          as if it were a recipe for a plant's favorite food.
          Show the "ingredients" (sunlight, water, CO2)
          and the "finished dish" (sugar/energy).
          The style should be like a page from a colorful
          kids' cookbook, suitable for a 4th grader.
          """);

      for (Part part : response.parts()) {
        if (part.text().isPresent()) {
          System.out.println(part.text().get());
        } else if (part.inlineData().isPresent()) {
          var blob = part.inlineData().get();
          if (blob.data().isPresent()) {
            Files.write(Paths.get("photosynthesis.png"), blob.data().get());
          }
        }
      }
      // ...
    }
  }
}
C#
using Google.GenAI;
using System;
using System.Collections.Generic;
using System.IO;
using System.Threading.Tasks;

public class MultiturnImageEditing {
  public static async Task Main(string[] args) {
    var client = new Client();

    var response = await client.Models.GenerateContentAsync(
        model: "gemini-3.1-flash-image",
        contents: new List<Part>
        {
            new Part { Text = "Create a vibrant infographic that explains photosynthesis as if it were a recipe for a plant's favorite food. Show the \"ingredients\" (sunlight, water, CO2) and the \"finished dish\" (sugar/energy). The style should be like a page from a colorful kids' cookbook, suitable for a 4th grader." }
        },
        config: new GenerateContentConfig
        {
            ResponseModalities = new List<string> { "TEXT", "IMAGE" },
            Tools = new List<Tool> { new Tool { GoogleSearch = new GoogleSearch() } }
        }
    );

    foreach (var candidate in response.Candidates) {
        foreach (var part in candidate.Content.Parts) {
            if (part.Text != null) {
                Console.WriteLine(part.Text);
            } else if (part.InlineData != null) {
                var imageBytes = Convert.FromBase64String(part.InlineData.Data);
                await File.WriteAllBytesAsync("photosynthesis.png", imageBytes);
                Console.WriteLine("Image saved as photosynthesis.png");
            }
        }
    }
  }
}
REST
curl -s -X POST \
  "https://generativelanguage.googleapis.com/v1/models/gemini-3.1-flash-image:generateContent" \
  -H "x-goog-api-key: $GEMINI_API_KEY" \
  -H "Content-Type: application/json" \
  -d '{
    "contents": [{
      "role": "user",
      "parts": [
        {"text": "Create a vibrant infographic that explains photosynthesis as if it were a recipe for a plants favorite food. Show the \"ingredients\" (sunlight, water, CO2) and the \"finished dish\" (sugar/energy). The style should be like a page from a colorful kids cookbook, suitable for a 4th grader."}
      ]
    }],
    "generationConfig": {
      "responseModalities": ["TEXT", "IMAGE"]
    }
  }'
然后,您可以使用同一对话将图片中的语言更改为西班牙语。
Python
message = "Update this infographic to be in Spanish. Do not change any other elements of the image."
aspect_ratio = "16:9" # "1:1","1:4","1:8","2:3","3:2","3:4","4:1","4:3","4:5","5:4","8:1","9:16","16:9","21:9"
resolution = "2K" # "512", "1K", "2K", "4K"

response = chat.send_message(message,
    config=types.GenerateContentConfig(
        response_format={"image": {aspect_ratio: aspect_ratio,                 image_size: resolution}},
    ))

for part in response.parts:
    if part.text is not None:
        print(part.text)
    elif image:= part.as_image():
        image.save("photosynthesis_spanish.png")
JavaScript
const message = 'Update this infographic to be in Spanish. Do not change any other elements of the image.';
const aspectRatio = '16:9';
const resolution = '2K';

let response = await chat.sendMessage({
  message,
  config: {
    responseModalities: ['TEXT', 'IMAGE'],
    responseFormat: {
    image: {
      aspectRatio: aspectRatio,
      imageSize: resolution,
    }
  },
    tools: [{googleSearch: {}}],
  },
});

for (const part of response.candidates[0].content.parts) {
    if (part.text) {
      console.log(part.text);
    } else if (part.inlineData) {
      const imageData = part.inlineData.data;
      const buffer = Buffer.from(imageData, "base64");
      fs.writeFileSync("photosynthesis2.png", buffer);
      console.log("Image saved as photosynthesis2.png");
    }
}
Go
message = "Update this infographic to be in Spanish. Do not change any other elements of the image."
aspect_ratio = "16:9" // "1:1","1:4","1:8","2:3","3:2","3:4","4:1","4:3","4:5","5:4","8:1","9:16","16:9","21:9"
resolution = "2K"     // "512", "1K", "2K", "4K"

model.GenerationConfig.ImageConfig = &pb.ImageConfig{
    AspectRatio: aspect_ratio,
    ImageSize:   resolution,
}

resp, err = chat.SendMessage(ctx, genai.Text(message))
if err != nil {
    log.Fatal(err)
}

for _, part := range resp.Candidates[0].Content.Parts {
    if txt, ok := part.(genai.Text); ok {
        fmt.Printf("%s", string(txt))
    } else if img, ok := part.(genai.ImageData); ok {
        err := os.WriteFile("photosynthesis_spanish.png", img.Data, 0644)
        if err != nil {
            log.Fatal(err)
        }
    }
}
Java
String aspectRatio = "16:9"; // "1:1","1:4","1:8","2:3","3:2","3:4","4:1","4:3","4:5","5:4","8:1","9:16","16:9","21:9"
String resolution = "2K"; // "512", "1K", "2K", "4K"

config = GenerateContentConfig.builder()
    .responseModalities("TEXT", "IMAGE")
    .imageConfig(ImageConfig.builder()
        .aspectRatio(aspectRatio)
        .imageSize(resolution)
        .build())
    .build();

response = chat.sendMessage(
    "Update this infographic to be in Spanish. " +
    "Do not change any other elements of the image.",
    config);

for (Part part : response.parts()) {
  if (part.text().isPresent()) {
    System.out.println(part.text().get());
  } else if (part.inlineData().isPresent()) {
    var blob = part.inlineData().get();
    if (blob.data().isPresent()) {
      Files.write(Paths.get("photosynthesis_spanish.png"), blob.data().get());
    }
  }
}
C#
using Google.GenAI;
using System;
using System.Collections.Generic;
using System.IO;
using System.Threading.Tasks;

public class MultiturnImageEditingSpanish {
  public static async Task Main(string[] args) {
    var client = new Client();

    var response = await client.Models.GenerateContentAsync(
        model: "gemini-3.1-flash-image",
        contents: new List<Part>
        {
            new Part { Text = "Update this infographic to be in Spanish. Do not change any other elements of the image." }
        },
        config: new GenerateContentConfig
        {
            ResponseModalities = new List<string> { "TEXT", "IMAGE" },
            ImageConfig = new ImageConfig
            {
                AspectRatio = "16:9",
                ImageSize = "2K"
            }
        }
    );

    foreach (var candidate in response.Candidates) {
        foreach (var part in candidate.Content.Parts) {
            if (part.Text != null) {
                Console.WriteLine(part.Text);
            } else if (part.InlineData != null) {
                var imageBytes = Convert.FromBase64String(part.InlineData.Data);
                await File.WriteAllBytesAsync("photosynthesis_spanish.png", imageBytes);
                Console.WriteLine("Image saved as photosynthesis_spanish.png");
            }
        }
    }
  }
}
REST
curl -s -X POST \
  "https://generativelanguage.googleapis.com/v1/models/gemini-3.1-flash-image:generateContent" \
  -H "x-goog-api-key: $GEMINI_API_KEY" \
  -H 'Content-Type: application/json' \
  -d '{
    "contents": [
      {
        "role": "user",
        "parts": [{"text": "Create a vibrant infographic that explains photosynthesis..."}]
      },
      {
        "role": "model",
        "parts": [{"inline_data": {"mime_type": "image/png", "data": "<PREVIOUS_IMAGE_DATA>"}}]
      },
      {
        "role": "user",
        "parts": [{"text": "Update this infographic to be in Spanish. Do not change any other elements of the image."}]
      }
    ],
    "tools": [{"google_search": {}}],
    "generationConfig": {
      "responseModalities": ["TEXT", "IMAGE"],
      "responseFormat": {
    "image": {
        "aspectRatio": "16:9",
        "imageSize": "2K"
      }
  }
    }
  }'
Gemini 3 Image 模型的新功能
Gemini 3 提供先进的图片生成和编辑模型。Gemini 3.1 Flash Image 针对速度和大规模使用场景进行了优化,而 Gemini 3 Pro Image 针对专业素材制作进行了优化。 这些模型旨在通过高级推理来应对最具挑战性的工作流程,擅长处理复杂的多轮创建和修改任务。
- 高分辨率输出:内置生成 1K、2K 和 4K 视觉内容的能力。
- Gemini 3.1 Flash Image 新增了较小的 512 像素 (0.5K) 分辨率。
- 高级文本呈现:能够为信息图表、菜单、图表和营销素材资源生成清晰易读的风格化文本。
- 依托 Google 搜索进行接地:模型可以使用 Google 搜索作为工具来验证事实,并根据实时数据(例如当前天气地图、股票图表、近期活动)生成图像。
- Gemini 3.1 Flash Image 新增了将依托 Google 搜索进行接地与 Google 图片搜索和 Google 网页搜索相集成的功能。
- 思考模式:模型会利用“思考”过程来推理复杂的提示。它会生成临时“构思图片”(在后端可见,但不收费),以在生成最终的高质量输出之前优化构图。
- 最多 14 张参考图片:您现在最多可混合使用 14 张参考图片来生成最终图片。
- 新增宽高比:Gemini 3.1 Flash Image 新增了 1:4、4:1、1:8 和 8:1 的宽高比。
使用最多 14 张参考图片
借助 Gemini 3 图片模型,您最多可混合使用 14 张参考图片。这 14 张图片可以包含以下内容:
| Gemini 3.1 Flash Image | Gemini 3.1 Pro Image |
|---|---|
| 最多 10 张高保真对象图片,用于添加到最终图片中 | 最多 6 张高保真对象图片,用于包含在最终图片中 |
| 最多 4 张角色图片,以保持角色一致性 | 最多 5 张角色图片,以保持角色一致性 |
Python
from google import genai
from google.genai import types
from PIL import Image
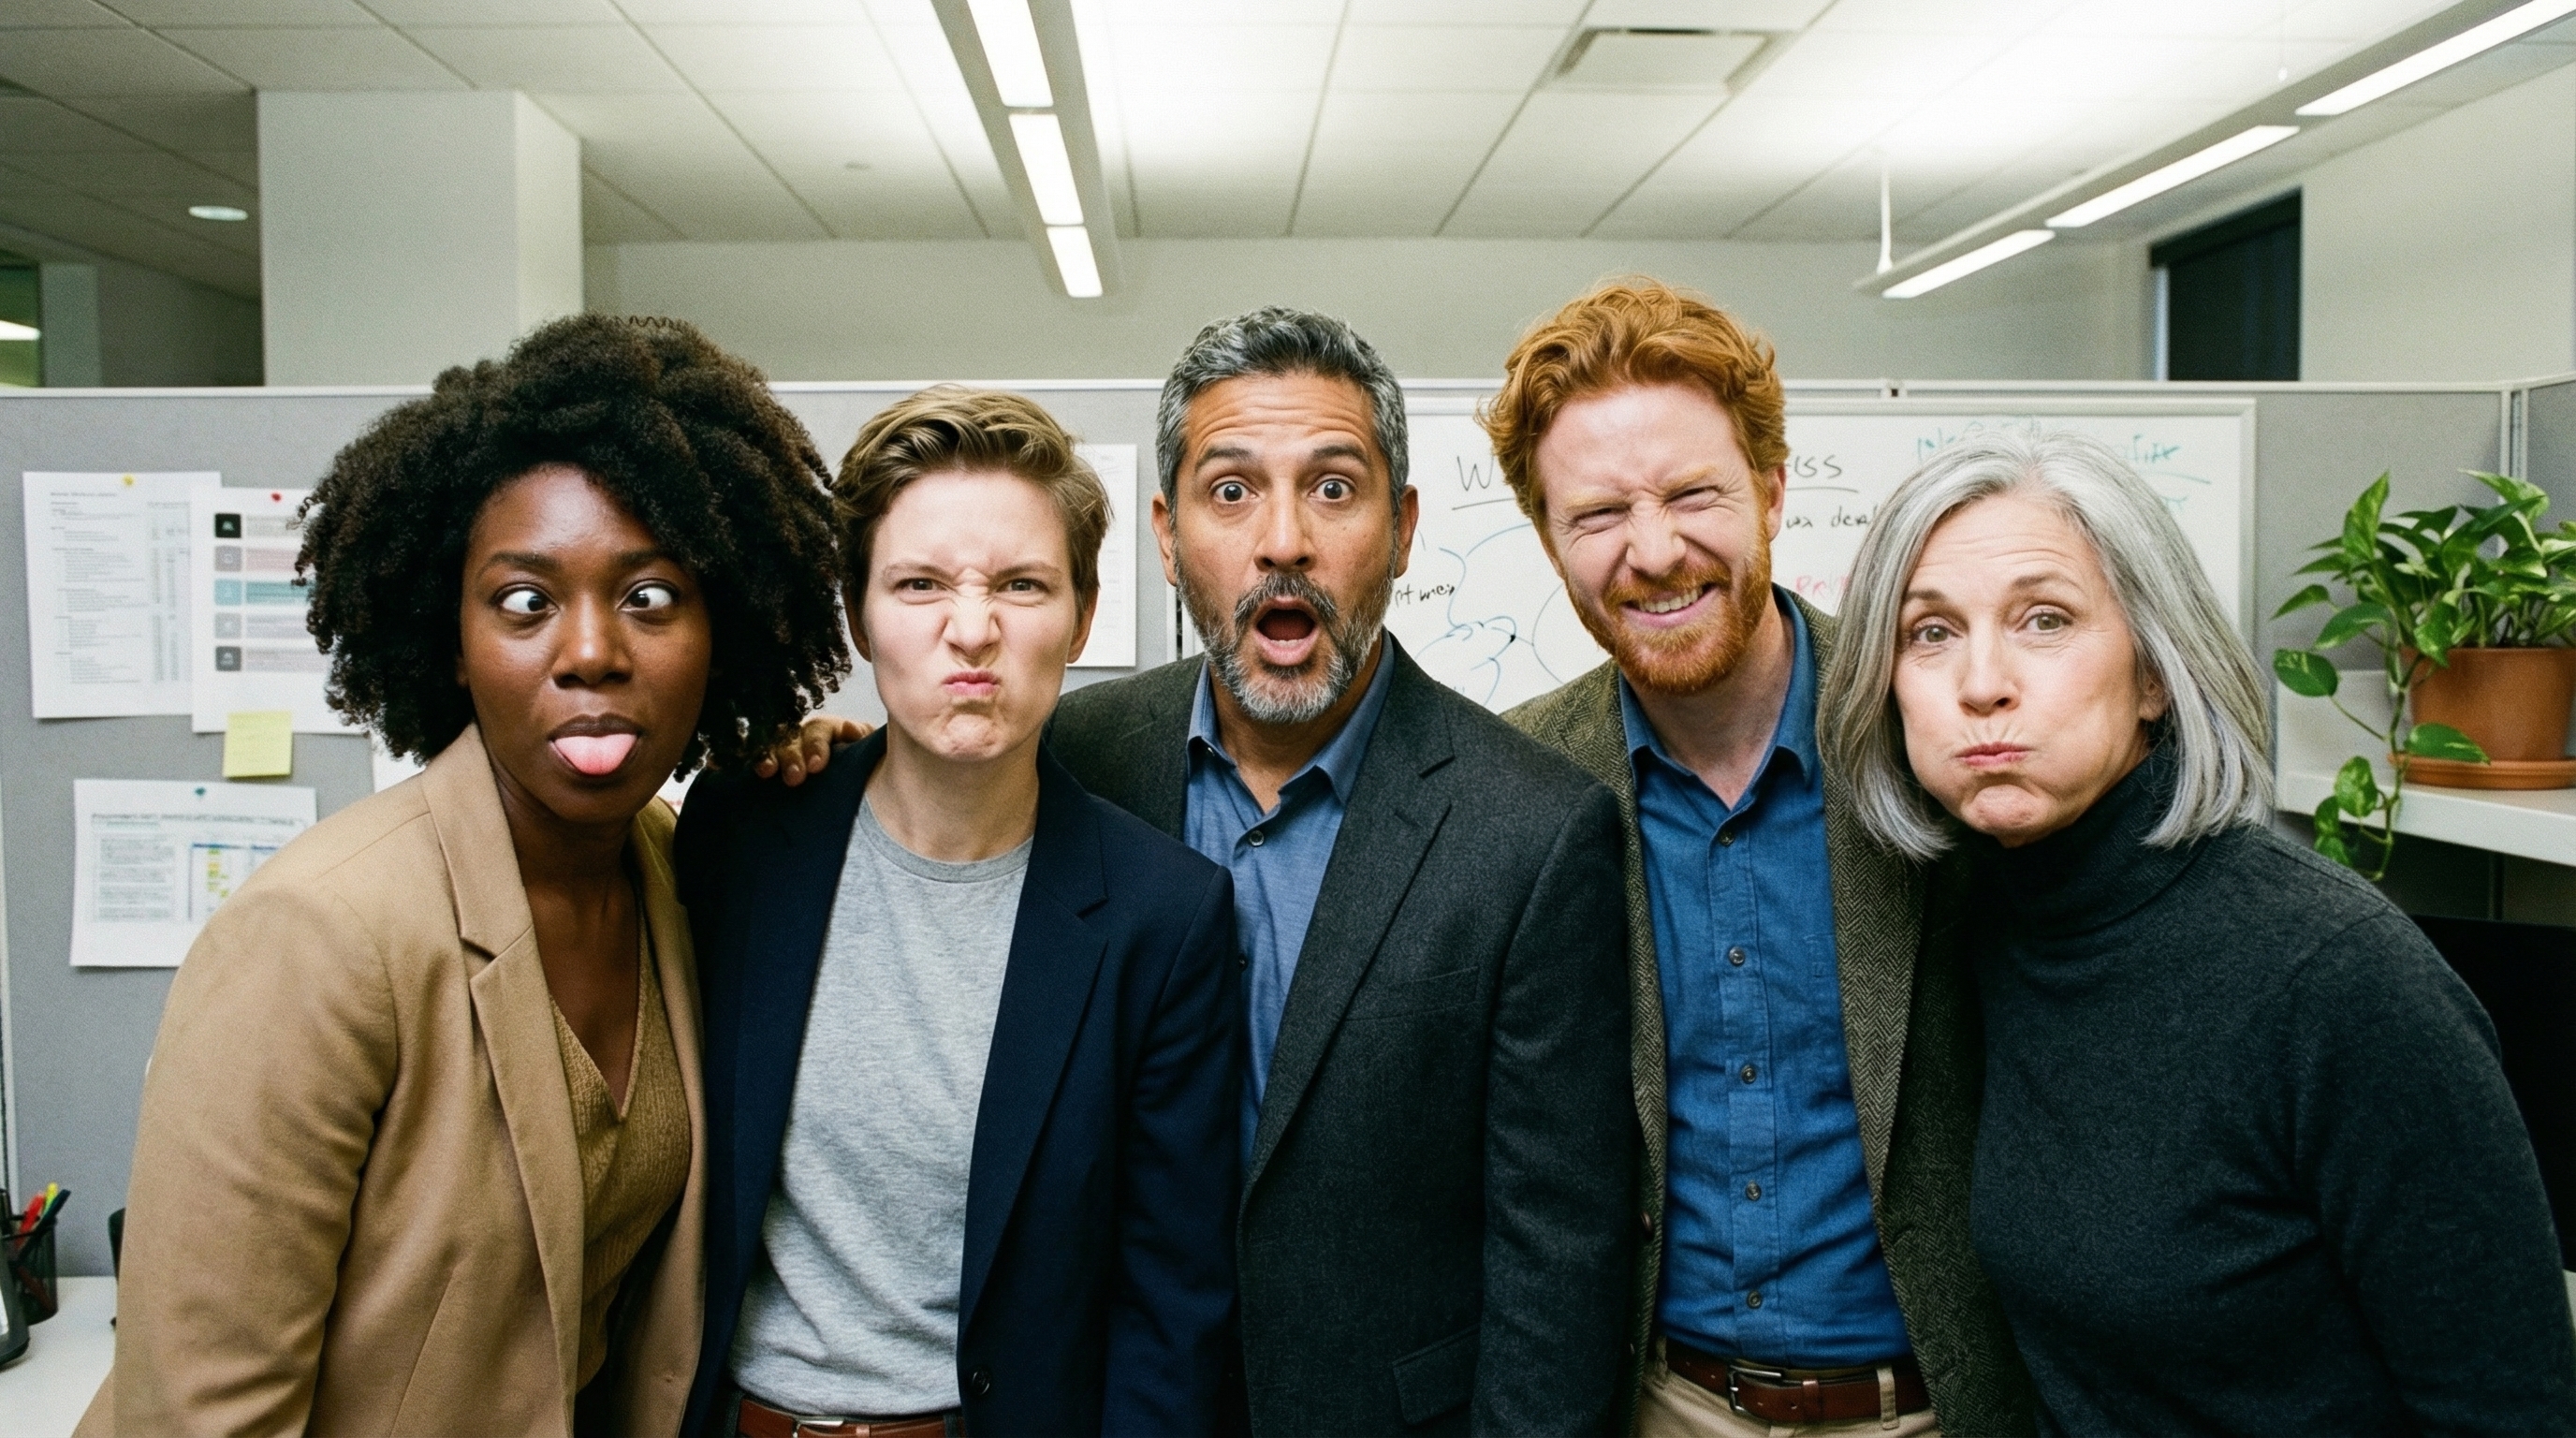
prompt = "An office group photo of these people, they are making funny faces."
aspect_ratio = "5:4" # "1:1","1:4","1:8","2:3","3:2","3:4","4:1","4:3","4:5","5:4","8:1","9:16","16:9","21:9"
resolution = "2K" # "512", "1K", "2K", "4K"
client = genai.Client()
response = client.models.generate_content(
model="gemini-3.1-flash-image",
contents=[
prompt,
Image.open('person1.png'),
Image.open('person2.png'),
Image.open('person3.png'),
Image.open('person4.png'),
Image.open('person5.png'),
],
config=types.GenerateContentConfig(
response_modalities=['TEXT', 'IMAGE'],
response_format={"image": {aspect_ratio: aspect_ratio, image_size: resolution}},
)
)
for part in response.parts:
if part.text is not None:
print(part.text)
elif image:= part.as_image():
image.save("office.png")
JavaScript
import { GoogleGenAI } from "@google/genai";
import * as fs from "node:fs";

async function main() {

  const ai = new GoogleGenAI({});

  const prompt =
      'An office group photo of these people, they are making funny faces.';
  const aspectRatio = '5:4';
  const resolution = '2K';

const contents = [
  { text: prompt },
  {
    inlineData: {
      mimeType: "image/jpeg",
      data: base64ImageFile1,
    },
  },
  {
    inlineData: {
      mimeType: "image/jpeg",
      data: base64ImageFile2,
    },
  },
  {
    inlineData: {
      mimeType: "image/jpeg",
      data: base64ImageFile3,
    },
  },
  {
    inlineData: {
      mimeType: "image/jpeg",
      data: base64ImageFile4,
    },
  },
  {
    inlineData: {
      mimeType: "image/jpeg",
      data: base64ImageFile5,
    },
  }
];

const response = await ai.models.generateContent({
    model: 'gemini-3.1-flash-image',
    contents: contents,
    config: {
      responseModalities: ['TEXT', 'IMAGE'],
      responseFormat: {
    image: {
        aspectRatio: aspectRatio,
        imageSize: resolution,
      }
  },
    },
  });

  for (const part of response.candidates[0].content.parts) {
    if (part.text) {
      console.log(part.text);
    } else if (part.inlineData) {
      const imageData = part.inlineData.data;
      const buffer = Buffer.from(imageData, "base64");
      fs.writeFileSync("image.png", buffer);
      console.log("Image saved as image.png");
    }
  }

}

main();
Go
package main

import (
    "context"
    "fmt"
    "log"
    "os"

    "google.golang.org/genai"
)

func main() {
    ctx := context.Background()
    client, err := genai.NewClient(ctx, nil)
    if err != nil {
        log.Fatal(err)
    }
    defer client.Close()

    model := client.GenerativeModel("gemini-3.1-flash-image")
    model.GenerationConfig = &pb.GenerationConfig{
        ResponseModalities: []pb.ResponseModality{genai.Text, genai.Image},
        ImageConfig: &pb.ImageConfig{
            AspectRatio: "5:4",
            ImageSize:   "2K",
        },
    }

    img1, err := os.ReadFile("person1.png")
    if err != nil { log.Fatal(err) }
    img2, err := os.ReadFile("person2.png")
    if err != nil { log.Fatal(err) }
    img3, err := os.ReadFile("person3.png")
    if err != nil { log.Fatal(err) }
    img4, err := os.ReadFile("person4.png")
    if err != nil { log.Fatal(err) }
    img5, err := os.ReadFile("person5.png")
    if err != nil { log.Fatal(err) }

    parts := []genai.Part{
        genai.Text("An office group photo of these people, they are making funny faces."),
        genai.ImageData{MIMEType: "image/png", Data: img1},
        genai.ImageData{MIMEType: "image/png", Data: img2},
        genai.ImageData{MIMEType: "image/png", Data: img3},
        genai.ImageData{MIMEType: "image/png", Data: img4},
        genai.ImageData{MIMEType: "image/png", Data: img5},
    }

    resp, err := model.GenerateContent(ctx, parts...)
    if err != nil {
        log.Fatal(err)
    }

    for _, part := range resp.Candidates[0].Content.Parts {
        if txt, ok := part.(genai.Text); ok {
            fmt.Printf("%s", string(txt))
        } else if img, ok := part.(genai.ImageData); ok {
            err := os.WriteFile("office.png", img.Data, 0644)
            if err != nil {
                log.Fatal(err)
            }
        }
    }
}
Java
import com.google.genai.Client;
import com.google.genai.types.Content;
import com.google.genai.types.GenerateContentConfig;
import com.google.genai.types.GenerateContentResponse;
import com.google.genai.types.ImageConfig;
import com.google.genai.types.Part;

import java.io.IOException;
import java.nio.file.Files;
import java.nio.file.Path;
import java.nio.file.Paths;

public class GroupPhoto {
  public static void main(String[] args) throws IOException {

    try (Client client = new Client()) {
      GenerateContentConfig config = GenerateContentConfig.builder()
          .responseModalities("TEXT", "IMAGE")
          .imageConfig(ImageConfig.builder()
              .aspectRatio("5:4")
              .imageSize("2K")
              .build())
          .build();

      GenerateContentResponse response = client.models.generateContent(
          "gemini-3.1-flash-image",
          Content.fromParts(
              Part.fromText("An office group photo of these people, they are making funny faces."),
              Part.fromBytes(Files.readAllBytes(Path.of("person1.png")), "image/png"),
              Part.fromBytes(Files.readAllBytes(Path.of("person2.png")), "image/png"),
              Part.fromBytes(Files.readAllBytes(Path.of("person3.png")), "image/png"),
              Part.fromBytes(Files.readAllBytes(Path.of("person4.png")), "image/png"),
              Part.fromBytes(Files.readAllBytes(Path.of("person5.png")), "image/png")
          ), config);

      for (Part part : response.parts()) {
        if (part.text().isPresent()) {
          System.out.println(part.text().get());
        } else if (part.inlineData().isPresent()) {
          var blob = part.inlineData().get();
          if (blob.data().isPresent()) {
            Files.write(Paths.get("office.png"), blob.data().get());
          }
        }
      }
    }
  }
}
C#
using Google.GenAI;
using System;
using System.Collections.Generic;
using System.IO;
using System.Threading.Tasks;

public class GroupPhoto {
  public static async Task Main(string[] args) {
    var client = new Client();

    var response = await client.Models.GenerateContentAsync(
        model: "gemini-3.1-flash-image",
        contents: new List<Part>
        {
            new Part { Text = "An office group photo of these people, they are making funny faces." },
            new Part { FileData = new FileData { FileUri = "file:///person1.png" } },
            new Part { FileData = new FileData { FileUri = "file:///person2.png" } },
            new Part { FileData = new FileData { FileUri = "file:///person3.png" } },
            new Part { FileData = new FileData { FileUri = "file:///person4.png" } },
            new Part { FileData = new FileData { FileUri = "file:///person5.png" } }
        },
        config: new GenerateContentConfig
        {
            ResponseModalities = new List<string> { "TEXT", "IMAGE" },
            ImageConfig = new ImageConfig
            {
                AspectRatio = "5:4",
                ImageSize = "2K"
            }
        }
    );

    foreach (var candidate in response.Candidates) {
        foreach (var part in candidate.Content.Parts) {
            if (part.Text != null) {
                Console.WriteLine(part.Text);
            } else if (part.InlineData != null) {
                var imageBytes = Convert.FromBase64String(part.InlineData.Data);
                await File.WriteAllBytesAsync("office.png", imageBytes);
                Console.WriteLine("Image saved as office.png");
            }
        }
    }
  }
}
REST
curl -s -X POST \
  "https://generativelanguage.googleapis.com/v1/models/gemini-3.1-flash-image:generateContent" \
    -H "x-goog-api-key: $GEMINI_API_KEY" \
    -H 'Content-Type: application/json' \
    -d "{
      \"contents\": [{
        \"parts\":[
            {\"text\": \"An office group photo of these people, they are making funny faces.\"},
            {\"inline_data\": {\"mime_type\":\"image/png\", \"data\": \"<BASE64_DATA_IMG_1>\"}},
            {\"inline_data\": {\"mime_type\":\"image/png\", \"data\": \"<BASE64_DATA_IMG_2>\"}},
            {\"inline_data\": {\"mime_type\":\"image/png\", \"data\": \"<BASE64_DATA_IMG_3>\"}},
            {\"inline_data\": {\"mime_type\":\"image/png\", \"data\": \"<BASE64_DATA_IMG_4>\"}},
            {\"inline_data\": {\"mime_type\":\"image/png\", \"data\": \"<BASE64_DATA_IMG_5>\"}}
        ]
      }],
      \"generationConfig\": {
        \"responseModalities\": [\"TEXT\", \"IMAGE\"],
        \"responseFormat\": {
        \"image\": {
          \"aspectRatio\": \"5:4\",
          \"imageSize\": \"2K\"
        }
      }
      }
    }"
依托 Google 搜索进行接地
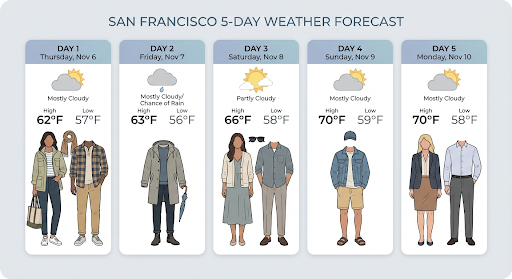
使用 Google 搜索工具根据实时信息(例如天气预报、股票图表或近期活动)生成图片。
请注意,将“依托 Google 搜索进行接地”与图片生成功能搭配使用时,基于图片的搜索结果不会传递给生成模型,并且会从回答中排除(请参阅依托 Google 搜索进行图片接地)
Python
from google import genai
prompt = "Visualize the current weather forecast for the next 5 days in San Francisco as a clean, modern weather chart. Add a visual on what I should wear each day"
aspect_ratio = "16:9" # "1:1","1:4","1:8","2:3","3:2","3:4","4:1","4:3","4:5","5:4","8:1","9:16","16:9","21:9"

client = genai.Client()

response = client.models.generate_content(
    model="gemini-3.1-flash-image",
    contents=prompt,
    config=types.GenerateContentConfig(
        response_modalities=['Text', 'Image'],
        response_format={"image": {aspect_ratio: aspect_ratio,}},
        tools=[{"google_search": {}}]
    )
)

for part in response.parts:
    if part.text is not None:
        print(part.text)
    elif image:= part.as_image():
        image.save("weather.png")
JavaScript
import { GoogleGenAI } from "@google/genai";
import * as fs from "node:fs";

async function main() {

  const ai = new GoogleGenAI({});

  const prompt = 'Visualize the current weather forecast for the next 5 days in San Francisco as a clean, modern weather chart. Add a visual on what I should wear each day';
  const aspectRatio = '16:9';
  const resolution = '2K';

const response = await ai.models.generateContent({
    model: 'gemini-3.1-flash-image',
    contents: prompt,
    config: {
      responseModalities: ['TEXT', 'IMAGE'],
      responseFormat: {
    image: {
        aspectRatio: aspectRatio,
        imageSize: resolution,
      }
  },
    tools: [{ googleSearch: {} }]
    },
  });

  for (const part of response.candidates[0].content.parts) {
    if (part.text) {
      console.log(part.text);
    } else if (part.inlineData) {
      const imageData = part.inlineData.data;
      const buffer = Buffer.from(imageData, "base64");
      fs.writeFileSync("image.png", buffer);
      console.log("Image saved as image.png");
    }
  }

}

main();
Java
import com.google.genai.Client;
import com.google.genai.types.GenerateContentConfig;
import com.google.genai.types.GenerateContentResponse;
import com.google.genai.types.GoogleSearch;
import com.google.genai.types.ImageConfig;
import com.google.genai.types.Part;
import com.google.genai.types.Tool;

import java.io.IOException;
import java.nio.file.Files;
import java.nio.file.Paths;

public class SearchGrounding {
  public static void main(String[] args) throws IOException {

    try (Client client = new Client()) {
      GenerateContentConfig config = GenerateContentConfig.builder()
          .responseModalities("TEXT", "IMAGE")
          .imageConfig(ImageConfig.builder()
              .aspectRatio("16:9")
              .build())
          .tools(Tool.builder()
              .googleSearch(GoogleSearch.builder().build())
              .build())
          .build();

      GenerateContentResponse response = client.models.generateContent(
          "gemini-3.1-flash-image", """
              Visualize the current weather forecast for the next 5 days
              in San Francisco as a clean, modern weather chart.
              Add a visual on what I should wear each day
              """,
          config);

      for (Part part : response.parts()) {
        if (part.text().isPresent()) {
          System.out.println(part.text().get());
        } else if (part.inlineData().isPresent()) {
          var blob = part.inlineData().get();
          if (blob.data().isPresent()) {
            Files.write(Paths.get("weather.png"), blob.data().get());
          }
        }
      }
    }
  }
}
C#
using Google.GenAI;
using System;
using System.Collections.Generic;
using System.IO;
using System.Threading.Tasks;

public class SearchGrounding {
  public static async Task Main(string[] args) {
    var client = new Client();

    var response = await client.Models.GenerateContentAsync(
        model: "gemini-3.1-flash-image",
        contents: new List<Part>
        {
            new Part { Text = "Visualize the current weather forecast for the next 5 days in San Francisco as a clean, modern weather chart. Add a visual on what I should wear each day" }
        },
        config: new GenerateContentConfig
        {
            ResponseModalities = new List<string> { "TEXT", "IMAGE" },
            ImageConfig = new ImageConfig
            {
                AspectRatio = "16:9"
            },
            Tools = new List<Tool> { new Tool { GoogleSearch = new GoogleSearch() } }
        }
    );

    foreach (var candidate in response.Candidates) {
        foreach (var part in candidate.Content.Parts) {
            if (part.Text != null) {
                Console.WriteLine(part.Text);
            } else if (part.InlineData != null) {
                var imageBytes = Convert.FromBase64String(part.InlineData.Data);
                await File.WriteAllBytesAsync("weather.png", imageBytes);
                Console.WriteLine("Image saved as weather.png");
            }
        }
    }
  }
}
REST
curl -s -X POST \
  "https://generativelanguage.googleapis.com/v1/models/gemini-3.1-flash-image:generateContent" \
  -H "x-goog-api-key: $GEMINI_API_KEY" \
  -H "Content-Type: application/json" \
  -d '{
    "contents": [{"parts": [{"text": "Visualize the current weather forecast for the next 5 days in San Francisco as a clean, modern weather chart. Add a visual on what I should wear each day"}]}],
    "tools": [{"google_search": {}}],
    "generationConfig": {
      "responseModalities": ["TEXT", "IMAGE"],
      "responseFormat": {
    "image": {"aspectRatio": "16:9"}
  }
    }
  }'
响应包含 groundingMetadata,其中包含以下必需字段:
searchEntryPoint:包含用于呈现所需搜索建议的 HTML 和 CSS。groundingChunks:返回用于为生成的图片提供依据的前 3 个网络来源
依托 Google 图片搜索进行接地 (3.1 Flash)
依托 Google 搜索进行接地功能允许模型使用通过 Google 搜索检索到的网络图片作为图片生成的视觉上下文。图片搜索是“依托 Google 搜索进行接地”工具中的一种新搜索类型,可与标准网页搜索配合使用。
如需启用图片搜索,请在 API 请求中配置 googleSearch 工具,并在 searchTypes 对象中指定 imageSearch。图片搜索可以单独使用,也可以与网页搜索一起使用。
请注意,依托 Google 搜索进行接地以搜索图片的功能无法用于搜索人物。
Python
from google import genai
prompt = "A detailed painting of a Timareta butterfly resting on a flower"

client = genai.Client()

response = client.models.generate_content(
    model="gemini-3.1-flash-image",
    contents=prompt,
    config=types.GenerateContentConfig(
        response_modalities=["IMAGE"],
        tools=[
            types.Tool(google_search=types.GoogleSearch(
                search_types=types.SearchTypes(
                    web_search=types.WebSearch(),
                    image_search=types.ImageSearch()
                )
            ))
        ]
    )
)

# Display grounding sources if available
if response.candidates and response.candidates[0].grounding_metadata and response.candidates[0].grounding_metadata.search_entry_point:
    display(HTML(response.candidates[0].grounding_metadata.search_entry_point.rendered_content))
JavaScript
import { GoogleGenAI } from "@google/genai";

async function main() {

  const ai = new GoogleGenAI({});

  const prompt = "A detailed painting of a Timareta butterfly resting on a flower";

  const response = await ai.models.generateContent({
    model: "gemini-3.1-flash-image",
    contents: prompt,
    config: {
      responseModalities: ["IMAGE"],
      tools: [
        {
          googleSearch: {
            searchTypes: {
              webSearch: {},
              imageSearch: {}
            }
          }
        }
      ]
    }
  });

  // Display grounding sources if available
  if (response.candidates && response.candidates[0].groundingMetadata && response.candidates[0].groundingMetadata.searchEntryPoint) {
      console.log(response.candidates[0].groundingMetadata.searchEntryPoint.renderedContent);
  }
}

main();
Go
package main

import (
  "context"
  "fmt"
  "log"

  "google.golang.org/genai"
  pb "google.golang.org/genai/schema"
)

func main() {
  ctx := context.Background()
  client, err := genai.NewClient(ctx, nil)
  if err != nil {
    log.Fatal(err)
  }
  defer client.Close()

  model := client.GenerativeModel("gemini-3.1-flash-image")
  model.Tools = []*pb.Tool{
    {
      GoogleSearch: &pb.GoogleSearch{
        SearchTypes: &pb.SearchTypes{
          WebSearch:   &pb.WebSearch{},
          ImageSearch: &pb.ImageSearch{},
        },
      },
    },
  }
  model.GenerationConfig = &pb.GenerationConfig{
    ResponseModalities: []pb.ResponseModality{genai.Image},
  }

  prompt := "A detailed painting of a Timareta butterfly resting on a flower"
  resp, err := model.GenerateContent(ctx, genai.Text(prompt))
  if err != nil {
    log.Fatal(err)
  }

  if resp.Candidates[0].GroundingMetadata != nil && resp.Candidates[0].GroundingMetadata.SearchEntryPoint != nil {
    fmt.Println(resp.Candidates[0].GroundingMetadata.SearchEntryPoint.RenderedContent)
  }
}
Java
import com.google.genai.Client;
import com.google.genai.types.GenerateContentConfig;
import com.google.genai.types.GenerateContentResponse;
import com.google.genai.types.GoogleSearch;
import com.google.genai.types.ImageSearch;
import com.google.genai.types.SearchTypes;
import com.google.genai.types.Tool;
import com.google.genai.types.WebSearch;

import java.io.IOException;

public class ImageSearchGrounding {
  public static void main(String[] args) throws IOException {

    try (Client client = new Client()) {
      GenerateContentConfig config = GenerateContentConfig.builder()
          .responseModalities("IMAGE")
          .tools(Tool.builder()
              .googleSearch(GoogleSearch.builder()
                  .searchTypes(SearchTypes.builder()
                      .webSearch(WebSearch.builder().build())
                      .imageSearch(ImageSearch.builder().build())
                      .build())
                  .build())
              .build())
          .build();

      GenerateContentResponse response = client.models.generateContent(
          "gemini-3.1-flash-image",
          "A detailed painting of a Timareta butterfly resting on a flower",
          config);

      if (response.candidates().isPresent() && !response.candidates().get().isEmpty()) {
        var candidate = response.candidates().get().get(0);
        if (candidate.groundingMetadata().isPresent() && candidate.groundingMetadata().get().searchEntryPoint().isPresent()) {
          System.out.println(candidate.groundingMetadata().get().searchEntryPoint().get().renderedContent().orElse(""));
        }
      }
    }
  }
}
C#
using Google.GenAI;
using System;
using System.Collections.Generic;
using System.Threading.Tasks;

public class ImageSearchGrounding {
  public static async Task Main(string[] args) {
    var client = new Client();

    var response = await client.Models.GenerateContentAsync(
        model: "gemini-3.1-flash-image",
        contents: new List<Part>
        {
            new Part { Text = "A detailed painting of a Timareta butterfly resting on a flower" }
        },
        config: new GenerateContentConfig
        {
            ResponseModalities = new List<string> { "IMAGE" },
            Tools = new List<Tool>
            {
                new Tool
                {
                    GoogleSearch = new GoogleSearch
                    {
                        SearchTypes = new SearchTypes
                        {
                            WebSearch = new WebSearch(),
                            ImageSearch = new ImageSearch()
                        }
                    }
                }
            }
        }
    );

    foreach (var candidate in response.Candidates) {
        if (candidate.GroundingMetadata != null && candidate.GroundingMetadata.SearchEntryPoint != null) {
            Console.WriteLine(candidate.GroundingMetadata.SearchEntryPoint.RenderedContent);
        }
    }
  }
}
REST
curl -s -X POST \
  "https://generativelanguage.googleapis.com/v1/models/gemini-3.1-flash-image:generateContent" \
  -H "x-goog-api-key: $GEMINI_API_KEY" \
  -H "Content-Type: application/json" \
  -d '{
    "contents": [{"parts": [{"text": "A detailed painting of a Timareta butterfly resting on a flower"}]}],
    "tools": [{"google_search": {"searchTypes": {"webSearch": {}, "imageSearch": {}}}}],
    "generationConfig": {
      "responseModalities": ["IMAGE"]
    }
  }'
展示要求
在“依托 Google 搜索进行接地”中使用图片搜索时,您必须遵守以下条件:
- 来源信息提供:您必须以用户能够识别为链接的方式,提供指向包含来源图片的网页(“包含网页”,而非图片文件本身)的链接。
- 直接导航:如果您还选择显示来源图片,则必须提供从来源图片到其所在来源网页的直接单点点击路径。任何其他延迟或抽象化最终用户对源网页的访问的实现方式(包括但不限于任何多点击路径或使用中间图片查看器)均不允许。
答案
对于使用图片搜索的有依据的回答,该 API 会提供清晰的提供方信息和元数据,以将其输出内容与经过验证的来源相关联。groundingMetadata 对象中的关键字段包括:
imageSearchQueries:模型用于视觉上下文(图片搜索)的具体查询。groundingChunks:包含检索到的结果的来源信息。 对于图片来源,这些内容将使用新的图片块类型作为重定向网址返回。此块包含:uri:用于提供提供方信息的网页网址(着陆页)。image_uri:直接图片网址。
groundingSupports:提供具体映射,将生成的内容与块中的相关引用来源相关联。searchEntryPoint:包含“Google 搜索”芯片,其中包含符合要求的 HTML 和 CSS,用于呈现搜索建议。
视频转图片生成 (3.1 Flash)
借助视频到图片生成功能,您可以将视频的上下文作为多模态参考,生成新图片。这对于创建高质量的视频缩略图、电影海报、摘要信息图表或受视频场景启发的新作品非常有用。
在生成过程中,模型会分析上下文中的视频帧(最多可分析 131,072 个 token,这是模型的输入 token 限制),以提取视觉主题和关键事件,然后将这些信息与您的文本提示一起用于合成输出图片。
您可以在 API 请求中直接传递公开的 YouTube 网址,也可以使用 Files API 上传本地视频文件。
Python
from google import genai
from google.genai import types

client = genai.Client()

# Pass a public YouTube video URL as part of the contents
response = client.models.generate_content(
    model="gemini-3.1-flash-image",
    contents=[
        types.Part(
          file_data=types.FileData(file_uri="https://www.youtube.com/watch?v=UTdfxFyOQTI"),
          video_metadata=types.VideoMetadata(fps=0.5)
        ),
        "Can you create an infographics that explains what this video is about?"
    ]
)

# Save the generated image part
for part in response.parts:
    if part.inline_data is not None:
        image = part.as_image()
        image.save("video_poster.png")
        print("Image saved as video_poster.png")
JavaScript
import { GoogleGenAI } from "@google/genai";
import * as fs from "node:fs";

async function main() {
  const ai = new GoogleGenAI({});

  const response = await ai.models.generateContent({
    model: "gemini-3.1-flash-image",
    contents: [
      {
        fileData: {
          fileUri: "https://www.youtube.com/watch?v=UTdfxFyOQTI",
        },
        videoMetadata: {
          fps: 0.5
        }
      },
      { text: "Can you create an infographics that explains what this video is about?" }
    ]
  });

  for (const part of response.candidates[0].content.parts) {
    if (part.inlineData) {
      const imageData = part.inlineData.data;
      const buffer = Buffer.from(imageData, "base64");
      fs.writeFileSync("video_poster.png", buffer);
      console.log("Image saved as video_poster.png");
    }
  }
}

main();
Go
package main

import (
    "context"
    "log"
    "os"
    "google.golang.org/genai"
)

func main() {
    ctx := context.Background()
    client, err := genai.NewClient(ctx, nil)
    if err != nil {
        log.Fatal(err)
    }

    videoPart := genai.NewPartFromURI("https://www.youtube.com/watch?v=UTdfxFyOQTI", "video/mp4")
    videoPart.VideoMetadata = &genai.VideoMetadata{FPS: genai.Ptr(0.5)}

    parts := []*genai.Part{
        videoPart,
        genai.NewPartFromText("Can you create an infographics that explains what this video is about?"),
    }

    contents := []*genai.Content{
        genai.NewContentFromParts(parts, genai.RoleUser),
    }

    result, err := client.Models.GenerateContent(
        ctx,
        "gemini-3.1-flash-image",
        contents,
        nil,
    )
    if err != nil {
        log.Fatal(err)
    }

    for _, part := range result.Candidates[0].Content.Parts {
        if part.InlineData != nil {
            imageBytes := part.InlineData.Data
            _ = os.WriteFile("video_poster.png", imageBytes, 0644)
            log.Println("Image saved as video_poster.png")
        }
    }
}
Java
import com.google.genai.Client;
import com.google.genai.types.Content;
import com.google.genai.types.FileData;
import com.google.genai.types.GenerateContentResponse;
import com.google.genai.types.Part;
import com.google.genai.types.VideoMetadata;
import com.google.common.collect.ImmutableList;

import java.io.IOException;
import java.nio.file.Files;
import java.nio.file.Paths;

public class VideoToImage {
  public static void main(String[] args) throws IOException {

    try (Client client = new Client()) {
      Part videoPart = Part.builder()
          .fileData(FileData.builder()
              .fileUri("https://www.youtube.com/watch?v=UTdfxFyOQTI")
              .build())
          .videoMetadata(VideoMetadata.builder()
              .fps(0.5)
              .build())
          .build();

      Part textPart = Part.builder()
          .text("Can you create an infographics that explains what this video is about?")
          .build();

      GenerateContentResponse response = client.models.generateContent(
          "gemini-3.1-flash-image",
          Content.builder()
              .role("user")
              .parts(ImmutableList.of(videoPart, textPart))
              .build());

      for (Part part : response.parts()) {
        if (part.inlineData().isPresent()) {
          var blob = part.inlineData().get();
          if (blob.data().isPresent()) {
            Files.write(Paths.get("video_poster.png"), blob.data().get());
            System.out.println("Image saved as video_poster.png");
          }
        }
      }
    }
  }
}
C#
using Google.GenAI;
using Google.GenAI.Types;
using System;
using System.Collections.Generic;
using System.IO;
using System.Threading.Tasks;

public class VideoToImage {
  public static async Task Main(string[] args) {
    var client = new Client();

    var response = await client.Models.GenerateContentAsync(
        model: "gemini-3.1-flash-image",
        contents: new List<Part>
        {
            new Part
            {
                FileData = new FileData { FileUri = "https://www.youtube.com/watch?v=UTdfxFyOQTI" },
                VideoMetadata = new VideoMetadata { Fps = 0.5 }
            },
            new Part { Text = "Can you create an infographics that explains what this video is about?" }
        }
    );

    foreach (var candidate in response.Candidates) {
        foreach (var part in candidate.Content.Parts) {
            if (part.InlineData != null) {
                var imageBytes = Convert.FromBase64String(part.InlineData.Data);
                await File.WriteAllBytesAsync("video_poster.png", imageBytes);
                Console.WriteLine("Image saved as video_poster.png");
            }
        }
    }
  }
}
REST
curl -s -X POST \
  "https://generativelanguage.googleapis.com/v1/models/gemini-3.1-flash-image:generateContent" \
  -H "x-goog-api-key: $GEMINI_API_KEY" \
  -H "Content-Type: application/json" \
  -d '{
    "contents": [{
      "parts": [
        {
          "file_data": {
            "file_uri": "https://www.youtube.com/watch?v=UTdfxFyOQTI"
          },
          "video_metadata": {
            "fps": 0.5
          }
        },
        {"text": "Can you create an infographics that explains what this video is about?"}
      ]
    }]
  }'
生成分辨率最高为 4K 的图片
Gemini 3 图片模型默认生成 1K 图片,但也可以输出 2K、4K 和 512 (0.5K)(仅限 Gemini 3.1 Flash Image)图片。如需生成更高分辨率的素材资源,请在 generation_config 中指定 image_size。
您必须使用大写“K”(例如 1K、2K、4K)。512 值未使用“K”后缀。系统会拒绝小写参数(例如 1k)。
Python
from google import genai
from google.genai import types

prompt = "Da Vinci style anatomical sketch of a dissected Monarch butterfly. Detailed drawings of the head, wings, and legs on textured parchment with notes in English."
aspect_ratio = "1:1" # "1:1","1:4","1:8","2:3","3:2","3:4","4:1","4:3","4:5","5:4","8:1","9:16","16:9","21:9"
resolution = "1K" # "512", "1K", "2K", "4K"

client = genai.Client()

response = client.models.generate_content(
    model="gemini-3.1-flash-image",
    contents=prompt,
    config=types.GenerateContentConfig(
        response_modalities=['TEXT', 'IMAGE'],
        response_format={"image": {aspect_ratio: aspect_ratio,                 image_size: resolution}},
    )
)

for part in response.parts:
    if part.text is not None:
        print(part.text)
    elif image:= part.as_image():
        image.save("butterfly.png")
JavaScript
import { GoogleGenAI } from "@google/genai";
import * as fs from "node:fs";

async function main() {

  const ai = new GoogleGenAI({});

  const prompt =
      'Da Vinci style anatomical sketch of a dissected Monarch butterfly. Detailed drawings of the head, wings, and legs on textured parchment with notes in English.';
  const aspectRatio = '1:1';
  const resolution = '1K';

  const response = await ai.models.generateContent({
    model: 'gemini-3.1-flash-image',
    contents: prompt,
    config: {
      responseModalities: ['TEXT', 'IMAGE'],
      responseFormat: {
    image: {
        aspectRatio: aspectRatio,
        imageSize: resolution,
      }
  },
    },
  });

  for (const part of response.candidates[0].content.parts) {
    if (part.text) {
      console.log(part.text);
    } else if (part.inlineData) {
      const imageData = part.inlineData.data;
      const buffer = Buffer.from(imageData, "base64");
      fs.writeFileSync("image.png", buffer);
      console.log("Image saved as image.png");
    }
  }

}

main();
Go
package main

import (
    "context"
    "fmt"
    "log"
    "os"

    "google.golang.org/genai"
)

func main() {
    ctx := context.Background()
    client, err := genai.NewClient(ctx, nil)
    if err != nil {
        log.Fatal(err)
    }
    defer client.Close()

    model := client.GenerativeModel("gemini-3.1-flash-image")
    model.GenerationConfig = &pb.GenerationConfig{
        ResponseModalities: []pb.ResponseModality{genai.Text, genai.Image},
        ImageConfig: &pb.ImageConfig{
            AspectRatio: "1:1",
            ImageSize:   "1K",
        },
    }

    prompt := "Da Vinci style anatomical sketch of a dissected Monarch butterfly. Detailed drawings of the head, wings, and legs on textured parchment with notes in English."
    resp, err := model.GenerateContent(ctx, genai.Text(prompt))
    if err != nil {
        log.Fatal(err)
    }

    for _, part := range resp.Candidates[0].Content.Parts {
        if txt, ok := part.(genai.Text); ok {
            fmt.Printf("%s", string(txt))
        } else if img, ok := part.(genai.ImageData); ok {
            err := os.WriteFile("butterfly.png", img.Data, 0644)
            if err != nil {
                log.Fatal(err)
            }
        }
    }
}
Java
import com.google.genai.Client;
import com.google.genai.types.GenerateContentConfig;
import com.google.genai.types.GenerateContentResponse;
import com.google.genai.types.GoogleSearch;
import com.google.genai.types.ImageConfig;
import com.google.genai.types.Part;
import com.google.genai.types.Tool;

import java.io.IOException;
import java.nio.file.Files;
import java.nio.file.Paths;

public class HiRes {
    public static void main(String[] args) throws IOException {

      try (Client client = new Client()) {
        GenerateContentConfig config = GenerateContentConfig.builder()
            .responseModalities("TEXT", "IMAGE")
            .imageConfig(ImageConfig.builder()
                .aspectRatio("16:9")
                .imageSize("4K")
                .build())
            .build();

        GenerateContentResponse response = client.models.generateContent(
            "gemini-3.1-flash-image", """
              Da Vinci style anatomical sketch of a dissected Monarch butterfly.
              Detailed drawings of the head, wings, and legs on textured
              parchment with notes in English.
              """,
            config);

        for (Part part : response.parts()) {
          if (part.text().isPresent()) {
            System.out.println(part.text().get());
          } else if (part.inlineData().isPresent()) {
            var blob = part.inlineData().get();
            if (blob.data().isPresent()) {
              Files.write(Paths.get("butterfly.png"), blob.data().get());
            }
          }
        }
      }
    }
}
C#
using Google.GenAI;
using System;
using System.Collections.Generic;
using System.IO;
using System.Threading.Tasks;

public class HiRes {
  public static async Task Main(string[] args) {
    var client = new Client();

    var response = await client.Models.GenerateContentAsync(
        model: "gemini-3.1-flash-image",
        contents: new List<Part>
        {
            new Part { Text = "Da Vinci style anatomical sketch of a dissected Monarch butterfly. Detailed drawings of the head, wings, and legs on textured parchment with notes in English." }
        },
        config: new GenerateContentConfig
        {
            ResponseModalities = new List<string> { "TEXT", "IMAGE" },
            ImageConfig = new ImageConfig
            {
                AspectRatio = "1:1",
                ImageSize = "1K"
            }
        }
    );

    foreach (var candidate in response.Candidates) {
        foreach (var part in candidate.Content.Parts) {
            if (part.Text != null) {
                Console.WriteLine(part.Text);
            } else if (part.InlineData != null) {
                var imageBytes = Convert.FromBase64String(part.InlineData.Data);
                await File.WriteAllBytesAsync("butterfly.png", imageBytes);
                Console.WriteLine("Image saved as butterfly.png");
            }
        }
    }
  }
}
REST
curl -s -X POST \
  "https://generativelanguage.googleapis.com/v1/models/gemini-3.1-flash-image:generateContent" \
  -H "x-goog-api-key: $GEMINI_API_KEY" \
  -H "Content-Type: application/json" \
  -d '{
    "contents": [{"parts": [{"text": "Da Vinci style anatomical sketch of a dissected Monarch butterfly. Detailed drawings of the head, wings, and legs on textured parchment with notes in English."}]}],
    "tools": [{"google_search": {}}],
    "generationConfig": {
      "responseModalities": ["TEXT", "IMAGE"],
      "responseFormat": {
    "image": {"aspectRatio": "1:1", "imageSize": "1K"}
  }
    }
  }'
以下是根据此提示生成的示例图片:

思维过程
Gemini 3 图片模型是思考型模型,可针对复杂提示使用推理流程(“思考”)。此功能默认处于启用状态,并且无法在 API 中停用。如需详细了解思考过程,请参阅 Gemini 思考指南。
模型最多会生成两张临时图片,以测试构图和逻辑。“思考”中的最后一张图片也是最终渲染的图片。
您可以查看生成最终图片所依据的想法。
Python
for part in response.parts:
    if part.thought:
        if part.text:
            print(part.text)
        elif image:= part.as_image():
            image.show()
JavaScript
for (const part of response.candidates[0].content.parts) {
  if (part.thought) {
    if (part.text) {
      console.log(part.text);
    } else if (part.inlineData) {
      const imageData = part.inlineData.data;
      const buffer = Buffer.from(imageData, 'base64');
      fs.writeFileSync('image.png', buffer);
      console.log('Image saved as image.png');
    }
  }
}
Java
for (Part part : response.parts()) {
  if (part.thought().orElse(false)) {
    if (part.text().isPresent()) {
      System.out.println(part.text().get());
    } else if (part.inlineData().isPresent()) {
      var blob = part.inlineData().get();
      if (blob.data().isPresent()) {
        Files.write(Paths.get("image.png"), blob.data().get());
        System.out.println("Image saved as image.png");
      }
    }
  }
}
C#
foreach (var candidate in response.Candidates) {
    foreach (var part in candidate.Content.Parts) {
        if (part.Thought) {
            if (part.Text != null) {
                Console.WriteLine(part.Text);
            } else if (part.InlineData != null) {
                var imageBytes = Convert.FromBase64String(part.InlineData.Data);
                await File.WriteAllBytesAsync("image.png", imageBytes);
                Console.WriteLine("Image saved as image.png");
            }
        }
    }
}
控制思考等级
借助 Gemini 3.1 Flash Image,您可以控制模型使用的思考量,以平衡质量和延迟时间。默认 thinkingLevel 为 minimal,支持的级别为 minimal 和 high。将 thinkingLevel 设置为 minimal 可提供延迟时间最短的响应。请注意,最少思考并不意味着模型完全不思考。
您可以添加 includeThoughts 布尔值来确定模型生成的想法是否在回答中返回,还是保持隐藏状态。
Python
from google import genai

response = client.models.generate_content(
    model="gemini-3.1-flash-image",
    contents="A futuristic city built inside a giant glass bottle floating in space",
    config=types.GenerateContentConfig(
        response_modalities=["IMAGE"],
        thinking_config=types.ThinkingConfig(
            thinking_level="High",
            include_thoughts=True
        ),
    )
)

for part in response.parts:
    if part.thought: # Skip outputting thoughts
      continue
    if part.text:
      display(Markdown(part.text))
    elif image:= part.as_image():
      image.show()
JavaScript
import { GoogleGenAI } from "@google/genai";
import * as fs from "node:fs";

async function main() {

  const ai = new GoogleGenAI({});

  const response = await ai.models.generateContent({
    model: "gemini-3.1-flash-image",
    contents: "A futuristic city built inside a giant glass bottle floating in space",
    config: {
      responseModalities: ["IMAGE"],
      thinkingConfig: {
        thinkingLevel: "High",
        includeThoughts: true
      },
    },
  });

  for (const part of response.candidates[0].content.parts) {
    if (part.thought) { // Skip outputting thoughts
      continue;
    }
    if (part.text) {
      console.log(part.text);
    } else if (part.inlineData) {
      const imageData = part.inlineData.data;
      const buffer = Buffer.from(imageData, "base64");
      fs.writeFileSync("image.png", buffer);
      console.log("Image saved as image.png");
    }
  }
}
main();
Go
package main

import (
    "context"
    "fmt"
    "log"
    "os"

    "google.golang.org/genai"
    pb "google.golang.org/genai/schema"
)

func main() {
    ctx := context.Background()
    client, err := genai.NewClient(ctx, nil)
    if err != nil {
        log.Fatal(err)
    }
    defer client.Close()

    model := client.GenerativeModel("gemini-3.1-flash-image")
    model.GenerationConfig = &pb.GenerationConfig{
        ResponseModalities: []pb.ResponseModality{genai.Image},
        ThinkingConfig: &pb.ThinkingConfig{
            ThinkingLevel:   "High",
            IncludeThoughts: true,
        },
    }

    prompt := "A futuristic city built inside a giant glass bottle floating in space"
    resp, err := model.GenerateContent(ctx, genai.Text(prompt))
    if err != nil {
        log.Fatal(err)
    }

    for _, part := range resp.Candidates[0].Content.Parts {
        if part.Thought { // Skip outputting thoughts
            continue
        }
        if txt, ok := part.(genai.Text); ok {
            fmt.Printf("%s", string(txt))
        } else if img, ok := part.(genai.ImageData); ok {
            err := os.WriteFile("image.png", img.Data, 0644)
            if err != nil {
                log.Fatal(err)
            }
        }
    }
}
Java
import com.google.genai.Client;
import com.google.genai.types.GenerateContentConfig;
import com.google.genai.types.GenerateContentResponse;
import com.google.genai.types.Part;
import com.google.genai.types.ThinkingConfig;

import java.io.IOException;
import java.nio.file.Files;
import java.nio.file.Paths;

public class ThinkingLevels {
  public static void main(String[] args) throws IOException {

    try (Client client = new Client()) {
      GenerateContentConfig config = GenerateContentConfig.builder()
          .responseModalities("IMAGE")
          .thinkingConfig(ThinkingConfig.builder()
              .thinkingLevel("High")
              .includeThoughts(true)
              .build())
          .build();

      GenerateContentResponse response = client.models.generateContent(
          "gemini-3.1-flash-image",
          "A futuristic city built inside a giant glass bottle floating in space",
          config);

      for (Part part : response.parts()) {
        if (part.thought().orElse(false)) {
          // Skip outputting thoughts
          continue;
        }
        if (part.text().isPresent()) {
          System.out.println(part.text().get());
        } else if (part.inlineData().isPresent()) {
          var blob = part.inlineData().get();
          if (blob.data().isPresent()) {
            Files.write(Paths.get("image.png"), blob.data().get());
            System.out.println("Image saved as image.png");
          }
        }
      }
    }
  }
}
C#
using Google.GenAI;
using System;
using System.Collections.Generic;
using System.IO;
using System.Threading.Tasks;

public class ThinkingLevels {
  public static async Task Main(string[] args) {
    var client = new Client();

    var response = await client.Models.GenerateContentAsync(
        model: "gemini-3.1-flash-image",
        contents: new List<Part>
        {
            new Part { Text = "A futuristic city built inside a giant glass bottle floating in space" }
        },
        config: new GenerateContentConfig
        {
            ResponseModalities = new List<string> { "IMAGE" },
            ThinkingConfig = new ThinkingConfig
            {
                ThinkingLevel = "High",
                IncludeThoughts = true
            }
        }
    );

    foreach (var candidate in response.Candidates) {
        foreach (var part in candidate.Content.Parts) {
            if (part.Thought) {
                // Skip outputting thoughts
                continue;
            }
            if (part.Text != null) {
                Console.WriteLine(part.Text);
            } else if (part.InlineData != null) {
                var imageBytes = Convert.FromBase64String(part.InlineData.Data);
                await File.WriteAllBytesAsync("image.png", imageBytes);
                Console.WriteLine("Image saved as image.png");
            }
        }
    }
  }
}
REST
curl -s -X POST \
  "https://generativelanguage.googleapis.com/v1/models/gemini-3.1-flash-image:generateContent" \
  -H "x-goog-api-key: $GEMINI_API_KEY" \
  -H "Content-Type: application/json" \
  -d '{
    "contents": [{"parts": [{"text": "A futuristic city built inside a giant glass bottle floating in space"}]}],
    "generationConfig": {
      "responseModalities": ["IMAGE"],
      "thinkingConfig": {
        "thinkingLevel": "High",
        "includeThoughts": true
      }
    }
  }'
请注意,无论 includeThoughts 设置为 true 还是 false,系统都会对思考令牌收费,因为无论您是否查看思考过程,系统默认情况下始终会进行思考过程。
思考签名
思考签名是模型内部思考过程的加密表示形式,用于在多轮互动中保留推理上下文。所有响应都包含 thought_signature 字段。一般来说,如果您在模型响应中收到思考签名,则应在下一轮对话中发送对话历史记录时,完全按收到的原样将其传递回去。未能循环使用思想签名可能会导致响应失败。如需详细了解签名,请参阅思想签名文档。
思考签名的运作方式如下:
- 所有包含图片
mimetype的inline_data部分(属于响应的一部分)都应具有签名。 - 如果想法之后(在任何图片之前)紧跟着一些文字部分,则第一个文字部分也应包含签名。
- 如果包含图片
mimetype的inline_data部分是想法的一部分,则不会有签名。
以下代码展示了包含意念签名的示例:
[
  {
    "inline_data": {
      "data": "<base64_image_data_0>",
      "mime_type": "image/png"
    },
    "thought": true // Thoughts don't have signatures
  },
  {
    "inline_data": {
      "data": "<base64_image_data_1>",
      "mime_type": "image/png"
    },
    "thought": true // Thoughts don't have signatures
  },
  {
    "inline_data": {
      "data": "<base64_image_data_2>",
      "mime_type": "image/png"
    },
    "thought": true // Thoughts don't have signatures
  },
  {
    "text": "Here is a step-by-step guide to baking macarons, presented in three separate images.\n\n### Step 1: Piping the Batter\n\nThe first step after making your macaron batter is to pipe it onto a baking sheet. This requires a steady hand to create uniform circles.\n\n",
    "thought_signature": "<Signature_A>" // The first non-thought part always has a signature
  },
  {
    "inline_data": {
      "data": "<base64_image_data_3>",
      "mime_type": "image/png"
    },
    "thought_signature": "<Signature_B>" // All image parts have a signatures
  },
  {
    "text": "\n\n### Step 2: Baking and Developing Feet\n\nOnce piped, the macarons are baked in the oven. A key sign of a successful bake is the development of \"feet\"—the ruffled edge at the base of each macaron shell.\n\n"
    // Follow-up text parts don't have signatures
  },
  {
    "inline_data": {
      "data": "<base64_image_data_4>",
      "mime_type": "image/png"
    },
    "thought_signature": "<Signature_C>" // All image parts have a signatures
  },
  {
    "text": "\n\n### Step 3: Assembling the Macaron\n\nThe final step is to pair the cooled macaron shells by size and sandwich them together with your desired filling, creating the classic macaron dessert.\n\n"
  },
  {
    "inline_data": {
      "data": "<base64_image_data_5>",
      "mime_type": "image/png"
    },
    "thought_signature": "<Signature_D>" // All image parts have a signatures
  }
]
其他图片生成模式
Gemini 还支持其他基于提示结构和上下文的图片互动模式,包括:
- 文生图和文本(交织):输出包含相关文本的图片。
- 提示示例:“生成一份图文并茂的海鲜饭食谱。”
- 图片和文本转图片和文本(交织):使用输入图片和文本创建新的相关图片和文本。
- 提示示例:(附带一张带家具的房间的照片)“我的空间还适合放置哪些颜色的沙发?你能更新一下图片吗?”
批量生成图片
如果您需要生成大量图片,可以使用批量 API。您可以获得更高的速率限制,但需要等待最长 24 小时才能获得回复。
如需查看 Batch API 图片示例和代码,请参阅 Batch API 图片生成文档和实用指南。
提示指南和策略
要掌握图片生成,首先要了解一个基本原则:
描述场景,而不仅仅是列出关键字。 该模型的核心优势在于其深厚的语言理解能力。与一连串不相关的字词相比,叙述性、描述性段落几乎总是能生成更好、更连贯的图片。
用于生成图片的提示
以下策略将帮助您创建有效的提示,从而生成您想要的图片。
摄影
对于逼真的图片,请使用摄影术语。提及拍摄角度、镜头类型、光线和细节,引导模型生成逼真的结果。
| 提示 | 生成的输出 |
|---|---|
| 一张特写照片,照片中一位年长的日本陶艺家脸上布满被阳光刻蚀的深深皱纹,露出温暖而会心的微笑。他正在仔细检查一个刚上过釉的茶碗。场景是他的乡村风格、阳光充足的工作室。柔和的黄金时段光线透过窗户照亮了整个场景,凸显了黏土的细腻质感。使用 85 毫米人像镜头拍摄,营造出柔和的模糊背景(焦外成像)。整体氛围宁静而富有大师风范。竖向纵向。 |
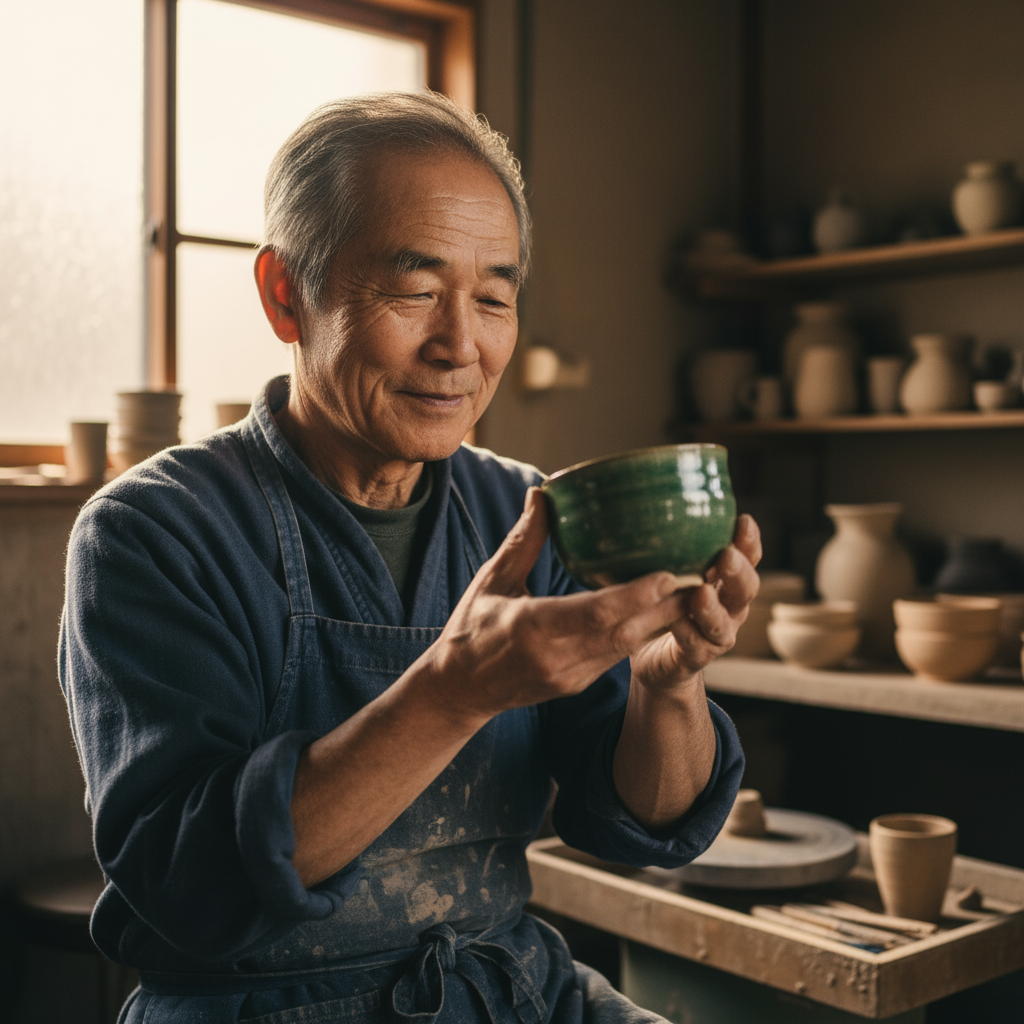
|
风格化插图和贴纸
如需创建贴纸、图标或素材资源,请明确说明样式并要求使用白色背景。
| 提示 | 生成的输出 |
|---|---|
| 一张卡哇伊风格的贴纸,上面是一只戴着小竹帽的快乐小熊猫。它正在啃食一片绿色的竹叶。设计采用醒目、简洁的轮廓、简单的赛璐珞着色和鲜艳的色调。背景必须为白色。 |

|
图片中的文字准确无误
Gemini 在渲染文本方面表现出色。清楚说明文字、字体样式(描述性)和整体设计。使用 Gemini 3.1 Pro Image 进行专业资源制作。
| 提示 | 生成的输出 |
|---|---|
| 为一家名为“The Daily Grind”的咖啡店设计一个现代简约的徽标。文字应采用清晰的粗体无衬线字体。配色方案为黑白色。将徽标放在圆圈中。巧妙地使用咖啡豆。 |
|
产品模型和商业摄影
非常适合为电子商务、广告或品牌宣传拍摄清晰专业的商品照片。
| 提示 | 生成的输出 |
|---|---|
| 一张高分辨率的摄影棚级商品照片,展示一款哑光黑色的极简陶瓷咖啡杯,摆放在抛光混凝土表面上。采用三点柔光箱布光法,旨在营造柔和漫射的高光效果,并消除刺眼的阴影。拍摄角度略微抬高,为 45 度,以展示其简洁的线条。超逼真,清晰聚焦于咖啡中升腾的蒸汽。方形图片。 |

|
极简主义和负空间设计
非常适合用于为网站、演示文稿或营销材料创建背景,以便在其中叠加文字。
| 提示 | 生成的输出 |
|---|---|
| 极简主义构图,画面右下角放置了一片精致的红枫叶。背景是一张广阔的米白色空白画布,为文字留出了大量留白空间。柔和的漫射光线从左上角照射下来。方形图片。 |

|
连续艺术(漫画分格 / 故事板)
以角色一致性和场景描述为基础,为视觉故事讲述创建分格。为了确保文本准确性和叙事能力,这些提示最适合搭配 Gemini 3.1 Pro 和 Gemini 3.1 Flash Image 使用。
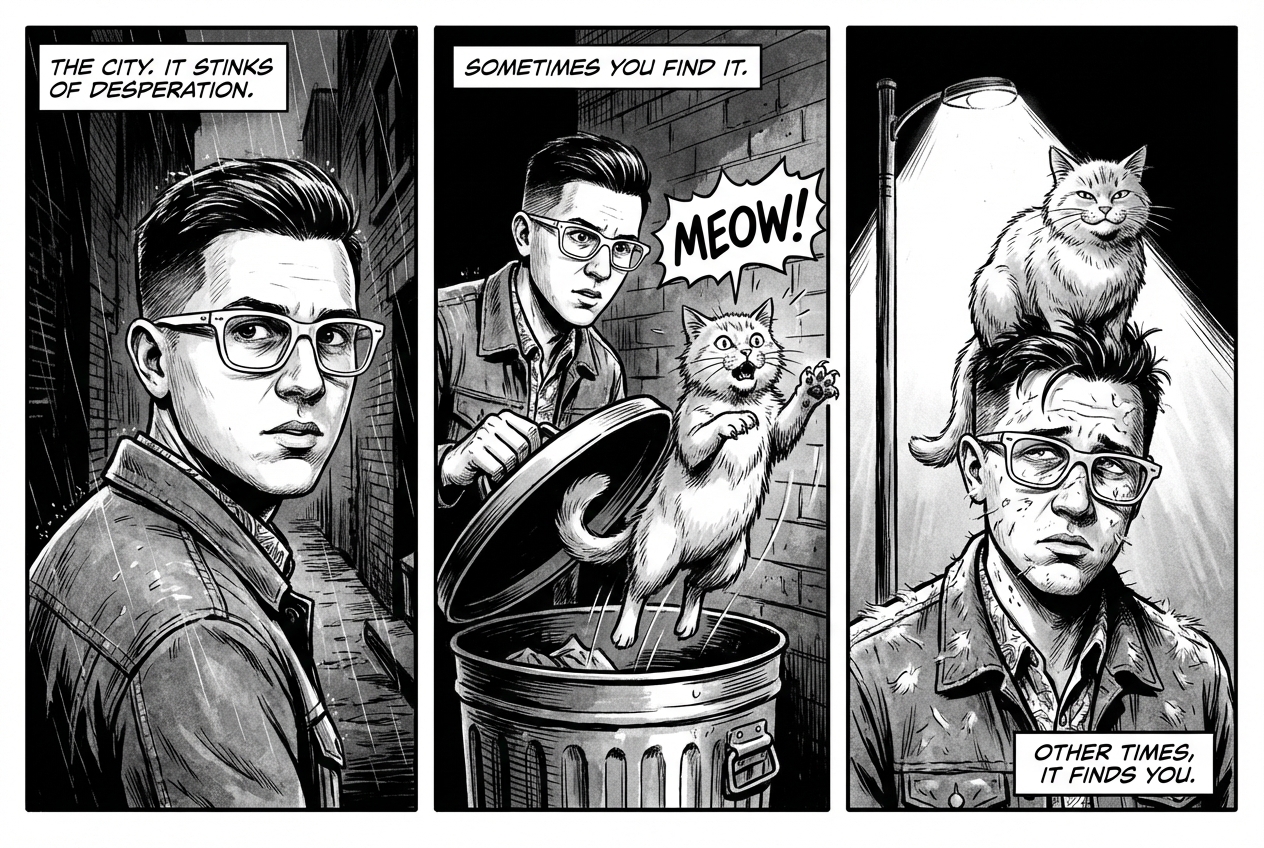
| 提示 | 生成的输出 |
|---|---|
|
输入图片: 
提示:创作一幅三格漫画,采用粗犷的黑色电影艺术风格,使用高对比度的黑白墨水。将角色置于幽默的场景中。 |
|
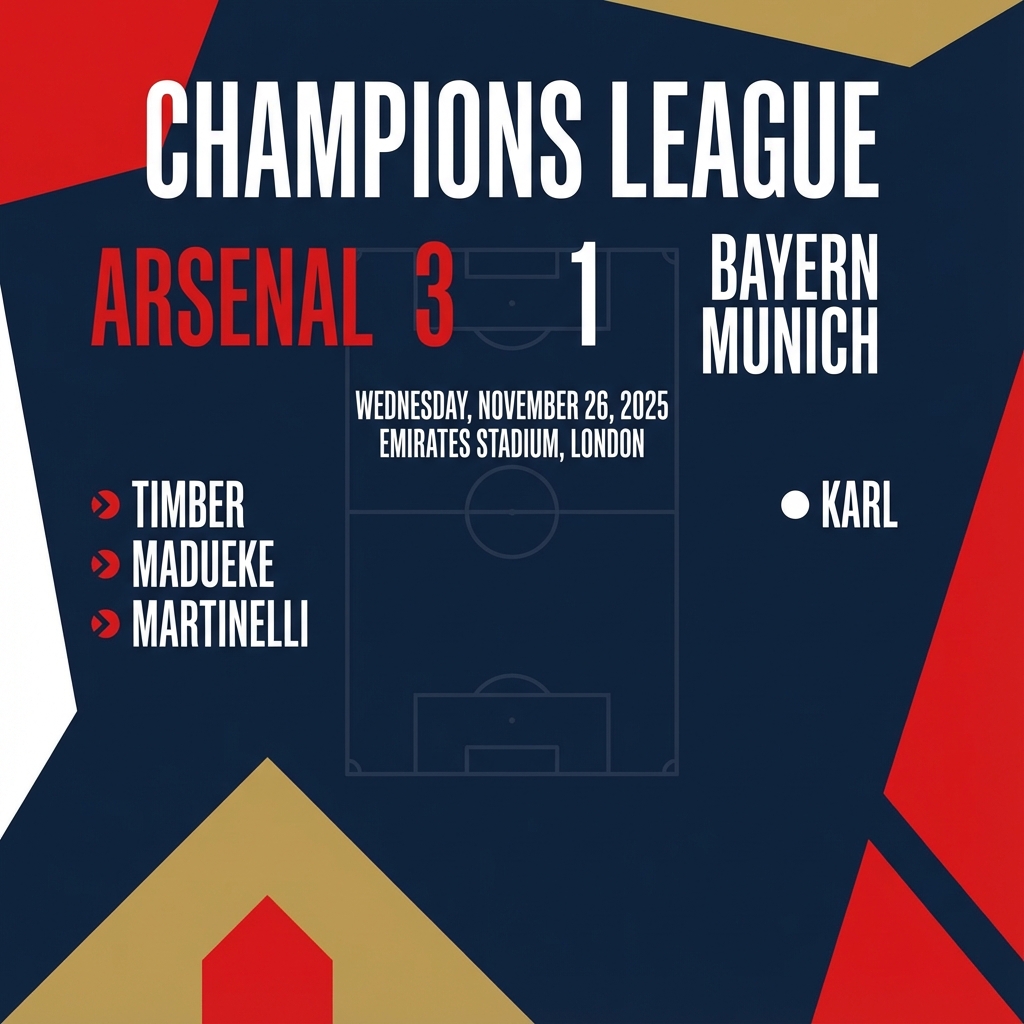
依托 Google 搜索进行接地
使用 Google 搜索根据最新信息或实时信息生成图片。 这对于新闻、天气和其他时效性主题非常有用。
| 提示 | 生成的输出 |
|---|---|
| 制作一张简单但时尚的图片,内容是昨晚阿森纳在欧冠联赛中的比赛 |
|
用于修改图片的提示
以下示例展示了如何提供图片以及文本提示,以进行编辑、构图和风格迁移。
添加和移除元素
提供图片并描述您的更改。模型将与原始图片的风格、光线和透视效果保持一致。
| 提示 | 生成的输出 |
|---|---|
|
输入图片: 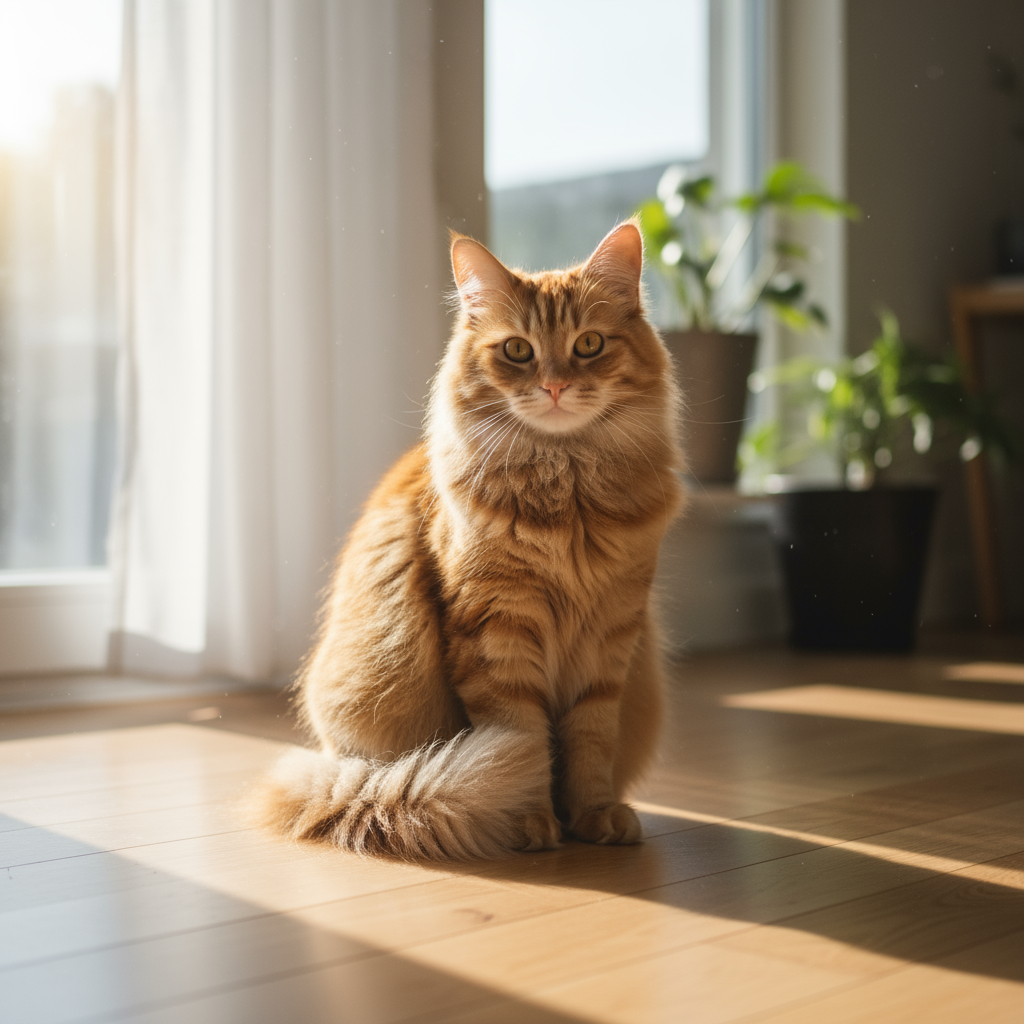
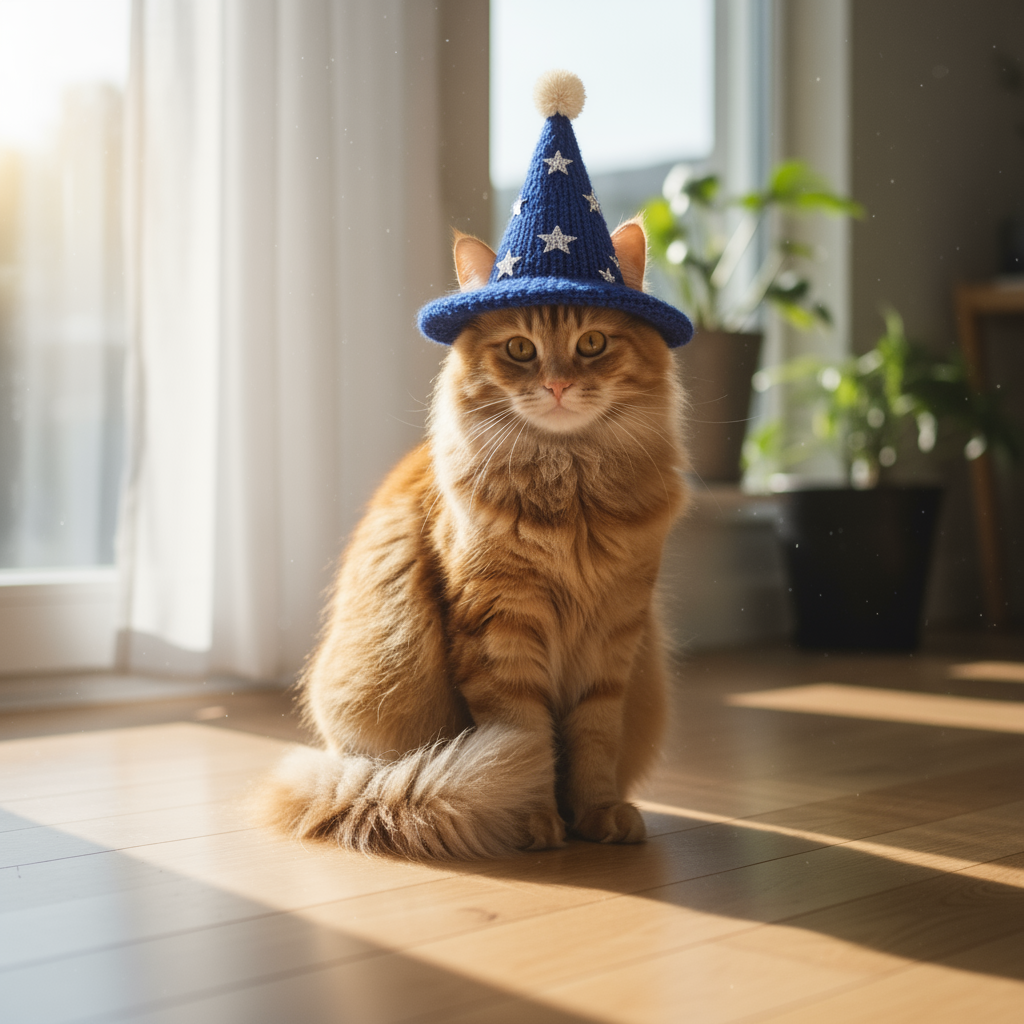
提示:请使用我提供的猫的图片,在其头上添加一顶针织的小巫师帽。让它看起来坐得很舒服,并且与照片的柔和光线相匹配。 |
|
局部重绘(语义遮盖)
通过对话定义“蒙版”,修改图片的特定部分,同时保持其余部分不变。
| 提示 | 生成的输出 |
|---|---|
|
输入图片: 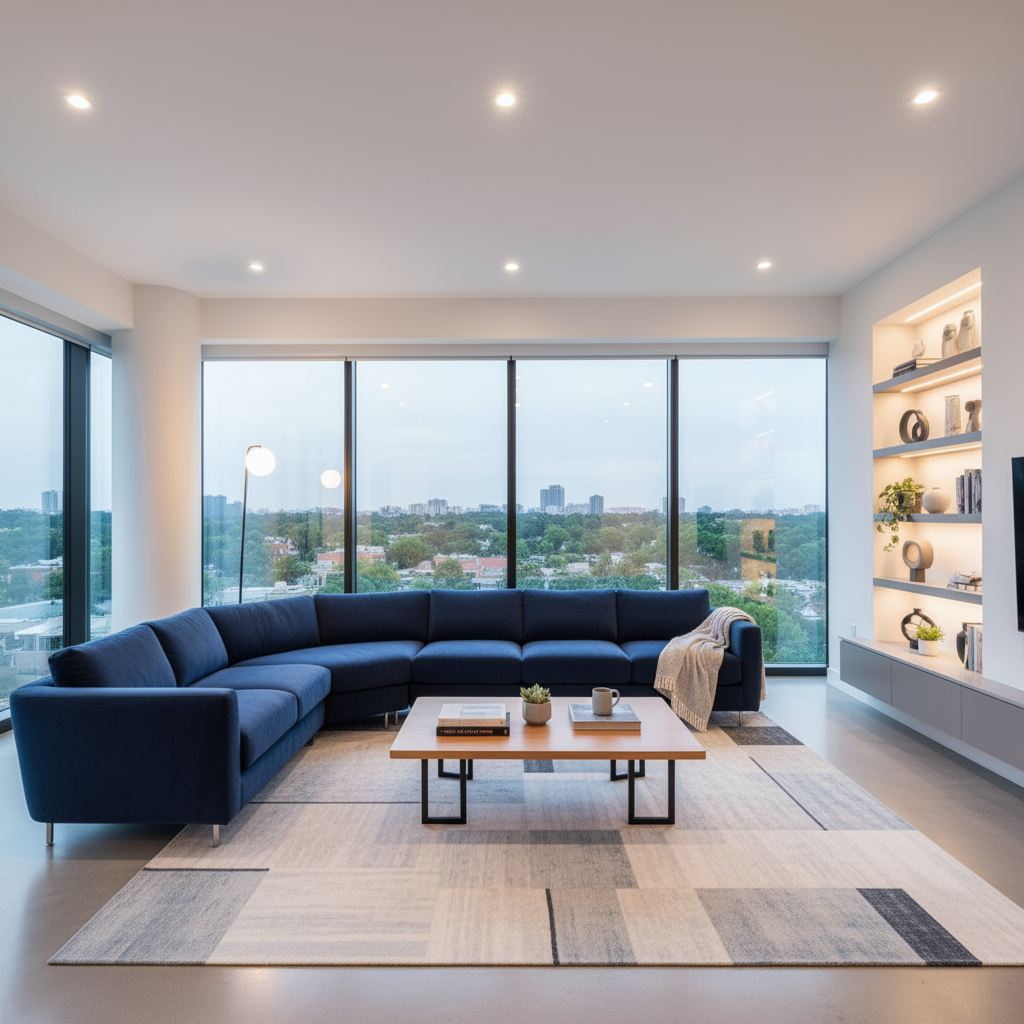
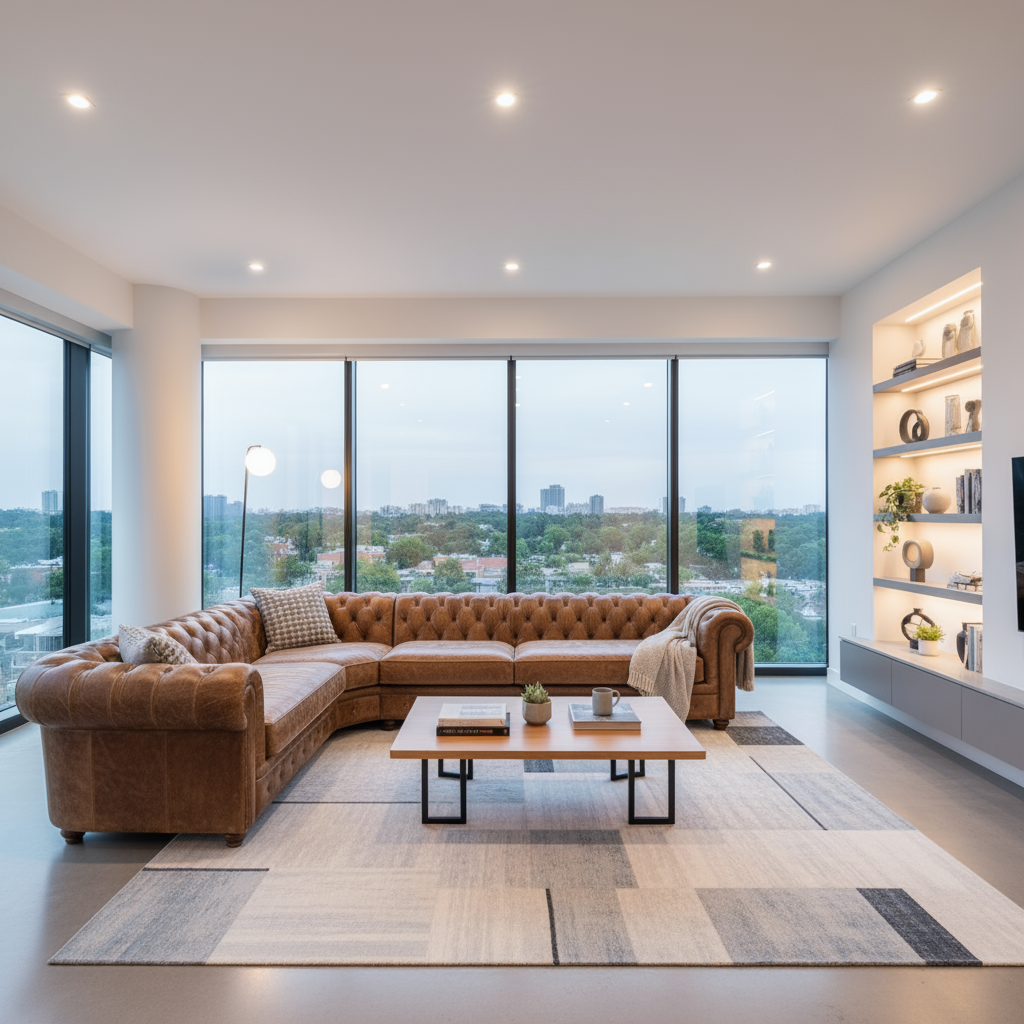
提示:使用提供的客厅图片,将蓝色沙发更改为复古棕色皮革切斯特菲尔德沙发。保持房间的其余部分(包括沙发上的枕头和照明)不变。 |
|
风格迁移
提供一张图片,并要求模型以不同的艺术风格重现其内容。
| 提示 | 生成的输出 |
|---|---|
|
输入图片: 
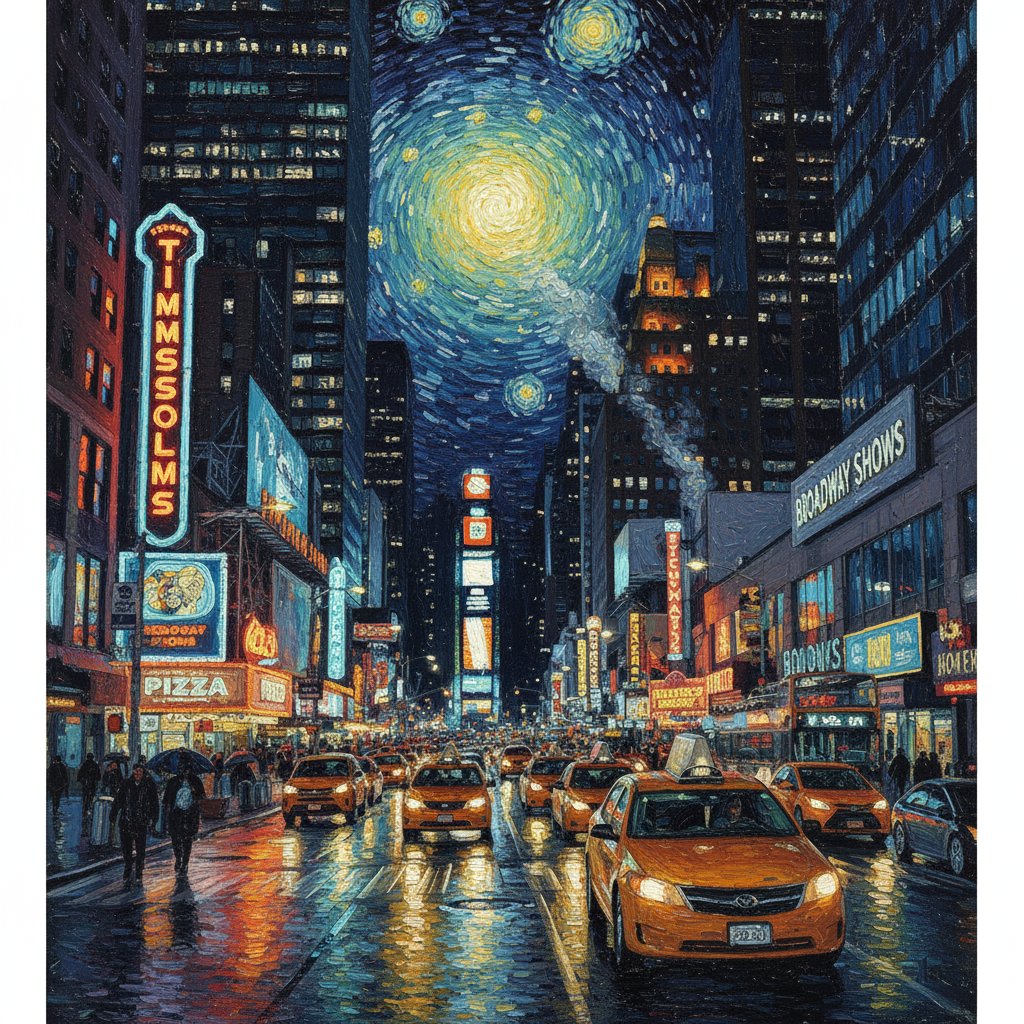
提示:将提供的现代城市街道夜景照片转换为文森特·梵高的《星月夜》的艺术风格。保留建筑物和汽车的原始构图,但使用漩涡状的厚涂笔触和深蓝色与亮黄色组成的鲜明调色板来渲染所有元素。 |
|
高级合成:组合多张图片
提供多张图片作为上下文,以创建新的合成场景。此功能非常适合制作产品模型或创意拼贴画。
| 提示 | 生成的输出 |
|---|---|
|
输入图片: 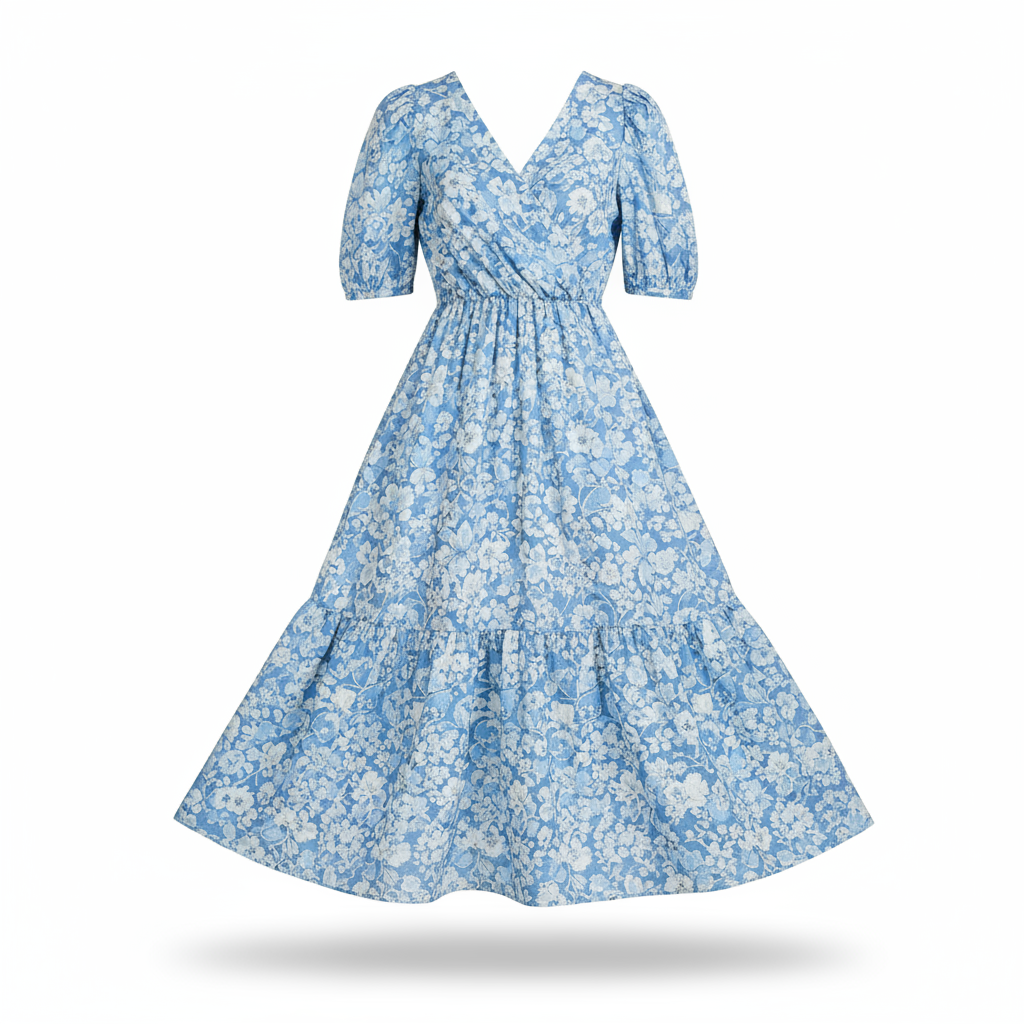

提示:制作一张专业的电子商务时尚照片。将第一张图片中的蓝色碎花连衣裙取出来,让第二张图片中的女子穿上。生成一张写实风格的全身照,照片中的女性穿着这件连衣裙,光线和阴影已调整为与户外环境相匹配。 |

|
高保真细节保留
为确保在编辑过程中保留关键细节(例如面部或徽标),请在编辑请求中详细描述这些细节。
| 提示 | 生成的输出 |
|---|---|
|
输入图片: 
提示:拍摄第一张照片,照片中的女性留着棕色头发,有着蓝色眼睛,面部表情平静。将第二张图片中的徽标添加到她的黑色 T 恤上。确保女性的面部和特征完全保持不变。徽标应看起来像是自然印在面料上,并贴合衬衫的褶皱。 |
|
让事物生动起来
上传草图或简笔画,然后让模型将其优化为成品图片。
| 提示 | 生成的输出 |
|---|---|
|
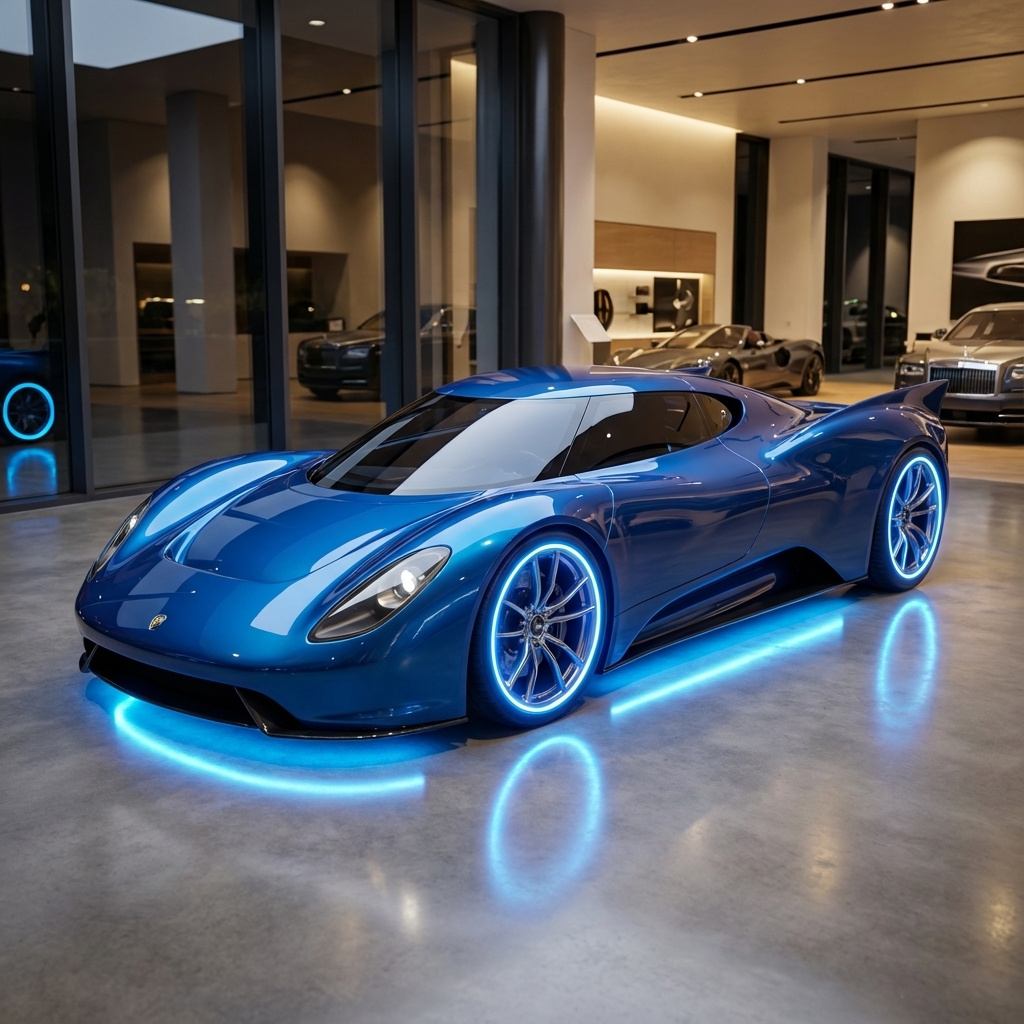
输入图片: 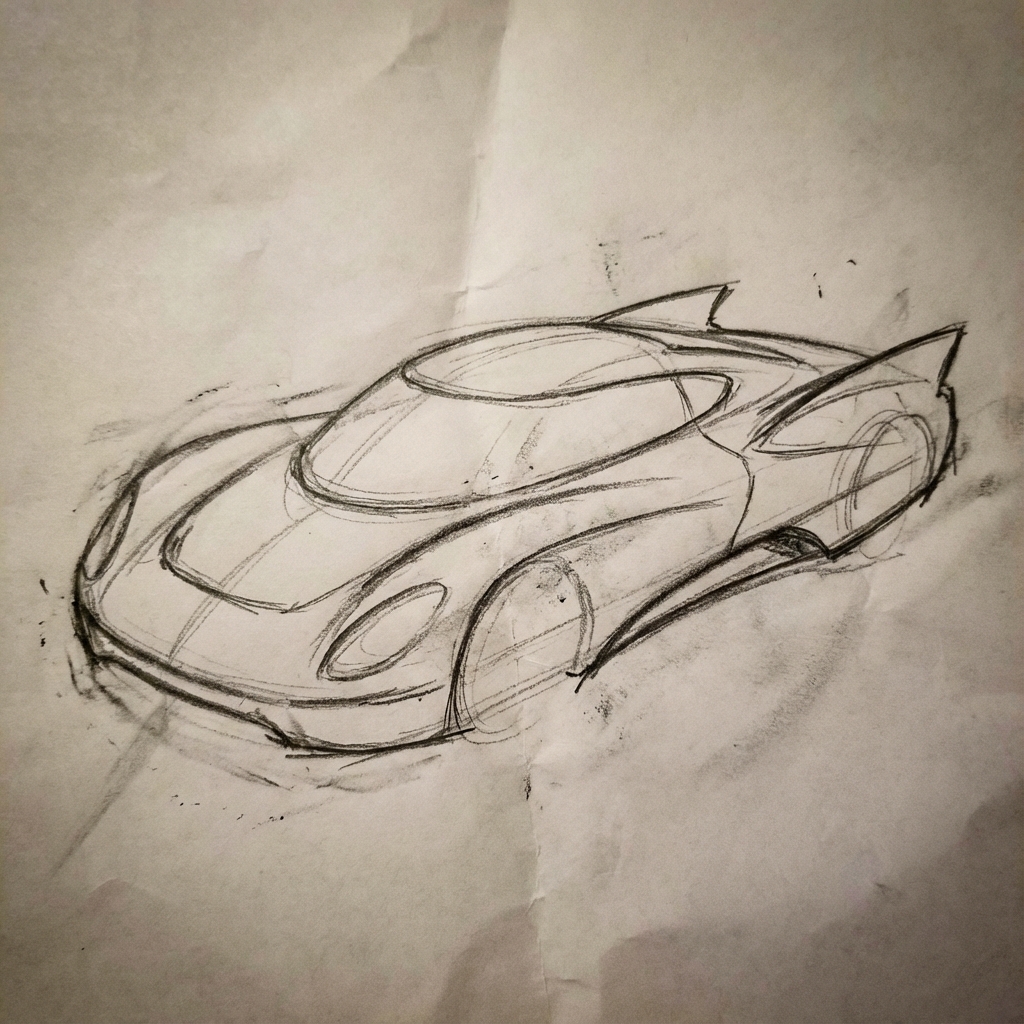
提示:将这幅未来汽车的粗略铅笔素描变成展厅中成品概念车的精美照片。保留草图中的流畅线条和低调外观,但添加金属蓝色油漆和霓虹灯轮圈照明。 |
|
角色一致性:360 度全景
您可以迭代提示不同的角度,从而生成角色的 360 度视图。为获得最佳效果,请在后续提示中添加之前生成的图片,以保持一致性。对于复杂的姿势,请添加所需姿势的参考图片。
| 提示 | 生成的输出 |
|---|---|
|
输入图片:
提示:一张以白色为背景的男士摄影棚肖像,侧面朝向右侧 |


|
最佳做法
如需将效果从“好”提升到“出色”,请将以下专业策略融入您的工作流程。
- 具体化:您提供的信息越详细,对输出结果的掌控程度就越高。与其使用“奇幻盔甲”,不如具体描述为“华丽的精灵板甲,蚀刻着银叶图案,带有高领和猎鹰翅膀形状的肩甲”。
- 提供上下文和意图:说明图片的用途。模型对上下文的理解会影响最终输出。例如,“为高端极简护肤品牌设计徽标”的效果要好于“设计徽标”。
- 迭代和优化:不要指望第一次尝试就能生成完美的图片。利用模型的对话特性进行小幅更改。然后,您可以继续发出提示,例如“效果不错,但能让光线更暖一些吗?”或“保持所有内容不变,但让角色的表情更严肃一些。”
- 使用分步指令:对于包含许多元素的复杂场景,请将提示拆分为多个步骤。“首先,创建一个宁静、薄雾弥漫的黎明森林的背景。然后,在前景中添加一个长满苔藓的古老石制祭坛。最后,将一把发光的剑放在祭坛顶部。”
- 使用“语义负面提示”:不要说“没有汽车”,而是通过说“一条没有交通迹象的空旷、荒凉的街道”来正面描述所需的场景。
- 控制镜头:使用摄影和电影语言来控制构图。例如
wide-angle shot、macro shot、low-angle perspective等字词。
限制
- 为获得最佳性能,请使用以下语言:英语、ar-EG、de-DE、es-MX、fr-FR、hi-IN、id-ID、it-IT、ja-JP、ko-KR、pt-BR、ru-RU、ua-UA、vi-VN、zh-CN。
- 图片生成不支持音频或视频输入。
- 模型不一定会生成用户明确要求的确切数量的图片输出。
gemini-2.5-flash-image最多可接受 3 张图片作为输入,而gemini-3-pro-image可支持 5 张高保真图片,总共最多可接受 14 张图片。gemini-3.1-flash-image支持在单一工作流中保持多达 4 个角色的相似度,并保持多达 10 个物体的细节保真度。- 在为图片生成文本时,如果先生成文本,再要求生成包含该文本的图片,Gemini 的效果会最佳。
gemini-3.1-flash-image目前,依托 Google 搜索进行接地不支持使用来自网页搜索的真实人物图片。- 生成的所有图片都包含 SynthID 水印。
可选配置
您可以选择在 generate_content 调用的 config 字段中配置模型输出的响应模态和宽高比。
输出类型
默认情况下,模型会返回文本和图片响应(即 response_modalities=['Text', 'Image'])。您可以使用 response_modalities=['Image'] 将响应配置为仅返回图片而不返回文本。
Python
response = client.models.generate_content(
    model="gemini-3.1-flash-image",
    contents=[prompt],
    config=types.GenerateContentConfig(
        response_modalities=['Image']
    )
)
JavaScript
const response = await ai.models.generateContent({
    model: "gemini-3.1-flash-image",
    contents: prompt,
    config: {
        responseModalities: ['Image']
    }
  });
Go
result, _ := client.Models.GenerateContent(
    ctx,
    "gemini-3.1-flash-image",
    genai.Text("Create a picture of a nano banana dish in a " +
                " fancy restaurant with a Gemini theme"),
    &genai.GenerateContentConfig{
        ResponseModalities: "Image",
    },
  )
Java
response = client.models.generateContent(
    "gemini-3.1-flash-image",
    prompt,
    GenerateContentConfig.builder()
        .responseModalities("IMAGE")
        .build());
C#
var response = await client.Models.GenerateContentAsync(
    model: "gemini-3.1-flash-image",
    contents: new List<Part> { new Part { Text = prompt } },
    config: new GenerateContentConfig
    {
        ResponseModalities = new List<string> { "IMAGE" }
    }
);
REST
curl -s -X POST \
  "https://generativelanguage.googleapis.com/v1/models/gemini-3.1-flash-image:generateContent" \
  -H "x-goog-api-key: $GEMINI_API_KEY" \
  -H "Content-Type: application/json" \
  -d '{
    "contents": [{
      "parts": [
        {"text": "Create a picture of a nano banana dish in a fancy restaurant with a Gemini theme"}
      ]
    }],
    "generationConfig": {
      "responseModalities": ["Image"]
    }
  }'
宽高比和图片大小
默认情况下,模型会使输出图片的大小与输入图片的大小保持一致,否则会生成 1:1 的正方形图片。您可以使用响应请求中 response_format 下的 aspect_ratio 字段来控制输出图片的宽高比,如下所示:
Python
# For gemini-2.5-flash-image
response = client.models.generate_content(
    model="gemini-2.5-flash-image",
    contents=[prompt],
    config=types.GenerateContentConfig(
        response_format={"image": {aspect_ratio: "16:9",}}
    )
)

# For gemini-3.1-flash-image and gemini-3-pro-image
response = client.models.generate_content(
    model="gemini-3.1-flash-image",
    contents=[prompt],
    config=types.GenerateContentConfig(
        response_format={"image": {aspect_ratio: "16:9",                 image_size: "2K",}}
    )
)
JavaScript
// For gemini-2.5-flash-image
const response = await ai.models.generateContent({
    model: "gemini-2.5-flash-image",
    contents: prompt,
    config: {
      responseFormat: {
    image: {
        aspectRatio: "16:9",
      }
  },
    }
  });

// For gemini-3.1-flash-image and gemini-3-pro-image
const response_gemini3 = await ai.models.generateContent({
    model: "gemini-3.1-flash-image",
    contents: prompt,
    config: {
      responseFormat: {
    image: {
        aspectRatio: "16:9",
        imageSize: "2K",
      }
  },
    }
  });
Go
// For gemini-2.5-flash-image
result, _ := client.Models.GenerateContent(
    ctx,
    "gemini-2.5-flash-image",
    genai.Text("Create a picture of a nano banana dish in a " +
                " fancy restaurant with a Gemini theme"),
    &genai.GenerateContentConfig{
        ImageConfig: &genai.ImageConfig{
          AspectRatio: "16:9",
        },
    }
  )

// For gemini-3.1-flash-image and gemini-3-pro-image
result_gemini3, _ := client.Models.GenerateContent(
    ctx,
    "gemini-3.1-flash-image",
    genai.Text("Create a picture of a nano banana dish in a " +
                " fancy restaurant with a Gemini theme"),
    &genai.GenerateContentConfig{
        ImageConfig: &genai.ImageConfig{
          AspectRatio: "16:9",
          ImageSize: "2K",
        },
    }
  )
Java
// For gemini-2.5-flash-image
response = client.models.generateContent(
    "gemini-2.5-flash-image",
    prompt,
    GenerateContentConfig.builder()
        .imageConfig(ImageConfig.builder()
            .aspectRatio("16:9")
            .build())
        .build());

// For gemini-3.1-flash-image and gemini-3-pro-image
response_gemini3 = client.models.generateContent(
    "gemini-3.1-flash-image",
    prompt,
    GenerateContentConfig.builder()
        .imageConfig(ImageConfig.builder()
            .aspectRatio("16:9")
            .imageSize("2K")
            .build())
        .build());
C#
// For gemini-2.5-flash-image
var response = await client.Models.GenerateContentAsync(
    model: "gemini-2.5-flash-image",
    contents: new List<Part> { new Part { Text = prompt } },
    config: new GenerateContentConfig
    {
        ImageConfig = new ImageConfig
        {
            AspectRatio = "16:9"
        }
    }
);

// For gemini-3.1-flash-image and gemini-3-pro-image
var response_gemini3 = await client.Models.GenerateContentAsync(
    model: "gemini-3.1-flash-image",
    contents: new List<Part> { new Part { Text = prompt } },
    config: new GenerateContentConfig
    {
        ImageConfig = new ImageConfig
        {
            AspectRatio = "16:9",
            ImageSize = "2K"
        }
    }
);
REST
# For gemini-2.5-flash-image
curl -s -X POST \
  "https://generativelanguage.googleapis.com/v1/models/gemini-2.5-flash-image:generateContent" \
  -H "x-goog-api-key: $GEMINI_API_KEY" \
  -H 'Content-Type: application/json' \
  -d '{
    "contents": [{
      "parts": [
        {"text": "Create a picture of a nano banana dish in a fancy restaurant with a Gemini theme"}
      ]
    }],
    "generationConfig": {
      "responseFormat": {
    "image": {
        "aspectRatio": "16:9"
      }
  }
    }
  }'

# For gemini-3-pro-image
curl -s -X POST \
  "https://generativelanguage.googleapis.com/v1/models/gemini-3.1-flash-image:generateContent" \
  -H "x-goog-api-key: $GEMINI_API_KEY" \
  -H 'Content-Type: application/json' \
  -d '{
    "contents": [{
      "parts": [
        {"text": "Create a picture of a nano banana dish in a fancy restaurant with a Gemini theme"}
      ]
    }],
    "generationConfig": {
      "responseFormat": {
    "image": {
        "aspectRatio": "16:9",
        "imageSize": "2K"
      }
  }
    }
  }'
下表列出了可用的不同宽高比以及生成的图片大小:
3.1 Flash 映像
| 宽高比 | 512 分辨率 | 500 个 token | 1K 分辨率 | 1,000 个 token | 2K 分辨率 | 2,000 个 token | 4K 分辨率 | 4,000 个 token |
|---|---|---|---|---|---|---|---|---|
| 1:1 | 512x512 | 747 | 1024x1024 | 1120 | 2048 x 2048 | 1680 | 4096x4096 | 2520 |
| 1:4 | 256x1024 | 747 | 512x2048 | 1120 | 1024x4096 | 1680 | 2048x8192 | 2520 |
| 1:8 | 192x1536 | 747 | 384x3072 | 1120 | 768x6144 | 1680 | 1536x12288 | 2520 |
| 2:3 | 424x632 | 747 | 848x1264 | 1120 | 1696x2528 | 1680 | 3392x5056 | 2520 |
| 3:2 | 632x424 | 747 | 1264x848 | 1120 | 2528x1696 | 1680 | 5056x3392 | 2520 |
| 3:4 | 448x600 | 747 | 896x1200 | 1120 | 1792x2400 | 1680 | 3584x4800 | 2520 |
| 4:1 | 1024x256 | 747 | 2048x512 | 1120 | 4096x1024 | 1680 | 8192x2048 | 2520 |
| 4:3 | 600x448 | 747 | 1200x896 | 1120 | 2400x1792 | 1680 | 4800x3584 | 2520 |
| 4:5 | 464x576 | 747 | 928x1152 | 1120 | 1856x2304 | 1680 | 3712x4608 | 2520 |
| 5:4 | 576x464 | 747 | 1152x928 | 1120 | 2304x1856 | 1680 | 4608x3712 | 2520 |
| 8:1 | 1536x192 | 747 | 3072x384 | 1120 | 6144x768 | 1680 | 12288x1536 | 2520 |
| 9:16 | 384x688 | 747 | 768x1376 | 1120 | 1536x2752 | 1680 | 3072x5504 | 2520 |
| 16:9 | 688x384 | 747 | 1376x768 | 1120 | 2752x1536 | 1680 | 5504x3072 | 2520 |
| 21:9 | 792x168 | 747 | 1584x672 | 1120 | 3168x1344 | 1680 | 6336x2688 | 2520 |
3.1 Pro Image
| 宽高比 | 1K 分辨率 | 1,000 个 token | 2K 分辨率 | 2,000 个 token | 4K 分辨率 | 4,000 个 token |
|---|---|---|---|---|---|---|
| 1:1 | 1024x1024 | 1120 | 2048 x 2048 | 1120 | 4096x4096 | 2000 |
| 2:3 | 848x1264 | 1120 | 1696x2528 | 1120 | 3392x5056 | 2000 |
| 3:2 | 1264x848 | 1120 | 2528x1696 | 1120 | 5056x3392 | 2000 |
| 3:4 | 896x1200 | 1120 | 1792x2400 | 1120 | 3584x4800 | 2000 |
| 4:3 | 1200x896 | 1120 | 2400x1792 | 1120 | 4800x3584 | 2000 |
| 4:5 | 928x1152 | 1120 | 1856x2304 | 1120 | 3712x4608 | 2000 |
| 5:4 | 1152x928 | 1120 | 2304x1856 | 1120 | 4608x3712 | 2000 |
| 9:16 | 768x1376 | 1120 | 1536x2752 | 1120 | 3072x5504 | 2000 |
| 16:9 | 1376x768 | 1120 | 2752x1536 | 1120 | 5504x3072 | 2000 |
| 21:9 | 1584x672 | 1120 | 3168x1344 | 1120 | 6336x2688 | 2000 |
Gemini 2.5 Flash 图片
| 宽高比 | 分辨率 | 令牌 |
|---|---|---|
| 1:1 | 1024x1024 | 1290 |
| 2:3 | 832x1248 | 1290 |
| 3:2 | 1248x832 | 1290 |
| 3:4 | 864x1184 | 1290 |
| 4:3 | 1184x864 | 1290 |
| 4:5 | 896x1152 | 1290 |
| 5:4 | 1152x896 | 1290 |
| 9:16 | 768x1344 | 1290 |
| 16:9 | 1344x768 | 1290 |
| 21:9 | 1536x672 | 1290 |
模型选择
选择最适合您的特定使用场景的模型。
Gemini 3.1 Flash Image (Nano Banana 2) 应该是您的首选图片生成模型,因为它在性能和智能方面表现出色,并且在成本和延迟方面也达到了平衡。如需了解详情,请参阅模型价格和功能页面。
Gemini 3.1 Pro Image (Nano Banana Pro) 专为专业资源制作和复杂指令而设计。该模型具有以下特点:使用 Google 搜索进行现实世界接地、默认的“思考”流程(在生成之前优化构图),并且可以生成分辨率高达 4K 的图片。如需了解详情,请参阅模型价格和功能页面。
Gemini 2.5 Flash Image (Nano Banana) 旨在实现速度和效率。此模型经过优化,可处理大批量、低延迟的任务,并生成 1024 像素分辨率的图片。如需了解详情,请参阅模型价格和功能页面。
何时使用 Imagen
除了使用 Gemini 的内置图片生成功能外,您还可以通过 Gemini API 访问我们专业的图片生成模型 Imagen。
如果您刚开始使用 Imagen 生成图片,Imagen 4 应该是您的首选模型。如果需要处理高级用例或需要最佳图片质量,请选择 Imagen 4 Ultra(请注意,该模型一次只能生成一张图片)。