LangGraph là một khung để tạo các ứng dụng LLM có trạng thái, khiến nó trở thành một lựa chọn phù hợp để tạo các Tác nhân ReAct (Suy luận và hành động).
Các tác nhân ReAct kết hợp khả năng suy luận của LLM với việc thực thi hành động. Họ suy nghĩ, sử dụng công cụ và hành động dựa trên những quan sát để đạt được mục tiêu của người dùng, đồng thời điều chỉnh phương pháp của mình một cách linh hoạt. Được giới thiệu trong bài viết "ReAct: Synergizing Reasoning and Acting in Language Models" (2023), mẫu này cố gắng phản ánh khả năng suy luận và giải quyết vấn đề linh hoạt như con người thay vì các quy trình làm việc cứng nhắc.
LangGraph cung cấp một tác nhân ReAct được tạo sẵn (
create_react_agent), hoạt động hiệu quả khi bạn cần kiểm soát và tuỳ chỉnh thêm cho các hoạt động triển khai ReAct. Hướng dẫn này sẽ cho bạn thấy một phiên bản đơn giản.
LangGraph mô hình hoá các tác nhân dưới dạng biểu đồ bằng cách sử dụng 3 thành phần chính:
State: Cấu trúc dữ liệu được chia sẻ (thường làTypedDicthoặcPydantic BaseModel) biểu thị ảnh chụp nhanh hiện tại của ứng dụng.Nodes: Mã hoá logic của các tác nhân. Các hàm này nhận Trạng thái hiện tại làm dữ liệu đầu vào, thực hiện một số phép tính hoặc hiệu ứng phụ và trả về Trạng thái đã cập nhật, chẳng hạn như lệnh gọi LLM hoặc lệnh gọi công cụ.Edges: Xác địnhNodetiếp theo sẽ thực thi dựa trênStatehiện tại, cho phép logic có điều kiện và các hiệu ứng chuyển đổi cố định.
Nếu chưa có Khoá API, bạn có thể lấy khoá này từ Google AI Studio.
pip install langgraph langchain-google-genai geopy requests
Đặt khoá API trong biến môi trường GEMINI_API_KEY.
import os

# Read your API key from the environment variable or set it manually
api_key = os.getenv("GEMINI_API_KEY")
Để hiểu rõ hơn về cách triển khai một tác nhân ReAct bằng LangGraph, hướng dẫn này sẽ trình bày một ví dụ thực tế. Bạn sẽ tạo một tác nhân có mục tiêu là sử dụng một công cụ để tìm thông tin thời tiết hiện tại cho một vị trí cụ thể.
Đối với tác nhân thời tiết này, State sẽ duy trì nhật ký cuộc trò chuyện đang diễn ra (dưới dạng danh sách tin nhắn) và một bộ đếm (dưới dạng số nguyên) cho số bước đã thực hiện, cho mục đích minh hoạ.
LangGraph cung cấp một hàm trợ giúp, add_messages, để cập nhật danh sách thông báo trạng thái. Nó hoạt động như một reducer, lấy danh sách hiện tại, cộng với các thông báo mới và trả về một danh sách kết hợp. Nó xử lý các bản cập nhật theo mã nhận dạng tin nhắn và mặc định là hành vi "chỉ thêm" cho các tin nhắn mới, chưa xem.
from typing import Annotated,Sequence, TypedDict

from langchain_core.messages import BaseMessage
from langgraph.graph.message import add_messages  # helper function to add messages to the state

class AgentState(TypedDict):
    """The state of the agent."""
    messages: Annotated[Sequence[BaseMessage], add_messages]
    number_of_steps: int
Tiếp theo, hãy xác định công cụ thời tiết của bạn.
from langchain_core.tools import tool
from geopy.geocoders import Nominatim
from pydantic import BaseModel, Field
import requests

geolocator = Nominatim(user_agent="weather-app")

class SearchInput(BaseModel):
    location:str = Field(description="The city and state, e.g., San Francisco")
    date:str = Field(description="the forecasting date for when to get the weather format (yyyy-mm-dd)")

@tool("get_weather_forecast", args_schema=SearchInput, return_direct=True)
def get_weather_forecast(location: str, date: str):
    """Retrieves the weather using Open-Meteo API.

    Takes a given location (city) and a date (yyyy-mm-dd).

    Returns:
        A dict with the time and temperature for each hour.
    """
    # Note that Colab may experience rate limiting on this service. If this
    # happens, use a machine to which you have exclusive access.
    location = geolocator.geocode(location)
    if location:
        try:
            response = requests.get(f"https://api.open-meteo.com/v1/forecast?latitude={location.latitude}&longitude={location.longitude}&hourly=temperature_2m&start_date={date}&end_date={date}")
            data = response.json()
            return dict(zip(data["hourly"]["time"], data["hourly"]["temperature_2m"]))
        except Exception as e:
            return {"error": str(e)}
    else:
        return {"error": "Location not found"}

tools = [get_weather_forecast]
Bây giờ, hãy khởi tạo mô hình và liên kết các công cụ với mô hình.
from datetime import datetime
from langchain_google_genai import ChatGoogleGenerativeAI

# Create LLM class
llm = ChatGoogleGenerativeAI(
    model= "gemini-3.5-flash",
    temperature=1.0,
    max_retries=2,
    google_api_key=api_key,
)

# Bind tools to the model
model = llm.bind_tools([get_weather_forecast])

# Test the model with tools
res=model.invoke(f"What is the weather in Berlin on {datetime.today()}?")

print(res)
Bước cuối cùng trước khi bạn có thể chạy tác nhân là xác định các nút và cạnh. Trong ví dụ này, bạn có 2 nút và 1 cạnh.
- nút
call_toolthực thi phương thức công cụ của bạn. LangGraph có một nút dựng sẵn cho việc này, được gọi là ToolNode. - Nút
call_modelsử dụngmodel_with_toolsđể gọi mô hình. should_continuecạnh quyết định có gọi công cụ hay mô hình hay không.
Số lượng nút và cạnh không cố định. Bạn có thể thêm bao nhiêu nút và cạnh tuỳ thích vào biểu đồ của mình. Ví dụ: bạn có thể thêm một nút để thêm đầu ra có cấu trúc hoặc một nút tự xác minh/phản chiếu để kiểm tra đầu ra của mô hình trước khi gọi công cụ hoặc mô hình.
from langchain_core.messages import ToolMessage
from langchain_core.runnables import RunnableConfig

tools_by_name = {tool.name: tool for tool in tools}

# Define our tool node
def call_tool(state: AgentState):
    outputs = []
    # Iterate over the tool calls in the last message
    for tool_call in state["messages"][-1].tool_calls:
        # Get the tool by name
        tool_result = tools_by_name[tool_call["name"]].invoke(tool_call["args"])
        outputs.append(
            ToolMessage(
                content=tool_result,
                name=tool_call["name"],
                tool_call_id=tool_call["id"],
            )
        )
    return {"messages": outputs}

def call_model(
    state: AgentState,
    config: RunnableConfig,
):
    # Invoke the model with the system prompt and the messages
    response = model.invoke(state["messages"], config)
    # This returns a list, which combines with the existing messages state
    # using the add_messages reducer.
    return {"messages": [response]}

# Define the conditional edge that determines whether to continue or not
def should_continue(state: AgentState):
    messages = state["messages"]
    # If the last message is not a tool call, then finish
    if not messages[-1].tool_calls:
        return "end"
    # default to continue
    return "continue"
Khi đã chuẩn bị xong tất cả các thành phần của tác nhân, bạn có thể kết hợp chúng lại với nhau.
from langgraph.graph import StateGraph, END

# Define a new graph with our state
workflow = StateGraph(AgentState)

# 1. Add the nodes
workflow.add_node("llm", call_model)
workflow.add_node("tools",  call_tool)
# 2. Set the entrypoint as `agent`, this is the first node called
workflow.set_entry_point("llm")
# 3. Add a conditional edge after the `llm` node is called.
workflow.add_conditional_edges(
    # Edge is used after the `llm` node is called.
    "llm",
    # The function that will determine which node is called next.
    should_continue,
    # Mapping for where to go next, keys are strings from the function return,
    # and the values are other nodes.
    # END is a special node marking that the graph is finish.
    {
        # If `tools`, then we call the tool node.
        "continue": "tools",
        # Otherwise we finish.
        "end": END,
    },
)
# 4. Add a normal edge after `tools` is called, `llm` node is called next.
workflow.add_edge("tools", "llm")

# Now we can compile and visualize our graph
graph = workflow.compile()
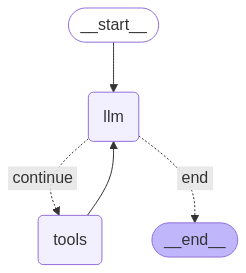
Bạn có thể trực quan hoá biểu đồ bằng phương thức draw_mermaid_png.
from IPython.display import Image, display

display(Image(graph.get_graph().draw_mermaid_png()))
Bây giờ, hãy chạy tác nhân.
from datetime import datetime
# Create our initial message dictionary
inputs = {"messages": [("user", f"What is the weather in Berlin on {datetime.today()}?")]}

# call our graph with streaming to see the steps
for state in graph.stream(inputs, stream_mode="values"):
    last_message = state["messages"][-1]
    last_message.pretty_print()
Giờ đây, bạn có thể tiếp tục cuộc trò chuyện, hỏi về Thời tiết ở một thành phố khác hoặc yêu cầu so sánh.
state["messages"].append(("user", "Would it be warmer in Munich?"))

for state in graph.stream(state, stream_mode="values"):
    last_message = state["messages"][-1]
    last_message.pretty_print()