Live API की मदद से, Gemini के साथ कम समय में रीयल-टाइम में बोलकर और देखकर बातचीत की जा सकती है. यह ऑडियो, इमेज, और टेक्स्ट की लगातार स्ट्रीम को प्रोसेस करता है, ताकि तुरंत, इंसानों की तरह बोलकर जवाब दिए जा सकें. इससे आपके उपयोगकर्ताओं को बातचीत का स्वाभाविक अनुभव मिलता है.
इस्तेमाल के उदाहरण
Live API का इस्तेमाल करके, कई इंडस्ट्री के लिए रीयल-टाइम में बोलकर बातचीत करने वाले एजेंट बनाए जा सकते हैं. इनमें ये इंडस्ट्री शामिल हैं:
- ई-कॉमर्स और खुदरा कारोबार: शॉपिंग असिस्टेंट, जो लोगों की पसंद के हिसाब से सुझाव देते हैं. साथ ही, ग्राहक सहायता एजेंट, जो ग्राहकों की समस्याओं को हल करते हैं.
- गेमिंग: इंटरैक्टिव नॉन-प्लेयर कैरेक्टर (एनपीसी), इन-गेम सहायता असिस्टेंट, और इन-गेम कॉन्टेंट का रीयल-टाइम में अनुवाद.
- नेक्स्ट-जनरेशन इंटरफ़ेस: रोबोटिक्स, स्मार्ट ग्लास, और वाहनों में आवाज़ और वीडियो की सुविधा वाले अनुभव.
- स्वास्थ्य सेवा: मरीज़ों की मदद और उन्हें जानकारी देने के लिए, हेल्थ कंपैनियन.
- वित्तीय सेवाएं: धन के प्रबंधन और निवेश के बारे में सलाह देने के लिए, एआई सलाहकार.
- शिक्षा: एआई मेंटर और लर्नर कंपैनियन, जो लोगों की ज़रूरतों के हिसाब से निर्देश और सुझाव देते हैं.
- अनुवाद और स्थानीयकरण: बोली जाने वाली बातचीत का रीयल-टाइम में, कम समय में अनुवाद. इससे अलग-अलग भाषाओं में आसानी से बातचीत की जा सकती है.
मुख्य सुविधाएं
Live API, बोलकर बातचीत करने वाले मज़बूत एजेंट बनाने के लिए कई सुविधाएं उपलब्ध कराता है:
- कई भाषाओं में काम करने की सुविधा: 70 भाषाओं में बातचीत की जा सकती है.
- बार्ज-इन: उपयोगकर्ता, बातचीत के दौरान किसी भी समय मॉडल को रोक सकते हैं, ताकि उन्हें तुरंत जवाब मिल सकें.
- टूल का इस्तेमाल: इसमें फ़ंक्शन कॉलिंग और Google Search जैसे टूल इंटिग्रेट किए जा सकते हैं, ताकि डाइनैमिक तरीके से बातचीत की जा सके.
- ऑडियो ट्रांसक्रिप्ट: इसमें उपयोगकर्ता के इनपुट और मॉडल आउटपुट, दोनों की टेक्स्ट ट्रांसक्रिप्ट मिलती हैं.
- प्रोऐक्टिव ऑडियो: इससे यह कंट्रोल किया जा सकता है कि मॉडल कब और किन संदर्भों में जवाब दे.
- अफ़ेक्टिव डायलॉग: यह उपयोगकर्ता के इनपुट एक्सप्रेशन के हिसाब से, जवाब देने के तरीके और टोन को अडजस्ट करता है.
- लाइव ट्रांसलेशन: 70 से ज़्यादा भाषाओं में, आवाज़ से आवाज़ में रीयल-टाइम में अनुवाद की सुविधा.
तकनीकी जानकारी
यहां दी गई टेबल में, Live API की तकनीकी जानकारी दी गई है:
| कैटगरी | विवरण |
|---|---|
| इनपुट मोडेलिटी | ऑडियो (रॉ 16-बिट पीसीएम ऑडियो, 16 किलोहर्ट्ज़, लिटिल-एंडियन), इमेज (जेपीईजी <= 1एफ़पीएस), टेक्स्ट |
| आउटपुट मोडेलिटी | ऑडियो (रॉ 16-बिट पीसीएम ऑडियो, 24 किलोहर्ट्ज़, लिटिल-एंडियन) |
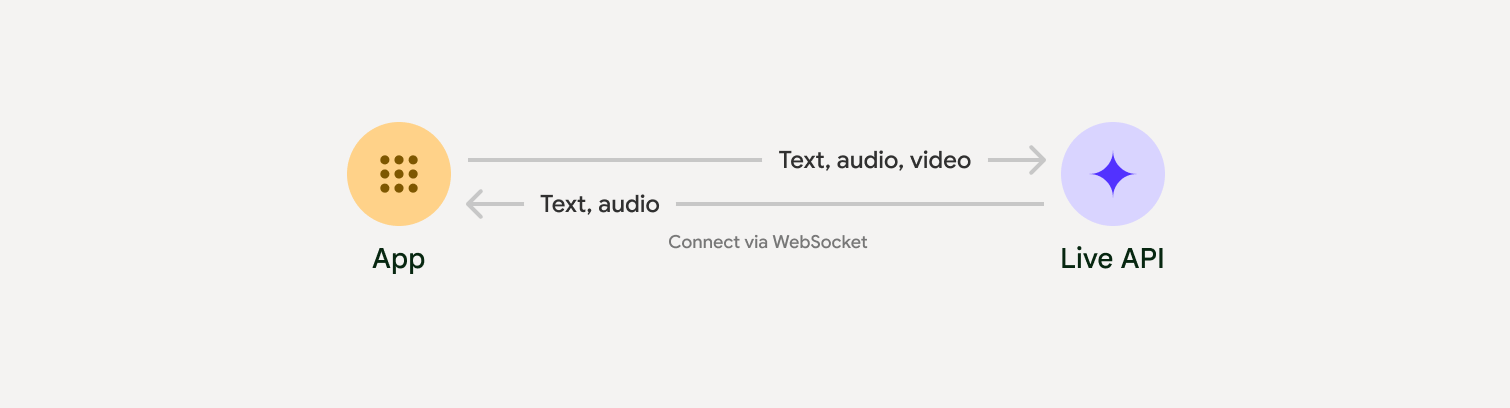
| प्रोटोकॉल | स्टेटफ़ुल WebSocket कनेक्शन (WSS) |
इस सुविधा को लागू करने का तरीका चुनना
Live API को इंटिग्रेट करते समय, आपको इस सुविधा को लागू करने के लिए इनमें से कोई एक तरीका चुनना होगा:
- सर्वर-टू-सर्वर: आपका बैकएंड, WebSockets का इस्तेमाल करके Live API से कनेक्ट होता है. आम तौर पर, आपका क्लाइंट स्ट्रीम डेटा (ऑडियो, वीडियो, टेक्स्ट) आपके सर्वर को भेजता है. इसके बाद, आपका सर्वर इसे Live API को फ़ॉरवर्ड करता है.
- क्लाइंट-टू-सर्वर: आपका फ़्रंटएंड कोड, डेटा स्ट्रीम करने के लिए WebSockets का इस्तेमाल करके सीधे Live API से कनेक्ट होता है. इसमें आपके बैकएंड की ज़रूरत नहीं होती.
शुरू करें
वह गाइड चुनें जो आपके डेवलपमेंट एनवायरमेंट से मेल खाती हो:
GenAI SDK का ट्यूटोरियल
Python बैकएंड वाले रीयल-टाइम मल्टीमॉडल ऐप्लिकेशन बनाने के लिए, GenAI SDK का इस्तेमाल करके Gemini Live API से कनेक्ट करें.
WebSocket का ट्यूटोरियल
JavaScript फ़्रंटएंड और कुछ समय के लिए मान्य टोकन वाले रीयल-टाइम मल्टीमॉडल ऐप्लिकेशन बनाने के लिए, WebSockets का इस्तेमाल करके Gemini Live API से कनेक्ट करें.
ADK का ट्यूटोरियल
कोई एजेंट बनाएं और आवाज़ और वीडियो के ज़रिए बातचीत करने की सुविधा चालू करने के लिए, एजेंट डेवलपमेंट किट (एडीके) स्ट्रीमिंग का इस्तेमाल करें.
पार्टनर इंटीग्रेशन
रीयल-टाइम में ऑडियो और वीडियो ऐप्लिकेशन के डेवलपमेंट को आसान बनाने के लिए, तीसरे पक्ष के इंटिग्रेशन का इस्तेमाल किया जा सकता है. यह इंटिग्रेशन, WebRTC या WebSockets पर Gemini Live API के साथ काम करता है.
LiveKit
LiveKit एजेंट के साथ Gemini Live API का इस्तेमाल करें.
Daily का Pipecat
Gemini Live और Pipecat का इस्तेमाल करके, रीयल-टाइम में एआई चैटबॉट बनाएं.
Software Mansion का Fishjam
Fishjam की मदद से, लाइव वीडियो और ऑडियो स्ट्रीमिंग ऐप्लिकेशन बनाएं.
Stream के Vision Agents
Vision Agents की मदद से, रीयल-टाइम में आवाज़ और वीडियो की सुविधा वाले एआई ऐप्लिकेशन बनाएं.
Voximplant
Voximplant की मदद से, इनबाउंड और आउटबाउंड कॉल को Live API से कनेक्ट करें.
Agora
अगोरा की मदद से, रीयल-टाइम में बातचीत करने वाले एआई ऐप्लिकेशन बनाएं.
Firebase AI SDK
Firebase AI Logic का इस्तेमाल करके, Gemini Live API का इस्तेमाल शुरू करें.