
您可以使用 MediaPipe 圖片區隔器工作,根據預先定義的類別將圖片分割成區域,以便套用背景模糊處理等視覺效果。本說明會說明如何在 Android 應用程式中使用圖片分割器。您可以在 GitHub 上找到這些操作說明中所述的程式碼範例。如要進一步瞭解這項工作的功能、模型和設定選項,請參閱總覽。
程式碼範例
MediaPipe Tasks 程式碼範例包含兩種簡單的 Android 圖片分割器應用程式實作方式:
這些範例會使用實體 Android 裝置的相機,在即時相機動態饋給上執行圖像區隔作業,您也可以從裝置相片庫中選擇圖片和影片。您可以使用這些應用程式做為自有 Android 應用程式的起點,或是在修改現有應用程式時參考這些應用程式。圖片區隔器範例程式碼託管於 GitHub 上。
以下各節將參照含有類別遮罩的圖片分割器應用程式。
下載程式碼
以下操作說明說明如何使用 git 指令列工具,建立範例程式碼的本機副本。
下載程式碼範例:
- 使用下列指令複製 Git 存放區:
git clone https://github.com/google-ai-edge/mediapipe-samples
- 您可以選擇將 Git 例項設定為使用稀疏檢查,這樣您就只會取得 Image Segmenter 範例應用程式的檔案:
cd mediapipe-samples
git sparse-checkout init --cone
git sparse-checkout set examples/image_segmentation/android
建立本機版本的範例程式碼後,您可以將專案匯入 Android Studio 並執行應用程式。如需操作說明,請參閱 Android 設定指南。
重要元件
下列檔案包含此圖像分割範例應用程式的重要程式碼:
- ImageSegmenterHelper.kt:初始化圖片區隔器工作,並處理模型和委派函式選項。
- CameraFragment.kt:提供相機的使用者介面和控制程式碼。
- GalleryFragment.kt:提供用於選取圖片和影片檔案的使用者介面和控制程式碼。
- OverlayView.kt - 處理並格式化區隔結果。
設定
本節將說明設定開發環境和程式碼專案以使用圖片分割器的關鍵步驟。如要進一步瞭解如何設定開發環境以使用 MediaPipe 工作,包括平台版本需求,請參閱 Android 設定指南。
依附元件
圖片區隔器會使用 com.google.mediapipe:tasks-vision 程式庫。將這個依附元件新增至 Android 應用程式開發專案的 build.gradle 檔案。使用以下程式碼匯入必要的依附元件:
dependencies {
    ...
    implementation 'com.google.mediapipe:tasks-vision:latest.release'
}
型號
MediaPipe 圖片區塊劃分器工作需要訓練的模型,且必須與此工作相容。如要進一步瞭解可用訓練模型的圖片區隔器,請參閱任務總覽的「模型」一節。
選取並下載模型,然後將模型儲存在專案目錄中:
<dev-project-root>/src/main/assets
請使用 BaseOptions.Builder.setModelAssetPath() 方法指定模型使用的路徑。這個方法會在下一節的程式碼範例中提及。
在圖片區隔器範例程式碼中,模型是在 setupImageSegmenter() 函式中的 ImageSegmenterHelper.kt 類別中定義。
建立工作
您可以使用 createFromOptions 函式建立工作。createFromOptions 函式接受設定選項,包括遮罩輸出類型。如要進一步瞭解工作設定,請參閱「設定選項」。
圖片區隔器工作支援下列輸入資料類型:靜態圖片、影片檔案和即時影像串流。建立工作時,您必須指定與輸入資料類型相對應的執行模式。請選擇輸入資料類型的分頁,瞭解如何建立該工作。
圖片
ImageSegmenterOptions options =
  ImageSegmenterOptions.builder()
    .setBaseOptions(
      BaseOptions.builder().setModelAssetPath("model.tflite").build())
    .setRunningMode(RunningMode.IMAGE)
    .setOutputCategoryMask(true)
    .setOutputConfidenceMasks(false)
    .build();
imagesegmenter = ImageSegmenter.createFromOptions(context, options);
影片
ImageSegmenterOptions options =
  ImageSegmenterOptions.builder()
    .setBaseOptions(
      BaseOptions.builder().setModelAssetPath("model.tflite").build())
    .setRunningMode(RunningMode.VIDEO)
    .setOutputCategoryMask(true)
    .setOutputConfidenceMasks(false)
    .build();
imagesegmenter = ImageSegmenter.createFromOptions(context, options);
直播
ImageSegmenterOptions options =
  ImageSegmenterOptions.builder()
    .setBaseOptions(
      BaseOptions.builder().setModelAssetPath("model.tflite").build())
    .setRunningMode(RunningMode.LIVE_STREAM)
    .setOutputCategoryMask(true)
    .setOutputConfidenceMasks(false)
    .setResultListener((result, inputImage) -> {
         // Process the segmentation result here.
    })
    .setErrorListener((result, inputImage) -> {
         // Process the segmentation errors here.
    })
    .build()
imagesegmenter = ImageSegmenter.createFromOptions(context, options)
圖片區塊分割器範例程式碼實作可讓使用者切換處理模式。這個方法會使建立工作程式的程式碼變得更複雜,可能不適合您的用途。您可以透過 setupImageSegmenter() 函式,在 ImageSegmenterHelper 類別中查看這段程式碼。
設定選項
此工作提供下列 Android 應用程式設定選項:
| 選項名稱 | 說明 | 值範圍 | 預設值 |
|---|---|---|---|
runningMode |
設定工作執行模式。共有三種模式: IMAGE:單一圖片輸入模式。 VIDEO:影片解碼影格模式。 LIVE_STREAM:輸入資料 (例如來自攝影機的資料) 的直播模式。 在這個模式中,必須呼叫 resultListener,才能設定事件監聽器,以非同步方式接收結果。 |
{IMAGE, VIDEO, LIVE_STREAM} |
IMAGE |
outputCategoryMask |
如果設為 True,輸出內容會包含分割遮罩,做為 uint8 圖片,其中每個像素值都會指出勝出的類別值。 |
{True, False} |
False |
outputConfidenceMasks |
如果設為 True,輸出內容會包含分割遮罩,做為浮點值圖片,其中每個浮點值代表類別的信心分數對應。 |
{True, False} |
True |
displayNamesLocale |
設定標籤語言,用於工作模型中繼資料中提供的顯示名稱 (如有)。預設值為英文的 en。您可以使用 TensorFlow Lite Metadata Writer API,在自訂模型的中繼資料中新增本地化標籤 |
語言代碼 | en |
resultListener |
在圖片分割器處於 LIVE_STREAM 模式時,將結果事件監聽器設為以非同步方式接收分割結果。只有在執行模式設為 LIVE_STREAM 時,才能使用 |
不適用 | 不適用 |
errorListener |
設定選用的錯誤監聽器。 | 不適用 | 未設定 |
準備資料
圖片分割器可處理圖片、影片檔案和直播影片。這個工作會處理資料輸入預先處理作業,包括調整大小、旋轉和值規格化。
您必須先將輸入圖片或影格轉換為 com.google.mediapipe.framework.image.MPImage 物件,再傳送至圖片區塊分割器。
圖片
import com.google.mediapipe.framework.image.BitmapImageBuilder;
import com.google.mediapipe.framework.image.MPImage;

// Load an image on the user’s device as a Bitmap object using BitmapFactory.

// Convert an Android’s Bitmap object to a MediaPipe’s Image object.
Image mpImage = new BitmapImageBuilder(bitmap).build();
影片
import com.google.mediapipe.framework.image.BitmapImageBuilder;
import com.google.mediapipe.framework.image.MPImage;

// Load a video file on the user's device using MediaMetadataRetriever

// From the video’s metadata, load the METADATA_KEY_DURATION and
// METADATA_KEY_VIDEO_FRAME_COUNT value. You’ll need them
// to calculate the timestamp of each frame later.

// Loop through the video and load each frame as a Bitmap object.

// Convert the Android’s Bitmap object to a MediaPipe’s Image object.
Image mpImage = new BitmapImageBuilder(frame).build();
直播
import com.google.mediapipe.framework.image.MediaImageBuilder;
import com.google.mediapipe.framework.image.MPImage;

// Create a CameraX’s ImageAnalysis to continuously receive frames
// from the device’s camera. Configure it to output frames in RGBA_8888
// format to match with what is required by the model.

// For each Android’s ImageProxy object received from the ImageAnalysis,
// extract the encapsulated Android’s Image object and convert it to
// a MediaPipe’s Image object.
android.media.Image mediaImage = imageProxy.getImage()
Image mpImage = new MediaImageBuilder(mediaImage).build();
在圖片區隔器範例程式碼中,資料準備作業會由 segmentLiveStreamFrame() 函式在 ImageSegmenterHelper 類別中處理。
執行工作
您可以根據使用的執行模式呼叫不同的 segment 函式。ImageSegmenter 函式會傳回輸入圖片或影格內已識別的區段。
圖片
ImageSegmenterResult segmenterResult = imagesegmenter.segment(image);
影片
// Calculate the timestamp in milliseconds of the current frame.
long frame_timestamp_ms = 1000 * video_duration * frame_index / frame_count;

// Run inference on the frame.
ImageSegmenterResult segmenterResult =
    imagesegmenter.segmentForVideo(image, frameTimestampMs);
直播
// Run inference on the frame. The segmentations results will be available via
// the `resultListener` provided in the `ImageSegmenterOptions` when the image
// segmenter was created.
imagesegmenter.segmentAsync(image, frameTimestampMs);
注意事項:
- 在影片模式或直播模式下執行時,您也必須向圖片分割器工作提供輸入影格時間戳記。
- 在圖片或影片模式下執行時,圖片區塊分割器工作會阻斷目前的執行緒,直到處理完輸入圖片或影格為止。為避免阻斷使用者介面,請在背景執行緒中執行處理作業。
- 在直播模式下執行時,圖片區塊劃分器工作不會阻斷目前的執行緒,而是會立即傳回。每次處理完輸入影格後,它都會使用偵測結果叫用結果監聽器。如果在圖片區塊分割器工作忙於處理其他影格時呼叫
segmentAsync函式,工作會忽略新的輸入影格。
在圖片區隔器範例程式碼中,segment 函式是在 ImageSegmenterHelper.kt 檔案中定義。
處理及顯示結果
執行推論時,圖片區隔器工作會傳回 ImageSegmenterResult 物件,其中包含區隔工作結果。輸出內容取決於您在設定工作時設定的 outputType。
以下各節會列舉此工作產生的輸出資料範例:
類別可信度
以下圖片顯示分類信心遮罩工作輸出的視覺化效果。信心遮罩輸出內容包含 [0, 1] 之間的浮點值。
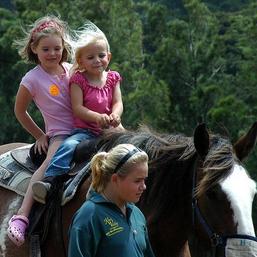
原始圖片和類別信心遮罩輸出結果。Pascal VOC 2012 資料集的原始圖片。
類別值
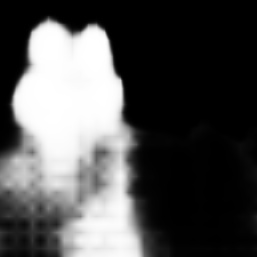
下圖顯示類別值遮罩的工作輸出結果視覺化資訊。類別遮罩範圍為 [0, 255],每個像素值代表模型輸出的獲勝類別索引。勝出的類別索引是模型可辨識的類別中分數最高者。

原始圖片和類別遮罩輸出結果。Pascal VOC 2012 資料集的原始圖片。