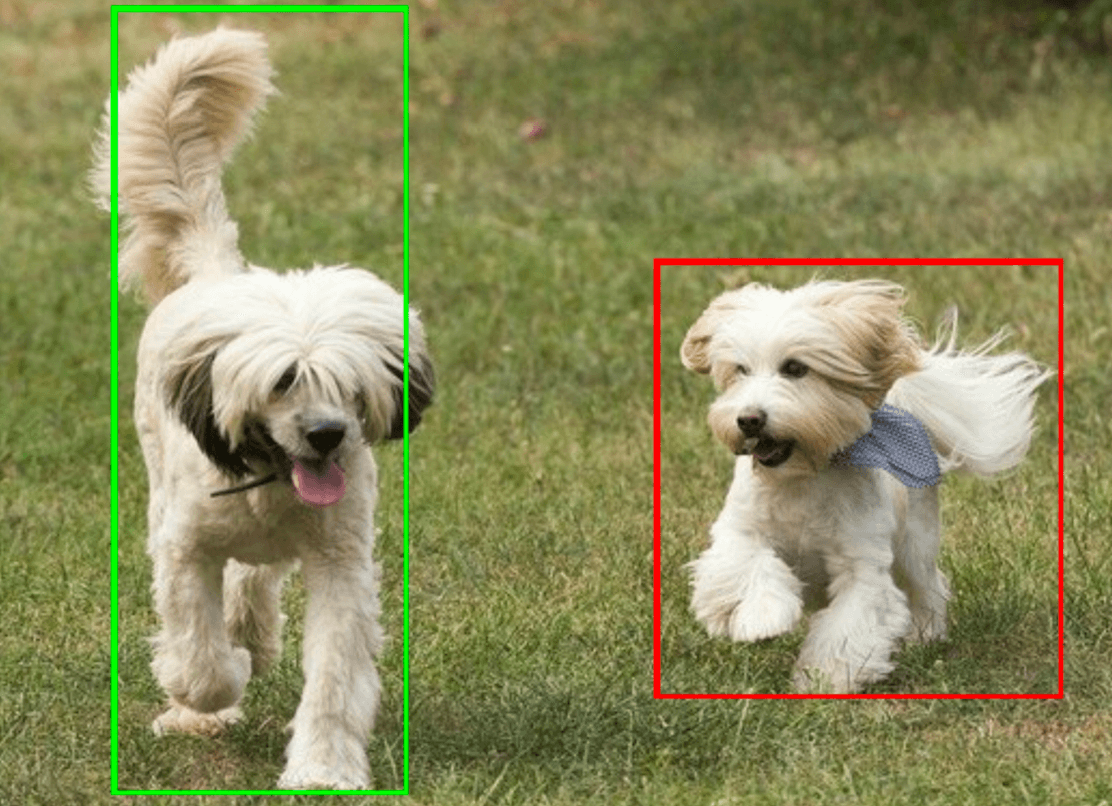
借助对象检测器任务,您可以检测多类对象的存在情况和位置。例如,对象检测器可以定位图片中的狗。以下说明介绍了如何在 iOS 中使用对象检测器任务。这些说明中介绍的代码示例可在 GitHub 上找到。
您可以查看此Web 演示,了解此任务的实际运作方式。如需详细了解此任务的功能、模型和配置选项,请参阅概览。
代码示例
MediaPipe Tasks 示例代码是对适用于 iOS 的 Object Detector 应用的基本实现。该示例使用实体 iOS 设备上的摄像头持续检测对象,还可以使用设备图库中的图片和视频静态检测对象。
您可以将该应用用作自己的 iOS 应用的起点,也可以在修改现有应用时参考该应用。物体检测器示例代码托管在 GitHub 上。
下载代码
以下说明介绍了如何使用 git 命令行工具创建示例代码的本地副本。
如需下载示例代码,请执行以下操作:
使用以下命令克隆 Git 代码库:
git clone https://github.com/google-ai-edge/mediapipe-samples(可选)将您的 Git 实例配置为使用稀疏检出,以便您只保留对象检测器示例应用的文件:
cd mediapipe-samples
git sparse-checkout init --cone
git sparse-checkout set examples/object_detection/ios/
创建示例代码的本地版本后,您可以安装 MediaPipe 任务库,使用 Xcode 打开项目并运行应用。如需了解相关说明,请参阅 适用于 iOS 的设置指南。
关键组件
以下文件包含物体检测器示例应用的重要代码:
- ObjectDetectorService.swift:初始化检测器、处理模型选择,并对输入数据运行推理。
- CameraViewController.swift:实现实时摄像头画面输入模式的界面,并直观呈现检测结果。
- MediaLibraryViewController.swift:实现静态图片和视频文件输入模式的界面,并直观呈现检测结果。
设置
本部分介绍了设置开发环境和编写代码项目以使用对象检测器的关键步骤。如需了解如何设置开发环境以使用 MediaPipe 任务(包括平台版本要求)的一般信息,请参阅 适用于 iOS 的设置指南。
依赖项
对象检测器使用 MediaPipeTasksVision 库,必须使用 CocoaPods 安装该库。该库与 Swift 和 Objective-C 应用兼容,并且无需任何额外的语言专用设置。
如需了解如何在 macOS 上安装 CocoaPods,请参阅 CocoaPods 安装指南。如需了解如何创建包含应用所需 pod 的 Podfile,请参阅使用 CocoaPods。
使用以下代码在 Podfile 中添加 MediaPipeTasksVision pod:
target 'MyObjectDetectorApp' do
  use_frameworks!
  pod 'MediaPipeTasksVision'
end
如果您的应用包含单元测试目标,请参阅 iOS 设置指南,详细了解如何设置 Podfile。
型号
MediaPipe 对象检测器任务需要与此任务兼容的训练模型。如需详细了解可供对象检测器使用的已训练模型,请参阅任务概览的“模型”部分。
选择并下载模型,然后使用 Xcode 将其添加到项目目录中。 如需了解如何向 Xcode 项目添加文件,请参阅管理 Xcode 项目中的文件和文件夹。
使用 BaseOptions.modelAssetPath 属性指定 app bundle 中的模型路径。如需查看代码示例,请参阅下一部分。
创建任务
您可以通过调用其某个初始化程序来创建对象检测器任务。ObjectDetector(options:) 初始化程序会为配置选项设置值,包括运行模式、显示名称语言区域、结果数量上限、置信度阈值、类别许可名单和禁止名单。
如果您不需要使用自定义配置选项初始化对象检测器,可以使用 ObjectDetector(modelPath:) 初始化程序使用默认选项创建对象检测器。如需详细了解配置选项,请参阅配置概览。
对象检测器任务支持 3 种输入数据类型:静态图片、视频文件和实时视频流。默认情况下,ObjectDetector(modelPath:) 会为静态图片初始化任务。如果您希望任务初始化以处理视频文件或实时视频串流,请使用 ObjectDetector(options:) 指定视频或直播运行模式。直播模式还需要额外的 objectDetectorLiveStreamDelegate 配置选项,以便对象检测器能够异步将检测结果传递给代理。
选择与您的运行模式对应的标签页,了解如何创建任务并运行推理。
Swift
Image
import MediaPipeTasksVision

let modelPath = Bundle.main.path(forResource: "model",
                                      ofType: "tflite")

let options = ObjectDetectorOptions()
options.baseOptions.modelAssetPath = modelPath
options.runningMode = .image
options.maxResults = 5

let objectDetector = try ObjectDetector(options: options)
视频
import MediaPipeTasksVision

let modelPath = Bundle.main.path(forResource: "model",
                                      ofType: "tflite")

let options = ObjectDetectorOptions()
options.baseOptions.modelAssetPath = modelPath
options.runningMode = .video
options.maxResults = 5

let objectDetector = try ObjectDetector(options: options)
直播
import MediaPipeTasksVision

// Class that conforms to the `ObjectDetectorLiveStreamDelegate` protocol and
// implements the method that the object detector calls once it
// finishes performing detection on each input frame.
class ObjectDetectorResultProcessor: NSObject, ObjectDetectorLiveStreamDelegate {

  func objectDetector(
    _ objectDetector: ObjectDetector,
    didFinishDetection objectDetectionResult: ObjectDetectorResult?,
    timestampInMilliseconds: Int,
    error: Error?) {
    // Process the detection result or errors here.
  }
}

let modelPath = Bundle.main.path(forResource: "model",
                                      ofType: "tflite")

let options = ObjectDetectorOptions()
options.baseOptions.modelAssetPath = modelPath
options.runningMode = .liveStream
options.maxResults = 5

// Assign an object of the class to the `objectDetectorLiveStreamDelegate`
// property.
let processor = ObjectDetectorResultProcessor()
options.objectDetectorLiveStreamDelegate = processor

let objectDetector = try ObjectDetector(options: options)
Objective-C
Image
@import MediaPipeTasksVision;

NSString *modelPath = [[NSBundle mainBundle] pathForResource:@"model"
                                                      ofType:@"tflite"];

MPPObjectDetectorOptions *options = [[MPPObjectDetectorOptions alloc] init];
options.baseOptions.modelAssetPath = modelPath;
options.runningMode = MPPRunningModeImage;
options.maxResults = 5;

MPPObjectDetector *objectDetector =
      [[MPPObjectDetector alloc] initWithOptions:options error:nil];
视频
@import MediaPipeTasksVision;

NSString *modelPath = [[NSBundle mainBundle] pathForResource:@"model"
                                                      ofType:@"tflite"];

MPPObjectDetectorOptions *options = [[MPPObjectDetectorOptions alloc] init];
options.baseOptions.modelAssetPath = modelPath;
options.runningMode = MPPRunningModeVideo;
options.maxResults = 5;

MPPObjectDetector *objectDetector =
      [[MPPObjectDetector alloc] initWithOptions:options error:nil];
直播
@import MediaPipeTasksVision; // Class that conforms to the `ObjectDetectorLiveStreamDelegate` protocol and // implements the method that the object detector calls once it // finishes performing detection on each input frame. @interface APPObjectDetectorResultProcessor : NSObject@end @implementation MPPObjectDetectorResultProcessor - (void)objectDetector:(MPPObjectDetector *)objectDetector didFinishDetectionWithResult:(MPPObjectDetectorResult *)ObjectDetectorResult timestampInMilliseconds:(NSInteger)timestampInMilliseconds error:(NSError *)error { // Process the detection result or errors here. } @end NSString *modelPath = [[NSBundle mainBundle] pathForResource:@"model" ofType:@"tflite"]; MPPObjectDetectorOptions *options = [[MPPObjectDetectorOptions alloc] init]; options.baseOptions.modelAssetPath = modelPath; options.runningMode = MPPRunningModeLiveStream; options.maxResults = 5; // Assign an object of the class to the `objectDetectorLiveStreamDelegate` // property. APPObjectDetectorResultProcessor *processor = [APPObjectDetectorResultProcessor new]; options.objectDetectorLiveStreamDelegate = processor; MPPObjectDetector *objectDetector = [[MPPObjectDetector alloc] initWithOptions:options error:nil];
配置选项
此任务针对 iOS 应用提供了以下配置选项:
| 选项名称 | 说明 | 值范围 | 默认值 |
|---|---|---|---|
runningMode |
设置任务的运行模式。共有三种模式: IMAGE:适用于单张图片输入的模式。 视频:视频的解码帧的模式。 LIVE_STREAM:输入数据(例如来自摄像头)的直播模式。在此模式下,必须调用 resultListener 以设置监听器以异步接收结果。 |
{RunningMode.image, RunningMode.video, RunningMode.liveStream} |
RunningMode.image |
displayNamesLocales |
设置要为任务模型的元数据(如果有)中提供的显示名称使用的标签语言。默认值为 en(英语)。您可以使用 TensorFlow Lite Metadata Writer API 向自定义模型的元数据添加本地化标签
|
语言区域代码 | en |
maxResults |
设置可选的要返回的得分最高的检测结果的数量上限。 | 任何正数 | -1(返回所有结果) |
scoreThreshold |
设置预测得分阈值,该阈值会替换模型元数据中提供的阈值(如果有)。低于此值的结果将被拒绝。 | 任何浮点数 | 未设置 |
categoryAllowlist |
设置允许的类别名称的可选列表。如果不为空,则系统会滤除类别名称不在该集合中的检测结果。系统会忽略重复或未知的类别名称。此选项与 categoryDenylist 互斥,同时使用这两个选项会导致错误。 |
任何字符串 | 未设置 |
categoryDenylist |
设置不允许的类别名称的可选列表。如果不为空,系统会滤除类别名称在此集合中的检测结果。系统会忽略重复或未知的类别名称。此选项与 categoryAllowlist 互斥,同时使用这两个选项会导致错误。 |
任何字符串 | 未设置 |
直播配置
将运行模式设置为直播时,对象检测器需要额外的 objectDetectorLiveStreamDelegate 配置选项,以便检测器异步提供检测结果。代理会实现 objectDetector(_objectDetector:didFinishDetection:timestampInMilliseconds:error:) 方法,对象检测器会在处理每个帧的检测结果后调用该方法。
| 选项名称 | 说明 | 值范围 | 默认值 |
|---|---|---|---|
objectDetectorLiveStreamDelegate |
让对象检测器能够在直播模式下异步接收检测结果。将实例设置为此属性的类必须实现 objectDetector(_:didFinishDetection:timestampInMilliseconds:error:) 方法。 |
不适用 | 未设置 |
准备数据
您需要先将输入图片或帧转换为 MPImage 对象,然后才能将其传递给对象检测器。MPImage 支持不同类型的 iOS 图片格式,并且可以在任何运行模式下使用这些格式进行推理。如需详细了解 MPImage,请参阅 MPImage API。
根据您的用例和应用所需的运行模式选择 iOS 图片格式。MPImage 接受 UIImage、CVPixelBuffer 和 CMSampleBuffer iOS 图片格式。
UIImage
UIImage 格式非常适合以下运行模式:
图片:应用 bundle、用户图库或文件系统中格式为
UIImage图片的图片可以转换为MPImage对象。视频:使用 AVAssetImageGenerator 将视频帧提取为 CGImage 格式,然后将其转换为
UIImage图片。
Swift
// Load an image on the user's device as an iOS `UIImage` object.

// Convert the `UIImage` object to a MediaPipe's Image object having the default
// orientation `UIImage.Orientation.up`.
let image = try MPImage(uiImage: image)
Objective-C
// Load an image on the user's device as an iOS `UIImage` object.

// Convert the `UIImage` object to a MediaPipe's Image object having the default
// orientation `UIImageOrientationUp`.
MPImage *image = [[MPPImage alloc] initWithUIImage:image error:nil];
该示例使用默认的 UIImage.Orientation.Up 方向初始化 MPImage。您可以使用任何受支持的 UIImage.Orientation 值初始化 MPImage。对象检测器不支持镜像屏幕方向,例如 .upMirrored、.downMirrored、.leftMirrored、.rightMirrored。
如需详细了解 UIImage,请参阅 UIImage Apple 开发者文档。
CVPixelBuffer
CVPixelBuffer 格式非常适合生成帧并使用 iOS CoreImage 框架进行处理的应用。
CVPixelBuffer 格式非常适合以下运行模式:
图片:在图片运行模式下,使用 iOS 的
CoreImage框架进行一些处理后生成CVPixelBuffer图片的应用可以发送到对象检测器。视频:视频帧可以转换为
CVPixelBuffer格式以进行处理,然后以视频模式发送到对象检测器。直播:使用 iOS 相机生成帧的应用可能会先转换为
CVPixelBuffer格式进行处理,然后再以直播模式发送到对象检测器。
Swift
// Obtain a CVPixelBuffer.

// Convert the `CVPixelBuffer` object to a MediaPipe's Image object having the default
// orientation `UIImage.Orientation.up`.
let image = try MPImage(pixelBuffer: pixelBuffer)
Objective-C
// Obtain a CVPixelBuffer.

// Convert the `CVPixelBuffer` object to a MediaPipe's Image object having the
// default orientation `UIImageOrientationUp`.
MPImage *image = [[MPPImage alloc] initWithUIImage:image error:nil];
如需详细了解 CVPixelBuffer,请参阅 CVPixelBuffer Apple 开发者文档。
CMSampleBuffer
CMSampleBuffer 格式用于存储统一媒体类型的媒体样本,非常适合直播运行模式。iOS 摄像头的实时帧由 iOS AVCaptureVideoDataOutput 以 CMSampleBuffer 格式异步传送。
Swift
// Obtain a CMSampleBuffer.

// Convert the `CMSampleBuffer` object to a MediaPipe's Image object having the default
// orientation `UIImage.Orientation.up`.
let image = try MPImage(sampleBuffer: sampleBuffer)
Objective-C
// Obtain a `CMSampleBuffer`.

// Convert the `CMSampleBuffer` object to a MediaPipe's Image object having the
// default orientation `UIImageOrientationUp`.
MPImage *image = [[MPPImage alloc] initWithSampleBuffer:sampleBuffer error:nil];
如需详细了解 CMSampleBuffer,请参阅 CMSampleBuffer Apple 开发者文档。
运行任务
如需运行对象检测器,请使用特定于分配的运行模式的 detect() 方法:
- 静态图片:
detect(image:) - 视频:
detect(videoFrame:timestampInMilliseconds:) - livestream:
detectAsync(image:)
以下代码示例展示了如何在这些不同运行模式下运行对象检测器的基本示例:
Swift
Image
let objectDetector.detect(image:image)
视频
let objectDetector.detect(videoFrame:image)
直播
let objectDetector.detectAsync(image:image)
Objective-C
Image
MPPObjectDetectorResult *result = [objectDetector detectInImage:image error:nil];
视频
MPPObjectDetectorResult *result = [objectDetector detectInVideoFrame:image timestampInMilliseconds:timestamp error:nil];
直播
BOOL success = [objectDetector detectAsyncInImage:image
                          timestampInMilliseconds:timestamp
                                            error:nil];
对象检测器代码示例详细介绍了 detect(image:)、detect(videoFrame:) 和 detectAsync(image:) 这三种模式的实现。示例代码允许用户在处理模式之间切换,但您的用例可能不需要这样做。
请注意以下几点:
在视频模式或直播模式下运行时,您还必须向对象检测器任务提供输入帧的时间戳。
在图片或视频模式下运行时,对象检测器任务会阻塞当前线程,直到其处理完输入图片或帧。为避免阻塞当前线程,请使用 iOS Dispatch 或 NSOperation 框架在后台线程中执行处理。
在直播模式下运行时,对象检测器任务会立即返回,并且不会阻塞当前线程。它会在处理每个输入帧后,使用检测结果调用
objectDetector(_objectDetector:didFinishDetection:timestampInMilliseconds:error:)方法。对象检测器会在专用串行调度队列上异步调用此方法。如需在界面上显示结果,请在处理结果后将结果分派到主队列。如果在对象检测器任务忙于处理其他帧时调用detectAsync函数,对象检测器会忽略新的输入帧。
处理和显示结果
运行推理后,对象检测器任务会返回一个 ObjectDetectorResult 对象,用于描述它在输入图片中发现的对象。
以下是此任务的输出数据示例:
ObjectDetectorResult:
 Detection #0:
  Box: (x: 355, y: 133, w: 190, h: 206)
  Categories:
   index       : 17
   score       : 0.73828
   class name  : dog
 Detection #1:
  Box: (x: 103, y: 15, w: 138, h: 369)
  Categories:
   index       : 17
   score       : 0.73047
   class name  : dog
下图显示了任务输出的可视化结果:

对象检测器示例代码演示了如何显示从任务返回的检测结果,如需了解详情,请参阅代码示例。
