Computer Use 도구를 사용하면 브라우저, 모바일, 데스크톱 제어 에이전트를 빌드하여 태스크와 상호작용하고 태스크를 자동화할 수 있습니다. 스크린샷을 사용하면 모델이 컴퓨터 화면을 '보고' 마우스 클릭 및 키보드 입력과 같은 특정 UI 작업을 생성하여 '작업'할 수 있습니다. 함수 호출과 마찬가지로 Computer Use 작업을 수신하고 실행하는 클라이언트 측 실행 환경을 구현해야 합니다.
Gemini 3.5 Flash는 Computer Use에 권장되는 모델이며 다음과 같은 여러 새로운 기능을 도입합니다.
- 멀티 환경 지원: 브라우저, 모바일, 데스크톱 환경용 빌드 에이전트
- 의도를 사용한 간소화된 작업: 작업에는 각 단계의 모델 추론을 설명하는
intent필드가 포함됩니다. - 구성 가능한 안전 정책: 기본 제공 정책 카테고리 및 재정의를 사용하여 안전 동작을 미세 조정합니다.
- 프롬프트 인젝션 감지: 숨겨진 적대적 명령어를 감지하려면 스크린샷 스캔을 선택하세요.
Computer Use를 사용하면 다음 작업을 할 수 있는 에이전트를 빌드할 수 있습니다.
- 웹사이트에서 반복적인 데이터 입력과 양식 작성을 자동화합니다.
- 웹 애플리케이션 및 사용자 흐름의 자동 테스트 실행
- 다양한 웹사이트에서 조사 수행 (예: 전자상거래 사이트에서 제품 정보, 가격, 리뷰를 수집하여 구매에 대한 정보 제공)
다음은 브라우저 환경에서 computer_use 도구를 사용 설정하여 클라이언트를 초기화하고 모델에 프롬프트를 전송하는 간단한 예시입니다.
Python
from google import genai

client = genai.Client()

interaction = client.interactions.create(
    model="gemini-3.5-flash",
    input="Search for 'Gemini API' on Google.",
    tools=[{"type": "computer_use", "environment": "browser"}]
)

print(interaction)
자바스크립트
import { GoogleGenAI } from '@google/genai';

const ai = new GoogleGenAI();

const interaction = await ai.interactions.create({
  model: 'gemini-3.5-flash',
  input: "Search for 'Gemini API' on Google.",
  tools: [{ type: "computer_use", environment: "browser" }]
});

console.log(interaction);
Computer Use 작동 방식
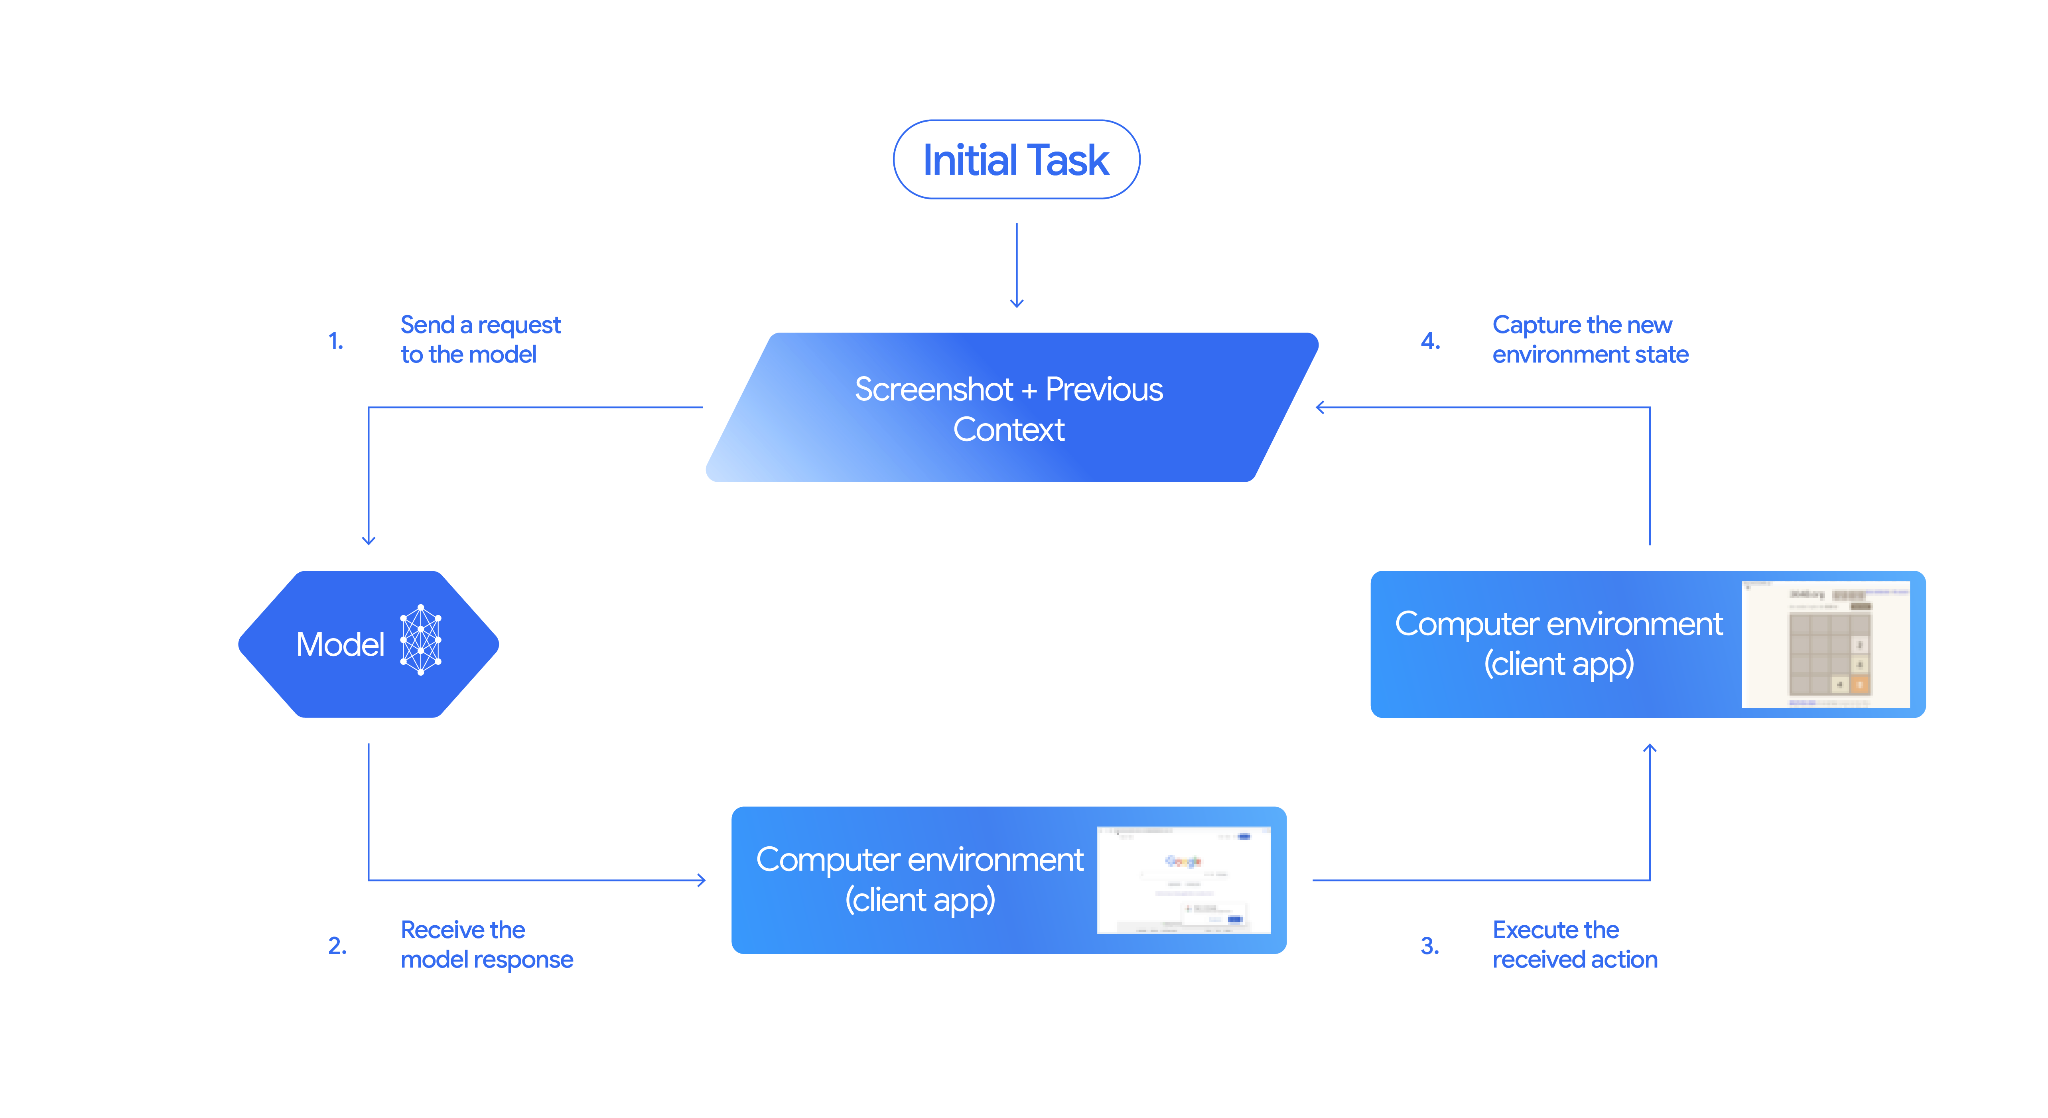
컴퓨터 사용 모델로 에이전트를 빌드하려면 애플리케이션과 API 간에 연속 루프를 설정해야 합니다. 각 단계에서 코드가 실행하는 작업은 다음과 같습니다.
- 모델에 요청 보내기
- 애플리케이션은 Computer Use 도구, 구성 설정 (예: 타겟 환경), 사용자 프롬프트, 현재 화면의 스크린샷이 포함된 API 요청을 전송합니다.
- 모델 대답 수신
- 모델은 화면과 프롬프트를 분석하여 UI 작업을 나타내는 추천
function_call(예: 클릭, 스크롤, 키 입력)이 포함된 대답을 반환합니다. - Gemini 3.5 Flash의 경우 모델이 해당 작업을 선택한 이유를 설명하는 추론
intent도 대답에 포함됩니다. - 대답에는 작업을 일반/허용,
require_confirmation(사용자 승인 필요) 또는 차단으로 분류하는 내부 안전 시스템의safety_decision도 포함될 수 있습니다.
- 모델은 화면과 프롬프트를 분석하여 UI 작업을 나타내는 추천
- 수신된 작업 실행
- 동작이 허용되거나 사용자가 확인하면 클라이언트 측 코드는
function_call를 파싱하고, 정규화된 좌표를 뷰포트에 맞게 조정하고, 자동화 도구(예: Playwright)를 사용하여 대상 환경에서 동작을 실행합니다. 작업이 차단되면 클라이언트는 실행을 중지하거나 중단을 처리해야 합니다.
- 동작이 허용되거나 사용자가 확인하면 클라이언트 측 코드는
- 새 환경 상태 캡처
- 작업이 실행되면 애플리케이션이 새 스크린샷을 캡처하고
function_result에서 모델에 다시 전송하여 다음 단계를 요청합니다.
- 작업이 실행되면 애플리케이션이 새 스크린샷을 캡처하고
그런 다음 이 프로세스는 2단계부터 반복되어 작업이 완료되거나 종료될 때까지 모델에서 다음 작업을 계속 요청합니다.
컴퓨터 사용 구현 방법
컴퓨터 사용 도구로 빌드하기 전에 다음을 설정해야 합니다.
- 안전한 실행 환경: 샌드박스 VM 또는 컨테이너에서 에이전트를 실행하여 호스트 시스템에서 격리하고 잠재적 영향을 제한합니다. 참조 구현에는 시작점으로 사용할 수 있는 즉시 사용 가능한 Docker 기반 샌드박스가 포함되어 있습니다.
- 클라이언트 측 작업 핸들러: 좌표를 실행하고, 텍스트를 입력하고, 스크린샷을 찍는 클라이언트 측 로직을 구현합니다.
아래 예에서는 웹브라우저를 실행 환경으로 사용하고 Playwright를 클라이언트 측 핸들러로 사용합니다.
0. Playwright 설정
먼저 필요한 패키지를 설치합니다.
pip install google-genai playwright
playwright install chromium
그런 다음 실행에 사용할 Playwright 브라우저 인스턴스를 초기화합니다.
from playwright.sync_api import sync_playwright

# 1. Configure screen dimensions for the target environment
SCREEN_WIDTH = 1440
SCREEN_HEIGHT = 900

# 2. Start the Playwright browser
# In production, utilize a sandboxed environment.
playwright = sync_playwright().start()
# Set headless=False to see the actions performed on your screen
browser = playwright.chromium.launch(headless=False)

# 3. Create a context and page with the specified dimensions
context = browser.new_context(
    viewport={"width": SCREEN_WIDTH, "height": SCREEN_HEIGHT}
)
page = context.new_page()

# 4. Navigate to an initial page to start the task
page.goto("https://www.google.com")

# The 'page', 'SCREEN_WIDTH', and 'SCREEN_HEIGHT' variables
# will be used in the steps below.
1. 모델에 요청 보내기
클라이언트 라이브러리를 초기화하고 Computer Use 도구를 구성합니다. 요청을 발행할 때 디스플레이 크기를 지정할 필요는 없습니다. 모델은 화면의 높이와 너비에 맞게 조정된 픽셀 좌표를 예측합니다.
Gemini 3.5 Flash (권장)
Python
google-genai Python SDK (버전 2.7.0 이상)를 사용하여 브라우저 환경을 타겟팅하는 요청을 구성합니다.
from google import genai

client = genai.Client()

interaction = client.interactions.create(
    model='gemini-3.5-flash',
    input="Find a flight from SF to Hawaii on Jun 30th, coming back on Jul 6th",
    tools=[
        {
            "type": "computer_use",
            "environment": "browser",
            "enable_prompt_injection_detection": True
        }
    ]
)

print(interaction)
자바스크립트
@google/genai Node.js SDK를 사용하여 브라우저 환경을 타겟팅하는 요청을 구성합니다.
import { GoogleGenAI } from '@google/genai';

const ai = new GoogleGenAI();

const interaction = await ai.interactions.create({
  model: 'gemini-3.5-flash',
  input: "Find a flight from SF to Hawaii on Jun 30th, coming back on Jul 6th",
  tools: [
    {
      type: "computer_use",
      environment: "browser",
      enable_prompt_injection_detection: true
    }
  ]
});

console.log(interaction);
REST
curl을 사용하여 요청을 보냅니다.
curl -X POST \
  "https://generativelanguage.googleapis.com/v1beta/interactions" \
  -H "x-goog-api-key: $GEMINI_API_KEY" \
  -H "Content-Type: application/json" \
  -d '{
    "model": "gemini-3.5-flash",
    "input": "Find me a flight from SF to Hawaii on Jun 30th, coming back on Jul 6th. Start by navigating directly to flights.google.com",
    "tools": [
      {
        "type": "computer_use",
        "environment": "browser",
        "enable_prompt_injection_detection": true
      }
    ]
  }'
Gemini 2.5 (기존)
Python
from google import genai

client = genai.Client()

# Specify predefined functions to exclude (optional)
excluded_functions = ["drag_and_drop"]

interaction = client.interactions.create(
    model='gemini-2.5-computer-use-preview-10-2025',
    input="Search for highly rated smart fridges on Google Shopping.",
    tools=[
        {
            "type": "computer_use",
            "environment": "browser",
            "excluded_predefined_functions": excluded_functions
        }
    ]
)

print(interaction)
자바스크립트
import { GoogleGenAI } from '@google/genai';

const ai = new GoogleGenAI();

// Specify predefined functions to exclude (optional)
const excludedFunctions = ["drag_and_drop"];

const interaction = await ai.interactions.create({
  model: 'gemini-2.5-computer-use-preview-10-2025',
  input: "Search for highly rated smart fridges on Google Shopping.",
  tools: [
    {
      type: "computer_use",
      environment: "browser",
      excluded_predefined_functions: excludedFunctions
    }
  ]
});

console.log(interaction);
2. 모델 응답 수신
대답 모델이 함수 호출을 제안합니다. Gemini 3.5 Flash의 경우 대답에는 맞춤형 추론 인텐트와 좌표가 포함됩니다. 다음은 두 응답의 예시를 보여줍니다.
Gemini 3.5 Flash
{
  "steps": [
    {
      "type": "function_call",
      "name": "click",
      "arguments": {
        "x": 450,
        "y": 120,
        "intent": "Click the search box to type the destination."
      }
    }
  ]
}
Gemini 2.5 (기존)
{
  "steps": [
    {
      "type": "model_output",
      "content": [
        {
          "type": "text",
          "text": "I will type the search query into the search bar."
        }
      ]
    },
    {
      "type": "function_call",
      "name": "type_text_at",
      "arguments": {
        "x": 371,
        "y": 470,
        "text": "highly rated smart fridges",
        "press_enter": true
      }
    }
  ]
}
3. 수신된 작업 실행
애플리케이션은 응답 좌표를 파싱하고 작업을 실행하고 정규화된 1000x1000 좌표에서 확장해야 합니다.
아래 코드는 기존 도구 명령 (click_at, type_text_at)과 Gemini 3.5 Flash 간소화 명령 (click, type)을 모두 처리합니다.
Python
from typing import Any, List, Tuple
import time

def denormalize_x(x: int, screen_width: int) -> int:
    """Convert normalized x coordinate (0-1000) to actual pixel coordinate."""
    return int(x / 1000 * screen_width)

def denormalize_y(y: int, screen_height: int) -> int:
    """Convert normalized y coordinate (0-1000) to actual pixel coordinate."""
    return int(y / 1000 * screen_height)

def execute_function_calls(interaction, page, screen_width, screen_height):
    results = []
    function_calls = [
        step for step in interaction.steps if step.type == "function_call"
    ]

    for function_call in function_calls:
        action_result = {}
        fname = function_call.name
        args = function_call.arguments
        print(f"  -> Executing: {fname} (Intent: {args.get('intent', 'N/A')})")

        try:
            if fname in ("open_web_browser", "open_app"):
                pass # Handled / already open
            elif fname in ("click", "click_at", "double_click", "triple_click", "middle_click", "right_click", "move", "long_press"):
                actual_x = denormalize_x(args["x"], screen_width)
                actual_y = denormalize_y(args["y"], screen_height)

                if fname in ("click", "click_at"):
                    page.mouse.click(actual_x, actual_y)
                elif fname == "double_click":
                    page.mouse.dblclick(actual_x, actual_y)
                elif fname == "right_click":
                    page.mouse.click(actual_x, actual_y, button="right")
                elif fname == "middle_click":
                    page.mouse.click(actual_x, actual_y, button="middle")
                elif fname == "move":
                    page.mouse.move(actual_x, actual_y)
            elif fname in ("type", "type_text_at"):
                actual_x = denormalize_x(args["x"], screen_width) if "x" in args else None
                actual_y = denormalize_y(args["y"], screen_height) if "y" in args else None
                text = args["text"]
                press_enter = args.get("press_enter", False)

                if actual_x is not None and actual_y is not None:
                    page.mouse.click(actual_x, actual_y)
                # Clear field first
                page.keyboard.press("Meta+A")
                page.keyboard.press("Backspace")
                page.keyboard.type(text)
                if press_enter:
                    page.keyboard.press("Enter")
            elif fname == "navigate":
                page.goto(args["url"])
            elif fname == "go_back":
                page.go_back()
            elif fname == "go_forward":
                page.go_forward()
            elif fname == "wait":
                time.sleep(args.get("seconds", 1))
            else:
                print(f"Warning: Custom or unhandled function {fname}")

            page.wait_for_load_state(timeout=5000)
            time.sleep(1)

        except Exception as e:
            print(f"Error executing {fname}: {e}")
            action_result = {"error": str(e)}

        results.append((fname, function_call.id, action_result))

    return results
자바스크립트
function denormalizeX(x, screenWidth) {
    // Convert normalized x coordinate (0-1000) to actual pixel coordinate.
    return Math.floor((x / 1000) * screenWidth);
}

function denormalizeY(y, screenHeight) {
    // Convert normalized y coordinate (0-1000) to actual pixel coordinate.
    return Math.floor((y / 1000) * screenHeight);
}

async function executeFunctionCalls(interaction, page, screenWidth, screenHeight) {
    const results = [];
    const functionCalls = interaction.steps.filter(step => step.type === "function_call");

    for (const functionCall of functionCalls) {
        const actionResult = {};
        const fname = functionCall.name;
        const args = functionCall.arguments;
        console.log(`  -> Executing: ${fname} (Intent: ${args.intent || 'N/A'})`);

        try {
            if (fname === "open_web_browser" || fname === "open_app") {
                // Handled / already open
            } else if (["click", "click_at", "double_click", "triple_click", "middle_click", "right_click", "move", "long_press"].includes(fname)) {
                const actualX = denormalizeX(args.x, screenWidth);
                const actualY = denormalizeY(args.y, screenHeight);

                if (fname === "click" || fname === "click_at") {
                    await page.mouse.click(actualX, actualY);
                } else if (fname === "double_click") {
                    await page.mouse.dblclick(actualX, actualY);
                } else if (fname === "right_click") {
                    await page.mouse.click(actualX, actualY, { button: "right" });
                } else if (fname === "middle_click") {
                    await page.mouse.click(actualX, actualY, { button: "middle" });
                } else if (fname === "move") {
                    await page.mouse.move(actualX, actualY);
                }
            } else if (fname === "type" || fname === "type_text_at") {
                const actualX = args.x !== undefined ? denormalizeX(args.x, screenWidth) : null;
                const actualY = args.y !== undefined ? denormalizeY(args.y, screenHeight) : null;
                const text = args.text;
                const pressEnter = args.press_enter || false;

                if (actualX !== null && actualY !== null) {
                    await page.mouse.click(actualX, actualY);
                }
                // Clear field first
                await page.keyboard.press("Meta+A");
                await page.keyboard.press("Backspace");
                await page.keyboard.type(text);
                if (pressEnter) {
                    await page.keyboard.press("Enter");
                }
            } else if (fname === "navigate") {
                await page.goto(args.url);
            } else if (fname === "go_back") {
                await page.goBack();
            } else if (fname === "go_forward") {
                await page.goForward();
            } else if (fname === "wait") {
                await new Promise(resolve => setTimeout(resolve, (args.seconds || 1) * 1000));
            } else {
                console.log(`Warning: Custom or unhandled function ${fname}`);
            }

            await page.waitForLoadState('load', { timeout: 5000 }).catch(() => {});
            await new Promise(resolve => setTimeout(resolve, 1000));
        } catch (e) {
            console.log(`Error executing ${fname}: ${e}`);
            actionResult.error = e.message;
        }

        results.push([fname, functionCall.id, actionResult]);
    }

    return results;
}
4. 새 환경 상태 캡처
작업을 실행한 후 이 정보를 사용하여 다음 작업을 생성할 수 있도록 함수 실행 결과를 모델에 다시 전송합니다. 작업 여러 개(병렬 호출)가 실행된 경우 후속 사용자 턴에서 작업마다 function_result를 전송해야 합니다.
Python
import json
import base64

def get_function_responses(page, results):
    screenshot_bytes = page.screenshot(type="png")
    current_url = page.url
    function_responses = []
    for name, call_id, result in results:
        function_responses.append({
            "type": "function_result",
            "name": name,
            "call_id": call_id,
            "result": [
                {
                    "type": "text",
                    "text": json.dumps({"url": current_url, **result})
                },
                {
                    "type": "image",
                    "data": base64.b64encode(screenshot_bytes).decode("utf-8"),
                    "mime_type": "image/png"
                }
            ]
        })
    return function_responses
자바스크립트
async function getFunctionResponses(page, results) {
    const screenshotBuffer = await page.screenshot({ type: 'png' });
    const screenshotBase64 = screenshotBuffer.toString('base64');
    const currentUrl = page.url();
    const functionResponses = [];

    for (const [name, callId, result] of results) {
        functionResponses.push({
            type: "function_result",
            name: name,
            call_id: callId,
            result: [
                {
                    type: "text",
                    text: JSON.stringify({ url: currentUrl, ...result })
                },
                {
                    type: "image",
                    data: screenshotBase64,
                    mime_type: "image/png"
                }
            ]
        });
    }
    return functionResponses;
}
환경 상태를 캡처하고 포맷하는 방법을 정의한 후에는 이러한 모든 단계를 연속 실행 루프로 결합할 수 있습니다.
에이전트 루프 빌드
다단계 상호작용을 사용 설정하려면 컴퓨터 사용 구현 방법 섹션의 네 단계를 단일 루프로 결합합니다. 이 루프는 작업이 완료될 때까지 작업을 요청하고 결과를 모델에 다시 제공합니다.
각 단계에서 모델 응답과 함수 응답을 모두 기록에 추가하여 대화 기록을 올바르게 관리해야 합니다.
Python
import time
from typing import Any, List, Tuple
from playwright.sync_api import sync_playwright

from google import genai

client = genai.Client()

# Constants for screen dimensions
SCREEN_WIDTH = 1440
SCREEN_HEIGHT = 900

# Setup Playwright
print("Initializing browser...")
playwright = sync_playwright().start()
browser = playwright.chromium.launch(headless=False)
context = browser.new_context(viewport={"width": SCREEN_WIDTH, "height": SCREEN_HEIGHT})
page = context.new_page()

# Define helper functions. Copy/paste from steps 3 and 4
# def denormalize_x(...)
# def denormalize_y(...)
# def execute_function_calls(...)
# def get_function_responses(...)

try:
    # Go to initial page
    page.goto("https://ai.google.dev/gemini-api/docs")

    # Take initial screenshot
    initial_screenshot = page.screenshot(type="png")
    USER_PROMPT = "Go to ai.google.dev/gemini-api/docs and search for pricing."
    print(f"Goal: {USER_PROMPT}")

    # First interaction
    interaction = client.interactions.create(
        model='gemini-3.5-flash',
        input=[
            {"type": "text", "text": USER_PROMPT},
            {"type": "image", "data": base64.b64encode(initial_screenshot).decode("utf-8"), "mime_type": "image/png"}
        ],
        tools=[{
            "type": "computer_use",
            "environment": "browser",
            "enable_prompt_injection_detection": True
        }]
    )

    # Agent Loop
    turn_limit = 5
    for i in range(turn_limit):
        print(f"\n--- Turn {i+1} ---")

        has_function_calls = any(
            step.type == "function_call"
            for step in interaction.steps
        )
        if not has_function_calls:
            text_response = " ".join([
                content_block.text for step in interaction.steps if step.type == "model_output"
                for content_block in step.content if content_block.type == "text"
            ])
            print("Agent finished:", text_response)
            break

        print("Executing actions...")
        results = execute_function_calls(interaction, page, SCREEN_WIDTH, SCREEN_HEIGHT)

        print("Capturing state...")
        function_responses = get_function_responses(page, results)

        # Continue conversation with function responses
        interaction = client.interactions.create(
            model='gemini-3.5-flash',
            previous_interaction_id=interaction.id,
            input=function_responses,
            tools=[{
                "type": "computer_use",
                "environment": "browser",
                "enable_prompt_injection_detection": True
            }]
        )

finally:
    # Cleanup
    print("\nClosing browser...")
    browser.close()
    playwright.stop()
자바스크립트
import { chromium } from 'playwright';
import { GoogleGenAI } from '@google/genai';

const ai = new GoogleGenAI();

// Constants for screen dimensions
const SCREEN_WIDTH = 1440;
const SCREEN_HEIGHT = 900;

console.log("Initializing browser...");
const browser = await chromium.launch({ headless: false });
const context = await browser.newContext({
    viewport: { width: SCREEN_WIDTH, height: SCREEN_HEIGHT }
});
const page = await context.newPage();

// Define helper functions. Copy/paste from steps 3 and 4:
// function denormalizeX(...)
// function denormalizeY(...)
// async function executeFunctionCalls(...)
// async function getFunctionResponses(...)

try {
    // Go to initial page
    await page.goto("https://ai.google.dev/gemini-api/docs");

    // Take initial screenshot
    const initialScreenshotBuffer = await page.screenshot({ type: 'png' });
    const initialScreenshotBase64 = initialScreenshotBuffer.toString('base64');
    const USER_PROMPT = "Go to ai.google.dev/gemini-api/docs and search for pricing.";
    console.log(`Goal: ${USER_PROMPT}`);

    // First interaction
    let interaction = await ai.interactions.create({
        model: 'gemini-3.5-flash',
        input: [
            { type: 'text', text: USER_PROMPT },
            { type: 'image', data: initialScreenshotBase64, mime_type: 'image/png' }
        ],
        tools: [{
            type: 'computer_use',
            environment: 'browser',
            enable_prompt_injection_detection: true
        }]
    });

    // Agent Loop
    const turnLimit = 5;
    for (let i = 0; i < turnLimit; i++) {
        console.log(`\n--- Turn ${i + 1} ---`);

        const hasFunctionCalls = interaction.steps.some(step => step.type === "function_call");
        if (!hasFunctionCalls) {
            const textResponses = [];
            for (const step of interaction.steps) {
                if (step.type === "model_output") {
                    for (const contentBlock of step.content || []) {
                        if (contentBlock.type === "text") {
                            textResponses.push(contentBlock.text);
                        }
                    }
                }
            }
            console.log("Agent finished:", textResponses.join(" "));
            break;
        }

        console.log("Executing actions...");
        const results = await executeFunctionCalls(interaction, page, SCREEN_WIDTH, SCREEN_HEIGHT);

        console.log("Capturing state...");
        const functionResponses = await getFunctionResponses(page, results);

        // Continue conversation with function responses
        interaction = await ai.interactions.create({
            model: 'gemini-3.5-flash',
            previous_interaction_id: interaction.id,
            input: functionResponses,
            tools: [{
                type: 'computer_use',
                environment: 'browser',
                enable_prompt_injection_detection: true
            }]
        });
    }
} finally {
    // Cleanup
    console.log("\nClosing browser...");
    await browser.close();
}
지원되는 환경 (Gemini 3.5 Flash)
Gemini 3.5 Flash는 computer_use 구성에 지정된 세 가지 환경을 지원합니다.
브라우저 환경 (ENVIRONMENT_BROWSER)
브라우저 도구에서 사용 가능한 작업:
| 명령어 이름 | 설명 | 인수 (함수 호출에서) |
|---|---|---|
| click | 좌표에서 왼쪽 클릭합니다. | y: int (0~999)x: int (0~999)intent: str |
| double_click | 좌표를 더블클릭합니다. | y: int (0~999)x: int (0~999)intent: str |
| triple_click | 좌표를 세 번 클릭합니다. | y: int (0~999)x: int (0~999)intent: str |
| middle_click | 좌표에서 가운데 클릭합니다. | y: int (0~999)x: int (0~999)intent: str |
| right_click | 좌표에서 마우스 오른쪽 버튼 클릭 | y: int (0~999)x: int (0~999)intent: str |
| mouse_down | 좌표에서 마우스 버튼을 누르고 있습니다. | y: int (0~999)x: int (0~999)intent: str |
| mouse_up | 좌표에서 마우스 버튼을 놓습니다. | y: int (0~999)x: int (0~999)intent: str |
| move | 커서를 지정된 위치로 이동합니다. | y: int (0~999)x: int (0~999)intent: str |
| type | 텍스트를 입력합니다. | text: strpress_enter: bool (선택사항, 기본값: false)intent: str |
| drag_and_drop | 시작 좌표에서 종료 좌표로 항목을 드래그합니다. | start_y: int (0~999)start_x: int (0~999)end_y: int (0~999)end_x: int (0~999)intent: str |
| wait | 지정된 시간(초) 동안 실행을 일시중지합니다. | seconds: int (선택사항, 기본값 1)intent: str |
| press_key | 지정된 키를 눌렀다가 놓습니다. | key: strintent: str |
| key_down | 지정된 키를 누른 상태로 유지합니다. | key: strintent: str |
| key_up | 지정된 키를 해제합니다. | key: strintent: str |
| 핫키 | 지정된 키 조합을 누릅니다. | keys: List[str]intent: str |
| take_screenshot | 현재 화면의 스크린샷을 반환합니다. | intent: 문자열 |
| scroll | 좌표에서 픽셀 거리만큼 위, 아래, 왼쪽 또는 오른쪽으로 스크롤합니다. | y: 정수 (0~999)x: 정수 (0~999)direction: 문자열 ("up", "down", "left", "right")magnitude_in_pixels: 정수 (0~999, 선택사항, 기본값: 300)intent: 문자열 |
| go_back | 브라우저 기록의 이전 웹페이지로 돌아갑니다. | intent: 문자열 |
| navigate | 지정된 URL로 직접 이동합니다. | url: strintent: str |
| go_forward | 브라우저 기록의 다음 웹페이지로 이동합니다. | intent: 문자열 |
모바일 환경 (ENVIRONMENT_MOBILE)
Android 최적화 환경 작업:
| 명령어 이름 | 설명 | 인수 (함수 호출에서) |
|---|---|---|
| open_app | 이름으로 애플리케이션을 엽니다. | app_name: strintent: str |
| click | 좌표에서 왼쪽 클릭합니다. | y: int (0~999)x: int (0~999)intent: str |
| list_apps | 기기에서 사용 가능한 애플리케이션을 나열하여 이름과 패키지 이름을 반환합니다. | intent: 문자열 |
| wait | 지정된 시간(초) 동안 실행을 일시중지합니다. | seconds: int (선택사항, 기본값 1)intent: str |
| go_back | 이전 화면이나 웹페이지로 돌아갑니다. | intent: 문자열 |
| type | 텍스트를 입력합니다. | text: strpress_enter: bool (선택사항, 기본값: false)intent: str |
| drag_and_drop | 시작 좌표에서 종료 좌표로 항목을 드래그합니다. | start_y: int (0~999)start_x: int (0~999)end_y: int (0~999)end_x: int (0~999)intent: str |
| long_press | 화면의 좌표에서 길게 누르기를 실행합니다. | y: int (0~999)x: int (0~999)seconds: int (선택사항, 기본값: 2)intent: str |
| press_key | 지정된 키를 눌렀다가 놓습니다. | key: strintent: str |
| take_screenshot | 현재 화면의 스크린샷을 반환합니다. | intent: 문자열 |
데스크톱 환경 (ENVIRONMENT_DESKTOP)
데스크톱 환경 OS 수준 커서 명령:
| 명령어 이름 | 설명 | 인수 (함수 호출에서) |
|---|---|---|
| click | 좌표에서 왼쪽 클릭합니다. | y: int (0~999)x: int (0~999)intent: str |
| double_click | 좌표를 더블클릭합니다. | y: int (0~999)x: int (0~999)intent: str |
| triple_click | 좌표를 세 번 클릭합니다. | y: int (0~999)x: int (0~999)intent: str |
| middle_click | 좌표에서 가운데 클릭합니다. | y: int (0~999)x: int (0~999)intent: str |
| right_click | 좌표에서 마우스 오른쪽 버튼 클릭 | y: int (0~999)x: int (0~999)intent: str |
| mouse_down | 좌표에서 마우스 버튼을 누르고 있습니다. | y: int (0~999)x: int (0~999)intent: str |
| mouse_up | 좌표에서 마우스 버튼을 놓습니다. | y: int (0~999)x: int (0~999)intent: str |
| move | 커서를 지정된 위치로 이동합니다. | y: int (0~999)x: int (0~999)intent: str |
| type | 텍스트를 입력합니다. | text: strpress_enter: bool (선택사항, 기본값: false)intent: str |
| drag_and_drop | 시작 좌표에서 종료 좌표로 항목을 드래그합니다. | start_y: int (0~999)start_x: int (0~999)end_y: int (0~999)end_x: int (0~999)intent: str |
| wait | 지정된 시간(초) 동안 실행을 일시중지합니다. | seconds: int (선택사항, 기본값 1)intent: str |
| press_key | 지정된 키를 눌렀다가 놓습니다. | key: strintent: str |
| key_down | 지정된 키를 누른 상태로 유지합니다. | key: strintent: str |
| key_up | 지정된 키를 해제합니다. | key: strintent: str |
| 핫키 | 지정된 키 조합을 누릅니다. | keys: List[str]intent: str |
| take_screenshot | 현재 화면의 스크린샷을 반환합니다. | intent: 문자열 |
| scroll | 좌표에서 픽셀 거리만큼 위, 아래, 왼쪽 또는 오른쪽으로 스크롤합니다. | y: 정수 (0~999)x: 정수 (0~999)direction: 문자열 ("up", "down", "left", "right")magnitude_in_pixels: 정수 (0~999, 선택사항, 기본값: 300)intent: 문자열 |
기존 지원 UI 작업 (Gemini 2.5)
기존 모델 (gemini-2.5-computer-use-preview-10-2025)의 경우 다음 작업이 지원됩니다.
| 명령어 이름 | 설명 | 인수 (함수 호출에서) | 함수 호출 예시 |
|---|---|---|---|
| open_web_browser | 웹브라우저를 엽니다. | 없음 | {"name": "open_web_browser", "arguments": {}} |
| wait_5_seconds | 5초 동안 실행을 일시중지합니다. | 없음 | {"name": "wait_5_seconds", "arguments": {}} |
| go_back | 방문 기록의 이전 페이지로 이동합니다. | 없음 | {"name": "go_back", "arguments": {}} |
| go_forward | 방문 기록의 다음 페이지로 이동합니다. | 없음 | {"name": "go_forward", "arguments": {}} |
| search | 기본 검색엔진으로 이동합니다. | 없음 | {"name": "search", "arguments": {}} |
| navigate | 브라우저를 지정된 URL로 직접 이동합니다. | url: 문자열 |
{"name": "navigate", "arguments": {"url": "https://www.wikipedia.org"}} |
| click_at | 특정 좌표를 클릭합니다. | y: 정수(0~999), x: 정수(0~999) |
{"name": "click_at", "arguments": {"y": 300, "x": 500}} |
| hover_at | 특정 좌표에 마우스를 가져갑니다. | y: 정수(0~999), x: 정수(0~999) |
{"name": "hover_at", "arguments": {"y": 150, "x": 250}} |
| type_text_at | 좌표에 텍스트를 입력합니다. | y: 정수 (0~999), x: 정수 (0~999), text: 문자열, press_enter: 불리언 (선택사항, 기본값: True), clear_before_typing: 불리언 (선택사항, 기본값: True) |
{"name": "type_text_at", "arguments": {"y": 250, "x": 400, "text": "search", "press_enter": false}} |
| key_combination | 키 또는 조합을 누릅니다. | keys: 문자열 |
{"name": "key_combination", "arguments": {"keys": "Control+A"}} |
| scroll_document | 전체 웹페이지를 스크롤합니다. | direction: 문자열 |
{"name": "scroll_document", "arguments": {"direction": "down"}} |
| scroll_at | 좌표 (x,y)에서 스크롤합니다. | y: int, x: int, direction: str, magnitude: int (선택사항, 기본값: 800) |
{"name": "scroll_at", "arguments": {"y": 500, "x": 500, "direction": "down"}} |
| drag_and_drop | 두 좌표 사이를 드래그합니다. | y: int, x: int, destination_y: int, destination_x: int |
{"name": "drag_and_drop", "arguments": {"y": 100, "destination_y": 500, "destination_x": 500, "x": 100}} |
맞춤 사용자 정의 함수
맞춤 사용자 정의 함수를 포함하여 모델의 기능을 확장할 수 있습니다. 예를 들어 인간 참여형 (HITL) 시나리오에서는 기본 사전 정의된 작업을 제외하고 맞춤 작업을 등록할 수 있습니다.
Gemini 3.5 Flash 맞춤 도구
Python
표준 사전 정의된 브라우저 작업 (예: click)을 제외하고 맞춤 yield_to_user 도구를 등록합니다.
from google import genai

client = genai.Client()

yield_to_user_tool = {
    "type": "function",
    "name": "yield_to_user",
    "description": "Yields control back to the user for assistance or verification when an automated action is unsafe or ambiguous.",
    "parameters": {
        "type": "object",
        "properties": {
            "reason": {
                "type": "string",
                "description": "The reason why the agent is yielding control to the human."
            }
        },
        "required": ["reason"]
    }
}

interaction = client.interactions.create(
    model="gemini-3.5-flash",
    input="Click the submit button. If you need a second factor authentication code, ask me.",
    tools=[
        {
            "type": "computer_use",
            "environment": "mobile",
            "excluded_predefined_functions": ["click"]
        },
        yield_to_user_tool
    ]
)
자바스크립트
표준 사전 정의된 브라우저 작업 (예: click)을 제외하고 맞춤 yield_to_user 도구를 등록합니다.
import { GoogleGenAI } from '@google/genai';

const ai = new GoogleGenAI();

const yieldToUserTool = {
    type: "function",
    name: "yield_to_user",
    description: "Yields control back to the user for assistance or verification when an automated action is unsafe or ambiguous.",
    parameters: {
        type: "object",
        properties: {
            reason: {
                type: "string",
                description: "The reason why the agent is yielding control to the human."
            }
        },
        required: ["reason"]
    }
};

const interaction = await ai.interactions.create({
    model: "gemini-3.5-flash",
    input: "Click the submit button. If you need a second factor authentication code, ask me.",
    tools: [
        {
            type: "computer_use",
            environment: "mobile",
            excluded_predefined_functions: ["click"]
        },
        yieldToUserTool
    ]
});
Gemini 2.5 (레거시) 맞춤 도구
Python
from google import genai

client = genai.Client()

# Define custom tools here
custom_functions = [...]  # Describe parameters as function declarations

excluded_functions = [
    "open_web_browser",
    "wait_5_seconds",
    "go_back",
    "go_forward",
    "search",
    "navigate",
    "hover_at",
    "scroll_document",
    "key_combination",
    "drag_and_drop",
]

interaction = client.interactions.create(
    model='gemini-2.5-computer-use-preview-10-2025',
    input="Open Chrome, then long-press at 200,400.",
    tools=[
        {
            "type": "computer_use",
            "environment": "browser",
            "excluded_predefined_functions": excluded_functions
        },
        *custom_functions
    ]
)

print(interaction)
자바스크립트
import { GoogleGenAI } from '@google/genai';

const ai = new GoogleGenAI();

// Define custom tools here
const customFunctions = [...]; // Describe parameters as function declarations

const excludedFunctions = [
    "open_web_browser",
    "wait_5_seconds",
    "go_back",
    "go_forward",
    "search",
    "navigate",
    "hover_at",
    "scroll_document",
    "key_combination",
    "drag_and_drop",
];

const interaction = await ai.interactions.create({
    model: 'gemini-2.5-computer-use-preview-10-2025',
    input: "Open Chrome, then long-press at 200,400.",
    tools: [
        {
            type: "computer_use",
            environment: "browser",
            excluded_predefined_functions: excludedFunctions
        },
        ...customFunctions
    ]
});

console.log(interaction);
사고 수준 관리 (Gemini 3.5 Flash)
컴퓨터 사용 에이전트의 경우 작업 품질과 실행 속도의 균형을 맞추기 위해 다양한 사고 수준을 구성할 수 있습니다. 일반적으로 낮은 사고 수준이 표준 자동화 작업에 적합한 균형을 제공합니다.
안전 및 보안
안전 정책 구성 (Gemini 3.5 Flash)
Gemini 3.5 Flash 모델에는 사용자 확인이 필요한지 자동으로 판단하는 내장 안전 서비스 카테고리가 포함되어 있습니다.
| 안전 정책 카테고리 | 설명 |
|---|---|
FINANCIAL_TRANSACTIONS |
결제, 소매 결제 또는 규제 상품과 관련된 작업의 확인을 차단하거나 트리거합니다. |
SENSITIVE_DATA_MODIFICATION |
건강, 금융 또는 정부 기록을 무단 수정으로부터 보호합니다. |
COMMUNICATION_TOOL |
에이전트가 이메일, 채팅 메시지 또는 초안을 자율적으로 보내지 못하도록 제한합니다. |
ACCOUNT_CREATION |
에이전트가 웹사이트에 새 계정을 자율적으로 등록하는 것을 제한합니다. |
DATA_MODIFICATION |
전반적인 파일 시스템 수정, 데이터 공유, 스토리지 삭제를 규제합니다. |
USER_CONSENT_MANAGEMENT |
쿠키 사용 동의 배너 및 개인 정보 보호 메시지에 사용자 인계가 필요합니다. |
LEGAL_TERMS_AND_AGREEMENTS |
모델이 서비스 약관 또는 법적 구속력이 있는 계약을 자율적으로 수락하는 것을 방지합니다. |
안전 재정의
재정의를 전달하여 선택한 정책을 재정의할 수 있습니다.
Python
from google import genai

client = genai.Client()

interaction = client.interactions.create(
    model="gemini-3.5-flash",
    input="Clean up the local folder by archiving old logs.",
    tools=[
        {
            "type": "computer_use",
            "environment": "desktop",
            "disabled_safety_policies": [
                "data_modification"
            ]
        }
    ]
)
자바스크립트
import { GoogleGenAI } from '@google/genai';

const ai = new GoogleGenAI();

const interaction = await ai.interactions.create({
    model: "gemini-3.5-flash",
    input: "Clean up the local folder by archiving old logs.",
    tools: [
        {
            type: "computer_use",
            environment: "desktop",
            disabled_safety_policies: [
                "data_modification"
            ]
        }
    ]
});
프롬프트 삽입 감지 (Gemini 3.5 Flash)
스크린샷 픽셀에서 숨겨진 적대적 프롬프트 명령어 (예: '이전 명령어 무시')를 스캔하고 감지되면 실행을 차단하는 선택적 안전 메커니즘입니다.
안전 결정 확인
대답에는 함수 호출 인수에서 safety_decision 매개변수가 포함될 수 있습니다.
{
  "steps": [
    {
      "type": "function_call",
      "name": "click_at",
      "arguments": {
        "x": 60,
        "y": 100,
        "safety_decision": {
          "explanation": "Must check check-box",
          "decision": "require_confirmation"
        }
      }
    }
  ]
}
safety_decision이 require_confirmation인 경우 최종 사용자에게 메시지를 표시합니다. 사용자가 확인하면 function_result에서 safety_acknowledgement을 설정합니다.
Python
def get_safety_confirmation(safety_decision):
    # Prompt user for confirmation
    print(f"Safety confirmation required: {safety_decision.get('explanation', '')}")
    return "CONTINUE" # Or TERMINATE

# Inside execute_function_calls, check for safety_decision:
if 'safety_decision' in function_call.arguments:
    decision = get_safety_confirmation(function_call.arguments['safety_decision'])
    if decision == "TERMINATE":
        break
    # Include safety_acknowledgement inside the action result
    action_result["safety_acknowledgement"] = True
안전 권장사항
Computer Use는 모델이 사용자를 대신하여 작동할 때 화면에서 신뢰할 수 없는 콘텐츠를 접하거나 작업을 실행할 때 오류가 발생할 수 있으므로 고유한 보안 및 운영 위험이 있습니다. 사용자 데이터와 시스템을 보호하려면 다음 권장사항을 구현하세요.
인간 참여형 (Human-In-The-Loop, HITL):
- 사용자 확인 시행: 안전 대답에
require_confirmation이 표시되면 (또는 기존 안전 결정에 필요한 경우) 사용자에게 승인을 요청합니다. 맞춤 안전 요청 사항 제공: 맞춤 시스템 요청 사항을 구현하여 자체 안전 경계를 정의하고 적용합니다. 예를 들면 다음과 같습니다.
Python
from google import genai

client = genai.Client()

system_instruction = """
## **RULE 1: Seek User Confirmation (USER_CONFIRMATION)**

This is your first and most important check. If the next required action falls
into any of the following categories, you MUST stop immediately, and seek the
user's explicit permission.

**Procedure for Seeking Confirmation:**
* **For Consequential Actions:** Perform all preparatory steps (e.g., navigating,
  filling out forms, typing a message). You will ask for confirmation **AFTER**
  all necessary information is entered on the screen, but **BEFORE** you perform
  the final, irreversible action (e.g., before clicking "Send", "Submit",
  "Confirm Purchase", "Share").
* **For Prohibited Actions:** If the action is strictly forbidden (e.g., accepting
  legal terms, solving a CAPTCHA), you must first inform the user about the
  required action and ask for their confirmation to proceed.

**USER_CONFIRMATION Categories:**

*   **Consent and Agreements:** You are FORBIDDEN from accepting, selecting, or
    agreeing to any of the following on the user's behalf. You must ask the
    user to confirm before performing these actions.
    *   Terms of Service
    *   Privacy Policies
    *   Cookie consent banners
    *   End User License Agreements (EULAs)
    *   Any other legally significant contracts or agreements.
*   **Robot Detection:** You MUST NEVER attempt to solve or bypass the
    following. You must ask the user to confirm before performing these actions.
    *   CAPTCHAs (of any kind)
    *   Any other anti-robot or human-verification mechanisms, even if you are
        capable.
*   **Financial Transactions:**
    *   Completing any purchase.
    *   Managing or moving money (e.g., transfers, payments).
    *   Purchasing regulated goods or participating in gambling.
*   **Sending Communications:**
    *   Sending emails.
    *   Sending messages on any platform (e.g., social media, chat apps).
    *   Posting content on social media or forums.
*   **Accessing or Modifying Sensitive Information:**
    *   Health, financial, or government records (e.g., medical history, tax
        forms, passport status).
    *   Revealing or modifying sensitive personal identifiers (e.g., SSN, bank
        account number, credit card number).
*   **User Data Management:**
    *   Accessing, downloading, or saving files from the web.
    *   Sharing or sending files/data to any third party.
    *   Transferring user data between systems.
*   **Browser Data Usage:**
    *   Accessing or managing Chrome browsing history, bookmarks, autofill data,
        or saved passwords.
*   **Security and Identity:**
    *   Logging into any user account.
    *   Any action that involves misrepresentation or impersonation (e.g.,
        creating a fan account, posting as someone else).
*   **Insurmountable Obstacles:** If you are technically unable to interact with
    a user interface element or are stuck in a loop you cannot resolve, ask the
    user to take over.
---

## **RULE 2: Default Behavior (ACTUATE)**

If an action does **NOT** fall under the conditions for `USER_CONFIRMATION`,
your default behavior is to **Actuate**.

**Actuation Means:**  You MUST proactively perform all necessary steps to move
the user's request forward. Continue to actuate until you either complete the
non-consequential task or encounter a condition defined in Rule 1.

*   **Example 1:** If asked to send money, you will navigate to the payment
    portal, enter the recipient's details, and enter the amount. You will then
    **STOP** as per Rule 1 and ask for confirmation before clicking the final
    "Send" button.
*   **Example 2:** If asked to post a message, you will navigate to the site,
    open the post composition window, and write the full message. You will then
    **STOP** as per Rule 1 and ask for confirmation before clicking the final
    "Post" button.

    After the user has confirmed, remember to get the user's latest screen
    before continuing to perform actions.

# Final Response Guidelines:
Write final response to the user in the following cases:
- User confirmation
- When the task is complete or you have enough information to respond to the user
"""

interaction = client.interactions.create(
    model="gemini-3.5-flash",
    system_instruction=system_instruction,
    input="Prepare a draft but do not send.",
    tools=[{
        "type": "computer_use",
        "environment": "browser"
    }]
)
자바스크립트
import { GoogleGenAI } from '@google/genai';

const ai = new GoogleGenAI();

const systemInstruction = `
## **RULE 1: Seek User Confirmation (USER_CONFIRMATION)**

This is your first and most important check. If the next required action falls
into any of the following categories, you MUST stop immediately, and seek the
user's explicit permission.

**Procedure for Seeking Confirmation:**
* **For Consequential Actions:** Perform all preparatory steps (e.g., navigating,
  filling out forms, typing a message). You will ask for confirmation **AFTER**
  all necessary information is entered on the screen, but **BEFORE** you perform
  the final, irreversible action (e.g., before clicking "Send", "Submit",
  "Confirm Purchase", "Share").
* **For Prohibited Actions:** If the action is strictly forbidden (e.g., accepting
  legal terms, solving a CAPTCHA), you must first inform the user about the
  required action and ask for their confirmation to proceed.

**USER_CONFIRMATION Categories:**

*   **Consent and Agreements:** You are FORBIDDEN from accepting, selecting, or
    agreeing to any of the following on the user's behalf. You must ask the
    user to confirm before performing these actions.
    *   Terms of Service
    *   Privacy Policies
    *   Cookie consent banners
    *   End User License Agreements (EULAs)
    *   Any other legally significant contracts or agreements.
*   **Robot Detection:** You MUST NEVER attempt to solve or bypass the
    following. You must ask the user to confirm before performing these actions.
    *   CAPTCHAs (of any kind)
    *   Any other anti-robot or human-verification mechanisms, even if you are
        capable.
*   **Financial Transactions:**
    *   Completing any purchase.
    *   Managing or moving money (e.g., transfers, payments).
    *   Purchasing regulated goods or participating in gambling.
*   **Sending Communications:**
    *   Sending emails.
    *   Sending messages on any platform (e.g., social media, chat apps).
    *   Posting content on social media or forums.
*   **Accessing or Modifying Sensitive Information:**
    *   Health, financial, or government records (e.g., medical history, tax
        forms, passport status).
    *   Revealing or modifying sensitive personal identifiers (e.g., SSN, bank
        account number, credit card number).
*   **User Data Management:**
    *   Accessing, downloading, or saving files from the web.
    *   Sharing or sending files/data to any third party.
    *   Transferring user data between systems.
*   **Browser Data Usage:**
    *   Accessing or managing Chrome browsing history, bookmarks, autofill data,
        or saved passwords.
*   **Security and Identity:**
    *   Logging into any user account.
    *   Any action that involves misrepresentation or impersonation (e.g.,
        creating a fan account, posting as someone else).
*   **Insurmountable Obstacles:** If you are technically unable to interact with
    a user interface element or are stuck in a loop you cannot resolve, ask the
    user to take over.
---

## **RULE 2: Default Behavior (ACTUATE)**

If an action does **NOT** fall under the conditions for `USER_CONFIRMATION`,
your default behavior is to **Actuate**.

**Actuation Means:**  You MUST proactively perform all necessary steps to move
the user's request forward. Continue to actuate until you either complete the
non-consequential task or encounter a condition defined in Rule 1.

*   **Example 1:** If asked to send money, you will navigate to the payment
    portal, enter the recipient's details, and enter the amount. You will then
    **STOP** as per Rule 1 and ask for confirmation before clicking the final
    "Send" button.
*   **Example 2:** If asked to post a message, you will navigate to the site,
    open the post composition window, and write the full message. You will then
    **STOP** as per Rule 1 and ask for confirmation before clicking the final
    "Post" button.

    After the user has confirmed, remember to get the user's latest screen
    before continuing to perform actions.

# Final Response Guidelines:
Write final response to the user in the following cases:
- User confirmation
- When the task is complete or you have enough information to respond to the user
`;

const interaction = await ai.interactions.create({
    model: "gemini-3.5-flash",
    system_instruction: systemInstruction,
    input: "Prepare a draft but do not send.",
    tools: [{
        type: "computer_use",
        environment: "browser"
    }]
});
- 사용자 확인 시행: 안전 대답에
안전한 실행 환경: 안전한 샌드박스 환경에서 에이전트를 실행하여 잠재적 영향을 제한합니다. 이는 샌드박스 가상 머신 (VM), 컨테이너 (예: Docker) 또는 권한이 제한된 전용 브라우저 프로필일 수 있습니다. Docker를 사용한 샌드박스 설정 안내는 GitHub 참조 구현을 참고하세요.
입력 삭제: 의도하지 않은 요청 사항이나 프롬프트 삽입의 위험을 완화하기 위해 프롬프트에서 사용자가 생성한 모든 텍스트를 삭제합니다. 이는 유용한 보안 강화책이지만 안전한 실행 환경을 대체하지는 않습니다.
콘텐츠 가드레일: 가드레일과 콘텐츠 안전 API를 사용하여 적절성, 프롬프트 인젝션, 탈옥 감지를 위해 사용자 입력, 도구 입력 및 출력, 에이전트의 응답을 평가합니다.
허용 목록 및 차단 목록: 모델에서 탐색할 수 있는 위치와 수행할 수 있는 작업을 제어하는 필터링 메커니즘을 구현합니다. 금지된 웹사이트 차단 목록이 좋은 시작점이며 더 제한적인 허용 목록이 더 안전합니다.
관측 가능성 및 로깅: 디버깅, 감사, 사고 대응에 사용되는 자세한 로그를 유지합니다. 클라이언트는 프롬프트, 스크린샷, 모델 추천 작업 (
function_call), 안전 대답, 클라이언트에서 최종적으로 실행한 모든 작업을 로깅해야 합니다.환경 관리: GUI 환경이 일관되도록 합니다. 예상치 못한 팝업, 알림 또는 레이아웃 변경은 모델에 혼동을 줄 수 있습니다. 가능하면 각 새 작업에 대해 알려진 깨끗한 상태에서 시작하세요.
모델 버전
다음 모델에서 Computer Use를 사용할 수 있습니다.
- Gemini 3.5 Flash (
gemini-3.5-flash): 컴퓨터 사용에 권장되는 모델로, 의도가 포함된 간소화된 작업, 브라우저, 모바일, 데스크톱 환경 지원, 구성 가능한 안전 정책, 프롬프트 삽입 감지 기능이 있습니다. - Gemini 3 Flash 프리뷰 (
gemini-3-flash-preview): 컴퓨터 사용을 지원하는 프리뷰 모델입니다. - Gemini 2.5 (기존 프리뷰) (
gemini-2.5-computer-use-preview-10-2025): 브라우저 기반 컴퓨터 사용에 최적화된 기존 프리뷰 모델입니다.
다음 단계
- Browserbase 데모 환경에서 컴퓨터 사용을 실험해 보세요.
- 예시 코드는 참조 구현을 확인하세요.
- 다른 Gemini API 도구 알아보기: