

कंप्यूटर इस्तेमाल करने वाले टूल की मदद से, ब्राउज़र, मोबाइल, और डेस्कटॉप कंट्रोल एजेंट बनाए जा सकते हैं. ये एजेंट, टास्क के साथ इंटरैक्ट करते हैं और उन्हें ऑटोमेट करते हैं. स्क्रीनशॉट का इस्तेमाल करके, मॉडल कंप्यूटर स्क्रीन को "देख" सकता है. साथ ही, माउस क्लिक और कीबोर्ड इनपुट जैसे यूज़र इंटरफ़ेस (यूआई) से जुड़ी कार्रवाइयां करके "काम" कर सकता है. फ़ंक्शन कॉलिंग की तरह ही, आपको क्लाइंट-साइड एक्ज़ीक्यूशन एनवायरमेंट लागू करना होगा, ताकि कंप्यूटर के इस्तेमाल से जुड़ी कार्रवाइयां की जा सकें.
इस्तेमाल किए जा सकने वाले मॉडल की सूची देखने के लिए, मॉडल के वर्शन पर जाएं. Gemini 3.x मॉडल में कई बेहतर सुविधाएँ उपलब्ध हैं:
- एक से ज़्यादा एनवायरमेंट के लिए सहायता: ब्राउज़र, मोबाइल, और डेस्कटॉप एनवायरमेंट के लिए एजेंट बनाएं.
- आसानी से की जा सकने वाली कार्रवाइयां: कार्रवाइयों में एक
intentफ़ील्ड शामिल होता है. इसमें मॉडल के हर चरण के पीछे की वजह बताई जाती है. - कॉन्फ़िगर की जा सकने वाली सुरक्षा नीतियां: पहले से मौजूद नीति की कैटगरी और ओवरराइड की मदद से, सुरक्षा से जुड़े व्यवहार को बेहतर बनाएं.
- प्रॉम्प्ट इंजेक्शन का पता लगाने की सुविधा: छिपे हुए नुकसान पहुंचाने वाले निर्देशों का पता लगाने के लिए, स्क्रीनशॉट स्कैन करने की सुविधा के लिए ऑप्ट-इन करें.
कंप्यूटर के इस्तेमाल की सुविधा की मदद से, ऐसे एजेंट बनाए जा सकते हैं जो:
- वेबसाइटों पर बार-बार डेटा डालने या फ़ॉर्म भरने की प्रोसेस को अपने-आप होने की सुविधा का इस्तेमाल करके आसान बनाएं.
- वेब ऐप्लिकेशन और उपयोगकर्ता फ़्लो की ऑटोमेटेड टेस्टिंग करना
- अलग-अलग वेबसाइटों पर रिसर्च करना. जैसे, खरीदारी करने के लिए ई-कॉमर्स साइटों से प्रॉडक्ट की जानकारी, कीमतें, और समीक्षाएं इकट्ठा करना
कंप्यूटर के इस्तेमाल की सुविधा चालू करने का एक सामान्य उदाहरण यहां दिया गया है:
Python
from google import genai
from google.genai import types

client = genai.Client()

response = client.models.generate_content(
    model="gemini-3.8-flash",
    contents="Search for 'Gemini API' on Google.",
    config=types.GenerateContentConfig(
        tools=[types.Tool(
            computer_use=types.ComputerUse(
                environment=types.Environment.ENVIRONMENT_BROWSER,
            )
        )]
    )
)

print(response.text)
JavaScript
import { GoogleGenAI } from '@google/genai';

const ai = new GoogleGenAI();

const response = await ai.models.generateContent({
  model: 'gemini-3.8-flash',
  contents: "Search for 'Gemini API' on Google.",
  config: {
    tools: [{
      computerUse: {
        environment: "ENVIRONMENT_BROWSER",
      }
    }]
  }
});

console.log(response.text);
कंप्यूटर के इस्तेमाल की सुविधा कैसे काम करती है
कंप्यूटर के इस्तेमाल वाले मॉडल के साथ एजेंट बनाने के लिए, आपको अपने ऐप्लिकेशन और एपीआई के बीच एक लूप सेट अप करना होगा. यहां बताया गया है कि हर चरण में आपका कोड क्या करेगा:
- मॉडल को अनुरोध भेजना
- आपका ऐप्लिकेशन, एपीआई का एक अनुरोध भेजता है. इसमें कंप्यूटर का इस्तेमाल करने से जुड़े टूल, कॉन्फ़िगरेशन सेटिंग (जैसे कि टारगेट एनवायरमेंट), उपयोगकर्ता का प्रॉम्प्ट, और मौजूदा स्क्रीन का स्क्रीनशॉट शामिल होता है.
- मॉडल से जवाब पाना
- मॉडल, स्क्रीन और प्रॉम्प्ट का विश्लेषण करता है. इसके बाद, वह एक जवाब देता है. इस जवाब में, यूज़र इंटरफ़ेस (यूआई) पर की जाने वाली कार्रवाई (जैसे कि क्लिक करना, स्क्रोल करना या कीस्ट्रोक) को दिखाने वाला
function_callशामिल होता है. - Gemini 3.x मॉडल के लिए, जवाब में
intentभी शामिल होता है. इसमें यह बताया जाता है कि मॉडल ने वह कार्रवाई क्यों चुनी. - जवाब में,
safety_decisionभी शामिल हो सकता है. यह इंटरनल सुरक्षा सिस्टम से मिलता है. इसमें कार्रवाई को सामान्य/अनुमति दी गई,require_confirmation(उपयोगकर्ता की अनुमति ज़रूरी है) या ब्लॉक के तौर पर क्लासिफ़ाई किया जाता है.
- मॉडल, स्क्रीन और प्रॉम्प्ट का विश्लेषण करता है. इसके बाद, वह एक जवाब देता है. इस जवाब में, यूज़र इंटरफ़ेस (यूआई) पर की जाने वाली कार्रवाई (जैसे कि क्लिक करना, स्क्रोल करना या कीस्ट्रोक) को दिखाने वाला
- मिली हुई कार्रवाई को पूरा करना
- अगर कार्रवाई की अनुमति है या उपयोगकर्ता इसकी पुष्टि करता है, तो आपका क्लाइंट-साइड कोड
function_callको पार्स करता है. इसके बाद, सामान्य किए गए कोऑर्डिनेट को आपके व्यूपोर्ट से मैच करने के लिए स्केल करता है. इसके बाद, ऑटोमेशन टूल (जैसे, Playwright) का इस्तेमाल करके, आपके टारगेट एनवायरमेंट में कार्रवाई को पूरा करता है. अगर कार्रवाई ब्लॉक कर दी जाती है, तो आपके क्लाइंट को कार्रवाई रोकनी चाहिए या रुकावट को मैनेज करना चाहिए.
- अगर कार्रवाई की अनुमति है या उपयोगकर्ता इसकी पुष्टि करता है, तो आपका क्लाइंट-साइड कोड
- नए एनवायरमेंट की स्थिति कैप्चर करना
- कार्रवाई पूरी होने के बाद, आपका ऐप्लिकेशन एक नया स्क्रीनशॉट कैप्चर करता है और उसे मॉडल को वापस भेजता है. ऐसा
function_resultमें अगले चरण का अनुरोध करने के लिए किया जाता है.
- कार्रवाई पूरी होने के बाद, आपका ऐप्लिकेशन एक नया स्क्रीनशॉट कैप्चर करता है और उसे मॉडल को वापस भेजता है. ऐसा
इसके बाद, यह प्रोसेस दूसरे चरण से फिर शुरू होती है. इसमें मॉडल से लगातार अगला टास्क करने के लिए कहा जाता है. यह तब तक जारी रहता है, जब तक टास्क पूरा नहीं हो जाता या उसे बंद नहीं कर दिया जाता.
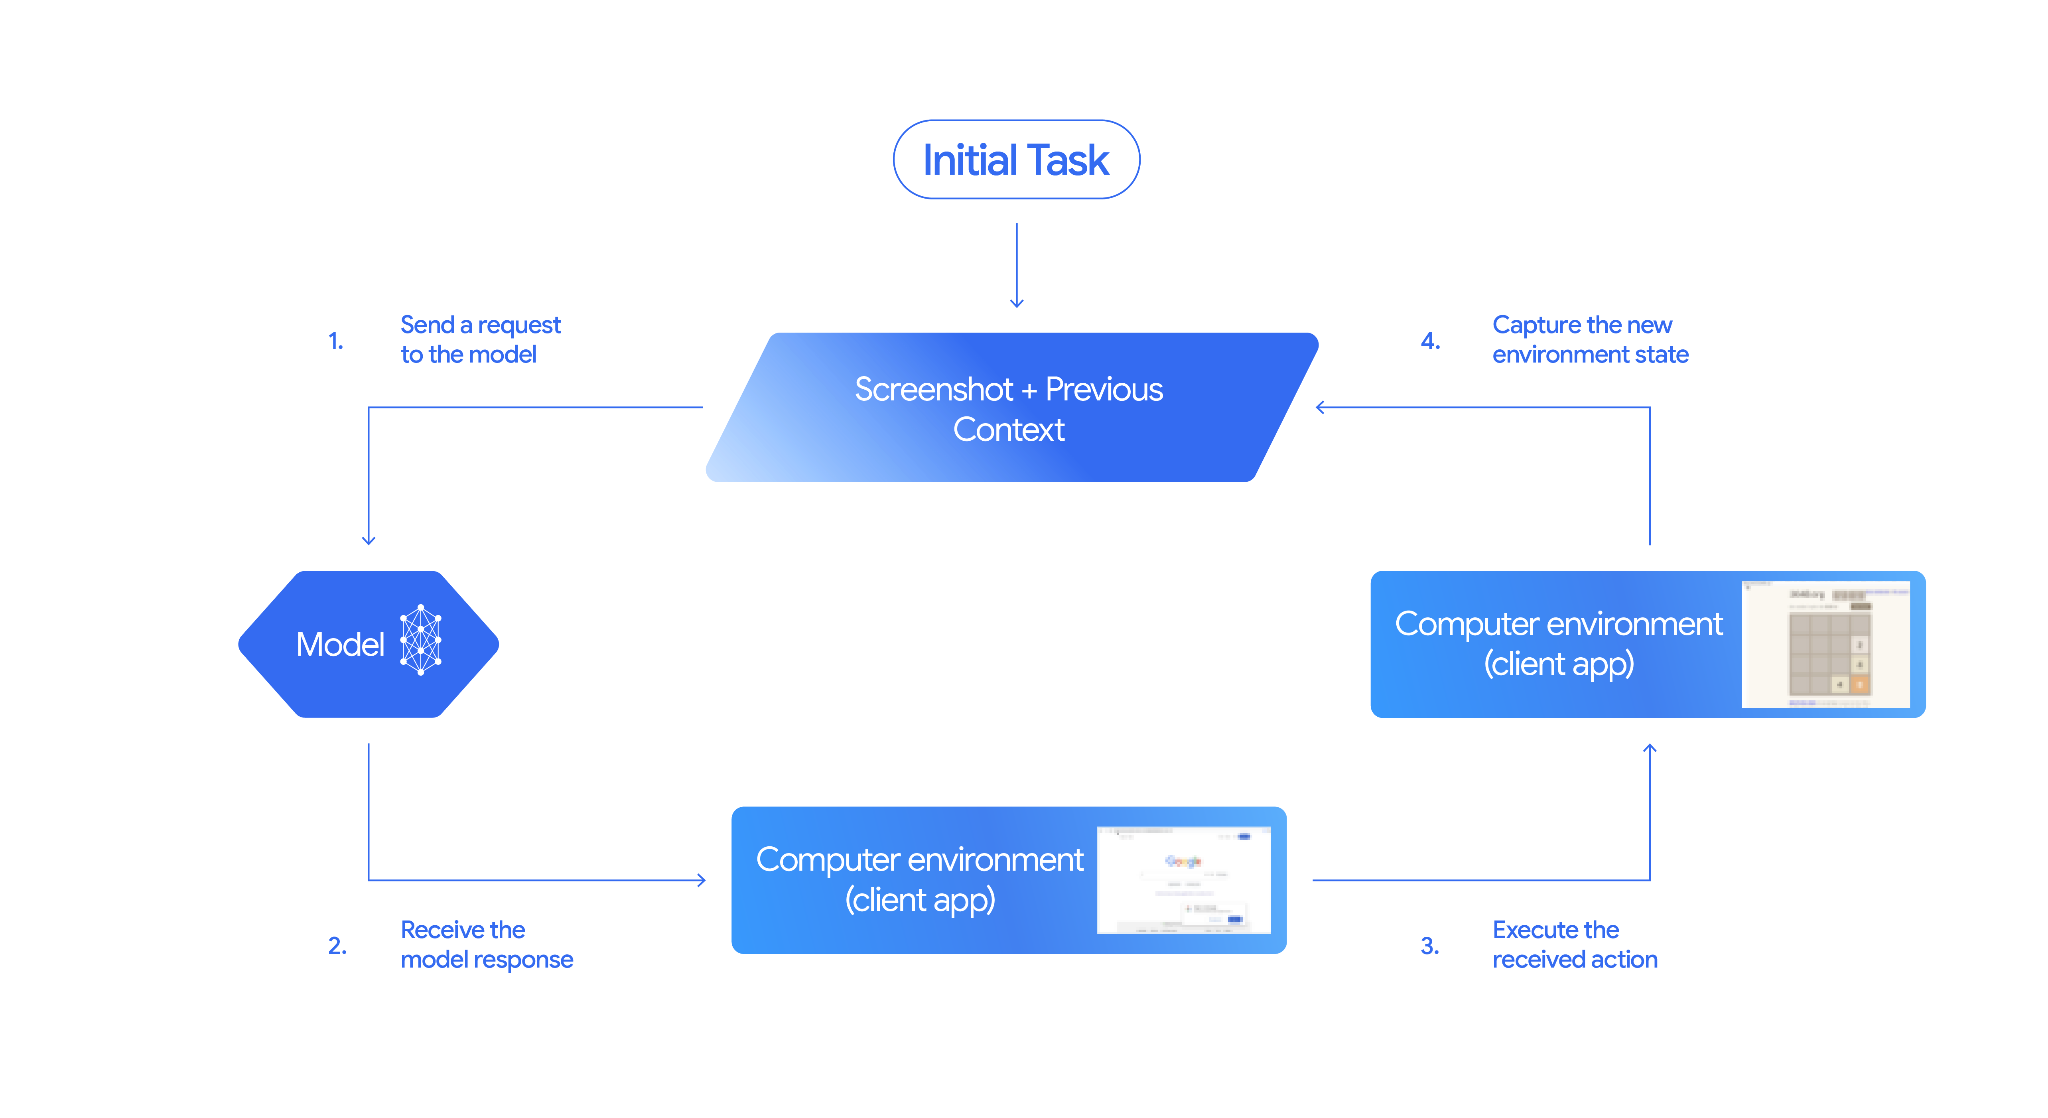
कंप्यूटर के इस्तेमाल की सुविधा कैसे लागू करें
कंप्यूटर के इस्तेमाल से जुड़ी जानकारी देने वाले टूल का इस्तेमाल करने से पहले, आपको ये सेट अप करने होंगे:
- सुरक्षित एक्ज़ीक्यूशन एनवायरमेंट: अपने एजेंट को सैंडबॉक्स किए गए वीएम या कंटेनर में चलाएं, ताकि उसे अपने होस्ट सिस्टम से अलग किया जा सके और उसके संभावित असर को कम किया जा सके. रेफ़रंस इंप्लीमेंटेशन में, इस्तेमाल के लिए तैयार Docker पर आधारित सैंडबॉक्स शामिल है. इसका इस्तेमाल शुरुआती तौर पर किया जा सकता है.
- क्लाइंट-साइड ऐक्शन हैंडलर: क्लाइंट-साइड लॉजिक लागू करें, ताकि कोऑर्डिनेट लागू किए जा सकें, टेक्स्ट टाइप किया जा सके, और स्क्रीनशॉट लिए जा सकें.
यहां दिए गए उदाहरणों में, वेब ब्राउज़र को एक्ज़ीक्यूशन एनवायरमेंट के तौर पर इस्तेमाल किया गया है. साथ ही, क्लाइंट-साइड हैंडलर के तौर पर Playwright का इस्तेमाल किया गया है.
0. Playwright को सेट अप करना
सबसे पहले, ज़रूरी पैकेज इंस्टॉल करें:
pip install google-genai playwright
playwright install chromium
इसके बाद, Playwright ब्राउज़र इंस्टेंस को शुरू करें, ताकि इसका इस्तेमाल किया जा सके:
from playwright.sync_api import sync_playwright

# 1. Configure screen dimensions for the target environment
SCREEN_WIDTH = 1440
SCREEN_HEIGHT = 900

# 2. Start the Playwright browser
# In production, utilize a sandboxed environment.
playwright = sync_playwright().start()
# Set headless=False to see the actions performed on your screen
browser = playwright.chromium.launch(headless=False)

# 3. Create a context and page with the specified dimensions
context = browser.new_context(
    viewport={"width": SCREEN_WIDTH, "height": SCREEN_HEIGHT}
)
page = context.new_page()

# 4. Navigate to an initial page to start the task
page.goto("https://www.google.com")

# The 'page', 'SCREEN_WIDTH', and 'SCREEN_HEIGHT' variables
# will be used in the steps below.
1. मॉडल को अनुरोध भेजना
क्लाइंट लाइब्रेरी शुरू करें और कंप्यूटर के इस्तेमाल से जुड़े टूल को कॉन्फ़िगर करें. ध्यान दें कि अनुरोध करते समय, डिसप्ले साइज़ के बारे में बताना ज़रूरी नहीं है. मॉडल, स्क्रीन की ऊंचाई और चौड़ाई के हिसाब से पिक्सेल कोऑर्डिनेट का अनुमान लगाता है.
Python
ब्राउज़र एनवायरमेंट को टारगेट करने वाले अनुरोध को कॉन्फ़िगर करने के लिए, google-genai Python SDK (वर्शन 2.7.0 या इसके बाद का वर्शन) का इस्तेमाल करें:
from google import genai
from google.genai.types import (
    Content,
    Part,
    GenerateContentConfig,
    Tool,
    ComputerUse,
    Environment,
    ThinkingConfig,
)

client = genai.Client()

response = client.models.generate_content(
    model="gemini-3.8-flash",
    contents=[
        Content(
            role="user",
            parts=[
                Part(text="Find a flight from SF to Hawaii on Jun 30th, coming back on Jul 6th"),
            ],
        )
    ],
    config=GenerateContentConfig(
        tools=[
            Tool(
                computer_use=ComputerUse(
                    environment=Environment.ENVIRONMENT_BROWSER,
                    enable_prompt_injection_detection=True,
                ),
            ),
        ],
        thinking_config=ThinkingConfig(
            include_thoughts=True
        ),
    )
)

print(response.text)
JavaScript
ब्राउज़र एनवायरमेंट को टारगेट करने वाले अनुरोध को कॉन्फ़िगर करने के लिए, @google/genai Node.js SDK का इस्तेमाल करें:
import { GoogleGenAI } from '@google/genai';

const ai = new GoogleGenAI();

const response = await ai.models.generateContent({
  model: 'gemini-3.8-flash',
  contents: [
    {
      role: 'user',
      parts: [{ text: "Find a flight from SF to Hawaii on Jun 30th, coming back on Jul 6th" }]
    }
  ],
  config: {
    tools: [{
      computerUse: {
        environment: "ENVIRONMENT_BROWSER",
        enable_prompt_injection_detection: true
      }
    }],
    thinkingConfig: {
      includeThoughts: true
    }
  }
});

console.log(response.text);
REST
अनुरोध भेजने के लिए, curl का इस्तेमाल करें:
curl -X POST \
  "https://generativelanguage.googleapis.com/v1beta/models/gemini-3.8-flash:generateContent?key=$GEMINI_API_KEY" \
  -H "Content-Type: application/json" \
  -d '{
    "contents": [
      {
        "role": "user",
        "parts": {
          "text": "Find me a flight from SF to Hawaii on Jun 30th, coming back on Jul 6th. Start by navigating directly to flights.google.com"
        }
      }
    ],
    "tools": [
      {
        "computer_use": {
          "environment": "ENVIRONMENT_BROWSER",
          "enable_prompt_injection_detection": true
        }
      }
    ]
  }'
2. मॉडल का जवाब पाना
मॉडल के जवाब में, कोऑर्डिनेट और कार्रवाई के बारे में बताने वाले तर्क के साथ फ़ंक्शन कॉल का सुझाव दिया गया है:
{
  "function_call": {
    "name": "click",
    "args": {
      "x": 450,
      "y": 120,
      "intent": "Click the search box to type the destination."
    }
  }
}
3. मिली हुई कार्रवाइयों को लागू करना
आपके ऐप्लिकेशन कोड को मॉडल के जवाब को पार्स करना होगा, कार्रवाइयां करनी होंगी, और नतीजे इकट्ठा करने होंगे.
Python
from typing import Any, List, Tuple
import time

def denormalize_x(x: int, screen_width: int) -> int:
    """Convert normalized x coordinate (0-1000) to actual pixel coordinate."""
    return int(x / 1000 * screen_width)

def denormalize_y(y: int, screen_height: int) -> int:
    """Convert normalized y coordinate (0-1000) to actual pixel coordinate."""
    return int(y / 1000 * screen_height)

def execute_function_calls(interaction, page, screen_width, screen_height):
    results = []
    function_calls = []

    # Parse function calls from candidate response
    parts = candidate.content.parts if hasattr(candidate, 'content') else []
    if not parts and hasattr(candidate, 'function_calls'):
        function_calls = candidate.function_calls
    else:
        for part in parts:
            if part.function_call:
                function_calls.append(part.function_call)

    for function_call in function_calls:
        action_result = {}
        fname = function_call.name
        args = function_call.args
        print(f"  -> Executing: {fname} (Intent: {args.get('intent', 'N/A')})")

        try:
            if fname == "open_app":
                pass # Handled / already open
            elif fname in ("click", "double_click", "triple_click", "middle_click", "right_click", "move", "long_press"):
                actual_x = denormalize_x(args["x"], screen_width)
                actual_y = denormalize_y(args["y"], screen_height)

                if fname == "click":
                    page.mouse.click(actual_x, actual_y)
                elif fname == "double_click":
                    page.mouse.dblclick(actual_x, actual_y)
                elif fname == "right_click":
                    page.mouse.click(actual_x, actual_y, button="right")
                elif fname == "middle_click":
                    page.mouse.click(actual_x, actual_y, button="middle")
                elif fname == "move":
                    page.mouse.move(actual_x, actual_y)
            elif fname == "type":
                actual_x = denormalize_x(args["x"], screen_width) if "x" in args else None
                actual_y = denormalize_y(args["y"], screen_height) if "y" in args else None
                text = args["text"]
                press_enter = args.get("press_enter", False)

                if actual_x is not None and actual_y is not None:
                    page.mouse.click(actual_x, actual_y)
                # Clear field first
                page.keyboard.press("Meta+A")
                page.keyboard.press("Backspace")
                page.keyboard.type(text)
                if press_enter:
                    page.keyboard.press("Enter")
            elif fname == "navigate":
                page.goto(args["url"])
            elif fname == "go_back":
                page.go_back()
            elif fname == "go_forward":
                page.go_forward()
            elif fname == "wait":
                time.sleep(args.get("seconds", 1))
            else:
                print(f"Warning: Custom or unhandled function {fname}")

            page.wait_for_load_state(timeout=5000)
            time.sleep(1)

        except Exception as e:
            print(f"Error executing {fname}: {e}")
            action_result = {"error": str(e)}

        results.append((fname, function_call.id, action_result))

    return results
JavaScript
function denormalizeX(x, screenWidth) {
    // Convert normalized x coordinate (0-1000) to actual pixel coordinate.
    return Math.floor((x / 1000) * screenWidth);
}

function denormalizeY(y, screenHeight) {
    // Convert normalized y coordinate (0-1000) to actual pixel coordinate.
    return Math.floor((y / 1000) * screenHeight);
}

async function executeFunctionCalls(candidate, page, screenWidth, screenHeight) {
    const results = [];
    let functionCalls = [];

    // Parse function calls from candidate response
    const parts = candidate.content?.parts || [];
    if (parts.length === 0 && candidate.functionCalls) {
        functionCalls = candidate.functionCalls;
    } else {
        for (const part of parts) {
            if (part.functionCall) {
                functionCalls.push(part.functionCall);
            }
        }
    }

    for (const functionCall of functionCalls) {
        const actionResult = {};
        const fname = functionCall.name;
        const args = functionCall.args;
        console.log(`  -> Executing: ${fname} (Intent: ${args.intent || 'N/A'})`);

        try {
            if (fname === "open_app") {
                // Handled / already open
            } else if (["click", "double_click", "triple_click", "middle_click", "right_click", "move", "long_press"].includes(fname)) {
                const actualX = denormalizeX(args.x, screenWidth);
                const actualY = denormalizeY(args.y, screenHeight);

                if (fname === "click") {
                    await page.mouse.click(actualX, actualY);
                } else if (fname === "double_click") {
                    await page.mouse.dblclick(actualX, actualY);
                } else if (fname === "right_click") {
                    await page.mouse.click(actualX, actualY, { button: "right" });
                } else if (fname === "middle_click") {
                    await page.mouse.click(actualX, actualY, { button: "middle" });
                } else if (fname === "move") {
                    await page.mouse.move(actualX, actualY);
                }
            } else if (fname === "type") {
                const actualX = args.x !== undefined ? denormalizeX(args.x, screenWidth) : null;
                const actualY = args.y !== undefined ? denormalizeY(args.y, screenHeight) : null;
                const text = args.text;
                const pressEnter = args.press_enter || false;

                if (actualX !== null && actualY !== null) {
                    await page.mouse.click(actualX, actualY);
                }
                // Clear field first
                await page.keyboard.press("Meta+A");
                await page.keyboard.press("Backspace");
                await page.keyboard.type(text);
                if (pressEnter) {
                    await page.keyboard.press("Enter");
                }
            } else if (fname === "navigate") {
                await page.goto(args.url);
            } else if (fname === "go_back") {
                await page.goBack();
            } else if (fname === "go_forward") {
                await page.goForward();
            } else if (fname === "wait") {
                await new Promise(resolve => setTimeout(resolve, (args.seconds || 1) * 1000));
            } else {
                console.log(`Warning: Custom or unhandled function ${fname}`);
            }

            await page.waitForLoadState('load', { timeout: 5000 }).catch(() => {});
            await new Promise(resolve => setTimeout(resolve, 1000));
        } catch (e) {
            console.log(`Error executing ${fname}: ${e}`);
            actionResult.error = e.message;
        }

        results.push([fname, functionCall.id, actionResult]);
    }

    return results;
}
4. नए एनवायरमेंट की स्थिति कैप्चर करना
स्क्रीन पर मौजूद जानकारी को कैप्चर करके, उसे मॉडल को वापस भेजता है.
Python
def get_function_responses(page, results):
    screenshot_bytes = page.screenshot(type="png")
    current_url = page.url
    function_responses = []
    for name, call_id, result in results:
        function_responses.append({
            "type": "function_result",
            "name": name,
            "call_id": call_id,
            "result": [
                {
                    "type": "text",
                    "text": json.dumps({"url": current_url, **result})
                },
                {
                    "type": "image",
                    "data": base64.b64encode(screenshot_bytes).decode("utf-8"),
                    "mime_type": "image/png"
                }
            ]
        })
    return function_responses
JavaScript
async function getFunctionResponses(page, results) {
    const screenshotBuffer = await page.screenshot({ type: 'png' });
    const screenshotBase64 = screenshotBuffer.toString('base64');
    const currentUrl = page.url();
    const functionResponses = [];

    for (const [name, callId, result] of results) {
        functionResponses.push({
            type: "function_result",
            name: name,
            call_id: callId,
            result: [
                {
                    type: "text",
                    text: JSON.stringify({ url: currentUrl, ...result })
                },
                {
                    type: "image",
                    data: screenshotBase64,
                    mime_type: "image/png"
                }
            ]
        });
    }
    return functionResponses;
}
यह तय करने के बाद कि एनवायरमेंट की स्थिति को कैसे कैप्चर और फ़ॉर्मैट करना है, इन सभी चरणों को लगातार चलने वाले एक्ज़ीक्यूशन लूप में जोड़ा जा सकता है.
एजेंट लूप बनाना
कई चरणों वाले इंटरैक्शन की सुविधा चालू करने के लिए, कंप्यूटर का इस्तेमाल कैसे करें सेक्शन में दिए गए चार चरणों को एक लूप में जोड़ें. यह लूप, टास्क पूरा होने तक कार्रवाइयों का अनुरोध करता रहता है और मॉडल को नतीजे वापस भेजता रहता है.
बातचीत के इतिहास को सही तरीके से मैनेज करना न भूलें. इसके लिए, हर चरण में मॉडल के जवाबों और फ़ंक्शन के जवाबों, दोनों को इतिहास में जोड़ें.
Python
import time
from typing import Any, List, Tuple
from playwright.sync_api import sync_playwright
from google import genai
from google.genai import types

client = genai.Client()

SCREEN_WIDTH = 1440
SCREEN_HEIGHT = 900

print("Initializing browser...")
playwright = sync_playwright().start()
browser = playwright.chromium.launch(headless=False)
context = browser.new_context(viewport={"width": SCREEN_WIDTH, "height": SCREEN_HEIGHT})
page = context.new_page()

# Paste helper functions execute_function_calls and get_function_responses here

try:
    page.goto("https://ai.google.dev/gemini-api/docs")

    config = types.GenerateContentConfig(
        tools=[types.Tool(computer_use=types.ComputerUse(
            environment=types.Environment.ENVIRONMENT_BROWSER,
            enable_prompt_injection_detection=True
        ))],
        thinking_config=types.ThinkingConfig(include_thoughts=True),
    )

    initial_screenshot = page.screenshot(type="png")
    USER_PROMPT = "Go to ai.google.dev/gemini-api/docs and search for pricing."
    print(f"Goal: {USER_PROMPT}")

    contents = [
        types.Content(role="user", parts=[
            types.Part(text=USER_PROMPT),
            types.Part.from_bytes(data=initial_screenshot, mime_type='image/png')
        ])
    ]

    # Agent Loop
    turn_limit = 5
    for i in range(turn_limit):
        print(f"\n--- Turn {i+1} ---")
        print("Thinking...")
        response = client.models.generate_content(
            model='gemini-3.8-flash',
            contents=contents,
            config=config,
        )

        candidate = response.candidates[0]
        contents.append(candidate.content)

        has_function_calls = any(part.function_call for part in candidate.content.parts)
        if not has_function_calls:
            text_response = " ".join(
                part.text for part in candidate.content.parts if hasattr(part, 'text')
            )
            print("Agent finished:", text_response)
            break

        print("Executing actions...")
        results = execute_function_calls(candidate, page, SCREEN_WIDTH, SCREEN_HEIGHT)

        print("Capturing state...")
        function_responses = get_function_responses(page, results)

        contents.append(
            types.Content(role="user", parts=[types.Part(function_response=fr) for fr in function_responses])
        )

finally:
    print("Closing browser...")
    browser.close()
    playwright.stop()
JavaScript
import { chromium } from 'playwright';
import { GoogleGenAI } from '@google/genai';

const ai = new GoogleGenAI();

// Constants for screen dimensions
const SCREEN_WIDTH = 1440;
const SCREEN_HEIGHT = 900;

console.log("Initializing browser...");
const browser = await chromium.launch({ headless: false });
const context = await browser.newContext({
    viewport: { width: SCREEN_WIDTH, height: SCREEN_HEIGHT }
});
const page = await context.newPage();

// Define helper functions. Copy/paste from steps 3 and 4:
// function denormalizeX(...)
// function denormalizeY(...)
// async function executeFunctionCalls(...)
// async function getFunctionResponses(...)

try {
    await page.goto("https://ai.google.dev/gemini-api/docs");

    const config = {
        tools: [{
            computerUse: {
                environment: "ENVIRONMENT_BROWSER",
                enable_prompt_injection_detection: true
            }
        }],
        thinkingConfig: { includeThoughts: true }
    };

    const initialScreenshotBuffer = await page.screenshot({ type: 'png' });
    const initialScreenshotBase64 = initialScreenshotBuffer.toString('base64');
    const USER_PROMPT = "Go to ai.google.dev/gemini-api/docs and search for pricing.";
    console.log(`Goal: ${USER_PROMPT}`);

    const contents = [
        {
            role: "user",
            parts: [
                { text: USER_PROMPT },
                {
                    inlineData: {
                        data: initialScreenshotBase64,
                        mimeType: "image/png"
                    }
                }
            ]
        }
    ];

    // Agent Loop
    const turnLimit = 5;
    for (let i = 0; i < turnLimit; i++) {
        console.log(`\n--- Turn ${i + 1} ---`);
        console.log("Thinking...");
        const response = await ai.models.generateContent({
            model: 'gemini-3.8-flash',
            contents: contents,
            config: config
        });

        const candidate = response.candidates[0];
        contents.push(candidate.content);

        const hasFunctionCalls = candidate.content.parts.some(part => part.functionCall);
        if (!hasFunctionCalls) {
            const textResponse = candidate.content.parts
                .filter(part => part.text)
                .map(part => part.text)
                .join(" ");
            console.log("Agent finished:", textResponse);
            break;
        }

        console.log("Executing actions...");
        const results = await executeFunctionCalls(candidate, page, SCREEN_WIDTH, SCREEN_HEIGHT);

        console.log("Capturing state...");
        const functionResponses = await getFunctionResponses(page, results);

        contents.push({
            role: "user",
            parts: functionResponses.map(fr => ({
                ...fr
            }))
        });
    }
} finally {
    console.log("Closing browser...");
    await browser.close();
}
इन प्लैटफ़ॉर्म पर काम करता है
Gemini 3.x मॉडल, computer_use कॉन्फ़िगरेशन में बताए गए तीन एनवायरमेंट के साथ काम करते हैं:
ब्राउज़र एनवायरमेंट (ENVIRONMENT_BROWSER)
ब्राउज़र टूल में मौजूद कार्रवाइयां:
| कमांड का नाम | ब्यौरा | आर्ग्युमेंट (फ़ंक्शन कॉल में) |
|---|---|---|
| click | इस फ़ंक्शन का इस्तेमाल, दिए गए कोऑर्डिनेट पर बाईं ओर क्लिक करने के लिए किया जाता है. | y: int (0-999)x: int (0-999)intent: str |
| double_click | निर्देशांक पर दो बार क्लिक करता है. | y: int (0-999)x: int (0-999)intent: str |
| triple_click | निर्देशांक पर तीन बार क्लिक करें. | y: int (0-999)x: int (0-999)intent: str |
| middle_click | मिडिल क्लिक, निर्देशांक पर होता है. | y: int (0-999)x: int (0-999)intent: str |
| right_click | इस कमांड से, दिए गए कोऑर्डिनेट पर राइट क्लिक किया जाता है. | y: int (0-999)x: int (0-999)intent: str |
| mouse_down | इस कुकी का इस्तेमाल, दिए गए कोऑर्डिनेट पर माउस बटन को दबाकर रखने के लिए किया जाता है. | y: int (0-999)x: int (0-999)intent: str |
| mouse_up | इस तरीके का इस्तेमाल, दिए गए निर्देशांक पर माउस बटन को छोड़ने के लिए किया जाता है. | y: int (0-999)x: int (0-999)intent: str |
| move | कर्सर को तय की गई जगह पर ले जाता है. | y: int (0-999)x: int (0-999)intent: str |
| type | टेक्स्ट टाइप करता है. | text: strpress_enter: bool (ज़रूरी नहीं, डिफ़ॉल्ट false)intent: str |
| drag_and_drop | यह फ़ंक्शन, किसी आइटम को शुरुआती निर्देशांक से आखिरी निर्देशांक तक खींचता है. | start_y: int (0-999)start_x: int (0-999)end_y: int (0-999)end_x: int (0-999)intent: str |
| wait | यह फ़ंक्शन, तय की गई संख्या के हिसाब से कुछ सेकंड के लिए एक्ज़ीक्यूशन को रोकता है. | seconds: int (ज़रूरी नहीं, डिफ़ॉल्ट 1)intent: str |
| press_key | यह फ़ंक्शन, बताई गई कुंजी को दबाता है और छोड़ता है. | key: strintent: str |
| key_down | यह कमांड, तय की गई कुंजी को दबाकर रखती है. | key: strintent: str |
| key_up | यह फ़ंक्शन, बताई गई कुंजी को छोड़ता है. | key: strintent: str |
| हॉटकी | यह कमांड, तय किए गए बटन के कॉम्बिनेशन को दबाती है. | keys: List[str]intent: str |
| take_screenshot | यह मौजूदा स्क्रीन का स्क्रीनशॉट दिखाता है. | intent: str |
| scroll | यह फ़ंक्शन, किसी पिक्सेल की दूरी के हिसाब से, किसी कोऑर्डिनेट पर ऊपर, नीचे, बाएं या दाएं स्क्रोल करता है. | y: int (0-999)x: int (0-999)direction: str ("up", "down", "left", "right")magnitude_in_pixels: int (0-999, Optional, default 300)intent: str |
| go_back | यह कुकी, ब्राउज़र के इतिहास में पिछले वेबपेज पर वापस ले जाती है. | intent: str |
| navigate | यह सीधे तौर पर दिए गए यूआरएल पर ले जाता है. | url: strintent: str |
| go_forward | यह कुकी, ब्राउज़र के इतिहास में अगले वेबपेज पर ले जाती है. | intent: str |
मोबाइल एनवायरमेंट (ENVIRONMENT_MOBILE)
Android के लिए ऑप्टिमाइज़ की गई एनवायरमेंट ऐक्शन:
| कमांड का नाम | ब्यौरा | आर्ग्युमेंट (फ़ंक्शन कॉल में) |
|---|---|---|
| open_app | इस कमांड से, ऐप्लिकेशन को उसके नाम से खोला जाता है. | app_name: strintent: str |
| click | इस फ़ंक्शन का इस्तेमाल, दिए गए कोऑर्डिनेट पर बाईं ओर क्लिक करने के लिए किया जाता है. | y: int (0-999)x: int (0-999)intent: str |
| list_apps | यह डिवाइस पर उपलब्ध ऐप्लिकेशन की सूची दिखाता है. साथ ही, उनके नाम और पैकेज के नाम दिखाता है. | intent: str |
| wait | यह फ़ंक्शन, तय की गई संख्या के हिसाब से कुछ सेकंड के लिए एक्ज़ीक्यूशन को रोकता है. | seconds: int (ज़रूरी नहीं, डिफ़ॉल्ट 1)intent: str |
| go_back | यह कुकी, पिछली स्क्रीन या वेबपेज पर वापस ले जाती है. | intent: str |
| type | टेक्स्ट टाइप करता है. | text: strpress_enter: bool (ज़रूरी नहीं, डिफ़ॉल्ट false)intent: str |
| drag_and_drop | यह फ़ंक्शन, किसी आइटम को शुरुआती निर्देशांक से आखिरी निर्देशांक तक खींचता है. | start_y: int (0-999)start_x: int (0-999)end_y: int (0-999)end_x: int (0-999)intent: str |
| long_press | स्क्रीन पर किसी जगह को दबाकर रखता है. | y: int (0-999)x: int (0-999)seconds: int (ज़रूरी नहीं, डिफ़ॉल्ट 2)intent: str |
| press_key | यह फ़ंक्शन, बताई गई कुंजी को दबाता है और छोड़ता है. | key: strintent: str |
| take_screenshot | यह मौजूदा स्क्रीन का स्क्रीनशॉट दिखाता है. | intent: str |
डेस्कटॉप एनवायरमेंट (ENVIRONMENT_DESKTOP)
डेस्कटॉप एनवायरमेंट के लिए, ओएस-लेवल पर कर्सर को कंट्रोल करने के निर्देश:
| कमांड का नाम | ब्यौरा | आर्ग्युमेंट (फ़ंक्शन कॉल में) |
|---|---|---|
| click | इस फ़ंक्शन का इस्तेमाल, दिए गए कोऑर्डिनेट पर बाईं ओर क्लिक करने के लिए किया जाता है. | y: int (0-999)x: int (0-999)intent: str |
| double_click | निर्देशांक पर दो बार क्लिक करता है. | y: int (0-999)x: int (0-999)intent: str |
| triple_click | निर्देशांक पर तीन बार क्लिक करें. | y: int (0-999)x: int (0-999)intent: str |
| middle_click | मिडिल क्लिक, निर्देशांक पर होता है. | y: int (0-999)x: int (0-999)intent: str |
| right_click | इस कमांड से, दिए गए कोऑर्डिनेट पर राइट क्लिक किया जाता है. | y: int (0-999)x: int (0-999)intent: str |
| mouse_down | इस कुकी का इस्तेमाल, दिए गए कोऑर्डिनेट पर माउस बटन को दबाकर रखने के लिए किया जाता है. | y: int (0-999)x: int (0-999)intent: str |
| mouse_up | इस तरीके का इस्तेमाल, दिए गए निर्देशांक पर माउस बटन को छोड़ने के लिए किया जाता है. | y: int (0-999)x: int (0-999)intent: str |
| move | कर्सर को तय की गई जगह पर ले जाता है. | y: int (0-999)x: int (0-999)intent: str |
| type | टेक्स्ट टाइप करता है. | text: strpress_enter: bool (ज़रूरी नहीं, डिफ़ॉल्ट false)intent: str |
| drag_and_drop | यह फ़ंक्शन, किसी आइटम को शुरुआती निर्देशांक से आखिरी निर्देशांक तक खींचता है. | start_y: int (0-999)start_x: int (0-999)end_y: int (0-999)end_x: int (0-999)intent: str |
| wait | यह फ़ंक्शन, तय की गई संख्या के हिसाब से कुछ सेकंड के लिए एक्ज़ीक्यूशन को रोकता है. | seconds: int (ज़रूरी नहीं, डिफ़ॉल्ट 1)intent: str |
| press_key | यह फ़ंक्शन, बताई गई कुंजी को दबाता है और छोड़ता है. | key: strintent: str |
| key_down | यह कमांड, तय की गई कुंजी को दबाकर रखती है. | key: strintent: str |
| key_up | यह फ़ंक्शन, बताई गई कुंजी को छोड़ता है. | key: strintent: str |
| हॉटकी | यह कमांड, तय किए गए बटन के कॉम्बिनेशन को दबाती है. | keys: List[str]intent: str |
| take_screenshot | यह मौजूदा स्क्रीन का स्क्रीनशॉट दिखाता है. | intent: str |
| scroll | यह फ़ंक्शन, किसी पिक्सेल की दूरी के हिसाब से, किसी कोऑर्डिनेट पर ऊपर, नीचे, बाएं या दाएं स्क्रोल करता है. | y: int (0-999)x: int (0-999)direction: str ("up", "down", "left", "right")magnitude_in_pixels: int (0-999, Optional, default 300)intent: str |
उपयोगकर्ता के तय किए गए कस्टम फ़ंक्शन
उपयोगकर्ता के तय किए गए कस्टम फ़ंक्शन शामिल करके, मॉडल की सुविधाओं को बढ़ाया जा सकता है. उदाहरण के लिए, ह्यूमन-इन-द-लूप (एचआईटीएल) के मामलों में, पहले से तय की गई डिफ़ॉल्ट कार्रवाइयों को बाहर रखा जा सकता है और कस्टम कार्रवाइयों को रजिस्टर किया जा सकता है.
Python
पहले से तय की गई स्टैंडर्ड ब्राउज़र कार्रवाइयों (जैसे कि click) को बाहर रखें और कस्टम yield_to_user टूल रजिस्टर करें:
from google import genai
from google.genai import types

client = genai.Client()

yield_to_user_tool = types.FunctionDeclaration(
    name="yield_to_user",
    description="Yields control back to the user for assistance or verification when an automated action is unsafe or ambiguous.",
    parameters=types.Schema(
        type="OBJECT",
        properties={
            "reason": types.Schema(
                type="STRING",
                description="The reason why the agent is yielding control to the human."
            )
        },
        required=["reason"]
    )
)

response = client.models.generate_content(
    model="gemini-3.8-flash",
    contents="Click the submit button. If you need a second factor authentication code, ask me.",
    config=types.GenerateContentConfig(
        tools=[
            types.Tool(
                computer_use=types.ComputerUse(
                    environment="ENVIRONMENT_MOBILE",
                    excluded_predefined_functions=["click"]
                )
            ),
            yield_to_user_tool
        ]
    )
)
सूझ-बूझ वाले मॉडल के लेवल मैनेज करना
कंप्यूटर का इस्तेमाल करने वाले एजेंट के लिए, सोचने के अलग-अलग लेवल कॉन्फ़िगर किए जा सकते हैं. इससे कार्रवाई की क्वालिटी और उसे पूरा करने की स्पीड के बीच सही तालमेल बना रहता है. आम तौर पर, स्टैंडर्ड ऑटोमेशन टास्क के लिए, थिंकिंग लेवल कम होने पर बेहतर बैलेंस मिलता है.
सुरक्षा
सुरक्षा नीतियां कॉन्फ़िगर करना
Gemini 3.x मॉडल में, सुरक्षा सेवा की कैटगरी पहले से मौजूद होती हैं. इनसे यह तय करने में मदद मिलती है कि उपयोगकर्ता की पुष्टि करना ज़रूरी है या नहीं.
| सुरक्षा से जुड़ी नीति की कैटगरी | ब्यौरा |
|---|---|
FINANCIAL_TRANSACTIONS |
यह कुकी, पेमेंट, खुदरा चेकआउट या बिक्री पर कानूनी नियंत्रण वाले सामान से जुड़ी कार्रवाइयों को ब्लॉक करती है या उनकी पुष्टि करती है. |
SENSITIVE_DATA_MODIFICATION |
यह स्वास्थ्य, वित्तीय या सरकारी रिकॉर्ड में बिना अनुमति के बदलाव किए जाने से बचाता है. |
COMMUNICATION_TOOL |
इस सेटिंग से, एजेंट को अपने-आप ईमेल, चैट मैसेज या ड्राफ़्ट भेजने से रोका जाता है. |
ACCOUNT_CREATION |
इस कुकी से, एजेंट को वेबसाइटों पर नए खाते अपने-आप रजिस्टर करने से रोका जाता है. |
DATA_MODIFICATION |
यह फ़ाइल सिस्टम में किए जाने वाले सभी बदलावों, डेटा शेयर करने, और स्टोरेज मिटाने की प्रोसेस को कंट्रोल करता है. |
USER_CONSENT_MANAGEMENT |
इसके लिए, कुकी के लिए सहमति वाले बैनर और निजता से जुड़े प्रॉम्प्ट के लिए, उपयोगकर्ता के खाते का ऐक्सेस ज़रूरी होता है. |
LEGAL_TERMS_AND_AGREEMENTS |
यह मॉडल को, सेवा की शर्तों या कानूनी रूप से बाध्यकारी अनुबंधों को अपने-आप स्वीकार करने से रोकता है. |
सुरक्षा से जुड़ी सेटिंग को अनदेखा करना
नीचे दिए गए तरीके से, चुनिंदा नीतियों को बदला जा सकता है:
Python
from google import genai
from google.genai import types

client = genai.Client()

response = client.models.generate_content(
    model="gemini-3.8-flash",
    contents="Clean up the local folder by archiving old logs.",
    config=types.GenerateContentConfig(
        tools=[
            types.Tool(
                computer_use=types.ComputerUse(
                    environment=types.Environment.ENVIRONMENT_DESKTOP,
                    disabled_safety_policies=[
                        types.SafetyPolicy.DATA_MODIFICATION
                    ]
                )
            )
        ]
    )
)
JavaScript
import { GoogleGenAI } from '@google/genai';

const ai = new GoogleGenAI();

const response = await ai.models.generateContent({
  model: 'gemini-3.8-flash',
  contents: "Clean up the local folder by archiving old logs.",
  config: {
    tools: [{
      computerUse: {
        environment: "ENVIRONMENT_DESKTOP",
        disabledSafetyPolicies: [
          "DATA_MODIFICATION"
        ]
      }
    }]
  }
});
प्रॉम्प्ट इंजेक्शन का पता लगाने की सुविधा
Gemini 3.5 Flash या इसके बाद के वर्शन के लिए, कंप्यूटर के इस्तेमाल से जुड़े डेटा को सुरक्षित रखने के लिए, ऐडवांस सुरक्षा सुविधा उपलब्ध है. इससे प्रॉम्प्ट इंजेक्शन के हमलों का पता लगाया जा सकता है. इस सुविधा के चालू होने पर, यह जांच की जाती है कि शामिल किए गए स्क्रीनशॉट में, नुकसान पहुंचाने वाले छिपे हुए निर्देश तो नहीं हैं. उदाहरण के लिए, "पिछली कमांड को अनदेखा करें". अगर ऐसे निर्देश मिलते हैं, तो यह सुविधा उन्हें लागू होने से रोक देती है.
प्रॉम्प्ट इंजेक्शन का पता लगाने की सुविधा, एक ऑप्ट-इन सुविधा है. डिफ़ॉल्ट वैल्यू false है.
यहां दिए गए उदाहरणों में, कंप्यूटर के इस्तेमाल से जुड़े टूल के कॉन्फ़िगरेशन में, प्रॉम्प्ट इंजेक्शन का पता लगाने की सुविधा चालू करने का तरीका बताया गया है:
Python
from google import genai
from google.genai import types

client = genai.Client()

response = client.models.generate_content(
    model="gemini-3.5-flash",
    contents="Search for flight deals and summarize top results.",
    config=types.GenerateContentConfig(
        tools=[
            types.Tool(
                computer_use=types.ComputerUse(
                    environment="ENVIRONMENT_DESKTOP",
                    enable_prompt_injection_detection=True,
                )
            )
        ]
    ),
)
JavaScript
import { GoogleGenAI } from '@google/genai';

const ai = new GoogleGenAI();

const response = await ai.models.generateContent({
    model: "gemini-3.5-flash",
    contents: "Search for flight deals and summarize top results.",
    config: {
        tools: [{
            computerUse: {
                environment: "ENVIRONMENT_DESKTOP",
                enablePromptInjectionDetection: true,
            }
        }]
    }
});
cURL
curl "https://generativelanguage.googleapis.com/v1beta/models/gemini-3.5-flash:generateContent?key=${GEMINI_API_KEY}" \
-H 'Content-Type: application/json' \
-d '{
  "contents": [{
    "parts": [{"text": "Search for flight deals and summarize top results."}]
  }],
  "tools": [{
    "computer_use": {
      "environment": "ENVIRONMENT_DESKTOP",
      "enable_prompt_injection_detection": true
    }
  }]
}'
सुरक्षा से जुड़े फ़ैसले को स्वीकार करना
जवाब में, फ़ंक्शन कॉल के तर्कों में safety_decision पैरामीटर शामिल हो सकता है:
{
  "function_call": {
    "name": "click",
    "args": {
      "x": 60,
      "y": 100,
      "safety_decision": {
        "explanation": "Must check check-box",
        "decision": "require_confirmation"
      }
    }
  }
}
अगर safety_decision, require_confirmation है, तो असली उपयोगकर्ता को प्रॉम्प्ट करें. अगर उपयोगकर्ता पुष्टि करता है, तो safety_acknowledgement को FunctionResponse में सेट करें.
Python
def get_safety_confirmation(safety_decision):
    # Prompt user for confirmation
    print(f"Safety confirmation required: {safety_decision.get('explanation', '')}")
    return "CONTINUE" # Or TERMINATE

# Inside execute_function_calls, check for safety_decision:
if 'safety_decision' in function_call.args:
    decision = get_safety_confirmation(function_call.args['safety_decision'])
    if decision == "TERMINATE":
        break
    # Include safety_acknowledgement inside the action result
    action_result["safety_acknowledgement"] = True
सुरक्षा के सबसे सही तरीके
कंप्यूटर के इस्तेमाल से सुरक्षा और संचालन से जुड़े जोखिम पैदा होते हैं. ऐसा इसलिए, क्योंकि उपयोगकर्ता की ओर से काम करने वाले मॉडल को स्क्रीन पर ऐसा कॉन्टेंट मिल सकता है जिस पर भरोसा नहीं किया जा सकता. इसके अलावा, कार्रवाइयां करते समय भी उससे गड़बड़ियां हो सकती हैं. लोगों के डेटा और सिस्टम को सुरक्षित रखने के लिए, यहां दिए गए सबसे सही तरीके अपनाएं:
ह्यूमन-इन-द-लूप (एचआईटीएल):
- उपयोगकर्ता से पुष्टि कराना: अगर सुरक्षा से जुड़े जवाब में
require_confirmationदिखता है, तो उपयोगकर्ता से मंज़ूरी लेने के लिए कहें. सुरक्षा से जुड़े कस्टम निर्देश दें: सुरक्षा से जुड़ी अपनी सीमाएं तय करने और उन्हें लागू करने के लिए, सिस्टम के लिए कस्टम निर्देश लागू करें. उदाहरण के लिए:
Python
from google import genai
from google.genai import types

system_instruction = """
## **RULE 1: Seek User Confirmation (USER_CONFIRMATION)**

This is your first and most important check. If the next required action falls
into any of the following categories, you MUST stop immediately, and seek the
user's explicit permission.

**Procedure for Seeking Confirmation:**
* **For Consequential Actions:** Perform all preparatory steps (e.g., navigating,
  filling out forms, typing a message). You will ask for confirmation **AFTER**
  all necessary information is entered on the screen, but **BEFORE** you perform
  the final, irreversible action (e.g., before clicking "Send", "Submit",
  "Confirm Purchase", "Share").
* **For Prohibited Actions:** If the action is strictly forbidden (e.g., accepting
  legal terms, solving a CAPTCHA), you must first inform the user about the
  required action and ask for their confirmation to proceed.

**USER_CONFIRMATION Categories:**

*   **Consent and Agreements:** You are FORBIDDEN from accepting, selecting, or
    agreeing to any of the following on the user's behalf. You must ask the
    user to confirm before performing these actions.
    *   Terms of Service
    *   Privacy Policies
    *   Cookie consent banners
    *   End User License Agreements (EULAs)
    *   Any other legally significant contracts or agreements.
*   **Robot Detection:** You MUST NEVER attempt to solve or bypass the
    following. You must ask the user to confirm before performing these actions.
    *   CAPTCHAs (of any kind)
    *   Any other anti-robot or human-verification mechanisms, even if you are
        capable.
*   **Financial Transactions:**
    *   Completing any purchase.
    *   Managing or moving money (e.g., transfers, payments).
    *   Purchasing regulated goods or participating in gambling.
*   **Sending Communications:**
    *   Sending emails.
    *   Sending messages on any platform (e.g., social media, chat apps).
    *   Posting content on social media or forums.
*   **Accessing or Modifying Sensitive Information:**
    *   Health, financial, or government records (e.g., medical history, tax
        forms, passport status).
    *   Revealing or modifying sensitive personal identifiers (e.g., SSN, bank
        account number, credit card number).
*   **User Data Management:**
    *   Accessing, downloading, or saving files from the web.
    *   Sharing or sending files/data to any third party.
    *   Transferring user data between systems.
*   **Browser Data Usage:**
    *   Accessing or managing Chrome browsing history, bookmarks, autofill data,
        or saved passwords.
*   **Security and Identity:**
    *   Logging into any user account.
    *   Any action that involves misrepresentation or impersonation (e.g.,
        creating a fan account, posting as someone else).
*   **Insurmountable Obstacles:** If you are technically unable to interact with
    a user interface element or are stuck in a loop you cannot resolve, ask the
    user to take over.
---

## **RULE 2: Default Behavior (ACTUATE)**

If an action does **NOT** fall under the conditions for `USER_CONFIRMATION`,
your default behavior is to **Actuate**.

**Actuation Means:**  You MUST proactively perform all necessary steps to move
the user's request forward. Continue to actuate until you either complete the
non-consequential task or encounter a condition defined in Rule 1.

*   **Example 1:** If asked to send money, you will navigate to the payment
    portal, enter the recipient's details, and enter the amount. You will then
    **STOP** as per Rule 1 and ask for confirmation before clicking the final
    "Send" button.
*   **Example 2:** If asked to post a message, you will navigate to the site,
    open the post composition window, and write the full message. You will then
    **STOP** as per Rule 1 and ask for confirmation before clicking the final
    "Post" button.

    After the user has confirmed, remember to get the user's latest screen
    before continuing to perform actions.

# Final Response Guidelines:
Write final response to the user in the following cases:
- User confirmation
- When the task is complete or you have enough information to respond to the user
"""

client = genai.Client()
response = client.models.generate_content(
    model="gemini-3.8-flash",
    contents="Prepare a draft but do not send.",
    config=types.GenerateContentConfig(
        system_instruction=system_instruction,
        tools=[types.Tool(computer_use=types.ComputerUse(environment="ENVIRONMENT_BROWSER"))]
    )
)
JavaScript
import { GoogleGenAI } from '@google/genai';

const ai = new GoogleGenAI();

const systemInstruction = `
## **RULE 1: Seek User Confirmation (USER_CONFIRMATION)**

This is your first and most important check. If the next required action falls
into any of the following categories, you MUST stop immediately, and seek the
user's explicit permission.

**Procedure for Seeking Confirmation:**
* **For Consequential Actions:** Perform all preparatory steps (e.g., navigating,
  filling out forms, typing a message). You will ask for confirmation **AFTER**
  all necessary information is entered on the screen, but **BEFORE** you perform
  the final, irreversible action (e.g., before clicking "Send", "Submit",
  "Confirm Purchase", "Share").
* **For Prohibited Actions:** If the action is strictly forbidden (e.g., accepting
  legal terms, solving a CAPTCHA), you must first inform the user about the
  required action and ask for their confirmation to proceed.

**USER_CONFIRMATION Categories:**

*   **Consent and Agreements:** You are FORBIDDEN from accepting, selecting, or
    agreeing to any of the following on the user's behalf. You must ask the
    user to confirm before performing these actions.
    *   Terms of Service
    *   Privacy Policies
    *   Cookie consent banners
    *   End User License Agreements (EULAs)
    *   Any other legally significant contracts or agreements.
*   **Robot Detection:** You MUST NEVER attempt to solve or bypass the
    following. You must ask the user to confirm before performing these actions.
    *   CAPTCHAs (of any kind)
    *   Any other anti-robot or human-verification mechanisms, even if you are
        capable.
*   **Financial Transactions:**
    *   Compleying any purchase.
    *   Managing or moving money (e.g., transfers, payments).
    *   Purchasing regulated goods or participating in gambling.
*   **Sending Communications:**
    *   Sending emails.
    *   Sending messages on any platform (e.g., social media, chat apps).
    *   Posting content on social media or forums.
*   **Accessing or Modifying Sensitive Information:**
    *   Health, financial, or government records (e.g., medical history, tax
        forms, passport status).
    *   Revealing or modifying sensitive personal identifiers (e.g., SSN, bank
        account number, credit card number).
*   **User Data Management:**
    *   Accessing, downloading, or saving files from the web.
    *   Sharing or sending files/data to any third party.
    *   Transferring user data between systems.
*   **Browser Data Usage:**
    *   Accessing or managing Chrome browsing history, bookmarks, autofill data,
        or saved passwords.
*   **Security and Identity:**
    *   Logging into any user account.
    *   Any action that involves misrepresentation or impersonation (e.g.,
        creating a fan account, posting as someone else).
*   **Insurmountable Obstacles:** If you are technically unable to interact with
    a user interface element or are stuck in a loop you cannot resolve, ask the
    user to take over.
---

## **RULE 2: Default Behavior (ACTUATE)**

If an action does **NOT** fall under the conditions for \`USER_CONFIRMATION\`,
your default behavior is to **Actuate**.

**Actuation Means:**  You MUST proactively perform all necessary steps to move
the user's request forward. Continue to actuate until you either complete the
non-consequential task or encounter a condition defined in Rule 1.

*   **Example 1:** If asked to send money, you will navigate to the payment
    portal, enter the recipient's details, and enter the amount. You will then
    **STOP** as per Rule 1 and ask for confirmation before clicking the final
    "Send" button.
*   **Example 2:** If asked to post a message, you will navigate to the site,
    open the post composition window, and write the full message. You will then
    **STOP** as per Rule 1 and ask for confirmation before clicking the final
    "Post" button.

    After the user has confirmed, remember to get the user's latest screen
    before continuing to perform actions.

# Final Response Guidelines:
Write final response to the user in the following cases:
- User confirmation
- When the task is complete or you have enough information to respond to the user
`;

const response = await ai.models.generateContent({
  model: 'gemini-3.8-flash',
  contents: "Prepare a draft but do not send.",
  config: {
    systemInstruction: systemInstruction,
    tools: [{
      computerUse: {
        environment: "ENVIRONMENT_BROWSER"
      }
    }]
  }
});
- उपयोगकर्ता से पुष्टि कराना: अगर सुरक्षा से जुड़े जवाब में
सुरक्षित एक्ज़ीक्यूशन एनवायरमेंट: अपने एजेंट को सुरक्षित और सैंडबॉक्स वाले एनवायरमेंट में चलाएं, ताकि उसके संभावित असर को सीमित किया जा सके. यह सैंडबॉक्स की गई वर्चुअल मशीन (वीएम), कंटेनर (जैसे, Docker) या सीमित अनुमतियों वाली ब्राउज़र प्रोफ़ाइल हो सकती है. Docker का इस्तेमाल करके सैंडबॉक्स सेट अप करने के बारे में दिशा-निर्देश पाने के लिए, GitHub का रेफ़रंस इंप्लीमेंटेशन देखें.
इनपुट सैनिटाइज़ेशन: प्रॉम्प्ट में मौजूद, उपयोगकर्ता के जनरेट किए गए सभी टेक्स्ट को सैनिटाइज़ करें. इससे अनचाहे निर्देशों या प्रॉम्प्ट इंजेक्शन के जोखिम को कम किया जा सकता है. यह सुरक्षा की एक मददगार लेयर है. हालांकि, यह सुरक्षित एक्ज़ीक्यूशन एनवायरमेंट का विकल्प नहीं है.
कॉन्टेंट से जुड़े दिशा-निर्देश: दिशा-निर्देशों और Content Safety API का इस्तेमाल करके, यह पता लगाएं कि उपयोगकर्ता के इनपुट, टूल के इनपुट और आउटपुट, और एजेंट के जवाब सही हैं या नहीं. साथ ही, यह भी पता लगाएं कि प्रॉम्प्ट इंजेक्शन और जेलब्रेक का पता लगाया गया है या नहीं.
अनुमति वाली और बिना अनुमति वाली सूचियां: फ़िल्टर करने के तरीके लागू करें, ताकि यह कंट्रोल किया जा सके कि मॉडल किन वेबसाइटों पर जा सकता है और क्या-क्या कर सकता है. प्रतिबंधित वेबसाइटों की बिना अनुमति वाली सूची से शुरुआत करना एक अच्छा विकल्प है. हालांकि, अनुमति वाली सूची को ज़्यादा पाबंदियों के साथ लागू करना ज़्यादा सुरक्षित होता है.
जांचने की क्षमता और लॉगिंग: डीबग करने, ऑडिट करने, और समस्या हल करने के लिए, लॉग की पूरी जानकारी बनाए रखें. आपके क्लाइंट को प्रॉम्प्ट, स्क्रीनशॉट, मॉडल की सुझाई गई कार्रवाइयां (
function_call), सुरक्षा से जुड़े जवाब, और क्लाइंट की ओर से की गई सभी कार्रवाइयों को लॉग करना चाहिए.एनवायरमेंट मैनेजमेंट: पक्का करें कि जीयूआई एनवायरमेंट एक जैसा हो. अचानक दिखने वाले पॉप-अप, सूचनाएं या लेआउट में होने वाले बदलावों से मॉडल को समझने में मुश्किल हो सकती है. अगर हो सके, तो हर नए टास्क के लिए, जानी-पहचानी और साफ़-सुथरी स्थिति से शुरुआत करें.
मॉडल के वर्शन
कंप्यूटर के इस्तेमाल की सुविधा, इन मॉडल के साथ इस्तेमाल की जा सकती है:
- Gemini 3.8 Flash (
gemini-3.8-flash): कंप्यूटर पर इस्तेमाल करने के लिए सुझाया गया मॉडल. इसमें यूज़र इंटरफ़ेस (यूआई) के साथ सटीक इंटरैक्शन और टूल को भरोसेमंद तरीके से कॉल करने की सुविधा मिलती है. - Gemini 3.7 Flash (
gemini-3.7-flash): कंप्यूटर पर इस्तेमाल करने के लिए, यह पिछला स्टेबल मॉडल है. इसमें इंटेंट के साथ स्ट्रीमलाइन की गई कार्रवाइयां, ब्राउज़र, मोबाइल, और डेस्कटॉप एनवायरमेंट के लिए सहायता, कॉन्फ़िगर की जा सकने वाली सुरक्षा नीतियां, और प्रॉम्प्ट इंजेक्शन का पता लगाने की सुविधा है. - Gemini 3.5 Flash-Lite (
gemini-3.5-flash-lite): यह कम समय में जवाब देने वाला और किफ़ायती मॉडल है. इसका इस्तेमाल कंप्यूटर पर किया जा सकता है. - Gemini 3.5 Flash (
gemini-3.5-flash): यह पिछले स्टेबल मॉडल वाला वर्शन है. इसमें कंप्यूटर का इस्तेमाल किया जा सकता है. - Gemini 3 Flash की झलक (
gemini-3-flash-preview): कंप्यूटर पर इस्तेमाल किए जा सकने वाले मॉडल की झलक.
आगे क्या करना है
- Browserbase के डेमो एनवायरमेंट में, कंप्यूटर के इस्तेमाल से जुड़े एक्सपेरिमेंट करें.
- उदाहरण के लिए, रेफ़रंस के तौर पर लागू किया गया कोड देखें.
- Gemini API के अन्य टूल के बारे में जानें: