LangGraph হলো স্টেটফুল এলএলএম অ্যাপ্লিকেশন তৈরির একটি ফ্রেমওয়ার্ক, যা ReAct (Reasoning and Acting) এজেন্ট নির্মাণের জন্য এটিকে একটি ভালো পছন্দ করে তোলে।
ReAct এজেন্টরা LLM যুক্তির সাথে কর্ম সম্পাদনকে একত্রিত করে। তারা ব্যবহারকারীর লক্ষ্য অর্জনের জন্য পুনরাবৃত্তিমূলকভাবে চিন্তা করে, সরঞ্জাম ব্যবহার করে এবং পর্যবেক্ষণের উপর ভিত্তি করে কাজ করে, এবং গতিশীলভাবে তাদের পদ্ধতিকে অভিযোজিত করে। 'ReAct: Synergizing Reasoning and Acting in Language Models' (2023)-এ প্রবর্তিত এই প্যাটার্নটি কঠোর কর্মপ্রবাহের পরিবর্তে মানুষের মতো, নমনীয় সমস্যা সমাধানের প্রতিফলন ঘটানোর চেষ্টা করে।
LangGraph একটি পূর্ব-নির্মিত ReAct এজেন্ট ( create_react_agent ) প্রদান করে, যা আপনার ReAct ইমপ্লিমেন্টেশনের জন্য আরও বেশি নিয়ন্ত্রণ এবং কাস্টমাইজেশনের প্রয়োজনে বিশেষভাবে কার্যকর। এই নির্দেশিকাটি আপনাকে এর একটি সরলীকৃত সংস্করণ দেখাবে।
ল্যাংগ্রাফ তিনটি মূল উপাদান ব্যবহার করে এজেন্টদের গ্রাফ হিসেবে মডেল করে:
-
State: একটি শেয়ার্ড ডেটা স্ট্রাকচার (সাধারণতTypedDictবাPydantic BaseModel) যা অ্যাপ্লিকেশনটির বর্তমান স্ন্যাপশটকে উপস্থাপন করে। -
Nodes: আপনার এজেন্টদের লজিক এনকোড করে। এগুলি ইনপুট হিসাবে বর্তমান স্টেট গ্রহণ করে, কিছু গণনা বা সাইড-ইফেক্ট সম্পাদন করে এবং একটি আপডেট করা স্টেট ফেরত দেয়, যেমন LLM কল বা টুল কল। -
Edges: বর্তমানStateউপর ভিত্তি করে পরবর্তী কোনNodeএক্সিকিউট হবে তা নির্ধারণ করে, যা শর্তসাপেক্ষ লজিক এবং নির্দিষ্ট ট্রানজিশনের সুযোগ দেয়।
আপনার যদি এখনও কোনো এপিআই কী না থাকে, তাহলে আপনি গুগল এআই স্টুডিও থেকে একটি সংগ্রহ করতে পারেন।
pip install langgraph langchain-google-genai geopy requests
আপনার API কী GEMINI_API_KEY এনভায়রনমেন্ট ভেরিয়েবলে সেট করুন।
import os

# Read your API key from the environment variable or set it manually
api_key = os.getenv("GEMINI_API_KEY")
LangGraph ব্যবহার করে কীভাবে একটি ReAct এজেন্ট তৈরি করতে হয় তা আরও ভালোভাবে বোঝার জন্য, এই নির্দেশিকাটিতে একটি বাস্তব উদাহরণের মাধ্যমে বিষয়টি ব্যাখ্যা করা হবে। আপনি এমন একটি এজেন্ট তৈরি করবেন যার লক্ষ্য হলো একটি টুল ব্যবহার করে একটি নির্দিষ্ট স্থানের বর্তমান আবহাওয়া খুঁজে বের করা।
এই আবহাওয়া এজেন্টের জন্য, দৃষ্টান্তমূলক উদ্দেশ্যে, State চলমান কথোপকথনের ইতিহাস (বার্তার তালিকা হিসেবে) এবং গৃহীত পদক্ষেপের সংখ্যার জন্য একটি কাউন্টার (পূর্ণসংখ্যা হিসেবে) সংরক্ষণ করবে।
LangGraph স্টেট মেসেজ লিস্ট আপডেট করার জন্য add_messages নামে একটি হেল্পার ফাংশন প্রদান করে। এটি একটি রিডিউসার হিসেবে কাজ করে, যা বর্তমান লিস্টের সাথে নতুন মেসেজগুলো নিয়ে একটি সম্মিলিত লিস্ট রিটার্ন করে। এটি মেসেজ আইডি অনুযায়ী আপডেট পরিচালনা করে এবং নতুন ও অদেখা মেসেজের জন্য ডিফল্টভাবে শুধু "অ্যাপেন্ড-অনলি" আচরণ করে।
from typing import Annotated,Sequence, TypedDict

from langchain_core.messages import BaseMessage
from langgraph.graph.message import add_messages  # helper function to add messages to the state

class AgentState(TypedDict):
    """The state of the agent."""
    messages: Annotated[Sequence[BaseMessage], add_messages]
    number_of_steps: int
এরপরে, আপনার আবহাওয়া টুলটি নির্ধারণ করুন।
from langchain_core.tools import tool
from geopy.geocoders import Nominatim
from pydantic import BaseModel, Field
import requests

geolocator = Nominatim(user_agent="weather-app")

class SearchInput(BaseModel):
    location:str = Field(description="The city and state, e.g., San Francisco")
    date:str = Field(description="the forecasting date for when to get the weather format (yyyy-mm-dd)")

@tool("get_weather_forecast", args_schema=SearchInput, return_direct=True)
def get_weather_forecast(location: str, date: str):
    """Retrieves the weather using Open-Meteo API.

    Takes a given location (city) and a date (yyyy-mm-dd).

    Returns:
        A dict with the time and temperature for each hour.
    """
    # Note that Colab may experience rate limiting on this service. If this
    # happens, use a machine to which you have exclusive access.
    location = geolocator.geocode(location)
    if location:
        try:
            response = requests.get(f"https://api.open-meteo.com/v1/forecast?latitude={location.latitude}&longitude={location.longitude}&hourly=temperature_2m&start_date={date}&end_date={date}")
            data = response.json()
            return dict(zip(data["hourly"]["time"], data["hourly"]["temperature_2m"]))
        except Exception as e:
            return {"error": str(e)}
    else:
        return {"error": "Location not found"}

tools = [get_weather_forecast]
এখন মডেলটি ইনিশিয়ালাইজ করুন এবং মডেলের সাথে টুলগুলো বাইন্ড করুন।
from datetime import datetime
from langchain_google_genai import ChatGoogleGenerativeAI

# Create LLM class
llm = ChatGoogleGenerativeAI(
    model= "gemini-3.5-flash",
    temperature=1.0,
    max_retries=2,
    google_api_key=api_key,
)

# Bind tools to the model
model = llm.bind_tools([get_weather_forecast])

# Test the model with tools
res=model.invoke(f"What is the weather in Berlin on {datetime.today()}?")

print(res)
আপনার এজেন্ট চালানোর আগের শেষ ধাপটি হলো আপনার নোড এবং এজগুলো নির্ধারণ করা। এই উদাহরণে, আপনার দুটি নোড এবং একটি এজ রয়েছে।
-
call_toolনোডটি আপনার টুল মেথডটি কার্যকর করে। LangGraph-এ এর জন্য ToolNode নামে একটি পূর্ব-নির্মিত নোড রয়েছে। -
call_modelনোড, যাmodel_with_toolsব্যবহার করে মডেলটিকে কল করে। -
should_continueএজ, যা টুল নাকি মডেলকে কল করা হবে তা নির্ধারণ করে।
নোড এবং এজ-এর সংখ্যা নির্দিষ্ট নয়। আপনি আপনার গ্রাফে যত খুশি নোড এবং এজ যোগ করতে পারেন। উদাহরণস্বরূপ, আপনি স্ট্রাকচার্ড আউটপুট যোগ করার জন্য একটি নোড অথবা টুল বা মডেলটি কল করার আগে মডেলের আউটপুট যাচাই করার জন্য একটি সেলফ-ভেরিফিকেশন/রিফ্লেকশন নোড যোগ করতে পারেন।
from langchain_core.messages import ToolMessage
from langchain_core.runnables import RunnableConfig

tools_by_name = {tool.name: tool for tool in tools}

# Define our tool node
def call_tool(state: AgentState):
    outputs = []
    # Iterate over the tool calls in the last message
    for tool_call in state["messages"][-1].tool_calls:
        # Get the tool by name
        tool_result = tools_by_name[tool_call["name"]].invoke(tool_call["args"])
        outputs.append(
            ToolMessage(
                content=tool_result,
                name=tool_call["name"],
                tool_call_id=tool_call["id"],
            )
        )
    return {"messages": outputs}

def call_model(
    state: AgentState,
    config: RunnableConfig,
):
    # Invoke the model with the system prompt and the messages
    response = model.invoke(state["messages"], config)
    # This returns a list, which combines with the existing messages state
    # using the add_messages reducer.
    return {"messages": [response]}

# Define the conditional edge that determines whether to continue or not
def should_continue(state: AgentState):
    messages = state["messages"]
    # If the last message is not a tool call, then finish
    if not messages[-1].tool_calls:
        return "end"
    # default to continue
    return "continue"
এজেন্টের সমস্ত উপাদান প্রস্তুত হয়ে গেলে, আপনি এখন সেগুলো একত্রিত করতে পারেন।
from langgraph.graph import StateGraph, END

# Define a new graph with our state
workflow = StateGraph(AgentState)

# 1. Add the nodes
workflow.add_node("llm", call_model)
workflow.add_node("tools",  call_tool)
# 2. Set the entrypoint as `agent`, this is the first node called
workflow.set_entry_point("llm")
# 3. Add a conditional edge after the `llm` node is called.
workflow.add_conditional_edges(
    # Edge is used after the `llm` node is called.
    "llm",
    # The function that will determine which node is called next.
    should_continue,
    # Mapping for where to go next, keys are strings from the function return,
    # and the values are other nodes.
    # END is a special node marking that the graph is finish.
    {
        # If `tools`, then we call the tool node.
        "continue": "tools",
        # Otherwise we finish.
        "end": END,
    },
)
# 4. Add a normal edge after `tools` is called, `llm` node is called next.
workflow.add_edge("tools", "llm")

# Now we can compile and visualize our graph
graph = workflow.compile()
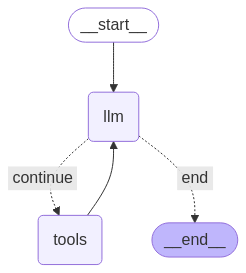
আপনি ` draw_mermaid_png মেথডটি ব্যবহার করে আপনার গ্রাফটি দেখতে পারেন।
from IPython.display import Image, display

display(Image(graph.get_graph().draw_mermaid_png()))
এখন এজেন্টটি চালান।
from datetime import datetime
# Create our initial message dictionary
inputs = {"messages": [("user", f"What is the weather in Berlin on {datetime.today()}?")]}

# call our graph with streaming to see the steps
for state in graph.stream(inputs, stream_mode="values"):
    last_message = state["messages"][-1]
    last_message.pretty_print()
আপনি এখন আপনার কথোপকথন চালিয়ে যেতে পারেন, অন্য শহরের আবহাওয়ার খবর জানতে চাইতে পারেন, অথবা তুলনার জন্য অনুরোধ করতে পারেন।
state["messages"].append(("user", "Would it be warmer in Munich?"))

for state in graph.stream(state, stream_mode="values"):
    last_message = state["messages"][-1]
    last_message.pretty_print()