LangGraph چارچوبی برای ساخت برنامههای کاربردی LLM با وضعیت است، که آن را به انتخابی مناسب برای ساخت عاملهای ReAct (استدلال و عمل) تبدیل میکند.
عاملهای ReAct استدلال LLM را با اجرای عمل ترکیب میکنند. آنها به صورت تکراری فکر میکنند، از ابزارها استفاده میکنند و بر اساس مشاهدات عمل میکنند تا به اهداف کاربر برسند و رویکرد خود را به صورت پویا تطبیق دهند. این الگو که در «ReAct: همافزایی استدلال و عمل در مدلهای زبانی» (۲۰۲۳) معرفی شد، سعی دارد حل مسئله انعطافپذیر و شبهانسانی را بر روی گردشهای کاری سفت و سخت منعکس کند.
LangGraph یک عامل ReAct از پیش ساخته شده ( create_react_agent ) ارائه میدهد که وقتی به کنترل و سفارشیسازی بیشتری برای پیادهسازیهای ReAct خود نیاز دارید، میدرخشد. این راهنما یک نسخه ساده شده را به شما نشان میدهد.
LangGraph عاملها را به صورت گراف با استفاده از سه جزء کلیدی مدلسازی میکند:
-
State: ساختار داده مشترک (معمولاًTypedDictیاPydantic BaseModel) که نشاندهنده اسنپشات فعلی برنامه است. -
Nodes: منطق عاملهای شما را کدگذاری میکنند. آنها وضعیت فعلی را به عنوان ورودی دریافت میکنند، برخی محاسبات یا عوارض جانبی را انجام میدهند و یک وضعیت بهروز شده را برمیگردانند، مانند فراخوانیهای LLM یا فراخوانیهای ابزار. -
Edges:Nodeبعدی را برای اجرا بر اساسStateفعلی تعریف میکند و منطق شرطی و انتقالهای ثابت را امکانپذیر میسازد.
اگر هنوز کلید API ندارید، میتوانید آن را از Google AI Studio دریافت کنید.
pip install langgraph langchain-google-genai geopy requests
کلید API خود را در متغیر محیطی GEMINI_API_KEY تنظیم کنید.
import os

# Read your API key from the environment variable or set it manually
api_key = os.getenv("GEMINI_API_KEY")
برای درک بهتر نحوه پیادهسازی یک عامل ReAct با استفاده از LangGraph، این راهنما یک مثال عملی را بررسی میکند. شما عاملی ایجاد خواهید کرد که هدف آن استفاده از ابزاری برای یافتن آب و هوای فعلی برای یک مکان مشخص است.
برای این عامل آب و هوا، State سابقه مکالمه جاری (به صورت فهرستی از پیامها) و یک شمارنده (به صورت یک عدد صحیح) برای تعداد مراحل انجام شده را برای اهداف توضیحی نگهداری خواهد کرد.
LangGraph یک تابع کمکی به نام add_messages برای بهروزرسانی فهرست پیامهای وضعیت ارائه میدهد. این تابع به عنوان یک کاهنده عمل میکند، فهرست فعلی به علاوه پیامهای جدید را دریافت میکند و یک فهرست ترکیبی را برمیگرداند. این تابع بهروزرسانیها را بر اساس شناسه پیام مدیریت میکند و برای پیامهای جدید و دیده نشده، رفتار پیشفرض «فقط اضافه کردن» را دارد.
from typing import Annotated,Sequence, TypedDict

from langchain_core.messages import BaseMessage
from langgraph.graph.message import add_messages  # helper function to add messages to the state

class AgentState(TypedDict):
    """The state of the agent."""
    messages: Annotated[Sequence[BaseMessage], add_messages]
    number_of_steps: int
سپس، ابزار هواشناسی خود را تعریف کنید.
from langchain_core.tools import tool
from geopy.geocoders import Nominatim
from pydantic import BaseModel, Field
import requests

geolocator = Nominatim(user_agent="weather-app")

class SearchInput(BaseModel):
    location:str = Field(description="The city and state, e.g., San Francisco")
    date:str = Field(description="the forecasting date for when to get the weather format (yyyy-mm-dd)")

@tool("get_weather_forecast", args_schema=SearchInput, return_direct=True)
def get_weather_forecast(location: str, date: str):
    """Retrieves the weather using Open-Meteo API.

    Takes a given location (city) and a date (yyyy-mm-dd).

    Returns:
        A dict with the time and temperature for each hour.
    """
    # Note that Colab may experience rate limiting on this service. If this
    # happens, use a machine to which you have exclusive access.
    location = geolocator.geocode(location)
    if location:
        try:
            response = requests.get(f"https://api.open-meteo.com/v1/forecast?latitude={location.latitude}&longitude={location.longitude}&hourly=temperature_2m&start_date={date}&end_date={date}")
            data = response.json()
            return dict(zip(data["hourly"]["time"], data["hourly"]["temperature_2m"]))
        except Exception as e:
            return {"error": str(e)}
    else:
        return {"error": "Location not found"}

tools = [get_weather_forecast]
حالا مدل را مقداردهی اولیه کنید و ابزارها را به مدل متصل کنید.
from datetime import datetime
from langchain_google_genai import ChatGoogleGenerativeAI

# Create LLM class
llm = ChatGoogleGenerativeAI(
    model= "gemini-3.5-flash",
    temperature=1.0,
    max_retries=2,
    google_api_key=api_key,
)

# Bind tools to the model
model = llm.bind_tools([get_weather_forecast])

# Test the model with tools
res=model.invoke(f"What is the weather in Berlin on {datetime.today()}?")

print(res)
آخرین مرحله قبل از اینکه بتوانید عامل خود را اجرا کنید، تعریف گرهها و لبههای آن است. در این مثال، شما دو گره و یک لبه دارید.
- گره
call_toolکه متد ابزار شما را اجرا میکند. LangGraph یک گره از پیش ساخته شده برای این کار به نام ToolNode دارد. - گره
call_modelکه ازmodel_with_toolsبرای فراخوانی مدل استفاده میکند. -
should_continueلبهای است که تصمیم میگیرد ابزار یا مدل را فراخوانی کند.
تعداد گرهها و لبهها ثابت نیست. میتوانید هر تعداد گره و لبه که میخواهید به گراف خود اضافه کنید. برای مثال، میتوانید یک گره برای اضافه کردن خروجی ساختاریافته یا یک گره خود-تایید/بازتاب برای بررسی خروجی مدل قبل از فراخوانی ابزار یا مدل اضافه کنید.
from langchain_core.messages import ToolMessage
from langchain_core.runnables import RunnableConfig

tools_by_name = {tool.name: tool for tool in tools}

# Define our tool node
def call_tool(state: AgentState):
    outputs = []
    # Iterate over the tool calls in the last message
    for tool_call in state["messages"][-1].tool_calls:
        # Get the tool by name
        tool_result = tools_by_name[tool_call["name"]].invoke(tool_call["args"])
        outputs.append(
            ToolMessage(
                content=tool_result,
                name=tool_call["name"],
                tool_call_id=tool_call["id"],
            )
        )
    return {"messages": outputs}

def call_model(
    state: AgentState,
    config: RunnableConfig,
):
    # Invoke the model with the system prompt and the messages
    response = model.invoke(state["messages"], config)
    # This returns a list, which combines with the existing messages state
    # using the add_messages reducer.
    return {"messages": [response]}

# Define the conditional edge that determines whether to continue or not
def should_continue(state: AgentState):
    messages = state["messages"]
    # If the last message is not a tool call, then finish
    if not messages[-1].tool_calls:
        return "end"
    # default to continue
    return "continue"
با آماده شدن تمام اجزای عامل، اکنون میتوانید آنها را مونتاژ کنید.
from langgraph.graph import StateGraph, END

# Define a new graph with our state
workflow = StateGraph(AgentState)

# 1. Add the nodes
workflow.add_node("llm", call_model)
workflow.add_node("tools",  call_tool)
# 2. Set the entrypoint as `agent`, this is the first node called
workflow.set_entry_point("llm")
# 3. Add a conditional edge after the `llm` node is called.
workflow.add_conditional_edges(
    # Edge is used after the `llm` node is called.
    "llm",
    # The function that will determine which node is called next.
    should_continue,
    # Mapping for where to go next, keys are strings from the function return,
    # and the values are other nodes.
    # END is a special node marking that the graph is finish.
    {
        # If `tools`, then we call the tool node.
        "continue": "tools",
        # Otherwise we finish.
        "end": END,
    },
)
# 4. Add a normal edge after `tools` is called, `llm` node is called next.
workflow.add_edge("tools", "llm")

# Now we can compile and visualize our graph
graph = workflow.compile()
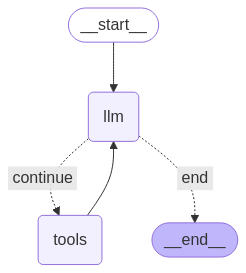
شما میتوانید نمودار خود را با استفاده از متد draw_mermaid_png به صورت بصری نمایش دهید.
from IPython.display import Image, display

display(Image(graph.get_graph().draw_mermaid_png()))
حالا عامل را اجرا کنید.
from datetime import datetime
# Create our initial message dictionary
inputs = {"messages": [("user", f"What is the weather in Berlin on {datetime.today()}?")]}

# call our graph with streaming to see the steps
for state in graph.stream(inputs, stream_mode="values"):
    last_message = state["messages"][-1]
    last_message.pretty_print()
اکنون میتوانید به مکالمه خود ادامه دهید، آب و هوای شهر دیگری را بپرسید یا درخواست مقایسه کنید.
state["messages"].append(("user", "Would it be warmer in Munich?"))

for state in graph.stream(state, stream_mode="values"):
    last_message = state["messages"][-1]
    last_message.pretty_print()