MediaPipe 手勢辨識器工作可讓您即時辨識手勢,並提供已辨識的手勢結果和偵測到的手部地標。本操作說明將說明如何在 iOS 應用程式中使用手勢辨識器。
如要瞭解這項工作的實際運作情形,請查看網路示範。如要進一步瞭解這項工作的功能、模型和設定選項,請參閱總覽。
程式碼範例
MediaPipe Tasks 範例程式碼是 iOS 手勢辨識器應用程式的基本實作。這個範例會使用實體 iOS 裝置的相機,持續偵測手勢,也可以使用裝置相片庫中的圖片和影片,以靜態方式偵測手勢。
您可以使用這個應用程式做為自有 iOS 應用程式的起點,或是在修改現有應用程式時參考這個應用程式。手勢辨識器範例程式碼託管於 GitHub。
下載程式碼
以下操作說明說明如何使用 git 指令列工具,建立範例程式碼的本機副本。
下載程式碼範例:
使用下列指令複製 Git 存放區:
git clone https://github.com/google-ai-edge/mediapipe-samples您可以選擇將 Git 例項設定為使用稀疏檢查,這樣您就只會取得手勢辨識器範例應用程式的檔案:
cd mediapipe-samples
git sparse-checkout init --cone
git sparse-checkout set examples/gesture_recognizer/ios/
建立範例程式碼的本機版本後,您可以安裝 MediaPipe 工作程式庫、使用 Xcode 開啟專案,然後執行應用程式。如需操作說明,請參閱 iOS 設定指南。
重要元件
下列檔案包含手勢辨識器範例應用程式的關鍵程式碼:
- GestureRecognizerService.swift:初始化手勢辨識器、處理模型選取作業,並對輸入資料執行推論。
- CameraViewController.swift:為即時攝影機動態饋給輸入模式實作 UI,並將結果以視覺化方式呈現。
- MediaLibraryViewController.swift:為靜態影像和影片檔案輸入模式實作 UI,並將結果以視覺化方式呈現。
設定
本節說明設定開發環境和程式碼專案以使用手勢辨識器的重要步驟。如要進一步瞭解如何設定開發環境以使用 MediaPipe 工作,包括平台版本需求,請參閱 iOS 專用設定指南。
依附元件
手勢辨識器會使用 MediaPipeTasksVision 程式庫,必須使用 CocoaPods 安裝。這個程式庫與 Swift 和 Objective-C 應用程式相容,且不需要任何額外的語言專屬設定。
如需在 macOS 上安裝 CocoaPods 的操作說明,請參閱 CocoaPods 安裝指南。如需有關如何為應用程式建立包含必要 Pod 的 Podfile 的操作說明,請參閱「使用 CocoaPods」。
使用下列程式碼,在 Podfile 中新增 MediaPipeTasksVision pod:
target 'MyGestureRecognizerApp' do
  use_frameworks!
  pod 'MediaPipeTasksVision'
end
如果您的應用程式包含單元測試目標,請參閱「iOS 設定指南」,進一步瞭解如何設定 Podfile。
型號
MediaPipe 手勢辨識器工作需要訓練的模型與此工作相容。如要進一步瞭解手勢辨識器可用的訓練模型,請參閱任務總覽的「模型」一節。
選取並下載模型,然後使用 Xcode 將模型新增至專案目錄。如需在 Xcode 專案中新增檔案的操作說明,請參閱「管理 Xcode 專案中的檔案和資料夾」。
使用 BaseOptions.modelAssetPath 屬性指定應用程式套件中的模型路徑。如需程式碼範例,請參閱下一節。
建立工作
您可以呼叫其中一個初始化器,建立手勢辨識器工作。GestureRecognizer(options:) 初始化器會接受設定選項的值。
如果您不需要使用自訂設定選項初始化的手勢辨識器,可以使用 GestureRecognizer(modelPath:) 初始化器,以預設選項建立手勢辨識器。如要進一步瞭解設定選項,請參閱「設定總覽」。
手勢辨識器工作支援 3 種輸入資料類型:靜態圖片、影片檔案和即時影像串流。根據預設,GestureRecognizer(modelPath:) 會初始化靜態圖片的工作。如果您希望任務初始化以處理影片檔案或直播影片串流,請使用 GestureRecognizer(options:) 指定影片或直播的執行模式。直播模式也需要額外的 gestureRecognizerLiveStreamDelegate 設定選項,才能讓手勢辨識器以非同步方式將手勢辨識結果傳送至委派函。
請選擇對應於執行模式的分頁,瞭解如何建立工作並執行推論。
Swift
圖片
import MediaPipeTasksVision

let modelPath = Bundle.main.path(forResource: "gesture_recognizer",
                                      ofType: "task")

let options = GestureRecognizerOptions()
options.baseOptions.modelAssetPath = modelPath
options.runningMode = .image
options.minHandDetectionConfidence = minHandDetectionConfidence
options.minHandPresenceConfidence = minHandPresenceConfidence
options.minTrackingConfidence = minHandTrackingConfidence
options.numHands = numHands

let gestureRecognizer = try GestureRecognizer(options: options)
影片
import MediaPipeTasksVision

let modelPath = Bundle.main.path(forResource: "gesture_recognizer",
                                      ofType: "task")

let options = GestureRecognizerOptions()
options.baseOptions.modelAssetPath = modelPath
options.runningMode = .video
options.minHandDetectionConfidence = minHandDetectionConfidence
options.minHandPresenceConfidence = minHandPresenceConfidence
options.minTrackingConfidence = minHandTrackingConfidence
options.numHands = numHands

let gestureRecognizer = try GestureRecognizer(options: options)
直播
import MediaPipeTasksVision

// Class that conforms to the `GestureRecognizerLiveStreamDelegate` protocol and
// implements the method that the gesture recognizer calls once it finishes
// performing recognizing hand gestures in each input frame.
class GestureRecognizerResultProcessor: NSObject, GestureRecognizerLiveStreamDelegate {

  func gestureRecognizer(
    _ gestureRecognizer: GestureRecognizer,
    didFinishRecognition result: GestureRecognizerResult?,
    timestampInMilliseconds: Int,
    error: Error?) {

    // Process the gesture recognizer result or errors here.

  }
}

let modelPath = Bundle.main.path(
  forResource: "gesture_recognizer",
  ofType: "task")

let options = GestureRecognizerOptions()
options.baseOptions.modelAssetPath = modelPath
options.runningMode = .liveStream
options.minHandDetectionConfidence = minHandDetectionConfidence
options.minHandPresenceConfidence = minHandPresenceConfidence
options.minTrackingConfidence = minHandTrackingConfidence
options.numHands = numHands

// Assign an object of the class to the `gestureRecognizerLiveStreamDelegate`
// property.
let processor = GestureRecognizerResultProcessor()
options.gestureRecognizerLiveStreamDelegate = processor

let gestureRecognizer = try GestureRecognizer(options: options)
Objective-C
圖片
@import MediaPipeTasksVision;

NSString *modelPath =
  [[NSBundle mainBundle] pathForResource:@"gesture_recognizer"
                                  ofType:@"task"];

MPPGestureRecognizerOptions *options =
  [[MPPGestureRecognizerOptions alloc] init];
options.baseOptions.modelAssetPath = modelPath;
options.runningMode = MPPRunningModeImage;
options.minHandDetectionConfidence = minHandDetectionConfidence
options.minHandPresenceConfidence = minHandPresenceConfidence
options.minTrackingConfidence = minHandTrackingConfidence
options.numHands = numHands

MPPGestureRecognizer *gestureRecognizer =
      [[MPPGestureRecognizer alloc] initWithOptions:options error:nil];
影片
@import MediaPipeTasksVision;

NSString *modelPath =
  [[NSBundle mainBundle] pathForResource:@"gesture_recognizer"
                                  ofType:@"task"];

MPPGestureRecognizerOptions *options =
  [[MPPGestureRecognizerOptions alloc] init];
options.baseOptions.modelAssetPath = modelPath;
options.runningMode = MPPRunningModeVideo;
options.minHandDetectionConfidence = minHandDetectionConfidence
options.minHandPresenceConfidence = minHandPresenceConfidence
options.minTrackingConfidence = minHandTrackingConfidence
options.numHands = numHands

MPPGestureRecognizer *gestureRecognizer =
      [[MPPGestureRecognizer alloc] initWithOptions:options error:nil];
直播
@import MediaPipeTasksVision; // Class that conforms to the `MPPGestureRecognizerLiveStreamDelegate` protocol // and implements the method that the gesture recognizer calls once it finishes // performing gesture recognition on each input frame. @interface APPGestureRecognizerResultProcessor : NSObject@end @implementation APPGestureRecognizerResultProcessor - (void)gestureRecognizer:(MPPGestureRecognizer *)gestureRecognizer didFinishRecognitionWithResult:(MPPGestureRecognizerResult *)gestureRecognizerResult timestampInMilliseconds:(NSInteger)timestampInMilliseconds error:(NSError *)error { // Process the gesture recognizer result or errors here. } @end NSString *modelPath = [[NSBundle mainBundle] pathForResource:@"gesture_recognizer" ofType:@"task"]; MPPGestureRecognizerOptions *options = [[MPPGestureRecognizerOptions alloc] init]; options.baseOptions.modelAssetPath = modelPath; options.runningMode = MPPRunningModeLiveStream; options.minHandDetectionConfidence = minHandDetectionConfidence options.minHandPresenceConfidence = minHandPresenceConfidence options.minTrackingConfidence = minHandTrackingConfidence options.numHands = numHands // Assign an object of the class to the `gestureRecognizerLiveStreamDelegate` // property. APPGestureRecognizerResultProcessor *processor = [APPGestureRecognizerResultProcessor new]; options.gestureRecognizerLiveStreamDelegate = processor; MPPGestureRecognizer *gestureRecognizer = [[MPPGestureRecognizer alloc] initWithOptions:options error:nil];
設定選項
此工作包含下列 iOS 應用程式的設定選項:
| 選項名稱 | 說明 | 值範圍 | 預設值 | |
|---|---|---|---|---|
runningMode |
設定工作執行模式。共有三種模式: IMAGE:單一圖片輸入模式。 VIDEO:影片解碼影格模式。 LIVE_STREAM:輸入資料 (例如來自攝影機的資料) 的直播模式。在這個模式中,必須呼叫 resultListener,才能設定事件監聽器,以非同步方式接收結果。在這個模式中, gestureRecognizerLiveStreamDelegate 必須設為實作 GestureRecognizerLiveStreamDelegate 的類別例項,才能非同步接收手勢辨識結果。 |
{RunningMode.image, RunningMode.video, RunningMode.liveStream} |
RunningMode.image |
|
num_hands |
GestureRecognizer 最多可偵測的手數。 |
Any integer > 0 |
1 |
|
min_hand_detection_confidence |
在手掌偵測模型中,手部偵測的最低信賴分數,才會視為成功。 | 0.0 - 1.0 |
0.5 |
|
min_hand_presence_confidence |
手部地標偵測模型中手部存在分數的最低可信度分數。在手勢辨識器的影片模式和直播模式中,如果手標記模型的手部存在可信度分數低於此閾值,則會觸發手掌偵測模型。否則,系統會使用輕量手勢追蹤演算法,判斷手的位置,以便後續的顯著點偵測。 | 0.0 - 1.0 |
0.5 |
|
min_tracking_confidence |
手部追蹤系統判定為成功的最低可信度分數。這是目前影格和上一個影格中手的定界框交併比閾值。在手勢辨識器的「影片」模式和「串流」模式中,如果追蹤失敗,手勢辨識器會觸發手部偵測。否則系統會略過手勢偵測。 | 0.0 - 1.0 |
0.5 |
|
canned_gestures_classifier_options |
設定預先錄製手勢分類器行為的選項。罐頭手勢為 ["None", "Closed_Fist", "Open_Palm", "Pointing_Up", "Thumb_Down", "Thumb_Up", "Victory", "ILoveYou"] |
|
|
|
custom_gestures_classifier_options |
設定自訂手勢分類器行為的選項。 |
|
|
|
result_listener |
在手勢辨識器處於即時串流模式時,將結果事件監聽器設為以非同步方式接收分類結果。只有在執行模式設為 LIVE_STREAM 時,才能使用 |
ResultListener |
不適用 | 不適用 |
當執行模式設為直播時,手勢辨識器需要額外的 gestureRecognizerLiveStreamDelegate 設定選項,才能讓手勢辨識器以非同步方式提供手勢辨識結果。委派函必須實作 gestureRecognizer(_:didFinishRecognition:timestampInMilliseconds:error:) 方法,Gesture Recognizer 會在處理對每個影格執行手勢辨識的結果後呼叫此方法。
| 選項名稱 | 說明 | 值範圍 | 預設值 |
|---|---|---|---|
gestureRecognizerLiveStreamDelegate |
讓手勢辨識器在直播模式下以非同步方式接收手勢辨識結果。將例項設為此屬性的類別必須實作 gestureRecognizer(_:didFinishRecognition:timestampInMilliseconds:error:) 方法。 |
不適用 | 未設定 |
準備資料
您必須先將輸入圖片或影格轉換為 MPImage 物件,再傳送至手勢辨識器。MPImage 支援不同類型的 iOS 圖片格式,並可在任何執行模式下用於推論。如要進一步瞭解 MPImage,請參閱 MPImage API。
請根據用途和應用程式所需的執行模式,選擇 iOS 圖片格式。MPImage 接受 UIImage、CVPixelBuffer 和 CMSampleBuffer iOS 圖片格式。
UIImage
UIImage 格式非常適合下列執行模式:
圖片:應用程式套件、使用者相片庫或檔案系統中的圖片,如果以
UIImage圖片格式編碼,即可轉換為MPImage物件。影片:使用 AVAssetImageGenerator 將影片影格擷取為 CGImage 格式,然後轉換為
UIImage圖片。
Swift
// Load an image on the user's device as an iOS `UIImage` object.

// Convert the `UIImage` object to a MediaPipe's Image object having the default
// orientation `UIImage.Orientation.up`.
let image = try MPImage(uiImage: image)
Objective-C
// Load an image on the user's device as an iOS `UIImage` object.

// Convert the `UIImage` object to a MediaPipe's Image object having the default
// orientation `UIImageOrientationUp`.
MPImage *image = [[MPPImage alloc] initWithUIImage:image error:nil];
這個範例會使用預設的 UIImage.Orientation.Up 方向初始化 MPImage。您可以使用任何支援的 UIImage.Orientation 值初始化 MPImage。手勢辨識器不支援鏡像方向,例如 .upMirrored、.downMirrored、.leftMirrored、.rightMirrored。
如要進一步瞭解 UIImage,請參閱 UIImage Apple 開發人員說明文件。
CVPixelBuffer
CVPixelBuffer 格式非常適合用於產生影格,並使用 iOS CoreImage 架構進行處理的應用程式。
CVPixelBuffer 格式非常適合下列執行模式:
圖片:如果應用程式在使用 iOS 的
CoreImage架構進行一些處理後產生CVPixelBuffer圖片,則可在圖片執行模式下傳送至手勢辨識器。影片:可將影片影格轉換為
CVPixelBuffer格式進行處理,然後以影片模式傳送至手勢辨識器。直播:使用 iOS 相機產生影格時,應用程式可能會先將影格轉換為
CVPixelBuffer格式進行處理,再以直播模式傳送至手勢辨識器。
Swift
// Obtain a CVPixelBuffer.

// Convert the `CVPixelBuffer` object to a MediaPipe's Image object having the default
// orientation `UIImage.Orientation.up`.
let image = try MPImage(pixelBuffer: pixelBuffer)
Objective-C
// Obtain a CVPixelBuffer.

// Convert the `CVPixelBuffer` object to a MediaPipe's Image object having the
// default orientation `UIImageOrientationUp`.
MPImage *image = [[MPPImage alloc] initWithUIImage:image error:nil];
如要進一步瞭解 CVPixelBuffer,請參閱 CVPixelBuffer Apple 開發人員說明文件。
CMSampleBuffer
CMSampleBuffer 格式會儲存統一媒體類型的媒體樣本,非常適合直播執行模式。iOS AVCaptureVideoDataOutput 會以 CMSampleBuffer 格式,以非同步方式傳送 iOS 攝影機的即時影格。
Swift
// Obtain a CMSampleBuffer.

// Convert the `CMSampleBuffer` object to a MediaPipe's Image object having the default
// orientation `UIImage.Orientation.up`.
let image = try MPImage(sampleBuffer: sampleBuffer)
Objective-C
// Obtain a `CMSampleBuffer`.

// Convert the `CMSampleBuffer` object to a MediaPipe's Image object having the
// default orientation `UIImageOrientationUp`.
MPImage *image = [[MPPImage alloc] initWithSampleBuffer:sampleBuffer error:nil];
如要進一步瞭解 CMSampleBuffer,請參閱 CMSampleBuffer Apple 開發人員說明文件。
執行工作
如要執行手勢辨識器,請使用指派的執行模式專用的 recognize() 方法:
- 靜態圖片:
recognize(image:) - 影片:
recognize(videoFrame:timestampInMilliseconds:) - 直播:
recognizeAsync(image:timestampInMilliseconds:)
以下程式碼範例示範如何在這些不同的執行模式中執行手勢辨識器:
Swift
圖片
let result = try gestureRecognizer.recognize(image: image)
影片
let result = try gestureRecognizer.recognize(
  videoFrame: image,
  timestampInMilliseconds: timestamp)
直播
try gestureRecognizer.recognizeAsync(
  image: image,
  timestampInMilliseconds: timestamp)
Objective-C
圖片
  MPPGestureRecognizerResult *result =
    [gestureRecognizer recognizeImage:mppImage
                                error:nil];
影片
MPPGestureRecognizerResult *result =
  [gestureRecognizer recognizeVideoFrame:image
                 timestampInMilliseconds:timestamp
                                   error:nil];
直播
BOOL success =
  [gestureRecognizer recognizeAsyncImage:image
                 timestampInMilliseconds:timestamp
                                   error:nil];
程式碼範例可讓使用者在處理模式之間切換,但這可能不是您使用情境所需的功能。
注意事項:
在影片模式或直播模式下執行時,您也必須向手勢辨識器工作提供輸入影格時間戳記。
在圖片或影片模式下執行時,Gesture Recognizer 工作會阻斷目前的執行緒,直到處理完輸入圖片或影格為止。為避免阻斷目前執行緒,請使用 iOS Dispatch 或 NSOperation 架構,在背景執行緒中執行處理作業。
在直播模式下執行時,Gesture Recognizer 工作會立即傳回,且不會封鎖目前的執行緒。在處理每個輸入影格後,會使用手勢辨識結果呼叫
gestureRecognizer(_:didFinishRecognition:timestampInMilliseconds:error:)方法。手勢辨識器會在專屬的序列調度佇列上非同步叫用此方法。如要在使用者介面上顯示結果,請在處理結果後將結果調度至主佇列。如果在手勢辨識器工作忙於處理另一個影格時呼叫recognizeAsync函式,手勢辨識器會忽略新的輸入影格。
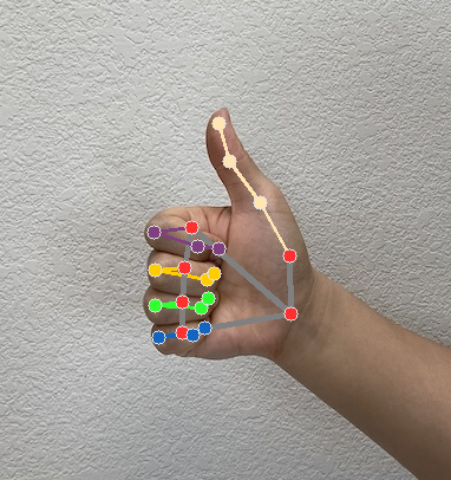
處理及顯示結果
在執行推論時,手勢辨識器工作會傳回 GestureRecognizerResult,其中包含以圖像座標表示的手部醒目標記、以世界座標表示的手部醒目標記、手的慣用手(左手/右手),以及所偵測手的手勢類別。
以下是這項工作的輸出資料範例:
產生的 GestureRecognizerResult 包含四個元件,每個元件都是陣列,每個元素都包含偵測到單一手的偵測結果。
慣用手
慣用手代表偵測到的手是左手還是右手。
手勢
系統偵測到的手勢類別。
地標
手部有 21 個地標,每個地標都由
x、y和z座標組成。x和y座標會分別根據圖片寬度和高度,正規化為 [0.0, 1.0]。z座標代表地標深度,其中手腕的深度為原點。值越小,地標與相機的距離就越近。z的大小會使用與x大致相同的刻度。世界著名地標
21 個手部地標也會以世界座標呈現。每個地標都由
x、y和z組成,代表以公尺為單位的實際 3D 座標,起點位於手的幾何中心。
GestureRecognizerResult:
  Handedness:
    Categories #0:
      index        : 0
      score        : 0.98396
      categoryName : Left
  Gestures:
    Categories #0:
      score        : 0.76893
      categoryName : Thumb_Up
  Landmarks:
    Landmark #0:
      x            : 0.638852
      y            : 0.671197
      z            : -3.41E-7
    Landmark #1:
      x            : 0.634599
      y            : 0.536441
      z            : -0.06984
    ... (21 landmarks for a hand)
  WorldLandmarks:
    Landmark #0:
      x            : 0.067485
      y            : 0.031084
      z            : 0.055223
    Landmark #1:
      x            : 0.063209
      y            : -0.00382
      z            : 0.020920
    ... (21 world landmarks for a hand)
下圖是工作輸出內容的視覺化呈現: