

Gemini Robotics ER 모델은 객체를 가리키고, 동영상에서 객체를 추적하고, 경계 상자로 객체를 감지하고, 이동 궤적을 생성할 수 있습니다. 이 페이지의 모든 예시에서는 generateContent를 사용하는 자연어 프롬프트를 사용합니다.
실행 가능한 전체 코드는 로봇공학 Cookbook을 참고하세요.
객체 가리키기
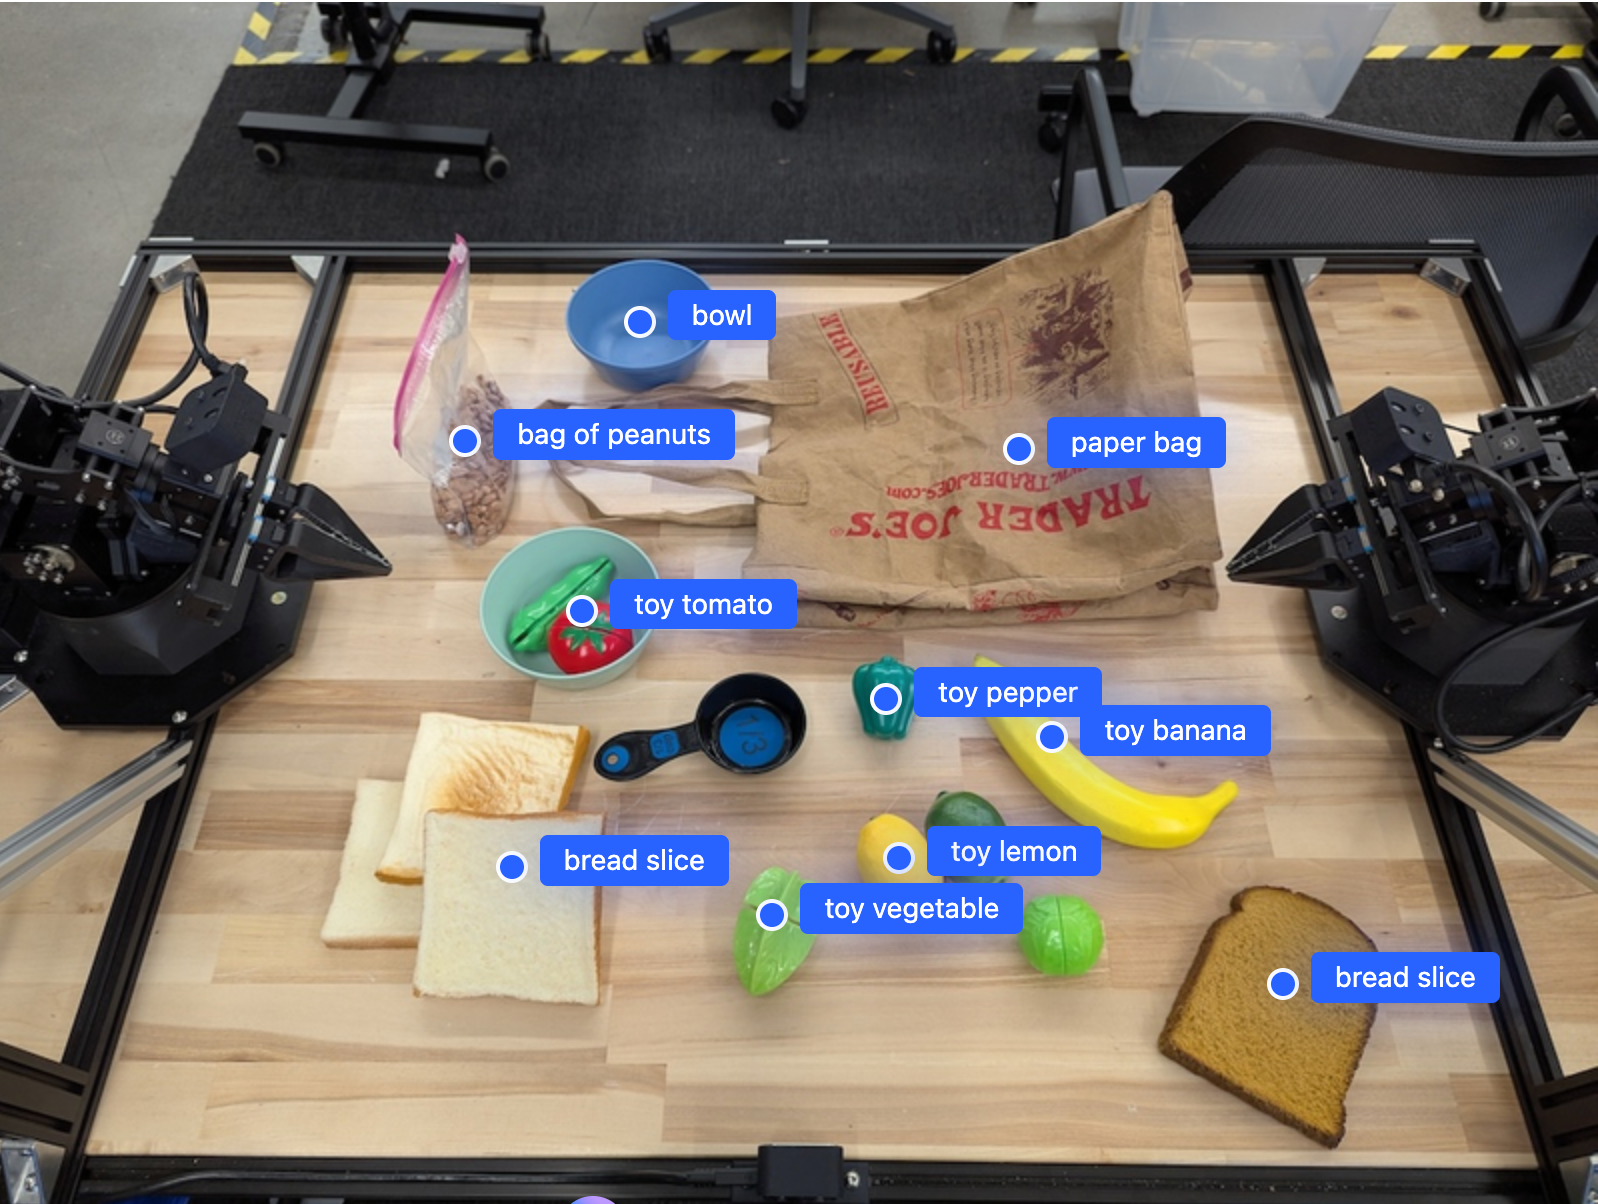
다음 예시에서는 이미지에서 특정 객체를 찾고 정규화된 [y, x] 좌표를 반환합니다.
Python
from google import genai
from google.genai import types

PROMPT = """
          Point to no more than 10 items in the image. The label returned
          should be an identifying name for the object detected.
          The answer should follow the json format: [{"point": <point>,
          "label": <label1>}, ...]. The points are in [y, x] format
          normalized to 0-1000.
        """
client = genai.Client()

# Load your image
with open("my-image.png", 'rb') as f:
    image_bytes = f.read()

image_response = client.models.generate_content(
    model="gemini-robotics-er-2-preview",
    contents=[
        types.Part.from_bytes(
            data=image_bytes,
            mime_type='image/png',
        ),
        PROMPT
    ],
    config = types.GenerateContentConfig(
        thinking_config=types.ThinkingConfig(thinking_level="high")
    )
)

print(image_response.text)
REST
# First, ensure you have the image file locally.
# Encode the image to base64
IMAGE_BASE64=$(base64 -w 0 my-image.png)

curl -X POST \
  "https://generativelanguage.googleapis.com/v1beta/models/gemini-robotics-er-2-preview:generateContent \
  -H "x-goog-api-key: $GEMINI_API_KEY" \
  -H "Content-Type: application/json" \
  -d '{
    "contents": [
      {
        "parts": [
          {
            "inlineData": {
              "mimeType": "image/png",
              "data": "'"${IMAGE_BASE64}"'"
            }
          },
          {
            "text": "Point to no more than 10 items in the image. The label returned should be an identifying name for the object detected. The answer should follow the json format: [{\"point\": [y, x], \"label\": <label1>}, ...]. The points are in [y, x] format normalized to 0-1000."
          }
        ]
      }
    ],
    "generationConfig": {
      "thinkingConfig": {
        "thinkingLevel": "high"
      }
    }
  }'
출력은 객체를 포함하는 JSON 배열이며, 각 객체에는 point(정규화된 [y, x] 좌표)와 객체를 식별하는 label이 있습니다.
JSON
[
  {"point": [376, 508], "label": "small banana"},
  {"point": [287, 609], "label": "larger banana"},
  {"point": [223, 303], "label": "pink starfruit"},
  {"point": [435, 172], "label": "paper bag"},
  {"point": [270, 786], "label": "green plastic bowl"},
  {"point": [488, 775], "label": "metal measuring cup"},
  {"point": [673, 580], "label": "dark blue bowl"},
  {"point": [471, 353], "label": "light blue bowl"},
  {"point": [492, 497], "label": "bread"},
  {"point": [525, 429], "label": "lime"}
]
다음 이미지는 이러한 점이 표시되는 방식을 보여주는 예시입니다.
동영상에서 객체 추적
Gemini Robotics ER 2는 동영상 프레임을 분석하여 시간이 지남에 따라 객체를 추적할 수도 있습니다. 지원되는 동영상 형식의 목록은 동영상 입력 을 참고하세요.
Python
from google import genai
from google.genai import types

client = genai.Client()

# Load your video
with open("my-video.mp4", 'rb') as f:
    video_bytes = f.read()

prompt = """
          Point to the red ball in every frame where it appears.
          The answer should follow the json format: [{"point": [y, x],
          "label": <label>}, ...]. The points are in [y, x] format
          normalized to 0-1000. Return one entry per frame that contains
          the object.
        """

image_response = client.models.generate_content(
  model="gemini-robotics-er-2-preview",
  contents=[
    types.Part.from_bytes(
      data=video_bytes,
      mime_type='video/mp4',
    ),
    prompt
  ],
  config = types.GenerateContentConfig(
      thinking_config=types.ThinkingConfig(thinking_level="high")
  )
)

print(image_response.text)
객체 감지 및 경계 상자
점을 사용하는 것 외에도 모델에 감지된 객체에 대한 더 많은 공간적 세부정보를 제공하는 2D 경계 상자를 반환하도록 프롬프트를 표시할 수 있습니다.
Python
from google import genai
from google.genai import types

client = genai.Client()

with open("my-image.png", 'rb') as f:
    image_bytes = f.read()

prompt = """
          Detect all objects in this image and return bounding boxes.
          The answer should follow the JSON format:
          [{"label": <label>, "y": <y_min>, "x": <x_min>,
            "y2": <y_max>, "x2": <x_max>}, ...]
          where coordinates are normalized to 0-1000.
        """

image_response = client.models.generate_content(
  model="gemini-robotics-er-2-preview",
  contents=[
    types.Part.from_bytes(
      data=image_bytes,
      mime_type='image/png',
    ),
    prompt
  ],
  config = types.GenerateContentConfig(
      thinking_config=types.ThinkingConfig(thinking_level="low")
  )
)

print(image_response.text)
궤적
Gemini Robotics ER 2는 로봇 이동을 안내하는 데 유용한 궤적을 정의하는 점 시퀀스를 생성할 수 있습니다.
이 예시에서는 중간 경유지의 추정치를 포함하여 빨간색 펜을 주최자로 이동하는 궤적을 요청합니다. 프롬프트만 표시되도록 코드가 축소되었습니다.
Python
prompt = """
          Generate a trajectory for the robotic arm to pick up the red pen
          and place it in the organizer. Return a list of waypoints as JSON:
          [{"step": <int>, "point": [y, x], "action": <description>}, ...]
          where coordinates are normalized to 0-1000.
        """
노트북을 위한 공간 만들기
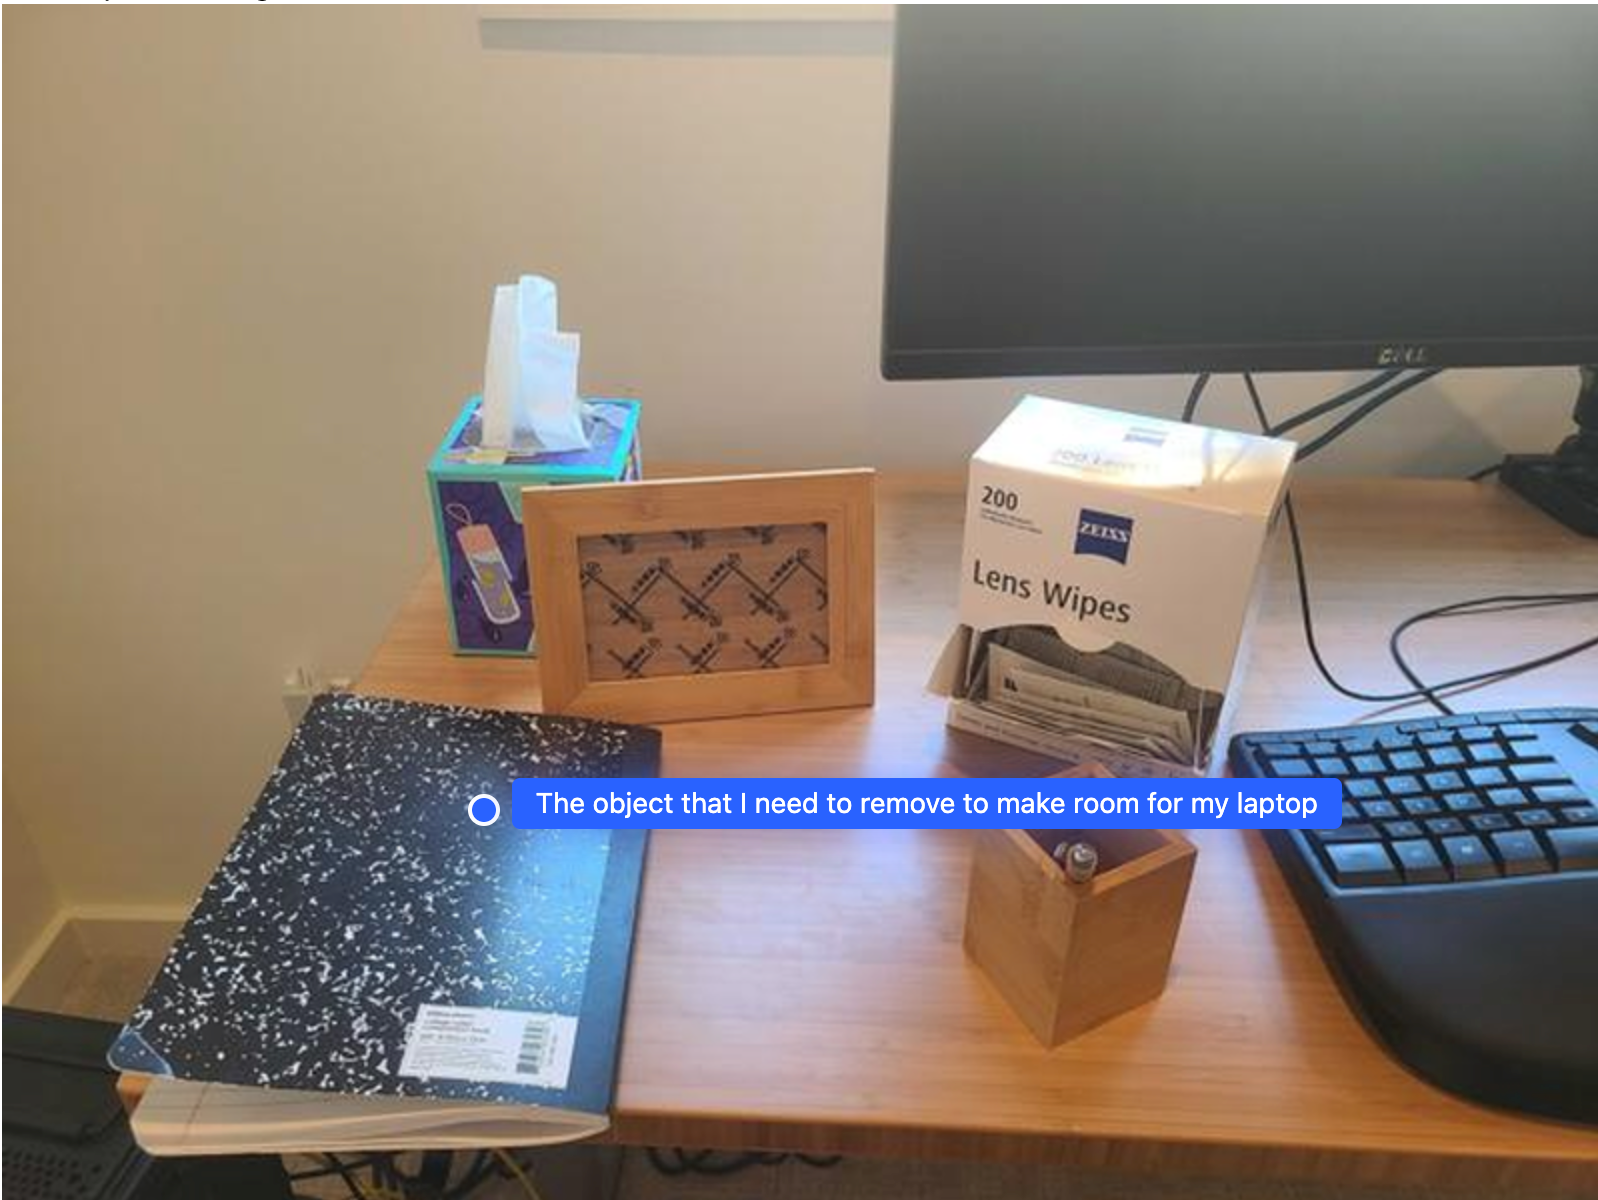
이 예시에서는 Gemini Robotics ER이 공간에 대해 추론하는 방법을 보여줍니다. 프롬프트는 모델에 다른 항목을 위한 공간을 만들기 위해 이동해야 하는 객체를 식별하도록 요청합니다.
Python
from google import genai
from google.genai import types

client = genai.Client()

with open('path/to/image-with-objects.jpg', 'rb') as f:
    image_bytes = f.read()

prompt = """
          Point to the object that I need to remove to make room for my laptop
          The answer should follow the JSON format: [{"point": <point>,
          "label": <label1>}, ...]. The points are in [y, x] format normalized to 0-1000.
        """

image_response = client.models.generate_content(
  model="gemini-robotics-er-2-preview",
  contents=[
    types.Part.from_bytes(
      data=image_bytes,
      mime_type='image/jpeg',
    ),
    prompt
  ],
  config=types.GenerateContentConfig(
      thinking_config=types.ThinkingConfig(thinking_level="high")
  )
)

print(image_response.text)
응답에는 사용자의 질문에 답변하는 객체의 2D 좌표가 포함되어 있습니다. 이 경우 노트북을 위한 공간을 만들기 위해 이동해야 하는 객체입니다.
[
  {"point": [672, 301], "label": "The object that I need to remove to make room for my laptop"}
]
점심 포장하기
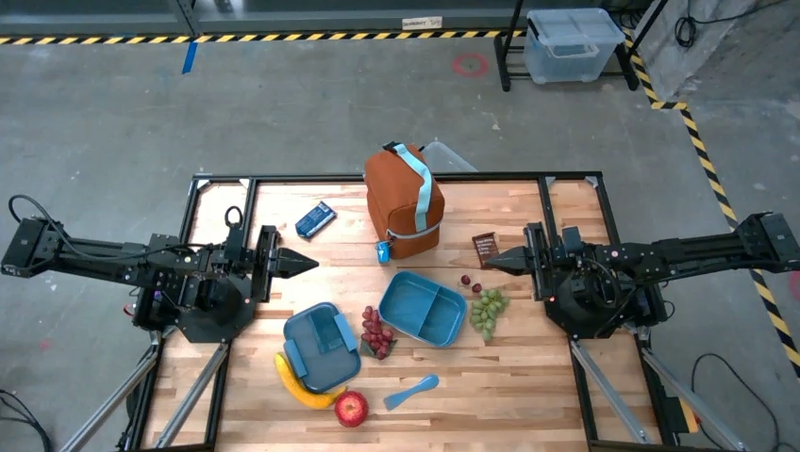
모델은 여러 단계 작업에 관한 안내를 제공하고 각 단계와 관련된 객체를 가리킬 수도 있습니다. 이 예시에서는 모델이 점심 가방을 포장하기 위한 일련의 단계를 계획하는 방법을 보여줍니다.
Python
from google import genai
from google.genai import types

client = genai.Client()

with open('path/to/image-of-lunch.jpg', 'rb') as f:
    image_bytes = f.read()

prompt = """
          Explain how to pack the lunch box and lunch bag. Point to each
          object that you refer to. Each point should be in the format:
          [{"point": [y, x], "label": }], where the coordinates are
          normalized between 0-1000.
        """

image_response = client.models.generate_content(
  model="gemini-robotics-er-2-preview",
  contents=[
    types.Part.from_bytes(
      data=image_bytes,
      mime_type='image/jpeg',
    ),
    prompt
  ],
  config=types.GenerateContentConfig(
      thinking_config=types.ThinkingConfig(thinking_level="high")
  )
)

print(image_response.text)
이 프롬프트의 응답은 이미지 입력에서 점심 가방을 포장하는 방법에 관한 단계별 안내입니다.
입력 이미지
모델 출력
Based on the image, here is a plan to pack the lunch box and lunch bag:

1.  **Pack the fruit into the lunch box.** Place the [apple](apple), [banana](banana), [red grapes](red grapes), and [green grapes](green grapes) into the [blue lunch box](blue lunch box).
2.  **Add the spoon to the lunch box.** Put the [blue spoon](blue spoon) inside the lunch box as well.
3.  **Close the lunch box.** Secure the lid on the [blue lunch box](blue lunch box).
4.  **Place the lunch box inside the lunch bag.** Put the closed [blue lunch box](blue lunch box) into the [brown lunch bag](brown lunch bag).
5.  **Pack the remaining items into the lunch bag.** Place the [blue snack bar](blue snack bar) and the [brown snack bar](brown snack bar) into the [brown lunch bag](brown lunch bag).

Here is the list of objects and their locations:
*   [{"point": [899, 440], "label": "apple"}]
*   [{"point": [814, 363], "label": "banana"}]
*   [{"point": [727, 470], "label": "red grapes"}]
*   [{"point": [675, 608], "label": "green grapes"}]
*   [{"point": [706, 529], "label": "blue lunch box"}]
*   [{"point": [864, 517], "label": "blue spoon"}]
*   [{"point": [499, 401], "label": "blue snack bar"}]
*   [{"point": [614, 705], "label": "brown snack bar"}]
*   [{"point": [448, 501], "label": "brown lunch bag"}]
다음 단계
- 에이전트 기능: 코드 실행, 기기 읽기, 이미지 주석 처리
- 작업 조정: 커스텀 로봇 API를 사용하는 장기 작업
- 스트리밍을 통한 로봇공학: 실시간 양방향 스트리밍 (Gemini Robotics ER 2만 해당)
- 동영상 이해: 순간 찾기 및 진행률 분류 (Gemini Robotics ER 2만 해당)