

Gemini Robotics ER 모델은 Python 코드를 작성하고 실행하여 이미지를 조작하고 답변하기 전에 로직을 적용할 수 있습니다. 이 페이지에서는 코드 실행 예시(확대/축소 및 자르기를 사용한 객체 감지, 계측기 읽기, 유체 측정, 회로 기판 읽기, 이미지 주석)를 다룹니다.
이러한 예시를 자체 사용 사례에 맞게 조정하려면 프롬프트 텍스트와 업로드된 이미지 파일을 자체 파일로 바꾸세요. 프롬프트에서 요청된 JSON 스키마를 애플리케이션에 필요한 출력 구조와 일치하도록 조정하거나 system_instruction을 추가하여 출력 형식과 정밀도를 적용할 수도 있습니다.
실행 가능한 전체 코드는 로봇공학 Cookbook을 참고하세요.
사고 수준
모델의 사고 수준을 제어하여 지연 시간과 정확도를 절충할 수 있습니다. 객체 감지와 같은 공간 작업은 낮은 사고 수준에서 잘 작동합니다. 계산 또는 무게 추정과 같은 복잡한 작업은 더 높은 사고 수준에서 이점을 얻습니다.
다음 예시에서는 복잡한 계산 작업의 사고 수준을 high로 설정합니다.
Python
from google import genai

client = genai.Client()

uploaded_file = client.files.upload(file="scene.jpeg")

interaction = client.interactions.create(
    model="gemini-robotics-er-2-preview",
    input=[
        {
            "type": "image",
            "uri": uploaded_file.uri,
            "mime_type": uploaded_file.mime_type
        },
        {"type": "text", "text": "Identify and count all objects on the table."}
    ],
    generation_config={
        "thinking_level": "high"  # Use "minimal" or "low" for faster spatial tasks
    }
)

print(interaction.output_text)
자세한 내용은 사고를 참고하세요.
객체 감지 (확대/축소 및 자르기)
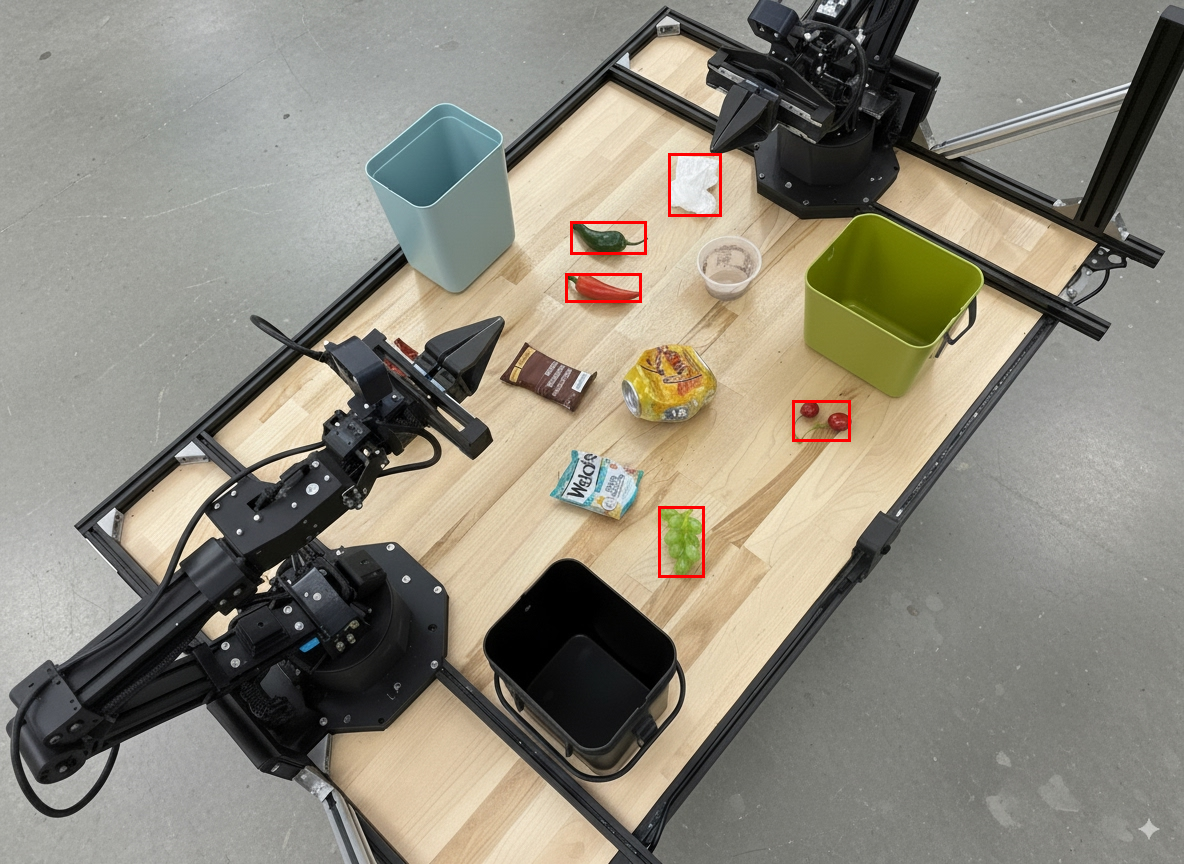
다음 예시에서는 코드 실행을 사용하여 객체를 감지하고 경계 상자를 반환할 때 더 명확하게 볼 수 있도록 이미지를 확대/축소하고 자릅니다.
Python
from google import genai

client = genai.Client()

uploaded_file = client.files.upload(file="sorting.jpeg")

prompt = """
Return JSON in the format {label: val, y: val, x: val, y2: val, x2: val} for
the compostable objects in this scene. Please Zoom and crop the image for a
clearer view. Return an annotated image of the final result with the bounding
boxes drawn on it to the API caller as a part of your process.
"""

interaction = client.interactions.create(
    model="gemini-robotics-er-2-preview",
    input=[
        {
            "type": "image",
            "uri": uploaded_file.uri,
            "mime_type": uploaded_file.mime_type
        },
        {"type": "text", "text": prompt}
    ],
    tools=[{"type": "code_execution"}]
)

print(interaction.output_text)
모델 출력은 다음 JSON 응답과 유사합니다.
[
  {"label": "compostable", "y": 256, "x": 482, "y2": 295, "x2": 546},
  {"label": "compostable", "y": 317, "x": 478, "y2": 350, "x2": 542},
  {"label": "compostable", "y": 586, "x": 556, "y2": 668, "x2": 595},
  {"label": "compostable", "y": 463, "x": 669, "y2": 511, "x2": 718},
  {"label": "compostable", "y": 178, "x": 565, "y2": 250, "x2": 609}
]
다음 이미지는 모델에서 반환된 상자를 보여줍니다.
아날로그 게이지 읽기 및 로직 적용
다음 예시에서는 모델을 사용하여 아날로그 게이지를 읽고 시간 계산을 실행하는 방법을 보여줍니다. 시스템 명령어를 사용하여 JSON 출력을 적용합니다.
Python
from google import genai

client = genai.Client()

uploaded_file = client.files.upload(file="gauge.jpeg")

interaction = client.interactions.create(
    model="gemini-robotics-er-2-preview",
    system_instruction="Be precise. When JSON is requested, reply with ONLY that JSON (no preface, no code block).",
    input=[
        {
            "type": "image",
            "uri": uploaded_file.uri,
            "mime_type": uploaded_file.mime_type
        },
        {"type": "text", "text": """Read the current value from this gauge. Then, calculate how long
        it will take at the current rate for the value to reach maximum.
        Reply in JSON: {"current_value": val, "max_value": val,
        "time_to_max_minutes": val}"""}
    ],
    tools=[{"type": "code_execution"}]
)

print(interaction.output_text)
컨테이너의 유체 측정
다음 예시에서는 코드 실행을 사용하여 컨테이너의 유체 수준을 측정하는 방법을 보여줍니다.
Python
from google import genai

client = genai.Client()

uploaded_file = client.files.upload(file="fluid.jpeg")

interaction = client.interactions.create(
    model="gemini-robotics-er-2-preview",
    system_instruction="Be precise. When JSON is requested, reply with ONLY that JSON (no preface, no code block).",
    input=[
        {
            "type": "image",
            "uri": uploaded_file.uri,
            "mime_type": uploaded_file.mime_type
        },
        {"type": "text", "text": """Measure the amount of fluid in the container. Reply in JSON:
        {"fluid_level_ml": val, "container_capacity_ml": val,
        "percentage_full": val}"""}
    ],
    tools=[{"type": "code_execution"}]
)

print(interaction.output_text)
회로 기판의 표시 읽기
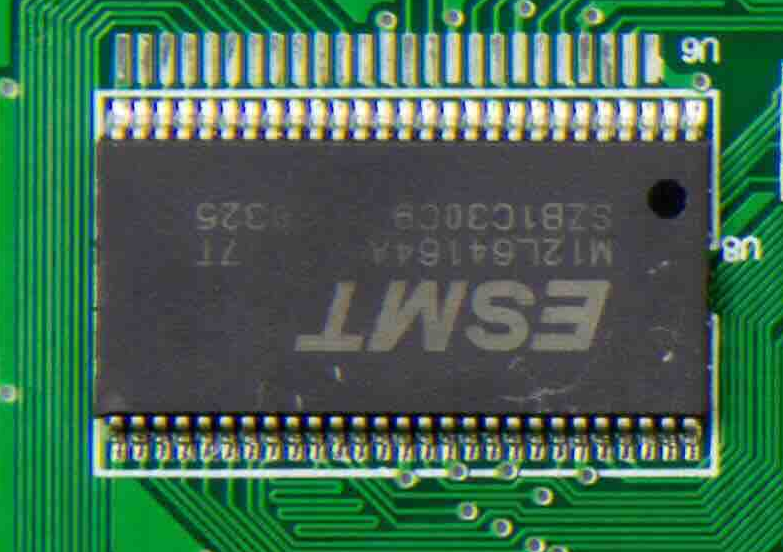
다음 예시에서는 코드 실행을 사용하여 회로 기판의 표시를 읽는 방법을 보여줍니다.
Python
from google import genai

client = genai.Client()

uploaded_file = client.files.upload(file="circuit_board.jpeg")

interaction = client.interactions.create(
    model="gemini-robotics-er-2-preview",
    system_instruction="Be precise. When JSON is requested, reply with ONLY that JSON (no preface, no code block).",
    input=[
        {
            "type": "image",
            "uri": uploaded_file.uri,
            "mime_type": uploaded_file.mime_type
        },
        {"type": "text", "text": """Read all visible component labels and markings on this circuit
        board. Reply in JSON: {"components": [{"label": val,
        "location": [y, x]}]}"""}
    ],
    tools=[{"type": "code_execution"}]
)

print(interaction.output_text)
이미지 주석
다음 예시에서는 코드 실행을 사용하여 이미지에 주석을 달고 (예: 폐기 안내 화살표 그리기) 수정된 이미지를 반환하는 방법을 보여줍니다.
Python
from google import genai

client = genai.Client()

# Load your image
uploaded_file = client.files.upload(file="sorting.jpeg")

prompt = """
Look at this image and return it as an annotated version using arrows of
different colors to represent which items should go in which bins for
disposal. You must return the final image to the API caller.
"""

interaction = client.interactions.create(
    model="gemini-robotics-er-2-preview",
    input=[
        {
            "type": "image",
            "uri": uploaded_file.uri,
            "mime_type": uploaded_file.mime_type
        },
        {"type": "text", "text": prompt}
    ],
    tools=[{"type": "code_execution"}]
)

print(interaction.output_text)
다음은 이미지 입력의 예입니다.
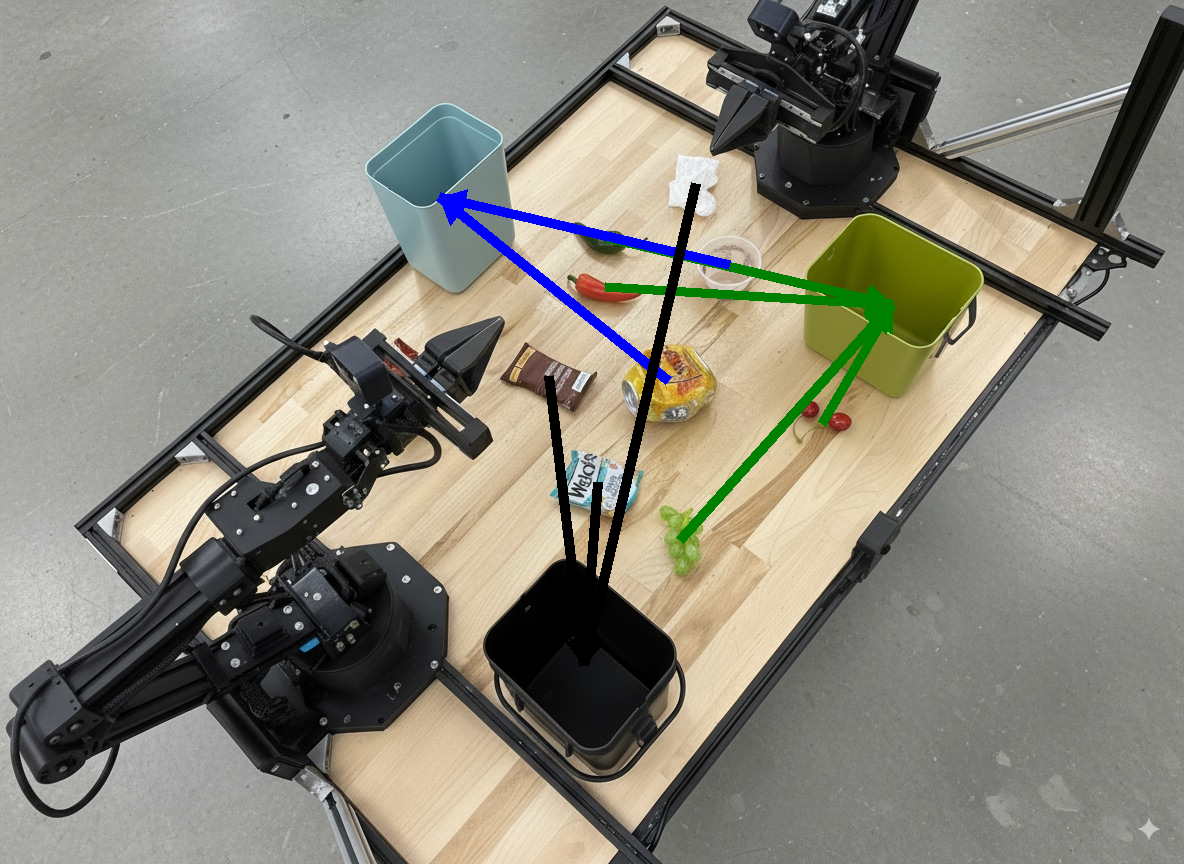
모델 출력은 다음과 유사합니다.
  The annotated image shows the suggested disposal locations for the items on the table:
  - **Green bin (Compost/Organic)**: Green chili, red chili, grapes, and cherries.
  - **Blue bin (Recycling)**: Yellow crushed can and plastic container.
  - **Black bin (Trash)**: Chocolate bar wrapper, Welch's packet, and white tissue.
다음 단계
- 작업 조정 - 맞춤 로봇 API를 사용한 장기 작업
- 스트리밍을 사용한 로봇공학 - 실시간 양방향 스트리밍 (Gemini Robotics ER 2만 해당)
- 동영상 이해 - 순간 찾기 및 진행률 분류 (Gemini Robotics ER 2만 해당)