

Gemini Omni Flash ( gemini-omni-1.1-flash ) یک مدل چندوجهی با کارایی بالا است که برای تولید، ویرایش و کنترل سینمایی ویدئو با سرعت بالا طراحی شده است. Gemini Omni بر اساس قابلیتهای اصلی زیر ساخته شده است که آن را از مدلهای ویدئویی قبلی متمایز میکند:
- چندوجهی بودن بومی: متن، تصویر، صدا و ویدیو را همزمان پردازش میکند و خروجی منسجمتر، سازگارتر و قابل کنترلتری به شما میدهد.
- ویرایش محاورهای: این قابلیت که توسط Interactions API فعال میشود، به شما امکان میدهد ویدیوهای خود را از طریق مکالمه زبان طبیعی به صورت مکرر اصلاح و ویرایش کنید. آنچه را که میخواهید تغییر دهید شرح دهید و مدل، ویرایش را اعمال میکند و در عین حال بخشهایی از ویدیو را که میخواهید نگه دارید، حفظ میکند.
- دانش جهانی: Gemini Omni درک فیزیک را با دانش Gemini از تاریخ، علم و زمینه فرهنگی ترکیب میکند و شکاف بین فوتورئالیسم و داستانسرایی معنادار را پر میکند.
تولید متن به ویدیو
از یک متن کوتاه، یک ویدیو بسازید. مدل بر اساس توضیحات متنی شما، ویدیویی با صدا تولید میکند. برای بهترین نتیجه، متنهای کوتاه را با جزئیاتی مانند شرح صحنه، حرکت دوربین، نورپردازی و حس و حال بنویسید.
پایتون
import base64
from google import genai

client = genai.Client()

interaction = client.interactions.create(
    model="gemini-omni-1.1-flash",
    input="A marble rolling fast on a chain reaction style track, continuous smooth shot."
)
with open("marble.mp4", "wb") as f:
    f.write(base64.b64decode(interaction.output_video.data))
جاوا اسکریپت
import { GoogleGenAI } from '@google/genai';
import * as fs from 'fs';
const ai = new GoogleGenAI({});

const interaction = await ai.interactions.create({
  model: 'gemini-omni-1.1-flash',
  input: 'A marble rolling fast on a chain reaction style track, continuous smooth shot.',
});

if (interaction.output_video?.data) {
  fs.writeFileSync('marble.mp4', Buffer.from(interaction.output_video.data, 'base64'));
}
جاوا
import com.google.genai.Client;
import com.google.genai.gaos.models.interactions.CreateModelInteraction;
import com.google.genai.gaos.models.interactions.Interaction;
import com.google.genai.gaos.models.interactions.InteractionsInput;
import com.google.genai.gaos.models.interactions.Model;
import com.google.genai.gaos.models.operations.CreateInteractionRequestBody;
import java.nio.file.Files;
import java.nio.file.Paths;
import java.util.Base64;

Client client = new Client();

CreateModelInteraction params =
    CreateModelInteraction.builder()
        .model(Model.of("gemini-omni-1.1-flash"))
        .input(
            InteractionsInput.of(
                "A marble rolling fast on a chain reaction style track, continuous smooth shot."))
        .build();

Interaction interaction =
    client.interactions.create(CreateInteractionRequestBody.of(params)).interaction().get();

if (interaction.outputVideo().isPresent() && interaction.outputVideo().get().data().isPresent()) {
  byte[] videoBytes = Base64.getDecoder().decode(interaction.outputVideo().get().data().get());
  Files.write(Paths.get("marble.mp4"), videoBytes);
}
برو
package main

import (
    "context"
    "encoding/base64"
    "log"
    "os"

    "google.golang.org/genai"
    "google.golang.org/genai/interactions/models/interactions"
    "google.golang.org/genai/interactions/models/operations"
)

func main() {
    ctx := context.Background()
    client, err := genai.NewClient(ctx, nil)
    if err != nil {
        log.Fatal(err)
    }

    res, err := client.Interactions.Create(ctx, operations.CreateInteractionRequest{
        Body: operations.NewCreateInteractionRequestBody(interactions.CreateModelInteraction{
            Model: interactions.Model("gemini-omni-1.1-flash"),
            Input: interactions.NewInteractionsInput(
                "A marble rolling fast on a chain reaction style track, continuous smooth shot.",
            ),
        }),
    })
    if err != nil {
        log.Fatal(err)
    }

    if res.Interaction.OutputVideo != nil && res.Interaction.OutputVideo.Data != nil {
        videoBytes, err := base64.StdEncoding.DecodeString(*res.Interaction.OutputVideo.Data)
        if err != nil {
            log.Fatal(err)
        }
        if err := os.WriteFile("marble.mp4", videoBytes, 0644); err != nil {
            log.Fatal(err)
        }
    }
}
استراحت
curl -X POST "https://generativelanguage.googleapis.com/v1beta/interactions?key=$API_KEY" \
-H "Content-Type: application/json" \
-d '{
 "model": "gemini-omni-1.1-flash",
 "input": "A marble rolling fast on a chain reaction style track, continuous smooth shot."
}'
طرحواره پاسخ REST
فیلد interaction.output_video فقط برای SDK قابل استفاده است. هنگام استفاده مستقیم از REST API، خروجی ویدیو را از آرایه steps دریافت کنید.
ساختار خام REST JSON:
{
  "steps": [
    { "type": "user_input", "content": [{"type": "text", "text": "..."}] },
    { "type": "thought", "content": [{"text": "...", "type": "thought"}] },
    {
      "type": "model_output",
      "content": [
        {
          "type": "video",
          "mime_type": "video/mp4",
          "data": "AAAAIGZ0eXBpc29t..." // Base64 encoded video data
        }
      ]
    }
  ],
  "id": "v1_...",
  "status": "completed",
  "model": "gemini-omni-1.1-flash",
  "object": "interaction"
}
نسبت ابعاد کنترل
برای ایجاد ویدیوهای عمودی، aspect_ratio ) را روی "9:16" تنظیم کنید. نسبت تصویر پیشفرض افقی (16:9) است.
پایتون
import base64
from google import genai

client = genai.Client()

interaction = client.interactions.create(
    model="gemini-omni-1.1-flash",
    input="A futuristic city with neon lights and flying cars, cyberpunk style",
    response_format={
        "type": "video",  # optional
        "aspect_ratio": "9:16"  # Supported values: "9:16", "16:9"
    }
)
with open("example.mp4", "wb") as f:
    f.write(base64.b64decode(interaction.output_video.data))
جاوا اسکریپت
import { GoogleGenAI } from '@google/genai';
import * as fs from 'fs';
const ai = new GoogleGenAI({});

const interaction = await ai.interactions.create({
  model: 'gemini-omni-1.1-flash',
  input: 'A futuristic city with neon lights and flying cars, cyberpunk style',
  response_format: {
    type: 'video', // optional
    aspect_ratio: '9:16' // Supported values: '9:16', '16:9'
  },
});

if (interaction.output_video?.data) {
  fs.writeFileSync('example.mp4', Buffer.from(interaction.output_video.data, 'base64'));
}
جاوا
import com.google.genai.Client;
import com.google.genai.gaos.models.interactions.CreateModelInteraction;
import com.google.genai.gaos.models.interactions.CreateModelInteractionResponseFormat;
import com.google.genai.gaos.models.interactions.Interaction;
import com.google.genai.gaos.models.interactions.InteractionsInput;
import com.google.genai.gaos.models.interactions.Model;
import com.google.genai.gaos.models.interactions.ResponseFormat;
import com.google.genai.gaos.models.interactions.VideoResponseFormat;
import com.google.genai.gaos.models.interactions.VideoResponseFormatAspectRatio;
import com.google.genai.gaos.models.operations.CreateInteractionRequestBody;
import java.nio.file.Files;
import java.nio.file.Paths;
import java.util.Base64;

Client client = new Client();

VideoResponseFormat videoFormat =
    VideoResponseFormat.builder()
        .aspectRatio(VideoResponseFormatAspectRatio.of("9:16"))
        .build();

CreateModelInteraction params =
    CreateModelInteraction.builder()
        .model(Model.of("gemini-omni-1.1-flash"))
        .input(
            InteractionsInput.of(
                "A futuristic city with neon lights and flying cars, cyberpunk style"))
        .responseFormat(CreateModelInteractionResponseFormat.of(ResponseFormat.of(videoFormat)))
        .build();

Interaction interaction =
    client.interactions.create(CreateInteractionRequestBody.of(params)).interaction().get();

if (interaction.outputVideo().isPresent() && interaction.outputVideo().get().data().isPresent()) {
  byte[] videoBytes = Base64.getDecoder().decode(interaction.outputVideo().get().data().get());
  Files.write(Paths.get("example.mp4"), videoBytes);
}
برو
package main

import (
    "context"
    "encoding/base64"
    "log"
    "os"

    "google.golang.org/genai"
    "google.golang.org/genai/interactions/models/interactions"
    "google.golang.org/genai/interactions/models/operations"
)

func main() {
    ctx := context.Background()
    client, err := genai.NewClient(ctx, nil)
    if err != nil {
        log.Fatal(err)
    }

    videoFormat := interactions.VideoResponseFormat{
        AspectRatio: interactions.VideoResponseFormatAspectRatioNineHundredAndSixteen.ToPointer(),
    }

    res, err := client.Interactions.Create(ctx, operations.CreateInteractionRequest{
        Body: operations.NewCreateInteractionRequestBody(interactions.CreateModelInteraction{
            Model: interactions.Model("gemini-omni-1.1-flash"),
            Input: interactions.NewInteractionsInput(
                "A futuristic city with neon lights and flying cars, cyberpunk style",
            ),
            ResponseFormat: genai.Ptr(interactions.NewCreateModelInteractionResponseFormat(
                interactions.NewResponseFormat(videoFormat),
            )),
        }),
    })
    if err != nil {
        log.Fatal(err)
    }

    if res.Interaction.OutputVideo != nil && res.Interaction.OutputVideo.Data != nil {
        videoBytes, err := base64.StdEncoding.DecodeString(*res.Interaction.OutputVideo.Data)
        if err != nil {
            log.Fatal(err)
        }
        if err := os.WriteFile("example.mp4", videoBytes, 0644); err != nil {
            log.Fatal(err)
        }
    }
}
استراحت
curl -X POST "https://generativelanguage.googleapis.com/v1beta/interactions?key=$API_KEY" \
-H "Content-Type: application/json" \
-d '{
 "model": "gemini-omni-1.1-flash",
 "input": "A futuristic city with neon lights and flying cars, cyberpunk style",
 "response_format": {
   "type": "video",
   "aspect_ratio": "9:16"
 }
}'
وضوح خروجی
وضوح خروجی ویدیوی تولید شده خود را با استفاده از پارامتر resolution در response_format کنترل کنید. وضوح پیشفرض 720p است.
| ارزش | توضیحات |
|---|---|
360p | وضوح خروجی ۳۶۰p |
720p | وضوح خروجی ۷۲۰p (پیشفرض) |
1080p | خروجی 1080p (ارتقا یافته) |
4k | خروجی 4K (ارتقاء یافته) |
پایتون
import base64
from google import genai

client = genai.Client()

interaction = client.interactions.create(
    model="gemini-omni-1.1-flash",
    input="A drone shot of a mountain landscape at sunrise.",
    response_format={
        "type": "video",
        "resolution": "1080p",
    },
)
with open("hires.mp4", "wb") as f:
    f.write(base64.b64decode(interaction.output_video.data))
جاوا اسکریپت
import { GoogleGenAI } from '@google/genai';
import * as fs from 'fs';
const ai = new GoogleGenAI({});

const interaction = await ai.interactions.create({
  model: 'gemini-omni-1.1-flash',
  input: 'A drone shot of a mountain landscape at sunrise.',
  response_format: {
    type: 'video',
    resolution: '1080p',
  },
});

if (interaction.output_video?.data) {
  fs.writeFileSync('hires.mp4', Buffer.from(interaction.output_video.data, 'base64'));
}
جاوا
import com.google.genai.Client;
import com.google.genai.gaos.models.interactions.CreateModelInteraction;
import com.google.genai.gaos.models.interactions.CreateModelInteractionResponseFormat;
import com.google.genai.gaos.models.interactions.Interaction;
import com.google.genai.gaos.models.interactions.InteractionsInput;
import com.google.genai.gaos.models.interactions.Model;
import com.google.genai.gaos.models.interactions.Resolution;
import com.google.genai.gaos.models.interactions.ResponseFormat;
import com.google.genai.gaos.models.interactions.VideoResponseFormat;
import com.google.genai.gaos.models.operations.CreateInteractionRequestBody;
import java.nio.file.Files;
import java.nio.file.Paths;
import java.util.Base64;

Client client = new Client();

VideoResponseFormat videoFormat =
    VideoResponseFormat.builder()
        .resolution(Resolution.of("1080p"))
        .build();

CreateModelInteraction params =
    CreateModelInteraction.builder()
        .model(Model.of("gemini-omni-1.1-flash"))
        .input(InteractionsInput.of("A drone shot of a mountain landscape at sunrise."))
        .responseFormat(CreateModelInteractionResponseFormat.of(ResponseFormat.of(videoFormat)))
        .build();

Interaction interaction =
    client.interactions.create(CreateInteractionRequestBody.of(params)).interaction().get();

if (interaction.outputVideo().isPresent() && interaction.outputVideo().get().data().isPresent()) {
  byte[] videoBytes = Base64.getDecoder().decode(interaction.outputVideo().get().data().get());
  Files.write(Paths.get("hires.mp4"), videoBytes);
}
برو
package main

import (
    "context"
    "encoding/base64"
    "log"
    "os"

    "google.golang.org/genai"
    "google.golang.org/genai/interactions/models/interactions"
    "google.golang.org/genai/interactions/models/operations"
)

func main() {
    ctx := context.Background()
    client, err := genai.NewClient(ctx, nil)
    if err != nil {
        log.Fatal(err)
    }

    videoFormat := interactions.VideoResponseFormat{
        Resolution: interactions.ResolutionOneThousandAndEightyp.ToPointer(),
    }

    res, err := client.Interactions.Create(ctx, operations.CreateInteractionRequest{
        Body: operations.NewCreateInteractionRequestBody(interactions.CreateModelInteraction{
            Model: interactions.Model("gemini-omni-1.1-flash"),
            Input: interactions.NewInteractionsInput("A drone shot of a mountain landscape at sunrise."),
            ResponseFormat: genai.Ptr(interactions.NewCreateModelInteractionResponseFormat(
                interactions.NewResponseFormat(videoFormat),
            )),
        }),
    })
    if err != nil {
        log.Fatal(err)
    }

    if res.Interaction.OutputVideo != nil && res.Interaction.OutputVideo.Data != nil {
        videoBytes, err := base64.StdEncoding.DecodeString(*res.Interaction.OutputVideo.Data)
        if err != nil {
            log.Fatal(err)
        }
        if err := os.WriteFile("hires.mp4", videoBytes, 0644); err != nil {
            log.Fatal(err)
        }
    }
}
استراحت
curl -X POST "https://generativelanguage.googleapis.com/v1beta/interactions?key=$API_KEY" \
-H "Content-Type: application/json" \
-d '{
 "model": "gemini-omni-1.1-flash",
 "input": "A drone shot of a mountain landscape at sunrise.",
 "response_format": {
   "type": "video",
   "resolution": "1080p"
 }
}'
تولید تصویر به ویدیو
شما میتوانید یک تصویر مرجع به همراه متن خود ارائه دهید. بسته به متن شما، مدل تصمیم میگیرد که چگونه از تصویر استفاده کند. این برای زنده کردن عکسهای محصول، تصاویر یا عکسها مفید است.
مثال زیر نحوه استفاده از تصویر مرجع نقاشی یک ماهی که از آب بیرون میپرد را نشان میدهد:
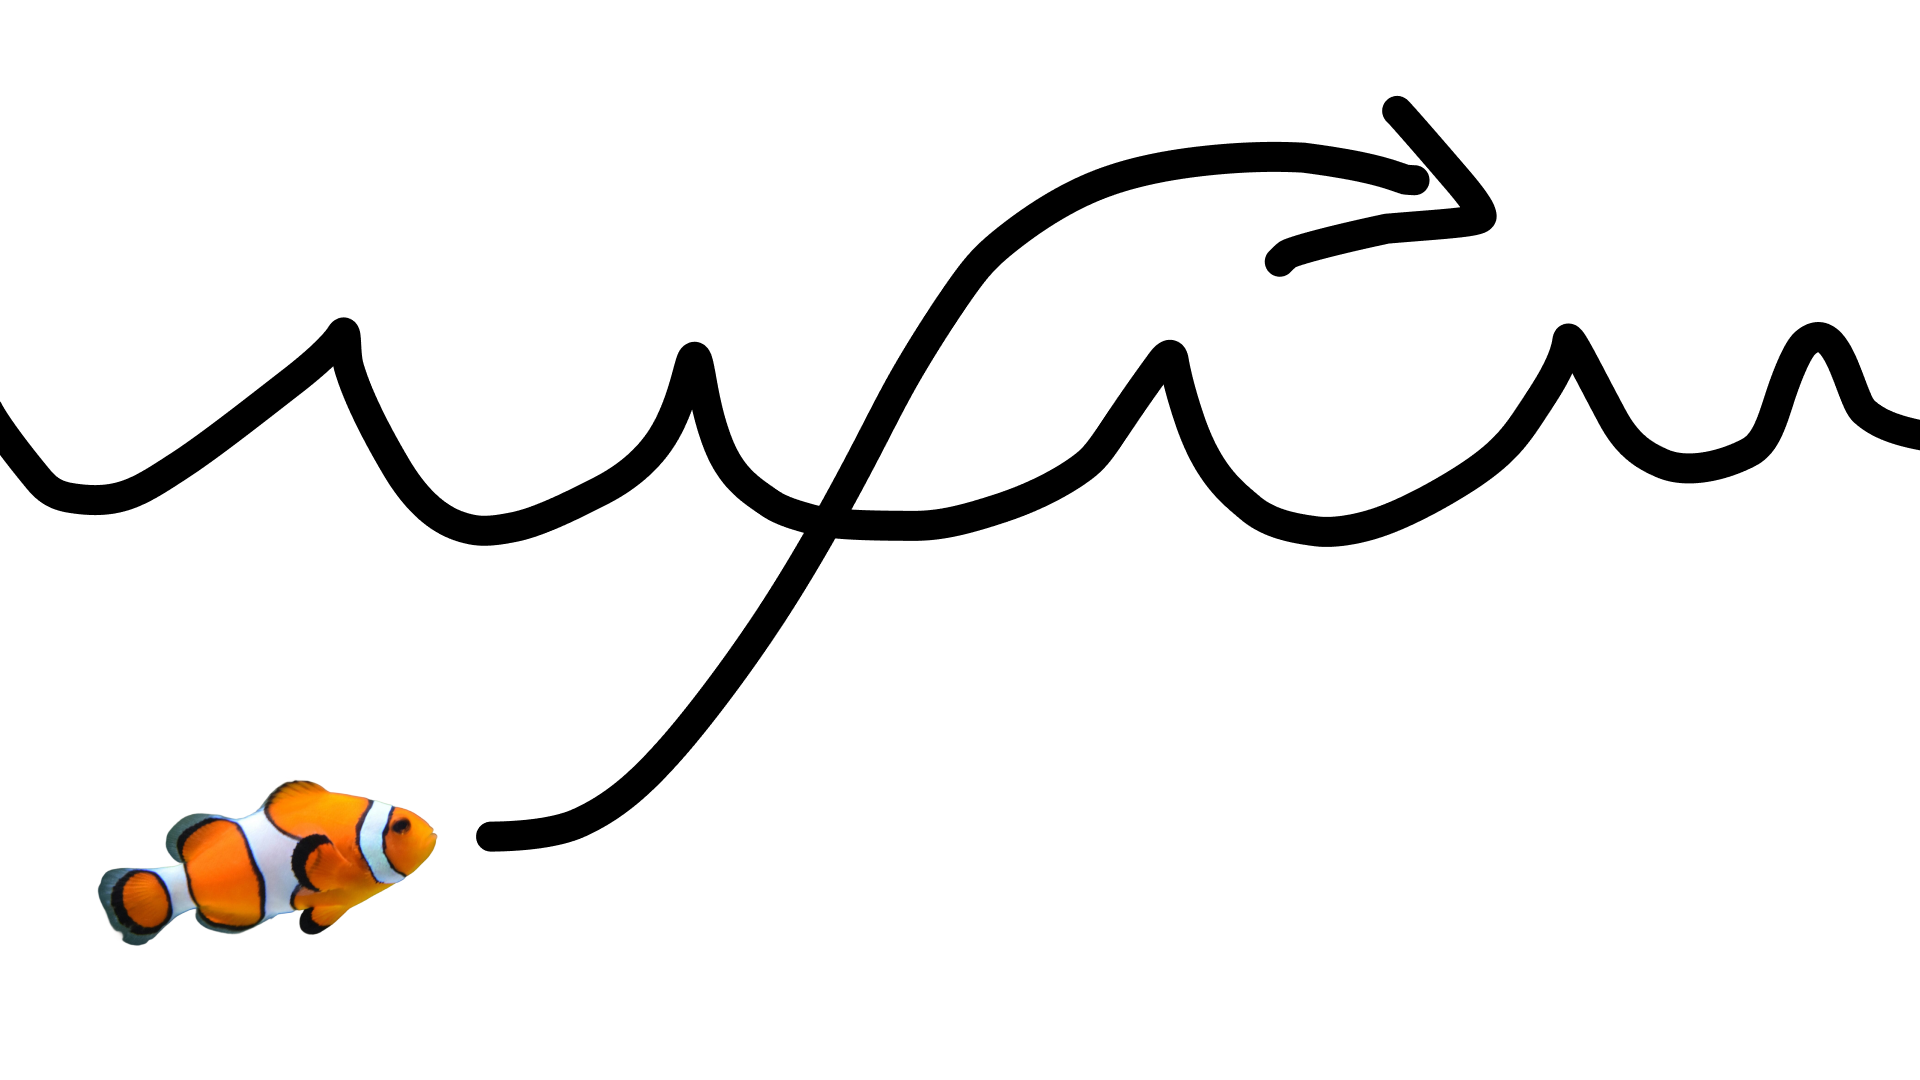
با دستور زیر:
turn this into realistic footage, using the drawing only as a guide for movement, do not show the drawing in the final video
برای تولید یک ویدیوی واقعگرایانه از نقاشی.
پایتون
import base64
from google import genai

client = genai.Client()

interaction = client.interactions.create(
    model="gemini-omni-1.1-flash",
    input=[
        {"type": "image", "data": base64_image, "mime_type": "image/jpeg"},
        {"type": "text", "text": "turn this into realistic footage, using the drawing only as a guide for movement, do not show the drawing in the final video"}
    ],
)
with open("clownfish.mp4", "wb") as f:
    f.write(base64.b64decode(interaction.output_video.data))
جاوا اسکریپت
import { GoogleGenAI } from '@google/genai';
import * as fs from 'fs';
const ai = new GoogleGenAI({});

const interaction = await ai.interactions.create({
  model: 'gemini-omni-1.1-flash',
  input: [
    { type: 'image', data: base64Image, mime_type: 'image/jpeg' },
    { type: 'text', text: 'turn this into realistic footage, using the drawing only as a guide for movement, do not show the drawing in the final video' }
  ]
});

if (interaction.output_video?.data) {
  fs.writeFileSync('clownfish.mp4', Buffer.from(interaction.output_video.data, 'base64'));
}
جاوا
import com.google.genai.Client;
import com.google.genai.gaos.models.interactions.Content;
import com.google.genai.gaos.models.interactions.CreateModelInteraction;
import com.google.genai.gaos.models.interactions.ImageContent;
import com.google.genai.gaos.models.interactions.ImageContentMimeType;
import com.google.genai.gaos.models.interactions.Interaction;
import com.google.genai.gaos.models.interactions.InteractionsInput;
import com.google.genai.gaos.models.interactions.Model;
import com.google.genai.gaos.models.interactions.TextContent;
import com.google.genai.gaos.models.operations.CreateInteractionRequestBody;
import java.nio.file.Files;
import java.nio.file.Paths;
import java.util.Arrays;
import java.util.Base64;
import java.util.List;

Client client = new Client();

byte[] imageBytes = Files.readAllBytes(Paths.get("drawing.jpg"));
String base64Image = Base64.getEncoder().encodeToString(imageBytes);

Content imageContent =
    ImageContent.builder()
        .data(base64Image)
        .mimeType(ImageContentMimeType.IMAGE_JPEG)
        .build();

Content textContent =
    TextContent.builder()
        .text(
            "turn this into realistic footage, using the drawing only as a guide for movement, do not show the drawing in the final video")
        .build();

List<Content> contents = Arrays.asList(imageContent, textContent);

CreateModelInteraction params =
    CreateModelInteraction.builder()
        .model(Model.of("gemini-omni-1.1-flash"))
        .input(InteractionsInput.ofContent(contents))
        .build();

Interaction interaction =
    client.interactions.create(CreateInteractionRequestBody.of(params)).interaction().get();

if (interaction.outputVideo().isPresent() && interaction.outputVideo().get().data().isPresent()) {
  byte[] videoBytes = Base64.getDecoder().decode(interaction.outputVideo().get().data().get());
  Files.write(Paths.get("clownfish.mp4"), videoBytes);
}
برو
package main

import (
    "context"
    "encoding/base64"
    "log"
    "os"

    "google.golang.org/genai"
    "google.golang.org/genai/interactions/models/interactions"
    "google.golang.org/genai/interactions/models/operations"
)

func main() {
    ctx := context.Background()
    client, err := genai.NewClient(ctx, nil)
    if err != nil {
        log.Fatal(err)
    }

    imageBytes, err := os.ReadFile("drawing.jpg")
    if err != nil {
        log.Fatal(err)
    }
    base64Image := base64.StdEncoding.EncodeToString(imageBytes)

    contents := []interactions.Content{
        interactions.NewContent(interactions.ImageContent{
            Data:     genai.Ptr(base64Image),
            MimeType: interactions.ImageContentMimeTypeImageJpeg.ToPointer(),
        }),
        interactions.NewContent(interactions.TextContent{
            Text: "turn this into realistic footage, using the drawing only as a guide for movement, do not show the drawing in the final video",
        }),
    }

    res, err := client.Interactions.Create(ctx, operations.CreateInteractionRequest{
        Body: operations.NewCreateInteractionRequestBody(interactions.CreateModelInteraction{
            Model: interactions.Model("gemini-omni-1.1-flash"),
            Input: interactions.NewInteractionsInput(contents),
        }),
    })
    if err != nil {
        log.Fatal(err)
    }

    if res.Interaction.OutputVideo != nil && res.Interaction.OutputVideo.Data != nil {
        videoBytes, err := base64.StdEncoding.DecodeString(*res.Interaction.OutputVideo.Data)
        if err != nil {
            log.Fatal(err)
        }
        if err := os.WriteFile("clownfish.mp4", videoBytes, 0644); err != nil {
            log.Fatal(err)
        }
    }
}
استراحت
curl -X POST "https://generativelanguage.googleapis.com/v1beta/interactions?key=$API_KEY" \
-H "Content-Type: application/json" \
-d '{
 "model": "gemini-omni-1.1-flash",
 "input": [
   {"type": "image", "data": "'"$BASE64_IMAGE"'", "mime_type": "image/jpeg"},
   {"type": "text", "text": "turn this into realistic footage, using the drawing only as a guide for movement, do not show the drawing in the final video"}
 ]
}'
درونیابی فریم اول و آخر
نرمافزار Gemini Omni Flash از درونیابی ویدیو پشتیبانی میکند و به شما این امکان را میدهد که ویدیویی تولید کنید که به طور روان بین تصویر شروع (فریم اول) و تصویر پایان (فریم آخر) تغییر کند.
دو تصویر را در لیست input ارائه دهید و انتقال مورد نظر را در اعلان خود شرح دهید. مدل صحنه را از فریم اول تا فریم پایانی متحرکسازی میکند.
پایتون
import base64
from google import genai

client = genai.Client()

interaction = client.interactions.create(
    model="gemini-omni-1.1-flash",
    input=[
        {"type": "image", "data": first_frame_b64, "mime_type": "image/jpeg"},
        {"type": "image", "data": last_frame_b64, "mime_type": "image/jpeg"},
        {"type": "text", "text": "A smooth cinematic transition from a lush green forest at sunrise to a snowy forest under a starry night sky."}
    ],
)
with open("interpolation.mp4", "wb") as f:
    f.write(base64.b64decode(interaction.output_video.data))
جاوا اسکریپت
import { GoogleGenAI } from '@google/genai';
import * as fs from 'fs';
const ai = new GoogleGenAI({});

const interaction = await ai.interactions.create({
  model: 'gemini-omni-1.1-flash',
  input: [
    { type: 'image', data: firstFrameB64, mime_type: 'image/jpeg' },
    { type: 'image', data: lastFrameB64, mime_type: 'image/jpeg' },
    { type: 'text', text: 'A smooth cinematic transition from a lush green forest at sunrise to a snowy forest under a starry night sky.' }
  ]
});

if (interaction.output_video?.data) {
  fs.writeFileSync('interpolation.mp4', Buffer.from(interaction.output_video.data, 'base64'));
}
جاوا
import com.google.genai.Client;
import com.google.genai.gaos.models.interactions.Content;
import com.google.genai.gaos.models.interactions.CreateModelInteraction;
import com.google.genai.gaos.models.interactions.ImageContent;
import com.google.genai.gaos.models.interactions.ImageContentMimeType;
import com.google.genai.gaos.models.interactions.Interaction;
import com.google.genai.gaos.models.interactions.InteractionsInput;
import com.google.genai.gaos.models.interactions.Model;
import com.google.genai.gaos.models.interactions.TextContent;
import com.google.genai.gaos.models.operations.CreateInteractionRequestBody;
import java.nio.file.Files;
import java.nio.file.Paths;
import java.util.Arrays;
import java.util.Base64;
import java.util.List;

Client client = new Client();

String firstFrameB64 =
    Base64.getEncoder().encodeToString(Files.readAllBytes(Paths.get("first_frame.jpg")));
String lastFrameB64 =
    Base64.getEncoder().encodeToString(Files.readAllBytes(Paths.get("last_frame.jpg")));

Content firstFrame =
    ImageContent.builder()
        .data(firstFrameB64)
        .mimeType(ImageContentMimeType.IMAGE_JPEG)
        .build();

Content lastFrame =
    ImageContent.builder()
        .data(lastFrameB64)
        .mimeType(ImageContentMimeType.IMAGE_JPEG)
        .build();

Content prompt =
    TextContent.builder()
        .text(
            "A smooth cinematic transition from a lush green forest at sunrise to a snowy forest under a starry night sky.")
        .build();

List<Content> contents = Arrays.asList(firstFrame, lastFrame, prompt);

CreateModelInteraction params =
    CreateModelInteraction.builder()
        .model(Model.of("gemini-omni-1.1-flash"))
        .input(InteractionsInput.ofContent(contents))
        .build();

Interaction interaction =
    client.interactions.create(CreateInteractionRequestBody.of(params)).interaction().get();

if (interaction.outputVideo().isPresent() && interaction.outputVideo().get().data().isPresent()) {
  byte[] videoBytes = Base64.getDecoder().decode(interaction.outputVideo().get().data().get());
  Files.write(Paths.get("interpolation.mp4"), videoBytes);
}
برو
package main

import (
    "context"
    "encoding/base64"
    "log"
    "os"

    "google.golang.org/genai"
    "google.golang.org/genai/interactions/models/interactions"
    "google.golang.org/genai/interactions/models/operations"
)

func main() {
    ctx := context.Background()
    client, err := genai.NewClient(ctx, nil)
    if err != nil {
        log.Fatal(err)
    }

    firstBytes, err := os.ReadFile("first_frame.jpg")
    if err != nil {
        log.Fatal(err)
    }
    lastBytes, err := os.ReadFile("last_frame.jpg")
    if err != nil {
        log.Fatal(err)
    }

    firstFrameB64 := base64.StdEncoding.EncodeToString(firstBytes)
    lastFrameB64 := base64.StdEncoding.EncodeToString(lastBytes)

    contents := []interactions.Content{
        interactions.NewContent(interactions.ImageContent{
            Data:     genai.Ptr(firstFrameB64),
            MimeType: interactions.ImageContentMimeTypeImageJpeg.ToPointer(),
        }),
        interactions.NewContent(interactions.ImageContent{
            Data:     genai.Ptr(lastFrameB64),
            MimeType: interactions.ImageContentMimeTypeImageJpeg.ToPointer(),
        }),
        interactions.NewContent(interactions.TextContent{
            Text: "A smooth cinematic transition from a lush green forest at sunrise to a snowy forest under a starry night sky.",
        }),
    }

    res, err := client.Interactions.Create(ctx, operations.CreateInteractionRequest{
        Body: operations.NewCreateInteractionRequestBody(interactions.CreateModelInteraction{
            Model: interactions.Model("gemini-omni-1.1-flash"),
            Input: interactions.NewInteractionsInput(contents),
        }),
    })
    if err != nil {
        log.Fatal(err)
    }

    if res.Interaction.OutputVideo != nil && res.Interaction.OutputVideo.Data != nil {
        videoBytes, err := base64.StdEncoding.DecodeString(*res.Interaction.OutputVideo.Data)
        if err != nil {
            log.Fatal(err)
        }
        if err := os.WriteFile("interpolation.mp4", videoBytes, 0644); err != nil {
            log.Fatal(err)
        }
    }
}
استراحت
curl -X POST "https://generativelanguage.googleapis.com/v1beta/interactions?key=$API_KEY" \
-H "Content-Type: application/json" \
-d '{
 "model": "gemini-omni-1.1-flash",
 "input": [
   {"type": "image", "data": "'"$FIRST_FRAME_B64"'", "mime_type": "image/jpeg"},
   {"type": "image", "data": "'"$LAST_FRAME_B64"'", "mime_type": "image/jpeg"},
   {"type": "text", "text": "A smooth cinematic transition from a lush green forest at sunrise to a snowy forest under a starry night sky."}
 ]
}'
مرجع موضوعی
شما میتوانید ویدیویی تولید کنید که شامل موضوعات خاصی باشد که به عنوان تصاویر مرجع ارائه شدهاند. برای مثال، کد زیر نحوه ارائه ۲ تصویر از یک گربه و نخ را برای تولید ویدیویی از گربه در حال بازی با نخ نشان میدهد.
پایتون
import base64
from google import genai

client = genai.Client()

interaction = client.interactions.create(
    model="gemini-omni-1.1-flash",
    input=[
        {"type": "image", "data": cat_b64, "mime_type": "image/png"},
        {"type": "image", "data": yarn_b64, "mime_type": "image/png"},
        {"type": "text", "text": "A cat playfully batting at a ball of yarn."}
    ],
)
with open("cat.mp4", "wb") as f:
    f.write(base64.b64decode(interaction.output_video.data))
جاوا اسکریپت
import { GoogleGenAI } from '@google/genai';
import * as fs from 'fs';
const ai = new GoogleGenAI({});

const interaction = await ai.interactions.create({
  model: 'gemini-omni-1.1-flash',
  input: [
    { type: 'image', data: catData, mime_type: 'image/png' },
    { type: 'image', data: yarnData, mime_type: 'image/png' },
    { type: 'text', text: 'A cat playfully batting at a ball of yarn.' }
  ]
});

if (interaction.output_video?.data) {
  fs.writeFileSync('cat.mp4', Buffer.from(interaction.output_video.data, 'base64'));
}
جاوا
import com.google.genai.Client;
import com.google.genai.gaos.models.interactions.Content;
import com.google.genai.gaos.models.interactions.CreateModelInteraction;
import com.google.genai.gaos.models.interactions.ImageContent;
import com.google.genai.gaos.models.interactions.ImageContentMimeType;
import com.google.genai.gaos.models.interactions.Interaction;
import com.google.genai.gaos.models.interactions.InteractionsInput;
import com.google.genai.gaos.models.interactions.Model;
import com.google.genai.gaos.models.interactions.TextContent;
import com.google.genai.gaos.models.operations.CreateInteractionRequestBody;
import java.nio.file.Files;
import java.nio.file.Paths;
import java.util.Arrays;
import java.util.Base64;
import java.util.List;

Client client = new Client();

String catB64 = Base64.getEncoder().encodeToString(Files.readAllBytes(Paths.get("cat.png")));
String yarnB64 = Base64.getEncoder().encodeToString(Files.readAllBytes(Paths.get("yarn.png")));

Content catImage =
    ImageContent.builder()
        .data(catB64)
        .mimeType(ImageContentMimeType.IMAGE_PNG)
        .build();

Content yarnImage =
    ImageContent.builder()
        .data(yarnB64)
        .mimeType(ImageContentMimeType.IMAGE_PNG)
        .build();

Content textContent =
    TextContent.builder()
        .text("A cat playfully batting at a ball of yarn.")
        .build();

List<Content> contents = Arrays.asList(catImage, yarnImage, textContent);

CreateModelInteraction params =
    CreateModelInteraction.builder()
        .model(Model.of("gemini-omni-1.1-flash"))
        .input(InteractionsInput.ofContent(contents))
        .build();

Interaction interaction =
    client.interactions.create(CreateInteractionRequestBody.of(params)).interaction().get();

if (interaction.outputVideo().isPresent() && interaction.outputVideo().get().data().isPresent()) {
  byte[] videoBytes = Base64.getDecoder().decode(interaction.outputVideo().get().data().get());
  Files.write(Paths.get("cat.mp4"), videoBytes);
}
برو
package main

import (
    "context"
    "encoding/base64"
    "log"
    "os"

    "google.golang.org/genai"
    "google.golang.org/genai/interactions/models/interactions"
    "google.golang.org/genai/interactions/models/operations"
)

func main() {
    ctx := context.Background()
    client, err := genai.NewClient(ctx, nil)
    if err != nil {
        log.Fatal(err)
    }

    catBytes, err := os.ReadFile("cat.png")
    if err != nil {
        log.Fatal(err)
    }
    yarnBytes, err := os.ReadFile("yarn.png")
    if err != nil {
        log.Fatal(err)
    }

    catB64 := base64.StdEncoding.EncodeToString(catBytes)
    yarnB64 := base64.StdEncoding.EncodeToString(yarnBytes)

    contents := []interactions.Content{
        interactions.NewContent(interactions.ImageContent{
            Data:     genai.Ptr(catB64),
            MimeType: interactions.ImageContentMimeTypeImagePng.ToPointer(),
        }),
        interactions.NewContent(interactions.ImageContent{
            Data:     genai.Ptr(yarnB64),
            MimeType: interactions.ImageContentMimeTypeImagePng.ToPointer(),
        }),
        interactions.NewContent(interactions.TextContent{
            Text: "A cat playfully batting at a ball of yarn.",
        }),
    }

    res, err := client.Interactions.Create(ctx, operations.CreateInteractionRequest{
        Body: operations.NewCreateInteractionRequestBody(interactions.CreateModelInteraction{
            Model: interactions.Model("gemini-omni-1.1-flash"),
            Input: interactions.NewInteractionsInput(contents),
        }),
    })
    if err != nil {
        log.Fatal(err)
    }

    if res.Interaction.OutputVideo != nil && res.Interaction.OutputVideo.Data != nil {
        videoBytes, err := base64.StdEncoding.DecodeString(*res.Interaction.OutputVideo.Data)
        if err != nil {
            log.Fatal(err)
        }
        if err := os.WriteFile("cat.mp4", videoBytes, 0644); err != nil {
            log.Fatal(err)
        }
    }
}
استراحت
curl -X POST "https://generativelanguage.googleapis.com/v1beta/interactions?key=$API_KEY" \
-H "Content-Type: application/json" \
-d '{
 "model": "gemini-omni-1.1-flash",
 "input": [
   {"type": "image", "data": "'"$CAT_B64"'", "mime_type": "image/png"},
   {"type": "image", "data": "'"$YARN_B64"'", "mime_type": "image/png"},
   {"type": "text", "text": "A cat playfully batting at a ball of yarn."}
 ]
}'
پارامتر وظایف
از پارامتر task در video_config برای مشخص کردن صریح رفتار مورد نظر استفاده کنید، برای مثال اگر میخواهید مدل از یک تصویر، ویدیویی تولید کند، میتوانید پارامتر را روی image_to_video تنظیم کنید. اگر این مقدار تنظیم نشده باشد، مدل از طریق اعلان، آنچه را که میخواهید استنباط میکند.
مقادیر مجاز زیر هستند:
-
text_to_video -
image_to_video -
reference_to_video -
edit -
extend
مثال زیر نحوه تنظیم این مورد را برای تصویر نشان داده شده قبلی به عنوان مثال ویدیو نشان میدهد.
پایتون
import base64
from google import genai

client = genai.Client()

interaction = client.interactions.create(
    model="gemini-omni-1.1-flash",
    input=[
        {"type": "image", "data": base64_image, "mime_type": "image/jpeg"},
        {"type": "text", "text": "turn this into realistic footage, using the drawing only as a guide for movement, do not show the drawing in the final video"}
    ],
    generation_config={
      "video_config": {
        "task": "image_to_video",
      }
    },
)
with open("example.mp4", "wb") as f:
    f.write(base64.b64decode(interaction.output_video.data))
جاوا اسکریپت
import { GoogleGenAI } from "@google/genai";
import * as fs from 'fs';
const ai = new GoogleGenAI({});

const interaction = await ai.interactions.create({
  model: 'gemini-omni-1.1-flash',
  input: [
    { type: 'image', data: base64Image, mime_type: 'image/jpeg' },
    { type: 'text', text: 'turn this into realistic footage, using the drawing only as a guide for movement, do not show the drawing in the final video' }
  ],
  generationConfig: {
    videoConfig: {
      task: 'image_to_video',
    }
  }
});

if (interaction.output_video?.data) {
  fs.writeFileSync('example.mp4', Buffer.from(interaction.output_video.data, 'base64'));
}
جاوا
import com.google.genai.Client;
import com.google.genai.gaos.models.interactions.Content;
import com.google.genai.gaos.models.interactions.CreateModelInteraction;
import com.google.genai.gaos.models.interactions.GenerationConfig;
import com.google.genai.gaos.models.interactions.ImageContent;
import com.google.genai.gaos.models.interactions.ImageContentMimeType;
import com.google.genai.gaos.models.interactions.Interaction;
import com.google.genai.gaos.models.interactions.InteractionsInput;
import com.google.genai.gaos.models.interactions.Model;
import com.google.genai.gaos.models.interactions.Task;
import com.google.genai.gaos.models.interactions.TextContent;
import com.google.genai.gaos.models.interactions.VideoConfig;
import com.google.genai.gaos.models.operations.CreateInteractionRequestBody;
import java.nio.file.Files;
import java.nio.file.Paths;
import java.util.Arrays;
import java.util.Base64;
import java.util.List;

Client client = new Client();

byte[] imageBytes = Files.readAllBytes(Paths.get("drawing.jpg"));
String base64Image = Base64.getEncoder().encodeToString(imageBytes);

Content imageContent =
    ImageContent.builder()
        .data(base64Image)
        .mimeType(ImageContentMimeType.IMAGE_JPEG)
        .build();

Content textContent =
    TextContent.builder()
        .text(
            "turn this into realistic footage, using the drawing only as a guide for movement, do not show the drawing in the final video")
        .build();

List<Content> contents = Arrays.asList(imageContent, textContent);

GenerationConfig generationConfig =
    GenerationConfig.builder()
        .videoConfig(VideoConfig.builder().task(Task.IMAGE_TO_VIDEO).build())
        .build();

CreateModelInteraction params =
    CreateModelInteraction.builder()
        .model(Model.of("gemini-omni-1.1-flash"))
        .input(InteractionsInput.ofContent(contents))
        .generationConfig(generationConfig)
        .build();

Interaction interaction =
    client.interactions.create(CreateInteractionRequestBody.of(params)).interaction().get();

if (interaction.outputVideo().isPresent() && interaction.outputVideo().get().data().isPresent()) {
  byte[] videoBytes = Base64.getDecoder().decode(interaction.outputVideo().get().data().get());
  Files.write(Paths.get("example.mp4"), videoBytes);
}
برو
package main

import (
    "context"
    "encoding/base64"
    "log"
    "os"

    "google.golang.org/genai"
    "google.golang.org/genai/interactions/models/interactions"
    "google.golang.org/genai/interactions/models/operations"
)

func main() {
    ctx := context.Background()
    client, err := genai.NewClient(ctx, nil)
    if err != nil {
        log.Fatal(err)
    }

    imageBytes, err := os.ReadFile("drawing.jpg")
    if err != nil {
        log.Fatal(err)
    }
    base64Image := base64.StdEncoding.EncodeToString(imageBytes)

    contents := []interactions.Content{
        interactions.NewContent(interactions.ImageContent{
            Data:     genai.Ptr(base64Image),
            MimeType: interactions.ImageContentMimeTypeImageJpeg.ToPointer(),
        }),
        interactions.NewContent(interactions.TextContent{
            Text: "turn this into realistic footage, using the drawing only as a guide for movement, do not show the drawing in the final video",
        }),
    }

    generationConfig := &interactions.GenerationConfig{
        VideoConfig: &interactions.VideoConfig{
            Task: interactions.TaskImageToVideo.ToPointer(),
        },
    }

    res, err := client.Interactions.Create(ctx, operations.CreateInteractionRequest{
        Body: operations.NewCreateInteractionRequestBody(interactions.CreateModelInteraction{
            Model:            interactions.Model("gemini-omni-1.1-flash"),
            Input:            interactions.NewInteractionsInput(contents),
            GenerationConfig: generationConfig,
        }),
    })
    if err != nil {
        log.Fatal(err)
    }

    if res.Interaction.OutputVideo != nil && res.Interaction.OutputVideo.Data != nil {
        videoBytes, err := base64.StdEncoding.DecodeString(*res.Interaction.OutputVideo.Data)
        if err != nil {
            log.Fatal(err)
        }
        if err := os.WriteFile("example.mp4", videoBytes, 0644); err != nil {
            log.Fatal(err)
        }
    }
}
استراحت
curl -X POST "https://generativelanguage.googleapis.com/v1beta/interactions" \
  -H "x-goog-api-key: $GEMINI_API_KEY" \
  -H "Content-Type: application/json" \
  -d '{
    "model": "gemini-omni-1.1-flash",
    "input": [
      {
        "type": "image",
        "data": "'"$BASE64_IMAGE"'",
        "mime_type": "image/jpeg"
      },
      {
        "type": "text",
        "text": "turn this into realistic footage, using the drawing only as a guide for movement, do not show the drawing in the final video"
      }
    ],
    "generation_config": {
      "video_config": {
        "task": "image_to_video"
      }
    }
  }'
ویرایش ویدیوی رسمی
یک ویدیو تولید کنید و آن را به صورت تکراری با استفاده از دستورالعملهای تکمیلی ویرایش کنید. هر نوبت بر اساس نتیجه قبلی ساخته میشود. مدل، زمینه ویدیو را به خاطر میسپارد و تغییرات شما را اعمال میکند و در عین حال عناصری را که ذکر نکردهاید حفظ میکند. از previous_interaction_id برای ردیابی تاریخچه مکالمه و وضعیت ویدیوی تولید شده بدون بارگذاری مجدد ویدیوی قبلی استفاده کنید.
مثال زیر نحوه تولید اولین ویدیو و سپس ویرایش آن را نشان میدهد:
پایتون
import base64
from google import genai

client = genai.Client()

# Turn 1: Generate initial video
res1 = client.interactions.create(model="gemini-omni-1.1-flash", input="A woman playing violin outdoors.")

# Turn 2: Edit the previous video
res2 = client.interactions.create(
    model="gemini-omni-1.1-flash",
    previous_interaction_id=res1.id,
    input="Make the violin invisible."
)
with open("example.mp4", "wb") as f:
    f.write(base64.b64decode(res2.output_video.data))
جاوا اسکریپت
import { GoogleGenAI } from '@google/genai';
import * as fs from 'fs';
const ai = new GoogleGenAI({});

// Turn 1: Generate initial video
const res1 = await ai.interactions.create({
  model: 'gemini-omni-1.1-flash',
  input: 'A woman playing violin outdoors.',
});

// Turn 2: Edit the previous video
const res2 = await ai.interactions.create({
  model: 'gemini-omni-1.1-flash',
  previous_interaction_id: res1.id,
  input: 'Make the violin invisible.',
});

if (res2.output_video?.data) {
  fs.writeFileSync('example.mp4', Buffer.from(res2.output_video.data, 'base64'));
}
جاوا
import com.google.genai.Client;
import com.google.genai.gaos.models.interactions.CreateModelInteraction;
import com.google.genai.gaos.models.interactions.Interaction;
import com.google.genai.gaos.models.interactions.InteractionsInput;
import com.google.genai.gaos.models.interactions.Model;
import com.google.genai.gaos.models.operations.CreateInteractionRequestBody;
import java.nio.file.Files;
import java.nio.file.Paths;
import java.util.Base64;

Client client = new Client();

// Turn 1: Generate initial video
CreateModelInteraction turn1Params =
    CreateModelInteraction.builder()
        .model(Model.of("gemini-omni-1.1-flash"))
        .input(InteractionsInput.of("A woman playing violin outdoors."))
        .build();

Interaction res1 =
    client.interactions.create(CreateInteractionRequestBody.of(turn1Params)).interaction().get();

// Turn 2: Edit the previous video
CreateModelInteraction turn2Params =
    CreateModelInteraction.builder()
        .model(Model.of("gemini-omni-1.1-flash"))
        .previousInteractionId(res1.id().get())
        .input(InteractionsInput.of("Make the violin invisible."))
        .build();

Interaction res2 =
    client.interactions.create(CreateInteractionRequestBody.of(turn2Params)).interaction().get();

if (res2.outputVideo().isPresent() && res2.outputVideo().get().data().isPresent()) {
  byte[] videoBytes = Base64.getDecoder().decode(res2.outputVideo().get().data().get());
  Files.write(Paths.get("example.mp4"), videoBytes);
}
برو
package main

import (
    "context"
    "encoding/base64"
    "log"
    "os"

    "google.golang.org/genai"
    "google.golang.org/genai/interactions/models/interactions"
    "google.golang.org/genai/interactions/models/operations"
)

func main() {
    ctx := context.Background()
    client, err := genai.NewClient(ctx, nil)
    if err != nil {
        log.Fatal(err)
    }

    // Turn 1: Generate initial video
    res1, err := client.Interactions.Create(ctx, operations.CreateInteractionRequest{
        Body: operations.NewCreateInteractionRequestBody(interactions.CreateModelInteraction{
            Model: interactions.Model("gemini-omni-1.1-flash"),
            Input: interactions.NewInteractionsInput("A woman playing violin outdoors."),
        }),
    })
    if err != nil {
        log.Fatal(err)
    }

    // Turn 2: Edit the previous video
    res2, err := client.Interactions.Create(ctx, operations.CreateInteractionRequest{
        Body: operations.NewCreateInteractionRequestBody(interactions.CreateModelInteraction{
            Model:                 interactions.Model("gemini-omni-1.1-flash"),
            PreviousInteractionID: res1.Interaction.ID,
            Input:                 interactions.NewInteractionsInput("Make the violin invisible."),
        }),
    })
    if err != nil {
        log.Fatal(err)
    }

    if res2.Interaction.OutputVideo != nil && res2.Interaction.OutputVideo.Data != nil {
        videoBytes, err := base64.StdEncoding.DecodeString(*res2.Interaction.OutputVideo.Data)
        if err != nil {
            log.Fatal(err)
        }
        if err := os.WriteFile("example.mp4", videoBytes, 0644); err != nil {
            log.Fatal(err)
        }
    }
}
استراحت
curl -X POST "https://generativelanguage.googleapis.com/v1beta/interactions?key=$API_KEY" \
-H "Content-Type: application/json" \
-d '{
 "model": "gemini-omni-1.1-flash",
 "previous_interaction_id": "'"$PREVIOUS_ID"'",
 "input": "Make the violin invisible."
}'
نمونهای از ویدیوی اولیه:
نمونهای از ویدیوی ویرایششده:
هر نوبت در مکالمه یک ویدیوی جدید تولید میکند. این مدل، زمینه را از نوبتهای قبلی درک میکند و به شما امکان میدهد تغییرات تدریجی مانند تنظیم نورپردازی و تعویض پسزمینه را بدون توصیف مجدد کل صحنه انجام دهید.
ویدیوهای خودتان را ویرایش کنید
ویدیوهای خود را با استفاده از Files API آپلود کنید تا بتوانید آنها را با Gemini Omni Flash ویرایش کنید.
مثال زیر نحوه ویرایش ویدیوی اصلی زیر را نشان میدهد:
پایتون
import time
import base64
from google import genai

client = genai.Client()

# Upload video using the file API
video_file = client.files.upload(file="Video.mp4")

while video_file.state == "PROCESSING":
    print('Waiting for video to be processed.')
    time.sleep(10)
    video_file = client.files.get(name=video_file.name)

if video_file.state == "FAILED":
  raise ValueError(video_file.state)
print(f'Video processing complete: ' + video_file.uri)

# Edit your video
interaction = client.interactions.create(
    model="gemini-omni-1.1-flash",
    input=[
        {"type": "video", "uri": video_file.uri},
        {"type": "text", "text": "When the person touches the mirror, make the mirror ripple beautifully like liquid, and the person's arm turns into reflective mirror material"}
    ],
)
with open("example.mp4", "wb") as f:
    f.write(base64.b64decode(interaction.output_video.data))
جاوا اسکریپت
import { GoogleGenAI } from '@google/genai';
import * as fs from 'fs';
const ai = new GoogleGenAI({});

// Upload video using the file API
let videoFile = await ai.files.upload({
  file: 'Video.mp4',
});

while (videoFile.state === 'PROCESSING') {
  console.log('Waiting for video to be processed.');
  await new Promise(r => setTimeout(r, 10000));
  videoFile = await ai.files.get({ name: videoFile.name });
}

if (videoFile.state === 'FAILED') {
  throw new Error(videoFile.state);
}
console.log('Video processing complete: ' + videoFile.uri);

// Edit your video
const interaction = await ai.interactions.create({
  model: 'gemini-omni-1.1-flash',
  input: [
    { type: 'video', uri: videoFile.uri },
    { type: 'text', text: "When the person touches the mirror, make the mirror ripple beautifully like liquid, and the person's arm turns into reflective mirror material" }
  ],
});

if (interaction.output_video?.data) {
  fs.writeFileSync('example.mp4', Buffer.from(interaction.output_video.data, 'base64'));
}
جاوا
import com.google.genai.Client;
import com.google.genai.gaos.models.interactions.Content;
import com.google.genai.gaos.models.interactions.CreateModelInteraction;
import com.google.genai.gaos.models.interactions.Interaction;
import com.google.genai.gaos.models.interactions.InteractionsInput;
import com.google.genai.gaos.models.interactions.Model;
import com.google.genai.gaos.models.interactions.TextContent;
import com.google.genai.gaos.models.interactions.VideoContent;
import com.google.genai.gaos.models.operations.CreateInteractionRequestBody;
import com.google.genai.types.File;
import com.google.genai.types.FileState;
import com.google.genai.types.UploadFileConfig;
import java.nio.file.Files;
import java.nio.file.Paths;
import java.util.Arrays;
import java.util.Base64;
import java.util.List;

Client client = new Client();

// Upload video using the file API
File videoFile =
    client.files.upload("Video.mp4", UploadFileConfig.builder().mimeType("video/mp4").build());

while (videoFile.state().isPresent()
    && videoFile.state().get().knownEnum() == FileState.Known.PROCESSING) {
  System.out.println("Waiting for video to be processed.");
  Thread.sleep(10000);
  videoFile = client.files.get(videoFile.name().get(), null);
}

if (videoFile.state().isPresent()
    && videoFile.state().get().knownEnum() == FileState.Known.FAILED) {
  throw new IllegalStateException("Video processing failed: " + videoFile.state().get());
}
System.out.println("Video processing complete: " + videoFile.uri().orElse(""));

// Edit your video
Content videoContent = VideoContent.builder().uri(videoFile.uri().get()).build();
Content textContent =
    TextContent.builder()
        .text(
            "When the person touches the mirror, make the mirror ripple beautifully like liquid, and the person's arm turns into reflective mirror material")
        .build();

List<Content> contents = Arrays.asList(videoContent, textContent);

CreateModelInteraction params =
    CreateModelInteraction.builder()
        .model(Model.of("gemini-omni-1.1-flash"))
        .input(InteractionsInput.ofContent(contents))
        .build();

Interaction interaction =
    client.interactions.create(CreateInteractionRequestBody.of(params)).interaction().get();

if (interaction.outputVideo().isPresent() && interaction.outputVideo().get().data().isPresent()) {
  byte[] videoBytes = Base64.getDecoder().decode(interaction.outputVideo().get().data().get());
  Files.write(Paths.get("example.mp4"), videoBytes);
}
برو
package main

import (
    "context"
    "encoding/base64"
    "fmt"
    "log"
    "os"
    "time"

    "google.golang.org/genai"
    "google.golang.org/genai/interactions/models/interactions"
    "google.golang.org/genai/interactions/models/operations"
)

func main() {
    ctx := context.Background()
    client, err := genai.NewClient(ctx, nil)
    if err != nil {
        log.Fatal(err)
    }

    // Upload video using the file API
    videoFile, err := client.Files.UploadFromPath(ctx, "Video.mp4", &genai.UploadFileConfig{
        MIMEType: "video/mp4",
    })
    if err != nil {
        log.Fatal(err)
    }

    for videoFile.State == genai.FileStateProcessing {
        fmt.Println("Waiting for video to be processed.")
        time.Sleep(10 * time.Second)
        videoFile, err = client.Files.Get(ctx, videoFile.Name, nil)
        if err != nil {
            log.Fatal(err)
        }
    }

    if videoFile.State == genai.FileStateFailed {
        log.Fatalf("Video processing failed: %s", videoFile.State)
    }
    fmt.Printf("Video processing complete: %s\n", videoFile.URI)

    // Edit your video
    contents := []interactions.Content{
        interactions.NewContent(interactions.VideoContent{
            URI: genai.Ptr(videoFile.URI),
        }),
        interactions.NewContent(interactions.TextContent{
            Text: "When the person touches the mirror, make the mirror ripple beautifully like liquid, and the person's arm turns into reflective mirror material",
        }),
    }

    res, err := client.Interactions.Create(ctx, operations.CreateInteractionRequest{
        Body: operations.NewCreateInteractionRequestBody(interactions.CreateModelInteraction{
            Model: interactions.Model("gemini-omni-1.1-flash"),
            Input: interactions.NewInteractionsInput(contents),
        }),
    })
    if err != nil {
        log.Fatal(err)
    }

    if res.Interaction.OutputVideo != nil && res.Interaction.OutputVideo.Data != nil {
        videoBytes, err := base64.StdEncoding.DecodeString(*res.Interaction.OutputVideo.Data)
        if err != nil {
            log.Fatal(err)
        }
        if err := os.WriteFile("example.mp4", videoBytes, 0644); err != nil {
            log.Fatal(err)
        }
    }
}
استراحت
#!/bin/bash
VIDEO_B64=$(encode_file "$VIDEO_FILE")

curl -sS -w "\n[HTTP %{http_code}]\n" "https://generativelanguage.googleapis.com/v1beta/interactions" \
  -H "x-goog-api-key: ${API_KEY}" \
  -H "Content-Type: application/json" \
  -d @- <<EOF > video_editing_response.json
{
  "model": "gemini-omni-1.1-flash",
  "input": [
    {
      "type": "user_input",
      "content": [
        {
          "type": "video",
          "mime_type": "video/mp4",
          "data": "$VIDEO_B64"
        },
        {
          "type": "text",
          "text": "When the person touches the mirror, make the mirror ripple beautifully like liquid, and the person's arm turns into reflective mirror material"
        }
      ]
    }
  ],
  "response_format": { "type": "video" }
}
EOF
نمونهای از ویدیوی ویرایششده:
بازیابی ویدیوها با یک URI
از پارامتر delivery="uri" در response_format برای بازیابی ویدیوهای تولید شدهای که بزرگتر از ۴ مگابایت هستند استفاده کنید. این یک URI میزبانی شده توسط گوگل را برمیگرداند که میتوانید تا زمان ACTIVE ویدیو قبل از دانلود، از آن نمونهبرداری کنید.
پایتون
import time
from google import genai

client = genai.Client()

# 1. Request video via URI delivery
interaction = client.interactions.create(
    model="gemini-omni-1.1-flash",
    input="A beautiful sunset.",
    response_format={"type": "video", "delivery": "uri"}
)

# 2. Extract file name and poll for ACTIVE state
video_output = interaction.output_video
file_name = video_output.uri.split("/")[-1] # Extract ID

print("Waiting for video processing...")
while True:
    f_info = client.files.get(name=f"files/{file_name}")
    if f_info.state.name == "ACTIVE":
        break
    elif f_info.state.name == "FAILED":
        raise RuntimeError("Generation failed.")
    time.sleep(5)

# 3. Download the final video
client.files.download(file=video_output.uri, destination="output.mp4")
جاوا اسکریپت
import { GoogleGenAI } from '@google/genai';
const ai = new GoogleGenAI({});

// 1. Request video using URI delivery
const interaction = await ai.interactions.create({
  model: 'gemini-omni-1.1-flash',
  input: 'A beautiful sunset.',
  response_format: { type: 'video', delivery: 'uri' },
});

// 2. Extract filename and poll for ACTIVE state
const videoOutput = interaction.output_video;
const fileId = videoOutput.uri.match(/files\/([a-zA-Z0-9]+)/)[1];
const name = `files/${fileId}`;

console.log("Waiting for video processing...");
while (true) {
  const fInfo = await ai.files.get({ name });
  if (fInfo.state.name === 'ACTIVE') break;
  if (fInfo.state.name === 'FAILED') throw new Error("Generation failed.");
  await new Promise(r => setTimeout(r, 5000));
}

// 3. Download the final video
await ai.files.download({
  file: videoOutput,
  downloadPath: 'output.mp4',
});
console.log("💾 Saved video to output.mp4");
جاوا
import com.google.genai.Client;
import com.google.genai.gaos.models.interactions.CreateModelInteraction;
import com.google.genai.gaos.models.interactions.CreateModelInteractionResponseFormat;
import com.google.genai.gaos.models.interactions.Interaction;
import com.google.genai.gaos.models.interactions.InteractionsInput;
import com.google.genai.gaos.models.interactions.Model;
import com.google.genai.gaos.models.interactions.ResponseFormat;
import com.google.genai.gaos.models.interactions.VideoContent;
import com.google.genai.gaos.models.interactions.VideoResponseFormat;
import com.google.genai.gaos.models.interactions.VideoResponseFormatDelivery;
import com.google.genai.gaos.models.operations.CreateInteractionRequestBody;
import com.google.genai.types.File;
import com.google.genai.types.FileState;

Client client = new Client();

// 1. Request video using URI delivery
VideoResponseFormat videoFormat =
    VideoResponseFormat.builder()
        .delivery(VideoResponseFormatDelivery.URI)
        .build();

CreateModelInteraction params =
    CreateModelInteraction.builder()
        .model(Model.of("gemini-omni-1.1-flash"))
        .input(InteractionsInput.of("A beautiful sunset."))
        .responseFormat(CreateModelInteractionResponseFormat.of(ResponseFormat.of(videoFormat)))
        .build();

Interaction interaction =
    client.interactions.create(CreateInteractionRequestBody.of(params)).interaction().get();

// 2. Extract filename and poll for ACTIVE state
VideoContent videoOutput = interaction.outputVideo().get();
String uri = videoOutput.uri().get();
String[] parts = uri.split("/");
String fileName = parts[parts.length - 1];

System.out.println("Waiting for video processing...");
while (true) {
  File fileInfo = client.files.get("files/" + fileName, null);
  if (fileInfo.state().isPresent()
      && fileInfo.state().get().knownEnum() == FileState.Known.ACTIVE) {
    break;
  } else if (fileInfo.state().isPresent()
      && fileInfo.state().get().knownEnum() == FileState.Known.FAILED) {
    throw new RuntimeException("Generation failed.");
  }
  Thread.sleep(5000);
}

// 3. Download the final video
client.files.download(uri, "output.mp4", null);
برو
package main

import (
    "context"
    "fmt"
    "log"
    "os"
    "strings"
    "time"

    "google.golang.org/genai"
    "google.golang.org/genai/interactions/models/interactions"
    "google.golang.org/genai/interactions/models/operations"
)

func main() {
    ctx := context.Background()
    client, err := genai.NewClient(ctx, nil)
    if err != nil {
        log.Fatal(err)
    }

    // 1. Request video using URI delivery
    videoFormat := interactions.VideoResponseFormat{
        Delivery: interactions.VideoResponseFormatDeliveryURI.ToPointer(),
    }

    res, err := client.Interactions.Create(ctx, operations.CreateInteractionRequest{
        Body: operations.NewCreateInteractionRequestBody(interactions.CreateModelInteraction{
            Model: interactions.Model("gemini-omni-1.1-flash"),
            Input: interactions.NewInteractionsInput("A beautiful sunset."),
            ResponseFormat: genai.Ptr(interactions.NewCreateModelInteractionResponseFormat(
                interactions.NewResponseFormat(videoFormat),
            )),
        }),
    })
    if err != nil {
        log.Fatal(err)
    }

    // 2. Extract filename and poll for ACTIVE state
    uri := *res.Interaction.OutputVideo.URI
    parts := strings.Split(uri, "/")
    fileName := parts[len(parts)-1]

    fmt.Println("Waiting for video processing...")
    var fileInfo *genai.File
    for {
        fileInfo, err = client.Files.Get(ctx, "files/"+fileName, nil)
        if err != nil {
            log.Fatal(err)
        }
        if fileInfo.State == genai.FileStateActive {
            break
        } else if fileInfo.State == genai.FileStateFailed {
            log.Fatal("Generation failed.")
        }
        time.Sleep(5 * time.Second)
    }

    // 3. Download the final video
    videoBytes, err := client.Files.Download(ctx, genai.NewDownloadURIFromFile(fileInfo), nil)
    if err != nil {
        log.Fatal(err)
    }
    if err := os.WriteFile("output.mp4", videoBytes, 0644); err != nil {
        log.Fatal(err)
    }
}
استراحت
#!/bin/bash

# 1. Initial request to generate the video
RESPONSE=$(curl -s -X POST "https://generativelanguage.googleapis.com/v1beta/interactions?key=$API_KEY" \
-H "Content-Type: application/json" \
-d '{
 "model": "gemini-omni-1.1-flash",
 "input": "A beautiful sunset over a calm ocean.",
 "response_format": {"type": "video", "delivery": "uri"}
}')

# Extract FILE_ID from the URI (e.g., "files/abc-123" -> "abc-123")
FILE_URI=$(echo $RESPONSE | jq -r '.output_video.uri')
FILE_ID=$(echo $FILE_URI | cut -d'/' -f2)

echo "Video requested (ID: $FILE_ID). Waiting for processing..."

# 2. Polling loop
while true; do
 # Get current file status
 STATUS_JSON=$(curl -s -X GET "https://generativelanguage.googleapis.com/v1beta/files/$FILE_ID?key=$API_KEY")
 STATE=$(echo $STATUS_JSON | jq -r '.state')

 if [ "$STATE" == "ACTIVE" ]; then
   echo "Processing complete! Downloading..."
   break
 elif [ "$STATE" == "FAILED" ]; then
   echo "Error: Generation failed."
   exit 1
 else
   echo "Current state: $STATE... (waiting 5s)"
   sleep 5
 fi
done

# 3. Final download
curl -L -X GET "https://generativelanguage.googleapis.com/v1beta/files/$FILE_ID:download?alt=media&key=$API_KEY" \
--output "output.mp4"

echo "Done! Video saved to output.mp4"
ساختار خام REST JSON (URI):
{
  "steps": [
    { "type": "user_input", "content": [{"type": "text", "text": "..."}] },
    { "type": "thought", "content": [{"text": "...", "type": "thought"}] },
    {
      "type": "model_output",
      "content": [
        {
          "type": "video",
          "mime_type": "video/mp4",
          "uri": "https://generativelanguage.googleapis.com/v1beta/files/...:download?alt=media"
        }
      ]
    }
  ],
  "id": "v1_...",
  "status": "completed",
  "model": "gemini-omni-1.1-flash",
  "object": "interaction"
}
پسوند ویدیو
با ایجاد یک ادامهی یکپارچه در انتهای کلیپ، یک ویدیوی موجود را گسترش دهید. در قسمت اعلان خود توضیح دهید که چگونه میخواهید ویدیو ادامه یابد، برای مثال "Extend this video" یا "Continue the scene: the camera pans across the mountains" . مدل، ویدیوی ورودی را تجزیه و تحلیل میکند تا یک ادامهی ۳ تا ۱۰ ثانیهای ایجاد کند.
شما میتوانید تمدید کنید:
- ویدیوهای تولید شده توسط مدل (چند نوبتی) : یک ویدیوی تولید شده قبلی را با ارجاع به
previous_interaction_idآن، گسترش دهید. ویدیوهای آپلود شده : یک فایل ویدیویی آپلود شده (از طریق API فایلها) را به همراه اعلان افزونه ارائه دهید.
پایتون
import base64
from google import genai

client = genai.Client()

# Upload your video using the Files API
video_file = client.files.upload(file="my_video.mp4")

# Extend the video using prompt-based extension
interaction = client.interactions.create(
    model="gemini-omni-1.1-flash",
    input=[
        {"type": "video", "uri": video_file.uri},
        {"type": "text", "text": "Continue the scene."}
    ],
)
with open("extended.mp4", "wb") as f:
    f.write(base64.b64decode(interaction.output_video.data))
جاوا اسکریپت
import { GoogleGenAI } from '@google/genai';
import * as fs from 'fs';
const ai = new GoogleGenAI({});

// Upload your video using the Files API
let videoFile = await ai.files.upload({
  file: 'my_video.mp4',
});

while (videoFile.state === 'PROCESSING') {
  await new Promise(r => setTimeout(r, 10000));
  videoFile = await ai.files.get({ name: videoFile.name });
}

// Extend the video using prompt-based extension
const interaction = await ai.interactions.create({
  model: 'gemini-omni-1.1-flash',
  input: [
    { type: 'video', uri: videoFile.uri },
    { type: 'text', text: 'Continue the scene.' }
  ],
});

if (interaction.output_video?.data) {
  fs.writeFileSync('extended.mp4', Buffer.from(interaction.output_video.data, 'base64'));
}
جاوا
import com.google.genai.Client;
import com.google.genai.gaos.models.interactions.Content;
import com.google.genai.gaos.models.interactions.CreateModelInteraction;
import com.google.genai.gaos.models.interactions.Interaction;
import com.google.genai.gaos.models.interactions.InteractionsInput;
import com.google.genai.gaos.models.interactions.Model;
import com.google.genai.gaos.models.interactions.TextContent;
import com.google.genai.gaos.models.interactions.VideoContent;
import com.google.genai.gaos.models.operations.CreateInteractionRequestBody;
import com.google.genai.types.File;
import com.google.genai.types.UploadFileConfig;
import java.nio.file.Files;
import java.nio.file.Paths;
import java.util.Arrays;
import java.util.Base64;
import java.util.List;

Client client = new Client();

// Upload your video using the Files API
File videoFile =
    client.files.upload(
        "my_video.mp4", UploadFileConfig.builder().mimeType("video/mp4").build());

// Extend the video using prompt-based extension
Content videoContent = VideoContent.builder().uri(videoFile.uri().get()).build();
Content textContent = TextContent.builder().text("Continue the scene.").build();

List<Content> contents = Arrays.asList(videoContent, textContent);

CreateModelInteraction params =
    CreateModelInteraction.builder()
        .model(Model.of("gemini-omni-1.1-flash"))
        .input(InteractionsInput.ofContent(contents))
        .build();

Interaction interaction =
    client.interactions.create(CreateInteractionRequestBody.of(params)).interaction().get();

if (interaction.outputVideo().isPresent() && interaction.outputVideo().get().data().isPresent()) {
  byte[] videoBytes = Base64.getDecoder().decode(interaction.outputVideo().get().data().get());
  Files.write(Paths.get("extended.mp4"), videoBytes);
}
برو
package main

import (
    "context"
    "encoding/base64"
    "log"
    "os"

    "google.golang.org/genai"
    "google.golang.org/genai/interactions/models/interactions"
    "google.golang.org/genai/interactions/models/operations"
)

func main() {
    ctx := context.Background()
    client, err := genai.NewClient(ctx, nil)
    if err != nil {
        log.Fatal(err)
    }

    // Upload your video using the Files API
    videoFile, err := client.Files.UploadFromPath(ctx, "my_video.mp4", &genai.UploadFileConfig{
        MIMEType: "video/mp4",
    })
    if err != nil {
        log.Fatal(err)
    }

    // Extend the video using prompt-based extension
    contents := []interactions.Content{
        interactions.NewContent(interactions.VideoContent{
            URI: genai.Ptr(videoFile.URI),
        }),
        interactions.NewContent(interactions.TextContent{
            Text: "Continue the scene.",
        }),
    }

    res, err := client.Interactions.Create(ctx, operations.CreateInteractionRequest{
        Body: operations.NewCreateInteractionRequestBody(interactions.CreateModelInteraction{
            Model: interactions.Model("gemini-omni-1.1-flash"),
            Input: interactions.NewInteractionsInput(contents),
        }),
    })
    if err != nil {
        log.Fatal(err)
    }

    if res.Interaction.OutputVideo != nil && res.Interaction.OutputVideo.Data != nil {
        videoBytes, err := base64.StdEncoding.DecodeString(*res.Interaction.OutputVideo.Data)
        if err != nil {
            log.Fatal(err)
        }
        if err := os.WriteFile("extended.mp4", videoBytes, 0644); err != nil {
            log.Fatal(err)
        }
    }
}
استراحت
curl -X POST "https://generativelanguage.googleapis.com/v1beta/interactions?key=$API_KEY"     -H "Content-Type: application/json"     -d '{
 "model": "gemini-omni-1.1-flash",
 "input": [
   {"type": "video", "uri": "'"$VIDEO_URI"'"},
   {"type": "text", "text": "Continue the scene."}
 ]
}'
گسترش با رسانههای مرجع
شما میتوانید تصاویر مرجع را در آرایه input به همراه اعلان خود برای معرفی شخصیتها یا عناصر جدید در ویدیوی توسعهیافته ارائه دهید:
پایتون
import base64
from google import genai

client = genai.Client()

# Upload base video and reference image using the Files API
video_file = client.files.upload(file="my_video.mp4")
character_img = client.files.upload(file="character.png")

# Extend the video while introducing the reference character
interaction = client.interactions.create(
    model="gemini-omni-1.1-flash",
    input=[
        {"type": "video", "uri": video_file.uri},
        {"type": "image", "uri": character_img.uri},
        {"type": "text", "text": "Extend this video: have the character shown in <IMAGE_REF_0> enter the scene and wave."}
    ],
)
with open("extended_with_character.mp4", "wb") as f:
    f.write(base64.b64decode(interaction.output_video.data))
جاوا اسکریپت
import { GoogleGenAI } from '@google/genai';
import * as fs from 'fs';
const ai = new GoogleGenAI({});

// Upload base video and reference image using the Files API
let videoFile = await ai.files.upload({ file: 'my_video.mp4' });
let characterImg = await ai.files.upload({ file: 'character.png' });

while (videoFile.state === 'PROCESSING' || characterImg.state === 'PROCESSING') {
  await new Promise(r => setTimeout(r, 10000));
  videoFile = await ai.files.get({ name: videoFile.name });
  characterImg = await ai.files.get({ name: characterImg.name });
}

// Extend the video while introducing the reference character
const interaction = await ai.interactions.create({
  model: 'gemini-omni-1.1-flash',
  input: [
    { type: 'video', uri: videoFile.uri },
    { type: 'image', uri: characterImg.uri },
    { type: 'text', text: 'Extend this video: have the character shown in <IMAGE_REF_0> enter the scene and wave.' }
  ],
});

if (interaction.output_video?.data) {
  fs.writeFileSync('extended_with_character.mp4', Buffer.from(interaction.output_video.data, 'base64'));
}
جاوا
import com.google.genai.Client;
import com.google.genai.gaos.models.interactions.Content;
import com.google.genai.gaos.models.interactions.CreateModelInteraction;
import com.google.genai.gaos.models.interactions.ImageContent;
import com.google.genai.gaos.models.interactions.Interaction;
import com.google.genai.gaos.models.interactions.InteractionsInput;
import com.google.genai.gaos.models.interactions.Model;
import com.google.genai.gaos.models.interactions.TextContent;
import com.google.genai.gaos.models.interactions.VideoContent;
import com.google.genai.gaos.models.operations.CreateInteractionRequestBody;
import com.google.genai.types.File;
import com.google.genai.types.UploadFileConfig;
import java.nio.file.Files;
import java.nio.file.Paths;
import java.util.Arrays;
import java.util.Base64;
import java.util.List;

Client client = new Client();

// Upload base video and reference image using the Files API
File videoFile =
    client.files.upload(
        "my_video.mp4", UploadFileConfig.builder().mimeType("video/mp4").build());
File characterImg =
    client.files.upload(
        "character.png", UploadFileConfig.builder().mimeType("image/png").build());

// Extend the video while introducing the reference character
Content videoContent = VideoContent.builder().uri(videoFile.uri().get()).build();
Content imageContent = ImageContent.builder().uri(characterImg.uri().get()).build();
Content textContent =
    TextContent.builder()
        .text(
            "Extend this video: have the character shown in <IMAGE_REF_0> enter the scene and wave.")
        .build();

List<Content> contents = Arrays.asList(videoContent, imageContent, textContent);

CreateModelInteraction params =
    CreateModelInteraction.builder()
        .model(Model.of("gemini-omni-1.1-flash"))
        .input(InteractionsInput.ofContent(contents))
        .build();

Interaction interaction =
    client.interactions.create(CreateInteractionRequestBody.of(params)).interaction().get();

if (interaction.outputVideo().isPresent() && interaction.outputVideo().get().data().isPresent()) {
  byte[] videoBytes = Base64.getDecoder().decode(interaction.outputVideo().get().data().get());
  Files.write(Paths.get("extended_with_character.mp4"), videoBytes);
}
برو
package main

import (
    "context"
    "encoding/base64"
    "log"
    "os"

    "google.golang.org/genai"
    "google.golang.org/genai/interactions/models/interactions"
    "google.golang.org/genai/interactions/models/operations"
)

func main() {
    ctx := context.Background()
    client, err := genai.NewClient(ctx, nil)
    if err != nil {
        log.Fatal(err)
    }

    // Upload base video and reference image using the Files API
    videoFile, err := client.Files.UploadFromPath(ctx, "my_video.mp4", &genai.UploadFileConfig{
        MIMEType: "video/mp4",
    })
    if err != nil {
        log.Fatal(err)
    }
    characterImg, err := client.Files.UploadFromPath(ctx, "character.png", &genai.UploadFileConfig{
        MIMEType: "image/png",
    })
    if err != nil {
        log.Fatal(err)
    }

    // Extend the video while introducing the reference character
    contents := []interactions.Content{
        interactions.NewContent(interactions.VideoContent{
            URI: genai.Ptr(videoFile.URI),
        }),
        interactions.NewContent(interactions.ImageContent{
            URI: genai.Ptr(characterImg.URI),
        }),
        interactions.NewContent(interactions.TextContent{
            Text: "Extend this video: have the character shown in <IMAGE_REF_0> enter the scene and wave.",
        }),
    }

    res, err := client.Interactions.Create(ctx, operations.CreateInteractionRequest{
        Body: operations.NewCreateInteractionRequestBody(interactions.CreateModelInteraction{
            Model: interactions.Model("gemini-omni-1.1-flash"),
            Input: interactions.NewInteractionsInput(contents),
        }),
    })
    if err != nil {
        log.Fatal(err)
    }

    if res.Interaction.OutputVideo != nil && res.Interaction.OutputVideo.Data != nil {
        videoBytes, err := base64.StdEncoding.DecodeString(*res.Interaction.OutputVideo.Data)
        if err != nil {
            log.Fatal(err)
        }
        if err := os.WriteFile("extended_with_character.mp4", videoBytes, 0644); err != nil {
            log.Fatal(err)
        }
    }
}
استراحت
curl -X POST "https://generativelanguage.googleapis.com/v1beta/interactions?key=$API_KEY"     -H "Content-Type: application/json"     -d '{
 "model": "gemini-omni-1.1-flash",
  "input": [
    {"type": "video", "uri": "'$VIDEO_URI'"},
    {"type": "image", "uri": "'$CHARACTER_IMG_URI'"},
    {"type": "text", "text": "Extend this video: have the character shown in <IMAGE_REF_0> enter the scene and wave."}
  ]
}'
محدودیتها و دستورالعملهای افزونه
هنگام گسترش ویدیوها، قوانین و محدودیتهای زیر را در نظر داشته باشید:
- گفتگوی گفتاری در ویدیوهای آپلود شده : در حال حاضر، نمیتوانید ویدیوی آپلود شدهای را که در آن شخصی در حال صحبت است، برای اضافه کردن گفتگوی اضافی ادامه دهید (این قابلیت در صورتی پشتیبانی میشود که شخصیت مورد نظر ساکت بماند یا اگر اعلان، گفتگویی اضافه نکند).
- افزونهی صدای چند-چرخشی : تولید دیالوگ یا گفتار گفتاری هنگام گسترش ویدیوهای تولید شدهی قبلی از طریق چند-چرخشی (
previous_interaction_id) پشتیبانی میشود. - فقط پایان کلیپ : افزونه محدود به اضافه کردن به انتهای ویدیو است. نمیتوانید محتوا را به ابتدای کلیپ اضافه کنید یا وسط آن را گسترش دهید.
- محدودیت مدت زمان : ویدیوهای ورودی برای افزونه هنگام آپلود باید 10 ثانیه یا کمتر باشند (مگر اینکه از چند نوبت استفاده شود).
- دسترسی منطقهای : گسترش ویدیوهای آپلود شده در حال حاضر برای کاربران منطقه اقتصادی اروپا (EEA)، سوئیس و بریتانیا در دسترس نیست (گسترش ویدیوهای تولید شده توسط این مدل در همه مناطق موجود پشتیبانی میشود).
بهترین شیوهها
- استفاده از تحویل URI برای ویدیوهای بزرگ: برای ویدیوهای بزرگتر از ۴ مگابایت (در صورت وجود >۷۲۰p)، از
delivery="uri"درresponse_formatاستفاده کنید تا از محدودیتهای اندازه بار داده جلوگیری شود. - عملکرد بهینه: برای تولید سریعتر و همزمان یکتایی،
background=false،store=falseوstream=falseرا تنظیم کنید. توجه داشته باشید که تنظیمstore=falseبه این معنی است که ویدیوی تولید شده در نوبتهای بعدی با استفاده ازprevious_interaction_idقابل ویرایش نخواهد بود. - دقت سریع: برای جزئیات بیشتر به بخش راهنمای سریع مراجعه کنید.
محدودیتها
- آپلود و ویرایش تصاویر حاوی افراد زیر سن قانونی در منطقه اقتصادی اروپا، سوئیس و بریتانیا پشتیبانی نمیشود.
- آپلود و ویرایش تصاویری که حاوی افراد قابل تشخیص خاصی هستند پشتیبانی نمیشود.
- ویرایش یا گسترش ویدیوهای آپلود شده در حال حاضر برای کاربران در منطقه اقتصادی اروپا (EEA)، سوئیس و بریتانیا در دسترس نیست (ویرایش یا گسترش ویدیوهای تولید شده توسط این مدل پشتیبانی میشود).
- ویدیوهای ورودی برای ویرایش و گسترش باید هنگام آپلود ۱۰ ثانیه یا کمتر باشند (مگر اینکه ویدیوهای گسترشیافته توسط مدل در چند نوبت تولید شده باشند).
- افزونهی ویدیو محدود به اضافه کردن به انتهای ویدیو است؛ اضافه کردن به ابتدای کلیپ یا امتداد دادن آن به وسط آن پشتیبانی نمیشود.
- شما نمیتوانید ویدیوی آپلود شدهای را که در آن شخصی در حال صحبت است، برای اضافه کردن دیالوگهای بیشتر، گسترش دهید (شخصیتها میتوانند ساکت بمانند، یا میتوان از گسترش چند نوبتی با
previous_interaction_idاستفاده کرد). - ویرایش صدا پشتیبانی نمیشود.
- آپلود منابع صوتی در نسخه فعلی API پشتیبانی نمیشود.
- ارجاعات ویدیویی با شباهتها بهترین عملکرد را دارند؛ هرگونه صدا در ارجاع ویدیویی نادیده گرفته میشود. ارجاعات ویدیویی حداکثر از ۳ کلیپ، هر کدام تا ۳ ثانیه، پشتیبانی میکنند.
- ارجاع یا استدلال در چندین ویدیو پشتیبانی نمیشود. تلاش برای ایجاد چند ویدیو ممکن است منجر به کاهش عملکرد مدل یا خروجیهای غیرمنتظره شود.
- توان عملیاتی ارائه شده پشتیبانی نمیشود.
- دستورالعملهای سیستم، دما،
top_p، توالیهای توقف و پیامهای منفی پشتیبانی نمیشوند (میتوانید پیامهای منفی خود را در پیام معمولی قرار دهید: مثلاً «کار X را انجام ندهید»). - استفاده از ویدیوهای یوتیوب به عنوان منبع رسانه پشتیبانی نمیشود.
جزئیات فنی
- تمام ویدیوهای تولید شده شامل واترمارک SynthID هستند که برای بینندگان نامرئی است اما میتوان آن را به صورت برنامهنویسی برای تأیید اصالت شناسایی کرد.
- زمان تولید ویدیو بسته به مدت زمان، وضوح تصویر و بار فعلی API متفاوت است. ویدیوهای طولانیتر و با وضوح بالاتر زمان بیشتری برای تولید نیاز دارند.
- Omni فیلترهای ایمنی محتوا را هم برای پیامهای ورودی و هم برای ویدیوهای تولید شده (که بسته به منطقه متفاوت است) اعمال میکند. پیامهایی که سیاستهای استفاده را نقض میکنند، مسدود میشوند.
- انگلیسی (EN) کاملاً پشتیبانی میشود، اما زبانهای دیگر ارزیابی نشدهاند، بنابراین ممکن است کار کنند اما نتایج میتوانند متفاوت باشند.
راهنمای سریع Gemini Omni Flash
این بخش شامل نکات و مثالهایی در مورد چگونگی فعال کردن مؤثر Gemini Omni Flash است.
تک صحنه
به طور پیشفرض، Omni Flash سعی میکند ویدیویی با چند نمای مختلف ایجاد کند. این برنامه تلاش میکند تا بر اساس موضوع، روایتی جالب خلق کند.
اگر نیاز دارید که ویدیوی خروجی شامل یک صحنه باشد، باید این را از طریق دستور زیر درخواست کنید:
- در یک صحنهی بیوقفه
- در یک نمای پیوسته
- بدون حذف صحنه
برای مثال:
Continuous, unbroken handheld shot of a fluffy tabby cat sitting on a sunny windowsill, looking out into a leafy garden. The cat's tail twitches slowly, and its ears rotate slightly toward ambient noises. Sunbeams illuminate dust motes in the air. Sound design: Gentle breeze, distant bird chirps. No dialogue.
حذف عناصر ناخواسته
اگر ویدیوی تولید شده حاوی چیزهایی است که نمیخواهید، برای جلوگیری از آنها، دستورالعملهای منفی سادهای را در آن بگنجانید:
- بدون دیالوگ
- بدون تزئینات
- بدون جلوههای صوتی اضافی
درخواستهایی برای ویرایش
دستورالعملهای ساده برای ویرایش ویدیو بهترین عملکرد را دارند. دستورالعملهای بیش از حد توصیفی میتوانند منجر به تغییرات ناخواسته شوند.
در ادامه نمونههای بیشتری از دستورات ویرایشی ساده آمده است:
- این ویدیو را انیمه کنید
- یه کلاه شیک سر این آدم بذار
- نورپردازی را تغییر دهید تا چشمگیرتر شود
- متن روی تابلو را به «Omni Flash» تغییر دهید.
هنگام ویرایش بخش خاصی از ویدیو، برای حفظ انسجام بصری، عبارت "Keep everything else the same" را اضافه کنید.
در ادامه چند مثال برای نشان دادن نحوهی بهکارگیری این تکنیک ارائه شده است:
- اجتناب:
In the video of the man sitting on the sofa, please add a small black cat that runs from the right side of the screen, jumps onto his lap, and then he starts to stroke its head while looking down.- سادهسازی:
Add a cat that jumps onto his lap, he begins to pet it. Keep everything else the same.
- سادهسازی:
- اجتناب کنید:
Please remove the cell phone that the person is holding in their hand and fill in the background so it looks like they are just holding their hand empty.- سادهسازی:
Make the phone invisible. Keep everything else the same.
- سادهسازی:
پخش صدا
به طور پیشفرض، مدل سعی میکند یک آهنگ صوتی مناسب برای ویدیو تولید کند. این ممکن است همیشه آن چیزی نباشد که شما میخواهید. میتوانید از دستور خود برای توصیف نوع صوتی که میخواهید استفاده کنید. این امر به ویژه در صورتی که میخواهید در ویدیوی خود موسیقی داشته باشید، مهم است:
- موسیقی پس زمینه آرام را در نظر بگیرید
- این ویدیو ریتم تکنوی پرانرژی دارد
- صدا، صدای ضعیف و ضعیف رادیویی است که در پسزمینه پخش میشود و آهنگی را پخش میکند.
رویدادهای زمانبندی
شما میتوانید در زمانهای مشخصی از ویدیو، اتفاقاتی را پیشبینی کنید، نیازی به دستور زبان خاصی نیست و میتوانید از زبان طبیعی استفاده کنید. این قابلیت به ویژه در ایجاد کاتهای صحنه، ریتم یا سکانسهای سریع خودتان مفید است. برای مثال به موارد زیر مراجعه کنید:
- بعد از ۳ ثانیه، زنی وارد صحنه میشود.
- در ثانیه ۵، همخوانی در صدای پسزمینه شروع میشود.
- هر ۲ ثانیه یک قاب جدید برش داده میشود.
- در یک سکانس تیراندازی سریع، هر نیم ثانیه (۱۲ فریم با سرعت ۲۴ فریم در ثانیه) صحنه به مکان جدیدی تغییر میکند.
همچنین میتوانید از سینتکس timecode استفاده کنید:
[0-3s] A person is walking
[3-6s] They stop and turn around
[6-10s] They start running
متای درخواست
میتوانید از Gemini Omni Flash بخواهید که به ویژگیهای کلی یا اصول تولید ویدیو توجه کند:
- برای خلق صحنهای بسیار غنی، پرجزئیات اما کاملاً طبیعی، جزئیات ریز، حالت چهره و زمانبندی را در نظر بگیرید.
- در توصیف شخصیتها و محیطها نهایت دقت را به خرج دهید. اصول طراحی لباس را برای شخصیتها به کار ببرید. در مورد افراد، اقلام و اشیاء موجود در صحنه بسیار دقیق باشید.
- جزئیات مناسب و زیادی را در عناصر پسزمینه بگنجانید تا صحنه واقعی و طبیعی به نظر برسد.
- یک ویدیوی سریع بسازید که هر ثانیه یک
[thing]کمیاب متفاوت را نشان دهد، موسیقی شاد داشته باشد و متنی برای برچسبگذاری آن چیز اضافه کند.
متن در ویدیوها
میتوانید از شما بخواهید که در ویدیوی خود متن قرار دهید و Gemini Omni آن را به روشی صحیح و خوانا رندر خواهد کرد. اگر متن طبیعی در ویدیوی شما، حتی در عناصر پسزمینه، وجود داشته باشد، میتواند به تعریف آنچه باید گفته شود، کمک کند.
- هر کلمه روی صفحه نمایش در هر زمان: «آیا، تو، میدانستی، که، اومنی، میتواند، انجام دهد، فوقالعاده، متن؟» هر کلمه برای ۱ ثانیه با سبک انیمیشنی متفاوت ظاهر میشود. بدون دیالوگ.
- یک تابلوی خیابانی هست که روی آن نوشته شده: «این یک نسل هوش مصنوعی از Omni است»، یک مغازه هست که روی آن نوشته شده: «هر آنچه که به هوش مصنوعی نیاز دارید»، یک ماشین هم هست که پلاکش «OMNI1.1» است.
درخواستهایی برای افزایش طول ویدیو
با Gemini Omni 1.1 Flash میتوانید ویدیوها را با پیامهایی مانند "Extend this video" یا "The scene continues" طولانیتر کنید. میتوانید ویدیوها را 10 ثانیه طولانیتر کنید تا در مجموع به 40 ثانیه برسید.
Omni افزونهای ایجاد میکند که با استفاده از ده ثانیه آخر ویدیوی اصلی شما به عنوان زمینه، ویدیو، حرکت، شخصیتها و صدا را منسجم نگه میدارد. برخی از فریمهای نهایی در ویدیوی ورودی شما ویرایش میشوند تا انتقال یکپارچه باشد.
هنگام گسترش، تمام نکات مربوط به Omni prompting این راهنما همچنان اعمال میشوند:
- صدای صحنهی طولانیتان را توصیف کنید، بهخصوص اگر نیاز به تغییر آن دارید:
"The music continues into the chorus" - توضیح دهید که آیا صحنه ادامه دارد یا اینکه یک نما به صحنه جدید (شاید با همان شخصیتها) کات شده است:
"Show the same characters in the next scene" - هنگام بسط دادن، تصاویر و ویدیوها را به عنوان مرجع در نظر بگیرید تا به دقیق ماندن خروجیهایتان یا معرفی شخصیتهای جدید کمک کنید:
"The person shown in the reference image enters the scene"،"The dog in the reference video <VIDEO_REF_0> jumps onto the sofa" - اگر از مهرهای زمانی یا سینتکس کد زمانی استفاده میکنید، 0s به ابتدای بخش طولانیشدهی ویدیو اشاره دارد. اگر یک ویدیوی 10 ثانیهای را طولانی میکنید، صحنهی برش داده شده در این اعلان پس از 12 ثانیه اتفاق میافتد:
"After 2s cut to a new scene with the same characters"
استفاده از برچسبها در اعلانها برای تنظیم نقشهای تصویر و ویدیو
شما میتوانید از برچسبها برای اتصال رسانههای آپلود شده به نقشهای تولید خاص استفاده کنید. این به شما امکان میدهد مشخص کنید که آیا هر تصویر یا ویدیو یک فریم شروع، یک فریم پایان یا یک مرجع است.
۱. تگهای ساده (توصیه میشود)
برای موارد سادهای که نقشهای رسانهای از طریق اعلان مشخص هستند، میتوانید تصاویر و ویدیوها را مستقیماً به نقشها متصل کنید:
-
<FIRST_FRAME>: از تصویر به عنوان فریم شروع ویدیو استفاده میکند، برای مثال:<FIRST_FRAME> a woman is walking -
<LAST_FRAME>: از تصویر به عنوان فریم آخر ویدیو برای انتقال به آن استفاده میشود. باید با<FIRST_FRAME>استفاده شود، برای مثال:<FIRST_FRAME> <LAST_FRAME> a woman is walking -
<IMAGE_REF_N>: از تصویر به عنوان مرجع استفاده میکند، برای مثال:in the style of <IMAGE_REF_0> a woman <IMAGE_REF_1> is walking(ارجاع سبک از تصویر اول و ارجاع موضوع از تصویر دوم را ترکیب میکند). ارجاعات تصویر از ۰ شروع میشوند. -
<VIDEO_REF_N>: از ویدیو به عنوان مرجع شخصیت یا شیء استفاده میکند، برای مثال:the person in <VIDEO_REF_0> is playing the violin. ارجاعات ویدیویی نیز از ۰ شروع میشوند.
مثال زیر شامل ۶ تصویر مرجع است:
[0-3s] A studio fashion sequence. Starting with woman <IMAGE_REF_0>, she is holding <IMAGE_REF_1>
[3-6s] Then we see the man <IMAGE_REF_2> holding <IMAGE_REF_3>
[6-10s] And finally another woman <IMAGE_REF_4> who is holding <IMAGE_REF_5> while walking.
۲. اعلام منابع و مآخذ
برای موارد پیچیدهتر با ورودیهای رسانهای متعدد و نقشهای متعدد، میتوانید از برچسبهای پیشوند صریح همراه با دستورالعملهای زبان طبیعی استفاده کنید. شما باید این منابع و مراجع را در ابتدای اعلان خود اعلام کنید.
-
[# Sources <FIRST_FRAME>@Image1] از تصویر اول به عنوان فریم شروع استفاده خواهد کرد. -
[# Sources <FIRST_FRAME>@Image1 <LAST_FRAME>@Image2] از تصویر اول به عنوان فریم شروع و تصویر دوم به عنوان فریم نهایی استفاده خواهد کرد. -
[# Sources <FIRST_FRAME>@Image1 <LAST_FRAME>@Image1]از تصویر اول هم به عنوان فریم اول و هم به عنوان فریم آخر استفاده میکند و ویدیویی ایجاد میکند که تکرار میشود. -
[# Sources <FIRST_FRAME>@Image1] [# References <IMAGE_REF_0>@Image2]از تصویر اول به عنوان فریم شروع و تصویر دوم به عنوان مرجع استفاده خواهد کرد. -
[# Sources <VIDEO_0>@Video1]از این ویدیو به عنوان ویدیوی منبع اصلی برای ویرایش یا تغییر استفاده خواهد کرد. -
[# Sources <PREVIOUS_VIDEO>@Video1]از ویدیوی نوبت قبلی برای ادامه دادن استفاده خواهد کرد. -
[# References <IMAGE_REF_0>@Image1] از تصویر اول به عنوان مرجع استفاده خواهد کرد. -
[# References <IMAGE_REF_1>@Image2] از تصویر دوم به عنوان مرجع استفاده خواهد کرد. -
[# References <IMAGE_REF_0>@Image1 <IMAGE_REF_1>@Image2]از هر دو تصویر به عنوان مرجع استفاده خواهد کرد. -
[# References <VIDEO_REF_0>@Video1] از اولین ویدیو به عنوان مرجع استفاده خواهد کرد. -
[# References <IMAGE_REF_0>@Image1 <VIDEO_REF_0>@Video1]از هر دو تصویر و ویدیو به عنوان مرجع استفاده خواهد کرد.
دستورالعملهای راهنما را در انتهای درخواست خود اضافه کنید:
- برای فریم شروع:
"Use this image as the starting frame." - برای یک ویدیوی تکرارشونده از طریق فریمهای شروع و پایان:
"Use this image as the first frame and the last frame." - برای تصاویر مرجع:
"Use the given image(s) as references for video generation. The images should not be used as literal initial frames." - برای ویدیوهای مرجع:
"Use the given video(s) as references. Do not use them as a source for video editing."
چند نمونه از دستورات با اعلان منبع و مرجع:
فریم شروع ترکیب شده با یک تصویر مرجع:
[# Sources <FIRST_FRAME>@Image1] [# References <IMAGE_REF_0>@Image2] a woman <IMAGE_REF_0> is walking. Use Image1 as the starting frame. Use Image2 as a reference for the video generation.
ویدیوی مرجع شخصیت همراه با تصویر مرجع شیء:
[# References <IMAGE_REF_0>@Image1 <VIDEO_REF_0>@Video1] The woman in <VIDEO_REF_0> is playing the violin shown in <IMAGE_REF_0>. Use Video1 as a character reference and Image1 as an object reference.
قدم بعدی چیست؟
- با آزمایش در Omni Quickstart Colab، کار با Gemini Omni Flash را شروع کنید.
- با «مقدمهای بر طراحی سریع» یاد بگیرید که چگونه دستورالعملهای بهتری بنویسید.