

O Gemini Omni Flash (gemini-omni-1.1-flash) é um modelo multimodal de alta performance projetado para geração, edição e controle cinematográfico de vídeos em alta velocidade.
O Gemini Omni foi criado com base nos seguintes recursos principais que o diferenciam dos modelos de vídeo anteriores:
- Multimodalidade nativa:processa texto, imagem, áudio e vídeo simultaneamente, oferecendo uma saída mais coesa, consistente e controlável.
- Edição conversacional:ativada pela API Interactions, ela permite refinar e editar seus vídeos de forma iterativa usando linguagem natural. Descreva o que você quer mudar, e o modelo vai aplicar a edição preservando as partes do vídeo que você quer manter.
- Conhecimento do mundo:o Gemini Omni combina a compreensão da física com o conhecimento do Gemini sobre história, ciência e contexto cultural, diminuindo a distância entre o fotorrealismo e a narrativa significativa.
Geração de texto para vídeo
Gere um vídeo com base em um comando de texto. O modelo gera um vídeo com áudio com base na sua descrição em texto. Escreva comandos com detalhes como descrição da cena, movimento da câmera, iluminação e clima para ter os melhores resultados.
Python
import base64
from google import genai

client = genai.Client()

interaction = client.interactions.create(
    model="gemini-omni-1.1-flash",
    input="A marble rolling fast on a chain reaction style track, continuous smooth shot."
)
with open("marble.mp4", "wb") as f:
    f.write(base64.b64decode(interaction.output_video.data))
JavaScript
import { GoogleGenAI } from '@google/genai';
import * as fs from 'fs';
const ai = new GoogleGenAI({});

const interaction = await ai.interactions.create({
  model: 'gemini-omni-1.1-flash',
  input: 'A marble rolling fast on a chain reaction style track, continuous smooth shot.',
});

if (interaction.output_video?.data) {
  fs.writeFileSync('marble.mp4', Buffer.from(interaction.output_video.data, 'base64'));
}
REST
curl -X POST "https://generativelanguage.googleapis.com/v1beta/interactions?key=$API_KEY" \
-H "Content-Type: application/json" \
-d '{
 "model": "gemini-omni-1.1-flash",
 "input": "A marble rolling fast on a chain reaction style track, continuous smooth shot."
}'
Esquema de resposta REST
O campo de conveniência interaction.output_video é somente para SDK.
Receba a saída de vídeo da matriz steps ao usar a API REST diretamente.
Estrutura JSON REST bruta:
{
  "steps": [
    { "type": "user_input", "content": [{"type": "text", "text": "..."}] },
    { "type": "thought", "content": [{"text": "...", "type": "thought"}] },
    {
      "type": "model_output",
      "content": [
        {
          "type": "video",
          "mime_type": "video/mp4",
          "data": "AAAAIGZ0eXBpc29t..." // Base64 encoded video data
        }
      ]
    }
  ],
  "id": "v1_...",
  "status": "completed",
  "model": "gemini-omni-1.1-flash",
  "object": "interaction"
}
Controlar a proporção
Defina o aspect_ratio como "9:16" para criar vídeos no modo retrato. Paisagem (16:9) é a opção padrão.
Python
import base64
from google import genai

client = genai.Client()

interaction = client.interactions.create(
    model="gemini-omni-1.1-flash",
    input="A futuristic city with neon lights and flying cars, cyberpunk style",
    response_format={
        "type": "video",  # optional
        "aspect_ratio": "9:16"  # Supported values: "9:16", "16:9"
    }
)
with open("example.mp4", "wb") as f:
    f.write(base64.b64decode(interaction.output_video.data))
JavaScript
import { GoogleGenAI } from '@google/genai';
import * as fs from 'fs';
const ai = new GoogleGenAI({});

const interaction = await ai.interactions.create({
  model: 'gemini-omni-1.1-flash',
  input: 'A futuristic city with neon lights and flying cars, cyberpunk style',
  response_format: {
    type: 'video', // optional
    aspect_ratio: '9:16' // Supported values: '9:16', '16:9'
  },
});

if (interaction.output_video?.data) {
  fs.writeFileSync('example.mp4', Buffer.from(interaction.output_video.data, 'base64'));
}
REST
curl -X POST "https://generativelanguage.googleapis.com/v1beta/interactions?key=$API_KEY" \
-H "Content-Type: application/json" \
-d '{
 "model": "gemini-omni-1.1-flash",
 "input": "A futuristic city with neon lights and flying cars, cyberpunk style",
 "response_format": {
   "type": "video",
   "aspect_ratio": "9:16"
 }
}'
Resolução de saída
Controle a resolução de saída do vídeo gerado usando o parâmetro resolution
em response_format. A resolução padrão é 720p.
| Valor | Descrição |
|---|---|
360p |
Resolução de saída de 360p |
720p |
Resolução de saída de 720p (padrão) |
1080p |
Saída de 1080p (resolução ampliada) |
4k |
Saída 4K (de alta qualidade) |
Python
import base64
from google import genai

client = genai.Client()

interaction = client.interactions.create(
    model="gemini-omni-1.1-flash",
    input="A drone shot of a mountain landscape at sunrise.",
    response_format={
        "type": "video",
        "resolution": "1080p",
    },
)
with open("hires.mp4", "wb") as f:
    f.write(base64.b64decode(interaction.output_video.data))
JavaScript
import { GoogleGenAI } from '@google/genai';
import * as fs from 'fs';
const ai = new GoogleGenAI({});

const interaction = await ai.interactions.create({
  model: 'gemini-omni-1.1-flash',
  input: 'A drone shot of a mountain landscape at sunrise.',
  response_format: {
    type: 'video',
    resolution: '1080p',
  },
});

if (interaction.output_video?.data) {
  fs.writeFileSync('hires.mp4', Buffer.from(interaction.output_video.data, 'base64'));
}
REST
curl -X POST "https://generativelanguage.googleapis.com/v1beta/interactions?key=$API_KEY" \
-H "Content-Type: application/json" \
-d '{
 "model": "gemini-omni-1.1-flash",
 "input": "A drone shot of a mountain landscape at sunrise.",
 "response_format": {
   "type": "video",
   "resolution": "1080p"
 }
}'
Geração de vídeo a partir de imagens
Você pode fornecer uma imagem de referência com seu comando de texto. Dependendo do seu comando, o modelo vai decidir como usar a imagem. Isso é útil para dar vida a fotos de produtos, ilustrações ou fotografias.
O exemplo a seguir mostra como usar a imagem de referência de um desenho de um peixe pulando para fora da água:
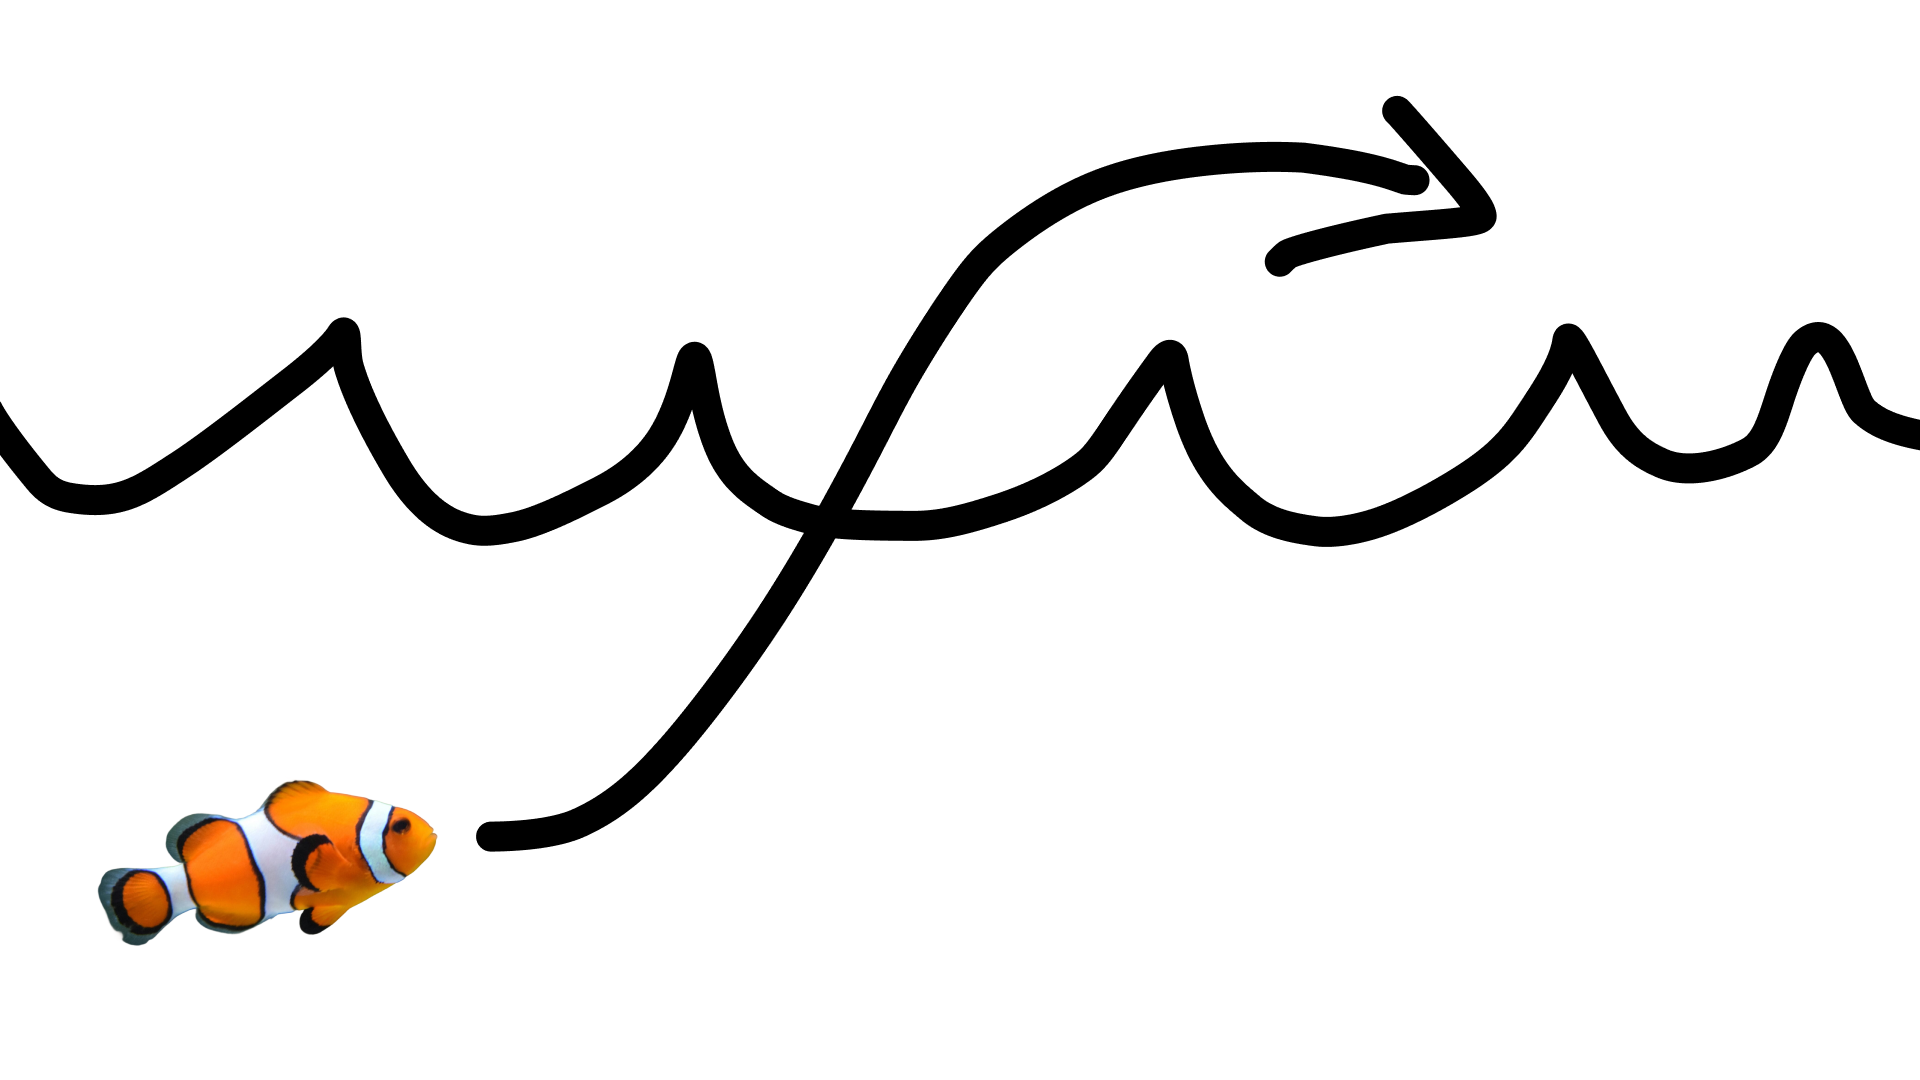
Com o seguinte comando:
turn this into realistic footage, using the drawing only as a guide for movement, do not show the drawing in the final video
Para gerar um vídeo realista do desenho.
Python
import base64
from google import genai

client = genai.Client()

interaction = client.interactions.create(
    model="gemini-omni-1.1-flash",
    input=[
        {"type": "image", "data": base64_image, "mime_type": "image/jpeg"},
        {"type": "text", "text": "turn this into realistic footage, using the drawing only as a guide for movement, do not show the drawing in the final video"}
    ],
)
with open("clownfish.mp4", "wb") as f:
    f.write(base64.b64decode(interaction.output_video.data))
JavaScript
import { GoogleGenAI } from '@google/genai';
import * as fs from 'fs';
const ai = new GoogleGenAI({});

const interaction = await ai.interactions.create({
  model: 'gemini-omni-1.1-flash',
  input: [
    { type: 'image', data: base64Image, mime_type: 'image/jpeg' },
    { type: 'text', text: 'turn this into realistic footage, using the drawing only as a guide for movement, do not show the drawing in the final video' }
  ]
});

if (interaction.output_video?.data) {
  fs.writeFileSync('clownfish.mp4', Buffer.from(interaction.output_video.data, 'base64'));
}
REST
curl -X POST "https://generativelanguage.googleapis.com/v1beta/interactions?key=$API_KEY" \
-H "Content-Type: application/json" \
-d '{
 "model": "gemini-omni-1.1-flash",
 "input": [
   {"type": "image", "data": "'"$BASE64_IMAGE"'", "mime_type": "image/jpeg"},
   {"type": "text", "text": "turn this into realistic footage, using the drawing only as a guide for movement, do not show the drawing in the final video"}
 ]
}'
Interpolação do primeiro e do último frame
O Gemini Omni Flash é compatível com a interpolação de vídeo, permitindo gerar um vídeo que faz a transição suave entre uma imagem inicial (primeiro frame) e uma imagem final (último frame).
Forneça duas imagens na lista input e descreva a transição desejada no comando. O modelo vai animar a cena do primeiro ao último frame.
Python
import base64
from google import genai

client = genai.Client()

interaction = client.interactions.create(
    model="gemini-omni-1.1-flash",
    input=[
        {"type": "image", "data": first_frame_b64, "mime_type": "image/jpeg"},
        {"type": "image", "data": last_frame_b64, "mime_type": "image/jpeg"},
        {"type": "text", "text": "A smooth cinematic transition from a lush green forest at sunrise to a snowy forest under a starry night sky."}
    ],
)
with open("interpolation.mp4", "wb") as f:
    f.write(base64.b64decode(interaction.output_video.data))
JavaScript
import { GoogleGenAI } from '@google/genai';
import * as fs from 'fs';
const ai = new GoogleGenAI({});

const interaction = await ai.interactions.create({
  model: 'gemini-omni-1.1-flash',
  input: [
    { type: 'image', data: firstFrameB64, mime_type: 'image/jpeg' },
    { type: 'image', data: lastFrameB64, mime_type: 'image/jpeg' },
    { type: 'text', text: 'A smooth cinematic transition from a lush green forest at sunrise to a snowy forest under a starry night sky.' }
  ]
});

if (interaction.output_video?.data) {
  fs.writeFileSync('interpolation.mp4', Buffer.from(interaction.output_video.data, 'base64'));
}
REST
curl -X POST "https://generativelanguage.googleapis.com/v1beta/interactions?key=$API_KEY" \
-H "Content-Type: application/json" \
-d '{
 "model": "gemini-omni-1.1-flash",
 "input": [
   {"type": "image", "data": "'"$FIRST_FRAME_B64"'", "mime_type": "image/jpeg"},
   {"type": "image", "data": "'"$LAST_FRAME_B64"'", "mime_type": "image/jpeg"},
   {"type": "text", "text": "A smooth cinematic transition from a lush green forest at sunrise to a snowy forest under a starry night sky."}
 ]
}'
Referência de assunto
Você pode gerar um vídeo incorporando assuntos específicos fornecidos como imagens de referência. Por exemplo, o código a seguir mostra como fornecer duas imagens de um gato e um novelo de lã para gerar um vídeo do gato brincando com a lã.
Python
import base64
from google import genai

client = genai.Client()

interaction = client.interactions.create(
    model="gemini-omni-1.1-flash",
    input=[
        {"type": "image", "data": cat_b64, "mime_type": "image/png"},
        {"type": "image", "data": yarn_b64, "mime_type": "image/png"},
        {"type": "text", "text": "A cat playfully batting at a ball of yarn."}
    ],
)
with open("cat.mp4", "wb") as f:
    f.write(base64.b64decode(interaction.output_video.data))
JavaScript
import { GoogleGenAI } from '@google/genai';
import * as fs from 'fs';
const ai = new GoogleGenAI({});

const interaction = await ai.interactions.create({
  model: 'gemini-omni-1.1-flash',
  input: [
    { type: 'image', data: catData, mime_type: 'image/png' },
    { type: 'image', data: yarnData, mime_type: 'image/png' },
    { type: 'text', text: 'A cat playfully batting at a ball of yarn.' }
  ]
});

if (interaction.output_video?.data) {
  fs.writeFileSync('cat.mp4', Buffer.from(interaction.output_video.data, 'base64'));
}
REST
curl -X POST "https://generativelanguage.googleapis.com/v1beta/interactions?key=$API_KEY" \
-H "Content-Type: application/json" \
-d '{
 "model": "gemini-omni-1.1-flash",
 "input": [
   {"type": "image", "data": "'"$CAT_B64"'", "mime_type": "image/png"},
   {"type": "image", "data": "'"$YARN_B64"'", "mime_type": "image/png"},
   {"type": "text", "text": "A cat playfully batting at a ball of yarn."}
 ]
}'
Parâmetro "Tasks"
Use o parâmetro task no video_config para especificar explicitamente o comportamento desejado. Por exemplo, se você quiser que o modelo gere um vídeo de uma imagem, defina o parâmetro como image_to_video. Se não for definido, o modelo vai inferir o que você quer com base no comando.
Estes são os valores permitidos:
text_to_videoimage_to_videoreference_to_videoeditextend
O exemplo a seguir mostra como definir isso para o exemplo de imagem para vídeo mostrado anteriormente.
Python
import base64
from google import genai

client = genai.Client()

interaction = client.interactions.create(
    model="gemini-omni-1.1-flash",
    input=[
        {"type": "image", "data": base64_image, "mime_type": "image/jpeg"},
        {"type": "text", "text": "turn this into realistic footage, using the drawing only as a guide for movement, do not show the drawing in the final video"}
    ],
    generation_config={
      "video_config": {
        "task": "image_to_video",
      }
    },
)
with open("example.mp4", "wb") as f:
    f.write(base64.b64decode(interaction.output_video.data))
JavaScript
import { GoogleGenAI } from "@google/genai";
import * as fs from 'fs';
const ai = new GoogleGenAI({});

const interaction = await ai.interactions.create({
  model: 'gemini-omni-1.1-flash',
  input: [
    { type: 'image', data: base64Image, mime_type: 'image/jpeg' },
    { type: 'text', text: 'turn this into realistic footage, using the drawing only as a guide for movement, do not show the drawing in the final video' }
  ],
  generationConfig: {
    videoConfig: {
      task: 'image_to_video',
    }
  }
});

if (interaction.output_video?.data) {
  fs.writeFileSync('example.mp4', Buffer.from(interaction.output_video.data, 'base64'));
}
REST
curl -X POST "https://generativelanguage.googleapis.com/v1beta/interactions" \
  -H "x-goog-api-key: $GEMINI_API_KEY" \
  -H "Content-Type: application/json" \
  -d '{
    "model": "gemini-omni-1.1-flash",
    "input": [
      {
        "type": "image",
        "data": "'"$BASE64_IMAGE"'",
        "mime_type": "image/jpeg"
      },
      {
        "type": "text",
        "text": "turn this into realistic footage, using the drawing only as a guide for movement, do not show the drawing in the final video"
      }
    ],
    "generation_config": {
      "video_config": {
        "task": "image_to_video"
      }
    }
  }'
Edição de vídeo com estado
Gerar e editar um vídeo de forma iterativa usando comandos de acompanhamento. Cada turno se baseia no resultado anterior. O modelo se lembra do contexto do vídeo e aplica suas mudanças preservando os elementos que você não mencionou. Use o
previous_interaction_id para acompanhar o histórico de conversas e o estado do
vídeo gerado sem fazer upload do vídeo anterior.
O exemplo a seguir demonstra como gerar um primeiro vídeo e depois editá-lo:
Python
import base64
from google import genai

client = genai.Client()

# Turn 1: Generate initial video
res1 = client.interactions.create(model="gemini-omni-1.1-flash", input="A woman playing violin outdoors.")

# Turn 2: Edit the previous video
res2 = client.interactions.create(
    model="gemini-omni-1.1-flash",
    previous_interaction_id=res1.id,
    input="Make the violin invisible."
)
with open("example.mp4", "wb") as f:
    f.write(base64.b64decode(res2.output_video.data))
JavaScript
import { GoogleGenAI } from '@google/genai';
import * as fs from 'fs';
const ai = new GoogleGenAI({});

// Turn 1: Generate initial video
const res1 = await ai.interactions.create({
  model: 'gemini-omni-1.1-flash',
  input: 'A woman playing violin outdoors.',
});

// Turn 2: Edit the previous video
const res2 = await ai.interactions.create({
  model: 'gemini-omni-1.1-flash',
  previous_interaction_id: res1.id,
  input: 'Make the violin invisible.',
});

if (res2.output_video?.data) {
  fs.writeFileSync('example.mp4', Buffer.from(res2.output_video.data, 'base64'));
}
REST
curl -X POST "https://generativelanguage.googleapis.com/v1beta/interactions?key=$API_KEY" \
-H "Content-Type: application/json" \
-d '{
 "model": "gemini-omni-1.1-flash",
 "previous_interaction_id": "'"$PREVIOUS_ID"'",
 "input": "Make the violin invisible."
}'
Exemplo de um vídeo inicial:
Exemplo de um vídeo editado:
Cada turno na conversa gera um novo vídeo. O modelo entende o contexto de turnos anteriores, permitindo que você faça mudanças incrementais, como ajustar a iluminação e trocar os planos de fundo, sem precisar descrever toda a cena novamente.
Editar seus próprios vídeos
Faça upload dos seus vídeos usando a API Files para editá-los com o Gemini Omni Flash.
O exemplo a seguir mostra como editar este vídeo original:
Python
import time
import base64
from google import genai

client = genai.Client()

# Upload video using the file API
video_file = client.files.upload(file="Video.mp4")

while video_file.state == "PROCESSING":
    print('Waiting for video to be processed.')
    time.sleep(10)
    video_file = client.files.get(name=video_file.name)

if video_file.state == "FAILED":
  raise ValueError(video_file.state)
print(f'Video processing complete: ' + video_file.uri)

# Edit your video
interaction = client.interactions.create(
    model="gemini-omni-1.1-flash",
    input=[
        {"type": "document", "uri": video_file.uri},
        {"type": "text", "text": "When the person touches the mirror, make the mirror ripple beautifully like liquid, and the person's arm turns into reflective mirror material"}
    ],
)
with open("example.mp4", "wb") as f:
    f.write(base64.b64decode(interaction.output_video.data))
JavaScript
import { GoogleGenAI } from '@google/genai';
import * as fs from 'fs';
const ai = new GoogleGenAI({});

// Upload video using the file API
let videoFile = await ai.files.upload({
  file: 'Video.mp4',
});

while (videoFile.state === 'PROCESSING') {
  console.log('Waiting for video to be processed.');
  await new Promise(r => setTimeout(r, 10000));
  videoFile = await ai.files.get({ name: videoFile.name });
}

if (videoFile.state === 'FAILED') {
  throw new Error(videoFile.state);
}
console.log('Video processing complete: ' + videoFile.uri);

// Edit your video
const interaction = await ai.interactions.create({
  model: 'gemini-omni-1.1-flash',
  input: [
    { type: 'document', uri: videoFile.uri },
    { type: 'text', text: "When the person touches the mirror, make the mirror ripple beautifully like liquid, and the person's arm turns into reflective mirror material" }
  ],
});

if (interaction.output_video?.data) {
  fs.writeFileSync('example.mp4', Buffer.from(interaction.output_video.data, 'base64'));
}
REST
#!/bin/bash
VIDEO_B64=$(encode_file "$VIDEO_FILE")

curl -sS -w "\n[HTTP %{http_code}]\n" "https://generativelanguage.googleapis.com/v1beta/interactions" \
  -H "x-goog-api-key: ${API_KEY}" \
  -H "Content-Type: application/json" \
  -d @- <<EOF > video_editing_response.json
{
  "model": "gemini-omni-1.1-flash",
  "input": [
    {
      "type": "user_input",
      "content": [
        {
          "type": "video",
          "mime_type": "video/mp4",
          "data": "$VIDEO_B64"
        },
        {
          "type": "text",
          "text": "When the person touches the mirror, make the mirror ripple beautifully like liquid, and the person's arm turns into reflective mirror material"
        }
      ]
    }
  ],
  "response_format": { "type": "video" }
}
EOF
Exemplo de um vídeo editado:
Como recuperar vídeos com um URI
Use o parâmetro delivery="uri" em
response_format para recuperar vídeos gerados com mais de 4 MB.
Isso retorna um URI hospedado pelo Google que você pode consultar até que o
vídeo esteja ACTIVE antes do download.
Python
import time
from google import genai

client = genai.Client()

# 1. Request video via URI delivery
interaction = client.interactions.create(
    model="gemini-omni-1.1-flash",
    input="A beautiful sunset.",
    response_format={"type": "video", "delivery": "uri"}
)

# 2. Extract file name and poll for ACTIVE state
video_output = interaction.output_video
file_name = video_output.uri.split("/")[-1] # Extract ID

print("Waiting for video processing...")
while True:
    f_info = client.files.get(name=f"files/{file_name}")
    if f_info.state.name == "ACTIVE":
        break
    elif f_info.state.name == "FAILED":
        raise RuntimeError("Generation failed.")
    time.sleep(5)

# 3. Download the final video
client.files.download(file=video_output.uri, destination="output.mp4")
JavaScript
import { GoogleGenAI } from '@google/genai';
const ai = new GoogleGenAI({});

// 1. Request video via URI delivery
const interaction = await ai.interactions.create({
  model: 'gemini-omni-1.1-flash',
  input: 'A beautiful sunset.',
  response_format: { type: 'video', delivery: 'uri' },
});

// 2. Extract file name and poll for ACTIVE state
const videoOutput = interaction.output_video;
const fileId = videoOutput.uri.match(/files\/([a-zA-Z0-9]+)/)[1];
const name = `files/${fileId}`;

console.log("Waiting for video processing...");
while (true) {
  const fInfo = await ai.files.get({ name });
  if (fInfo.state.name === 'ACTIVE') break;
  if (fInfo.state.name === 'FAILED') throw new Error("Generation failed.");
  await new Promise(r => setTimeout(r, 5000));
}

// 3. Download the final video
await ai.files.download({
  file: videoOutput,
  downloadPath: 'output.mp4',
});
console.log("💾 Saved video to output.mp4");
REST
#!/bin/bash

# 1. Initial request to generate the video
RESPONSE=$(curl -s -X POST "https://generativelanguage.googleapis.com/v1beta/interactions?key=$API_KEY" \
-H "Content-Type: application/json" \
-d '{
 "model": "gemini-omni-1.1-flash",
 "input": "A beautiful sunset over a calm ocean.",
 "response_format": {"type": "video", "delivery": "uri"}
}')

# Extract FILE_ID from the URI (e.g., "files/abc-123" -> "abc-123")
FILE_URI=$(echo $RESPONSE | jq -r '.output_video.uri')
FILE_ID=$(echo $FILE_URI | cut -d'/' -f2)

echo "Video requested (ID: $FILE_ID). Waiting for processing..."

# 2. Polling loop
while true; do
 # Get current file status
 STATUS_JSON=$(curl -s -X GET "https://generativelanguage.googleapis.com/v1beta/files/$FILE_ID?key=$API_KEY")
 STATE=$(echo $STATUS_JSON | jq -r '.state')

 if [ "$STATE" == "ACTIVE" ]; then
   echo "Processing complete! Downloading..."
   break
 elif [ "$STATE" == "FAILED" ]; then
   echo "Error: Generation failed."
   exit 1
 else
   echo "Current state: $STATE... (waiting 5s)"
   sleep 5
 fi
done

# 3. Final download
curl -L -X GET "https://generativelanguage.googleapis.com/v1beta/files/$FILE_ID:download?alt=media&key=$API_KEY" \
--output "output.mp4"

echo "Done! Video saved to output.mp4"
Estrutura JSON REST bruta (URI):
{
  "steps": [
    { "type": "user_input", "content": [{"type": "text", "text": "..."}] },
    { "type": "thought", "content": [{"text": "...", "type": "thought"}] },
    {
      "type": "model_output",
      "content": [
        {
          "type": "video",
          "mime_type": "video/mp4",
          "uri": "https://generativelanguage.googleapis.com/v1beta/files/...:download?alt=media"
        }
      ]
    }
  ],
  "id": "v1_...",
  "status": "completed",
  "model": "gemini-omni-1.1-flash",
  "object": "interaction"
}
Extensão de vídeo
Estenda um vídeo gerando uma continuação perfeita no final do clipe. Descreva como você quer que o vídeo continue no comando, por exemplo, "Extend this video" ou "Continue the scene: the camera pans across the mountains".
O modelo analisa o vídeo de entrada para gerar uma continuação de 3 a 10 segundos.
Você pode estender:
- Vídeos gerados pelo modelo (multiturno): estenda um vídeo gerado anteriormente referenciando o
previous_interaction_iddele. Vídeos enviados: forneça um arquivo de vídeo enviado (pela API Files) junto com o comando da extensão.
Python
import base64
from google import genai

client = genai.Client()

# Upload your video using the Files API
video_file = client.files.upload(file="my_video.mp4")

# Extend the video using prompt-based extension
interaction = client.interactions.create(
    model="gemini-omni-1.1-flash",
    input=[
        {"type": "document", "uri": video_file.uri},
        {"type": "text", "text": "Continue the scene."}
    ],
)
with open("extended.mp4", "wb") as f:
    f.write(base64.b64decode(interaction.output_video.data))
JavaScript
import { GoogleGenAI } from '@google/genai';
import * as fs from 'fs';
const ai = new GoogleGenAI({});

// Upload your video using the Files API
let videoFile = await ai.files.upload({
  file: 'my_video.mp4',
});

while (videoFile.state === 'PROCESSING') {
  await new Promise(r => setTimeout(r, 10000));
  videoFile = await ai.files.get({ name: videoFile.name });
}

// Extend the video using prompt-based extension
const interaction = await ai.interactions.create({
  model: 'gemini-omni-1.1-flash',
  input: [
    { type: 'document', uri: videoFile.uri },
    { type: 'text', text: 'Continue the scene.' }
  ],
});

if (interaction.output_video?.data) {
  fs.writeFileSync('extended.mp4', Buffer.from(interaction.output_video.data, 'base64'));
}
REST
curl -X POST "https://generativelanguage.googleapis.com/v1beta/interactions?key=$API_KEY"     -H "Content-Type: application/json"     -d '{
 "model": "gemini-omni-1.1-flash",
 "input": [
   {"type": "document", "uri": "'"$VIDEO_URI"'"},
   {"type": "text", "text": "Continue the scene."}
 ]
}'
Extensão com mídia de referência
Você pode fornecer imagens de referência na matriz input junto com o comando para apresentar novos personagens ou elementos no vídeo estendido:
Python
import base64
from google import genai

client = genai.Client()

# Upload base video and reference image using the Files API
video_file = client.files.upload(file="my_video.mp4")
character_img = client.files.upload(file="character.png")

# Extend the video while introducing the reference character
interaction = client.interactions.create(
    model="gemini-omni-1.1-flash",
    input=[
        {"type": "document", "uri": video_file.uri},
        {"type": "document", "uri": character_img.uri},
        {"type": "text", "text": "Extend this video: have the character shown in <IMAGE_REF_0> enter the scene and wave."}
    ],
)
with open("extended_with_character.mp4", "wb") as f:
    f.write(base64.b64decode(interaction.output_video.data))
JavaScript
import { GoogleGenAI } from '@google/genai';
import * as fs from 'fs';
const ai = new GoogleGenAI({});

// Upload base video and reference image using the Files API
let videoFile = await ai.files.upload({ file: 'my_video.mp4' });
let characterImg = await ai.files.upload({ file: 'character.png' });

while (videoFile.state === 'PROCESSING' || characterImg.state === 'PROCESSING') {
  await new Promise(r => setTimeout(r, 10000));
  videoFile = await ai.files.get({ name: videoFile.name });
  characterImg = await ai.files.get({ name: characterImg.name });
}

// Extend the video while introducing the reference character
const interaction = await ai.interactions.create({
  model: 'gemini-omni-1.1-flash',
  input: [
    { type: 'document', uri: videoFile.uri },
    { type: 'document', uri: characterImg.uri },
    { type: 'text', text: 'Extend this video: have the character shown in <IMAGE_REF_0> enter the scene and wave.' }
  ],
});

if (interaction.output_video?.data) {
  fs.writeFileSync('extended_with_character.mp4', Buffer.from(interaction.output_video.data, 'base64'));
}
REST
curl -X POST "https://generativelanguage.googleapis.com/v1beta/interactions?key=$API_KEY"     -H "Content-Type: application/json"     -d '{
 "model": "gemini-omni-1.1-flash",
 "input": [
   {"type": "document", "uri": "'$VIDEO_URI'"},
   {"type": "document", "uri": "'$CHARACTER_IMG_URI'"},
   {"type": "text", "text": "Extend this video: have the character shown in <IMAGE_REF_0> enter the scene and wave."}
 ]
}'
Restrições e diretrizes de extensão
Lembre-se das seguintes regras e restrições ao estender vídeos:
- Diálogo falado em vídeos enviados: no momento, não é possível estender um vídeo enviado em que alguém está falando para adicionar mais diálogo. Isso é possível se o personagem permanecer em silêncio ou se o comando não adicionar diálogo.
- Extensão de voz multiturno: é possível gerar diálogos ou falas ao estender vídeos gerados anteriormente em multiturno (
previous_interaction_id). - Somente no final do clipe: a extensão é limitada à adição ao final do vídeo. Não é possível adicionar conteúdo no início nem estender o meio de um clipe.
- Limite de duração: os vídeos de entrada para extensão precisam ter 10 segundos ou menos ao fazer upload (a menos que você esteja usando multiturno).
- Disponibilidade regional: no momento, não é possível estender vídeos enviados para usuários no Espaço Econômico Europeu (EEE), na Suíça e no Reino Unido. No entanto, é possível estender vídeos gerados pelo modelo em todas as regiões disponíveis.
Práticas recomendadas
- Use a entrega de URI para vídeos grandes:para vídeos maiores que 4 MB (>720p quando disponível), use
delivery="uri"emresponse_formatpara evitar limites de tamanho de payload. - Performance otimizada:defina
background=false,store=falseestream=falsepara uma geração unária síncrona mais rápida. Observação: definirstore=falsesignifica que o vídeo gerado não poderá ser editado em comandos subsequentes usando oprevious_interaction_id. - Precisão do comando:consulte a seção orientações sobre comandos para mais detalhes.
Limitações
- Fazer upload e editar imagens com menores de idade é indisponível no Espaço Econômico Europeu, na Suíça e no Reino Unido.
- Não é possível fazer upload e editar imagens que contenham pessoas reconhecíveis.
- No momento, a edição ou extensão de vídeos enviados não está disponível para usuários no Espaço Econômico Europeu (EEE), na Suíça e no Reino Unido. No entanto, é possível editar ou estender vídeos gerados pelo modelo.
- Os vídeos de entrada para edição e extensão precisam ter no máximo 10 segundos ao fazer upload (a menos que sejam extensões de vídeos gerados pelo modelo em multiturno).
- A extensão de vídeo é limitada à anexação ao final de um vídeo. Não é possível adicionar ou estender o meio de um clipe.
- Não é possível estender um vídeo enviado em que alguém está falando para adicionar mais diálogos. Os personagens podem ficar em silêncio ou usar a extensão multiturno com
previous_interaction_id. - A edição de voz não é compatível.
- O upload de referências de áudio não é compatível com a versão atual da API.
- As referências de vídeo funcionam melhor com semelhanças. O áudio em uma referência de vídeo é ignorado. As referências de vídeo aceitam no máximo três clipes de até três segundos cada.
- Não é possível fazer referência ou raciocinar em vários vídeos. Tentar usar vários vídeos pode resultar em desempenho degradado do modelo ou saídas inesperadas.
- O throughput provisionado não é aceito.
- Instruções do sistema, temperatura,
top_p, sequências de parada e comandos negativos não são aceitos. Você pode colocar seus comandos negativos no comando normal, por exemplo, "Não faça X". - Não é possível usar vídeos do YouTube como fonte de mídia.
Detalhes técnicos
- Todos os vídeos gerados incluem marca-d'água do SynthID, que é invisível para os espectadores, mas pode ser detectada programaticamente para verificação de procedência.
- Os tempos de geração de vídeo variam de acordo com a duração, a resolução e a carga atual da API. Vídeos mais longos e com resolução mais alta levam mais tempo para serem gerados.
- O Omni aplica filtros de segurança de conteúdo aos comandos de entrada e ao vídeo gerado, que variam de acordo com a região. Comandos que violam as políticas de uso são bloqueados.
- O inglês (EN) tem suporte total, mas outros idiomas não foram avaliados. Portanto, eles podem funcionar, mas os resultados podem variar.
Guia de comandos do Gemini Omni Flash
Esta seção contém dicas e exemplos de como usar o Gemini Omni Flash de maneira eficaz.
Cena única
Por padrão, o Omni Flash tenta criar um vídeo com algumas cenas diferentes. Ele vai tentar criar uma narrativa interessante com base no comando.
Se você quiser que o vídeo de saída tenha uma única cena, faça o seguinte comando:
- Em uma única cena ininterrupta
- Em um único plano-sequência
- Sem cortes de cena
Exemplo:
Continuous, unbroken handheld shot of a fluffy tabby cat sitting on a sunny windowsill, looking out into a leafy garden. The cat's tail twitches slowly, and its ears rotate slightly toward ambient noises. Sunbeams illuminate dust motes in the air. Sound design: Gentle breeze, distant bird chirps. No dialogue.
Remover elementos indesejados
Se o vídeo gerado tiver algo que você não quer, inclua comandos negativos simples para evitar isso:
- Sem diálogo
- Sem enfeites
- Sem efeitos sonoros extras
Comandos para edição
Comandos simples funcionam melhor para edição de vídeo. Comandos excessivamente descritivos podem levar a mudanças indesejadas.
Confira mais exemplos de comandos simples de edição:
- Transforme este vídeo em anime
- Coloque um chapéu elegante nessa pessoa
- Mude a iluminação para ser mais dramática
- Mude o texto na placa para "Omni Flash"
Ao editar um aspecto específico do vídeo, inclua "Keep everything else the same" para manter a consistência visual.
Confira alguns exemplos de como aplicar essa técnica:
- Evite:
In the video of the man sitting on the sofa, please add a small black cat that runs from the right side of the screen, jumps onto his lap, and then he starts to stroke its head while looking down.- Simplificação:
Add a cat that jumps onto his lap, he begins to pet it.
Keep everything else the same.
- Simplificação:
- Evite:
Please remove the cell phone that the person is holding in their hand and fill in the background so it looks like they are just holding their hand empty.- Simplificação:
Make the phone invisible. Keep everything else the
same.
- Simplificação:
Comando de áudio
Por padrão, o modelo tenta gerar uma faixa de áudio adequada para um vídeo. Isso nem sempre é o que você quer. Use o comando para descrever o tipo de áudio que você quer. Isso é especialmente importante se você quiser música no seu vídeo:
- Incluir uma música de fundo calma
- O vídeo tem uma batida techno de alta energia
- O áudio é uma transmissão de rádio baixa e estridente em segundo plano, tocando uma música
Marcação de tempo de eventos
Você pode pedir que as coisas aconteçam em momentos específicos do vídeo. Não é necessário usar uma sintaxe precisa, e você pode usar linguagem natural. Isso é especialmente útil para criar cortes de cena, ritmo ou sequências rápidas. Confira exemplos:
- Depois de três segundos, uma mulher entra em cena.
- Aos 5 segundos, o refrão começa no áudio em segundo plano.
- Corte para um novo frame a cada 2 segundos.
- Em uma sequência rápida, a cada meio segundo (12 frames a 24 fps), mude a cena para um novo local.
Você também pode usar uma sintaxe de timecode:
[0-3s] A person is walking
[3-6s] They stop and turn around
[6-10s] They start running
Metacomandos
Você pode pedir ao Gemini Omni Flash para prestar atenção às qualidades ou princípios gerais da geração de vídeo:
- Considere microdetalhes, expressão e tempo para criar uma cena muito rica, detalhada, mas totalmente natural.
- Seja extremamente detalhado nas descrições de personagens e ambientes. Aplicar princípios de design de figurino aos personagens. Seja muito específico sobre as pessoas, os itens e os objetos na cena.
- Inclua muitos detalhes adequados nos elementos de plano de fundo para que a cena pareça realista e natural.
- Faça um vídeo rápido que mostre um
[thing]raro diferente a cada segundo, com música alegre e texto para rotular o item.
Texto em vídeos
Você pode pedir para incluir texto no vídeo, e o Gemini Omni vai renderizar de uma maneira correta e legível. Se houver texto no vídeo, mesmo em elementos de plano de fundo, defina o que ele deve dizer.
- Uma palavra por vez na tela: "você, sabia, que, o, Omni, pode, criar, textos, incríveis?" Cada palavra aparece por um segundo com um estilo animado diferente. Sem diálogo.
- Há uma placa de rua que diz: "Esta é uma geração de IA do Omni", uma vitrine que diz: "Tudo o que você precisa de IA" e um carro com a placa "OMNI1.1".
Comandos para estender um vídeo
Com o Gemini Omni 1.1 Flash, você pode estender vídeos com comandos como "Extend this video" ou "The scene continues". Você pode estender os vídeos em 10 segundos, até uma duração total de 40 segundos.
O Omni cria uma extensão que mantém a coerência de vídeo, movimento, personagens e áudio usando os últimos 10 segundos do vídeo original como contexto. Alguns dos frames finais do vídeo de entrada serão editados para tornar a transição perfeita.
Ao estender, todas as dicas de solicitação do Omni deste guia ainda se aplicam:
- Descreva o áudio na cena estendida, principalmente se você precisar que ele mude:
"The music continues into the chorus" - Descreva se a cena continua ou se há um corte para uma nova cena (talvez com os mesmos personagens):
"Show the same characters in the next scene" - Inclua imagens e vídeos como referências ao estender para manter a precisão das respostas ou apresentar novos personagens:
"The person shown in the reference image enters the scene","The dog in the reference video <VIDEO_REF_0> jumps onto the sofa" - Se você usar carimbos de data/hora ou uma sintaxe de timecode, "0s" se refere ao início da parte estendida do vídeo. Se você estiver estendendo um vídeo de 10 segundos, o corte de cena nesse comando vai acontecer após 12 segundos:
"After 2s cut to a new scene with the same characters"
Usar tags em comandos para definir funções de imagem e vídeo
É possível usar tags para vincular a mídia enviada a funções de geração específicas. Assim, você pode especificar se cada imagem ou vídeo é um frame inicial, um frame final ou uma referência.
1. Tags simples (recomendadas)
Para casos simples em que as funções de mídia estão claras no comando, é possível vincular imagens e vídeos diretamente às funções:
<FIRST_FRAME>: use a imagem como o frame inicial do vídeo. Por exemplo:<FIRST_FRAME> a woman is walking<LAST_FRAME>: use a imagem como o frame final do vídeo para fazer a transição. Precisa ser usado com<FIRST_FRAME>. Por exemplo:<FIRST_FRAME> <LAST_FRAME> a woman is walking<IMAGE_REF_N>: use a imagem como referência, por exemplo:in the style of <IMAGE_REF_0> a woman <IMAGE_REF_1> is walking(combina a referência de estilo da primeira imagem e a referência de assunto da segunda imagem). As referências de imagem começam em 0.<VIDEO_REF_N>: use o vídeo como referência de personagem ou objeto, por exemplo:the person in <VIDEO_REF_0> is playing the violin. As referências de vídeo também começam em 0.
Confira um exemplo com seis imagens de referência:
[0-3s] A studio fashion sequence. Starting with woman <IMAGE_REF_0>, she is holding <IMAGE_REF_1>
[3-6s] Then we see the man <IMAGE_REF_2> holding <IMAGE_REF_3>
[6-10s] And finally another woman <IMAGE_REF_4> who is holding <IMAGE_REF_5> while walking.
2. Como declarar fontes e referências
Para casos mais complexos com várias entradas de mídia e várias funções, use tags de prefixo explícitas combinadas com instruções em linguagem natural. Declare essas fontes e referências no início do comando.
- O
[# Sources <FIRST_FRAME>@Image1]vai usar a primeira imagem como o frame inicial. - O
[# Sources <FIRST_FRAME>@Image1 <LAST_FRAME>@Image2]vai usar a primeira imagem como o frame inicial e a segunda como o frame final. - O
[# Sources <FIRST_FRAME>@Image1 <LAST_FRAME>@Image1]vai usar a primeira imagem como o primeiro e o último frame, criando um vídeo em loop. - O
[# Sources <FIRST_FRAME>@Image1] [# References <IMAGE_REF_0>@Image2]vai usar a primeira imagem como o frame inicial e a segunda como referência. - O
[# Sources <VIDEO_0>@Video1]vai usar o vídeo como fonte principal para edição ou modificação. - O
[# Sources <PREVIOUS_VIDEO>@Video1]vai usar o vídeo da vez anterior para estender. - O
[# References <IMAGE_REF_0>@Image1]vai usar a primeira imagem como referência. - O
[# References <IMAGE_REF_1>@Image2]vai usar a segunda imagem como referência. - O
[# References <IMAGE_REF_0>@Image1 <IMAGE_REF_1>@Image2]vai usar as duas imagens como referências. - O
[# References <VIDEO_REF_0>@Video1]vai usar o primeiro vídeo como referência. - O
[# References <IMAGE_REF_0>@Image1 <VIDEO_REF_0>@Video1]vai usar uma imagem e um vídeo como referência.
Adicione instruções no final do comando:
- Para um frame inicial:
"Use this image as the starting frame." - Para um vídeo em loop usando frames de início e fim:
"Use this image as the first frame and the last frame." - Para imagens de referência:
"Use the given image(s) as references for video generation. The images should not be used as literal initial frames." - Para vídeos de referência:
"Use the given video(s) as references. Do not use them as a source for video editing."
Alguns exemplos de comandos com declarações de fonte e referência:
Frame inicial combinado com uma imagem de referência:
[# Sources <FIRST_FRAME>@Image1] [# References <IMAGE_REF_0>@Image2] a woman <IMAGE_REF_0> is walking. Use Image1 as the starting frame. Use Image2 as a reference for the video generation.
Vídeo de referência de personagem combinado com uma imagem de referência de objeto:
[# References <IMAGE_REF_0>@Image1 <VIDEO_REF_0>@Video1] The woman in <VIDEO_REF_0> is playing the violin shown in <IMAGE_REF_0>. Use Video1 as a character reference and Image1 as an object reference.
A seguir
- Comece a usar o Gemini Omni Flash testando o Omni Quickstart Colab.
- Aprenda a escrever comandos ainda melhores com nossa Introdução ao design de comandos.