

Gemini Omni Flash (gemini-omni-1.1-flash) 是高效能多模態模型,專為高速影片生成、編輯和電影級控制而設計。Gemini Omni 具備下列核心功能,與先前的影片模型有所不同:
- 原生多模態:可同時處理文字、圖像、音訊和影片,生成更連貫、一致且可控的輸出內容。
- 對話式修圖:透過 Interactions API 啟用,可讓你透過自然語言對話,反覆調整及編輯影片。描述想變更的內容,模型就會套用編輯效果,同時保留影片中你想要的部分。
- 世界知識:Gemini Omni 結合了物理學知識與 Gemini 的歷史、科學和文化背景知識,彌合了寫實主義與有意義的敘事之間的差距。
文字轉影片生成
根據文字提示詞生成影片。模型會根據文字說明生成影片和音訊。撰寫提示時,請加入場景描述、運鏡、燈光和情境等詳細資訊,以獲得最佳效果。
Python
import base64
from google import genai

client = genai.Client()

interaction = client.interactions.create(
    model="gemini-omni-1.1-flash",
    input="A marble rolling fast on a chain reaction style track, continuous smooth shot."
)
with open("marble.mp4", "wb") as f:
    f.write(base64.b64decode(interaction.output_video.data))
JavaScript
import { GoogleGenAI } from '@google/genai';
import * as fs from 'fs';
const ai = new GoogleGenAI({});

const interaction = await ai.interactions.create({
  model: 'gemini-omni-1.1-flash',
  input: 'A marble rolling fast on a chain reaction style track, continuous smooth shot.',
});

if (interaction.output_video?.data) {
  fs.writeFileSync('marble.mp4', Buffer.from(interaction.output_video.data, 'base64'));
}
Java
import com.google.genai.Client;
import com.google.genai.gaos.models.interactions.CreateModelInteraction;
import com.google.genai.gaos.models.interactions.Interaction;
import com.google.genai.gaos.models.interactions.InteractionsInput;
import com.google.genai.gaos.models.interactions.Model;
import com.google.genai.gaos.models.operations.CreateInteractionRequestBody;
import java.nio.file.Files;
import java.nio.file.Paths;
import java.util.Base64;

Client client = new Client();

CreateModelInteraction params =
    CreateModelInteraction.builder()
        .model(Model.of("gemini-omni-1.1-flash"))
        .input(
            InteractionsInput.of(
                "A marble rolling fast on a chain reaction style track, continuous smooth shot."))
        .build();

Interaction interaction =
    client.interactions.create(CreateInteractionRequestBody.of(params)).interaction().get();

if (interaction.outputVideo().isPresent() && interaction.outputVideo().get().data().isPresent()) {
  byte[] videoBytes = Base64.getDecoder().decode(interaction.outputVideo().get().data().get());
  Files.write(Paths.get("marble.mp4"), videoBytes);
}
Go
package main

import (
    "context"
    "encoding/base64"
    "log"
    "os"

    "google.golang.org/genai"
    "google.golang.org/genai/interactions/models/interactions"
    "google.golang.org/genai/interactions/models/operations"
)

func main() {
    ctx := context.Background()
    client, err := genai.NewClient(ctx, nil)
    if err != nil {
        log.Fatal(err)
    }

    res, err := client.Interactions.Create(ctx, operations.CreateInteractionRequest{
        Body: operations.NewCreateInteractionRequestBody(interactions.CreateModelInteraction{
            Model: interactions.Model("gemini-omni-1.1-flash"),
            Input: interactions.NewInteractionsInput(
                "A marble rolling fast on a chain reaction style track, continuous smooth shot.",
            ),
        }),
    })
    if err != nil {
        log.Fatal(err)
    }

    if res.Interaction.OutputVideo != nil && res.Interaction.OutputVideo.Data != nil {
        videoBytes, err := base64.StdEncoding.DecodeString(*res.Interaction.OutputVideo.Data)
        if err != nil {
            log.Fatal(err)
        }
        if err := os.WriteFile("marble.mp4", videoBytes, 0644); err != nil {
            log.Fatal(err)
        }
    }
}
REST
curl -X POST "https://generativelanguage.googleapis.com/v1beta/interactions?key=$API_KEY" \
-H "Content-Type: application/json" \
-d '{
 "model": "gemini-omni-1.1-flash",
 "input": "A marble rolling fast on a chain reaction style track, continuous smooth shot."
}'
REST 回覆結構定義
便利性欄位 interaction.output_video 僅適用於 SDK。
直接使用 REST API 時,請從 steps 陣列取得影片輸出內容。
原始 REST JSON 結構:
{
  "steps": [
    { "type": "user_input", "content": [{"type": "text", "text": "..."}] },
    { "type": "thought", "content": [{"text": "...", "type": "thought"}] },
    {
      "type": "model_output",
      "content": [
        {
          "type": "video",
          "mime_type": "video/mp4",
          "data": "AAAAIGZ0eXBpc29t..." // Base64 encoded video data
        }
      ]
    }
  ],
  "id": "v1_...",
  "status": "completed",
  "model": "gemini-omni-1.1-flash",
  "object": "interaction"
}
控制顯示比例
將 aspect_ratio 設為 "9:16",即可製作直向影片。預設為橫向 (16:9)。
Python
import base64
from google import genai

client = genai.Client()

interaction = client.interactions.create(
    model="gemini-omni-1.1-flash",
    input="A futuristic city with neon lights and flying cars, cyberpunk style",
    response_format={
        "type": "video",  # optional
        "aspect_ratio": "9:16"  # Supported values: "9:16", "16:9"
    }
)
with open("example.mp4", "wb") as f:
    f.write(base64.b64decode(interaction.output_video.data))
JavaScript
import { GoogleGenAI } from '@google/genai';
import * as fs from 'fs';
const ai = new GoogleGenAI({});

const interaction = await ai.interactions.create({
  model: 'gemini-omni-1.1-flash',
  input: 'A futuristic city with neon lights and flying cars, cyberpunk style',
  response_format: {
    type: 'video', // optional
    aspect_ratio: '9:16' // Supported values: '9:16', '16:9'
  },
});

if (interaction.output_video?.data) {
  fs.writeFileSync('example.mp4', Buffer.from(interaction.output_video.data, 'base64'));
}
Java
import com.google.genai.Client;
import com.google.genai.gaos.models.interactions.CreateModelInteraction;
import com.google.genai.gaos.models.interactions.CreateModelInteractionResponseFormat;
import com.google.genai.gaos.models.interactions.Interaction;
import com.google.genai.gaos.models.interactions.InteractionsInput;
import com.google.genai.gaos.models.interactions.Model;
import com.google.genai.gaos.models.interactions.ResponseFormat;
import com.google.genai.gaos.models.interactions.VideoResponseFormat;
import com.google.genai.gaos.models.interactions.VideoResponseFormatAspectRatio;
import com.google.genai.gaos.models.operations.CreateInteractionRequestBody;
import java.nio.file.Files;
import java.nio.file.Paths;
import java.util.Base64;

Client client = new Client();

VideoResponseFormat videoFormat =
    VideoResponseFormat.builder()
        .aspectRatio(VideoResponseFormatAspectRatio.of("9:16"))
        .build();

CreateModelInteraction params =
    CreateModelInteraction.builder()
        .model(Model.of("gemini-omni-1.1-flash"))
        .input(
            InteractionsInput.of(
                "A futuristic city with neon lights and flying cars, cyberpunk style"))
        .responseFormat(CreateModelInteractionResponseFormat.of(ResponseFormat.of(videoFormat)))
        .build();

Interaction interaction =
    client.interactions.create(CreateInteractionRequestBody.of(params)).interaction().get();

if (interaction.outputVideo().isPresent() && interaction.outputVideo().get().data().isPresent()) {
  byte[] videoBytes = Base64.getDecoder().decode(interaction.outputVideo().get().data().get());
  Files.write(Paths.get("example.mp4"), videoBytes);
}
Go
package main

import (
    "context"
    "encoding/base64"
    "log"
    "os"

    "google.golang.org/genai"
    "google.golang.org/genai/interactions/models/interactions"
    "google.golang.org/genai/interactions/models/operations"
)

func main() {
    ctx := context.Background()
    client, err := genai.NewClient(ctx, nil)
    if err != nil {
        log.Fatal(err)
    }

    videoFormat := interactions.VideoResponseFormat{
        AspectRatio: interactions.VideoResponseFormatAspectRatioNineHundredAndSixteen.ToPointer(),
    }

    res, err := client.Interactions.Create(ctx, operations.CreateInteractionRequest{
        Body: operations.NewCreateInteractionRequestBody(interactions.CreateModelInteraction{
            Model: interactions.Model("gemini-omni-1.1-flash"),
            Input: interactions.NewInteractionsInput(
                "A futuristic city with neon lights and flying cars, cyberpunk style",
            ),
            ResponseFormat: genai.Ptr(interactions.NewCreateModelInteractionResponseFormat(
                interactions.NewResponseFormat(videoFormat),
            )),
        }),
    })
    if err != nil {
        log.Fatal(err)
    }

    if res.Interaction.OutputVideo != nil && res.Interaction.OutputVideo.Data != nil {
        videoBytes, err := base64.StdEncoding.DecodeString(*res.Interaction.OutputVideo.Data)
        if err != nil {
            log.Fatal(err)
        }
        if err := os.WriteFile("example.mp4", videoBytes, 0644); err != nil {
            log.Fatal(err)
        }
    }
}
REST
curl -X POST "https://generativelanguage.googleapis.com/v1beta/interactions?key=$API_KEY" \
-H "Content-Type: application/json" \
-d '{
 "model": "gemini-omni-1.1-flash",
 "input": "A futuristic city with neon lights and flying cars, cyberpunk style",
 "response_format": {
   "type": "video",
   "aspect_ratio": "9:16"
 }
}'
輸出解析度
使用 response_format 中的 resolution
參數,控制生成影片的輸出解析度。預設解析度為 720p。
| 值 | 說明 |
|---|---|
360p |
360p 輸出解析度 |
720p |
720p 輸出解析度 (預設) |
1080p |
1080p 輸出 (畫質提升) |
4k |
4K 輸出 (畫質提升) |
Python
import base64
from google import genai

client = genai.Client()

interaction = client.interactions.create(
    model="gemini-omni-1.1-flash",
    input="A drone shot of a mountain landscape at sunrise.",
    response_format={
        "type": "video",
        "resolution": "1080p",
    },
)
with open("hires.mp4", "wb") as f:
    f.write(base64.b64decode(interaction.output_video.data))
JavaScript
import { GoogleGenAI } from '@google/genai';
import * as fs from 'fs';
const ai = new GoogleGenAI({});

const interaction = await ai.interactions.create({
  model: 'gemini-omni-1.1-flash',
  input: 'A drone shot of a mountain landscape at sunrise.',
  response_format: {
    type: 'video',
    resolution: '1080p',
  },
});

if (interaction.output_video?.data) {
  fs.writeFileSync('hires.mp4', Buffer.from(interaction.output_video.data, 'base64'));
}
Java
import com.google.genai.Client;
import com.google.genai.gaos.models.interactions.CreateModelInteraction;
import com.google.genai.gaos.models.interactions.CreateModelInteractionResponseFormat;
import com.google.genai.gaos.models.interactions.Interaction;
import com.google.genai.gaos.models.interactions.InteractionsInput;
import com.google.genai.gaos.models.interactions.Model;
import com.google.genai.gaos.models.interactions.Resolution;
import com.google.genai.gaos.models.interactions.ResponseFormat;
import com.google.genai.gaos.models.interactions.VideoResponseFormat;
import com.google.genai.gaos.models.operations.CreateInteractionRequestBody;
import java.nio.file.Files;
import java.nio.file.Paths;
import java.util.Base64;

Client client = new Client();

VideoResponseFormat videoFormat =
    VideoResponseFormat.builder()
        .resolution(Resolution.of("1080p"))
        .build();

CreateModelInteraction params =
    CreateModelInteraction.builder()
        .model(Model.of("gemini-omni-1.1-flash"))
        .input(InteractionsInput.of("A drone shot of a mountain landscape at sunrise."))
        .responseFormat(CreateModelInteractionResponseFormat.of(ResponseFormat.of(videoFormat)))
        .build();

Interaction interaction =
    client.interactions.create(CreateInteractionRequestBody.of(params)).interaction().get();

if (interaction.outputVideo().isPresent() && interaction.outputVideo().get().data().isPresent()) {
  byte[] videoBytes = Base64.getDecoder().decode(interaction.outputVideo().get().data().get());
  Files.write(Paths.get("hires.mp4"), videoBytes);
}
Go
package main

import (
    "context"
    "encoding/base64"
    "log"
    "os"

    "google.golang.org/genai"
    "google.golang.org/genai/interactions/models/interactions"
    "google.golang.org/genai/interactions/models/operations"
)

func main() {
    ctx := context.Background()
    client, err := genai.NewClient(ctx, nil)
    if err != nil {
        log.Fatal(err)
    }

    videoFormat := interactions.VideoResponseFormat{
        Resolution: interactions.ResolutionOneThousandAndEightyp.ToPointer(),
    }

    res, err := client.Interactions.Create(ctx, operations.CreateInteractionRequest{
        Body: operations.NewCreateInteractionRequestBody(interactions.CreateModelInteraction{
            Model: interactions.Model("gemini-omni-1.1-flash"),
            Input: interactions.NewInteractionsInput("A drone shot of a mountain landscape at sunrise."),
            ResponseFormat: genai.Ptr(interactions.NewCreateModelInteractionResponseFormat(
                interactions.NewResponseFormat(videoFormat),
            )),
        }),
    })
    if err != nil {
        log.Fatal(err)
    }

    if res.Interaction.OutputVideo != nil && res.Interaction.OutputVideo.Data != nil {
        videoBytes, err := base64.StdEncoding.DecodeString(*res.Interaction.OutputVideo.Data)
        if err != nil {
            log.Fatal(err)
        }
        if err := os.WriteFile("hires.mp4", videoBytes, 0644); err != nil {
            log.Fatal(err)
        }
    }
}
REST
curl -X POST "https://generativelanguage.googleapis.com/v1beta/interactions?key=$API_KEY" \
-H "Content-Type: application/json" \
-d '{
 "model": "gemini-omni-1.1-flash",
 "input": "A drone shot of a mountain landscape at sunrise.",
 "response_format": {
   "type": "video",
   "resolution": "1080p"
 }
}'
以圖片生成影片
你可以提供參考圖像和文字提示詞。模型會根據提示決定如何使用圖片。這項功能可讓產品照片、插圖或相片更加生動。
以下範例說明如何使用魚躍出水面的手繪參考圖像:
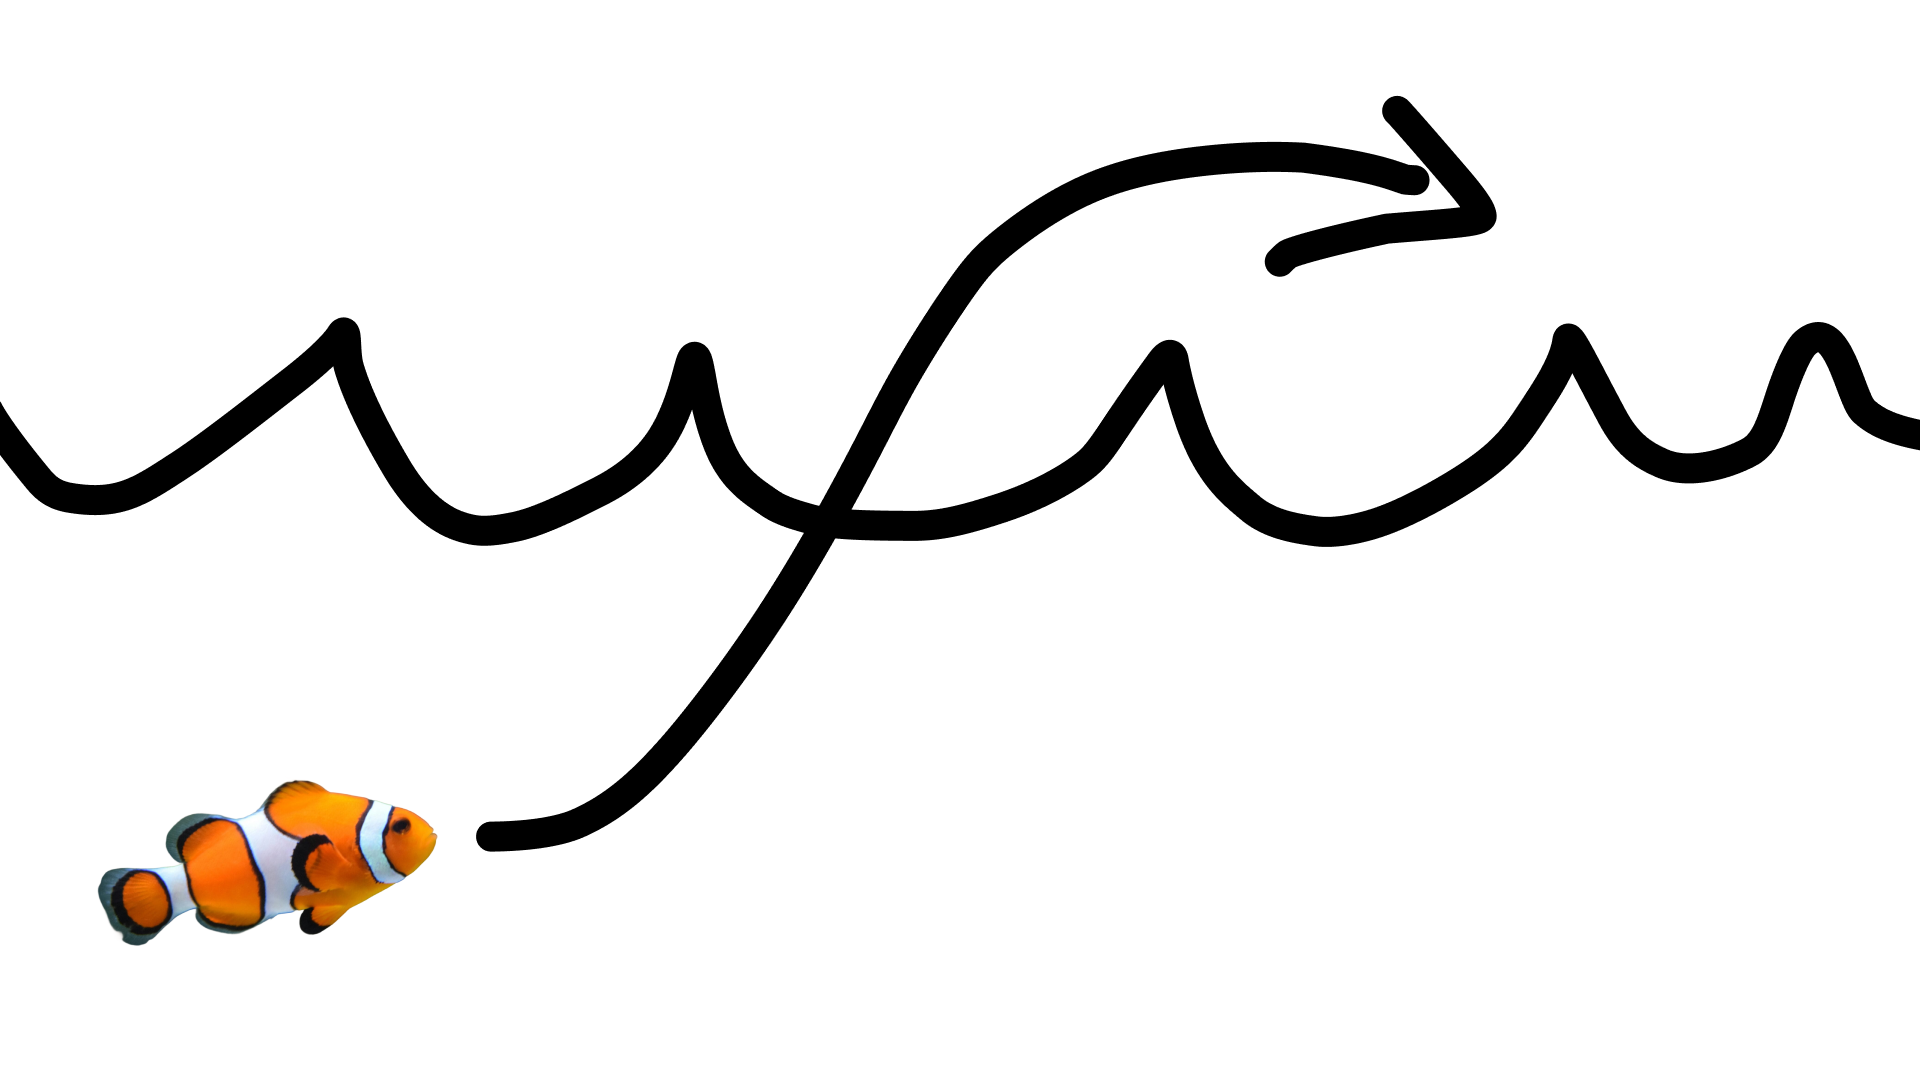
輸入下列提示詞:
turn this into realistic footage, using the drawing only as a guide for movement, do not show the drawing in the final video
生成寫實的繪圖影片。
Python
import base64
from google import genai

client = genai.Client()

interaction = client.interactions.create(
    model="gemini-omni-1.1-flash",
    input=[
        {"type": "image", "data": base64_image, "mime_type": "image/jpeg"},
        {"type": "text", "text": "turn this into realistic footage, using the drawing only as a guide for movement, do not show the drawing in the final video"}
    ],
)
with open("clownfish.mp4", "wb") as f:
    f.write(base64.b64decode(interaction.output_video.data))
JavaScript
import { GoogleGenAI } from '@google/genai';
import * as fs from 'fs';
const ai = new GoogleGenAI({});

const interaction = await ai.interactions.create({
  model: 'gemini-omni-1.1-flash',
  input: [
    { type: 'image', data: base64Image, mime_type: 'image/jpeg' },
    { type: 'text', text: 'turn this into realistic footage, using the drawing only as a guide for movement, do not show the drawing in the final video' }
  ]
});

if (interaction.output_video?.data) {
  fs.writeFileSync('clownfish.mp4', Buffer.from(interaction.output_video.data, 'base64'));
}
Java
import com.google.genai.Client;
import com.google.genai.gaos.models.interactions.Content;
import com.google.genai.gaos.models.interactions.CreateModelInteraction;
import com.google.genai.gaos.models.interactions.ImageContent;
import com.google.genai.gaos.models.interactions.ImageContentMimeType;
import com.google.genai.gaos.models.interactions.Interaction;
import com.google.genai.gaos.models.interactions.InteractionsInput;
import com.google.genai.gaos.models.interactions.Model;
import com.google.genai.gaos.models.interactions.TextContent;
import com.google.genai.gaos.models.operations.CreateInteractionRequestBody;
import java.nio.file.Files;
import java.nio.file.Paths;
import java.util.Arrays;
import java.util.Base64;
import java.util.List;

Client client = new Client();

byte[] imageBytes = Files.readAllBytes(Paths.get("drawing.jpg"));
String base64Image = Base64.getEncoder().encodeToString(imageBytes);

Content imageContent =
    ImageContent.builder()
        .data(base64Image)
        .mimeType(ImageContentMimeType.IMAGE_JPEG)
        .build();

Content textContent =
    TextContent.builder()
        .text(
            "turn this into realistic footage, using the drawing only as a guide for movement, do not show the drawing in the final video")
        .build();

List<Content> contents = Arrays.asList(imageContent, textContent);

CreateModelInteraction params =
    CreateModelInteraction.builder()
        .model(Model.of("gemini-omni-1.1-flash"))
        .input(InteractionsInput.ofContent(contents))
        .build();

Interaction interaction =
    client.interactions.create(CreateInteractionRequestBody.of(params)).interaction().get();

if (interaction.outputVideo().isPresent() && interaction.outputVideo().get().data().isPresent()) {
  byte[] videoBytes = Base64.getDecoder().decode(interaction.outputVideo().get().data().get());
  Files.write(Paths.get("clownfish.mp4"), videoBytes);
}
Go
package main

import (
    "context"
    "encoding/base64"
    "log"
    "os"

    "google.golang.org/genai"
    "google.golang.org/genai/interactions/models/interactions"
    "google.golang.org/genai/interactions/models/operations"
)

func main() {
    ctx := context.Background()
    client, err := genai.NewClient(ctx, nil)
    if err != nil {
        log.Fatal(err)
    }

    imageBytes, err := os.ReadFile("drawing.jpg")
    if err != nil {
        log.Fatal(err)
    }
    base64Image := base64.StdEncoding.EncodeToString(imageBytes)

    contents := []interactions.Content{
        interactions.NewContent(interactions.ImageContent{
            Data:     genai.Ptr(base64Image),
            MimeType: interactions.ImageContentMimeTypeImageJpeg.ToPointer(),
        }),
        interactions.NewContent(interactions.TextContent{
            Text: "turn this into realistic footage, using the drawing only as a guide for movement, do not show the drawing in the final video",
        }),
    }

    res, err := client.Interactions.Create(ctx, operations.CreateInteractionRequest{
        Body: operations.NewCreateInteractionRequestBody(interactions.CreateModelInteraction{
            Model: interactions.Model("gemini-omni-1.1-flash"),
            Input: interactions.NewInteractionsInput(contents),
        }),
    })
    if err != nil {
        log.Fatal(err)
    }

    if res.Interaction.OutputVideo != nil && res.Interaction.OutputVideo.Data != nil {
        videoBytes, err := base64.StdEncoding.DecodeString(*res.Interaction.OutputVideo.Data)
        if err != nil {
            log.Fatal(err)
        }
        if err := os.WriteFile("clownfish.mp4", videoBytes, 0644); err != nil {
            log.Fatal(err)
        }
    }
}
REST
curl -X POST "https://generativelanguage.googleapis.com/v1beta/interactions?key=$API_KEY" \
-H "Content-Type: application/json" \
-d '{
 "model": "gemini-omni-1.1-flash",
 "input": [
   {"type": "image", "data": "'"$BASE64_IMAGE"'", "mime_type": "image/jpeg"},
   {"type": "text", "text": "turn this into realistic footage, using the drawing only as a guide for movement, do not show the drawing in the final video"}
 ]
}'
初始和結束影格內插
Gemini Omni Flash 支援影片插補,可生成影片,在起始圖片 (第一格) 和結尾圖片 (最後一格) 之間順暢轉換。
在 input 清單中提供兩張圖片,並在提示中說明所需的轉場效果。模型會從第一個影格到結尾影格,為場景製作動畫。
Python
import base64
from google import genai

client = genai.Client()

interaction = client.interactions.create(
    model="gemini-omni-1.1-flash",
    input=[
        {"type": "image", "data": first_frame_b64, "mime_type": "image/jpeg"},
        {"type": "image", "data": last_frame_b64, "mime_type": "image/jpeg"},
        {"type": "text", "text": "A smooth cinematic transition from a lush green forest at sunrise to a snowy forest under a starry night sky."}
    ],
)
with open("interpolation.mp4", "wb") as f:
    f.write(base64.b64decode(interaction.output_video.data))
JavaScript
import { GoogleGenAI } from '@google/genai';
import * as fs from 'fs';
const ai = new GoogleGenAI({});

const interaction = await ai.interactions.create({
  model: 'gemini-omni-1.1-flash',
  input: [
    { type: 'image', data: firstFrameB64, mime_type: 'image/jpeg' },
    { type: 'image', data: lastFrameB64, mime_type: 'image/jpeg' },
    { type: 'text', text: 'A smooth cinematic transition from a lush green forest at sunrise to a snowy forest under a starry night sky.' }
  ]
});

if (interaction.output_video?.data) {
  fs.writeFileSync('interpolation.mp4', Buffer.from(interaction.output_video.data, 'base64'));
}
Java
import com.google.genai.Client;
import com.google.genai.gaos.models.interactions.Content;
import com.google.genai.gaos.models.interactions.CreateModelInteraction;
import com.google.genai.gaos.models.interactions.ImageContent;
import com.google.genai.gaos.models.interactions.ImageContentMimeType;
import com.google.genai.gaos.models.interactions.Interaction;
import com.google.genai.gaos.models.interactions.InteractionsInput;
import com.google.genai.gaos.models.interactions.Model;
import com.google.genai.gaos.models.interactions.TextContent;
import com.google.genai.gaos.models.operations.CreateInteractionRequestBody;
import java.nio.file.Files;
import java.nio.file.Paths;
import java.util.Arrays;
import java.util.Base64;
import java.util.List;

Client client = new Client();

String firstFrameB64 =
    Base64.getEncoder().encodeToString(Files.readAllBytes(Paths.get("first_frame.jpg")));
String lastFrameB64 =
    Base64.getEncoder().encodeToString(Files.readAllBytes(Paths.get("last_frame.jpg")));

Content firstFrame =
    ImageContent.builder()
        .data(firstFrameB64)
        .mimeType(ImageContentMimeType.IMAGE_JPEG)
        .build();

Content lastFrame =
    ImageContent.builder()
        .data(lastFrameB64)
        .mimeType(ImageContentMimeType.IMAGE_JPEG)
        .build();

Content prompt =
    TextContent.builder()
        .text(
            "A smooth cinematic transition from a lush green forest at sunrise to a snowy forest under a starry night sky.")
        .build();

List<Content> contents = Arrays.asList(firstFrame, lastFrame, prompt);

CreateModelInteraction params =
    CreateModelInteraction.builder()
        .model(Model.of("gemini-omni-1.1-flash"))
        .input(InteractionsInput.ofContent(contents))
        .build();

Interaction interaction =
    client.interactions.create(CreateInteractionRequestBody.of(params)).interaction().get();

if (interaction.outputVideo().isPresent() && interaction.outputVideo().get().data().isPresent()) {
  byte[] videoBytes = Base64.getDecoder().decode(interaction.outputVideo().get().data().get());
  Files.write(Paths.get("interpolation.mp4"), videoBytes);
}
Go
package main

import (
    "context"
    "encoding/base64"
    "log"
    "os"

    "google.golang.org/genai"
    "google.golang.org/genai/interactions/models/interactions"
    "google.golang.org/genai/interactions/models/operations"
)

func main() {
    ctx := context.Background()
    client, err := genai.NewClient(ctx, nil)
    if err != nil {
        log.Fatal(err)
    }

    firstBytes, err := os.ReadFile("first_frame.jpg")
    if err != nil {
        log.Fatal(err)
    }
    lastBytes, err := os.ReadFile("last_frame.jpg")
    if err != nil {
        log.Fatal(err)
    }

    firstFrameB64 := base64.StdEncoding.EncodeToString(firstBytes)
    lastFrameB64 := base64.StdEncoding.EncodeToString(lastBytes)

    contents := []interactions.Content{
        interactions.NewContent(interactions.ImageContent{
            Data:     genai.Ptr(firstFrameB64),
            MimeType: interactions.ImageContentMimeTypeImageJpeg.ToPointer(),
        }),
        interactions.NewContent(interactions.ImageContent{
            Data:     genai.Ptr(lastFrameB64),
            MimeType: interactions.ImageContentMimeTypeImageJpeg.ToPointer(),
        }),
        interactions.NewContent(interactions.TextContent{
            Text: "A smooth cinematic transition from a lush green forest at sunrise to a snowy forest under a starry night sky.",
        }),
    }

    res, err := client.Interactions.Create(ctx, operations.CreateInteractionRequest{
        Body: operations.NewCreateInteractionRequestBody(interactions.CreateModelInteraction{
            Model: interactions.Model("gemini-omni-1.1-flash"),
            Input: interactions.NewInteractionsInput(contents),
        }),
    })
    if err != nil {
        log.Fatal(err)
    }

    if res.Interaction.OutputVideo != nil && res.Interaction.OutputVideo.Data != nil {
        videoBytes, err := base64.StdEncoding.DecodeString(*res.Interaction.OutputVideo.Data)
        if err != nil {
            log.Fatal(err)
        }
        if err := os.WriteFile("interpolation.mp4", videoBytes, 0644); err != nil {
            log.Fatal(err)
        }
    }
}
REST
curl -X POST "https://generativelanguage.googleapis.com/v1beta/interactions?key=$API_KEY" \
-H "Content-Type: application/json" \
-d '{
 "model": "gemini-omni-1.1-flash",
 "input": [
   {"type": "image", "data": "'"$FIRST_FRAME_B64"'", "mime_type": "image/jpeg"},
   {"type": "image", "data": "'"$LAST_FRAME_B64"'", "mime_type": "image/jpeg"},
   {"type": "text", "text": "A smooth cinematic transition from a lush green forest at sunrise to a snowy forest under a starry night sky."}
 ]
}'
主體參考資源
你可以生成影片,並加入參考圖像中的特定主體。 舉例來說,下列程式碼說明如何提供貓咪和毛線的 2 張圖片,生成貓咪玩毛線的影片。
Python
import base64
from google import genai

client = genai.Client()

interaction = client.interactions.create(
    model="gemini-omni-1.1-flash",
    input=[
        {"type": "image", "data": cat_b64, "mime_type": "image/png"},
        {"type": "image", "data": yarn_b64, "mime_type": "image/png"},
        {"type": "text", "text": "A cat playfully batting at a ball of yarn."}
    ],
)
with open("cat.mp4", "wb") as f:
    f.write(base64.b64decode(interaction.output_video.data))
JavaScript
import { GoogleGenAI } from '@google/genai';
import * as fs from 'fs';
const ai = new GoogleGenAI({});

const interaction = await ai.interactions.create({
  model: 'gemini-omni-1.1-flash',
  input: [
    { type: 'image', data: catData, mime_type: 'image/png' },
    { type: 'image', data: yarnData, mime_type: 'image/png' },
    { type: 'text', text: 'A cat playfully batting at a ball of yarn.' }
  ]
});

if (interaction.output_video?.data) {
  fs.writeFileSync('cat.mp4', Buffer.from(interaction.output_video.data, 'base64'));
}
Java
import com.google.genai.Client;
import com.google.genai.gaos.models.interactions.Content;
import com.google.genai.gaos.models.interactions.CreateModelInteraction;
import com.google.genai.gaos.models.interactions.ImageContent;
import com.google.genai.gaos.models.interactions.ImageContentMimeType;
import com.google.genai.gaos.models.interactions.Interaction;
import com.google.genai.gaos.models.interactions.InteractionsInput;
import com.google.genai.gaos.models.interactions.Model;
import com.google.genai.gaos.models.interactions.TextContent;
import com.google.genai.gaos.models.operations.CreateInteractionRequestBody;
import java.nio.file.Files;
import java.nio.file.Paths;
import java.util.Arrays;
import java.util.Base64;
import java.util.List;

Client client = new Client();

String catB64 = Base64.getEncoder().encodeToString(Files.readAllBytes(Paths.get("cat.png")));
String yarnB64 = Base64.getEncoder().encodeToString(Files.readAllBytes(Paths.get("yarn.png")));

Content catImage =
    ImageContent.builder()
        .data(catB64)
        .mimeType(ImageContentMimeType.IMAGE_PNG)
        .build();

Content yarnImage =
    ImageContent.builder()
        .data(yarnB64)
        .mimeType(ImageContentMimeType.IMAGE_PNG)
        .build();

Content textContent =
    TextContent.builder()
        .text("A cat playfully batting at a ball of yarn.")
        .build();

List<Content> contents = Arrays.asList(catImage, yarnImage, textContent);

CreateModelInteraction params =
    CreateModelInteraction.builder()
        .model(Model.of("gemini-omni-1.1-flash"))
        .input(InteractionsInput.ofContent(contents))
        .build();

Interaction interaction =
    client.interactions.create(CreateInteractionRequestBody.of(params)).interaction().get();

if (interaction.outputVideo().isPresent() && interaction.outputVideo().get().data().isPresent()) {
  byte[] videoBytes = Base64.getDecoder().decode(interaction.outputVideo().get().data().get());
  Files.write(Paths.get("cat.mp4"), videoBytes);
}
Go
package main

import (
    "context"
    "encoding/base64"
    "log"
    "os"

    "google.golang.org/genai"
    "google.golang.org/genai/interactions/models/interactions"
    "google.golang.org/genai/interactions/models/operations"
)

func main() {
    ctx := context.Background()
    client, err := genai.NewClient(ctx, nil)
    if err != nil {
        log.Fatal(err)
    }

    catBytes, err := os.ReadFile("cat.png")
    if err != nil {
        log.Fatal(err)
    }
    yarnBytes, err := os.ReadFile("yarn.png")
    if err != nil {
        log.Fatal(err)
    }

    catB64 := base64.StdEncoding.EncodeToString(catBytes)
    yarnB64 := base64.StdEncoding.EncodeToString(yarnBytes)

    contents := []interactions.Content{
        interactions.NewContent(interactions.ImageContent{
            Data:     genai.Ptr(catB64),
            MimeType: interactions.ImageContentMimeTypeImagePng.ToPointer(),
        }),
        interactions.NewContent(interactions.ImageContent{
            Data:     genai.Ptr(yarnB64),
            MimeType: interactions.ImageContentMimeTypeImagePng.ToPointer(),
        }),
        interactions.NewContent(interactions.TextContent{
            Text: "A cat playfully batting at a ball of yarn.",
        }),
    }

    res, err := client.Interactions.Create(ctx, operations.CreateInteractionRequest{
        Body: operations.NewCreateInteractionRequestBody(interactions.CreateModelInteraction{
            Model: interactions.Model("gemini-omni-1.1-flash"),
            Input: interactions.NewInteractionsInput(contents),
        }),
    })
    if err != nil {
        log.Fatal(err)
    }

    if res.Interaction.OutputVideo != nil && res.Interaction.OutputVideo.Data != nil {
        videoBytes, err := base64.StdEncoding.DecodeString(*res.Interaction.OutputVideo.Data)
        if err != nil {
            log.Fatal(err)
        }
        if err := os.WriteFile("cat.mp4", videoBytes, 0644); err != nil {
            log.Fatal(err)
        }
    }
}
REST
curl -X POST "https://generativelanguage.googleapis.com/v1beta/interactions?key=$API_KEY" \
-H "Content-Type: application/json" \
-d '{
 "model": "gemini-omni-1.1-flash",
 "input": [
   {"type": "image", "data": "'"$CAT_B64"'", "mime_type": "image/png"},
   {"type": "image", "data": "'"$YARN_B64"'", "mime_type": "image/png"},
   {"type": "text", "text": "A cat playfully batting at a ball of yarn."}
 ]
}'
工作參數
在 video_config 中使用 task 參數,明確指定預期行為。舉例來說,如果想讓模型根據圖片生成影片,可以將參數設為 image_to_video。如未設定,模型會根據提示推斷您想要什麼。
允許的值如下:
text_to_videoimage_to_videoreference_to_videoeditextend
以下範例說明如何為先前顯示的圖片設定此屬性,以影片為例。
Python
import base64
from google import genai

client = genai.Client()

interaction = client.interactions.create(
    model="gemini-omni-1.1-flash",
    input=[
        {"type": "image", "data": base64_image, "mime_type": "image/jpeg"},
        {"type": "text", "text": "turn this into realistic footage, using the drawing only as a guide for movement, do not show the drawing in the final video"}
    ],
    generation_config={
      "video_config": {
        "task": "image_to_video",
      }
    },
)
with open("example.mp4", "wb") as f:
    f.write(base64.b64decode(interaction.output_video.data))
JavaScript
import { GoogleGenAI } from "@google/genai";
import * as fs from 'fs';
const ai = new GoogleGenAI({});

const interaction = await ai.interactions.create({
  model: 'gemini-omni-1.1-flash',
  input: [
    { type: 'image', data: base64Image, mime_type: 'image/jpeg' },
    { type: 'text', text: 'turn this into realistic footage, using the drawing only as a guide for movement, do not show the drawing in the final video' }
  ],
  generationConfig: {
    videoConfig: {
      task: 'image_to_video',
    }
  }
});

if (interaction.output_video?.data) {
  fs.writeFileSync('example.mp4', Buffer.from(interaction.output_video.data, 'base64'));
}
Java
import com.google.genai.Client;
import com.google.genai.gaos.models.interactions.Content;
import com.google.genai.gaos.models.interactions.CreateModelInteraction;
import com.google.genai.gaos.models.interactions.GenerationConfig;
import com.google.genai.gaos.models.interactions.ImageContent;
import com.google.genai.gaos.models.interactions.ImageContentMimeType;
import com.google.genai.gaos.models.interactions.Interaction;
import com.google.genai.gaos.models.interactions.InteractionsInput;
import com.google.genai.gaos.models.interactions.Model;
import com.google.genai.gaos.models.interactions.Task;
import com.google.genai.gaos.models.interactions.TextContent;
import com.google.genai.gaos.models.interactions.VideoConfig;
import com.google.genai.gaos.models.operations.CreateInteractionRequestBody;
import java.nio.file.Files;
import java.nio.file.Paths;
import java.util.Arrays;
import java.util.Base64;
import java.util.List;

Client client = new Client();

byte[] imageBytes = Files.readAllBytes(Paths.get("drawing.jpg"));
String base64Image = Base64.getEncoder().encodeToString(imageBytes);

Content imageContent =
    ImageContent.builder()
        .data(base64Image)
        .mimeType(ImageContentMimeType.IMAGE_JPEG)
        .build();

Content textContent =
    TextContent.builder()
        .text(
            "turn this into realistic footage, using the drawing only as a guide for movement, do not show the drawing in the final video")
        .build();

List<Content> contents = Arrays.asList(imageContent, textContent);

GenerationConfig generationConfig =
    GenerationConfig.builder()
        .videoConfig(VideoConfig.builder().task(Task.IMAGE_TO_VIDEO).build())
        .build();

CreateModelInteraction params =
    CreateModelInteraction.builder()
        .model(Model.of("gemini-omni-1.1-flash"))
        .input(InteractionsInput.ofContent(contents))
        .generationConfig(generationConfig)
        .build();

Interaction interaction =
    client.interactions.create(CreateInteractionRequestBody.of(params)).interaction().get();

if (interaction.outputVideo().isPresent() && interaction.outputVideo().get().data().isPresent()) {
  byte[] videoBytes = Base64.getDecoder().decode(interaction.outputVideo().get().data().get());
  Files.write(Paths.get("example.mp4"), videoBytes);
}
Go
package main

import (
    "context"
    "encoding/base64"
    "log"
    "os"

    "google.golang.org/genai"
    "google.golang.org/genai/interactions/models/interactions"
    "google.golang.org/genai/interactions/models/operations"
)

func main() {
    ctx := context.Background()
    client, err := genai.NewClient(ctx, nil)
    if err != nil {
        log.Fatal(err)
    }

    imageBytes, err := os.ReadFile("drawing.jpg")
    if err != nil {
        log.Fatal(err)
    }
    base64Image := base64.StdEncoding.EncodeToString(imageBytes)

    contents := []interactions.Content{
        interactions.NewContent(interactions.ImageContent{
            Data:     genai.Ptr(base64Image),
            MimeType: interactions.ImageContentMimeTypeImageJpeg.ToPointer(),
        }),
        interactions.NewContent(interactions.TextContent{
            Text: "turn this into realistic footage, using the drawing only as a guide for movement, do not show the drawing in the final video",
        }),
    }

    generationConfig := &interactions.GenerationConfig{
        VideoConfig: &interactions.VideoConfig{
            Task: interactions.TaskImageToVideo.ToPointer(),
        },
    }

    res, err := client.Interactions.Create(ctx, operations.CreateInteractionRequest{
        Body: operations.NewCreateInteractionRequestBody(interactions.CreateModelInteraction{
            Model:            interactions.Model("gemini-omni-1.1-flash"),
            Input:            interactions.NewInteractionsInput(contents),
            GenerationConfig: generationConfig,
        }),
    })
    if err != nil {
        log.Fatal(err)
    }

    if res.Interaction.OutputVideo != nil && res.Interaction.OutputVideo.Data != nil {
        videoBytes, err := base64.StdEncoding.DecodeString(*res.Interaction.OutputVideo.Data)
        if err != nil {
            log.Fatal(err)
        }
        if err := os.WriteFile("example.mp4", videoBytes, 0644); err != nil {
            log.Fatal(err)
        }
    }
}
REST
curl -X POST "https://generativelanguage.googleapis.com/v1beta/interactions" \
  -H "x-goog-api-key: $GEMINI_API_KEY" \
  -H "Content-Type: application/json" \
  -d '{
    "model": "gemini-omni-1.1-flash",
    "input": [
      {
        "type": "image",
        "data": "'"$BASE64_IMAGE"'",
        "mime_type": "image/jpeg"
      },
      {
        "type": "text",
        "text": "turn this into realistic footage, using the drawing only as a guide for movement, do not show the drawing in the final video"
      }
    ],
    "generation_config": {
      "video_config": {
        "task": "image_to_video"
      }
    }
  }'
有狀態的影片編輯
生成影片,並使用後續提示詞反覆編輯。每一輪都會以前一輪的結果為基礎。模型會記住影片內容,套用變更並保留您未提及的元素。使用 previous_interaction_id 追蹤對話記錄和生成的影片狀態,不必重新上傳先前的影片。
以下範例說明如何生成第一部影片,然後進行編輯:
Python
import base64
from google import genai

client = genai.Client()

# Turn 1: Generate initial video
res1 = client.interactions.create(model="gemini-omni-1.1-flash", input="A woman playing violin outdoors.")

# Turn 2: Edit the previous video
res2 = client.interactions.create(
    model="gemini-omni-1.1-flash",
    previous_interaction_id=res1.id,
    input="Make the violin invisible."
)
with open("example.mp4", "wb") as f:
    f.write(base64.b64decode(res2.output_video.data))
JavaScript
import { GoogleGenAI } from '@google/genai';
import * as fs from 'fs';
const ai = new GoogleGenAI({});

// Turn 1: Generate initial video
const res1 = await ai.interactions.create({
  model: 'gemini-omni-1.1-flash',
  input: 'A woman playing violin outdoors.',
});

// Turn 2: Edit the previous video
const res2 = await ai.interactions.create({
  model: 'gemini-omni-1.1-flash',
  previous_interaction_id: res1.id,
  input: 'Make the violin invisible.',
});

if (res2.output_video?.data) {
  fs.writeFileSync('example.mp4', Buffer.from(res2.output_video.data, 'base64'));
}
Java
import com.google.genai.Client;
import com.google.genai.gaos.models.interactions.CreateModelInteraction;
import com.google.genai.gaos.models.interactions.Interaction;
import com.google.genai.gaos.models.interactions.InteractionsInput;
import com.google.genai.gaos.models.interactions.Model;
import com.google.genai.gaos.models.operations.CreateInteractionRequestBody;
import java.nio.file.Files;
import java.nio.file.Paths;
import java.util.Base64;

Client client = new Client();

// Turn 1: Generate initial video
CreateModelInteraction turn1Params =
    CreateModelInteraction.builder()
        .model(Model.of("gemini-omni-1.1-flash"))
        .input(InteractionsInput.of("A woman playing violin outdoors."))
        .build();

Interaction res1 =
    client.interactions.create(CreateInteractionRequestBody.of(turn1Params)).interaction().get();

// Turn 2: Edit the previous video
CreateModelInteraction turn2Params =
    CreateModelInteraction.builder()
        .model(Model.of("gemini-omni-1.1-flash"))
        .previousInteractionId(res1.id().get())
        .input(InteractionsInput.of("Make the violin invisible."))
        .build();

Interaction res2 =
    client.interactions.create(CreateInteractionRequestBody.of(turn2Params)).interaction().get();

if (res2.outputVideo().isPresent() && res2.outputVideo().get().data().isPresent()) {
  byte[] videoBytes = Base64.getDecoder().decode(res2.outputVideo().get().data().get());
  Files.write(Paths.get("example.mp4"), videoBytes);
}
Go
package main

import (
    "context"
    "encoding/base64"
    "log"
    "os"

    "google.golang.org/genai"
    "google.golang.org/genai/interactions/models/interactions"
    "google.golang.org/genai/interactions/models/operations"
)

func main() {
    ctx := context.Background()
    client, err := genai.NewClient(ctx, nil)
    if err != nil {
        log.Fatal(err)
    }

    // Turn 1: Generate initial video
    res1, err := client.Interactions.Create(ctx, operations.CreateInteractionRequest{
        Body: operations.NewCreateInteractionRequestBody(interactions.CreateModelInteraction{
            Model: interactions.Model("gemini-omni-1.1-flash"),
            Input: interactions.NewInteractionsInput("A woman playing violin outdoors."),
        }),
    })
    if err != nil {
        log.Fatal(err)
    }

    // Turn 2: Edit the previous video
    res2, err := client.Interactions.Create(ctx, operations.CreateInteractionRequest{
        Body: operations.NewCreateInteractionRequestBody(interactions.CreateModelInteraction{
            Model:                 interactions.Model("gemini-omni-1.1-flash"),
            PreviousInteractionID: res1.Interaction.ID,
            Input:                 interactions.NewInteractionsInput("Make the violin invisible."),
        }),
    })
    if err != nil {
        log.Fatal(err)
    }

    if res2.Interaction.OutputVideo != nil && res2.Interaction.OutputVideo.Data != nil {
        videoBytes, err := base64.StdEncoding.DecodeString(*res2.Interaction.OutputVideo.Data)
        if err != nil {
            log.Fatal(err)
        }
        if err := os.WriteFile("example.mp4", videoBytes, 0644); err != nil {
            log.Fatal(err)
        }
    }
}
REST
curl -X POST "https://generativelanguage.googleapis.com/v1beta/interactions?key=$API_KEY" \
-H "Content-Type: application/json" \
-d '{
 "model": "gemini-omni-1.1-flash",
 "previous_interaction_id": "'"$PREVIOUS_ID"'",
 "input": "Make the violin invisible."
}'
初始影片範例:
編輯影片的範例:
對話中的每一輪都會產生新影片。模型會瞭解先前回合的內容,讓您進行調整光線和更換背景等漸進式變更,而不必重新描述整個場景。
編輯自己的影片
使用 Files API 上傳影片,然後使用 Gemini Omni Flash 編輯影片。
以下範例說明如何編輯下列原始影片:
Python
import time
import base64
from google import genai

client = genai.Client()

# Upload video using the file API
video_file = client.files.upload(file="Video.mp4")

while video_file.state == "PROCESSING":
    print('Waiting for video to be processed.')
    time.sleep(10)
    video_file = client.files.get(name=video_file.name)

if video_file.state == "FAILED":
  raise ValueError(video_file.state)
print(f'Video processing complete: ' + video_file.uri)

# Edit your video
interaction = client.interactions.create(
    model="gemini-omni-1.1-flash",
    input=[
        {"type": "video", "uri": video_file.uri},
        {"type": "text", "text": "When the person touches the mirror, make the mirror ripple beautifully like liquid, and the person's arm turns into reflective mirror material"}
    ],
)
with open("example.mp4", "wb") as f:
    f.write(base64.b64decode(interaction.output_video.data))
JavaScript
import { GoogleGenAI } from '@google/genai';
import * as fs from 'fs';
const ai = new GoogleGenAI({});

// Upload video using the file API
let videoFile = await ai.files.upload({
  file: 'Video.mp4',
});

while (videoFile.state === 'PROCESSING') {
  console.log('Waiting for video to be processed.');
  await new Promise(r => setTimeout(r, 10000));
  videoFile = await ai.files.get({ name: videoFile.name });
}

if (videoFile.state === 'FAILED') {
  throw new Error(videoFile.state);
}
console.log('Video processing complete: ' + videoFile.uri);

// Edit your video
const interaction = await ai.interactions.create({
  model: 'gemini-omni-1.1-flash',
  input: [
    { type: 'video', uri: videoFile.uri },
    { type: 'text', text: "When the person touches the mirror, make the mirror ripple beautifully like liquid, and the person's arm turns into reflective mirror material" }
  ],
});

if (interaction.output_video?.data) {
  fs.writeFileSync('example.mp4', Buffer.from(interaction.output_video.data, 'base64'));
}
Java
import com.google.genai.Client;
import com.google.genai.gaos.models.interactions.Content;
import com.google.genai.gaos.models.interactions.CreateModelInteraction;
import com.google.genai.gaos.models.interactions.Interaction;
import com.google.genai.gaos.models.interactions.InteractionsInput;
import com.google.genai.gaos.models.interactions.Model;
import com.google.genai.gaos.models.interactions.TextContent;
import com.google.genai.gaos.models.interactions.VideoContent;
import com.google.genai.gaos.models.operations.CreateInteractionRequestBody;
import com.google.genai.types.File;
import com.google.genai.types.FileState;
import com.google.genai.types.UploadFileConfig;
import java.nio.file.Files;
import java.nio.file.Paths;
import java.util.Arrays;
import java.util.Base64;
import java.util.List;

Client client = new Client();

// Upload video using the file API
File videoFile =
    client.files.upload("Video.mp4", UploadFileConfig.builder().mimeType("video/mp4").build());

while (videoFile.state().isPresent()
    && videoFile.state().get().knownEnum() == FileState.Known.PROCESSING) {
  System.out.println("Waiting for video to be processed.");
  Thread.sleep(10000);
  videoFile = client.files.get(videoFile.name().get(), null);
}

if (videoFile.state().isPresent()
    && videoFile.state().get().knownEnum() == FileState.Known.FAILED) {
  throw new IllegalStateException("Video processing failed: " + videoFile.state().get());
}
System.out.println("Video processing complete: " + videoFile.uri().orElse(""));

// Edit your video
Content videoContent = VideoContent.builder().uri(videoFile.uri().get()).build();
Content textContent =
    TextContent.builder()
        .text(
            "When the person touches the mirror, make the mirror ripple beautifully like liquid, and the person's arm turns into reflective mirror material")
        .build();

List<Content> contents = Arrays.asList(videoContent, textContent);

CreateModelInteraction params =
    CreateModelInteraction.builder()
        .model(Model.of("gemini-omni-1.1-flash"))
        .input(InteractionsInput.ofContent(contents))
        .build();

Interaction interaction =
    client.interactions.create(CreateInteractionRequestBody.of(params)).interaction().get();

if (interaction.outputVideo().isPresent() && interaction.outputVideo().get().data().isPresent()) {
  byte[] videoBytes = Base64.getDecoder().decode(interaction.outputVideo().get().data().get());
  Files.write(Paths.get("example.mp4"), videoBytes);
}
Go
package main

import (
    "context"
    "encoding/base64"
    "fmt"
    "log"
    "os"
    "time"

    "google.golang.org/genai"
    "google.golang.org/genai/interactions/models/interactions"
    "google.golang.org/genai/interactions/models/operations"
)

func main() {
    ctx := context.Background()
    client, err := genai.NewClient(ctx, nil)
    if err != nil {
        log.Fatal(err)
    }

    // Upload video using the file API
    videoFile, err := client.Files.UploadFromPath(ctx, "Video.mp4", &genai.UploadFileConfig{
        MIMEType: "video/mp4",
    })
    if err != nil {
        log.Fatal(err)
    }

    for videoFile.State == genai.FileStateProcessing {
        fmt.Println("Waiting for video to be processed.")
        time.Sleep(10 * time.Second)
        videoFile, err = client.Files.Get(ctx, videoFile.Name, nil)
        if err != nil {
            log.Fatal(err)
        }
    }

    if videoFile.State == genai.FileStateFailed {
        log.Fatalf("Video processing failed: %s", videoFile.State)
    }
    fmt.Printf("Video processing complete: %s\n", videoFile.URI)

    // Edit your video
    contents := []interactions.Content{
        interactions.NewContent(interactions.VideoContent{
            URI: genai.Ptr(videoFile.URI),
        }),
        interactions.NewContent(interactions.TextContent{
            Text: "When the person touches the mirror, make the mirror ripple beautifully like liquid, and the person's arm turns into reflective mirror material",
        }),
    }

    res, err := client.Interactions.Create(ctx, operations.CreateInteractionRequest{
        Body: operations.NewCreateInteractionRequestBody(interactions.CreateModelInteraction{
            Model: interactions.Model("gemini-omni-1.1-flash"),
            Input: interactions.NewInteractionsInput(contents),
        }),
    })
    if err != nil {
        log.Fatal(err)
    }

    if res.Interaction.OutputVideo != nil && res.Interaction.OutputVideo.Data != nil {
        videoBytes, err := base64.StdEncoding.DecodeString(*res.Interaction.OutputVideo.Data)
        if err != nil {
            log.Fatal(err)
        }
        if err := os.WriteFile("example.mp4", videoBytes, 0644); err != nil {
            log.Fatal(err)
        }
    }
}
REST
#!/bin/bash
VIDEO_B64=$(encode_file "$VIDEO_FILE")

curl -sS -w "\n[HTTP %{http_code}]\n" "https://generativelanguage.googleapis.com/v1beta/interactions" \
  -H "x-goog-api-key: ${API_KEY}" \
  -H "Content-Type: application/json" \
  -d @- <<EOF > video_editing_response.json
{
  "model": "gemini-omni-1.1-flash",
  "input": [
    {
      "type": "user_input",
      "content": [
        {
          "type": "video",
          "mime_type": "video/mp4",
          "data": "$VIDEO_B64"
        },
        {
          "type": "text",
          "text": "When the person touches the mirror, make the mirror ripple beautifully like liquid, and the person's arm turns into reflective mirror material"
        }
      ]
    }
  ],
  "response_format": { "type": "video" }
}
EOF
編輯影片的範例:
使用 URI 擷取影片
在 response_format 中使用 delivery="uri" 參數,擷取大於 4MB 的生成影片。這會傳回由 Google 代管的 URI,您可以輪詢該 URI,直到影片 ACTIVE 為止,再進行下載。
Python
import time
from google import genai

client = genai.Client()

# 1. Request video via URI delivery
interaction = client.interactions.create(
    model="gemini-omni-1.1-flash",
    input="A beautiful sunset.",
    response_format={"type": "video", "delivery": "uri"}
)

# 2. Extract file name and poll for ACTIVE state
video_output = interaction.output_video
file_name = video_output.uri.split("/")[-1] # Extract ID

print("Waiting for video processing...")
while True:
    f_info = client.files.get(name=f"files/{file_name}")
    if f_info.state.name == "ACTIVE":
        break
    elif f_info.state.name == "FAILED":
        raise RuntimeError("Generation failed.")
    time.sleep(5)

# 3. Download the final video
client.files.download(file=video_output.uri, destination="output.mp4")
JavaScript
import { GoogleGenAI } from '@google/genai';
const ai = new GoogleGenAI({});

// 1. Request video using URI delivery
const interaction = await ai.interactions.create({
  model: 'gemini-omni-1.1-flash',
  input: 'A beautiful sunset.',
  response_format: { type: 'video', delivery: 'uri' },
});

// 2. Extract filename and poll for ACTIVE state
const videoOutput = interaction.output_video;
const fileId = videoOutput.uri.match(/files\/([a-zA-Z0-9]+)/)[1];
const name = `files/${fileId}`;

console.log("Waiting for video processing...");
while (true) {
  const fInfo = await ai.files.get({ name });
  if (fInfo.state.name === 'ACTIVE') break;
  if (fInfo.state.name === 'FAILED') throw new Error("Generation failed.");
  await new Promise(r => setTimeout(r, 5000));
}

// 3. Download the final video
await ai.files.download({
  file: videoOutput,
  downloadPath: 'output.mp4',
});
console.log("💾 Saved video to output.mp4");
Java
import com.google.genai.Client;
import com.google.genai.gaos.models.interactions.CreateModelInteraction;
import com.google.genai.gaos.models.interactions.CreateModelInteractionResponseFormat;
import com.google.genai.gaos.models.interactions.Interaction;
import com.google.genai.gaos.models.interactions.InteractionsInput;
import com.google.genai.gaos.models.interactions.Model;
import com.google.genai.gaos.models.interactions.ResponseFormat;
import com.google.genai.gaos.models.interactions.VideoContent;
import com.google.genai.gaos.models.interactions.VideoResponseFormat;
import com.google.genai.gaos.models.interactions.VideoResponseFormatDelivery;
import com.google.genai.gaos.models.operations.CreateInteractionRequestBody;
import com.google.genai.types.File;
import com.google.genai.types.FileState;

Client client = new Client();

// 1. Request video using URI delivery
VideoResponseFormat videoFormat =
    VideoResponseFormat.builder()
        .delivery(VideoResponseFormatDelivery.URI)
        .build();

CreateModelInteraction params =
    CreateModelInteraction.builder()
        .model(Model.of("gemini-omni-1.1-flash"))
        .input(InteractionsInput.of("A beautiful sunset."))
        .responseFormat(CreateModelInteractionResponseFormat.of(ResponseFormat.of(videoFormat)))
        .build();

Interaction interaction =
    client.interactions.create(CreateInteractionRequestBody.of(params)).interaction().get();

// 2. Extract filename and poll for ACTIVE state
VideoContent videoOutput = interaction.outputVideo().get();
String uri = videoOutput.uri().get();
String[] parts = uri.split("/");
String fileName = parts[parts.length - 1];

System.out.println("Waiting for video processing...");
while (true) {
  File fileInfo = client.files.get("files/" + fileName, null);
  if (fileInfo.state().isPresent()
      && fileInfo.state().get().knownEnum() == FileState.Known.ACTIVE) {
    break;
  } else if (fileInfo.state().isPresent()
      && fileInfo.state().get().knownEnum() == FileState.Known.FAILED) {
    throw new RuntimeException("Generation failed.");
  }
  Thread.sleep(5000);
}

// 3. Download the final video
client.files.download(uri, "output.mp4", null);
Go
package main

import (
    "context"
    "fmt"
    "log"
    "os"
    "strings"
    "time"

    "google.golang.org/genai"
    "google.golang.org/genai/interactions/models/interactions"
    "google.golang.org/genai/interactions/models/operations"
)

func main() {
    ctx := context.Background()
    client, err := genai.NewClient(ctx, nil)
    if err != nil {
        log.Fatal(err)
    }

    // 1. Request video using URI delivery
    videoFormat := interactions.VideoResponseFormat{
        Delivery: interactions.VideoResponseFormatDeliveryURI.ToPointer(),
    }

    res, err := client.Interactions.Create(ctx, operations.CreateInteractionRequest{
        Body: operations.NewCreateInteractionRequestBody(interactions.CreateModelInteraction{
            Model: interactions.Model("gemini-omni-1.1-flash"),
            Input: interactions.NewInteractionsInput("A beautiful sunset."),
            ResponseFormat: genai.Ptr(interactions.NewCreateModelInteractionResponseFormat(
                interactions.NewResponseFormat(videoFormat),
            )),
        }),
    })
    if err != nil {
        log.Fatal(err)
    }

    // 2. Extract filename and poll for ACTIVE state
    uri := *res.Interaction.OutputVideo.URI
    parts := strings.Split(uri, "/")
    fileName := parts[len(parts)-1]

    fmt.Println("Waiting for video processing...")
    var fileInfo *genai.File
    for {
        fileInfo, err = client.Files.Get(ctx, "files/"+fileName, nil)
        if err != nil {
            log.Fatal(err)
        }
        if fileInfo.State == genai.FileStateActive {
            break
        } else if fileInfo.State == genai.FileStateFailed {
            log.Fatal("Generation failed.")
        }
        time.Sleep(5 * time.Second)
    }

    // 3. Download the final video
    videoBytes, err := client.Files.Download(ctx, genai.NewDownloadURIFromFile(fileInfo), nil)
    if err != nil {
        log.Fatal(err)
    }
    if err := os.WriteFile("output.mp4", videoBytes, 0644); err != nil {
        log.Fatal(err)
    }
}
REST
#!/bin/bash

# 1. Initial request to generate the video
RESPONSE=$(curl -s -X POST "https://generativelanguage.googleapis.com/v1beta/interactions?key=$API_KEY" \
-H "Content-Type: application/json" \
-d '{
 "model": "gemini-omni-1.1-flash",
 "input": "A beautiful sunset over a calm ocean.",
 "response_format": {"type": "video", "delivery": "uri"}
}')

# Extract FILE_ID from the URI (e.g., "files/abc-123" -> "abc-123")
FILE_URI=$(echo $RESPONSE | jq -r '.output_video.uri')
FILE_ID=$(echo $FILE_URI | cut -d'/' -f2)

echo "Video requested (ID: $FILE_ID). Waiting for processing..."

# 2. Polling loop
while true; do
 # Get current file status
 STATUS_JSON=$(curl -s -X GET "https://generativelanguage.googleapis.com/v1beta/files/$FILE_ID?key=$API_KEY")
 STATE=$(echo $STATUS_JSON | jq -r '.state')

 if [ "$STATE" == "ACTIVE" ]; then
   echo "Processing complete! Downloading..."
   break
 elif [ "$STATE" == "FAILED" ]; then
   echo "Error: Generation failed."
   exit 1
 else
   echo "Current state: $STATE... (waiting 5s)"
   sleep 5
 fi
done

# 3. Final download
curl -L -X GET "https://generativelanguage.googleapis.com/v1beta/files/$FILE_ID:download?alt=media&key=$API_KEY" \
--output "output.mp4"

echo "Done! Video saved to output.mp4"
原始 REST JSON 結構 (URI):
{
  "steps": [
    { "type": "user_input", "content": [{"type": "text", "text": "..."}] },
    { "type": "thought", "content": [{"text": "...", "type": "thought"}] },
    {
      "type": "model_output",
      "content": [
        {
          "type": "video",
          "mime_type": "video/mp4",
          "uri": "https://generativelanguage.googleapis.com/v1beta/files/...:download?alt=media"
        }
      ]
    }
  ],
  "id": "v1_...",
  "status": "completed",
  "model": "gemini-omni-1.1-flash",
  "object": "interaction"
}
影片額外資訊
在現有影片的尾端生成可無縫銜接的後續內容,在提示中描述影片的後續內容,例如 "Extend this video" 或 "Continue the scene: the camera pans across the mountains"。
模型會分析輸入的影片,生成 3 到 10 秒的後續內容。
你可以延長:
- 模型生成的影片 (多輪):參考先前生成的影片
previous_interaction_id,延伸製作新影片。 上傳的影片:提供上傳的影片檔案 (透過 Files API),以及擴充功能提示。
Python
import base64
from google import genai

client = genai.Client()

# Upload your video using the Files API
video_file = client.files.upload(file="my_video.mp4")

# Extend the video using prompt-based extension
interaction = client.interactions.create(
    model="gemini-omni-1.1-flash",
    input=[
        {"type": "video", "uri": video_file.uri},
        {"type": "text", "text": "Continue the scene."}
    ],
)
with open("extended.mp4", "wb") as f:
    f.write(base64.b64decode(interaction.output_video.data))
JavaScript
import { GoogleGenAI } from '@google/genai';
import * as fs from 'fs';
const ai = new GoogleGenAI({});

// Upload your video using the Files API
let videoFile = await ai.files.upload({
  file: 'my_video.mp4',
});

while (videoFile.state === 'PROCESSING') {
  await new Promise(r => setTimeout(r, 10000));
  videoFile = await ai.files.get({ name: videoFile.name });
}

// Extend the video using prompt-based extension
const interaction = await ai.interactions.create({
  model: 'gemini-omni-1.1-flash',
  input: [
    { type: 'video', uri: videoFile.uri },
    { type: 'text', text: 'Continue the scene.' }
  ],
});

if (interaction.output_video?.data) {
  fs.writeFileSync('extended.mp4', Buffer.from(interaction.output_video.data, 'base64'));
}
Java
import com.google.genai.Client;
import com.google.genai.gaos.models.interactions.Content;
import com.google.genai.gaos.models.interactions.CreateModelInteraction;
import com.google.genai.gaos.models.interactions.Interaction;
import com.google.genai.gaos.models.interactions.InteractionsInput;
import com.google.genai.gaos.models.interactions.Model;
import com.google.genai.gaos.models.interactions.TextContent;
import com.google.genai.gaos.models.interactions.VideoContent;
import com.google.genai.gaos.models.operations.CreateInteractionRequestBody;
import com.google.genai.types.File;
import com.google.genai.types.UploadFileConfig;
import java.nio.file.Files;
import java.nio.file.Paths;
import java.util.Arrays;
import java.util.Base64;
import java.util.List;

Client client = new Client();

// Upload your video using the Files API
File videoFile =
    client.files.upload(
        "my_video.mp4", UploadFileConfig.builder().mimeType("video/mp4").build());

// Extend the video using prompt-based extension
Content videoContent = VideoContent.builder().uri(videoFile.uri().get()).build();
Content textContent = TextContent.builder().text("Continue the scene.").build();

List<Content> contents = Arrays.asList(videoContent, textContent);

CreateModelInteraction params =
    CreateModelInteraction.builder()
        .model(Model.of("gemini-omni-1.1-flash"))
        .input(InteractionsInput.ofContent(contents))
        .build();

Interaction interaction =
    client.interactions.create(CreateInteractionRequestBody.of(params)).interaction().get();

if (interaction.outputVideo().isPresent() && interaction.outputVideo().get().data().isPresent()) {
  byte[] videoBytes = Base64.getDecoder().decode(interaction.outputVideo().get().data().get());
  Files.write(Paths.get("extended.mp4"), videoBytes);
}
Go
package main

import (
    "context"
    "encoding/base64"
    "log"
    "os"

    "google.golang.org/genai"
    "google.golang.org/genai/interactions/models/interactions"
    "google.golang.org/genai/interactions/models/operations"
)

func main() {
    ctx := context.Background()
    client, err := genai.NewClient(ctx, nil)
    if err != nil {
        log.Fatal(err)
    }

    // Upload your video using the Files API
    videoFile, err := client.Files.UploadFromPath(ctx, "my_video.mp4", &genai.UploadFileConfig{
        MIMEType: "video/mp4",
    })
    if err != nil {
        log.Fatal(err)
    }

    // Extend the video using prompt-based extension
    contents := []interactions.Content{
        interactions.NewContent(interactions.VideoContent{
            URI: genai.Ptr(videoFile.URI),
        }),
        interactions.NewContent(interactions.TextContent{
            Text: "Continue the scene.",
        }),
    }

    res, err := client.Interactions.Create(ctx, operations.CreateInteractionRequest{
        Body: operations.NewCreateInteractionRequestBody(interactions.CreateModelInteraction{
            Model: interactions.Model("gemini-omni-1.1-flash"),
            Input: interactions.NewInteractionsInput(contents),
        }),
    })
    if err != nil {
        log.Fatal(err)
    }

    if res.Interaction.OutputVideo != nil && res.Interaction.OutputVideo.Data != nil {
        videoBytes, err := base64.StdEncoding.DecodeString(*res.Interaction.OutputVideo.Data)
        if err != nil {
            log.Fatal(err)
        }
        if err := os.WriteFile("extended.mp4", videoBytes, 0644); err != nil {
            log.Fatal(err)
        }
    }
}
REST
curl -X POST "https://generativelanguage.googleapis.com/v1beta/interactions?key=$API_KEY"     -H "Content-Type: application/json"     -d '{
 "model": "gemini-omni-1.1-flash",
 "input": [
   {"type": "video", "uri": "'"$VIDEO_URI"'"},
   {"type": "text", "text": "Continue the scene."}
 ]
}'
使用參考媒體擴充
您可以在 input 陣列中提供參考圖片和提示,將新角色或元素導入擴充影片:
Python
import base64
from google import genai

client = genai.Client()

# Upload base video and reference image using the Files API
video_file = client.files.upload(file="my_video.mp4")
character_img = client.files.upload(file="character.png")

# Extend the video while introducing the reference character
interaction = client.interactions.create(
    model="gemini-omni-1.1-flash",
    input=[
        {"type": "video", "uri": video_file.uri},
        {"type": "image", "uri": character_img.uri},
        {"type": "text", "text": "Extend this video: have the character shown in <IMAGE_REF_0> enter the scene and wave."}
    ],
)
with open("extended_with_character.mp4", "wb") as f:
    f.write(base64.b64decode(interaction.output_video.data))
JavaScript
import { GoogleGenAI } from '@google/genai';
import * as fs from 'fs';
const ai = new GoogleGenAI({});

// Upload base video and reference image using the Files API
let videoFile = await ai.files.upload({ file: 'my_video.mp4' });
let characterImg = await ai.files.upload({ file: 'character.png' });

while (videoFile.state === 'PROCESSING' || characterImg.state === 'PROCESSING') {
  await new Promise(r => setTimeout(r, 10000));
  videoFile = await ai.files.get({ name: videoFile.name });
  characterImg = await ai.files.get({ name: characterImg.name });
}

// Extend the video while introducing the reference character
const interaction = await ai.interactions.create({
  model: 'gemini-omni-1.1-flash',
  input: [
    { type: 'video', uri: videoFile.uri },
    { type: 'image', uri: characterImg.uri },
    { type: 'text', text: 'Extend this video: have the character shown in <IMAGE_REF_0> enter the scene and wave.' }
  ],
});

if (interaction.output_video?.data) {
  fs.writeFileSync('extended_with_character.mp4', Buffer.from(interaction.output_video.data, 'base64'));
}
Java
import com.google.genai.Client;
import com.google.genai.gaos.models.interactions.Content;
import com.google.genai.gaos.models.interactions.CreateModelInteraction;
import com.google.genai.gaos.models.interactions.ImageContent;
import com.google.genai.gaos.models.interactions.Interaction;
import com.google.genai.gaos.models.interactions.InteractionsInput;
import com.google.genai.gaos.models.interactions.Model;
import com.google.genai.gaos.models.interactions.TextContent;
import com.google.genai.gaos.models.interactions.VideoContent;
import com.google.genai.gaos.models.operations.CreateInteractionRequestBody;
import com.google.genai.types.File;
import com.google.genai.types.UploadFileConfig;
import java.nio.file.Files;
import java.nio.file.Paths;
import java.util.Arrays;
import java.util.Base64;
import java.util.List;

Client client = new Client();

// Upload base video and reference image using the Files API
File videoFile =
    client.files.upload(
        "my_video.mp4", UploadFileConfig.builder().mimeType("video/mp4").build());
File characterImg =
    client.files.upload(
        "character.png", UploadFileConfig.builder().mimeType("image/png").build());

// Extend the video while introducing the reference character
Content videoContent = VideoContent.builder().uri(videoFile.uri().get()).build();
Content imageContent = ImageContent.builder().uri(characterImg.uri().get()).build();
Content textContent =
    TextContent.builder()
        .text(
            "Extend this video: have the character shown in <IMAGE_REF_0> enter the scene and wave.")
        .build();

List<Content> contents = Arrays.asList(videoContent, imageContent, textContent);

CreateModelInteraction params =
    CreateModelInteraction.builder()
        .model(Model.of("gemini-omni-1.1-flash"))
        .input(InteractionsInput.ofContent(contents))
        .build();

Interaction interaction =
    client.interactions.create(CreateInteractionRequestBody.of(params)).interaction().get();

if (interaction.outputVideo().isPresent() && interaction.outputVideo().get().data().isPresent()) {
  byte[] videoBytes = Base64.getDecoder().decode(interaction.outputVideo().get().data().get());
  Files.write(Paths.get("extended_with_character.mp4"), videoBytes);
}
Go
package main

import (
    "context"
    "encoding/base64"
    "log"
    "os"

    "google.golang.org/genai"
    "google.golang.org/genai/interactions/models/interactions"
    "google.golang.org/genai/interactions/models/operations"
)

func main() {
    ctx := context.Background()
    client, err := genai.NewClient(ctx, nil)
    if err != nil {
        log.Fatal(err)
    }

    // Upload base video and reference image using the Files API
    videoFile, err := client.Files.UploadFromPath(ctx, "my_video.mp4", &genai.UploadFileConfig{
        MIMEType: "video/mp4",
    })
    if err != nil {
        log.Fatal(err)
    }
    characterImg, err := client.Files.UploadFromPath(ctx, "character.png", &genai.UploadFileConfig{
        MIMEType: "image/png",
    })
    if err != nil {
        log.Fatal(err)
    }

    // Extend the video while introducing the reference character
    contents := []interactions.Content{
        interactions.NewContent(interactions.VideoContent{
            URI: genai.Ptr(videoFile.URI),
        }),
        interactions.NewContent(interactions.ImageContent{
            URI: genai.Ptr(characterImg.URI),
        }),
        interactions.NewContent(interactions.TextContent{
            Text: "Extend this video: have the character shown in <IMAGE_REF_0> enter the scene and wave.",
        }),
    }

    res, err := client.Interactions.Create(ctx, operations.CreateInteractionRequest{
        Body: operations.NewCreateInteractionRequestBody(interactions.CreateModelInteraction{
            Model: interactions.Model("gemini-omni-1.1-flash"),
            Input: interactions.NewInteractionsInput(contents),
        }),
    })
    if err != nil {
        log.Fatal(err)
    }

    if res.Interaction.OutputVideo != nil && res.Interaction.OutputVideo.Data != nil {
        videoBytes, err := base64.StdEncoding.DecodeString(*res.Interaction.OutputVideo.Data)
        if err != nil {
            log.Fatal(err)
        }
        if err := os.WriteFile("extended_with_character.mp4", videoBytes, 0644); err != nil {
            log.Fatal(err)
        }
    }
}
REST
curl -X POST "https://generativelanguage.googleapis.com/v1beta/interactions?key=$API_KEY"     -H "Content-Type: application/json"     -d '{
 "model": "gemini-omni-1.1-flash",
  "input": [
    {"type": "video", "uri": "'$VIDEO_URI'"},
    {"type": "image", "uri": "'$CHARACTER_IMG_URI'"},
    {"type": "text", "text": "Extend this video: have the character shown in <IMAGE_REF_0> enter the scene and wave."}
  ]
}'
擴充功能限制和規範
延長影片時,請注意下列規則和限制:
- 上傳影片中的對話:目前無法擴充上傳影片中有人說話的部分,加入額外對話 (如果角色保持沉默,或提示未加入對話,則支援這項功能)。
- 多輪語音擴充功能:透過多輪 (
previous_interaction_id) 擴充先前生成的影片時,系統支援生成語音對話或語音。 - 僅限短片結尾:擴充功能只能附加在影片結尾。 你無法在片段開頭插入內容,也無法延長片段中間的內容。
- 時間長度限制:上傳影片時,擴充功能的影片長度不得超過 10 秒 (使用多輪式除外)。
- 適用地區:目前歐洲經濟區、瑞士和英國的使用者無法延長上傳的影片 (所有適用地區皆支援延長模型生成的影片)。
最佳做法
- 使用 URI 傳送大型影片:如要傳送大於 4 MB 的影片 (如有 720p 以上的影片),請在
response_format中使用delivery="uri",以免超出酬載大小限制。 - 最佳化效能:設定
background=false、store=false和stream=false,加快同步一元產生速度。請注意,設定store=false後,生成的影片就無法在後續輪流使用previous_interaction_id編輯。 - 提示精確度:詳情請參閱提示指南一節。
限制
- 歐洲經濟區、瑞士和英國不支援上傳及編輯含有未成年人的圖片。
- 系統不支援上傳及編輯含有特定可辨識人物的圖片。
- 歐洲經濟區、瑞士和英國的使用者目前無法編輯或延長上傳的影片 (但可以編輯或延長模型生成的影片)。
- 上傳用於編輯和擴充的輸入影片時,長度不得超過 10 秒 (除非是透過多輪對話擴充模型生成的影片)。
- 影片擴充功能只能附加在影片結尾,不支援在片段開頭或中間擴充。
- 你無法延長上傳的影片,加入額外的對話 (角色可以保持沉默,或使用
previous_interaction_id進行多輪延長)。 - 不支援語音編輯。
- 目前的 API 版本不支援上傳音訊參考內容。
- 影片參考資料最適合用於相似度,系統會忽略影片參考資料中的任何音訊。影片參考資料最多可包含 3 個片段,每個片段最長 3 秒。
- 系統不支援參照或推論多部影片的內容。嘗試使用多部影片做為提示,可能會導致模型效能降低或輸出非預期的內容。
- 不支援佈建輸送量。
- 不支援系統指令、溫度參數、
top_p、停止序列和負面提示詞 (你可以將負面提示詞放在一般提示詞中,例如「不要執行 X」)。 - 系統不支援使用 YouTube 影片做為媒體來源。
技術詳細資料
- 所有生成的影片都會加上 SynthID 浮水印,觀眾無法察覺,但系統可透過程式偵測,驗證影片出處。
- 影片生成時間會因影片長度、解析度和目前的 API 負載而異。生成時間會因影片長度和解析度而異。
- Omni 會對輸入提示和生成的影片套用內容安全篩選器 (因地區而異)。系統會封鎖違反使用政策的提示。
- 系統完全支援英文 (EN),但尚未評估其他語言,因此其他語言可能可以運作,但結果可能有所不同。
Gemini Omni Flash 提示詞指南
本節提供提示和範例,說明如何有效提示 Gemini Omni Flash。
單一場景
根據預設,Omni Flash 會嘗試製作包含幾種不同鏡頭的影片。 並嘗試根據提示製作有趣的敘述內容。
如要讓輸出影片只包含單一場景,請務必提示:
- 在單一不間斷的場景中
- 一鏡到底
- 沒有場景剪接
例如:
Continuous, unbroken handheld shot of a fluffy tabby cat sitting on a sunny windowsill, looking out into a leafy garden. The cat's tail twitches slowly, and its ears rotate slightly toward ambient noises. Sunbeams illuminate dust motes in the air. Sound design: Gentle breeze, distant bird chirps. No dialogue.
移除多餘元素
如果生成的影片含有不想要的內容,請加入簡單的負面提示來避免:
- 沒有對話
- 沒有裝飾
- 沒有額外音效
編輯提示
簡單的提示詞最適合用於影片編輯。如果提示詞過於詳細,可能會導致非預期的變更。
以下提供更多簡單的編輯提示範例:
- 將這部影片轉換成動漫風格
- 幫這個人戴上時尚帽子
- 讓亮度更戲劇化
- 將招牌上的文字改為「Omni Flash」
編輯影片的特定部分時,請加入 "Keep everything else the same",確保視覺效果一致。
以下舉例說明如何套用這項技巧:
- 請避免:
In the video of the man sitting on the sofa, please add a small black cat that runs from the right side of the screen, jumps onto his lap, and then he starts to stroke its head while looking down.- 簡化:
Add a cat that jumps onto his lap, he begins to pet it.
Keep everything else the same.
- 簡化:
- 請避免:
Please remove the cell phone that the person is holding in their hand and fill in the background so it looks like they are just holding their hand empty.- 簡化:
Make the phone invisible. Keep everything else the
same.
- 簡化:
提示音訊
根據預設,模型會嘗試為影片生成合適的音軌。這可能不是您想要的結果。你可以使用提示詞描述想要的音訊類型。如要在影片中加入音樂,這點就特別重要:
- 加入平靜的背景音樂
- 影片的配樂是充滿活力的 Techno 節奏
- 背景音訊是低音質的廣播,正在播放歌曲
時間碼事件
你可以提示在影片中的特定時間點發生某些事件,不需要精確的語法,只要使用自然語言即可。這項功能特別適合用來建立自己的場景剪接、節奏或快速連拍序列。請參閱以下範例:
- 3 秒後,一名女子進入畫面。
- 背景音訊會在 5 秒時開始播放副歌。
- 每 2 秒切換到新影格。
- 在快速連拍序列中,每半秒 (24 fps 時為 12 個影格) 將場景變更為新位置。
您也可以使用時間碼語法:
[0-3s] A person is walking
[3-6s] They stop and turn around
[6-10s] They start running
Meta 提示
你可以要求 Gemini Omni Flash 注意影片生成的一般品質或原則:
- 請考慮微細節、表情和時間,打造非常豐富細膩但完全自然的場景。
- 詳細描述角色和環境。 將服裝設計原則套用至角色。請務必詳細說明場景中的人物、物品和物件。
- 在背景元素中加入大量適當的細節,讓場景感覺寫實自然。
- 製作快速連發影片,每 1 秒顯示一個不同的稀有
[thing],搭配輕快的音樂,並加入文字標籤。
影片中的文字
你可以提示在影片中加入文字,Gemini Omni 會以正確且可讀的方式呈現。如果影片中會出現自然生成的文字 (即使是背景元素),建議定義文字內容。
- 一次一個字:「你知道 Omni 可以生成很棒的文字嗎?」每個字詞會以不同的動畫樣式顯示 1 秒。沒有對話。
- 街上有一個路牌寫著「這是 Omni 生成的 AI 圖片」,店面寫著「All you need AI」,車牌號碼是「OMNI1.1」
延長影片的提示
你可以使用 Gemini Omni 1.1 Flash,透過 "Extend this video" 或 "The scene continues" 等提示延長影片。你可以延長影片 10 秒,總長度最多 40 秒。
Omni 會以原始影片的最後 10 秒做為背景資訊,製作延伸內容,確保影片、動作、角色和音訊保持一致。系統會編輯輸入影片中的部分結尾影格,讓轉場效果更流暢。
擴充時,本指南中的所有 Omni 提示訣竅仍適用:
- 描述擴展場景中的音訊,特別是需要變更音訊時:
"The music continues into the chorus" - 說明場景是否延續,或是否切換到新場景 (也許是相同角色):
"Show the same characters in the next scene" - 擴充時加入圖片和影片做為參考,有助於確保輸出內容準確,或介紹新角色:
"The person shown in the reference image enters the scene"、"The dog in the reference video <VIDEO_REF_0> jumps onto the sofa" - 如果使用時間戳記或時間碼語法,0 秒是指影片延長部分的開頭。如果延長 10 秒的影片,提示中的場景剪接會在 12 秒後發生:
"After 2s cut to a new scene with the same characters"
在提示中使用標記設定圖片和影片角色
你可以使用標記,將上傳的媒體繫結至特定生成角色。你可以指定每張圖片或影片是起始影格、最終影格還是參考影格。
1. 簡單代碼 (建議)
如果提示清楚指出媒體角色,您可以直接將圖片和影片繫結至角色:
<FIRST_FRAME>:將圖片做為影片的起始影格,例如:<FIRST_FRAME> a woman is walking<LAST_FRAME>:將圖片做為影片的最後一格,並轉換為該圖片。必須與<FIRST_FRAME>一併使用,例如:<FIRST_FRAME> <LAST_FRAME> a woman is walking<IMAGE_REF_N>:將圖片做為參考,例如:in the style of <IMAGE_REF_0> a woman <IMAGE_REF_1> is walking(結合第一張圖片的風格參考和第二張圖片的主體參考)。圖片參照從 0 開始。<VIDEO_REF_N>:將影片做為角色或物件參考,例如:the person in <VIDEO_REF_0> is playing the violin。影片參考資料的編號也是從 0 開始。
以下是 6 張參考圖片的範例:
[0-3s] A studio fashion sequence. Starting with woman <IMAGE_REF_0>, she is holding <IMAGE_REF_1>
[3-6s] Then we see the man <IMAGE_REF_2> holding <IMAGE_REF_3>
[6-10s] And finally another woman <IMAGE_REF_4> who is holding <IMAGE_REF_5> while walking.
2. 宣告來源和參照
如果有多個媒體輸入內容和多個角色,可以搭配自然語言指令使用明確的前置字元標記,您應在提示開頭聲明這些來源和參考資料。
[# Sources <FIRST_FRAME>@Image1]會使用第一張圖片做為起始影格。[# Sources <FIRST_FRAME>@Image1 <LAST_FRAME>@Image2]會使用第一張圖片做為起始影格,第二張圖片做為最終影格。[# Sources <FIRST_FRAME>@Image1 <LAST_FRAME>@Image1]會將第一張圖片做為第一個和最後一個影格,建立循環播放的影片。[# Sources <FIRST_FRAME>@Image1] [# References <IMAGE_REF_0>@Image2]會使用第一張圖片做為起始影格,第二張圖片做為參考。[# Sources <VIDEO_0>@Video1]會將影片做為主要來源影片,用於編輯或修改。[# Sources <PREVIOUS_VIDEO>@Video1]會使用前一輪的影片進行擴充。[# References <IMAGE_REF_0>@Image1]會以第一張圖片做為參考。[# References <IMAGE_REF_1>@Image2]會以第二張圖片做為參考。[# References <IMAGE_REF_0>@Image1 <IMAGE_REF_1>@Image2]會將兩張圖片做為參考。[# References <VIDEO_REF_0>@Video1]會以第一個影片做為參考。[# References <IMAGE_REF_0>@Image1 <VIDEO_REF_0>@Video1]會同時使用圖片和影片做為參考。
在提示結尾新增引導式指令:
- 起始影格:
"Use this image as the starting frame." - 如要透過開始和結束影格製作循環播放的影片,請按一下
"Use this image as the first frame and the last frame."。 - 參考圖像:
"Use the given image(s) as references for video generation. The images should not be used as literal initial frames." - 參考影片:
"Use the given video(s) as references. Do not use them as a source for video editing."
以下列舉幾個含有來源和參照宣告的提示:
起始影格與參考圖像的組合:
[# Sources <FIRST_FRAME>@Image1] [# References <IMAGE_REF_0>@Image2] a woman <IMAGE_REF_0> is walking. Use Image1 as the starting frame. Use Image2 as a reference for the video generation.
角色參考影片搭配物件參考圖像:
[# References <IMAGE_REF_0>@Image1 <VIDEO_REF_0>@Video1] The woman in <VIDEO_REF_0> is playing the violin shown in <IMAGE_REF_0>. Use Video1 as a character reference and Image1 as an object reference.
後續步驟
- 如要開始使用 Gemini Omni Flash,請在 Omni 快速入門 Colab 中進行實驗。
- 如要瞭解如何撰寫更有效的提示,請參閱「提示設計簡介」。