

Gemini Omni Flash (gemini-omni-1.1-flash)는 고속 동영상 생성, 편집, 영화 같은 제어를 위해 설계된 고성능 멀티모달 모델입니다.
Gemini Omni는 이전 동영상 모델과 차별화되는 다음과 같은 핵심 기능을 기반으로 빌드되었습니다.
- 기본 멀티모달: 텍스트, 이미지, 오디오, 동영상을 동시에 처리하여 더 일관되고 제어 가능한 출력을 제공합니다.
- 대화 기반 수정: Interactions API를 통해 사용 설정되며, 자연어 대화를 통해 동영상을 반복적으로 미세 조정하고 편집할 수 있습니다. 변경하려는 부분을 설명하면 모델이 수정 사항을 적용하면서 유지하려는 동영상 부분을 보존합니다.
- 세계에 대한 지식: Gemini Omni는 물리학에 대한 이해와 Gemini의 역사, 과학, 문화적 맥락에 대한 지식을 결합하여 사실적인 이미지와 의미 있는 스토리텔링 사이의 간극을 해소합니다.
텍스트로 동영상 생성
텍스트 프롬프트로 동영상을 생성합니다. 모델은 텍스트 설명을 기반으로 오디오가 포함된 동영상을 생성합니다. 최상의 결과를 얻으려면 장면 설명, 카메라 움직임, 조명, 분위기와 같은 세부정보를 포함하여 프롬프트를 작성하세요.
Python
import base64
from google import genai

client = genai.Client()

interaction = client.interactions.create(
    model="gemini-omni-1.1-flash",
    input="A marble rolling fast on a chain reaction style track, continuous smooth shot."
)
with open("marble.mp4", "wb") as f:
    f.write(base64.b64decode(interaction.output_video.data))
자바스크립트
import { GoogleGenAI } from '@google/genai';
import * as fs from 'fs';
const ai = new GoogleGenAI({});

const interaction = await ai.interactions.create({
  model: 'gemini-omni-1.1-flash',
  input: 'A marble rolling fast on a chain reaction style track, continuous smooth shot.',
});

if (interaction.output_video?.data) {
  fs.writeFileSync('marble.mp4', Buffer.from(interaction.output_video.data, 'base64'));
}
자바
import com.google.genai.Client;
import com.google.genai.gaos.models.interactions.CreateModelInteraction;
import com.google.genai.gaos.models.interactions.Interaction;
import com.google.genai.gaos.models.interactions.InteractionsInput;
import com.google.genai.gaos.models.interactions.Model;
import com.google.genai.gaos.models.operations.CreateInteractionRequestBody;
import java.nio.file.Files;
import java.nio.file.Paths;
import java.util.Base64;

Client client = new Client();

CreateModelInteraction params =
    CreateModelInteraction.builder()
        .model(Model.of("gemini-omni-1.1-flash"))
        .input(
            InteractionsInput.of(
                "A marble rolling fast on a chain reaction style track, continuous smooth shot."))
        .build();

Interaction interaction =
    client.interactions.create(CreateInteractionRequestBody.of(params)).interaction().get();

if (interaction.outputVideo().isPresent() && interaction.outputVideo().get().data().isPresent()) {
  byte[] videoBytes = Base64.getDecoder().decode(interaction.outputVideo().get().data().get());
  Files.write(Paths.get("marble.mp4"), videoBytes);
}
Go
package main

import (
    "context"
    "encoding/base64"
    "log"
    "os"

    "google.golang.org/genai"
    "google.golang.org/genai/interactions/models/interactions"
    "google.golang.org/genai/interactions/models/operations"
)

func main() {
    ctx := context.Background()
    client, err := genai.NewClient(ctx, nil)
    if err != nil {
        log.Fatal(err)
    }

    res, err := client.Interactions.Create(ctx, operations.CreateInteractionRequest{
        Body: operations.NewCreateInteractionRequestBody(interactions.CreateModelInteraction{
            Model: interactions.Model("gemini-omni-1.1-flash"),
            Input: interactions.NewInteractionsInput(
                "A marble rolling fast on a chain reaction style track, continuous smooth shot.",
            ),
        }),
    })
    if err != nil {
        log.Fatal(err)
    }

    if res.Interaction.OutputVideo != nil && res.Interaction.OutputVideo.Data != nil {
        videoBytes, err := base64.StdEncoding.DecodeString(*res.Interaction.OutputVideo.Data)
        if err != nil {
            log.Fatal(err)
        }
        if err := os.WriteFile("marble.mp4", videoBytes, 0644); err != nil {
            log.Fatal(err)
        }
    }
}
REST
curl -X POST "https://generativelanguage.googleapis.com/v1beta/interactions?key=$API_KEY" \
-H "Content-Type: application/json" \
-d '{
 "model": "gemini-omni-1.1-flash",
 "input": "A marble rolling fast on a chain reaction style track, continuous smooth shot."
}'
REST 응답 스키마
편의 필드 interaction.output_video는 SDK 전용입니다.
REST API를 직접 사용하는 경우 steps 배열에서 동영상 출력을 가져옵니다.
원시 REST JSON 구조:
{
  "steps": [
    { "type": "user_input", "content": [{"type": "text", "text": "..."}] },
    { "type": "thought", "content": [{"text": "...", "type": "thought"}] },
    {
      "type": "model_output",
      "content": [
        {
          "type": "video",
          "mime_type": "video/mp4",
          "data": "AAAAIGZ0eXBpc29t..." // Base64 encoded video data
        }
      ]
    }
  ],
  "id": "v1_...",
  "status": "completed",
  "model": "gemini-omni-1.1-flash",
  "object": "interaction"
}
가로세로 비율 제어
aspect_ratio을 "9:16"로 설정하여 세로 동영상을 만듭니다. 기본값은 가로 모드 (16:9)입니다.
Python
import base64
from google import genai

client = genai.Client()

interaction = client.interactions.create(
    model="gemini-omni-1.1-flash",
    input="A futuristic city with neon lights and flying cars, cyberpunk style",
    response_format={
        "type": "video",  # optional
        "aspect_ratio": "9:16"  # Supported values: "9:16", "16:9"
    }
)
with open("example.mp4", "wb") as f:
    f.write(base64.b64decode(interaction.output_video.data))
자바스크립트
import { GoogleGenAI } from '@google/genai';
import * as fs from 'fs';
const ai = new GoogleGenAI({});

const interaction = await ai.interactions.create({
  model: 'gemini-omni-1.1-flash',
  input: 'A futuristic city with neon lights and flying cars, cyberpunk style',
  response_format: {
    type: 'video', // optional
    aspect_ratio: '9:16' // Supported values: '9:16', '16:9'
  },
});

if (interaction.output_video?.data) {
  fs.writeFileSync('example.mp4', Buffer.from(interaction.output_video.data, 'base64'));
}
자바
import com.google.genai.Client;
import com.google.genai.gaos.models.interactions.CreateModelInteraction;
import com.google.genai.gaos.models.interactions.CreateModelInteractionResponseFormat;
import com.google.genai.gaos.models.interactions.Interaction;
import com.google.genai.gaos.models.interactions.InteractionsInput;
import com.google.genai.gaos.models.interactions.Model;
import com.google.genai.gaos.models.interactions.ResponseFormat;
import com.google.genai.gaos.models.interactions.VideoResponseFormat;
import com.google.genai.gaos.models.interactions.VideoResponseFormatAspectRatio;
import com.google.genai.gaos.models.operations.CreateInteractionRequestBody;
import java.nio.file.Files;
import java.nio.file.Paths;
import java.util.Base64;

Client client = new Client();

VideoResponseFormat videoFormat =
    VideoResponseFormat.builder()
        .aspectRatio(VideoResponseFormatAspectRatio.of("9:16"))
        .build();

CreateModelInteraction params =
    CreateModelInteraction.builder()
        .model(Model.of("gemini-omni-1.1-flash"))
        .input(
            InteractionsInput.of(
                "A futuristic city with neon lights and flying cars, cyberpunk style"))
        .responseFormat(CreateModelInteractionResponseFormat.of(ResponseFormat.of(videoFormat)))
        .build();

Interaction interaction =
    client.interactions.create(CreateInteractionRequestBody.of(params)).interaction().get();

if (interaction.outputVideo().isPresent() && interaction.outputVideo().get().data().isPresent()) {
  byte[] videoBytes = Base64.getDecoder().decode(interaction.outputVideo().get().data().get());
  Files.write(Paths.get("example.mp4"), videoBytes);
}
Go
package main

import (
    "context"
    "encoding/base64"
    "log"
    "os"

    "google.golang.org/genai"
    "google.golang.org/genai/interactions/models/interactions"
    "google.golang.org/genai/interactions/models/operations"
)

func main() {
    ctx := context.Background()
    client, err := genai.NewClient(ctx, nil)
    if err != nil {
        log.Fatal(err)
    }

    videoFormat := interactions.VideoResponseFormat{
        AspectRatio: interactions.VideoResponseFormatAspectRatioNineHundredAndSixteen.ToPointer(),
    }

    res, err := client.Interactions.Create(ctx, operations.CreateInteractionRequest{
        Body: operations.NewCreateInteractionRequestBody(interactions.CreateModelInteraction{
            Model: interactions.Model("gemini-omni-1.1-flash"),
            Input: interactions.NewInteractionsInput(
                "A futuristic city with neon lights and flying cars, cyberpunk style",
            ),
            ResponseFormat: genai.Ptr(interactions.NewCreateModelInteractionResponseFormat(
                interactions.NewResponseFormat(videoFormat),
            )),
        }),
    })
    if err != nil {
        log.Fatal(err)
    }

    if res.Interaction.OutputVideo != nil && res.Interaction.OutputVideo.Data != nil {
        videoBytes, err := base64.StdEncoding.DecodeString(*res.Interaction.OutputVideo.Data)
        if err != nil {
            log.Fatal(err)
        }
        if err := os.WriteFile("example.mp4", videoBytes, 0644); err != nil {
            log.Fatal(err)
        }
    }
}
REST
curl -X POST "https://generativelanguage.googleapis.com/v1beta/interactions?key=$API_KEY" \
-H "Content-Type: application/json" \
-d '{
 "model": "gemini-omni-1.1-flash",
 "input": "A futuristic city with neon lights and flying cars, cyberpunk style",
 "response_format": {
   "type": "video",
   "aspect_ratio": "9:16"
 }
}'
출력 해상도
response_format에서 resolution 매개변수를 사용하여 생성된 동영상의 출력 해상도를 제어합니다. 기본 해상도는 720p입니다.
| 값 | 설명 |
|---|---|
360p |
360p 출력 해상도 |
720p |
720p 출력 해상도 (기본값) |
1080p |
1080p 출력 (업스케일) |
4k |
4K 출력 (업스케일됨) |
Python
import base64
from google import genai

client = genai.Client()

interaction = client.interactions.create(
    model="gemini-omni-1.1-flash",
    input="A drone shot of a mountain landscape at sunrise.",
    response_format={
        "type": "video",
        "resolution": "1080p",
    },
)
with open("hires.mp4", "wb") as f:
    f.write(base64.b64decode(interaction.output_video.data))
자바스크립트
import { GoogleGenAI } from '@google/genai';
import * as fs from 'fs';
const ai = new GoogleGenAI({});

const interaction = await ai.interactions.create({
  model: 'gemini-omni-1.1-flash',
  input: 'A drone shot of a mountain landscape at sunrise.',
  response_format: {
    type: 'video',
    resolution: '1080p',
  },
});

if (interaction.output_video?.data) {
  fs.writeFileSync('hires.mp4', Buffer.from(interaction.output_video.data, 'base64'));
}
자바
import com.google.genai.Client;
import com.google.genai.gaos.models.interactions.CreateModelInteraction;
import com.google.genai.gaos.models.interactions.CreateModelInteractionResponseFormat;
import com.google.genai.gaos.models.interactions.Interaction;
import com.google.genai.gaos.models.interactions.InteractionsInput;
import com.google.genai.gaos.models.interactions.Model;
import com.google.genai.gaos.models.interactions.Resolution;
import com.google.genai.gaos.models.interactions.ResponseFormat;
import com.google.genai.gaos.models.interactions.VideoResponseFormat;
import com.google.genai.gaos.models.operations.CreateInteractionRequestBody;
import java.nio.file.Files;
import java.nio.file.Paths;
import java.util.Base64;

Client client = new Client();

VideoResponseFormat videoFormat =
    VideoResponseFormat.builder()
        .resolution(Resolution.of("1080p"))
        .build();

CreateModelInteraction params =
    CreateModelInteraction.builder()
        .model(Model.of("gemini-omni-1.1-flash"))
        .input(InteractionsInput.of("A drone shot of a mountain landscape at sunrise."))
        .responseFormat(CreateModelInteractionResponseFormat.of(ResponseFormat.of(videoFormat)))
        .build();

Interaction interaction =
    client.interactions.create(CreateInteractionRequestBody.of(params)).interaction().get();

if (interaction.outputVideo().isPresent() && interaction.outputVideo().get().data().isPresent()) {
  byte[] videoBytes = Base64.getDecoder().decode(interaction.outputVideo().get().data().get());
  Files.write(Paths.get("hires.mp4"), videoBytes);
}
Go
package main

import (
    "context"
    "encoding/base64"
    "log"
    "os"

    "google.golang.org/genai"
    "google.golang.org/genai/interactions/models/interactions"
    "google.golang.org/genai/interactions/models/operations"
)

func main() {
    ctx := context.Background()
    client, err := genai.NewClient(ctx, nil)
    if err != nil {
        log.Fatal(err)
    }

    videoFormat := interactions.VideoResponseFormat{
        Resolution: interactions.ResolutionOneThousandAndEightyp.ToPointer(),
    }

    res, err := client.Interactions.Create(ctx, operations.CreateInteractionRequest{
        Body: operations.NewCreateInteractionRequestBody(interactions.CreateModelInteraction{
            Model: interactions.Model("gemini-omni-1.1-flash"),
            Input: interactions.NewInteractionsInput("A drone shot of a mountain landscape at sunrise."),
            ResponseFormat: genai.Ptr(interactions.NewCreateModelInteractionResponseFormat(
                interactions.NewResponseFormat(videoFormat),
            )),
        }),
    })
    if err != nil {
        log.Fatal(err)
    }

    if res.Interaction.OutputVideo != nil && res.Interaction.OutputVideo.Data != nil {
        videoBytes, err := base64.StdEncoding.DecodeString(*res.Interaction.OutputVideo.Data)
        if err != nil {
            log.Fatal(err)
        }
        if err := os.WriteFile("hires.mp4", videoBytes, 0644); err != nil {
            log.Fatal(err)
        }
    }
}
REST
curl -X POST "https://generativelanguage.googleapis.com/v1beta/interactions?key=$API_KEY" \
-H "Content-Type: application/json" \
-d '{
 "model": "gemini-omni-1.1-flash",
 "input": "A drone shot of a mountain landscape at sunrise.",
 "response_format": {
   "type": "video",
   "resolution": "1080p"
 }
}'
이미지 동영상 변환 생성
텍스트 프롬프트와 함께 참고 이미지를 제공할 수 있습니다. 프롬프트에 따라 모델이 이미지를 사용하는 방법을 결정합니다. 제품 사진, 일러스트레이션 또는 사진에 생기를 불어넣는 데 유용합니다.
다음 예시에서는 물에서 뛰어오르는 물고기 그림의 참고 이미지를 사용하는 방법을 보여줍니다.
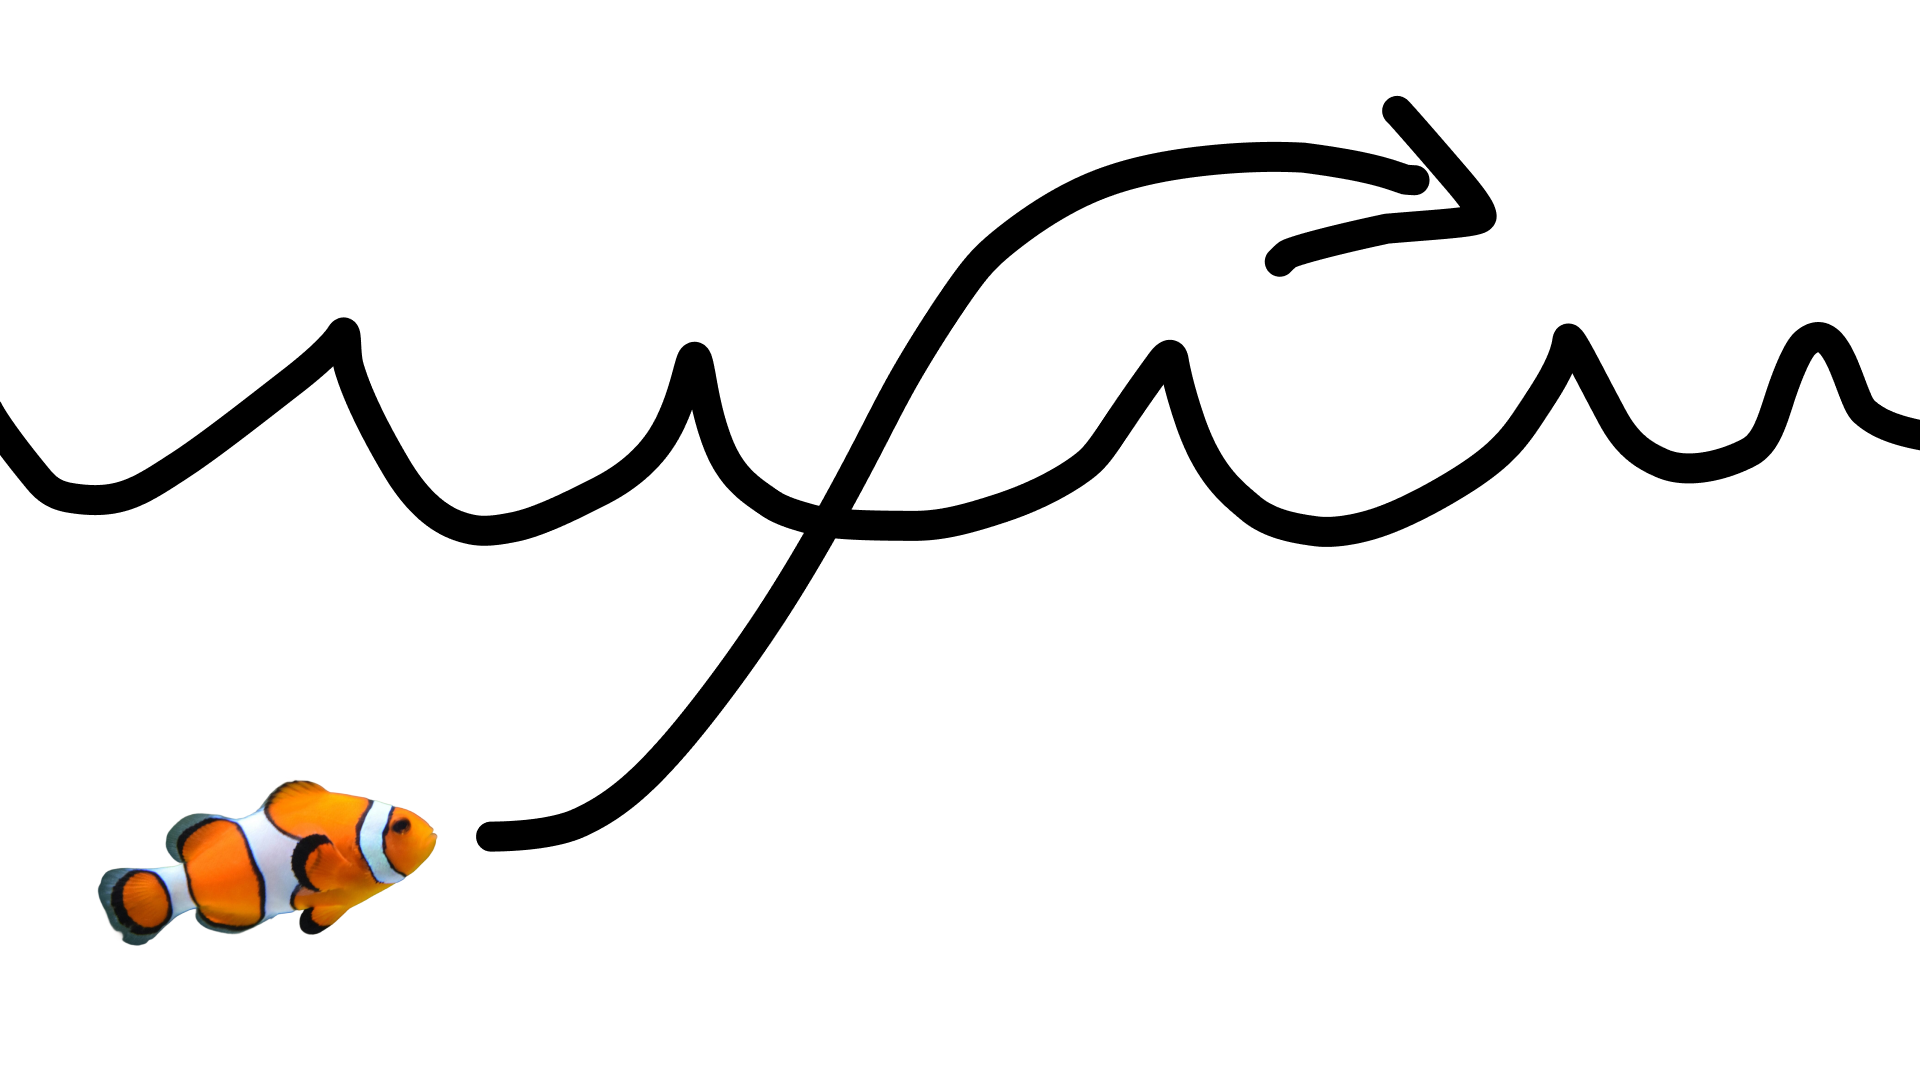
다음 프롬프트를 사용합니다.
turn this into realistic footage, using the drawing only as a guide for movement, do not show the drawing in the final video
그림의 사실적인 동영상을 생성합니다.
Python
import base64
from google import genai

client = genai.Client()

interaction = client.interactions.create(
    model="gemini-omni-1.1-flash",
    input=[
        {"type": "image", "data": base64_image, "mime_type": "image/jpeg"},
        {"type": "text", "text": "turn this into realistic footage, using the drawing only as a guide for movement, do not show the drawing in the final video"}
    ],
)
with open("clownfish.mp4", "wb") as f:
    f.write(base64.b64decode(interaction.output_video.data))
자바스크립트
import { GoogleGenAI } from '@google/genai';
import * as fs from 'fs';
const ai = new GoogleGenAI({});

const interaction = await ai.interactions.create({
  model: 'gemini-omni-1.1-flash',
  input: [
    { type: 'image', data: base64Image, mime_type: 'image/jpeg' },
    { type: 'text', text: 'turn this into realistic footage, using the drawing only as a guide for movement, do not show the drawing in the final video' }
  ]
});

if (interaction.output_video?.data) {
  fs.writeFileSync('clownfish.mp4', Buffer.from(interaction.output_video.data, 'base64'));
}
자바
import com.google.genai.Client;
import com.google.genai.gaos.models.interactions.Content;
import com.google.genai.gaos.models.interactions.CreateModelInteraction;
import com.google.genai.gaos.models.interactions.ImageContent;
import com.google.genai.gaos.models.interactions.ImageContentMimeType;
import com.google.genai.gaos.models.interactions.Interaction;
import com.google.genai.gaos.models.interactions.InteractionsInput;
import com.google.genai.gaos.models.interactions.Model;
import com.google.genai.gaos.models.interactions.TextContent;
import com.google.genai.gaos.models.operations.CreateInteractionRequestBody;
import java.nio.file.Files;
import java.nio.file.Paths;
import java.util.Arrays;
import java.util.Base64;
import java.util.List;

Client client = new Client();

byte[] imageBytes = Files.readAllBytes(Paths.get("drawing.jpg"));
String base64Image = Base64.getEncoder().encodeToString(imageBytes);

Content imageContent =
    ImageContent.builder()
        .data(base64Image)
        .mimeType(ImageContentMimeType.IMAGE_JPEG)
        .build();

Content textContent =
    TextContent.builder()
        .text(
            "turn this into realistic footage, using the drawing only as a guide for movement, do not show the drawing in the final video")
        .build();

List<Content> contents = Arrays.asList(imageContent, textContent);

CreateModelInteraction params =
    CreateModelInteraction.builder()
        .model(Model.of("gemini-omni-1.1-flash"))
        .input(InteractionsInput.ofContent(contents))
        .build();

Interaction interaction =
    client.interactions.create(CreateInteractionRequestBody.of(params)).interaction().get();

if (interaction.outputVideo().isPresent() && interaction.outputVideo().get().data().isPresent()) {
  byte[] videoBytes = Base64.getDecoder().decode(interaction.outputVideo().get().data().get());
  Files.write(Paths.get("clownfish.mp4"), videoBytes);
}
Go
package main

import (
    "context"
    "encoding/base64"
    "log"
    "os"

    "google.golang.org/genai"
    "google.golang.org/genai/interactions/models/interactions"
    "google.golang.org/genai/interactions/models/operations"
)

func main() {
    ctx := context.Background()
    client, err := genai.NewClient(ctx, nil)
    if err != nil {
        log.Fatal(err)
    }

    imageBytes, err := os.ReadFile("drawing.jpg")
    if err != nil {
        log.Fatal(err)
    }
    base64Image := base64.StdEncoding.EncodeToString(imageBytes)

    contents := []interactions.Content{
        interactions.NewContent(interactions.ImageContent{
            Data:     genai.Ptr(base64Image),
            MimeType: interactions.ImageContentMimeTypeImageJpeg.ToPointer(),
        }),
        interactions.NewContent(interactions.TextContent{
            Text: "turn this into realistic footage, using the drawing only as a guide for movement, do not show the drawing in the final video",
        }),
    }

    res, err := client.Interactions.Create(ctx, operations.CreateInteractionRequest{
        Body: operations.NewCreateInteractionRequestBody(interactions.CreateModelInteraction{
            Model: interactions.Model("gemini-omni-1.1-flash"),
            Input: interactions.NewInteractionsInput(contents),
        }),
    })
    if err != nil {
        log.Fatal(err)
    }

    if res.Interaction.OutputVideo != nil && res.Interaction.OutputVideo.Data != nil {
        videoBytes, err := base64.StdEncoding.DecodeString(*res.Interaction.OutputVideo.Data)
        if err != nil {
            log.Fatal(err)
        }
        if err := os.WriteFile("clownfish.mp4", videoBytes, 0644); err != nil {
            log.Fatal(err)
        }
    }
}
REST
curl -X POST "https://generativelanguage.googleapis.com/v1beta/interactions?key=$API_KEY" \
-H "Content-Type: application/json" \
-d '{
 "model": "gemini-omni-1.1-flash",
 "input": [
   {"type": "image", "data": "'"$BASE64_IMAGE"'", "mime_type": "image/jpeg"},
   {"type": "text", "text": "turn this into realistic footage, using the drawing only as a guide for movement, do not show the drawing in the final video"}
 ]
}'
첫 번째 및 마지막 프레임 보간
Gemini Omni Flash는 동영상 보간을 지원하므로 시작 이미지 (첫 번째 프레임)와 종료 이미지 (마지막 프레임) 사이를 부드럽게 전환하는 동영상을 생성할 수 있습니다.
input 목록에 두 이미지를 제공하고 프롬프트에 원하는 전환을 설명합니다. 모델은 첫 번째 프레임부터 마지막 프레임까지 장면을 애니메이션으로 표시합니다.
Python
import base64
from google import genai

client = genai.Client()

interaction = client.interactions.create(
    model="gemini-omni-1.1-flash",
    input=[
        {"type": "image", "data": first_frame_b64, "mime_type": "image/jpeg"},
        {"type": "image", "data": last_frame_b64, "mime_type": "image/jpeg"},
        {"type": "text", "text": "A smooth cinematic transition from a lush green forest at sunrise to a snowy forest under a starry night sky."}
    ],
)
with open("interpolation.mp4", "wb") as f:
    f.write(base64.b64decode(interaction.output_video.data))
자바스크립트
import { GoogleGenAI } from '@google/genai';
import * as fs from 'fs';
const ai = new GoogleGenAI({});

const interaction = await ai.interactions.create({
  model: 'gemini-omni-1.1-flash',
  input: [
    { type: 'image', data: firstFrameB64, mime_type: 'image/jpeg' },
    { type: 'image', data: lastFrameB64, mime_type: 'image/jpeg' },
    { type: 'text', text: 'A smooth cinematic transition from a lush green forest at sunrise to a snowy forest under a starry night sky.' }
  ]
});

if (interaction.output_video?.data) {
  fs.writeFileSync('interpolation.mp4', Buffer.from(interaction.output_video.data, 'base64'));
}
자바
import com.google.genai.Client;
import com.google.genai.gaos.models.interactions.Content;
import com.google.genai.gaos.models.interactions.CreateModelInteraction;
import com.google.genai.gaos.models.interactions.ImageContent;
import com.google.genai.gaos.models.interactions.ImageContentMimeType;
import com.google.genai.gaos.models.interactions.Interaction;
import com.google.genai.gaos.models.interactions.InteractionsInput;
import com.google.genai.gaos.models.interactions.Model;
import com.google.genai.gaos.models.interactions.TextContent;
import com.google.genai.gaos.models.operations.CreateInteractionRequestBody;
import java.nio.file.Files;
import java.nio.file.Paths;
import java.util.Arrays;
import java.util.Base64;
import java.util.List;

Client client = new Client();

String firstFrameB64 =
    Base64.getEncoder().encodeToString(Files.readAllBytes(Paths.get("first_frame.jpg")));
String lastFrameB64 =
    Base64.getEncoder().encodeToString(Files.readAllBytes(Paths.get("last_frame.jpg")));

Content firstFrame =
    ImageContent.builder()
        .data(firstFrameB64)
        .mimeType(ImageContentMimeType.IMAGE_JPEG)
        .build();

Content lastFrame =
    ImageContent.builder()
        .data(lastFrameB64)
        .mimeType(ImageContentMimeType.IMAGE_JPEG)
        .build();

Content prompt =
    TextContent.builder()
        .text(
            "A smooth cinematic transition from a lush green forest at sunrise to a snowy forest under a starry night sky.")
        .build();

List<Content> contents = Arrays.asList(firstFrame, lastFrame, prompt);

CreateModelInteraction params =
    CreateModelInteraction.builder()
        .model(Model.of("gemini-omni-1.1-flash"))
        .input(InteractionsInput.ofContent(contents))
        .build();

Interaction interaction =
    client.interactions.create(CreateInteractionRequestBody.of(params)).interaction().get();

if (interaction.outputVideo().isPresent() && interaction.outputVideo().get().data().isPresent()) {
  byte[] videoBytes = Base64.getDecoder().decode(interaction.outputVideo().get().data().get());
  Files.write(Paths.get("interpolation.mp4"), videoBytes);
}
Go
package main

import (
    "context"
    "encoding/base64"
    "log"
    "os"

    "google.golang.org/genai"
    "google.golang.org/genai/interactions/models/interactions"
    "google.golang.org/genai/interactions/models/operations"
)

func main() {
    ctx := context.Background()
    client, err := genai.NewClient(ctx, nil)
    if err != nil {
        log.Fatal(err)
    }

    firstBytes, err := os.ReadFile("first_frame.jpg")
    if err != nil {
        log.Fatal(err)
    }
    lastBytes, err := os.ReadFile("last_frame.jpg")
    if err != nil {
        log.Fatal(err)
    }

    firstFrameB64 := base64.StdEncoding.EncodeToString(firstBytes)
    lastFrameB64 := base64.StdEncoding.EncodeToString(lastBytes)

    contents := []interactions.Content{
        interactions.NewContent(interactions.ImageContent{
            Data:     genai.Ptr(firstFrameB64),
            MimeType: interactions.ImageContentMimeTypeImageJpeg.ToPointer(),
        }),
        interactions.NewContent(interactions.ImageContent{
            Data:     genai.Ptr(lastFrameB64),
            MimeType: interactions.ImageContentMimeTypeImageJpeg.ToPointer(),
        }),
        interactions.NewContent(interactions.TextContent{
            Text: "A smooth cinematic transition from a lush green forest at sunrise to a snowy forest under a starry night sky.",
        }),
    }

    res, err := client.Interactions.Create(ctx, operations.CreateInteractionRequest{
        Body: operations.NewCreateInteractionRequestBody(interactions.CreateModelInteraction{
            Model: interactions.Model("gemini-omni-1.1-flash"),
            Input: interactions.NewInteractionsInput(contents),
        }),
    })
    if err != nil {
        log.Fatal(err)
    }

    if res.Interaction.OutputVideo != nil && res.Interaction.OutputVideo.Data != nil {
        videoBytes, err := base64.StdEncoding.DecodeString(*res.Interaction.OutputVideo.Data)
        if err != nil {
            log.Fatal(err)
        }
        if err := os.WriteFile("interpolation.mp4", videoBytes, 0644); err != nil {
            log.Fatal(err)
        }
    }
}
REST
curl -X POST "https://generativelanguage.googleapis.com/v1beta/interactions?key=$API_KEY" \
-H "Content-Type: application/json" \
-d '{
 "model": "gemini-omni-1.1-flash",
 "input": [
   {"type": "image", "data": "'"$FIRST_FRAME_B64"'", "mime_type": "image/jpeg"},
   {"type": "image", "data": "'"$LAST_FRAME_B64"'", "mime_type": "image/jpeg"},
   {"type": "text", "text": "A smooth cinematic transition from a lush green forest at sunrise to a snowy forest under a starry night sky."}
 ]
}'
피사체 참조
참고 이미지로 제공된 특정 피사체를 포함하는 동영상을 생성할 수 있습니다. 예를 들어 다음 코드는 고양이와 털실의 이미지 2개를 제공하여 고양이가 털실을 가지고 노는 동영상을 생성하는 방법을 보여줍니다.
Python
import base64
from google import genai

client = genai.Client()

interaction = client.interactions.create(
    model="gemini-omni-1.1-flash",
    input=[
        {"type": "image", "data": cat_b64, "mime_type": "image/png"},
        {"type": "image", "data": yarn_b64, "mime_type": "image/png"},
        {"type": "text", "text": "A cat playfully batting at a ball of yarn."}
    ],
)
with open("cat.mp4", "wb") as f:
    f.write(base64.b64decode(interaction.output_video.data))
자바스크립트
import { GoogleGenAI } from '@google/genai';
import * as fs from 'fs';
const ai = new GoogleGenAI({});

const interaction = await ai.interactions.create({
  model: 'gemini-omni-1.1-flash',
  input: [
    { type: 'image', data: catData, mime_type: 'image/png' },
    { type: 'image', data: yarnData, mime_type: 'image/png' },
    { type: 'text', text: 'A cat playfully batting at a ball of yarn.' }
  ]
});

if (interaction.output_video?.data) {
  fs.writeFileSync('cat.mp4', Buffer.from(interaction.output_video.data, 'base64'));
}
자바
import com.google.genai.Client;
import com.google.genai.gaos.models.interactions.Content;
import com.google.genai.gaos.models.interactions.CreateModelInteraction;
import com.google.genai.gaos.models.interactions.ImageContent;
import com.google.genai.gaos.models.interactions.ImageContentMimeType;
import com.google.genai.gaos.models.interactions.Interaction;
import com.google.genai.gaos.models.interactions.InteractionsInput;
import com.google.genai.gaos.models.interactions.Model;
import com.google.genai.gaos.models.interactions.TextContent;
import com.google.genai.gaos.models.operations.CreateInteractionRequestBody;
import java.nio.file.Files;
import java.nio.file.Paths;
import java.util.Arrays;
import java.util.Base64;
import java.util.List;

Client client = new Client();

String catB64 = Base64.getEncoder().encodeToString(Files.readAllBytes(Paths.get("cat.png")));
String yarnB64 = Base64.getEncoder().encodeToString(Files.readAllBytes(Paths.get("yarn.png")));

Content catImage =
    ImageContent.builder()
        .data(catB64)
        .mimeType(ImageContentMimeType.IMAGE_PNG)
        .build();

Content yarnImage =
    ImageContent.builder()
        .data(yarnB64)
        .mimeType(ImageContentMimeType.IMAGE_PNG)
        .build();

Content textContent =
    TextContent.builder()
        .text("A cat playfully batting at a ball of yarn.")
        .build();

List<Content> contents = Arrays.asList(catImage, yarnImage, textContent);

CreateModelInteraction params =
    CreateModelInteraction.builder()
        .model(Model.of("gemini-omni-1.1-flash"))
        .input(InteractionsInput.ofContent(contents))
        .build();

Interaction interaction =
    client.interactions.create(CreateInteractionRequestBody.of(params)).interaction().get();

if (interaction.outputVideo().isPresent() && interaction.outputVideo().get().data().isPresent()) {
  byte[] videoBytes = Base64.getDecoder().decode(interaction.outputVideo().get().data().get());
  Files.write(Paths.get("cat.mp4"), videoBytes);
}
Go
package main

import (
    "context"
    "encoding/base64"
    "log"
    "os"

    "google.golang.org/genai"
    "google.golang.org/genai/interactions/models/interactions"
    "google.golang.org/genai/interactions/models/operations"
)

func main() {
    ctx := context.Background()
    client, err := genai.NewClient(ctx, nil)
    if err != nil {
        log.Fatal(err)
    }

    catBytes, err := os.ReadFile("cat.png")
    if err != nil {
        log.Fatal(err)
    }
    yarnBytes, err := os.ReadFile("yarn.png")
    if err != nil {
        log.Fatal(err)
    }

    catB64 := base64.StdEncoding.EncodeToString(catBytes)
    yarnB64 := base64.StdEncoding.EncodeToString(yarnBytes)

    contents := []interactions.Content{
        interactions.NewContent(interactions.ImageContent{
            Data:     genai.Ptr(catB64),
            MimeType: interactions.ImageContentMimeTypeImagePng.ToPointer(),
        }),
        interactions.NewContent(interactions.ImageContent{
            Data:     genai.Ptr(yarnB64),
            MimeType: interactions.ImageContentMimeTypeImagePng.ToPointer(),
        }),
        interactions.NewContent(interactions.TextContent{
            Text: "A cat playfully batting at a ball of yarn.",
        }),
    }

    res, err := client.Interactions.Create(ctx, operations.CreateInteractionRequest{
        Body: operations.NewCreateInteractionRequestBody(interactions.CreateModelInteraction{
            Model: interactions.Model("gemini-omni-1.1-flash"),
            Input: interactions.NewInteractionsInput(contents),
        }),
    })
    if err != nil {
        log.Fatal(err)
    }

    if res.Interaction.OutputVideo != nil && res.Interaction.OutputVideo.Data != nil {
        videoBytes, err := base64.StdEncoding.DecodeString(*res.Interaction.OutputVideo.Data)
        if err != nil {
            log.Fatal(err)
        }
        if err := os.WriteFile("cat.mp4", videoBytes, 0644); err != nil {
            log.Fatal(err)
        }
    }
}
REST
curl -X POST "https://generativelanguage.googleapis.com/v1beta/interactions?key=$API_KEY" \
-H "Content-Type: application/json" \
-d '{
 "model": "gemini-omni-1.1-flash",
 "input": [
   {"type": "image", "data": "'"$CAT_B64"'", "mime_type": "image/png"},
   {"type": "image", "data": "'"$YARN_B64"'", "mime_type": "image/png"},
   {"type": "text", "text": "A cat playfully batting at a ball of yarn."}
 ]
}'
Tasks 매개변수
video_config에서 task 매개변수를 사용하여 원하는 동작을 명시적으로 지정합니다. 예를 들어 모델이 이미지에서 동영상을 생성하도록 하려면 매개변수를 image_to_video로 설정하면 됩니다. 설정되지 않으면 모델이 프롬프트에서 원하는 내용을 추론합니다.
허용되는 값은 다음과 같습니다.
text_to_videoimage_to_videoreference_to_videoeditextend
다음 예에서는 이전에 표시된 이미지-동영상 예시에서 이를 설정하는 방법을 보여줍니다.
Python
import base64
from google import genai

client = genai.Client()

interaction = client.interactions.create(
    model="gemini-omni-1.1-flash",
    input=[
        {"type": "image", "data": base64_image, "mime_type": "image/jpeg"},
        {"type": "text", "text": "turn this into realistic footage, using the drawing only as a guide for movement, do not show the drawing in the final video"}
    ],
    generation_config={
      "video_config": {
        "task": "image_to_video",
      }
    },
)
with open("example.mp4", "wb") as f:
    f.write(base64.b64decode(interaction.output_video.data))
자바스크립트
import { GoogleGenAI } from "@google/genai";
import * as fs from 'fs';
const ai = new GoogleGenAI({});

const interaction = await ai.interactions.create({
  model: 'gemini-omni-1.1-flash',
  input: [
    { type: 'image', data: base64Image, mime_type: 'image/jpeg' },
    { type: 'text', text: 'turn this into realistic footage, using the drawing only as a guide for movement, do not show the drawing in the final video' }
  ],
  generationConfig: {
    videoConfig: {
      task: 'image_to_video',
    }
  }
});

if (interaction.output_video?.data) {
  fs.writeFileSync('example.mp4', Buffer.from(interaction.output_video.data, 'base64'));
}
자바
import com.google.genai.Client;
import com.google.genai.gaos.models.interactions.Content;
import com.google.genai.gaos.models.interactions.CreateModelInteraction;
import com.google.genai.gaos.models.interactions.GenerationConfig;
import com.google.genai.gaos.models.interactions.ImageContent;
import com.google.genai.gaos.models.interactions.ImageContentMimeType;
import com.google.genai.gaos.models.interactions.Interaction;
import com.google.genai.gaos.models.interactions.InteractionsInput;
import com.google.genai.gaos.models.interactions.Model;
import com.google.genai.gaos.models.interactions.Task;
import com.google.genai.gaos.models.interactions.TextContent;
import com.google.genai.gaos.models.interactions.VideoConfig;
import com.google.genai.gaos.models.operations.CreateInteractionRequestBody;
import java.nio.file.Files;
import java.nio.file.Paths;
import java.util.Arrays;
import java.util.Base64;
import java.util.List;

Client client = new Client();

byte[] imageBytes = Files.readAllBytes(Paths.get("drawing.jpg"));
String base64Image = Base64.getEncoder().encodeToString(imageBytes);

Content imageContent =
    ImageContent.builder()
        .data(base64Image)
        .mimeType(ImageContentMimeType.IMAGE_JPEG)
        .build();

Content textContent =
    TextContent.builder()
        .text(
            "turn this into realistic footage, using the drawing only as a guide for movement, do not show the drawing in the final video")
        .build();

List<Content> contents = Arrays.asList(imageContent, textContent);

GenerationConfig generationConfig =
    GenerationConfig.builder()
        .videoConfig(VideoConfig.builder().task(Task.IMAGE_TO_VIDEO).build())
        .build();

CreateModelInteraction params =
    CreateModelInteraction.builder()
        .model(Model.of("gemini-omni-1.1-flash"))
        .input(InteractionsInput.ofContent(contents))
        .generationConfig(generationConfig)
        .build();

Interaction interaction =
    client.interactions.create(CreateInteractionRequestBody.of(params)).interaction().get();

if (interaction.outputVideo().isPresent() && interaction.outputVideo().get().data().isPresent()) {
  byte[] videoBytes = Base64.getDecoder().decode(interaction.outputVideo().get().data().get());
  Files.write(Paths.get("example.mp4"), videoBytes);
}
Go
package main

import (
    "context"
    "encoding/base64"
    "log"
    "os"

    "google.golang.org/genai"
    "google.golang.org/genai/interactions/models/interactions"
    "google.golang.org/genai/interactions/models/operations"
)

func main() {
    ctx := context.Background()
    client, err := genai.NewClient(ctx, nil)
    if err != nil {
        log.Fatal(err)
    }

    imageBytes, err := os.ReadFile("drawing.jpg")
    if err != nil {
        log.Fatal(err)
    }
    base64Image := base64.StdEncoding.EncodeToString(imageBytes)

    contents := []interactions.Content{
        interactions.NewContent(interactions.ImageContent{
            Data:     genai.Ptr(base64Image),
            MimeType: interactions.ImageContentMimeTypeImageJpeg.ToPointer(),
        }),
        interactions.NewContent(interactions.TextContent{
            Text: "turn this into realistic footage, using the drawing only as a guide for movement, do not show the drawing in the final video",
        }),
    }

    generationConfig := &interactions.GenerationConfig{
        VideoConfig: &interactions.VideoConfig{
            Task: interactions.TaskImageToVideo.ToPointer(),
        },
    }

    res, err := client.Interactions.Create(ctx, operations.CreateInteractionRequest{
        Body: operations.NewCreateInteractionRequestBody(interactions.CreateModelInteraction{
            Model:            interactions.Model("gemini-omni-1.1-flash"),
            Input:            interactions.NewInteractionsInput(contents),
            GenerationConfig: generationConfig,
        }),
    })
    if err != nil {
        log.Fatal(err)
    }

    if res.Interaction.OutputVideo != nil && res.Interaction.OutputVideo.Data != nil {
        videoBytes, err := base64.StdEncoding.DecodeString(*res.Interaction.OutputVideo.Data)
        if err != nil {
            log.Fatal(err)
        }
        if err := os.WriteFile("example.mp4", videoBytes, 0644); err != nil {
            log.Fatal(err)
        }
    }
}
REST
curl -X POST "https://generativelanguage.googleapis.com/v1beta/interactions" \
  -H "x-goog-api-key: $GEMINI_API_KEY" \
  -H "Content-Type: application/json" \
  -d '{
    "model": "gemini-omni-1.1-flash",
    "input": [
      {
        "type": "image",
        "data": "'"$BASE64_IMAGE"'",
        "mime_type": "image/jpeg"
      },
      {
        "type": "text",
        "text": "turn this into realistic footage, using the drawing only as a guide for movement, do not show the drawing in the final video"
      }
    ],
    "generation_config": {
      "video_config": {
        "task": "image_to_video"
      }
    }
  }'
상태 저장 동영상 편집
후속 프롬프트를 사용하여 동영상을 생성하고 반복적으로 수정합니다. 각 턴은 이전 결과를 기반으로 합니다. 모델은 동영상 컨텍스트를 기억하여 변경사항을 적용하면서 언급하지 않은 요소는 유지합니다. previous_interaction_id을 사용하여 이전 동영상을 다시 업로드하지 않고도 대화 기록과 생성된 동영상 상태를 추적합니다.
다음 예에서는 첫 번째 동영상을 생성한 후 수정하는 방법을 보여줍니다.
Python
import base64
from google import genai

client = genai.Client()

# Turn 1: Generate initial video
res1 = client.interactions.create(model="gemini-omni-1.1-flash", input="A woman playing violin outdoors.")

# Turn 2: Edit the previous video
res2 = client.interactions.create(
    model="gemini-omni-1.1-flash",
    previous_interaction_id=res1.id,
    input="Make the violin invisible."
)
with open("example.mp4", "wb") as f:
    f.write(base64.b64decode(res2.output_video.data))
자바스크립트
import { GoogleGenAI } from '@google/genai';
import * as fs from 'fs';
const ai = new GoogleGenAI({});

// Turn 1: Generate initial video
const res1 = await ai.interactions.create({
  model: 'gemini-omni-1.1-flash',
  input: 'A woman playing violin outdoors.',
});

// Turn 2: Edit the previous video
const res2 = await ai.interactions.create({
  model: 'gemini-omni-1.1-flash',
  previous_interaction_id: res1.id,
  input: 'Make the violin invisible.',
});

if (res2.output_video?.data) {
  fs.writeFileSync('example.mp4', Buffer.from(res2.output_video.data, 'base64'));
}
자바
import com.google.genai.Client;
import com.google.genai.gaos.models.interactions.CreateModelInteraction;
import com.google.genai.gaos.models.interactions.Interaction;
import com.google.genai.gaos.models.interactions.InteractionsInput;
import com.google.genai.gaos.models.interactions.Model;
import com.google.genai.gaos.models.operations.CreateInteractionRequestBody;
import java.nio.file.Files;
import java.nio.file.Paths;
import java.util.Base64;

Client client = new Client();

// Turn 1: Generate initial video
CreateModelInteraction turn1Params =
    CreateModelInteraction.builder()
        .model(Model.of("gemini-omni-1.1-flash"))
        .input(InteractionsInput.of("A woman playing violin outdoors."))
        .build();

Interaction res1 =
    client.interactions.create(CreateInteractionRequestBody.of(turn1Params)).interaction().get();

// Turn 2: Edit the previous video
CreateModelInteraction turn2Params =
    CreateModelInteraction.builder()
        .model(Model.of("gemini-omni-1.1-flash"))
        .previousInteractionId(res1.id().get())
        .input(InteractionsInput.of("Make the violin invisible."))
        .build();

Interaction res2 =
    client.interactions.create(CreateInteractionRequestBody.of(turn2Params)).interaction().get();

if (res2.outputVideo().isPresent() && res2.outputVideo().get().data().isPresent()) {
  byte[] videoBytes = Base64.getDecoder().decode(res2.outputVideo().get().data().get());
  Files.write(Paths.get("example.mp4"), videoBytes);
}
Go
package main

import (
    "context"
    "encoding/base64"
    "log"
    "os"

    "google.golang.org/genai"
    "google.golang.org/genai/interactions/models/interactions"
    "google.golang.org/genai/interactions/models/operations"
)

func main() {
    ctx := context.Background()
    client, err := genai.NewClient(ctx, nil)
    if err != nil {
        log.Fatal(err)
    }

    // Turn 1: Generate initial video
    res1, err := client.Interactions.Create(ctx, operations.CreateInteractionRequest{
        Body: operations.NewCreateInteractionRequestBody(interactions.CreateModelInteraction{
            Model: interactions.Model("gemini-omni-1.1-flash"),
            Input: interactions.NewInteractionsInput("A woman playing violin outdoors."),
        }),
    })
    if err != nil {
        log.Fatal(err)
    }

    // Turn 2: Edit the previous video
    res2, err := client.Interactions.Create(ctx, operations.CreateInteractionRequest{
        Body: operations.NewCreateInteractionRequestBody(interactions.CreateModelInteraction{
            Model:                 interactions.Model("gemini-omni-1.1-flash"),
            PreviousInteractionID: res1.Interaction.ID,
            Input:                 interactions.NewInteractionsInput("Make the violin invisible."),
        }),
    })
    if err != nil {
        log.Fatal(err)
    }

    if res2.Interaction.OutputVideo != nil && res2.Interaction.OutputVideo.Data != nil {
        videoBytes, err := base64.StdEncoding.DecodeString(*res2.Interaction.OutputVideo.Data)
        if err != nil {
            log.Fatal(err)
        }
        if err := os.WriteFile("example.mp4", videoBytes, 0644); err != nil {
            log.Fatal(err)
        }
    }
}
REST
curl -X POST "https://generativelanguage.googleapis.com/v1beta/interactions?key=$API_KEY" \
-H "Content-Type: application/json" \
-d '{
 "model": "gemini-omni-1.1-flash",
 "previous_interaction_id": "'"$PREVIOUS_ID"'",
 "input": "Make the violin invisible."
}'
초기 동영상 예시:
수정된 동영상의 예:
대화의 각 턴마다 새 동영상이 생성됩니다. 이 모델은 이전 턴의 컨텍스트를 이해하므로 전체 장면을 다시 설명하지 않고도 조명 조정, 배경 바꾸기 등 점진적인 변경을 할 수 있습니다.
내 동영상 수정하기
Files API를 사용하여 동영상을 업로드하고 Gemini Omni Flash로 수정하세요.
다음 예에서는 원본 동영상을 수정하는 방법을 보여줍니다.
Python
import time
import base64
from google import genai

client = genai.Client()

# Upload video using the file API
video_file = client.files.upload(file="Video.mp4")

while video_file.state == "PROCESSING":
    print('Waiting for video to be processed.')
    time.sleep(10)
    video_file = client.files.get(name=video_file.name)

if video_file.state == "FAILED":
  raise ValueError(video_file.state)
print(f'Video processing complete: ' + video_file.uri)

# Edit your video
interaction = client.interactions.create(
    model="gemini-omni-1.1-flash",
    input=[
        {"type": "video", "uri": video_file.uri},
        {"type": "text", "text": "When the person touches the mirror, make the mirror ripple beautifully like liquid, and the person's arm turns into reflective mirror material"}
    ],
)
with open("example.mp4", "wb") as f:
    f.write(base64.b64decode(interaction.output_video.data))
자바스크립트
import { GoogleGenAI } from '@google/genai';
import * as fs from 'fs';
const ai = new GoogleGenAI({});

// Upload video using the file API
let videoFile = await ai.files.upload({
  file: 'Video.mp4',
});

while (videoFile.state === 'PROCESSING') {
  console.log('Waiting for video to be processed.');
  await new Promise(r => setTimeout(r, 10000));
  videoFile = await ai.files.get({ name: videoFile.name });
}

if (videoFile.state === 'FAILED') {
  throw new Error(videoFile.state);
}
console.log('Video processing complete: ' + videoFile.uri);

// Edit your video
const interaction = await ai.interactions.create({
  model: 'gemini-omni-1.1-flash',
  input: [
    { type: 'video', uri: videoFile.uri },
    { type: 'text', text: "When the person touches the mirror, make the mirror ripple beautifully like liquid, and the person's arm turns into reflective mirror material" }
  ],
});

if (interaction.output_video?.data) {
  fs.writeFileSync('example.mp4', Buffer.from(interaction.output_video.data, 'base64'));
}
자바
import com.google.genai.Client;
import com.google.genai.gaos.models.interactions.Content;
import com.google.genai.gaos.models.interactions.CreateModelInteraction;
import com.google.genai.gaos.models.interactions.Interaction;
import com.google.genai.gaos.models.interactions.InteractionsInput;
import com.google.genai.gaos.models.interactions.Model;
import com.google.genai.gaos.models.interactions.TextContent;
import com.google.genai.gaos.models.interactions.VideoContent;
import com.google.genai.gaos.models.operations.CreateInteractionRequestBody;
import com.google.genai.types.File;
import com.google.genai.types.FileState;
import com.google.genai.types.UploadFileConfig;
import java.nio.file.Files;
import java.nio.file.Paths;
import java.util.Arrays;
import java.util.Base64;
import java.util.List;

Client client = new Client();

// Upload video using the file API
File videoFile =
    client.files.upload("Video.mp4", UploadFileConfig.builder().mimeType("video/mp4").build());

while (videoFile.state().isPresent()
    && videoFile.state().get().knownEnum() == FileState.Known.PROCESSING) {
  System.out.println("Waiting for video to be processed.");
  Thread.sleep(10000);
  videoFile = client.files.get(videoFile.name().get(), null);
}

if (videoFile.state().isPresent()
    && videoFile.state().get().knownEnum() == FileState.Known.FAILED) {
  throw new IllegalStateException("Video processing failed: " + videoFile.state().get());
}
System.out.println("Video processing complete: " + videoFile.uri().orElse(""));

// Edit your video
Content videoContent = VideoContent.builder().uri(videoFile.uri().get()).build();
Content textContent =
    TextContent.builder()
        .text(
            "When the person touches the mirror, make the mirror ripple beautifully like liquid, and the person's arm turns into reflective mirror material")
        .build();

List<Content> contents = Arrays.asList(videoContent, textContent);

CreateModelInteraction params =
    CreateModelInteraction.builder()
        .model(Model.of("gemini-omni-1.1-flash"))
        .input(InteractionsInput.ofContent(contents))
        .build();

Interaction interaction =
    client.interactions.create(CreateInteractionRequestBody.of(params)).interaction().get();

if (interaction.outputVideo().isPresent() && interaction.outputVideo().get().data().isPresent()) {
  byte[] videoBytes = Base64.getDecoder().decode(interaction.outputVideo().get().data().get());
  Files.write(Paths.get("example.mp4"), videoBytes);
}
Go
package main

import (
    "context"
    "encoding/base64"
    "fmt"
    "log"
    "os"
    "time"

    "google.golang.org/genai"
    "google.golang.org/genai/interactions/models/interactions"
    "google.golang.org/genai/interactions/models/operations"
)

func main() {
    ctx := context.Background()
    client, err := genai.NewClient(ctx, nil)
    if err != nil {
        log.Fatal(err)
    }

    // Upload video using the file API
    videoFile, err := client.Files.UploadFromPath(ctx, "Video.mp4", &genai.UploadFileConfig{
        MIMEType: "video/mp4",
    })
    if err != nil {
        log.Fatal(err)
    }

    for videoFile.State == genai.FileStateProcessing {
        fmt.Println("Waiting for video to be processed.")
        time.Sleep(10 * time.Second)
        videoFile, err = client.Files.Get(ctx, videoFile.Name, nil)
        if err != nil {
            log.Fatal(err)
        }
    }

    if videoFile.State == genai.FileStateFailed {
        log.Fatalf("Video processing failed: %s", videoFile.State)
    }
    fmt.Printf("Video processing complete: %s\n", videoFile.URI)

    // Edit your video
    contents := []interactions.Content{
        interactions.NewContent(interactions.VideoContent{
            URI: genai.Ptr(videoFile.URI),
        }),
        interactions.NewContent(interactions.TextContent{
            Text: "When the person touches the mirror, make the mirror ripple beautifully like liquid, and the person's arm turns into reflective mirror material",
        }),
    }

    res, err := client.Interactions.Create(ctx, operations.CreateInteractionRequest{
        Body: operations.NewCreateInteractionRequestBody(interactions.CreateModelInteraction{
            Model: interactions.Model("gemini-omni-1.1-flash"),
            Input: interactions.NewInteractionsInput(contents),
        }),
    })
    if err != nil {
        log.Fatal(err)
    }

    if res.Interaction.OutputVideo != nil && res.Interaction.OutputVideo.Data != nil {
        videoBytes, err := base64.StdEncoding.DecodeString(*res.Interaction.OutputVideo.Data)
        if err != nil {
            log.Fatal(err)
        }
        if err := os.WriteFile("example.mp4", videoBytes, 0644); err != nil {
            log.Fatal(err)
        }
    }
}
REST
#!/bin/bash
VIDEO_B64=$(encode_file "$VIDEO_FILE")

curl -sS -w "\n[HTTP %{http_code}]\n" "https://generativelanguage.googleapis.com/v1beta/interactions" \
  -H "x-goog-api-key: ${API_KEY}" \
  -H "Content-Type: application/json" \
  -d @- <<EOF > video_editing_response.json
{
  "model": "gemini-omni-1.1-flash",
  "input": [
    {
      "type": "user_input",
      "content": [
        {
          "type": "video",
          "mime_type": "video/mp4",
          "data": "$VIDEO_B64"
        },
        {
          "type": "text",
          "text": "When the person touches the mirror, make the mirror ripple beautifully like liquid, and the person's arm turns into reflective mirror material"
        }
      ]
    }
  ],
  "response_format": { "type": "video" }
}
EOF
수정된 동영상의 예:
URI로 동영상 가져오기
response_format에서 delivery="uri" 파라미터를 사용하여 4MB보다 큰 생성된 동영상을 가져옵니다.
이렇게 하면 다운로드하기 전에 동영상이 ACTIVE될 때까지 폴링할 수 있는 Google 호스팅 URI가 반환됩니다.
Python
import time
from google import genai

client = genai.Client()

# 1. Request video via URI delivery
interaction = client.interactions.create(
    model="gemini-omni-1.1-flash",
    input="A beautiful sunset.",
    response_format={"type": "video", "delivery": "uri"}
)

# 2. Extract file name and poll for ACTIVE state
video_output = interaction.output_video
file_name = video_output.uri.split("/")[-1] # Extract ID

print("Waiting for video processing...")
while True:
    f_info = client.files.get(name=f"files/{file_name}")
    if f_info.state.name == "ACTIVE":
        break
    elif f_info.state.name == "FAILED":
        raise RuntimeError("Generation failed.")
    time.sleep(5)

# 3. Download the final video
client.files.download(file=video_output.uri, destination="output.mp4")
자바스크립트
import { GoogleGenAI } from '@google/genai';
const ai = new GoogleGenAI({});

// 1. Request video using URI delivery
const interaction = await ai.interactions.create({
  model: 'gemini-omni-1.1-flash',
  input: 'A beautiful sunset.',
  response_format: { type: 'video', delivery: 'uri' },
});

// 2. Extract filename and poll for ACTIVE state
const videoOutput = interaction.output_video;
const fileId = videoOutput.uri.match(/files\/([a-zA-Z0-9]+)/)[1];
const name = `files/${fileId}`;

console.log("Waiting for video processing...");
while (true) {
  const fInfo = await ai.files.get({ name });
  if (fInfo.state.name === 'ACTIVE') break;
  if (fInfo.state.name === 'FAILED') throw new Error("Generation failed.");
  await new Promise(r => setTimeout(r, 5000));
}

// 3. Download the final video
await ai.files.download({
  file: videoOutput,
  downloadPath: 'output.mp4',
});
console.log("💾 Saved video to output.mp4");
자바
import com.google.genai.Client;
import com.google.genai.gaos.models.interactions.CreateModelInteraction;
import com.google.genai.gaos.models.interactions.CreateModelInteractionResponseFormat;
import com.google.genai.gaos.models.interactions.Interaction;
import com.google.genai.gaos.models.interactions.InteractionsInput;
import com.google.genai.gaos.models.interactions.Model;
import com.google.genai.gaos.models.interactions.ResponseFormat;
import com.google.genai.gaos.models.interactions.VideoContent;
import com.google.genai.gaos.models.interactions.VideoResponseFormat;
import com.google.genai.gaos.models.interactions.VideoResponseFormatDelivery;
import com.google.genai.gaos.models.operations.CreateInteractionRequestBody;
import com.google.genai.types.File;
import com.google.genai.types.FileState;

Client client = new Client();

// 1. Request video using URI delivery
VideoResponseFormat videoFormat =
    VideoResponseFormat.builder()
        .delivery(VideoResponseFormatDelivery.URI)
        .build();

CreateModelInteraction params =
    CreateModelInteraction.builder()
        .model(Model.of("gemini-omni-1.1-flash"))
        .input(InteractionsInput.of("A beautiful sunset."))
        .responseFormat(CreateModelInteractionResponseFormat.of(ResponseFormat.of(videoFormat)))
        .build();

Interaction interaction =
    client.interactions.create(CreateInteractionRequestBody.of(params)).interaction().get();

// 2. Extract filename and poll for ACTIVE state
VideoContent videoOutput = interaction.outputVideo().get();
String uri = videoOutput.uri().get();
String[] parts = uri.split("/");
String fileName = parts[parts.length - 1];

System.out.println("Waiting for video processing...");
while (true) {
  File fileInfo = client.files.get("files/" + fileName, null);
  if (fileInfo.state().isPresent()
      && fileInfo.state().get().knownEnum() == FileState.Known.ACTIVE) {
    break;
  } else if (fileInfo.state().isPresent()
      && fileInfo.state().get().knownEnum() == FileState.Known.FAILED) {
    throw new RuntimeException("Generation failed.");
  }
  Thread.sleep(5000);
}

// 3. Download the final video
client.files.download(uri, "output.mp4", null);
Go
package main

import (
    "context"
    "fmt"
    "log"
    "os"
    "strings"
    "time"

    "google.golang.org/genai"
    "google.golang.org/genai/interactions/models/interactions"
    "google.golang.org/genai/interactions/models/operations"
)

func main() {
    ctx := context.Background()
    client, err := genai.NewClient(ctx, nil)
    if err != nil {
        log.Fatal(err)
    }

    // 1. Request video using URI delivery
    videoFormat := interactions.VideoResponseFormat{
        Delivery: interactions.VideoResponseFormatDeliveryURI.ToPointer(),
    }

    res, err := client.Interactions.Create(ctx, operations.CreateInteractionRequest{
        Body: operations.NewCreateInteractionRequestBody(interactions.CreateModelInteraction{
            Model: interactions.Model("gemini-omni-1.1-flash"),
            Input: interactions.NewInteractionsInput("A beautiful sunset."),
            ResponseFormat: genai.Ptr(interactions.NewCreateModelInteractionResponseFormat(
                interactions.NewResponseFormat(videoFormat),
            )),
        }),
    })
    if err != nil {
        log.Fatal(err)
    }

    // 2. Extract filename and poll for ACTIVE state
    uri := *res.Interaction.OutputVideo.URI
    parts := strings.Split(uri, "/")
    fileName := parts[len(parts)-1]

    fmt.Println("Waiting for video processing...")
    var fileInfo *genai.File
    for {
        fileInfo, err = client.Files.Get(ctx, "files/"+fileName, nil)
        if err != nil {
            log.Fatal(err)
        }
        if fileInfo.State == genai.FileStateActive {
            break
        } else if fileInfo.State == genai.FileStateFailed {
            log.Fatal("Generation failed.")
        }
        time.Sleep(5 * time.Second)
    }

    // 3. Download the final video
    videoBytes, err := client.Files.Download(ctx, genai.NewDownloadURIFromFile(fileInfo), nil)
    if err != nil {
        log.Fatal(err)
    }
    if err := os.WriteFile("output.mp4", videoBytes, 0644); err != nil {
        log.Fatal(err)
    }
}
REST
#!/bin/bash

# 1. Initial request to generate the video
RESPONSE=$(curl -s -X POST "https://generativelanguage.googleapis.com/v1beta/interactions?key=$API_KEY" \
-H "Content-Type: application/json" \
-d '{
 "model": "gemini-omni-1.1-flash",
 "input": "A beautiful sunset over a calm ocean.",
 "response_format": {"type": "video", "delivery": "uri"}
}')

# Extract FILE_ID from the URI (e.g., "files/abc-123" -> "abc-123")
FILE_URI=$(echo $RESPONSE | jq -r '.output_video.uri')
FILE_ID=$(echo $FILE_URI | cut -d'/' -f2)

echo "Video requested (ID: $FILE_ID). Waiting for processing..."

# 2. Polling loop
while true; do
 # Get current file status
 STATUS_JSON=$(curl -s -X GET "https://generativelanguage.googleapis.com/v1beta/files/$FILE_ID?key=$API_KEY")
 STATE=$(echo $STATUS_JSON | jq -r '.state')

 if [ "$STATE" == "ACTIVE" ]; then
   echo "Processing complete! Downloading..."
   break
 elif [ "$STATE" == "FAILED" ]; then
   echo "Error: Generation failed."
   exit 1
 else
   echo "Current state: $STATE... (waiting 5s)"
   sleep 5
 fi
done

# 3. Final download
curl -L -X GET "https://generativelanguage.googleapis.com/v1beta/files/$FILE_ID:download?alt=media&key=$API_KEY" \
--output "output.mp4"

echo "Done! Video saved to output.mp4"
원시 REST JSON 구조 (URI):
{
  "steps": [
    { "type": "user_input", "content": [{"type": "text", "text": "..."}] },
    { "type": "thought", "content": [{"text": "...", "type": "thought"}] },
    {
      "type": "model_output",
      "content": [
        {
          "type": "video",
          "mime_type": "video/mp4",
          "uri": "https://generativelanguage.googleapis.com/v1beta/files/...:download?alt=media"
        }
      ]
    }
  ],
  "id": "v1_...",
  "status": "completed",
  "model": "gemini-omni-1.1-flash",
  "object": "interaction"
}
동영상 확장 프로그램
클립의 끝부분에 끊김 없는 연속 동영상을 생성하여 기존 동영상을 연장합니다. 프롬프트에서 동영상이 어떻게 이어지기를 원하는지 설명합니다(예: "Extend this video" 또는 "Continue the scene: the camera pans across the mountains").
모델이 입력 동영상을 분석하여 3~10초 길이의 이어지는 동영상을 생성합니다.
다음과 같은 항목을 확장할 수 있습니다.
- 모델에서 생성한 동영상 (멀티턴):
previous_interaction_id를 참조하여 이전에 생성된 동영상을 확장합니다. 업로드된 동영상: 확장 프로그램 프롬프트와 함께 업로드된 동영상 파일 (Files API를 통해)을 제공합니다.
Python
import base64
from google import genai

client = genai.Client()

# Upload your video using the Files API
video_file = client.files.upload(file="my_video.mp4")

# Extend the video using prompt-based extension
interaction = client.interactions.create(
    model="gemini-omni-1.1-flash",
    input=[
        {"type": "video", "uri": video_file.uri},
        {"type": "text", "text": "Continue the scene."}
    ],
)
with open("extended.mp4", "wb") as f:
    f.write(base64.b64decode(interaction.output_video.data))
자바스크립트
import { GoogleGenAI } from '@google/genai';
import * as fs from 'fs';
const ai = new GoogleGenAI({});

// Upload your video using the Files API
let videoFile = await ai.files.upload({
  file: 'my_video.mp4',
});

while (videoFile.state === 'PROCESSING') {
  await new Promise(r => setTimeout(r, 10000));
  videoFile = await ai.files.get({ name: videoFile.name });
}

// Extend the video using prompt-based extension
const interaction = await ai.interactions.create({
  model: 'gemini-omni-1.1-flash',
  input: [
    { type: 'video', uri: videoFile.uri },
    { type: 'text', text: 'Continue the scene.' }
  ],
});

if (interaction.output_video?.data) {
  fs.writeFileSync('extended.mp4', Buffer.from(interaction.output_video.data, 'base64'));
}
자바
import com.google.genai.Client;
import com.google.genai.gaos.models.interactions.Content;
import com.google.genai.gaos.models.interactions.CreateModelInteraction;
import com.google.genai.gaos.models.interactions.Interaction;
import com.google.genai.gaos.models.interactions.InteractionsInput;
import com.google.genai.gaos.models.interactions.Model;
import com.google.genai.gaos.models.interactions.TextContent;
import com.google.genai.gaos.models.interactions.VideoContent;
import com.google.genai.gaos.models.operations.CreateInteractionRequestBody;
import com.google.genai.types.File;
import com.google.genai.types.UploadFileConfig;
import java.nio.file.Files;
import java.nio.file.Paths;
import java.util.Arrays;
import java.util.Base64;
import java.util.List;

Client client = new Client();

// Upload your video using the Files API
File videoFile =
    client.files.upload(
        "my_video.mp4", UploadFileConfig.builder().mimeType("video/mp4").build());

// Extend the video using prompt-based extension
Content videoContent = VideoContent.builder().uri(videoFile.uri().get()).build();
Content textContent = TextContent.builder().text("Continue the scene.").build();

List<Content> contents = Arrays.asList(videoContent, textContent);

CreateModelInteraction params =
    CreateModelInteraction.builder()
        .model(Model.of("gemini-omni-1.1-flash"))
        .input(InteractionsInput.ofContent(contents))
        .build();

Interaction interaction =
    client.interactions.create(CreateInteractionRequestBody.of(params)).interaction().get();

if (interaction.outputVideo().isPresent() && interaction.outputVideo().get().data().isPresent()) {
  byte[] videoBytes = Base64.getDecoder().decode(interaction.outputVideo().get().data().get());
  Files.write(Paths.get("extended.mp4"), videoBytes);
}
Go
package main

import (
    "context"
    "encoding/base64"
    "log"
    "os"

    "google.golang.org/genai"
    "google.golang.org/genai/interactions/models/interactions"
    "google.golang.org/genai/interactions/models/operations"
)

func main() {
    ctx := context.Background()
    client, err := genai.NewClient(ctx, nil)
    if err != nil {
        log.Fatal(err)
    }

    // Upload your video using the Files API
    videoFile, err := client.Files.UploadFromPath(ctx, "my_video.mp4", &genai.UploadFileConfig{
        MIMEType: "video/mp4",
    })
    if err != nil {
        log.Fatal(err)
    }

    // Extend the video using prompt-based extension
    contents := []interactions.Content{
        interactions.NewContent(interactions.VideoContent{
            URI: genai.Ptr(videoFile.URI),
        }),
        interactions.NewContent(interactions.TextContent{
            Text: "Continue the scene.",
        }),
    }

    res, err := client.Interactions.Create(ctx, operations.CreateInteractionRequest{
        Body: operations.NewCreateInteractionRequestBody(interactions.CreateModelInteraction{
            Model: interactions.Model("gemini-omni-1.1-flash"),
            Input: interactions.NewInteractionsInput(contents),
        }),
    })
    if err != nil {
        log.Fatal(err)
    }

    if res.Interaction.OutputVideo != nil && res.Interaction.OutputVideo.Data != nil {
        videoBytes, err := base64.StdEncoding.DecodeString(*res.Interaction.OutputVideo.Data)
        if err != nil {
            log.Fatal(err)
        }
        if err := os.WriteFile("extended.mp4", videoBytes, 0644); err != nil {
            log.Fatal(err)
        }
    }
}
REST
curl -X POST "https://generativelanguage.googleapis.com/v1beta/interactions?key=$API_KEY"     -H "Content-Type: application/json"     -d '{
 "model": "gemini-omni-1.1-flash",
 "input": [
   {"type": "video", "uri": "'"$VIDEO_URI"'"},
   {"type": "text", "text": "Continue the scene."}
 ]
}'
참조 미디어로 확장
프롬프트와 함께 input 배열에 참조 이미지를 제공하여 확장된 동영상에 새 캐릭터나 요소를 도입할 수 있습니다.
Python
import base64
from google import genai

client = genai.Client()

# Upload base video and reference image using the Files API
video_file = client.files.upload(file="my_video.mp4")
character_img = client.files.upload(file="character.png")

# Extend the video while introducing the reference character
interaction = client.interactions.create(
    model="gemini-omni-1.1-flash",
    input=[
        {"type": "video", "uri": video_file.uri},
        {"type": "image", "uri": character_img.uri},
        {"type": "text", "text": "Extend this video: have the character shown in <IMAGE_REF_0> enter the scene and wave."}
    ],
)
with open("extended_with_character.mp4", "wb") as f:
    f.write(base64.b64decode(interaction.output_video.data))
자바스크립트
import { GoogleGenAI } from '@google/genai';
import * as fs from 'fs';
const ai = new GoogleGenAI({});

// Upload base video and reference image using the Files API
let videoFile = await ai.files.upload({ file: 'my_video.mp4' });
let characterImg = await ai.files.upload({ file: 'character.png' });

while (videoFile.state === 'PROCESSING' || characterImg.state === 'PROCESSING') {
  await new Promise(r => setTimeout(r, 10000));
  videoFile = await ai.files.get({ name: videoFile.name });
  characterImg = await ai.files.get({ name: characterImg.name });
}

// Extend the video while introducing the reference character
const interaction = await ai.interactions.create({
  model: 'gemini-omni-1.1-flash',
  input: [
    { type: 'video', uri: videoFile.uri },
    { type: 'image', uri: characterImg.uri },
    { type: 'text', text: 'Extend this video: have the character shown in <IMAGE_REF_0> enter the scene and wave.' }
  ],
});

if (interaction.output_video?.data) {
  fs.writeFileSync('extended_with_character.mp4', Buffer.from(interaction.output_video.data, 'base64'));
}
자바
import com.google.genai.Client;
import com.google.genai.gaos.models.interactions.Content;
import com.google.genai.gaos.models.interactions.CreateModelInteraction;
import com.google.genai.gaos.models.interactions.ImageContent;
import com.google.genai.gaos.models.interactions.Interaction;
import com.google.genai.gaos.models.interactions.InteractionsInput;
import com.google.genai.gaos.models.interactions.Model;
import com.google.genai.gaos.models.interactions.TextContent;
import com.google.genai.gaos.models.interactions.VideoContent;
import com.google.genai.gaos.models.operations.CreateInteractionRequestBody;
import com.google.genai.types.File;
import com.google.genai.types.UploadFileConfig;
import java.nio.file.Files;
import java.nio.file.Paths;
import java.util.Arrays;
import java.util.Base64;
import java.util.List;

Client client = new Client();

// Upload base video and reference image using the Files API
File videoFile =
    client.files.upload(
        "my_video.mp4", UploadFileConfig.builder().mimeType("video/mp4").build());
File characterImg =
    client.files.upload(
        "character.png", UploadFileConfig.builder().mimeType("image/png").build());

// Extend the video while introducing the reference character
Content videoContent = VideoContent.builder().uri(videoFile.uri().get()).build();
Content imageContent = ImageContent.builder().uri(characterImg.uri().get()).build();
Content textContent =
    TextContent.builder()
        .text(
            "Extend this video: have the character shown in <IMAGE_REF_0> enter the scene and wave.")
        .build();

List<Content> contents = Arrays.asList(videoContent, imageContent, textContent);

CreateModelInteraction params =
    CreateModelInteraction.builder()
        .model(Model.of("gemini-omni-1.1-flash"))
        .input(InteractionsInput.ofContent(contents))
        .build();

Interaction interaction =
    client.interactions.create(CreateInteractionRequestBody.of(params)).interaction().get();

if (interaction.outputVideo().isPresent() && interaction.outputVideo().get().data().isPresent()) {
  byte[] videoBytes = Base64.getDecoder().decode(interaction.outputVideo().get().data().get());
  Files.write(Paths.get("extended_with_character.mp4"), videoBytes);
}
Go
package main

import (
    "context"
    "encoding/base64"
    "log"
    "os"

    "google.golang.org/genai"
    "google.golang.org/genai/interactions/models/interactions"
    "google.golang.org/genai/interactions/models/operations"
)

func main() {
    ctx := context.Background()
    client, err := genai.NewClient(ctx, nil)
    if err != nil {
        log.Fatal(err)
    }

    // Upload base video and reference image using the Files API
    videoFile, err := client.Files.UploadFromPath(ctx, "my_video.mp4", &genai.UploadFileConfig{
        MIMEType: "video/mp4",
    })
    if err != nil {
        log.Fatal(err)
    }
    characterImg, err := client.Files.UploadFromPath(ctx, "character.png", &genai.UploadFileConfig{
        MIMEType: "image/png",
    })
    if err != nil {
        log.Fatal(err)
    }

    // Extend the video while introducing the reference character
    contents := []interactions.Content{
        interactions.NewContent(interactions.VideoContent{
            URI: genai.Ptr(videoFile.URI),
        }),
        interactions.NewContent(interactions.ImageContent{
            URI: genai.Ptr(characterImg.URI),
        }),
        interactions.NewContent(interactions.TextContent{
            Text: "Extend this video: have the character shown in <IMAGE_REF_0> enter the scene and wave.",
        }),
    }

    res, err := client.Interactions.Create(ctx, operations.CreateInteractionRequest{
        Body: operations.NewCreateInteractionRequestBody(interactions.CreateModelInteraction{
            Model: interactions.Model("gemini-omni-1.1-flash"),
            Input: interactions.NewInteractionsInput(contents),
        }),
    })
    if err != nil {
        log.Fatal(err)
    }

    if res.Interaction.OutputVideo != nil && res.Interaction.OutputVideo.Data != nil {
        videoBytes, err := base64.StdEncoding.DecodeString(*res.Interaction.OutputVideo.Data)
        if err != nil {
            log.Fatal(err)
        }
        if err := os.WriteFile("extended_with_character.mp4", videoBytes, 0644); err != nil {
            log.Fatal(err)
        }
    }
}
REST
curl -X POST "https://generativelanguage.googleapis.com/v1beta/interactions?key=$API_KEY"     -H "Content-Type: application/json"     -d '{
 "model": "gemini-omni-1.1-flash",
  "input": [
    {"type": "video", "uri": "'$VIDEO_URI'"},
    {"type": "image", "uri": "'$CHARACTER_IMG_URI'"},
    {"type": "text", "text": "Extend this video: have the character shown in <IMAGE_REF_0> enter the scene and wave."}
  ]
}'
확장 프로그램 제약 조건 및 가이드라인
동영상을 연장할 때는 다음 규칙과 제약 조건에 유의하세요.
- 업로드된 동영상의 대화: 현재는 누군가 말하는 업로드된 동영상을 확장하여 대화를 추가할 수 없습니다 (캐릭터가 조용히 있거나 프롬프트에서 대화를 추가하지 않는 경우에는 지원됨).
- 멀티턴 음성 확장: 멀티턴 (
previous_interaction_id)을 통해 이전에 생성된 동영상을 확장할 때 음성 대화 또는 음성 생성이 지원됩니다. - 클립 끝에만 추가: 확장 프로그램은 동영상 끝에만 추가할 수 있습니다. 콘텐츠를 앞에 추가하거나 클립의 중간을 확장할 수는 없습니다.
- 길이 제한: 확장 프로그램에 사용할 동영상은 업로드 시 길이가 10초 이하여야 합니다 (멀티턴을 사용하는 경우 제외).
- 지역별 사용 가능 여부: 현재 유럽 경제 지역 (EEA), 스위스, 영국에서는 업로드된 동영상을 연장할 수 없습니다 (모델에서 생성된 동영상 연장은 사용 가능한 모든 지역에서 지원됨).
권장사항
- 대용량 동영상에 URI 전송 사용: 4MB보다 큰 동영상(사용 가능한 경우 720p 초과)의 경우
response_format에서delivery="uri"를 사용하여 페이로드 크기 제한을 방지합니다. - 최적화된 성능: 더 빠른 동기 단항 생성을 위해
background=false,store=false,stream=false를 설정합니다.store=false를 설정하면 생성된 동영상을previous_interaction_id를 사용하여 후속 턴에서 수정할 수 없습니다. - 프롬프트 정확성: 자세한 내용은 프롬프트 안내 섹션을 참고하세요.
제한사항
- 유럽 경제 지역, 스위스, 영국에서는 미성년자가 포함된 이미지를 업로드하거나 수정할 수 없습니다.
- 특정 식별 가능한 인물이 포함된 이미지를 업로드하고 수정하는 것은 지원되지 않습니다.
- 현재 유럽 경제 지역 (EEA), 스위스, 영국에서는 업로드된 동영상을 수정하거나 연장할 수 없습니다 (모델에서 생성된 동영상의 수정 또는 연장은 지원됨).
- 수정 및 연장을 위한 입력 동영상은 업로드 시 10초 이하여야 합니다 (멀티턴에서 모델이 생성한 동영상을 연장하는 경우는 제외).
- 동영상 연장은 동영상 끝에 추가하는 것만 가능하며, 클립의 시작 부분에 추가하거나 중간 부분을 연장하는 것은 지원되지 않습니다.
- 누군가 말하는 업로드된 동영상을 확장하여 추가 대화를 추가할 수는 없습니다 (캐릭터는 무음으로 유지하거나
previous_interaction_id를 사용한 멀티턴 확장 기능을 사용할 수 있음). - 음성 편집은 지원되지 않습니다.
- 현재 버전의 API에서는 오디오 참조 업로드가 지원되지 않습니다.
- 동영상 참조는 인물 사진에 가장 적합하며 동영상 참조의 오디오는 무시됩니다. 동영상 참조는 최대 3개의 클립을 지원하며 각 클립의 길이는 최대 3초입니다.
- 여러 동영상에 걸쳐 참조하거나 추론하는 것은 지원되지 않습니다. 다중 동영상 프롬프트를 시도하면 모델 성능이 저하되거나 예기치 않은 출력이 발생할 수 있습니다.
- 프로비저닝된 처리량은 지원되지 않습니다.
- 시스템 안내, 온도,
top_p, 중지 시퀀스, 부정적 프롬프트는 지원되지 않습니다. 부정적 프롬프트는 일반 프롬프트에 입력할 수 있습니다 (예: 'X를 하지 마세요'). - YouTube 동영상을 미디어 소스로 사용하는 것은 지원되지 않습니다.
기술 세부정보
- 생성된 모든 동영상에는 시청자에게는 보이지 않지만 출처 확인을 위해 프로그래매틱 방식으로 감지할 수 있는 SynthID 워터마크가 포함됩니다.
- 동영상 생성 시간은 길이, 해상도, 현재 API 로드에 따라 다릅니다. 길고 해상도가 높은 동영상은 생성하는 데 시간이 더 오래 걸립니다.
- Omni는 입력 프롬프트와 생성된 동영상에 콘텐츠 안전 필터를 적용합니다 (지역에 따라 다름). 사용 정책을 위반하는 프롬프트는 차단됩니다.
- 영어 (EN)는 완전히 지원되지만 다른 언어는 평가되지 않았으므로 작동할 수도 있지만 결과는 다를 수 있습니다.
Gemini Omni Flash 프롬프트 가이드
이 섹션에는 Gemini Omni Flash에 효과적으로 프롬프트를 입력하는 방법에 관한 팁과 예시가 포함되어 있습니다.
단일 장면
기본적으로 Omni Flash는 몇 가지 다른 장면이 포함된 동영상을 만들려고 시도합니다. 프롬프트를 기반으로 흥미로운 이야기를 만들려고 시도합니다.
출력 동영상에 단일 장면이 포함되어야 하는 경우 다음과 같이 프롬프트를 입력해야 합니다.
- 단일 끊김 없는 장면
- 하나의 연속된 샷으로
- 장면 자르기 없음
예를 들면 다음과 같습니다.
Continuous, unbroken handheld shot of a fluffy tabby cat sitting on a sunny windowsill, looking out into a leafy garden. The cat's tail twitches slowly, and its ears rotate slightly toward ambient noises. Sunbeams illuminate dust motes in the air. Sound design: Gentle breeze, distant bird chirps. No dialogue.
원치 않는 요소 삭제
생성된 동영상에 원치 않는 항목이 포함되어 있으면 간단한 부정적 프롬프트를 포함하여 이를 방지하세요.
- 대화 없음
- 장식 없음
- 추가 음향 효과 없음
수정을 위한 프롬프트
동영상 편집에는 간단한 프롬프트가 가장 적합합니다. 지나치게 설명적인 프롬프트는 의도하지 않은 변경으로 이어질 수 있습니다.
다음은 간단한 수정 프롬프트의 추가 예입니다.
- 이 동영상을 애니메이션으로 만들어 줘.
- 이 사람에게 세련된 모자를 씌워 줘
- 조명을 더 극적으로 바꿔 줘
- 표지판의 텍스트를 'Omni Flash'로 변경합니다.
동영상의 특정 부분을 수정할 때는 "Keep everything else the same"를 포함하여 시각적 일관성을 유지하세요.
다음은 이 기법을 적용하는 방법을 보여주는 몇 가지 예입니다.
- 피해야 할 사항:
In the video of the man sitting on the sofa, please add a small black cat that runs from the right side of the screen, jumps onto his lap, and then he starts to stroke its head while looking down.- 단순화:
Add a cat that jumps onto his lap, he begins to pet it.
Keep everything else the same.
- 단순화:
- 피해야 할 사항:
Please remove the cell phone that the person is holding in their hand and fill in the background so it looks like they are just holding their hand empty.- 단순화:
Make the phone invisible. Keep everything else the
same.
- 단순화:
오디오 프롬프트
기본적으로 모델은 동영상에 적합한 오디오 트랙을 생성하려고 시도합니다. 이 방법이 항상 원하는 결과로 이어지는 것은 아닙니다. 프롬프트를 사용하여 원하는 오디오 유형을 설명할 수 있습니다. 동영상에 음악을 포함하려는 경우 특히 중요합니다.
- 차분한 배경 음악 포함
- 동영상에 활기찬 테크노 비트가 있습니다.
- 오디오는 배경에서 노래를 재생하는 낮은 음질의 라디오 방송입니다.
타이밍 이벤트
동영상에서 특정 시간에 발생할 일을 요청할 수 있으며, 정확한 문법이 필요하지 않고 자연어를 사용할 수 있습니다. 이 기능은 특히 자체 장면 전환, 리듬 또는 연사 시퀀스를 만드는 데 유용합니다. 예는 다음을 참고하세요.
- 3초 후 여성이 장면으로 들어옵니다.
- 5초에 백그라운드 오디오에서 코러스가 시작됩니다.
- 2초마다 새로운 프레임으로 전환됩니다.
- 연속적인 시퀀스에서 0.5초 (24fps에서 12프레임)마다 장면을 새 위치로 변경합니다.
타임코드 구문을 사용할 수도 있습니다.
[0-3s] A person is walking
[3-6s] They stop and turn around
[6-10s] They start running
메타 프롬프트 작성
Gemini Omni Flash에게 동영상 생성의 일반적인 품질이나 원칙에 주의를 기울여 달라고 요청할 수 있습니다.
- 미세한 디테일, 표정, 타이밍을 고려하여 매우 풍부하고 섬세하지만 완전히 자연스러운 장면을 만드세요.
- 캐릭터와 환경을 매우 자세하게 설명하세요. 캐릭터에 의상 디자인 원칙을 적용합니다. 장면에 있는 사람, 항목, 객체를 매우 구체적으로 설명하세요.
- 배경 요소에 적절한 세부정보를 많이 포함하여 장면이 사실적이고 자연스럽게 느껴지도록 합니다.
- 1초마다 다른 희귀한
[thing]를 보여주는 래피드 파이어 동영상을 만들어 줘. 신나는 음악을 넣고 텍스트를 포함해 사물을 라벨링해 줘.
동영상의 텍스트
동영상에 텍스트를 포함하도록 프롬프트를 입력하면 Gemini Omni가 올바르고 읽기 쉬운 방식으로 렌더링합니다. 동영상에 자연스럽게 발생하는 텍스트가 있는 경우(배경 요소 포함) 텍스트의 내용을 정의하는 것이 좋습니다.
- 화면에 한 번에 한 단어씩 표시됩니다. 'Omni가, 멋진, 텍스트를, 생성할 수 있다는 사실을, 알고 계셨나요?' 각 단어는 서로 다른 애니메이션 스타일로 1초 동안 표시됩니다. 대화가 없습니다.
- 'This is an AI generation by Omni'라고 적힌 거리 표지판이 있고, 'All you need AI'라고 적힌 상점 전면이 있으며, 번호판이 'OMNI1.1'인 자동차가 있습니다.
동영상 연장을 위한 프롬프트
Gemini Omni 1.1 Flash를 사용하면 "Extend this video" 또는 "The scene continues"과 같은 프롬프트로 동영상을 확장할 수 있습니다. 동영상을 10초씩 최대 총 길이 40초까지 연장할 수 있습니다.
Omni는 원본 동영상의 마지막 10초를 컨텍스트로 사용하여 동영상, 동작, 캐릭터, 오디오를 일관되게 유지하는 확장 프로그램을 만듭니다. 입력 동영상의 일부 마지막 프레임이 수정되어 전환이 매끄럽게 이루어집니다.
확장할 때 이 가이드의 모든 Omni 프롬프트 팁이 계속 적용됩니다.
- 확장된 장면의 오디오를 설명합니다. 특히 오디오를 변경해야 하는 경우에 유용합니다.
"The music continues into the chorus" - 장면이 계속되는지 아니면 새로운 장면으로 샷이 전환되는지 설명합니다 (동일한 캐릭터가 등장할 수도 있음).
"Show the same characters in the next scene" - 출력의 정확성을 유지하거나 새로운 캐릭터를 소개하기 위해 확장할 때 이미지와 동영상을 참조로 포함하세요.
"The person shown in the reference image enters the scene","The dog in the reference video <VIDEO_REF_0> jumps onto the sofa" - 타임스탬프 또는 타임코드 문법을 사용하는 경우 0초는 동영상의 확장된 부분의 시작을 나타냅니다. 10초 동영상을 연장하는 경우 이 프롬프트의 장면 전환은 12초 후에 발생합니다.
"After 2s cut to a new scene with the same characters"
프롬프트에서 태그를 사용하여 이미지 및 동영상 역할 설정
태그를 사용하여 업로드된 미디어를 특정 생성 역할에 바인딩할 수 있습니다. 이를 통해 각 이미지 또는 동영상이 시작 프레임인지, 최종 프레임인지, 참조인지 지정할 수 있습니다.
1. 단순 태그 (권장)
미디어 역할이 프롬프트에서 명확한 간단한 경우 이미지와 동영상을 역할에 직접 바인드할 수 있습니다.
<FIRST_FRAME>: 이미지를 동영상의 시작 프레임으로 사용합니다(예:<FIRST_FRAME> a woman is walking).<LAST_FRAME>: 이미지를 동영상의 최종 프레임으로 사용하여 전환합니다.<FIRST_FRAME>와 함께 사용해야 합니다(예:<FIRST_FRAME> <LAST_FRAME> a woman is walking).<IMAGE_REF_N>: 이미지를 참조로 사용합니다 (예:in the style of <IMAGE_REF_0> a woman <IMAGE_REF_1> is walking은 첫 번째 이미지의 스타일 참조와 두 번째 이미지의 피사체 참조를 결합함). 이미지 참조는 0부터 시작합니다.<VIDEO_REF_N>: 동영상을 캐릭터 또는 객체 참조로 사용합니다(예:the person in <VIDEO_REF_0> is playing the violin). 동영상 참조도 0부터 시작합니다.
다음은 참조 이미지가 6개인 예시입니다.
[0-3s] A studio fashion sequence. Starting with woman <IMAGE_REF_0>, she is holding <IMAGE_REF_1>
[3-6s] Then we see the man <IMAGE_REF_2> holding <IMAGE_REF_3>
[6-10s] And finally another woman <IMAGE_REF_4> who is holding <IMAGE_REF_5> while walking.
2. 소스 및 참조 선언
미디어 입력이 여러 개이고 역할이 여러 개인 더 복잡한 경우에는 자연어 요청 사항과 함께 명시적 접두사 태그를 사용할 수 있습니다. 프롬프트 시작 부분에 이러한 소스와 참조를 선언해야 합니다.
[# Sources <FIRST_FRAME>@Image1]는 첫 번째 이미지를 시작 프레임으로 사용합니다.[# Sources <FIRST_FRAME>@Image1 <LAST_FRAME>@Image2]은 첫 번째 이미지를 시작 프레임으로, 두 번째 이미지를 최종 프레임으로 사용합니다.[# Sources <FIRST_FRAME>@Image1 <LAST_FRAME>@Image1]는 첫 번째 이미지를 첫 번째 프레임과 마지막 프레임으로 모두 사용하여 연속 재생되는 동영상을 만듭니다.[# Sources <FIRST_FRAME>@Image1] [# References <IMAGE_REF_0>@Image2]는 첫 번째 이미지를 시작 프레임으로 사용하고 두 번째 이미지를 참조로 사용합니다.[# Sources <VIDEO_0>@Video1]는 동영상을 기본 소스 동영상으로 사용하여 편집하거나 수정합니다.[# Sources <PREVIOUS_VIDEO>@Video1]는 이전 턴의 동영상을 사용하여 확장합니다.[# References <IMAGE_REF_0>@Image1]은 첫 번째 이미지를 참조로 사용합니다.[# References <IMAGE_REF_1>@Image2]는 두 번째 이미지를 참조로 사용합니다.[# References <IMAGE_REF_0>@Image1 <IMAGE_REF_1>@Image2]는 두 이미지를 모두 참조로 사용합니다.[# References <VIDEO_REF_0>@Video1]에서는 첫 번째 동영상을 참조로 사용합니다.[# References <IMAGE_REF_0>@Image1 <VIDEO_REF_0>@Video1]는 이미지와 동영상을 모두 참조로 사용합니다.
프롬프트 끝에 안내 요청 사항을 추가합니다.
- 시작 프레임:
"Use this image as the starting frame." - 시작 프레임과 종료 프레임을 통해 반복되는 동영상:
"Use this image as the first frame and the last frame." - 참고 이미지:
"Use the given image(s) as references for video generation. The images should not be used as literal initial frames." - 참조 동영상:
"Use the given video(s) as references. Do not use them as a source for video editing."
소스 및 참조 선언이 포함된 프롬프트의 예는 다음과 같습니다.
시작 프레임과 참고 이미지를 결합한 경우:
[# Sources <FIRST_FRAME>@Image1] [# References <IMAGE_REF_0>@Image2] a woman <IMAGE_REF_0> is walking. Use Image1 as the starting frame. Use Image2 as a reference for the video generation.
캐릭터 참조 동영상과 결합된 객체 참고 이미지:
[# References <IMAGE_REF_0>@Image1 <VIDEO_REF_0>@Video1] The woman in <VIDEO_REF_0> is playing the violin shown in <IMAGE_REF_0>. Use Video1 as a character reference and Image1 as an object reference.
다음 단계
- Omni 빠른 시작 Colab에서 실험하여 Gemini Omni Flash를 시작하세요.
- 프롬프트 설계 소개를 통해 더 나은 프롬프트를 작성하는 방법을 알아보세요.