

Gemini Omni Flash (gemini-omni-1.1-flash) הוא מודל מולטימודאלי עם ביצועים גבוהים שנועד ליצירה, לעריכה ולשליטה קולנועית של סרטונים במהירות גבוהה.
Gemini Omni מבוסס על היכולות הבסיסיות הבאות שמבדילות אותו ממודלים קודמים ליצירת סרטונים:
- מולטי-מודאליות מובנית: הוא מעבד טקסט, תמונות, אודיו וסרטונים בו-זמנית, ומספק פלט מגובש, עקבי וניתן לשליטה.
- עריכה בממשק שיחה: האפשרות הזו מופעלת על ידי Interactions API, והיא מאפשרת לכם לשפר ולערוך את הסרטונים באופן איטרטיבי באמצעות שיחה בשפה טבעית. מתארים את השינוי שרוצים לעשות, והמודל מבצע את העריכה תוך שמירה על החלקים בסרטון שרוצים להשאיר.
- ידע על העולם: Gemini Omni משלב בין הבנה של פיזיקה לבין הידע של Gemini בהיסטוריה, במדע ובהקשר תרבותי, ומגשר על הפער בין פוטוריאליזם לבין סיפור משמעותי.
יצירת סרטונים לפי טקסט
יצירת סרטון מפרומפט טקסטואלי. המודל יוצר סרטון עם אודיו על סמך תיאור הטקסט שהזנתם. כדי לקבל את התוצאות הטובות ביותר, כדאי לכתוב הנחיות עם פרטים כמו תיאור הסצנה, תנועת המצלמה, התאורה והאווירה.
Python
import base64
from google import genai

client = genai.Client()

interaction = client.interactions.create(
    model="gemini-omni-1.1-flash",
    input="A marble rolling fast on a chain reaction style track, continuous smooth shot."
)
with open("marble.mp4", "wb") as f:
    f.write(base64.b64decode(interaction.output_video.data))
JavaScript
import { GoogleGenAI } from '@google/genai';
import * as fs from 'fs';
const ai = new GoogleGenAI({});

const interaction = await ai.interactions.create({
  model: 'gemini-omni-1.1-flash',
  input: 'A marble rolling fast on a chain reaction style track, continuous smooth shot.',
});

if (interaction.output_video?.data) {
  fs.writeFileSync('marble.mp4', Buffer.from(interaction.output_video.data, 'base64'));
}
Java
import com.google.genai.Client;
import com.google.genai.gaos.models.interactions.CreateModelInteraction;
import com.google.genai.gaos.models.interactions.Interaction;
import com.google.genai.gaos.models.interactions.InteractionsInput;
import com.google.genai.gaos.models.interactions.Model;
import com.google.genai.gaos.models.operations.CreateInteractionRequestBody;
import java.nio.file.Files;
import java.nio.file.Paths;
import java.util.Base64;

Client client = new Client();

CreateModelInteraction params =
    CreateModelInteraction.builder()
        .model(Model.of("gemini-omni-1.1-flash"))
        .input(
            InteractionsInput.of(
                "A marble rolling fast on a chain reaction style track, continuous smooth shot."))
        .build();

Interaction interaction =
    client.interactions.create(CreateInteractionRequestBody.of(params)).interaction().get();

if (interaction.outputVideo().isPresent() && interaction.outputVideo().get().data().isPresent()) {
  byte[] videoBytes = Base64.getDecoder().decode(interaction.outputVideo().get().data().get());
  Files.write(Paths.get("marble.mp4"), videoBytes);
}
Go
package main

import (
    "context"
    "encoding/base64"
    "log"
    "os"

    "google.golang.org/genai"
    "google.golang.org/genai/interactions/models/interactions"
    "google.golang.org/genai/interactions/models/operations"
)

func main() {
    ctx := context.Background()
    client, err := genai.NewClient(ctx, nil)
    if err != nil {
        log.Fatal(err)
    }

    res, err := client.Interactions.Create(ctx, operations.CreateInteractionRequest{
        Body: operations.NewCreateInteractionRequestBody(interactions.CreateModelInteraction{
            Model: interactions.Model("gemini-omni-1.1-flash"),
            Input: interactions.NewInteractionsInput(
                "A marble rolling fast on a chain reaction style track, continuous smooth shot.",
            ),
        }),
    })
    if err != nil {
        log.Fatal(err)
    }

    if res.Interaction.OutputVideo != nil && res.Interaction.OutputVideo.Data != nil {
        videoBytes, err := base64.StdEncoding.DecodeString(*res.Interaction.OutputVideo.Data)
        if err != nil {
            log.Fatal(err)
        }
        if err := os.WriteFile("marble.mp4", videoBytes, 0644); err != nil {
            log.Fatal(err)
        }
    }
}
REST
curl -X POST "https://generativelanguage.googleapis.com/v1beta/interactions?key=$API_KEY" \
-H "Content-Type: application/json" \
-d '{
 "model": "gemini-omni-1.1-flash",
 "input": "A marble rolling fast on a chain reaction style track, continuous smooth shot."
}'
סכמת תשובה של REST
שדה הנוחות interaction.output_video הוא SDK בלבד.
כשמשתמשים ישירות ב-API בארכיטקטורת REST, מקבלים את פלט הסרטון ממערך steps.
מבנה JSON גולמי של REST:
{
  "steps": [
    { "type": "user_input", "content": [{"type": "text", "text": "..."}] },
    { "type": "thought", "content": [{"text": "...", "type": "thought"}] },
    {
      "type": "model_output",
      "content": [
        {
          "type": "video",
          "mime_type": "video/mp4",
          "data": "AAAAIGZ0eXBpc29t..." // Base64 encoded video data
        }
      ]
    }
  ],
  "id": "v1_...",
  "status": "completed",
  "model": "gemini-omni-1.1-flash",
  "object": "interaction"
}
שליטה ביחס הגובה-רוחב
כדי ליצור סרטונים בפורמט אנכי, מגדירים את aspect_ratio ל-"9:16". ברירת המחדל היא לרוחב (16:9).
Python
import base64
from google import genai

client = genai.Client()

interaction = client.interactions.create(
    model="gemini-omni-1.1-flash",
    input="A futuristic city with neon lights and flying cars, cyberpunk style",
    response_format={
        "type": "video",  # optional
        "aspect_ratio": "9:16"  # Supported values: "9:16", "16:9"
    }
)
with open("example.mp4", "wb") as f:
    f.write(base64.b64decode(interaction.output_video.data))
JavaScript
import { GoogleGenAI } from '@google/genai';
import * as fs from 'fs';
const ai = new GoogleGenAI({});

const interaction = await ai.interactions.create({
  model: 'gemini-omni-1.1-flash',
  input: 'A futuristic city with neon lights and flying cars, cyberpunk style',
  response_format: {
    type: 'video', // optional
    aspect_ratio: '9:16' // Supported values: '9:16', '16:9'
  },
});

if (interaction.output_video?.data) {
  fs.writeFileSync('example.mp4', Buffer.from(interaction.output_video.data, 'base64'));
}
Java
import com.google.genai.Client;
import com.google.genai.gaos.models.interactions.CreateModelInteraction;
import com.google.genai.gaos.models.interactions.CreateModelInteractionResponseFormat;
import com.google.genai.gaos.models.interactions.Interaction;
import com.google.genai.gaos.models.interactions.InteractionsInput;
import com.google.genai.gaos.models.interactions.Model;
import com.google.genai.gaos.models.interactions.ResponseFormat;
import com.google.genai.gaos.models.interactions.VideoResponseFormat;
import com.google.genai.gaos.models.interactions.VideoResponseFormatAspectRatio;
import com.google.genai.gaos.models.operations.CreateInteractionRequestBody;
import java.nio.file.Files;
import java.nio.file.Paths;
import java.util.Base64;

Client client = new Client();

VideoResponseFormat videoFormat =
    VideoResponseFormat.builder()
        .aspectRatio(VideoResponseFormatAspectRatio.of("9:16"))
        .build();

CreateModelInteraction params =
    CreateModelInteraction.builder()
        .model(Model.of("gemini-omni-1.1-flash"))
        .input(
            InteractionsInput.of(
                "A futuristic city with neon lights and flying cars, cyberpunk style"))
        .responseFormat(CreateModelInteractionResponseFormat.of(ResponseFormat.of(videoFormat)))
        .build();

Interaction interaction =
    client.interactions.create(CreateInteractionRequestBody.of(params)).interaction().get();

if (interaction.outputVideo().isPresent() && interaction.outputVideo().get().data().isPresent()) {
  byte[] videoBytes = Base64.getDecoder().decode(interaction.outputVideo().get().data().get());
  Files.write(Paths.get("example.mp4"), videoBytes);
}
Go
package main

import (
    "context"
    "encoding/base64"
    "log"
    "os"

    "google.golang.org/genai"
    "google.golang.org/genai/interactions/models/interactions"
    "google.golang.org/genai/interactions/models/operations"
)

func main() {
    ctx := context.Background()
    client, err := genai.NewClient(ctx, nil)
    if err != nil {
        log.Fatal(err)
    }

    videoFormat := interactions.VideoResponseFormat{
        AspectRatio: interactions.VideoResponseFormatAspectRatioNineHundredAndSixteen.ToPointer(),
    }

    res, err := client.Interactions.Create(ctx, operations.CreateInteractionRequest{
        Body: operations.NewCreateInteractionRequestBody(interactions.CreateModelInteraction{
            Model: interactions.Model("gemini-omni-1.1-flash"),
            Input: interactions.NewInteractionsInput(
                "A futuristic city with neon lights and flying cars, cyberpunk style",
            ),
            ResponseFormat: genai.Ptr(interactions.NewCreateModelInteractionResponseFormat(
                interactions.NewResponseFormat(videoFormat),
            )),
        }),
    })
    if err != nil {
        log.Fatal(err)
    }

    if res.Interaction.OutputVideo != nil && res.Interaction.OutputVideo.Data != nil {
        videoBytes, err := base64.StdEncoding.DecodeString(*res.Interaction.OutputVideo.Data)
        if err != nil {
            log.Fatal(err)
        }
        if err := os.WriteFile("example.mp4", videoBytes, 0644); err != nil {
            log.Fatal(err)
        }
    }
}
REST
curl -X POST "https://generativelanguage.googleapis.com/v1beta/interactions?key=$API_KEY" \
-H "Content-Type: application/json" \
-d '{
 "model": "gemini-omni-1.1-flash",
 "input": "A futuristic city with neon lights and flying cars, cyberpunk style",
 "response_format": {
   "type": "video",
   "aspect_ratio": "9:16"
 }
}'
רזולוציית הפלט
אפשר לשלוט ברזולוציית הפלט של הסרטון שנוצר באמצעות הפרמטר resolution
ב-response_format. רזולוציית ברירת המחדל היא 720p.
| ערך | תיאור |
|---|---|
360p |
רזולוציית פלט של 360p |
720p |
רזולוציית פלט של 720p (ברירת מחדל) |
1080p |
פלט 1080p (הגדלת רזולוציה) |
4k |
פלט באיכות 4K (משופר) |
Python
import base64
from google import genai

client = genai.Client()

interaction = client.interactions.create(
    model="gemini-omni-1.1-flash",
    input="A drone shot of a mountain landscape at sunrise.",
    response_format={
        "type": "video",
        "resolution": "1080p",
    },
)
with open("hires.mp4", "wb") as f:
    f.write(base64.b64decode(interaction.output_video.data))
JavaScript
import { GoogleGenAI } from '@google/genai';
import * as fs from 'fs';
const ai = new GoogleGenAI({});

const interaction = await ai.interactions.create({
  model: 'gemini-omni-1.1-flash',
  input: 'A drone shot of a mountain landscape at sunrise.',
  response_format: {
    type: 'video',
    resolution: '1080p',
  },
});

if (interaction.output_video?.data) {
  fs.writeFileSync('hires.mp4', Buffer.from(interaction.output_video.data, 'base64'));
}
Java
import com.google.genai.Client;
import com.google.genai.gaos.models.interactions.CreateModelInteraction;
import com.google.genai.gaos.models.interactions.CreateModelInteractionResponseFormat;
import com.google.genai.gaos.models.interactions.Interaction;
import com.google.genai.gaos.models.interactions.InteractionsInput;
import com.google.genai.gaos.models.interactions.Model;
import com.google.genai.gaos.models.interactions.Resolution;
import com.google.genai.gaos.models.interactions.ResponseFormat;
import com.google.genai.gaos.models.interactions.VideoResponseFormat;
import com.google.genai.gaos.models.operations.CreateInteractionRequestBody;
import java.nio.file.Files;
import java.nio.file.Paths;
import java.util.Base64;

Client client = new Client();

VideoResponseFormat videoFormat =
    VideoResponseFormat.builder()
        .resolution(Resolution.of("1080p"))
        .build();

CreateModelInteraction params =
    CreateModelInteraction.builder()
        .model(Model.of("gemini-omni-1.1-flash"))
        .input(InteractionsInput.of("A drone shot of a mountain landscape at sunrise."))
        .responseFormat(CreateModelInteractionResponseFormat.of(ResponseFormat.of(videoFormat)))
        .build();

Interaction interaction =
    client.interactions.create(CreateInteractionRequestBody.of(params)).interaction().get();

if (interaction.outputVideo().isPresent() && interaction.outputVideo().get().data().isPresent()) {
  byte[] videoBytes = Base64.getDecoder().decode(interaction.outputVideo().get().data().get());
  Files.write(Paths.get("hires.mp4"), videoBytes);
}
Go
package main

import (
    "context"
    "encoding/base64"
    "log"
    "os"

    "google.golang.org/genai"
    "google.golang.org/genai/interactions/models/interactions"
    "google.golang.org/genai/interactions/models/operations"
)

func main() {
    ctx := context.Background()
    client, err := genai.NewClient(ctx, nil)
    if err != nil {
        log.Fatal(err)
    }

    videoFormat := interactions.VideoResponseFormat{
        Resolution: interactions.ResolutionOneThousandAndEightyp.ToPointer(),
    }

    res, err := client.Interactions.Create(ctx, operations.CreateInteractionRequest{
        Body: operations.NewCreateInteractionRequestBody(interactions.CreateModelInteraction{
            Model: interactions.Model("gemini-omni-1.1-flash"),
            Input: interactions.NewInteractionsInput("A drone shot of a mountain landscape at sunrise."),
            ResponseFormat: genai.Ptr(interactions.NewCreateModelInteractionResponseFormat(
                interactions.NewResponseFormat(videoFormat),
            )),
        }),
    })
    if err != nil {
        log.Fatal(err)
    }

    if res.Interaction.OutputVideo != nil && res.Interaction.OutputVideo.Data != nil {
        videoBytes, err := base64.StdEncoding.DecodeString(*res.Interaction.OutputVideo.Data)
        if err != nil {
            log.Fatal(err)
        }
        if err := os.WriteFile("hires.mp4", videoBytes, 0644); err != nil {
            log.Fatal(err)
        }
    }
}
REST
curl -X POST "https://generativelanguage.googleapis.com/v1beta/interactions?key=$API_KEY" \
-H "Content-Type: application/json" \
-d '{
 "model": "gemini-omni-1.1-flash",
 "input": "A drone shot of a mountain landscape at sunrise.",
 "response_format": {
   "type": "video",
   "resolution": "1080p"
 }
}'
יצירת סרטון מתמונה
אתם יכולים לספק תמונת רפרנס עם פרומפט טקסטואלי. בהתאם להנחיה, המודל יחליט איך להשתמש בתמונה. התכונה הזו שימושית כדי להפיח חיים בתמונות מוצרים, באיורים או בצילומים.
בדוגמה הבאה אפשר לראות איך משתמשים בתמונת ההפניה של ציור של דג שקופץ מהמים:
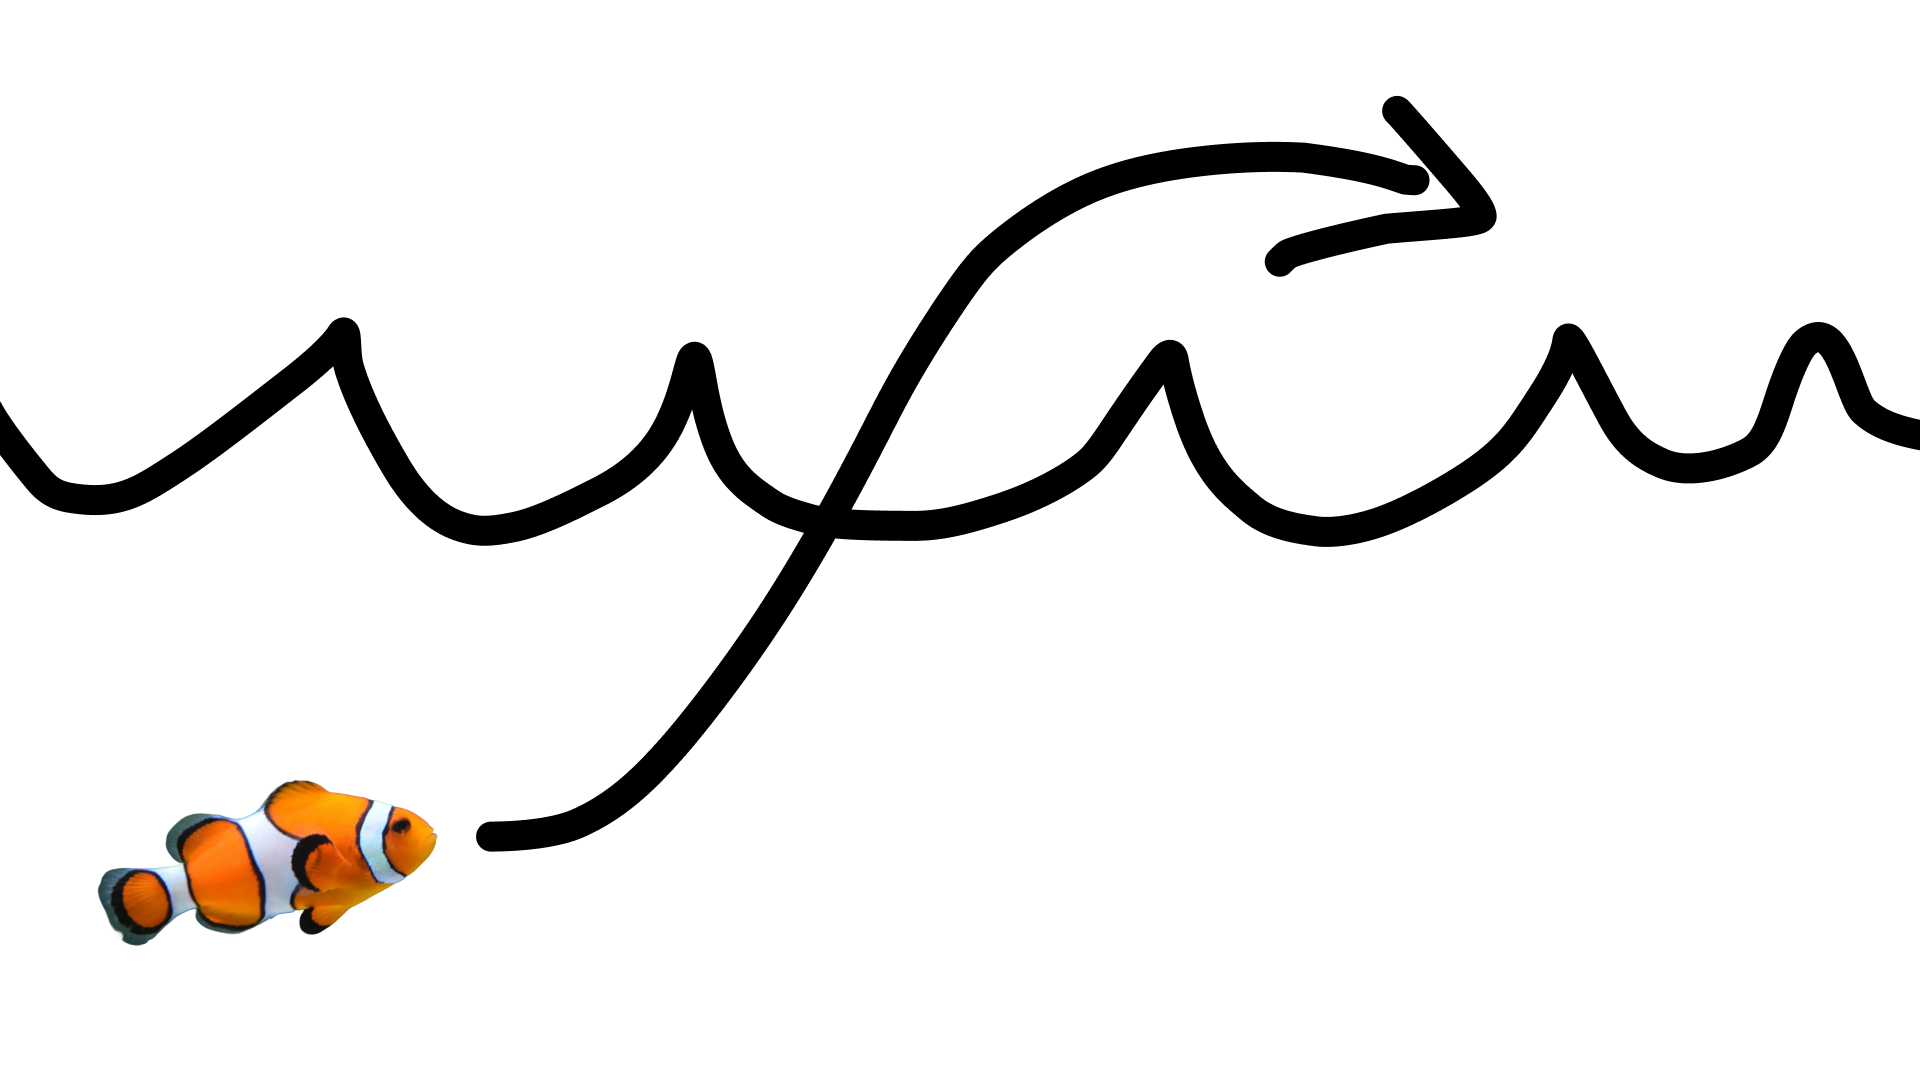
עם הפרומפט הבא:
turn this into realistic footage, using the drawing only as a guide for movement, do not show the drawing in the final video
כדי ליצור סרטון ריאליסטי של הציור.
Python
import base64
from google import genai

client = genai.Client()

interaction = client.interactions.create(
    model="gemini-omni-1.1-flash",
    input=[
        {"type": "image", "data": base64_image, "mime_type": "image/jpeg"},
        {"type": "text", "text": "turn this into realistic footage, using the drawing only as a guide for movement, do not show the drawing in the final video"}
    ],
)
with open("clownfish.mp4", "wb") as f:
    f.write(base64.b64decode(interaction.output_video.data))
JavaScript
import { GoogleGenAI } from '@google/genai';
import * as fs from 'fs';
const ai = new GoogleGenAI({});

const interaction = await ai.interactions.create({
  model: 'gemini-omni-1.1-flash',
  input: [
    { type: 'image', data: base64Image, mime_type: 'image/jpeg' },
    { type: 'text', text: 'turn this into realistic footage, using the drawing only as a guide for movement, do not show the drawing in the final video' }
  ]
});

if (interaction.output_video?.data) {
  fs.writeFileSync('clownfish.mp4', Buffer.from(interaction.output_video.data, 'base64'));
}
Java
import com.google.genai.Client;
import com.google.genai.gaos.models.interactions.Content;
import com.google.genai.gaos.models.interactions.CreateModelInteraction;
import com.google.genai.gaos.models.interactions.ImageContent;
import com.google.genai.gaos.models.interactions.ImageContentMimeType;
import com.google.genai.gaos.models.interactions.Interaction;
import com.google.genai.gaos.models.interactions.InteractionsInput;
import com.google.genai.gaos.models.interactions.Model;
import com.google.genai.gaos.models.interactions.TextContent;
import com.google.genai.gaos.models.operations.CreateInteractionRequestBody;
import java.nio.file.Files;
import java.nio.file.Paths;
import java.util.Arrays;
import java.util.Base64;
import java.util.List;

Client client = new Client();

byte[] imageBytes = Files.readAllBytes(Paths.get("drawing.jpg"));
String base64Image = Base64.getEncoder().encodeToString(imageBytes);

Content imageContent =
    ImageContent.builder()
        .data(base64Image)
        .mimeType(ImageContentMimeType.IMAGE_JPEG)
        .build();

Content textContent =
    TextContent.builder()
        .text(
            "turn this into realistic footage, using the drawing only as a guide for movement, do not show the drawing in the final video")
        .build();

List<Content> contents = Arrays.asList(imageContent, textContent);

CreateModelInteraction params =
    CreateModelInteraction.builder()
        .model(Model.of("gemini-omni-1.1-flash"))
        .input(InteractionsInput.ofContent(contents))
        .build();

Interaction interaction =
    client.interactions.create(CreateInteractionRequestBody.of(params)).interaction().get();

if (interaction.outputVideo().isPresent() && interaction.outputVideo().get().data().isPresent()) {
  byte[] videoBytes = Base64.getDecoder().decode(interaction.outputVideo().get().data().get());
  Files.write(Paths.get("clownfish.mp4"), videoBytes);
}
Go
package main

import (
    "context"
    "encoding/base64"
    "log"
    "os"

    "google.golang.org/genai"
    "google.golang.org/genai/interactions/models/interactions"
    "google.golang.org/genai/interactions/models/operations"
)

func main() {
    ctx := context.Background()
    client, err := genai.NewClient(ctx, nil)
    if err != nil {
        log.Fatal(err)
    }

    imageBytes, err := os.ReadFile("drawing.jpg")
    if err != nil {
        log.Fatal(err)
    }
    base64Image := base64.StdEncoding.EncodeToString(imageBytes)

    contents := []interactions.Content{
        interactions.NewContent(interactions.ImageContent{
            Data:     genai.Ptr(base64Image),
            MimeType: interactions.ImageContentMimeTypeImageJpeg.ToPointer(),
        }),
        interactions.NewContent(interactions.TextContent{
            Text: "turn this into realistic footage, using the drawing only as a guide for movement, do not show the drawing in the final video",
        }),
    }

    res, err := client.Interactions.Create(ctx, operations.CreateInteractionRequest{
        Body: operations.NewCreateInteractionRequestBody(interactions.CreateModelInteraction{
            Model: interactions.Model("gemini-omni-1.1-flash"),
            Input: interactions.NewInteractionsInput(contents),
        }),
    })
    if err != nil {
        log.Fatal(err)
    }

    if res.Interaction.OutputVideo != nil && res.Interaction.OutputVideo.Data != nil {
        videoBytes, err := base64.StdEncoding.DecodeString(*res.Interaction.OutputVideo.Data)
        if err != nil {
            log.Fatal(err)
        }
        if err := os.WriteFile("clownfish.mp4", videoBytes, 0644); err != nil {
            log.Fatal(err)
        }
    }
}
REST
curl -X POST "https://generativelanguage.googleapis.com/v1beta/interactions?key=$API_KEY" \
-H "Content-Type: application/json" \
-d '{
 "model": "gemini-omni-1.1-flash",
 "input": [
   {"type": "image", "data": "'"$BASE64_IMAGE"'", "mime_type": "image/jpeg"},
   {"type": "text", "text": "turn this into realistic footage, using the drawing only as a guide for movement, do not show the drawing in the final video"}
 ]
}'
אינטרפולציה של הפריים הראשון והפריים האחרון
Gemini Omni Flash תומך באינטרפולציה של סרטונים, ומאפשר ליצור סרטון עם מעבר חלק בין תמונת התחלה (הפריים הראשון) לבין תמונת סיום (הפריים האחרון).
מספקים שתי תמונות ברשימה input ומתארים את המעבר הרצוי בהנחיה. המודל יעשה אנימציה לסצנה מהפריים הראשון ועד לפריים האחרון.
Python
import base64
from google import genai

client = genai.Client()

interaction = client.interactions.create(
    model="gemini-omni-1.1-flash",
    input=[
        {"type": "image", "data": first_frame_b64, "mime_type": "image/jpeg"},
        {"type": "image", "data": last_frame_b64, "mime_type": "image/jpeg"},
        {"type": "text", "text": "A smooth cinematic transition from a lush green forest at sunrise to a snowy forest under a starry night sky."}
    ],
)
with open("interpolation.mp4", "wb") as f:
    f.write(base64.b64decode(interaction.output_video.data))
JavaScript
import { GoogleGenAI } from '@google/genai';
import * as fs from 'fs';
const ai = new GoogleGenAI({});

const interaction = await ai.interactions.create({
  model: 'gemini-omni-1.1-flash',
  input: [
    { type: 'image', data: firstFrameB64, mime_type: 'image/jpeg' },
    { type: 'image', data: lastFrameB64, mime_type: 'image/jpeg' },
    { type: 'text', text: 'A smooth cinematic transition from a lush green forest at sunrise to a snowy forest under a starry night sky.' }
  ]
});

if (interaction.output_video?.data) {
  fs.writeFileSync('interpolation.mp4', Buffer.from(interaction.output_video.data, 'base64'));
}
Java
import com.google.genai.Client;
import com.google.genai.gaos.models.interactions.Content;
import com.google.genai.gaos.models.interactions.CreateModelInteraction;
import com.google.genai.gaos.models.interactions.ImageContent;
import com.google.genai.gaos.models.interactions.ImageContentMimeType;
import com.google.genai.gaos.models.interactions.Interaction;
import com.google.genai.gaos.models.interactions.InteractionsInput;
import com.google.genai.gaos.models.interactions.Model;
import com.google.genai.gaos.models.interactions.TextContent;
import com.google.genai.gaos.models.operations.CreateInteractionRequestBody;
import java.nio.file.Files;
import java.nio.file.Paths;
import java.util.Arrays;
import java.util.Base64;
import java.util.List;

Client client = new Client();

String firstFrameB64 =
    Base64.getEncoder().encodeToString(Files.readAllBytes(Paths.get("first_frame.jpg")));
String lastFrameB64 =
    Base64.getEncoder().encodeToString(Files.readAllBytes(Paths.get("last_frame.jpg")));

Content firstFrame =
    ImageContent.builder()
        .data(firstFrameB64)
        .mimeType(ImageContentMimeType.IMAGE_JPEG)
        .build();

Content lastFrame =
    ImageContent.builder()
        .data(lastFrameB64)
        .mimeType(ImageContentMimeType.IMAGE_JPEG)
        .build();

Content prompt =
    TextContent.builder()
        .text(
            "A smooth cinematic transition from a lush green forest at sunrise to a snowy forest under a starry night sky.")
        .build();

List<Content> contents = Arrays.asList(firstFrame, lastFrame, prompt);

CreateModelInteraction params =
    CreateModelInteraction.builder()
        .model(Model.of("gemini-omni-1.1-flash"))
        .input(InteractionsInput.ofContent(contents))
        .build();

Interaction interaction =
    client.interactions.create(CreateInteractionRequestBody.of(params)).interaction().get();

if (interaction.outputVideo().isPresent() && interaction.outputVideo().get().data().isPresent()) {
  byte[] videoBytes = Base64.getDecoder().decode(interaction.outputVideo().get().data().get());
  Files.write(Paths.get("interpolation.mp4"), videoBytes);
}
Go
package main

import (
    "context"
    "encoding/base64"
    "log"
    "os"

    "google.golang.org/genai"
    "google.golang.org/genai/interactions/models/interactions"
    "google.golang.org/genai/interactions/models/operations"
)

func main() {
    ctx := context.Background()
    client, err := genai.NewClient(ctx, nil)
    if err != nil {
        log.Fatal(err)
    }

    firstBytes, err := os.ReadFile("first_frame.jpg")
    if err != nil {
        log.Fatal(err)
    }
    lastBytes, err := os.ReadFile("last_frame.jpg")
    if err != nil {
        log.Fatal(err)
    }

    firstFrameB64 := base64.StdEncoding.EncodeToString(firstBytes)
    lastFrameB64 := base64.StdEncoding.EncodeToString(lastBytes)

    contents := []interactions.Content{
        interactions.NewContent(interactions.ImageContent{
            Data:     genai.Ptr(firstFrameB64),
            MimeType: interactions.ImageContentMimeTypeImageJpeg.ToPointer(),
        }),
        interactions.NewContent(interactions.ImageContent{
            Data:     genai.Ptr(lastFrameB64),
            MimeType: interactions.ImageContentMimeTypeImageJpeg.ToPointer(),
        }),
        interactions.NewContent(interactions.TextContent{
            Text: "A smooth cinematic transition from a lush green forest at sunrise to a snowy forest under a starry night sky.",
        }),
    }

    res, err := client.Interactions.Create(ctx, operations.CreateInteractionRequest{
        Body: operations.NewCreateInteractionRequestBody(interactions.CreateModelInteraction{
            Model: interactions.Model("gemini-omni-1.1-flash"),
            Input: interactions.NewInteractionsInput(contents),
        }),
    })
    if err != nil {
        log.Fatal(err)
    }

    if res.Interaction.OutputVideo != nil && res.Interaction.OutputVideo.Data != nil {
        videoBytes, err := base64.StdEncoding.DecodeString(*res.Interaction.OutputVideo.Data)
        if err != nil {
            log.Fatal(err)
        }
        if err := os.WriteFile("interpolation.mp4", videoBytes, 0644); err != nil {
            log.Fatal(err)
        }
    }
}
REST
curl -X POST "https://generativelanguage.googleapis.com/v1beta/interactions?key=$API_KEY" \
-H "Content-Type: application/json" \
-d '{
 "model": "gemini-omni-1.1-flash",
 "input": [
   {"type": "image", "data": "'"$FIRST_FRAME_B64"'", "mime_type": "image/jpeg"},
   {"type": "image", "data": "'"$LAST_FRAME_B64"'", "mime_type": "image/jpeg"},
   {"type": "text", "text": "A smooth cinematic transition from a lush green forest at sunrise to a snowy forest under a starry night sky."}
 ]
}'
רפרנס של מושא הצילום
אתם יכולים ליצור סרטון שכולל נושאים ספציפיים שסיפקתם כתמונות לדוגמה. לדוגמה, בקוד הבא אפשר לראות איך מספקים 2 תמונות של חתול וכדור צמר כדי ליצור סרטון של החתול משחק עם כדור הצמר.
Python
import base64
from google import genai

client = genai.Client()

interaction = client.interactions.create(
    model="gemini-omni-1.1-flash",
    input=[
        {"type": "image", "data": cat_b64, "mime_type": "image/png"},
        {"type": "image", "data": yarn_b64, "mime_type": "image/png"},
        {"type": "text", "text": "A cat playfully batting at a ball of yarn."}
    ],
)
with open("cat.mp4", "wb") as f:
    f.write(base64.b64decode(interaction.output_video.data))
JavaScript
import { GoogleGenAI } from '@google/genai';
import * as fs from 'fs';
const ai = new GoogleGenAI({});

const interaction = await ai.interactions.create({
  model: 'gemini-omni-1.1-flash',
  input: [
    { type: 'image', data: catData, mime_type: 'image/png' },
    { type: 'image', data: yarnData, mime_type: 'image/png' },
    { type: 'text', text: 'A cat playfully batting at a ball of yarn.' }
  ]
});

if (interaction.output_video?.data) {
  fs.writeFileSync('cat.mp4', Buffer.from(interaction.output_video.data, 'base64'));
}
Java
import com.google.genai.Client;
import com.google.genai.gaos.models.interactions.Content;
import com.google.genai.gaos.models.interactions.CreateModelInteraction;
import com.google.genai.gaos.models.interactions.ImageContent;
import com.google.genai.gaos.models.interactions.ImageContentMimeType;
import com.google.genai.gaos.models.interactions.Interaction;
import com.google.genai.gaos.models.interactions.InteractionsInput;
import com.google.genai.gaos.models.interactions.Model;
import com.google.genai.gaos.models.interactions.TextContent;
import com.google.genai.gaos.models.operations.CreateInteractionRequestBody;
import java.nio.file.Files;
import java.nio.file.Paths;
import java.util.Arrays;
import java.util.Base64;
import java.util.List;

Client client = new Client();

String catB64 = Base64.getEncoder().encodeToString(Files.readAllBytes(Paths.get("cat.png")));
String yarnB64 = Base64.getEncoder().encodeToString(Files.readAllBytes(Paths.get("yarn.png")));

Content catImage =
    ImageContent.builder()
        .data(catB64)
        .mimeType(ImageContentMimeType.IMAGE_PNG)
        .build();

Content yarnImage =
    ImageContent.builder()
        .data(yarnB64)
        .mimeType(ImageContentMimeType.IMAGE_PNG)
        .build();

Content textContent =
    TextContent.builder()
        .text("A cat playfully batting at a ball of yarn.")
        .build();

List<Content> contents = Arrays.asList(catImage, yarnImage, textContent);

CreateModelInteraction params =
    CreateModelInteraction.builder()
        .model(Model.of("gemini-omni-1.1-flash"))
        .input(InteractionsInput.ofContent(contents))
        .build();

Interaction interaction =
    client.interactions.create(CreateInteractionRequestBody.of(params)).interaction().get();

if (interaction.outputVideo().isPresent() && interaction.outputVideo().get().data().isPresent()) {
  byte[] videoBytes = Base64.getDecoder().decode(interaction.outputVideo().get().data().get());
  Files.write(Paths.get("cat.mp4"), videoBytes);
}
Go
package main

import (
    "context"
    "encoding/base64"
    "log"
    "os"

    "google.golang.org/genai"
    "google.golang.org/genai/interactions/models/interactions"
    "google.golang.org/genai/interactions/models/operations"
)

func main() {
    ctx := context.Background()
    client, err := genai.NewClient(ctx, nil)
    if err != nil {
        log.Fatal(err)
    }

    catBytes, err := os.ReadFile("cat.png")
    if err != nil {
        log.Fatal(err)
    }
    yarnBytes, err := os.ReadFile("yarn.png")
    if err != nil {
        log.Fatal(err)
    }

    catB64 := base64.StdEncoding.EncodeToString(catBytes)
    yarnB64 := base64.StdEncoding.EncodeToString(yarnBytes)

    contents := []interactions.Content{
        interactions.NewContent(interactions.ImageContent{
            Data:     genai.Ptr(catB64),
            MimeType: interactions.ImageContentMimeTypeImagePng.ToPointer(),
        }),
        interactions.NewContent(interactions.ImageContent{
            Data:     genai.Ptr(yarnB64),
            MimeType: interactions.ImageContentMimeTypeImagePng.ToPointer(),
        }),
        interactions.NewContent(interactions.TextContent{
            Text: "A cat playfully batting at a ball of yarn.",
        }),
    }

    res, err := client.Interactions.Create(ctx, operations.CreateInteractionRequest{
        Body: operations.NewCreateInteractionRequestBody(interactions.CreateModelInteraction{
            Model: interactions.Model("gemini-omni-1.1-flash"),
            Input: interactions.NewInteractionsInput(contents),
        }),
    })
    if err != nil {
        log.Fatal(err)
    }

    if res.Interaction.OutputVideo != nil && res.Interaction.OutputVideo.Data != nil {
        videoBytes, err := base64.StdEncoding.DecodeString(*res.Interaction.OutputVideo.Data)
        if err != nil {
            log.Fatal(err)
        }
        if err := os.WriteFile("cat.mp4", videoBytes, 0644); err != nil {
            log.Fatal(err)
        }
    }
}
REST
curl -X POST "https://generativelanguage.googleapis.com/v1beta/interactions?key=$API_KEY" \
-H "Content-Type: application/json" \
-d '{
 "model": "gemini-omni-1.1-flash",
 "input": [
   {"type": "image", "data": "'"$CAT_B64"'", "mime_type": "image/png"},
   {"type": "image", "data": "'"$YARN_B64"'", "mime_type": "image/png"},
   {"type": "text", "text": "A cat playfully batting at a ball of yarn."}
 ]
}'
פרמטר Tasks
משתמשים בפרמטר task ב-video_config כדי לציין במפורש את ההתנהגות הרצויה. לדוגמה, אם רוצים שהמודל ייצור סרטון מתמונה, אפשר להגדיר את הפרמטר ל-image_to_video. אם לא מגדירים את הפרמטר הזה, המודל יסיק מההנחיה מה רוצים.
הערכים המותרים הם:
text_to_videoimage_to_videoreference_to_videoeditextend
בדוגמה הבאה אפשר לראות איך מגדירים את זה עבור הדוגמה שלמעלה, שבה תמונה מוחלפת בסרטון.
Python
import base64
from google import genai

client = genai.Client()

interaction = client.interactions.create(
    model="gemini-omni-1.1-flash",
    input=[
        {"type": "image", "data": base64_image, "mime_type": "image/jpeg"},
        {"type": "text", "text": "turn this into realistic footage, using the drawing only as a guide for movement, do not show the drawing in the final video"}
    ],
    generation_config={
      "video_config": {
        "task": "image_to_video",
      }
    },
)
with open("example.mp4", "wb") as f:
    f.write(base64.b64decode(interaction.output_video.data))
JavaScript
import { GoogleGenAI } from "@google/genai";
import * as fs from 'fs';
const ai = new GoogleGenAI({});

const interaction = await ai.interactions.create({
  model: 'gemini-omni-1.1-flash',
  input: [
    { type: 'image', data: base64Image, mime_type: 'image/jpeg' },
    { type: 'text', text: 'turn this into realistic footage, using the drawing only as a guide for movement, do not show the drawing in the final video' }
  ],
  generationConfig: {
    videoConfig: {
      task: 'image_to_video',
    }
  }
});

if (interaction.output_video?.data) {
  fs.writeFileSync('example.mp4', Buffer.from(interaction.output_video.data, 'base64'));
}
Java
import com.google.genai.Client;
import com.google.genai.gaos.models.interactions.Content;
import com.google.genai.gaos.models.interactions.CreateModelInteraction;
import com.google.genai.gaos.models.interactions.GenerationConfig;
import com.google.genai.gaos.models.interactions.ImageContent;
import com.google.genai.gaos.models.interactions.ImageContentMimeType;
import com.google.genai.gaos.models.interactions.Interaction;
import com.google.genai.gaos.models.interactions.InteractionsInput;
import com.google.genai.gaos.models.interactions.Model;
import com.google.genai.gaos.models.interactions.Task;
import com.google.genai.gaos.models.interactions.TextContent;
import com.google.genai.gaos.models.interactions.VideoConfig;
import com.google.genai.gaos.models.operations.CreateInteractionRequestBody;
import java.nio.file.Files;
import java.nio.file.Paths;
import java.util.Arrays;
import java.util.Base64;
import java.util.List;

Client client = new Client();

byte[] imageBytes = Files.readAllBytes(Paths.get("drawing.jpg"));
String base64Image = Base64.getEncoder().encodeToString(imageBytes);

Content imageContent =
    ImageContent.builder()
        .data(base64Image)
        .mimeType(ImageContentMimeType.IMAGE_JPEG)
        .build();

Content textContent =
    TextContent.builder()
        .text(
            "turn this into realistic footage, using the drawing only as a guide for movement, do not show the drawing in the final video")
        .build();

List<Content> contents = Arrays.asList(imageContent, textContent);

GenerationConfig generationConfig =
    GenerationConfig.builder()
        .videoConfig(VideoConfig.builder().task(Task.IMAGE_TO_VIDEO).build())
        .build();

CreateModelInteraction params =
    CreateModelInteraction.builder()
        .model(Model.of("gemini-omni-1.1-flash"))
        .input(InteractionsInput.ofContent(contents))
        .generationConfig(generationConfig)
        .build();

Interaction interaction =
    client.interactions.create(CreateInteractionRequestBody.of(params)).interaction().get();

if (interaction.outputVideo().isPresent() && interaction.outputVideo().get().data().isPresent()) {
  byte[] videoBytes = Base64.getDecoder().decode(interaction.outputVideo().get().data().get());
  Files.write(Paths.get("example.mp4"), videoBytes);
}
Go
package main

import (
    "context"
    "encoding/base64"
    "log"
    "os"

    "google.golang.org/genai"
    "google.golang.org/genai/interactions/models/interactions"
    "google.golang.org/genai/interactions/models/operations"
)

func main() {
    ctx := context.Background()
    client, err := genai.NewClient(ctx, nil)
    if err != nil {
        log.Fatal(err)
    }

    imageBytes, err := os.ReadFile("drawing.jpg")
    if err != nil {
        log.Fatal(err)
    }
    base64Image := base64.StdEncoding.EncodeToString(imageBytes)

    contents := []interactions.Content{
        interactions.NewContent(interactions.ImageContent{
            Data:     genai.Ptr(base64Image),
            MimeType: interactions.ImageContentMimeTypeImageJpeg.ToPointer(),
        }),
        interactions.NewContent(interactions.TextContent{
            Text: "turn this into realistic footage, using the drawing only as a guide for movement, do not show the drawing in the final video",
        }),
    }

    generationConfig := &interactions.GenerationConfig{
        VideoConfig: &interactions.VideoConfig{
            Task: interactions.TaskImageToVideo.ToPointer(),
        },
    }

    res, err := client.Interactions.Create(ctx, operations.CreateInteractionRequest{
        Body: operations.NewCreateInteractionRequestBody(interactions.CreateModelInteraction{
            Model:            interactions.Model("gemini-omni-1.1-flash"),
            Input:            interactions.NewInteractionsInput(contents),
            GenerationConfig: generationConfig,
        }),
    })
    if err != nil {
        log.Fatal(err)
    }

    if res.Interaction.OutputVideo != nil && res.Interaction.OutputVideo.Data != nil {
        videoBytes, err := base64.StdEncoding.DecodeString(*res.Interaction.OutputVideo.Data)
        if err != nil {
            log.Fatal(err)
        }
        if err := os.WriteFile("example.mp4", videoBytes, 0644); err != nil {
            log.Fatal(err)
        }
    }
}
REST
curl -X POST "https://generativelanguage.googleapis.com/v1beta/interactions" \
  -H "x-goog-api-key: $GEMINI_API_KEY" \
  -H "Content-Type: application/json" \
  -d '{
    "model": "gemini-omni-1.1-flash",
    "input": [
      {
        "type": "image",
        "data": "'"$BASE64_IMAGE"'",
        "mime_type": "image/jpeg"
      },
      {
        "type": "text",
        "text": "turn this into realistic footage, using the drawing only as a guide for movement, do not show the drawing in the final video"
      }
    ],
    "generation_config": {
      "video_config": {
        "task": "image_to_video"
      }
    }
  }'
עריכת סרטונים עם שמירת מצב
ליצור סרטון ולערוך אותו באופן איטרטיבי באמצעות פרומפטים נוספים. כל תור
מבוסס על התוצאה הקודמת. המודל זוכר את ההקשר של הסרטון ומחיל את השינויים שלכם תוך שמירה על רכיבים שלא הזכרתם. אפשר להשתמש בלחצן previous_interaction_id כדי לעקוב אחרי היסטוריית השיחות ומצב הסרטון שנוצר בלי להעלות מחדש את הסרטון הקודם.
בדוגמה הבאה אפשר לראות איך יוצרים סרטון ראשון ואז עורכים אותו:
Python
import base64
from google import genai

client = genai.Client()

# Turn 1: Generate initial video
res1 = client.interactions.create(model="gemini-omni-1.1-flash", input="A woman playing violin outdoors.")

# Turn 2: Edit the previous video
res2 = client.interactions.create(
    model="gemini-omni-1.1-flash",
    previous_interaction_id=res1.id,
    input="Make the violin invisible."
)
with open("example.mp4", "wb") as f:
    f.write(base64.b64decode(res2.output_video.data))
JavaScript
import { GoogleGenAI } from '@google/genai';
import * as fs from 'fs';
const ai = new GoogleGenAI({});

// Turn 1: Generate initial video
const res1 = await ai.interactions.create({
  model: 'gemini-omni-1.1-flash',
  input: 'A woman playing violin outdoors.',
});

// Turn 2: Edit the previous video
const res2 = await ai.interactions.create({
  model: 'gemini-omni-1.1-flash',
  previous_interaction_id: res1.id,
  input: 'Make the violin invisible.',
});

if (res2.output_video?.data) {
  fs.writeFileSync('example.mp4', Buffer.from(res2.output_video.data, 'base64'));
}
Java
import com.google.genai.Client;
import com.google.genai.gaos.models.interactions.CreateModelInteraction;
import com.google.genai.gaos.models.interactions.Interaction;
import com.google.genai.gaos.models.interactions.InteractionsInput;
import com.google.genai.gaos.models.interactions.Model;
import com.google.genai.gaos.models.operations.CreateInteractionRequestBody;
import java.nio.file.Files;
import java.nio.file.Paths;
import java.util.Base64;

Client client = new Client();

// Turn 1: Generate initial video
CreateModelInteraction turn1Params =
    CreateModelInteraction.builder()
        .model(Model.of("gemini-omni-1.1-flash"))
        .input(InteractionsInput.of("A woman playing violin outdoors."))
        .build();

Interaction res1 =
    client.interactions.create(CreateInteractionRequestBody.of(turn1Params)).interaction().get();

// Turn 2: Edit the previous video
CreateModelInteraction turn2Params =
    CreateModelInteraction.builder()
        .model(Model.of("gemini-omni-1.1-flash"))
        .previousInteractionId(res1.id().get())
        .input(InteractionsInput.of("Make the violin invisible."))
        .build();

Interaction res2 =
    client.interactions.create(CreateInteractionRequestBody.of(turn2Params)).interaction().get();

if (res2.outputVideo().isPresent() && res2.outputVideo().get().data().isPresent()) {
  byte[] videoBytes = Base64.getDecoder().decode(res2.outputVideo().get().data().get());
  Files.write(Paths.get("example.mp4"), videoBytes);
}
Go
package main

import (
    "context"
    "encoding/base64"
    "log"
    "os"

    "google.golang.org/genai"
    "google.golang.org/genai/interactions/models/interactions"
    "google.golang.org/genai/interactions/models/operations"
)

func main() {
    ctx := context.Background()
    client, err := genai.NewClient(ctx, nil)
    if err != nil {
        log.Fatal(err)
    }

    // Turn 1: Generate initial video
    res1, err := client.Interactions.Create(ctx, operations.CreateInteractionRequest{
        Body: operations.NewCreateInteractionRequestBody(interactions.CreateModelInteraction{
            Model: interactions.Model("gemini-omni-1.1-flash"),
            Input: interactions.NewInteractionsInput("A woman playing violin outdoors."),
        }),
    })
    if err != nil {
        log.Fatal(err)
    }

    // Turn 2: Edit the previous video
    res2, err := client.Interactions.Create(ctx, operations.CreateInteractionRequest{
        Body: operations.NewCreateInteractionRequestBody(interactions.CreateModelInteraction{
            Model:                 interactions.Model("gemini-omni-1.1-flash"),
            PreviousInteractionID: res1.Interaction.ID,
            Input:                 interactions.NewInteractionsInput("Make the violin invisible."),
        }),
    })
    if err != nil {
        log.Fatal(err)
    }

    if res2.Interaction.OutputVideo != nil && res2.Interaction.OutputVideo.Data != nil {
        videoBytes, err := base64.StdEncoding.DecodeString(*res2.Interaction.OutputVideo.Data)
        if err != nil {
            log.Fatal(err)
        }
        if err := os.WriteFile("example.mp4", videoBytes, 0644); err != nil {
            log.Fatal(err)
        }
    }
}
REST
curl -X POST "https://generativelanguage.googleapis.com/v1beta/interactions?key=$API_KEY" \
-H "Content-Type: application/json" \
-d '{
 "model": "gemini-omni-1.1-flash",
 "previous_interaction_id": "'"$PREVIOUS_ID"'",
 "input": "Make the violin invisible."
}'
דוגמה לסרטון מקורי:
דוגמה לסרטון ערוך:
כל תור בשיחה יוצר סרטון חדש. המודל מבין את ההקשר מהתורות הקודמות, כך שאפשר לבצע שינויים מצטברים כמו התאמת התאורה והחלפת הרקע, בלי לתאר מחדש את כל הסצנה.
עריכת סרטונים משלכם
מעלים את הסרטונים באמצעות Files API כדי לערוך אותם באמצעות Gemini Omni Flash.
בדוגמה הבאה אפשר לראות איך עורכים את הסרטון המקורי הבא:
Python
import time
import base64
from google import genai

client = genai.Client()

# Upload video using the file API
video_file = client.files.upload(file="Video.mp4")

while video_file.state == "PROCESSING":
    print('Waiting for video to be processed.')
    time.sleep(10)
    video_file = client.files.get(name=video_file.name)

if video_file.state == "FAILED":
  raise ValueError(video_file.state)
print(f'Video processing complete: ' + video_file.uri)

# Edit your video
interaction = client.interactions.create(
    model="gemini-omni-1.1-flash",
    input=[
        {"type": "video", "uri": video_file.uri},
        {"type": "text", "text": "When the person touches the mirror, make the mirror ripple beautifully like liquid, and the person's arm turns into reflective mirror material"}
    ],
)
with open("example.mp4", "wb") as f:
    f.write(base64.b64decode(interaction.output_video.data))
JavaScript
import { GoogleGenAI } from '@google/genai';
import * as fs from 'fs';
const ai = new GoogleGenAI({});

// Upload video using the file API
let videoFile = await ai.files.upload({
  file: 'Video.mp4',
});

while (videoFile.state === 'PROCESSING') {
  console.log('Waiting for video to be processed.');
  await new Promise(r => setTimeout(r, 10000));
  videoFile = await ai.files.get({ name: videoFile.name });
}

if (videoFile.state === 'FAILED') {
  throw new Error(videoFile.state);
}
console.log('Video processing complete: ' + videoFile.uri);

// Edit your video
const interaction = await ai.interactions.create({
  model: 'gemini-omni-1.1-flash',
  input: [
    { type: 'video', uri: videoFile.uri },
    { type: 'text', text: "When the person touches the mirror, make the mirror ripple beautifully like liquid, and the person's arm turns into reflective mirror material" }
  ],
});

if (interaction.output_video?.data) {
  fs.writeFileSync('example.mp4', Buffer.from(interaction.output_video.data, 'base64'));
}
Java
import com.google.genai.Client;
import com.google.genai.gaos.models.interactions.Content;
import com.google.genai.gaos.models.interactions.CreateModelInteraction;
import com.google.genai.gaos.models.interactions.Interaction;
import com.google.genai.gaos.models.interactions.InteractionsInput;
import com.google.genai.gaos.models.interactions.Model;
import com.google.genai.gaos.models.interactions.TextContent;
import com.google.genai.gaos.models.interactions.VideoContent;
import com.google.genai.gaos.models.operations.CreateInteractionRequestBody;
import com.google.genai.types.File;
import com.google.genai.types.FileState;
import com.google.genai.types.UploadFileConfig;
import java.nio.file.Files;
import java.nio.file.Paths;
import java.util.Arrays;
import java.util.Base64;
import java.util.List;

Client client = new Client();

// Upload video using the file API
File videoFile =
    client.files.upload("Video.mp4", UploadFileConfig.builder().mimeType("video/mp4").build());

while (videoFile.state().isPresent()
    && videoFile.state().get().knownEnum() == FileState.Known.PROCESSING) {
  System.out.println("Waiting for video to be processed.");
  Thread.sleep(10000);
  videoFile = client.files.get(videoFile.name().get(), null);
}

if (videoFile.state().isPresent()
    && videoFile.state().get().knownEnum() == FileState.Known.FAILED) {
  throw new IllegalStateException("Video processing failed: " + videoFile.state().get());
}
System.out.println("Video processing complete: " + videoFile.uri().orElse(""));

// Edit your video
Content videoContent = VideoContent.builder().uri(videoFile.uri().get()).build();
Content textContent =
    TextContent.builder()
        .text(
            "When the person touches the mirror, make the mirror ripple beautifully like liquid, and the person's arm turns into reflective mirror material")
        .build();

List<Content> contents = Arrays.asList(videoContent, textContent);

CreateModelInteraction params =
    CreateModelInteraction.builder()
        .model(Model.of("gemini-omni-1.1-flash"))
        .input(InteractionsInput.ofContent(contents))
        .build();

Interaction interaction =
    client.interactions.create(CreateInteractionRequestBody.of(params)).interaction().get();

if (interaction.outputVideo().isPresent() && interaction.outputVideo().get().data().isPresent()) {
  byte[] videoBytes = Base64.getDecoder().decode(interaction.outputVideo().get().data().get());
  Files.write(Paths.get("example.mp4"), videoBytes);
}
Go
package main

import (
    "context"
    "encoding/base64"
    "fmt"
    "log"
    "os"
    "time"

    "google.golang.org/genai"
    "google.golang.org/genai/interactions/models/interactions"
    "google.golang.org/genai/interactions/models/operations"
)

func main() {
    ctx := context.Background()
    client, err := genai.NewClient(ctx, nil)
    if err != nil {
        log.Fatal(err)
    }

    // Upload video using the file API
    videoFile, err := client.Files.UploadFromPath(ctx, "Video.mp4", &genai.UploadFileConfig{
        MIMEType: "video/mp4",
    })
    if err != nil {
        log.Fatal(err)
    }

    for videoFile.State == genai.FileStateProcessing {
        fmt.Println("Waiting for video to be processed.")
        time.Sleep(10 * time.Second)
        videoFile, err = client.Files.Get(ctx, videoFile.Name, nil)
        if err != nil {
            log.Fatal(err)
        }
    }

    if videoFile.State == genai.FileStateFailed {
        log.Fatalf("Video processing failed: %s", videoFile.State)
    }
    fmt.Printf("Video processing complete: %s\n", videoFile.URI)

    // Edit your video
    contents := []interactions.Content{
        interactions.NewContent(interactions.VideoContent{
            URI: genai.Ptr(videoFile.URI),
        }),
        interactions.NewContent(interactions.TextContent{
            Text: "When the person touches the mirror, make the mirror ripple beautifully like liquid, and the person's arm turns into reflective mirror material",
        }),
    }

    res, err := client.Interactions.Create(ctx, operations.CreateInteractionRequest{
        Body: operations.NewCreateInteractionRequestBody(interactions.CreateModelInteraction{
            Model: interactions.Model("gemini-omni-1.1-flash"),
            Input: interactions.NewInteractionsInput(contents),
        }),
    })
    if err != nil {
        log.Fatal(err)
    }

    if res.Interaction.OutputVideo != nil && res.Interaction.OutputVideo.Data != nil {
        videoBytes, err := base64.StdEncoding.DecodeString(*res.Interaction.OutputVideo.Data)
        if err != nil {
            log.Fatal(err)
        }
        if err := os.WriteFile("example.mp4", videoBytes, 0644); err != nil {
            log.Fatal(err)
        }
    }
}
REST
#!/bin/bash
VIDEO_B64=$(encode_file "$VIDEO_FILE")

curl -sS -w "\n[HTTP %{http_code}]\n" "https://generativelanguage.googleapis.com/v1beta/interactions" \
  -H "x-goog-api-key: ${API_KEY}" \
  -H "Content-Type: application/json" \
  -d @- <<EOF > video_editing_response.json
{
  "model": "gemini-omni-1.1-flash",
  "input": [
    {
      "type": "user_input",
      "content": [
        {
          "type": "video",
          "mime_type": "video/mp4",
          "data": "$VIDEO_B64"
        },
        {
          "type": "text",
          "text": "When the person touches the mirror, make the mirror ripple beautifully like liquid, and the person's arm turns into reflective mirror material"
        }
      ]
    }
  ],
  "response_format": { "type": "video" }
}
EOF
דוגמה לסרטון ערוך:
אחזור סרטונים באמצעות URI
משתמשים בפרמטר delivery="uri" ב-response_format כדי לאחזר סרטונים שנוצרו ושגודלם גדול מ-4MB.
הפעולה הזו מחזירה URI שמתארח ב-Google, שאפשר לשלוח לו בקשות עד שהסרטון ACTIVE לפני ההורדה.
Python
import time
from google import genai

client = genai.Client()

# 1. Request video via URI delivery
interaction = client.interactions.create(
    model="gemini-omni-1.1-flash",
    input="A beautiful sunset.",
    response_format={"type": "video", "delivery": "uri"}
)

# 2. Extract file name and poll for ACTIVE state
video_output = interaction.output_video
file_name = video_output.uri.split("/")[-1] # Extract ID

print("Waiting for video processing...")
while True:
    f_info = client.files.get(name=f"files/{file_name}")
    if f_info.state.name == "ACTIVE":
        break
    elif f_info.state.name == "FAILED":
        raise RuntimeError("Generation failed.")
    time.sleep(5)

# 3. Download the final video
client.files.download(file=video_output.uri, destination="output.mp4")
JavaScript
import { GoogleGenAI } from '@google/genai';
const ai = new GoogleGenAI({});

// 1. Request video using URI delivery
const interaction = await ai.interactions.create({
  model: 'gemini-omni-1.1-flash',
  input: 'A beautiful sunset.',
  response_format: { type: 'video', delivery: 'uri' },
});

// 2. Extract filename and poll for ACTIVE state
const videoOutput = interaction.output_video;
const fileId = videoOutput.uri.match(/files\/([a-zA-Z0-9]+)/)[1];
const name = `files/${fileId}`;

console.log("Waiting for video processing...");
while (true) {
  const fInfo = await ai.files.get({ name });
  if (fInfo.state.name === 'ACTIVE') break;
  if (fInfo.state.name === 'FAILED') throw new Error("Generation failed.");
  await new Promise(r => setTimeout(r, 5000));
}

// 3. Download the final video
await ai.files.download({
  file: videoOutput,
  downloadPath: 'output.mp4',
});
console.log("💾 Saved video to output.mp4");
Java
import com.google.genai.Client;
import com.google.genai.gaos.models.interactions.CreateModelInteraction;
import com.google.genai.gaos.models.interactions.CreateModelInteractionResponseFormat;
import com.google.genai.gaos.models.interactions.Interaction;
import com.google.genai.gaos.models.interactions.InteractionsInput;
import com.google.genai.gaos.models.interactions.Model;
import com.google.genai.gaos.models.interactions.ResponseFormat;
import com.google.genai.gaos.models.interactions.VideoContent;
import com.google.genai.gaos.models.interactions.VideoResponseFormat;
import com.google.genai.gaos.models.interactions.VideoResponseFormatDelivery;
import com.google.genai.gaos.models.operations.CreateInteractionRequestBody;
import com.google.genai.types.File;
import com.google.genai.types.FileState;

Client client = new Client();

// 1. Request video using URI delivery
VideoResponseFormat videoFormat =
    VideoResponseFormat.builder()
        .delivery(VideoResponseFormatDelivery.URI)
        .build();

CreateModelInteraction params =
    CreateModelInteraction.builder()
        .model(Model.of("gemini-omni-1.1-flash"))
        .input(InteractionsInput.of("A beautiful sunset."))
        .responseFormat(CreateModelInteractionResponseFormat.of(ResponseFormat.of(videoFormat)))
        .build();

Interaction interaction =
    client.interactions.create(CreateInteractionRequestBody.of(params)).interaction().get();

// 2. Extract filename and poll for ACTIVE state
VideoContent videoOutput = interaction.outputVideo().get();
String uri = videoOutput.uri().get();
String[] parts = uri.split("/");
String fileName = parts[parts.length - 1];

System.out.println("Waiting for video processing...");
while (true) {
  File fileInfo = client.files.get("files/" + fileName, null);
  if (fileInfo.state().isPresent()
      && fileInfo.state().get().knownEnum() == FileState.Known.ACTIVE) {
    break;
  } else if (fileInfo.state().isPresent()
      && fileInfo.state().get().knownEnum() == FileState.Known.FAILED) {
    throw new RuntimeException("Generation failed.");
  }
  Thread.sleep(5000);
}

// 3. Download the final video
client.files.download(uri, "output.mp4", null);
Go
package main

import (
    "context"
    "fmt"
    "log"
    "os"
    "strings"
    "time"

    "google.golang.org/genai"
    "google.golang.org/genai/interactions/models/interactions"
    "google.golang.org/genai/interactions/models/operations"
)

func main() {
    ctx := context.Background()
    client, err := genai.NewClient(ctx, nil)
    if err != nil {
        log.Fatal(err)
    }

    // 1. Request video using URI delivery
    videoFormat := interactions.VideoResponseFormat{
        Delivery: interactions.VideoResponseFormatDeliveryURI.ToPointer(),
    }

    res, err := client.Interactions.Create(ctx, operations.CreateInteractionRequest{
        Body: operations.NewCreateInteractionRequestBody(interactions.CreateModelInteraction{
            Model: interactions.Model("gemini-omni-1.1-flash"),
            Input: interactions.NewInteractionsInput("A beautiful sunset."),
            ResponseFormat: genai.Ptr(interactions.NewCreateModelInteractionResponseFormat(
                interactions.NewResponseFormat(videoFormat),
            )),
        }),
    })
    if err != nil {
        log.Fatal(err)
    }

    // 2. Extract filename and poll for ACTIVE state
    uri := *res.Interaction.OutputVideo.URI
    parts := strings.Split(uri, "/")
    fileName := parts[len(parts)-1]

    fmt.Println("Waiting for video processing...")
    var fileInfo *genai.File
    for {
        fileInfo, err = client.Files.Get(ctx, "files/"+fileName, nil)
        if err != nil {
            log.Fatal(err)
        }
        if fileInfo.State == genai.FileStateActive {
            break
        } else if fileInfo.State == genai.FileStateFailed {
            log.Fatal("Generation failed.")
        }
        time.Sleep(5 * time.Second)
    }

    // 3. Download the final video
    videoBytes, err := client.Files.Download(ctx, genai.NewDownloadURIFromFile(fileInfo), nil)
    if err != nil {
        log.Fatal(err)
    }
    if err := os.WriteFile("output.mp4", videoBytes, 0644); err != nil {
        log.Fatal(err)
    }
}
REST
#!/bin/bash

# 1. Initial request to generate the video
RESPONSE=$(curl -s -X POST "https://generativelanguage.googleapis.com/v1beta/interactions?key=$API_KEY" \
-H "Content-Type: application/json" \
-d '{
 "model": "gemini-omni-1.1-flash",
 "input": "A beautiful sunset over a calm ocean.",
 "response_format": {"type": "video", "delivery": "uri"}
}')

# Extract FILE_ID from the URI (e.g., "files/abc-123" -> "abc-123")
FILE_URI=$(echo $RESPONSE | jq -r '.output_video.uri')
FILE_ID=$(echo $FILE_URI | cut -d'/' -f2)

echo "Video requested (ID: $FILE_ID). Waiting for processing..."

# 2. Polling loop
while true; do
 # Get current file status
 STATUS_JSON=$(curl -s -X GET "https://generativelanguage.googleapis.com/v1beta/files/$FILE_ID?key=$API_KEY")
 STATE=$(echo $STATUS_JSON | jq -r '.state')

 if [ "$STATE" == "ACTIVE" ]; then
   echo "Processing complete! Downloading..."
   break
 elif [ "$STATE" == "FAILED" ]; then
   echo "Error: Generation failed."
   exit 1
 else
   echo "Current state: $STATE... (waiting 5s)"
   sleep 5
 fi
done

# 3. Final download
curl -L -X GET "https://generativelanguage.googleapis.com/v1beta/files/$FILE_ID:download?alt=media&key=$API_KEY" \
--output "output.mp4"

echo "Done! Video saved to output.mp4"
מבנה JSON גולמי של REST (מזהה URI):
{
  "steps": [
    { "type": "user_input", "content": [{"type": "text", "text": "..."}] },
    { "type": "thought", "content": [{"text": "...", "type": "thought"}] },
    {
      "type": "model_output",
      "content": [
        {
          "type": "video",
          "mime_type": "video/mp4",
          "uri": "https://generativelanguage.googleapis.com/v1beta/files/...:download?alt=media"
        }
      ]
    }
  ],
  "id": "v1_...",
  "status": "completed",
  "model": "gemini-omni-1.1-flash",
  "object": "interaction"
}
תוסף סרטונים
הארכת סרטון קיים באמצעות יצירת המשך חלק בקצה של קטע הווידאו. בפרומפט, מתארים איך רוצים שהסרטון ימשיך, למשל
"Extend this video" או "Continue the scene: the camera pans across the mountains".
המודל מנתח את סרטון הקלט כדי ליצור המשך באורך 3 עד 10 שניות.
אפשר להאריך את:
- סרטונים שנוצרו על ידי המודל (רב-שלבי): אפשר להאריך סרטון שנוצר קודם על ידי הפניה ל
previous_interaction_idשלו. סרטונים שהועלו: צריך לספק קובץ סרטון שהועלה (באמצעות Files API) יחד עם ההנחיה לתוסף.
Python
import base64
from google import genai

client = genai.Client()

# Upload your video using the Files API
video_file = client.files.upload(file="my_video.mp4")

# Extend the video using prompt-based extension
interaction = client.interactions.create(
    model="gemini-omni-1.1-flash",
    input=[
        {"type": "video", "uri": video_file.uri},
        {"type": "text", "text": "Continue the scene."}
    ],
)
with open("extended.mp4", "wb") as f:
    f.write(base64.b64decode(interaction.output_video.data))
JavaScript
import { GoogleGenAI } from '@google/genai';
import * as fs from 'fs';
const ai = new GoogleGenAI({});

// Upload your video using the Files API
let videoFile = await ai.files.upload({
  file: 'my_video.mp4',
});

while (videoFile.state === 'PROCESSING') {
  await new Promise(r => setTimeout(r, 10000));
  videoFile = await ai.files.get({ name: videoFile.name });
}

// Extend the video using prompt-based extension
const interaction = await ai.interactions.create({
  model: 'gemini-omni-1.1-flash',
  input: [
    { type: 'video', uri: videoFile.uri },
    { type: 'text', text: 'Continue the scene.' }
  ],
});

if (interaction.output_video?.data) {
  fs.writeFileSync('extended.mp4', Buffer.from(interaction.output_video.data, 'base64'));
}
Java
import com.google.genai.Client;
import com.google.genai.gaos.models.interactions.Content;
import com.google.genai.gaos.models.interactions.CreateModelInteraction;
import com.google.genai.gaos.models.interactions.Interaction;
import com.google.genai.gaos.models.interactions.InteractionsInput;
import com.google.genai.gaos.models.interactions.Model;
import com.google.genai.gaos.models.interactions.TextContent;
import com.google.genai.gaos.models.interactions.VideoContent;
import com.google.genai.gaos.models.operations.CreateInteractionRequestBody;
import com.google.genai.types.File;
import com.google.genai.types.UploadFileConfig;
import java.nio.file.Files;
import java.nio.file.Paths;
import java.util.Arrays;
import java.util.Base64;
import java.util.List;

Client client = new Client();

// Upload your video using the Files API
File videoFile =
    client.files.upload(
        "my_video.mp4", UploadFileConfig.builder().mimeType("video/mp4").build());

// Extend the video using prompt-based extension
Content videoContent = VideoContent.builder().uri(videoFile.uri().get()).build();
Content textContent = TextContent.builder().text("Continue the scene.").build();

List<Content> contents = Arrays.asList(videoContent, textContent);

CreateModelInteraction params =
    CreateModelInteraction.builder()
        .model(Model.of("gemini-omni-1.1-flash"))
        .input(InteractionsInput.ofContent(contents))
        .build();

Interaction interaction =
    client.interactions.create(CreateInteractionRequestBody.of(params)).interaction().get();

if (interaction.outputVideo().isPresent() && interaction.outputVideo().get().data().isPresent()) {
  byte[] videoBytes = Base64.getDecoder().decode(interaction.outputVideo().get().data().get());
  Files.write(Paths.get("extended.mp4"), videoBytes);
}
Go
package main

import (
    "context"
    "encoding/base64"
    "log"
    "os"

    "google.golang.org/genai"
    "google.golang.org/genai/interactions/models/interactions"
    "google.golang.org/genai/interactions/models/operations"
)

func main() {
    ctx := context.Background()
    client, err := genai.NewClient(ctx, nil)
    if err != nil {
        log.Fatal(err)
    }

    // Upload your video using the Files API
    videoFile, err := client.Files.UploadFromPath(ctx, "my_video.mp4", &genai.UploadFileConfig{
        MIMEType: "video/mp4",
    })
    if err != nil {
        log.Fatal(err)
    }

    // Extend the video using prompt-based extension
    contents := []interactions.Content{
        interactions.NewContent(interactions.VideoContent{
            URI: genai.Ptr(videoFile.URI),
        }),
        interactions.NewContent(interactions.TextContent{
            Text: "Continue the scene.",
        }),
    }

    res, err := client.Interactions.Create(ctx, operations.CreateInteractionRequest{
        Body: operations.NewCreateInteractionRequestBody(interactions.CreateModelInteraction{
            Model: interactions.Model("gemini-omni-1.1-flash"),
            Input: interactions.NewInteractionsInput(contents),
        }),
    })
    if err != nil {
        log.Fatal(err)
    }

    if res.Interaction.OutputVideo != nil && res.Interaction.OutputVideo.Data != nil {
        videoBytes, err := base64.StdEncoding.DecodeString(*res.Interaction.OutputVideo.Data)
        if err != nil {
            log.Fatal(err)
        }
        if err := os.WriteFile("extended.mp4", videoBytes, 0644); err != nil {
            log.Fatal(err)
        }
    }
}
REST
curl -X POST "https://generativelanguage.googleapis.com/v1beta/interactions?key=$API_KEY"     -H "Content-Type: application/json"     -d '{
 "model": "gemini-omni-1.1-flash",
 "input": [
   {"type": "video", "uri": "'"$VIDEO_URI"'"},
   {"type": "text", "text": "Continue the scene."}
 ]
}'
הרחבה באמצעות מדיה לדוגמה
אתם יכולים לספק תמונות לדוגמה במערך input יחד עם ההנחיה כדי להוסיף דמויות או אלמנטים חדשים לסרטון המורחב:
Python
import base64
from google import genai

client = genai.Client()

# Upload base video and reference image using the Files API
video_file = client.files.upload(file="my_video.mp4")
character_img = client.files.upload(file="character.png")

# Extend the video while introducing the reference character
interaction = client.interactions.create(
    model="gemini-omni-1.1-flash",
    input=[
        {"type": "video", "uri": video_file.uri},
        {"type": "image", "uri": character_img.uri},
        {"type": "text", "text": "Extend this video: have the character shown in <IMAGE_REF_0> enter the scene and wave."}
    ],
)
with open("extended_with_character.mp4", "wb") as f:
    f.write(base64.b64decode(interaction.output_video.data))
JavaScript
import { GoogleGenAI } from '@google/genai';
import * as fs from 'fs';
const ai = new GoogleGenAI({});

// Upload base video and reference image using the Files API
let videoFile = await ai.files.upload({ file: 'my_video.mp4' });
let characterImg = await ai.files.upload({ file: 'character.png' });

while (videoFile.state === 'PROCESSING' || characterImg.state === 'PROCESSING') {
  await new Promise(r => setTimeout(r, 10000));
  videoFile = await ai.files.get({ name: videoFile.name });
  characterImg = await ai.files.get({ name: characterImg.name });
}

// Extend the video while introducing the reference character
const interaction = await ai.interactions.create({
  model: 'gemini-omni-1.1-flash',
  input: [
    { type: 'video', uri: videoFile.uri },
    { type: 'image', uri: characterImg.uri },
    { type: 'text', text: 'Extend this video: have the character shown in <IMAGE_REF_0> enter the scene and wave.' }
  ],
});

if (interaction.output_video?.data) {
  fs.writeFileSync('extended_with_character.mp4', Buffer.from(interaction.output_video.data, 'base64'));
}
Java
import com.google.genai.Client;
import com.google.genai.gaos.models.interactions.Content;
import com.google.genai.gaos.models.interactions.CreateModelInteraction;
import com.google.genai.gaos.models.interactions.ImageContent;
import com.google.genai.gaos.models.interactions.Interaction;
import com.google.genai.gaos.models.interactions.InteractionsInput;
import com.google.genai.gaos.models.interactions.Model;
import com.google.genai.gaos.models.interactions.TextContent;
import com.google.genai.gaos.models.interactions.VideoContent;
import com.google.genai.gaos.models.operations.CreateInteractionRequestBody;
import com.google.genai.types.File;
import com.google.genai.types.UploadFileConfig;
import java.nio.file.Files;
import java.nio.file.Paths;
import java.util.Arrays;
import java.util.Base64;
import java.util.List;

Client client = new Client();

// Upload base video and reference image using the Files API
File videoFile =
    client.files.upload(
        "my_video.mp4", UploadFileConfig.builder().mimeType("video/mp4").build());
File characterImg =
    client.files.upload(
        "character.png", UploadFileConfig.builder().mimeType("image/png").build());

// Extend the video while introducing the reference character
Content videoContent = VideoContent.builder().uri(videoFile.uri().get()).build();
Content imageContent = ImageContent.builder().uri(characterImg.uri().get()).build();
Content textContent =
    TextContent.builder()
        .text(
            "Extend this video: have the character shown in <IMAGE_REF_0> enter the scene and wave.")
        .build();

List<Content> contents = Arrays.asList(videoContent, imageContent, textContent);

CreateModelInteraction params =
    CreateModelInteraction.builder()
        .model(Model.of("gemini-omni-1.1-flash"))
        .input(InteractionsInput.ofContent(contents))
        .build();

Interaction interaction =
    client.interactions.create(CreateInteractionRequestBody.of(params)).interaction().get();

if (interaction.outputVideo().isPresent() && interaction.outputVideo().get().data().isPresent()) {
  byte[] videoBytes = Base64.getDecoder().decode(interaction.outputVideo().get().data().get());
  Files.write(Paths.get("extended_with_character.mp4"), videoBytes);
}
Go
package main

import (
    "context"
    "encoding/base64"
    "log"
    "os"

    "google.golang.org/genai"
    "google.golang.org/genai/interactions/models/interactions"
    "google.golang.org/genai/interactions/models/operations"
)

func main() {
    ctx := context.Background()
    client, err := genai.NewClient(ctx, nil)
    if err != nil {
        log.Fatal(err)
    }

    // Upload base video and reference image using the Files API
    videoFile, err := client.Files.UploadFromPath(ctx, "my_video.mp4", &genai.UploadFileConfig{
        MIMEType: "video/mp4",
    })
    if err != nil {
        log.Fatal(err)
    }
    characterImg, err := client.Files.UploadFromPath(ctx, "character.png", &genai.UploadFileConfig{
        MIMEType: "image/png",
    })
    if err != nil {
        log.Fatal(err)
    }

    // Extend the video while introducing the reference character
    contents := []interactions.Content{
        interactions.NewContent(interactions.VideoContent{
            URI: genai.Ptr(videoFile.URI),
        }),
        interactions.NewContent(interactions.ImageContent{
            URI: genai.Ptr(characterImg.URI),
        }),
        interactions.NewContent(interactions.TextContent{
            Text: "Extend this video: have the character shown in <IMAGE_REF_0> enter the scene and wave.",
        }),
    }

    res, err := client.Interactions.Create(ctx, operations.CreateInteractionRequest{
        Body: operations.NewCreateInteractionRequestBody(interactions.CreateModelInteraction{
            Model: interactions.Model("gemini-omni-1.1-flash"),
            Input: interactions.NewInteractionsInput(contents),
        }),
    })
    if err != nil {
        log.Fatal(err)
    }

    if res.Interaction.OutputVideo != nil && res.Interaction.OutputVideo.Data != nil {
        videoBytes, err := base64.StdEncoding.DecodeString(*res.Interaction.OutputVideo.Data)
        if err != nil {
            log.Fatal(err)
        }
        if err := os.WriteFile("extended_with_character.mp4", videoBytes, 0644); err != nil {
            log.Fatal(err)
        }
    }
}
REST
curl -X POST "https://generativelanguage.googleapis.com/v1beta/interactions?key=$API_KEY"     -H "Content-Type: application/json"     -d '{
 "model": "gemini-omni-1.1-flash",
  "input": [
    {"type": "video", "uri": "'$VIDEO_URI'"},
    {"type": "image", "uri": "'$CHARACTER_IMG_URI'"},
    {"type": "text", "text": "Extend this video: have the character shown in <IMAGE_REF_0> enter the scene and wave."}
  ]
}'
הגבלות והנחיות לגבי תוספים
כשמאריכים סרטונים, חשוב לזכור את הכללים וההגבלות הבאים:
- דיאלוג מדובר בסרטונים שהועלו: בשלב הזה, אי אפשר להאריך סרטון שהועלה שבו מישהו מדבר כדי להוסיף דיאלוג נוסף (האפשרות הזו נתמכת אם הדמות נשארת בשקט או אם ההנחיה לא מוסיפה דיאלוג).
- תוסף קולי רב-שלבי: אפשר ליצור דיאלוג או נאום מדובר כשמרחיבים סרטונים שנוצרו קודם באמצעות רב-שלבי (
previous_interaction_id). - בסוף הקליפ בלבד: התוסף מוגבל להוספה לסוף הסרטון. אי אפשר להוסיף תוכן בתחילת הקליפ או להאריך את החלק האמצעי שלו.
- מגבלת משך: כשמעלים סרטונים לתוסף (אלא אם משתמשים בשיחה מרובת תורות), האורך שלהם צריך להיות 10 שניות או פחות.
- זמינות אזורית: בשלב הזה, האפשרות להאריך סרטונים שהועלו לא זמינה למשתמשים באזור הכלכלי האירופי (EEA), בשווייץ ובבריטניה (הארכת סרטונים שנוצרו על ידי המודל נתמכת בכל האזורים שבהם התכונה זמינה).
שיטות מומלצות
- שימוש ב-URI למסירת סרטונים גדולים: בסרטונים שגודלם גדול מ-4MB (>720p
when available), צריך להשתמש ב-
delivery="uri"ב-response_formatכדי להימנע ממגבלות על גודל המטען הייעודי. - ביצועים אופטימליים: הגדרת
background=false,store=falseו-stream=falseליצירה מהירה יותר של קריאות יחידות סינכרוניות. שימו לב: הגדרה שלstore=falseפירושה שלא תהיה אפשרות לערוך את הסרטון שנוצר בפעולות הבאות באמצעותprevious_interaction_id. - דיוק ההנחיה: פרטים נוספים זמינים בקטע הנחיות לכתיבת הנחיות.
מגבלות
- העלאה ועריכה של תמונות שכוללות קטינים אינה אפשרית באזור הכלכלי האירופי, בשווייץ ובבריטניה.
- העלאה ועריכה של תמונות שכוללות אנשים מסוימים שניתן לזהות אינה אפשרית.
- בשלב הזה, משתמשים באזור הכלכלי האירופי (EEA), בשווייץ ובבריטניה לא יכולים לערוך סרטונים שהועלו או להאריך אותם (אבל הם יכולים לערוך סרטונים שנוצרו על ידי המודל או להאריך אותם).
- סרטונים שמעלים לעריכה ולהארכה צריכים להיות באורך של 10 שניות או פחות (אלא אם מאריכים סרטונים שנוצרו על ידי המודל באופן רב-שלבי).
- הארכת סרטון מוגבלת להוספה לסוף הסרטון. אי אפשר להוסיף בתחילת הסרטון או באמצע הקליפ.
- אי אפשר להאריך סרטון שהועלה שבו מישהו מדבר כדי להוסיף דיאלוג נוסף (אפשר להשאיר את הדמויות בשקט, או להשתמש בהארכה רב-שלבית עם
previous_interaction_id). - אין תמיכה בעריכה קולית.
- העלאת הפניות לאודיו לא נתמכת בגרסה הנוכחית של ה-API.
- הפניות לסרטונים פועלות בצורה הטובה ביותר עם דמיון; כל אודיו בהפניה לסרטון מתעלמים ממנו. אפשר להוסיף עד 3 קטעים של עד 3 שניות כל אחד.
- אי אפשר להפנות לכמה סרטונים או להסיק מסקנות על סמך כמה סרטונים. ניסיון ליצור הנחיות לכמה סרטונים עלול להוביל לירידה בביצועי המודל או לפלטים לא צפויים.
- אין תמיכה ברוחב פס מוקצה.
- אין תמיכה בהוראות למערכת, בטמפרטורה, ב-
top_p, ברצפי עצירה ובפרומפטים שליליים (אפשר להוסיף את הפרומפטים השליליים לפרומפט הרגיל, לדוגמה: "אל תעשה X"). - אין תמיכה בשימוש בסרטונים ב-YouTube כמקור מדיה.
פרטים טכניים
- כל הסרטונים שנוצרים כוללים סימני מים של SynthID, שהם בלתי נראים לצופים אבל אפשר לזהות אותם באופן פרוגרמטי כדי לאמת את המקור.
- זמני יצירת הסרטונים משתנים בהתאם למשך, לרזולוציה ולעומס הנוכחי על ה-API. יצירת סרטונים ארוכים יותר וברזולוציה גבוהה יותר אורכת יותר זמן.
- Omni מפעיל מסננים של בטיחות תוכן גם על הנחיות קלט וגם על סרטונים שנוצרו (המסננים משתנים בהתאם לאזור). הנחיות שמפירות את מדיניות השימוש נחסמות.
- יש תמיכה מלאה באנגלית (EN), אבל לא בוצעו הערכות לשפות אחרות, כך שיכול להיות שהן יעבדו אבל התוצאות עשויות להיות שונות.
מדריך לכתיבת פרומפטים ל-Gemini Omni Flash
בקטע הזה יש טיפים ודוגמאות שיעזרו לכם לנסח הנחיות יעילות ל-Gemini Omni Flash.
סצנה אחת
כברירת מחדל, Gemini Omni Flash ינסה ליצור סרטון עם כמה צילומים שונים. הוא ינסה ליצור סיפור מעניין על סמך ההנחיה.
אם אתם רוצים שסרטון הפלט יכיל סצנה אחת, אתם צריכים לציין את זה בהנחיה:
- בסצנה רציפה אחת
- בצילום רציף אחד
- אין מעברים בין סצנות
לדוגמה:
Continuous, unbroken handheld shot of a fluffy tabby cat sitting on a sunny windowsill, looking out into a leafy garden. The cat's tail twitches slowly, and its ears rotate slightly toward ambient noises. Sunbeams illuminate dust motes in the air. Sound design: Gentle breeze, distant bird chirps. No dialogue.
הסרת אלמנטים לא רצויים
אם הסרטון שנוצר מכיל דברים שלא רציתם, תוכלו להוסיף הנחיות שליליות פשוטות כדי להימנע מהם:
- אין דיאלוג
- ללא קישוטים
- אין אפקטים קוליים נוספים
הנחיות לעריכה
הפרומפטים הפשוטים הם הכי טובים לעריכת סרטונים. הנחיות מפורטות מדי עלולות להוביל לשינויים לא רצויים.
הנה עוד דוגמאות להנחיות פשוטות לעריכה:
- הסרטון ייראה כמו אנימה
- תוסיף כובע אופנתי לאדם הזה
- תשנה את התאורה כך שתהיה יותר דרמטית
- שינוי הטקסט בשלט ל-Omni Flash
כשעורכים היבט ספציפי של הסרטון, כדאי להוסיף את התג "Keep everything else the same" כדי לשמור על עקביות חזותית.
ריכזנו כאן כמה דוגמאות כדי להמחיש איך משתמשים בטכניקה הזו:
- לא מומלץ:
In the video of the man sitting on the sofa, please add a small black cat that runs from the right side of the screen, jumps onto his lap, and then he starts to stroke its head while looking down.- ישר ולעניין:
Add a cat that jumps onto his lap, he begins to pet it.
Keep everything else the same.
- ישר ולעניין:
- לא מומלץ:
Please remove the cell phone that the person is holding in their hand and fill in the background so it looks like they are just holding their hand empty.- ישר ולעניין:
Make the phone invisible. Keep everything else the
same.
- ישר ולעניין:
הנחיה לאודיו
כברירת מחדל, המודל ינסה ליצור טראק אודיו מתאים לסרטון. יכול להיות שזה לא מה שאתם רוצים. אתם יכולים להשתמש בפרומפט כדי לתאר את סוג האודיו שאתם רוצים. זה חשוב במיוחד אם אתם רוצים להוסיף מוזיקה לסרטון:
- הוספת מוזיקת רקע מרגיעה
- הסרטון כולל ביט טכנו קצבי
- האודיו הוא שידור רדיו חלש ומתכתי ברקע, שבו מושמע שיר
תזמון אירועים
אתם יכולים להנחות את המערכת לבצע פעולות בשעות ספציפיות בסרטון, בלי שתצטרכו להשתמש בתחביר מדויק, אלא בשפה טבעית. האפשרות הזו שימושית במיוחד ליצירת מעברים בין סצנות, קצב או רצפים מהירים. דוגמאות:
- אחרי 3 שניות, אישה נכנסת לסצנה.
- ב-5 שניות הפזמון מתחיל באודיו ברקע.
- כל 2 שניות מתבצע מעבר לפריים חדש.
- בסצנת ירי מהיר, כל חצי שנייה (12 פריימים ב-24fps) משנים את הסצנה למיקום חדש.
אפשר גם להשתמש בתחביר של קוד זמן:
[0-3s] A person is walking
[3-6s] They stop and turn around
[6-10s] They start running
שיפור פרומפטים בעזרת AI
אתם יכולים לבקש מ-Gemini Omni Flash לשים לב לאיכויות כלליות או לעקרונות כלליים של יצירת סרטונים:
- כדי ליצור סצנה עשירה ומפורטת אבל טבעית לחלוטין, חשוב להתייחס לפרטים הקטנים, להבעה ולתזמון.
- חשוב לתת תיאורים מפורטים מאוד של הדמויות והסביבות. יישום עקרונות של עיצוב תלבושות על דמויות. צריך להיות ספציפיים מאוד לגבי האנשים, הפריטים והאובייקטים בסצנה.
- כדאי להוסיף הרבה פרטים מתאימים ברכיבי הרקע כדי שהסצנה תיראה מציאותית וטבעית.
- ליצור סרטון מהיר שבו מוצגות
[thing]נדירות שונות כל שנייה, עם מוזיקה קצבית וטקסט לציון הדבר.
טקסט בסרטונים
אתם יכולים להנחות את Gemini Omni לכלול טקסט בסרטון, והוא יעבד את הטקסט בצורה נכונה וקריאה. אם בסרטון שלכם יופיע טקסט באופן טבעי, גם ברכיבי הרקע, כדאי להגדיר מה הטקסט צריך לומר.
- מילה אחת בכל פעם במסך: "did, you, know, that, Omni, can, do, awesome, text?" כל מילה מופיעה למשך שנייה אחת בסגנון אנימציה שונה. אין דיאלוג.
- יש תמרור שאומר: "This is an AI generation by Omni", יש חזית חנות שאומרת: "All you need AI", יש מכונית עם לוחית רישוי: "OMNI1.1"
הנחיות להארכת סרטון
עם Gemini Omni 1.1 Flash אתם יכולים להאריך סרטונים באמצעות הנחיות כמו "Extend this video" או "The scene continues". אפשר להאריך את הסרטונים ב-10 שניות, עד לאורך כולל של 40 שניות.
Omni יוצר תוסף ששומר על עקביות של סרטונים, תנועות, דמויות ואודיו באמצעות 10 השניות האחרונות של הסרטון המקורי כהקשר. חלק מהפריים הסופיים בסרטון המקור ייערכו כדי שהמעבר יהיה חלק.
כשמרחיבים את ההנחיה, כל הטיפים להנחיות מקיפות שמופיעים במדריך הזה עדיין רלוונטיים:
- מתארים את האודיו בסצנה המורחבת, במיוחד אם רוצים לשנות אותו:
"The music continues into the chorus" - תארו אם הסצנה ממשיכה, או אם יש מעבר חד לסצנה חדשה (אולי עם אותן דמויות):
"Show the same characters in the next scene" - כדי לשמור על דיוק התוצאות או כדי להציג דמויות חדשות, כדאי לכלול תמונות וסרטונים כהפניות:
"The person shown in the reference image enters the scene","The dog in the reference video <VIDEO_REF_0> jumps onto the sofa" - אם משתמשים בחותמות זמן או בתחביר של קוד זמן, הערך 0s מתייחס לתחילת החלק המורחב של הסרטון. אם מאריכים סרטון באורך 10 שניות, המעבר בין הסצנות בהנחיה הזו יקרה אחרי 12 שניות:
"After 2s cut to a new scene with the same characters"
שימוש בתגים בפרומפטים כדי להגדיר תפקידים של תמונות וסרטונים
אתם יכולים להשתמש בתגים כדי לקשר בין מדיה שהועלתה לבין תפקידי יצירה ספציפיים. כך תוכלו לציין אם כל תמונה או סרטון הם פריים התחלתי, פריים סופי או הפניה.
1. תגים פשוטים (מומלץ)
במקרים פשוטים שבהם תפקידי המדיה ברורים מההנחיה, אפשר לקשר תמונות וסרטונים לתפקידים ישירות:
-
<FIRST_FRAME>: שימוש בתמונה כמסגרת הפתיחה של הסרטון, לדוגמה:<FIRST_FRAME> a woman is walking -
<LAST_FRAME>: שימוש בתמונה כמסגרת האחרונה של הסרטון כדי ליצור מעבר. חובה להשתמש בתג<FIRST_FRAME>, לדוגמה:<FIRST_FRAME> <LAST_FRAME> a woman is walking -
<IMAGE_REF_N>: שימוש בתמונה כהפניה, לדוגמה:in the style of <IMAGE_REF_0> a woman <IMAGE_REF_1> is walking(שילוב של הפניה לסגנון מהתמונה הראשונה והפניה לנושא מהתמונה השנייה). תמונות לדוגמה מתחילות מ-0. -
<VIDEO_REF_N>: שימוש בסרטון כהפניה לדמות או לאובייקט, לדוגמה:the person in <VIDEO_REF_0> is playing the violin. גם קובצי עזר של סרטונים מתחילים מ-0.
דוגמה עם 6 תמונות רפרנס:
[0-3s] A studio fashion sequence. Starting with woman <IMAGE_REF_0>, she is holding <IMAGE_REF_1>
[3-6s] Then we see the man <IMAGE_REF_2> holding <IMAGE_REF_3>
[6-10s] And finally another woman <IMAGE_REF_4> who is holding <IMAGE_REF_5> while walking.
2. הצהרה על מקורות והפניות
במקרים מורכבים יותר עם כמה קלט מדיה וכמה תפקידים, אפשר להשתמש בתגי קידומת מפורשים בשילוב עם הוראות בשפה טבעית. מומלץ לציין את המקורות וההפניות האלה בתחילת ההנחיה.
-
[# Sources <FIRST_FRAME>@Image1]ישתמש בתמונה הראשונה כפריים ההתחלתי. -
[# Sources <FIRST_FRAME>@Image1 <LAST_FRAME>@Image2]ישתמש בתמונה הראשונה כפריים ההתחלתי ובתמונה השנייה כפריים הסופי. -
[# Sources <FIRST_FRAME>@Image1 <LAST_FRAME>@Image1]ישתמש בתמונה הראשונה גם כפריים הראשון וגם כפריים האחרון, וייצור סרטון שחוזר על עצמו בלופ. -
[# Sources <FIRST_FRAME>@Image1] [# References <IMAGE_REF_0>@Image2]ישתמש בתמונה הראשונה כפריים התחלתי ובתמונה השנייה כהפניה. -
[# Sources <VIDEO_0>@Video1]ישמש כסרטון המקור הראשי לעריכה או לשינוי. -
[# Sources <PREVIOUS_VIDEO>@Video1]ישתמש בסרטון מהתור הקודם כדי להרחיב אותו. -
[# References <IMAGE_REF_0>@Image1]ישתמש בתמונה הראשונה כדוגמה. -
[# References <IMAGE_REF_1>@Image2]ישתמש בתמונה השנייה כרפרנס. -
[# References <IMAGE_REF_0>@Image1 <IMAGE_REF_1>@Image2]ישתמש בשתי התמונות כרפרנס. -
[# References <VIDEO_REF_0>@Video1]ישתמש בסרטון הראשון כהפניה. -
[# References <IMAGE_REF_0>@Image1 <VIDEO_REF_0>@Video1]ישתמש גם בתמונה וגם בסרטון כדוגמה.
מוסיפים הוראות מנחות בסוף ההנחיה:
- לפריים פותח:
"Use this image as the starting frame." - כדי ליצור סרטון בלופ באמצעות מסגרות התחלה וסיום:
"Use this image as the first frame and the last frame." - לתמונות לדוגמה:
"Use the given image(s) as references for video generation. The images should not be used as literal initial frames." - לסרטוני הפניה:
"Use the given video(s) as references. Do not use them as a source for video editing."
דוגמאות לפרומפטים עם הצהרות על מקורות ורפרנסים:
פריים פותח בשילוב עם תמונת רפרנס:
[# Sources <FIRST_FRAME>@Image1] [# References <IMAGE_REF_0>@Image2] a woman <IMAGE_REF_0> is walking. Use Image1 as the starting frame. Use Image2 as a reference for the video generation.
סרטון רפרנס של דמות בשילוב עם תמונת רפרנס של אובייקט:
[# References <IMAGE_REF_0>@Image1 <VIDEO_REF_0>@Video1] The woman in <VIDEO_REF_0> is playing the violin shown in <IMAGE_REF_0>. Use Video1 as a character reference and Image1 as an object reference.
המאמרים הבאים
- כדי להתחיל לעבוד עם Gemini Omni Flash, אפשר להתנסות ב-Omni Quickstart Colab.
- במאמר מבוא לעיצוב הנחיות מוסבר איך לכתוב הנחיות טובות עוד יותר.