Gemini Robotics-ER 1.6 เป็นโมเดลภาษาภาพ (VLM) ที่นำความสามารถด้าน Agentic AI ของ Gemini มาใช้กับหุ่นยนต์ โดยออกแบบมาเพื่อการให้เหตุผลขั้นสูงในโลกกายภาพ ซึ่งช่วยให้หุ่นยนต์ตีความข้อมูลภาพที่ซับซ้อน ทำการให้เหตุผลเชิงพื้นที่ และวางแผนการดำเนินการจากคำสั่งภาษาธรรมชาติได้
โปรดทราบว่าหากคุณใช้ Gemini Robotics-ER 1.5 คุณจะเริ่มใช้โมเดล 1.6
ได้โดยการแทนที่ชื่อโมเดลจาก model="gemini-robotics-er-1.5-preview"
เป็น model="gemini-robotics-er-1.6-preview" ในการเรียก API
ฟีเจอร์และสิทธิประโยชน์หลัก
- อิสระที่เพิ่มขึ้น: หุ่นยนต์สามารถให้เหตุผล ปรับตัว และตอบสนองต่อการเปลี่ยนแปลงใน สภาพแวดล้อมแบบเปิด
- การโต้ตอบด้วยภาษาธรรมชาติ: ช่วยให้ใช้หุ่นยนต์ได้ง่ายขึ้นด้วยการเปิดใช้ การมอบหมายงานที่ซับซ้อนโดยใช้ภาษาธรรมชาติ
- การจัดระเบียบงาน: แยกคำสั่งภาษาธรรมชาติออกเป็นงานย่อย และผสานรวมกับตัวควบคุมและลักษณะการทำงานของหุ่นยนต์ที่มีอยู่เพื่อทำงาน ระยะยาวให้เสร็จสมบูรณ์
- ความสามารถที่หลากหลาย: ค้นหาและระบุออบเจ็กต์ ทำความเข้าใจ ความสัมพันธ์ของออบเจ็กต์ วางแผนการจับและวิถี และตีความฉาก แบบไดนามิก
เอกสารนี้จะอธิบายสิ่งที่โมเดลทำและพาคุณไปดูตัวอย่างหลายรายการที่เน้นความสามารถด้าน Agentic AI ของโมเดล
หากต้องการเริ่มใช้งานทันที คุณสามารถลองใช้โมเดลใน Google AI Studio ได้
ความปลอดภัย
แม้ว่า Gemini Robotics-ER 1.6 จะสร้างขึ้นโดยคำนึงถึงความปลอดภัย แต่คุณมี หน้าที่รับผิดชอบในการรักษาสภาพแวดล้อมที่ปลอดภัยรอบๆ หุ่นยนต์ โมเดล Generative AI อาจทำงานผิดพลาดได้ และหุ่นยนต์ที่จับต้องได้อาจทำให้เกิดความเสียหาย ความปลอดภัยเป็นสิ่งที่เราให้ความสำคัญเป็นอันดับแรก และการทำให้โมเดล Generative AI ปลอดภัยเมื่อใช้กับหุ่นยนต์ในโลกแห่งความเป็นจริงเป็นหัวข้อวิจัยที่สำคัญและมีการดำเนินการอย่างต่อเนื่อง ดูข้อมูลเพิ่มเติมได้ที่หน้าความปลอดภัยด้านหุ่นยนต์ของ Google DeepMind
เริ่มต้นใช้งาน: การค้นหาออบเจ็กต์ในฉาก
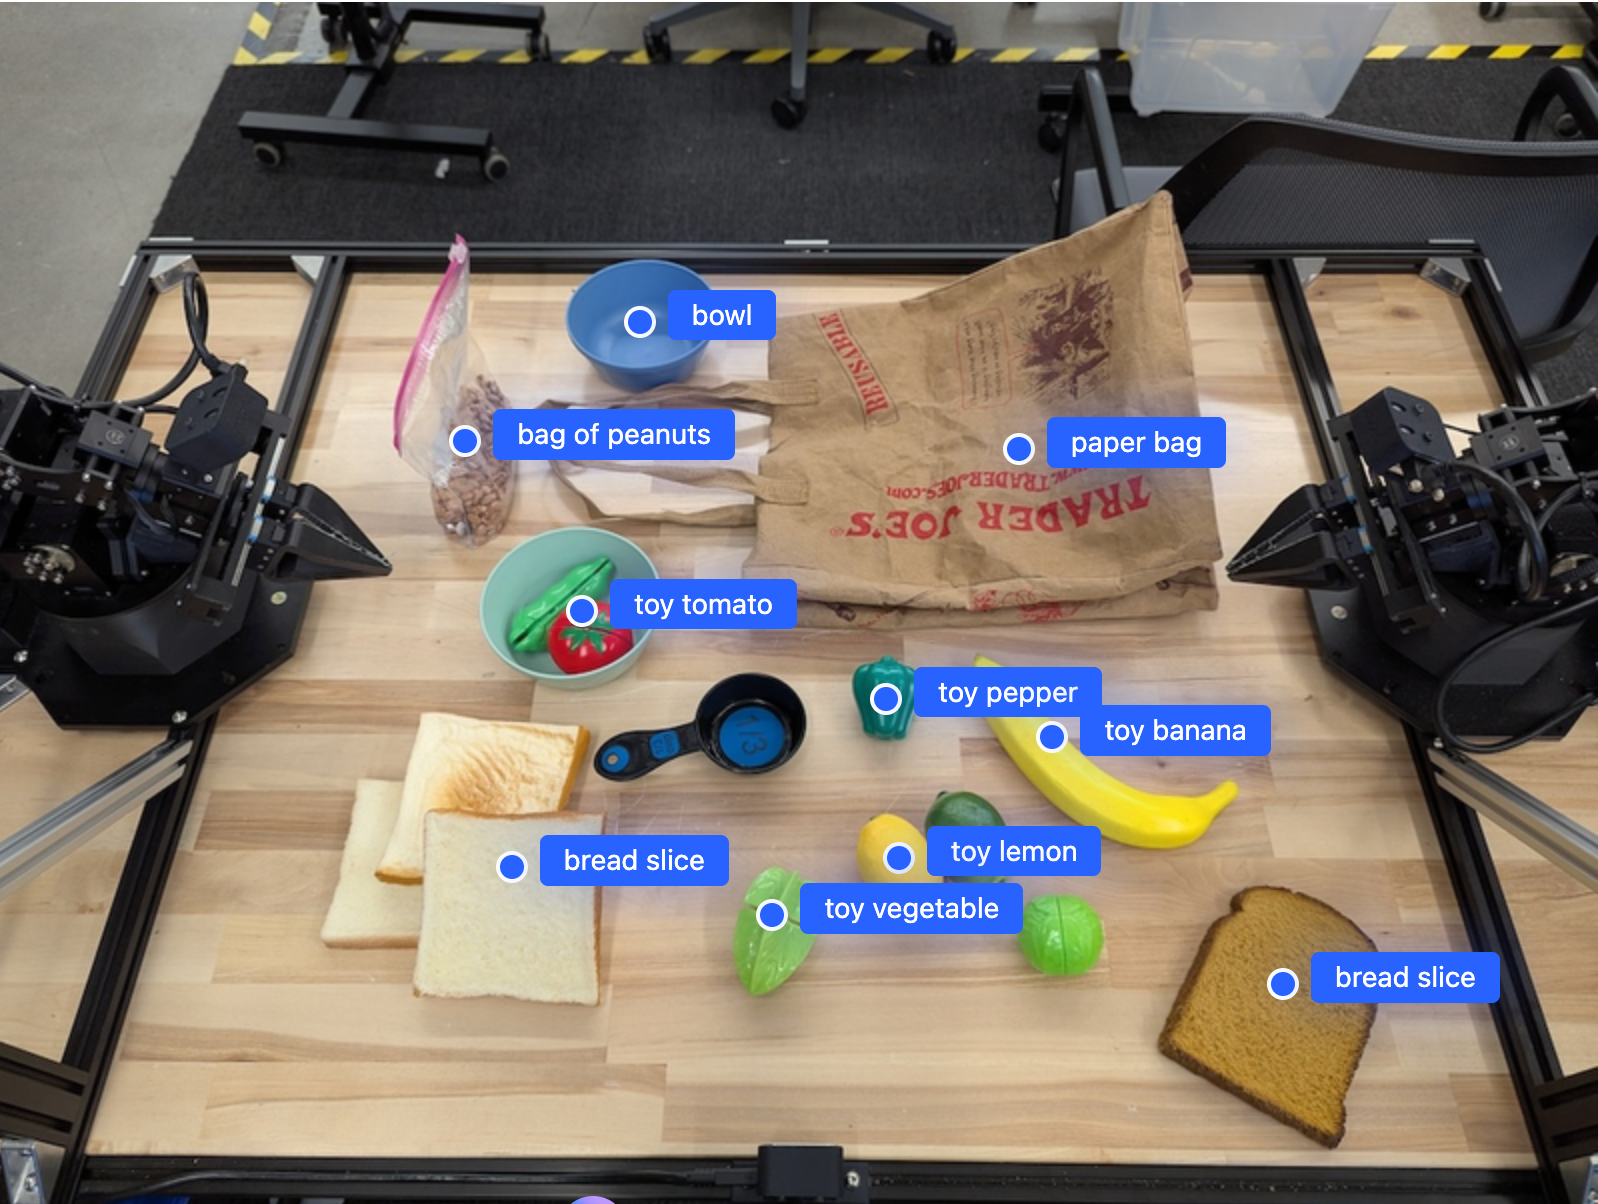
ตัวอย่างต่อไปนี้แสดงกรณีการใช้งานหุ่นยนต์ทั่วไป โดยจะแสดงวิธีส่งรูปภาพและพรอมต์ข้อความไปยังโมเดลโดยใช้เมธอด generateContent เพื่อรับรายการออบเจ็กต์ที่ระบุพร้อมกับจุด 2 มิติที่เกี่ยวข้อง
โมเดลจะแสดงผลจุดสำหรับรายการที่ระบุในรูปภาพ โดยแสดงผลพิกัด 2 มิติที่ได้รับการทำให้เป็นมาตรฐานและป้ายกำกับของรายการเหล่านั้น
คุณสามารถใช้เอาต์พุตนี้กับ API ของหุ่นยนต์ หรือเรียกใช้โมเดล Vision-Language-Action (VLA) หรือฟังก์ชันอื่นๆ ที่ผู้ใช้กำหนดเองของบุคคลที่สามเพื่อสร้างการดำเนินการ ให้หุ่นยนต์ทำ
Python
from google import genai
from google.genai import types

PROMPT = """
          Point to no more than 10 items in the image. The label returned
          should be an identifying name for the object detected.
          The answer should follow the json format: [{"point": <point>,
          "label": <label1>}, ...]. The points are in [y, x] format
          normalized to 0-1000.
        """
client = genai.Client()

# Load your image
with open("my-image.png", 'rb') as f:
    image_bytes = f.read()

image_response = client.models.generate_content(
    model="gemini-robotics-er-1.6-preview",
    contents=[
        types.Part.from_bytes(
            data=image_bytes,
            mime_type='image/png',
        ),
        PROMPT
    ],
    config = types.GenerateContentConfig(
        temperature=1.0,
        thinking_config=types.ThinkingConfig(thinking_budget=0)
    )
)

print(image_response.text)
REST
# First, ensure you have the image file locally.
# Encode the image to base64
IMAGE_BASE64=$(base64 -w 0 my-image.png)

curl -X POST \
  "https://generativelanguage.googleapis.com/v1beta/models/gemini-robotics-er-1.6-preview:generateContent \
  -H "x-goog-api-key: $GEMINI_API_KEY" \
  -H "Content-Type: application/json" \
  -d '{
    "contents": [
      {
        "parts": [
          {
            "inlineData": {
              "mimeType": "image/png",
              "data": "'"${IMAGE_BASE64}"'"
            }
          },
          {
            "text": "Point to no more than 10 items in the image. The label returned should be an identifying name for the object detected. The answer should follow the json format: [{\"point\": [y, x], \"label\": <label1>}, ...]. The points are in [y, x] format normalized to 0-1000."
          }
        ]
      }
    ],
    "generationConfig": {
      "temperature": 0.5,
      "thinkingConfig": {
        "thinkingBudget": 0
      }
    }
  }'
เอาต์พุตจะเป็นอาร์เรย์ JSON ที่มีออบเจ็กต์ โดยแต่ละออบเจ็กต์จะมี point
(พิกัด [y, x] ที่ปรับให้เป็นมาตรฐาน) และ label ที่ระบุออบเจ็กต์
JSON
[
  {"point": [376, 508], "label": "small banana"},
  {"point": [287, 609], "label": "larger banana"},
  {"point": [223, 303], "label": "pink starfruit"},
  {"point": [435, 172], "label": "paper bag"},
  {"point": [270, 786], "label": "green plastic bowl"},
  {"point": [488, 775], "label": "metal measuring cup"},
  {"point": [673, 580], "label": "dark blue bowl"},
  {"point": [471, 353], "label": "light blue bowl"},
  {"point": [492, 497], "label": "bread"},
  {"point": [525, 429], "label": "lime"}
]
รูปภาพต่อไปนี้เป็นตัวอย่างวิธีแสดงคะแนนเหล่านี้
วิธีการทำงาน
Gemini Robotics-ER 1.6 ช่วยให้หุ่นยนต์ของคุณเข้าใจบริบทและทำงานในโลก ทางกายภาพได้โดยใช้ความเข้าใจเชิงพื้นที่ โดยจะรับอินพุตเป็นรูปภาพ/วิดีโอ/เสียงและพรอมต์ภาษาธรรมชาติเพื่อทำสิ่งต่อไปนี้
- ทำความเข้าใจออบเจ็กต์และบริบทของฉาก: ระบุออบเจ็กต์และให้เหตุผล เกี่ยวกับความสัมพันธ์ของออบเจ็กต์กับฉาก รวมถึงความสามารถของออบเจ็กต์
- เข้าใจวิธีการของงาน: ตีความงานที่กำหนดในภาษาธรรมชาติ เช่น "หาผลไม้"
- ใช้เหตุผลเชิงพื้นที่และเชิงเวลา: เข้าใจลำดับการดำเนินการและวิธีที่ออบเจ็กต์โต้ตอบกับฉากเมื่อเวลาผ่านไป
- ระบุเอาต์พุตที่มีโครงสร้าง: แสดงผลพิกัด (จุดหรือกรอบล้อมรอบ) ที่แสดงตำแหน่งของออบเจ็กต์
ซึ่งช่วยให้หุ่นยนต์ "มองเห็น" และ "เข้าใจ" สภาพแวดล้อมของตนเอง โดยอัตโนมัติ
นอกจากนี้ Gemini Robotics-ER 1.6 ยังเป็นเอเจนต์ ซึ่งหมายความว่าสามารถแบ่งงานที่ซับซ้อน (เช่น "ใส่แอปเปิ้ลลงในชาม") ออกเป็นงานย่อยเพื่อจัดระเบียบงานระยะยาวได้
- การจัดลำดับงานย่อย: แยกคำสั่งออกเป็นลำดับขั้นตอนที่สมเหตุสมผล
- การเรียกฟังก์ชัน/การเรียกใช้โค้ด: เรียกใช้ขั้นตอนโดยการเรียกฟังก์ชัน/เครื่องมือของหุ่นยนต์ที่มีอยู่ หรือเรียกใช้โค้ดที่สร้างขึ้น
อ่านเพิ่มเติมเกี่ยวกับวิธีการเรียกใช้ฟังก์ชันด้วย Gemini ได้ในหน้าการเรียกใช้ฟังก์ชัน
การใช้งบประมาณการคิดด้วย Gemini Robotics-ER 1.6
Gemini Robotics-ER 1.6 มีงบประมาณการคิดที่ยืดหยุ่นซึ่งช่วยให้คุณควบคุม การแลกระหว่างเวลาในการตอบสนองกับความแม่นยำได้ สำหรับงานที่ต้องทำความเข้าใจเชิงพื้นที่ เช่น การตรวจหาออบเจ็กต์ โมเดลจะทำงานได้อย่างมีประสิทธิภาพสูงโดยใช้ต้นทุนการคิดต่ำ งานการให้เหตุผลที่ซับซ้อนมากขึ้น เช่น การนับและการประมาณน้ำหนัก จะได้รับประโยชน์จากงบประมาณการคิดที่มากขึ้น ซึ่งช่วยให้คุณปรับสมดุลความต้องการคำตอบที่มีเวลาในการตอบสนองต่ำกับผลลัพธ์ที่มีความแม่นยำสูงสำหรับงานที่ท้าทายมากขึ้น
ดูข้อมูลเพิ่มเติมเกี่ยวกับงบประมาณการคิดได้ที่หน้าความสามารถหลักของการคิด
การให้เหตุผลเชิงพื้นที่มาตรฐาน
ตัวอย่างต่อไปนี้แสดงให้เห็นถึงงานสำหรับการรับรู้ของหุ่นยนต์และการใช้เหตุผลเชิงพื้นที่โดยใช้พรอมต์ภาษาธรรมชาติ ตั้งแต่การชี้และการค้นหาวัตถุในรูปภาพไปจนถึงการวางแผนวิถี เพื่อความเรียบง่าย เราได้ลดข้อมูลโค้ดในตัวอย่างเหล่านี้เพื่อแสดงเฉพาะพรอมต์และการเรียกใช้ generate_content API
คุณดูโค้ดที่เรียกใช้ได้ทั้งหมดและ ตัวอย่างเพิ่มเติมได้ใน Robotics cookbook
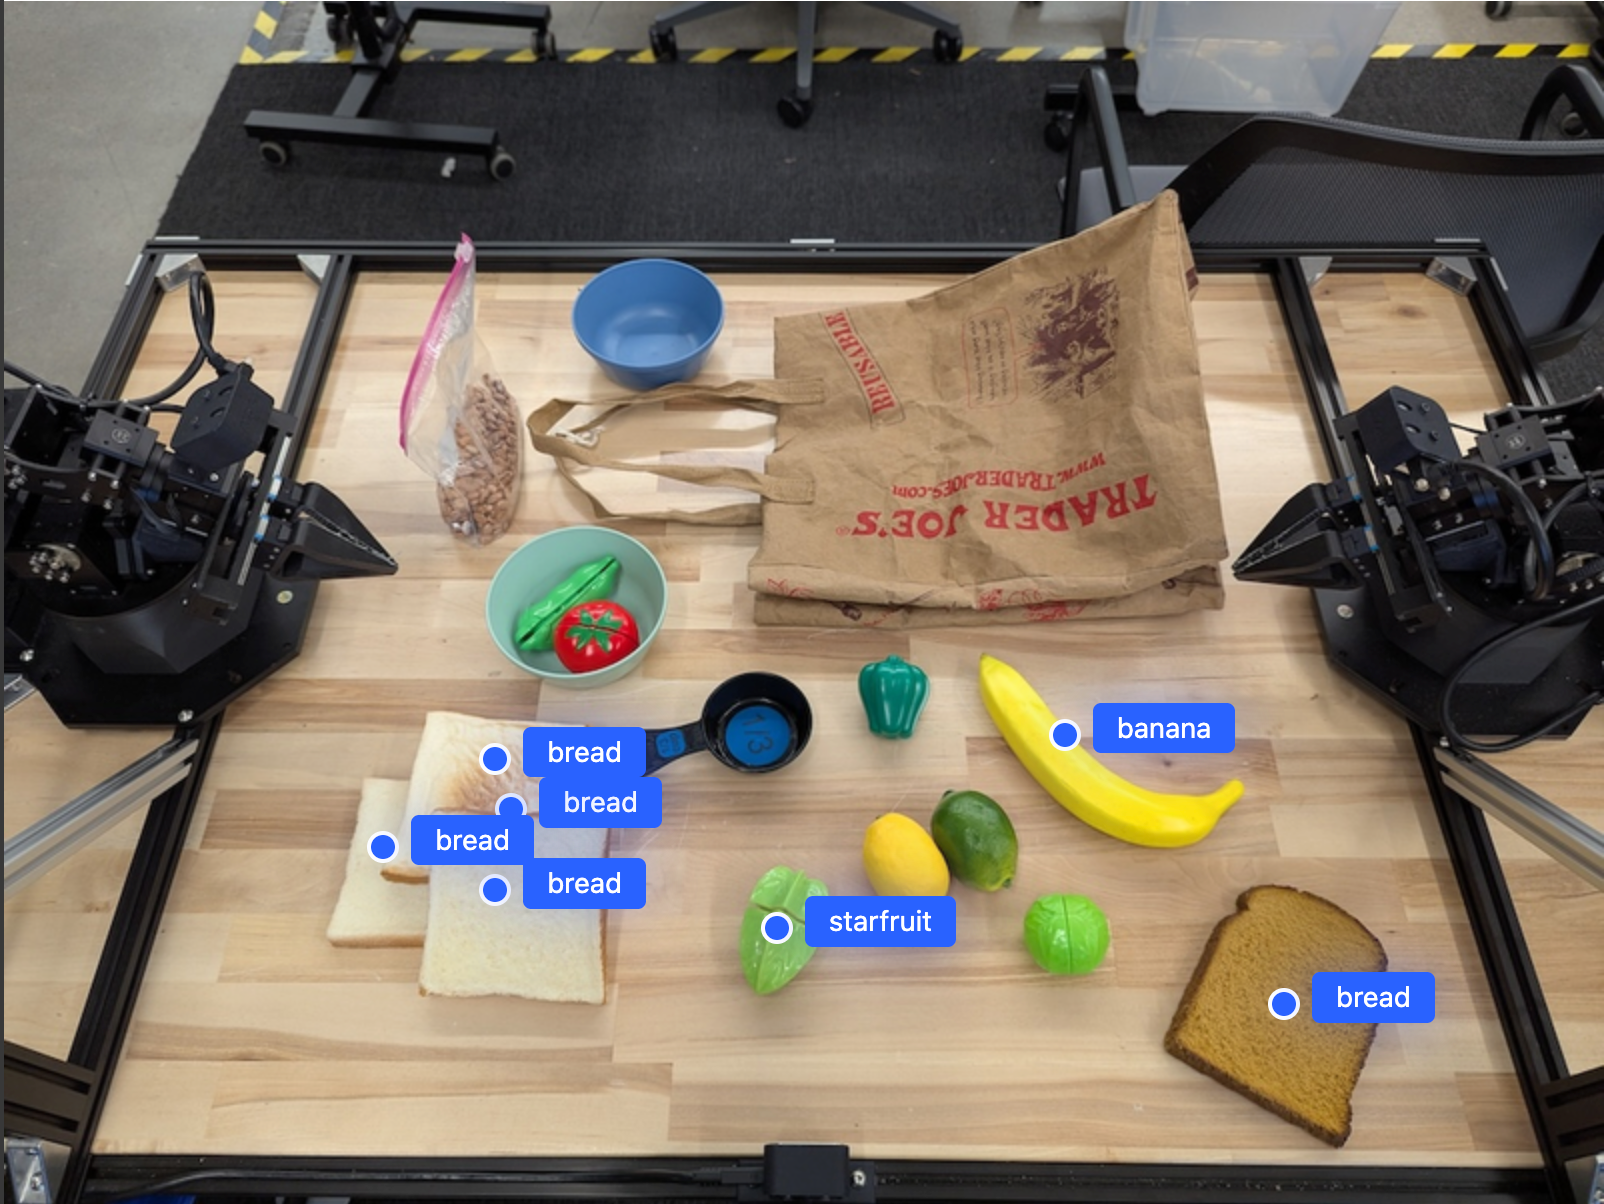
ชี้ไปที่วัตถุ
การชี้และค้นหาออบเจ็กต์ในรูปภาพหรือเฟรมวิดีโอเป็นกรณีการใช้งานทั่วไปสำหรับ โมเดลวิชันและภาษา (VLM) ในหุ่นยนต์ ตัวอย่างต่อไปนี้ขอให้ โมเดลค้นหาออบเจ็กต์ที่เฉพาะเจาะจงภายในรูปภาพและแสดงผลพิกัดของออบเจ็กต์
Python
from google import genai
from google.genai import types

client = genai.Client()

# Load your image and set up your prompt
with open('path/to/image-with-objects.jpg', 'rb') as f:
    image_bytes = f.read()

queries = [
    "bread",
    "starfruit",
    "banana",
]

prompt = f"""
    Get all points matching the following objects: {', '.join(queries)}. The
    label returned should be an identifying name for the object detected.
    The answer should follow the json format:

    [{{"point": , "label": }}, ...]. The points are in

    [y, x] format normalized to 0-1000.
    """

image_response = client.models.generate_content(
  model="gemini-robotics-er-1.6-preview",
  contents=[
    types.Part.from_bytes(
      data=image_bytes,
      mime_type='image/jpeg',
    ),
    prompt
  ],
  config = types.GenerateContentConfig(
      temperature=1.0,
      thinking_config=types.ThinkingConfig(thinking_budget=0)
  )
)

print(image_response.text)
เอาต์พุตจะคล้ายกับตัวอย่างการเริ่มต้นใช้งาน ซึ่งเป็น JSON ที่มี พิกัดของออบเจ็กต์ที่พบและป้ายกำกับของออบเจ็กต์
[
  {"point": [671, 317], "label": "bread"},
  {"point": [738, 307], "label": "bread"},
  {"point": [702, 237], "label": "bread"},
  {"point": [629, 307], "label": "bread"},
  {"point": [833, 800], "label": "bread"},
  {"point": [609, 663], "label": "banana"},
  {"point": [770, 483], "label": "starfruit"}
]
ใช้พรอมต์ต่อไปนี้เพื่อขอให้โมเดลตีความหมวดหมู่ที่เป็นนามธรรม เช่น "ผลไม้" แทนที่จะเป็นออบเจ็กต์ที่เฉพาะเจาะจง และค้นหาอินสแตนซ์ทั้งหมดในรูปภาพ
Python
prompt = f"""
        Get all points for fruit. The label returned should be an identifying
        name for the object detected.
        """ + """The answer should follow the json format:
        [{"point": <point>, "label": <label1>}, ...]. The points are in
        [y, x] format normalized to 0-1000."""
ไปที่หน้าการทำความเข้าใจรูปภาพเพื่อดู เทคนิคการประมวลผลรูปภาพอื่นๆ
การติดตามออบเจ็กต์ในวิดีโอ
Gemini Robotics-ER 1.6 ยังวิเคราะห์เฟรมวิดีโอเพื่อติดตามออบเจ็กต์ เมื่อเวลาผ่านไปได้ด้วย ดูรายการรูปแบบวิดีโอที่รองรับได้ที่อินพุตวิดีโอ
ต่อไปนี้คือพรอมต์พื้นฐานที่ใช้ค้นหาออบเจ็กต์ที่เฉพาะเจาะจงใน แต่ละเฟรมที่โมเดลวิเคราะห์
Python
# Define the objects to find
queries = [
    "pen (on desk)",
    "pen (in robot hand)",
    "laptop (opened)",
    "laptop (closed)",
]

base_prompt = f"""
  Point to the following objects in the provided image: {', '.join(queries)}.
  The answer should follow the json format:

  [{{"point": , "label": }}, ...].

  The points are in [y, x] format normalized to 0-1000.
  If no objects are found, return an empty JSON list [].
  """
เอาต์พุตแสดงปากกาและแล็ปท็อปที่ระบบติดตามในเฟรมวิดีโอ
![]()
ดูโค้ดที่เรียกใช้ได้ทั้งหมดได้ใน สูตรอาหารสำหรับหุ่นยนต์
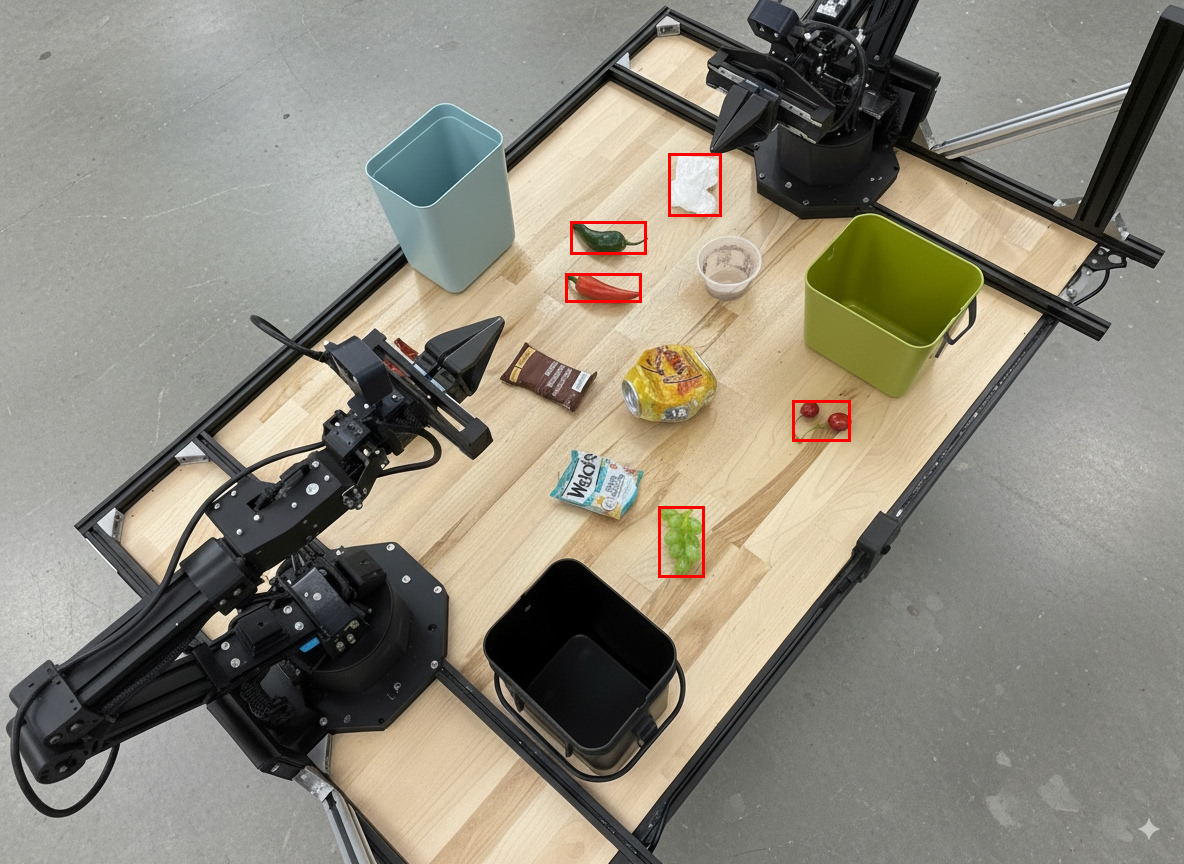
การตรวจหาวัตถุและกรอบล้อมรอบ
นอกจากจุดเดียวแล้ว โมเดลยังสามารถแสดงกรอบล้อมรอบ 2 มิติได้ด้วย ซึ่งจะให้ ภูมิภาคสี่เหลี่ยมผืนผ้าที่ล้อมรอบวัตถุ
ตัวอย่างนี้ขอขอบเขต 2 มิติสำหรับวัตถุที่ระบุได้บนโต๊ะ โมเดลได้รับคำสั่งให้จำกัดเอาต์พุตไว้ที่ 25 ออบเจ็กต์และตั้งชื่ออินสแตนซ์หลายรายการ ให้ไม่ซ้ำกัน
Python
from google import genai
from google.genai import types

client = genai.Client()

# Load your image and set up your prompt
with open('path/to/image-with-objects.jpg', 'rb') as f:
    image_bytes = f.read()

prompt = """
      Return bounding boxes as a JSON array with labels. Never return masks
      or code fencing. Limit to 25 objects. Include as many objects as you
      can identify on the table.
      If an object is present multiple times, name them according to their
      unique characteristic (colors, size, position, unique characteristics, etc..).
      The format should be as follows: [{"box_2d": [ymin, xmin, ymax, xmax],
      "label": <label for the object>}] normalized to 0-1000. The values in
      box_2d must only be integers
      """

image_response = client.models.generate_content(
  model="gemini-robotics-er-1.6-preview",
  contents=[
    types.Part.from_bytes(
      data=image_bytes,
      mime_type='image/jpeg',
    ),
    prompt
  ],
  config = types.GenerateContentConfig(
      temperature=1.0,
      thinking_config=types.ThinkingConfig(thinking_budget=0)
  )
)

print(image_response.text)
ต่อไปนี้จะแสดงกรอบที่โมเดลส่งคืน
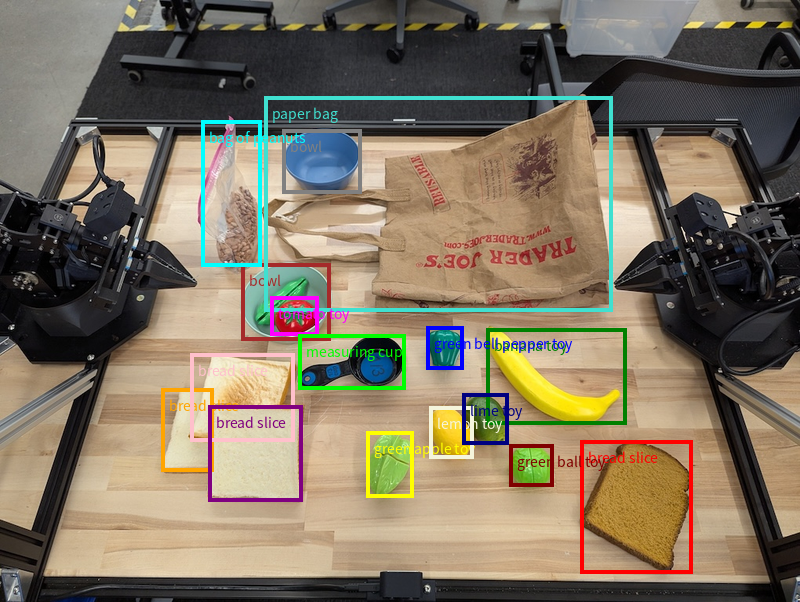
ดูโค้ดที่เรียกใช้ได้ทั้งหมดได้ที่ตำรา หุ่นยนต์ หน้าการทำความเข้าใจรูปภาพยังมี ตัวอย่างเพิ่มเติมของงานด้านภาพ เช่น การตรวจจับออบเจ็กต์และ ตัวอย่างกรอบล้อมรอบ
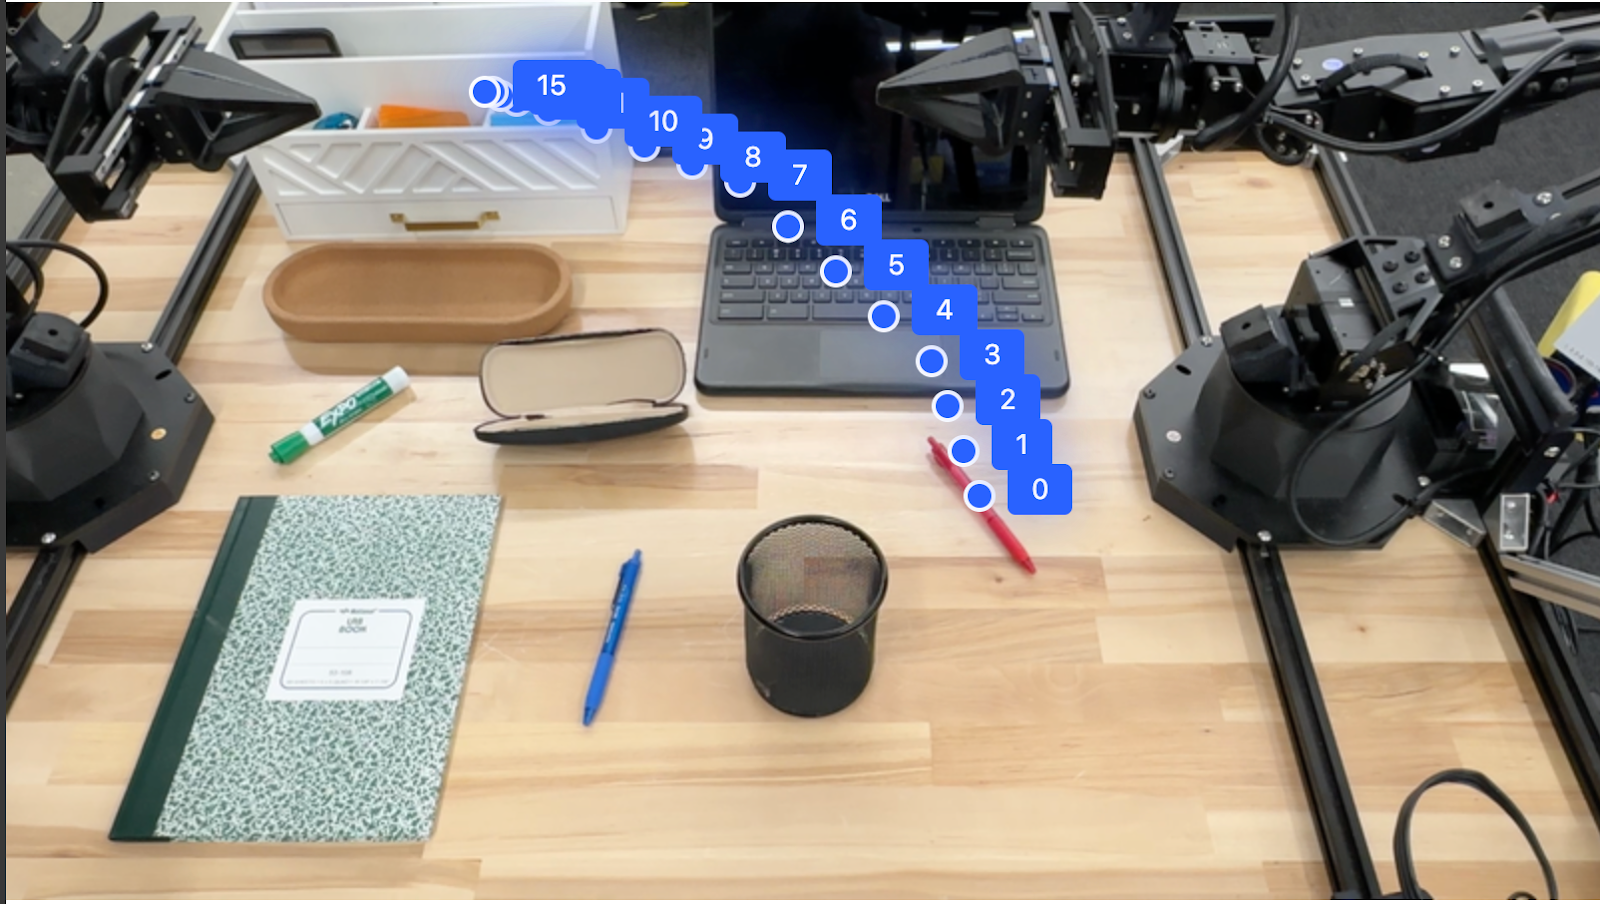
วิถี
Gemini Robotics-ER 1.6 สามารถสร้างลำดับของจุดที่กำหนดวิถี ซึ่งมีประโยชน์ในการนำทางการเคลื่อนไหวของหุ่นยนต์
ตัวอย่างนี้ขอเส้นทางการเคลื่อนที่ปากกาสีแดงไปยังออแกไนเซอร์ ซึ่งรวมถึง จุดเริ่มต้นและชุดจุดกลาง
Python
from google import genai
from google.genai import types

client = genai.Client()

# Load your image and set up your prompt
with open('path/to/image-with-objects.jpg', 'rb') as f:
    image_bytes = f.read()

points_data = []
prompt = """
        Place a point on the red pen, then 15 points for the trajectory of
        moving the red pen to the top of the organizer on the left.
        The points should be labeled by order of the trajectory, from '0'
        (start point at left hand) to <n> (final point)
        The answer should follow the json format:
        [{"point": <point>, "label": <label1>}, ...].
        The points are in [y, x] format normalized to 0-1000.
        """

image_response = client.models.generate_content(
  model="gemini-robotics-er-1.6-preview",
  contents=[
    types.Part.from_bytes(
      data=image_bytes,
      mime_type='image/jpeg',
    ),
    prompt
  ],
  config = types.GenerateContentConfig(
      temperature=1.0,
  )
)

print(image_response.text)
การตอบกลับคือชุดพิกัดที่อธิบายวิถีของเส้นทาง ที่ปากกาสีแดงควรใช้เพื่อทำงานให้เสร็จสมบูรณ์โดยการย้ายปากกาไปไว้ด้านบนของ ออแกไนเซอร์
[
  {"point": [550, 610], "label": "0"},
  {"point": [500, 600], "label": "1"},
  {"point": [450, 590], "label": "2"},
  {"point": [400, 580], "label": "3"},
  {"point": [350, 550], "label": "4"},
  {"point": [300, 520], "label": "5"},
  {"point": [250, 490], "label": "6"},
  {"point": [200, 460], "label": "7"},
  {"point": [180, 430], "label": "8"},
  {"point": [160, 400], "label": "9"},
  {"point": [140, 370], "label": "10"},
  {"point": [120, 340], "label": "11"},
  {"point": [110, 320], "label": "12"},
  {"point": [105, 310], "label": "13"},
  {"point": [100, 305], "label": "14"},
  {"point": [100, 300], "label": "15"}
]
ความสามารถด้าน Agentic AI
ตัวอย่างต่อไปนี้แสดงให้เห็นถึงการให้เหตุผลเชิงหุ่นยนต์ขั้นสูงโดยใช้ความสามารถของ Agent ของโมเดล ซึ่งก็คือการดำเนินการโค้ด ในสถานการณ์เหล่านี้ โมเดลสามารถตัดสินใจเขียนและรันโค้ด Python เพื่อจัดการรูปภาพ (เช่น ซูมเข้า ครอบตัด หรือหมุน) เพื่อแก้ไขความคลุมเครือหรือ ปรับปรุงความแม่นยำก่อนตอบ
การตรวจจับออบเจ็กต์ (ซูมและครอบตัด)
ตัวอย่างต่อไปนี้แสดงวิธีใช้การดำเนินการโค้ดเพื่อซูมและครอบตัดรูปภาพ เพื่อให้เห็นชัดเจนยิ่งขึ้นเมื่อตรวจหาออบเจ็กต์และแสดงกล่องขอบเขต
Python
from google import genai
from google.genai import types

client = genai.Client()

# Load your image
with open('sorting.jpeg', 'rb') as f:
    image_bytes = f.read()

prompt = """
Return JSON in the format {label: val, y: val, x: val, y2: val, x2: val} for
the compostable objects in this scene. Please Zoom and crop the image for a
clearer view. Return an annotated image of the final result with the bounding
boxes drawn on it to the API caller as a part of your process.
"""

response = client.models.generate_content(
    model="gemini-robotics-er-1.6-preview",
    contents=[
        types.Part.from_bytes(
            data=image_bytes,
            mime_type='image/jpeg',
        ),
        prompt
    ],
    config = types.GenerateContentConfig(
        temperature=1.0,
        tools=[types.Tool(code_execution=types.ToolCodeExecution)],
    )
)

print(response.text)
เอาต์พุตโมเดลจะมีลักษณะคล้ายกับตัวอย่างต่อไปนี้
[
  {"label": "compostable", "y": 256, "x": 482, "y2": 295, "x2": 546},
  {"label": "compostable", "y": 317, "x": 478, "y2": 350, "x2": 542},
  {"label": "compostable", "y": 586, "x": 556, "y2": 668, "x2": 595},
  {"label": "compostable", "y": 463, "x": 669, "y2": 511, "x2": 718},
  {"label": "compostable", "y": 178, "x": 565, "y2": 250, "x2": 609}
]
ต่อไปนี้จะแสดงกรอบที่โมเดลส่งคืน
อ่านเกจแบบอนาล็อกและใช้ตรรกะ
ตัวอย่างต่อไปนี้แสดงวิธีใช้โมเดลเพื่ออ่านเกจแบบอนาล็อก และทำการคำนวณเวลา โดยจะใช้คำสั่งของระบบเพื่อบังคับใช้เอาต์พุต JSON
Python
from google import genai
from google.genai import types

client = genai.Client()

# Load your image
with open('clock.jpg', 'rb') as f:
    image_bytes = f.read()

q_time = """
Tell me what the value is. Please respond in the following JSON format:\n {\n "hours": X,\n  "minutes": Y,\n}. Zoom in or crop as necessary to confirm location of the clock hands.
"""

system_instruction = "Be precise. When JSON is requested, reply with ONLY that JSON (no preface, no code block)."

response = client.models.generate_content(
    model="gemini-robotics-er-1.6-preview",
    contents=[
        types.Part.from_bytes(
            data=image_bytes,
            mime_type='image/jpeg',
        ),
        system_instruction + " " + q_time
    ],
    config = types.GenerateContentConfig(
        temperature=1.0,
    )
)

print(response.text)
ต่อไปนี้คือตัวอย่างอินพุตรูปภาพ
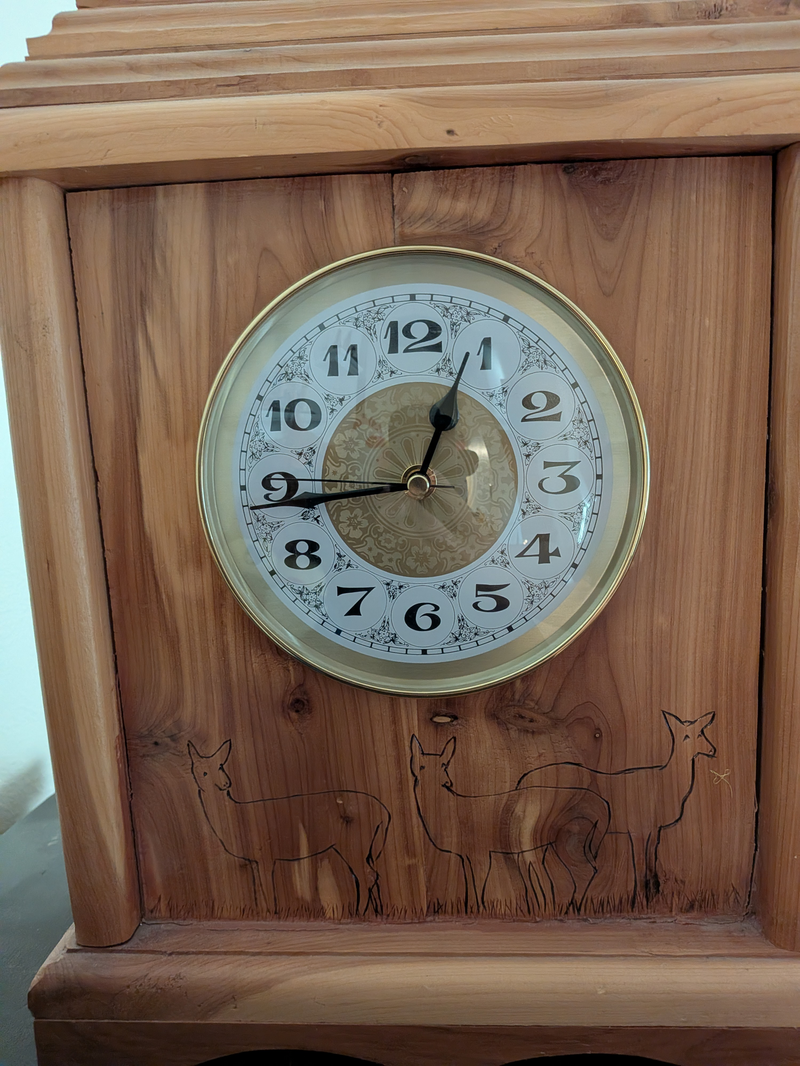
เอาต์พุตโมเดลจะมีลักษณะคล้ายกับตัวอย่างต่อไปนี้
Time Response:  {
  "hours": 12,
  "minutes": 44
 }
วัดของเหลวในภาชนะ
ตัวอย่างต่อไปนี้แสดงวิธีใช้การดำเนินการโค้ดเพื่ออ่านมิเตอร์และ คำนวณระดับของเหลวเป็นเปอร์เซ็นต์
Python
from google import genai
from google.genai import types

client = genai.Client()

# Load your image
with open('meter.jpeg', 'rb') as f:
    image_bytes = f.read()

prompt = """
How full is the meter of liquid?
To read it,
1) Find the points for the top of the sight window, bottom of the sight window and the liquid level, formatted as [y, x] with values ranging from 0-1000;
2) Use math to determine the liquid level as a percentage;
3) Output "Answer: ??" on a separate line, where ?? is a number without % or unit.
"""

response = client.models.generate_content(
    model="gemini-robotics-er-1.6-preview",
    contents=[
        types.Part.from_bytes(
            data=image_bytes,
            mime_type='image/jpeg',
        ),
        prompt
    ],
    config = types.GenerateContentConfig(
        temperature=1.0,
        tools=[types.Tool(code_execution=types.ToolCodeExecution)],
    )
)

print(response.text)
รูปภาพต่อไปนี้เป็นรูปภาพของอินพุตที่ซูมเข้า

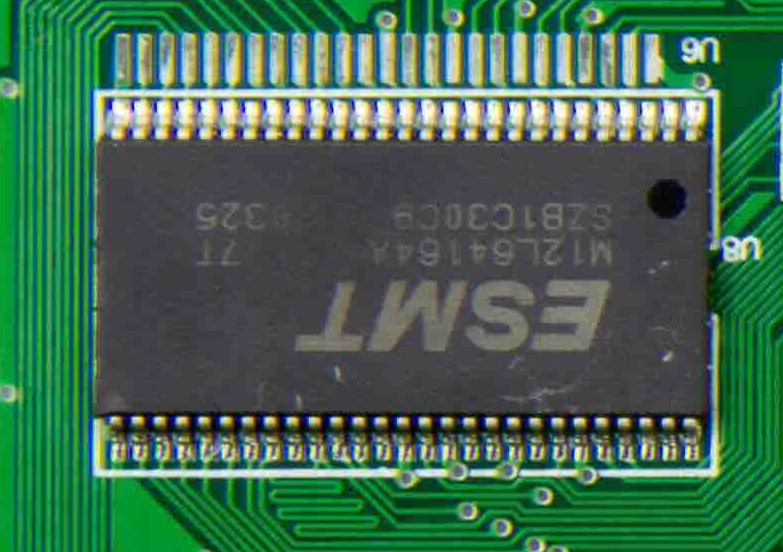
อ่านเครื่องหมายบนแผงวงจร
ตัวอย่างต่อไปนี้แสดงวิธีใช้การดำเนินการโค้ดเพื่ออ่านข้อความบนชิปแผงวงจร ซึ่งช่วยให้โมเดลซูม ครอบตัด และหมุนรูปภาพได้ตามต้องการ
Python
from google import genai
from google.genai import types

client = genai.Client()

# Load your image
with open('circuit_board.jpeg', 'rb') as f:
    image_bytes = f.read()

prompt = "What is the number on the ESMT chip? Zoom, crop, and rotate if needed."

response = client.models.generate_content(
    model="gemini-robotics-er-1.6-preview",
    contents=[
        types.Part.from_bytes(
            data=image_bytes,
            mime_type='image/jpeg',
        ),
        prompt
    ],
    config = types.GenerateContentConfig(
        temperature=1.0,
        tools=[types.Tool(code_execution=types.ToolCodeExecution)],
    )
)

print(response.text)
รูปภาพต่อไปนี้เป็นรูปภาพของอินพุตที่ซูมเข้า
คำอธิบายประกอบรูปภาพ
ตัวอย่างต่อไปนี้แสดงวิธีใช้การดำเนินการโค้ดเพื่อประกอบรูปภาพ (เช่น การวาดลูกศรสำหรับวิธีการกำจัด) และส่งคืนรูปภาพที่แก้ไขแล้ว
Python
from google import genai
from google.genai import types

client = genai.Client()

# Load your image
with open('sorting.jpeg', 'rb') as f:
    image_bytes = f.read()

prompt = """
Look at this image and return it as an annotated version using arrows of
different colors to represent which items should go in which bins for
disposal. You must return the final image to the API caller.
"""

response = client.models.generate_content(
    model="gemini-robotics-er-1.6-preview",
    contents=[
        types.Part.from_bytes(
            data=image_bytes,
            mime_type='image/jpeg',
        ),
        prompt
    ],
    config = types.GenerateContentConfig(
        temperature=1.0,
        tools=[types.Tool(code_execution=types.ToolCodeExecution)],
    )
)

print(response.text)
ต่อไปนี้คือตัวอย่างอินพุตรูปภาพ
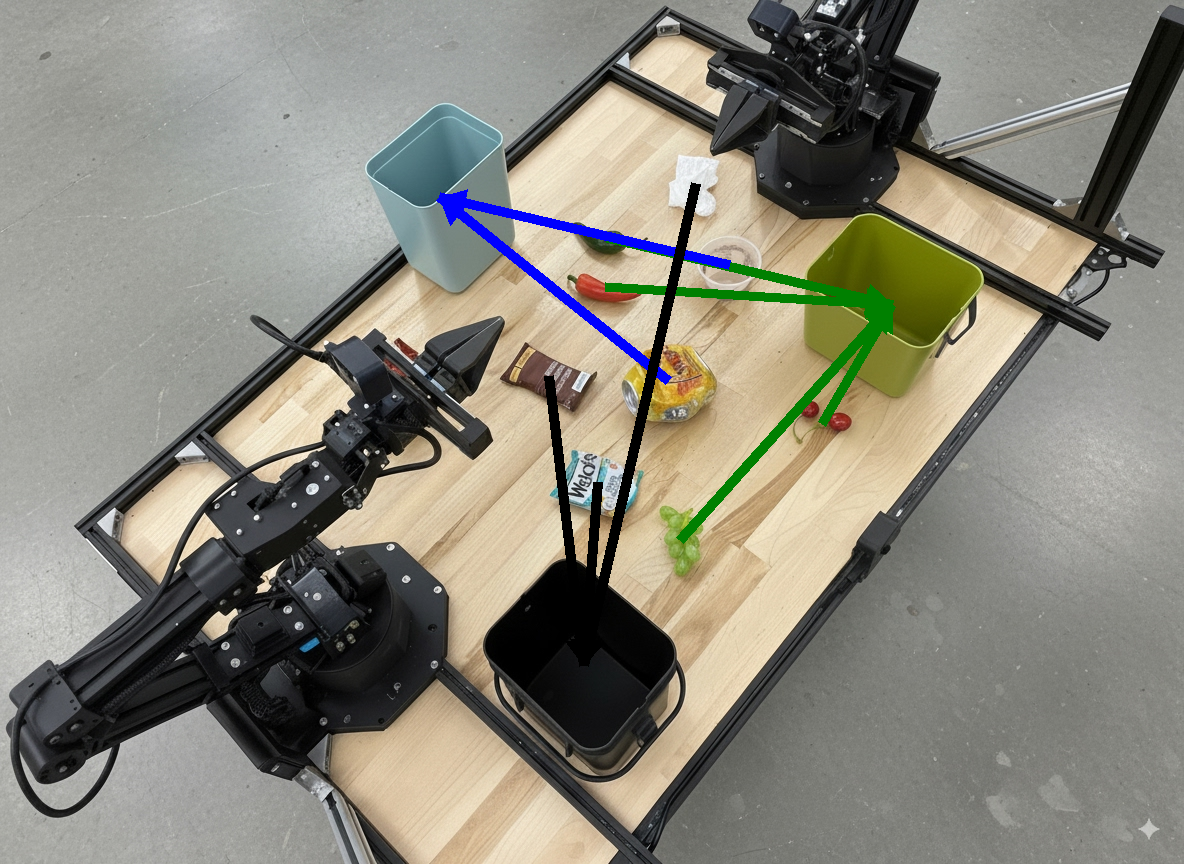
เอาต์พุตโมเดลจะมีลักษณะคล้ายกับตัวอย่างต่อไปนี้
The annotated image shows the suggested disposal locations for the items on the table:
- **Green bin (Compost/Organic)**: Green chili, red chili, grapes, and cherries.
- **Blue bin (Recycling)**: Yellow crushed can and plastic container.
- **Black bin (Trash)**: Chocolate bar wrapper, Welch's packet, and white tissue.
การจัดการเป็นกลุ่ม
Gemini Robotics-ER 1.6 สามารถวางแผนงานและใช้การให้เหตุผลเชิงพื้นที่ในระดับที่สูงขึ้น โดยอนุมานการดำเนินการหรือระบุตำแหน่งที่เหมาะสมที่สุดตามความเข้าใจบริบทเพื่อประสานงานในระยะยาว
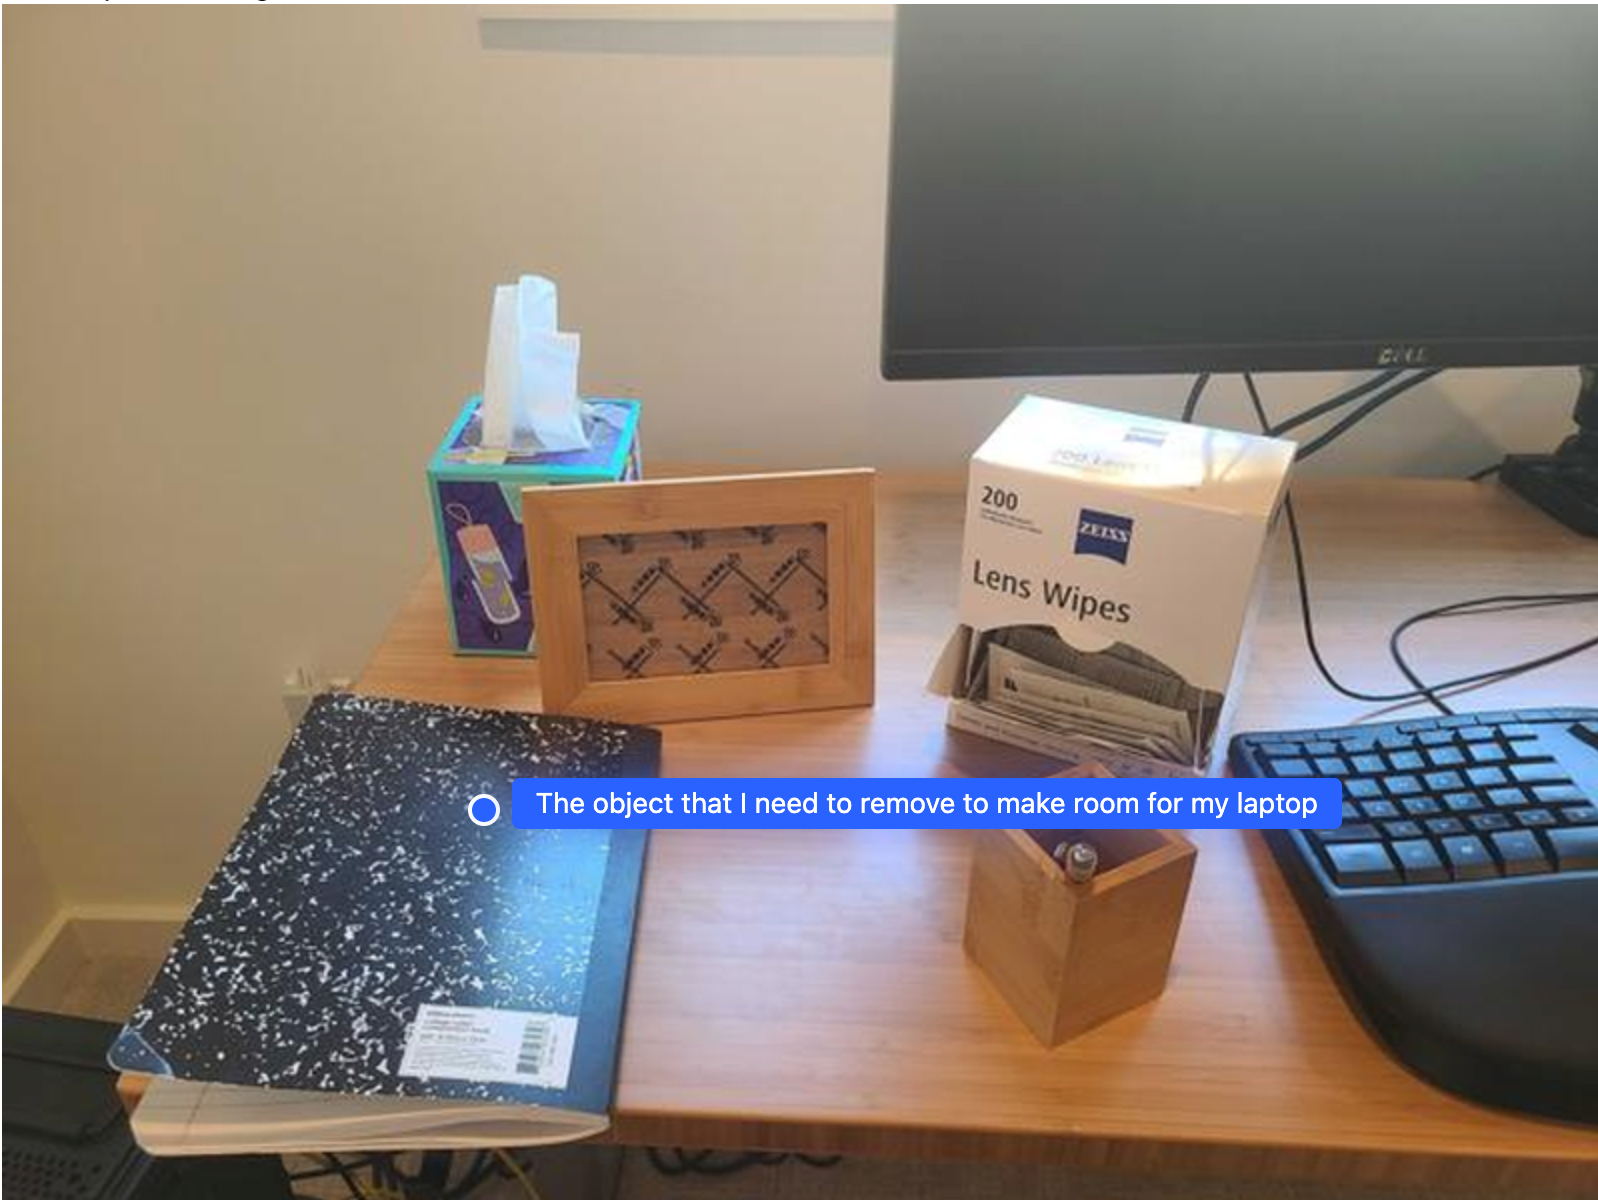
การจัดพื้นที่สำหรับแล็ปท็อป
ตัวอย่างนี้แสดงให้เห็นว่า Gemini Robotics-ER สามารถให้เหตุผลเกี่ยวกับพื้นที่ได้อย่างไร พรอมต์ ขอให้โมเดลระบุวัตถุที่ต้องย้ายเพื่อสร้าง พื้นที่สำหรับรายการอื่น
Python
from google import genai
from google.genai import types

client = genai.Client()

# Load your image and set up your prompt
with open('path/to/image-with-objects.jpg', 'rb') as f:
    image_bytes = f.read()

prompt = """
          Point to the object that I need to remove to make room for my laptop
          The answer should follow the json format: [{"point": <point>,
          "label": <label1>}, ...]. The points are in [y, x] format normalized to 0-1000.
        """

image_response = client.models.generate_content(
  model="gemini-robotics-er-1.6-preview",
  contents=[
    types.Part.from_bytes(
      data=image_bytes,
      mime_type='image/jpeg',
    ),
    prompt
  ],
  config = types.GenerateContentConfig(
      temperature=1.0,
      thinking_config=types.ThinkingConfig(thinking_budget=0)
  )
)

print(image_response.text)
การตอบกลับมีพิกัด 2 มิติของออบเจ็กต์ที่ตอบคำถามของผู้ใช้ ในกรณีนี้คือออบเจ็กต์ที่ควรย้ายออกเพื่อให้มีที่วางแล็ปท็อป
[
  {"point": [672, 301], "label": "The object that I need to remove to make room for my laptop"}
]
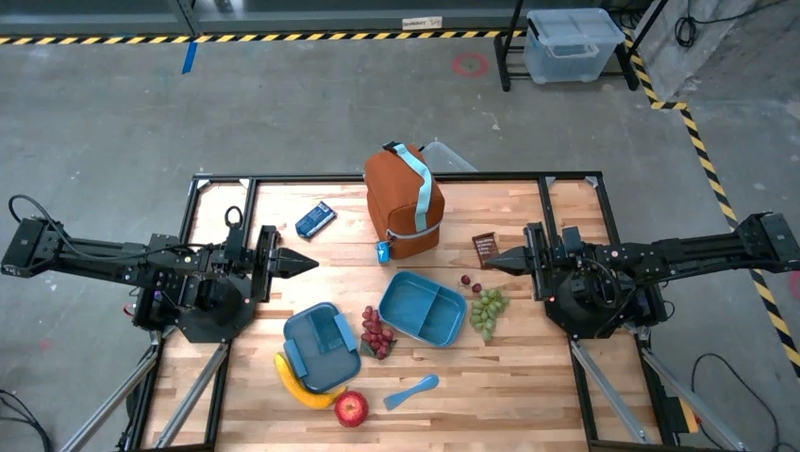
การจัดอาหารกลางวัน
นอกจากนี้ โมเดลยังให้คำแนะนำสำหรับงานแบบหลายขั้นตอนและชี้ไปยัง ออบเจ็กต์ที่เกี่ยวข้องในแต่ละขั้นตอนได้ด้วย ตัวอย่างนี้แสดงวิธีที่โมเดลวางแผนลำดับ ขั้นตอนในการจัดกระเป๋าอาหารกลางวัน
Python
from google import genai
from google.genai import types

client = genai.Client()

# Load your image and set up your prompt
with open('path/to/image-of-lunch.jpg', 'rb') as f:
    image_bytes = f.read()

prompt = """
          Explain how to pack the lunch box and lunch bag. Point to each
          object that you refer to. Each point should be in the format:
          [{"point": [y, x], "label": }], where the coordinates are
          normalized between 0-1000.
        """

image_response = client.models.generate_content(
  model="gemini-robotics-er-1.6-preview",
  contents=[
    types.Part.from_bytes(
      data=image_bytes,
      mime_type='image/jpeg',
    ),
    prompt
  ],
  config = types.GenerateContentConfig(
      temperature=1.0,
      thinking_config=types.ThinkingConfig(thinking_budget=0)
  )
)

print(image_response.text)
คำตอบของพรอมต์นี้คือชุดวิธีการแบบทีละขั้นตอนในการจัดกระเป๋าอาหารกลางวันจากอินพุตรูปภาพ
รูปภาพที่ป้อน
เอาต์พุตโมเดล
Based on the image, here is a plan to pack the lunch box and lunch bag:

1.  **Pack the fruit into the lunch box.** Place the [apple](apple), [banana](banana), [red grapes](red grapes), and [green grapes](green grapes) into the [blue lunch box](blue lunch box).
2.  **Add the spoon to the lunch box.** Put the [blue spoon](blue spoon) inside the lunch box as well.
3.  **Close the lunch box.** Secure the lid on the [blue lunch box](blue lunch box).
4.  **Place the lunch box inside the lunch bag.** Put the closed [blue lunch box](blue lunch box) into the [brown lunch bag](brown lunch bag).
5.  **Pack the remaining items into the lunch bag.** Place the [blue snack bar](blue snack bar) and the [brown snack bar](brown snack bar) into the [brown lunch bag](brown lunch bag).

Here is the list of objects and their locations:
*   [{"point": [899, 440], "label": "apple"}]
*   [{"point": [814, 363], "label": "banana"}]
*   [{"point": [727, 470], "label": "red grapes"}]
*   [{"point": [675, 608], "label": "green grapes"}]
*   [{"point": [706, 529], "label": "blue lunch box"}]
*   [{"point": [864, 517], "label": "blue spoon"}]
*   [{"point": [499, 401], "label": "blue snack bar"}]
*   [{"point": [614, 705], "label": "brown snack bar"}]
*   [{"point": [448, 501], "label": "brown lunch bag"}]
การเรียกใช้ API ของหุ่นยนต์ที่กำหนดเอง
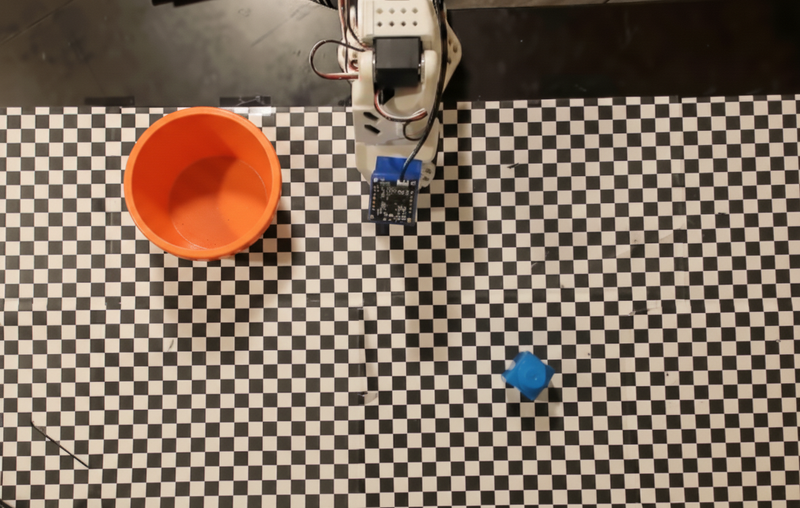
ตัวอย่างนี้แสดงการจัดการเป็นกลุ่มงานด้วย API ของหุ่นยนต์ที่กำหนดเอง โดยจะ แนะนำ API จำลองที่ออกแบบมาสำหรับการดำเนินการหยิบและวาง งานคือ หยิบบล็อกสีน้ำเงินแล้ววางลงในชามสีส้ม
โค้ดที่เรียกใช้ได้ทั้งหมดจะอยู่ในตำราอาหารสำหรับหุ่นยนต์เช่นเดียวกับตัวอย่างอื่นๆ ในหน้านี้
ขั้นตอนแรกคือการค้นหารายการทั้ง 2 รายการด้วยพรอมต์ต่อไปนี้
Python
prompt = """
            Locate and point to the blue block and the orange bowl. The label
            returned should be an identifying name for the object detected.
            The answer should follow the json format: [{"point": <point>, "label": <label1>}, ...].
            The points are in [y, x] format normalized to 0-1000.
          """
คำตอบของโมเดลประกอบด้วยพิกัดที่ปรับให้เป็นมาตรฐานของบล็อกและชาม
[
  {"point": [389, 252], "label": "orange bowl"},
  {"point": [727, 659], "label": "blue block"}
]
ตัวอย่างนี้ใช้ API ของหุ่นยนต์จำลองต่อไปนี้
Python
def move(x, y, high):
  print(f"moving to coordinates: {x}, {y}, {15 if high else 5}")

def setGripperState(opened):
  print("Opening gripper" if opened else "Closing gripper")

def returnToOrigin():
  print("Returning to origin pose")
ขั้นตอนถัดไปคือการเรียกใช้ลำดับฟังก์ชัน API ด้วยตรรกะที่จำเป็นเพื่อ ดำเนินการ พรอมต์ต่อไปนี้มีคำอธิบายของหุ่นยนต์ API ที่โมเดลควรใช้เมื่อจัดระเบียบงานนี้
Python
prompt = f"""
    You are a robotic arm with six degrees-of-freedom. You have the
    following functions available to you:

    def move(x, y, high):
      # moves the arm to the given coordinates. The boolean value 'high' set
      to True means the robot arm should be lifted above the scene for
      avoiding obstacles during motion. 'high' set to False means the robot
      arm should have the gripper placed on the surface for interacting with
      objects.

    def setGripperState(opened):
      # Opens the gripper if opened set to true, otherwise closes the gripper

    def returnToOrigin():
      # Returns the robot to an initial state. Should be called as a cleanup
      operation.

    The origin point for calculating the moves is at normalized point
    y={robot_origin_y}, x={robot_origin_x}. Use this as the new (0,0) for
    calculating moves, allowing x and y to be negative.
    Perform a pick and place operation where you pick up the blue block at
    normalized coordinates ({block_x}, {block_y}) (relative coordinates:
    {block_relative_x}, {block_relative_y}) and place it into the orange
    bowl at normalized coordinates ({bowl_x}, {bowl_y})
    (relative coordinates: {bowl_relative_x}, {bowl_relative_y}).
    Provide the sequence of function calls as a JSON list of objects, where
    each object has a "function" key (the function name) and an "args" key
    (a list of arguments for the function).
    Also, include your reasoning before the JSON output.
    For example:
    Reasoning: To pick up the block, I will first move the arm to a high
    position above the block, open the gripper, move down to the block,
    close the gripper, lift the arm, move to a high position above the bowl,
    move down to the bowl, open the gripper, and then lift the arm back to
    a high position.
"""
ต่อไปนี้คือเอาต์พุตที่เป็นไปได้ของโมเดลตามพรอมต์และ API ของหุ่นยนต์จำลอง เอาต์พุตประกอบด้วยกระบวนการคิดของโมเดลและ งานที่โมเดลวางแผนไว้เป็นผลลัพธ์ นอกจากนี้ยังแสดงเอาต์พุตของการเรียกใช้ฟังก์ชันของหุ่นยนต์ ที่โมเดลจัดลำดับไว้ด้วยกัน
Reasoning: To perform the pick and place operation, I will first move the
robotic arm to a high position above the blue block to ensure clearance. Then, I
will open the gripper in preparation for grasping. Next, I will lower the arm to
the surface level to position the gripper around the block and close the gripper
to secure it. After picking up the block, I will lift the arm to clear the
surface and move towards the orange bowl, maintaining a high position to avoid
collisions. Once positioned above the bowl, I will lower the arm to place the
block inside. I will then open the gripper to release the block. Finally, I will
lift the arm out of the bowl and call `returnToOrigin` to reset the robot's
state.

[
  {
    "function": "move",
    "args": [
      163,
      427,
      true
    ]
  },
  {
    "function": "setGripperState",
    "args": [
      true
    ]
  },
  {
    "function": "move",
    "args": [
      163,
      427,
      false
    ]
  },
  {
    "function": "setGripperState",
    "args": [
      false
    ]
  },
  {
    "function": "move",
    "args": [
      163,
      427,
      true
    ]
  },
  {
    "function": "move",
    "args": [
      -247,
      90,
      true
    ]
  },
  {
    "function": "move",
    "args": [
      -247,
      90,
      false
    ]
  },
  {
    "function": "setGripperState",
    "args": [
      true
    ]
  },
  {
    "function": "move",
    "args": [
      -247,
      90,
      true
    ]
  },
  {
    "function": "returnToOrigin",
    "args": []
  }
]


Executing Function Calls:
moving to coordinates: 163, 427, 15
Opening gripper
moving to coordinates: 163, 427, 5
Closing gripper
moving to coordinates: 163, 427, 15
moving to coordinates: -247, 90, 15
moving to coordinates: -247, 90, 5
Opening gripper
moving to coordinates: -247, 90, 15
Returning to origin pose
แนวทางปฏิบัติแนะนำ
การทำความเข้าใจวิธีโต้ตอบกับโมเดล Gemini อย่างมีประสิทธิภาพเป็นสิ่งสำคัญอย่างยิ่งในการเพิ่มประสิทธิภาพและความแม่นยำของแอปพลิเคชันหุ่นยนต์ ส่วนนี้จะอธิบายแนวทางปฏิบัติแนะนำและกลยุทธ์สำคัญสำหรับการสร้างพรอมต์ การจัดการข้อมูลภาพ และการจัดโครงสร้างงานเพื่อให้ได้ผลลัพธ์ที่เชื่อถือได้มากที่สุด
ใช้ภาษาที่ชัดเจนและเข้าใจง่าย
ใช้ภาษาที่เป็นธรรมชาติ: โมเดล Gemini ออกแบบมาให้เข้าใจภาษาที่เป็นธรรมชาติและภาษาที่ใช้ในการสนทนา สร้างโครงสร้างพรอมต์ในลักษณะที่ชัดเจนในเชิงความหมายและสะท้อนวิธีที่บุคคลจะให้คำสั่งตามธรรมชาติ
ใช้คำศัพท์ที่ใช้กันทั่วไป: เลือกใช้ภาษาที่ใช้กันทั่วไปในชีวิตประจำวันแทน คำศัพท์เฉพาะทางหรือคำศัพท์เฉพาะวงการ หากโมเดลไม่ตอบสนองตามที่คาดไว้ต่อคำหนึ่งๆ ให้ลองเปลี่ยนคำนั้นเป็นคำพ้องความหมายที่ใช้กันทั่วไป
เพิ่มประสิทธิภาพอินพุตภาพ
ซูมเข้าเพื่อดูรายละเอียด: เมื่อต้องจัดการกับวัตถุที่มีขนาดเล็กหรือ ดูยากในภาพมุมกว้าง ให้ใช้ฟังก์ชันกรอบล้อมรอบเพื่อ แยกวัตถุที่สนใจ จากนั้นคุณสามารถครอบตัดรูปภาพให้เป็นส่วนที่เลือกนี้และส่งรูปภาพใหม่ที่โฟกัสไปยังโมเดลเพื่อการวิเคราะห์ที่ละเอียดยิ่งขึ้น
ทดลองใช้แสงและสี: การรับรู้ของโมเดลอาจได้รับผลกระทบจากสภาพแสงที่ท้าทายและคอนทราสต์ของสีที่ไม่ดี
แบ่งปัญหาที่ซับซ้อนออกเป็นขั้นตอนย่อยๆ การจัดการแต่ละขั้นตอนย่อยๆ ทีละขั้นตอนจะช่วยให้คุณนำโมเดลไปสู่ผลลัพธ์ที่แม่นยำและประสบความสำเร็จมากขึ้นได้
ปรับปรุงความแม่นยำผ่านฉันทามติ สำหรับงานที่ต้องการความแม่นยำสูง คุณสามารถค้นหาโมเดลหลายครั้งด้วยพรอมต์เดียวกัน การหาค่าเฉลี่ยของผลลัพธ์ที่ได้จะช่วยให้คุณได้ "ฉันทามติ" ซึ่งมักจะแม่นยำและเชื่อถือได้มากกว่า
ข้อจำกัด
โปรดคำนึงถึงข้อจำกัดต่อไปนี้เมื่อพัฒนาด้วย Gemini Robotics-ER 1.6
- สถานะเวอร์ชันตัวอย่าง: ปัจจุบันโมเดลอยู่ในเวอร์ชันตัวอย่าง API และ ความสามารถอาจมีการเปลี่ยนแปลง และอาจไม่เหมาะสำหรับแอปพลิเคชันที่สำคัญต่อการผลิต หากไม่มีการทดสอบอย่างละเอียด
- เวลาในการตอบสนอง: คำค้นหาที่ซับซ้อน อินพุตความละเอียดสูง หรือ
thinking_budgetจำนวนมากอาจทำให้ใช้เวลาในการประมวลผลนานขึ้น - อาการหลอน: เช่นเดียวกับโมเดลภาษาขนาดใหญ่ทั้งหมด Gemini Robotics-ER 1.6 อาจ "หลอน" หรือให้ข้อมูลที่ไม่ถูกต้องในบางครั้ง โดยเฉพาะ สำหรับพรอมต์ที่ไม่ชัดเจนหรืออินพุตที่อยู่นอกการกระจาย
- ขึ้นอยู่กับคุณภาพของพรอมต์: คุณภาพของเอาต์พุตของโมเดลขึ้นอยู่กับความชัดเจนและความเฉพาะเจาะจงของพรอมต์อินพุตเป็นอย่างมาก พรอมต์ที่คลุมเครือ หรือมีโครงสร้างไม่ดีอาจทำให้ได้ผลลัพธ์ที่ไม่ดี
- ค่าใช้จ่ายในการคำนวณ: การเรียกใช้โมเดล โดยเฉพาะอย่างยิ่งเมื่อมีอินพุตวิดีโอหรือ
thinking_budgetสูง จะใช้ทรัพยากรการคำนวณและทำให้เกิดค่าใช้จ่าย ดูรายละเอียดเพิ่มเติมได้ที่หน้าการคิด - ประเภทอินพุต: ดูรายละเอียดเกี่ยวกับข้อจำกัดของแต่ละโหมดได้ในหัวข้อต่อไปนี้
ประกาศเกี่ยวกับนโยบายความเป็นส่วนตัว
คุณรับทราบว่าโมเดลที่อ้างอิงในเอกสารนี้ ("โมเดลหุ่นยนต์") ใช้ประโยชน์จากข้อมูลวิดีโอและเสียงเพื่อดำเนินการและเคลื่อนย้ายฮาร์ดแวร์ตามคำสั่งของคุณ ดังนั้น คุณอาจใช้งานโมเดลหุ่นยนต์เพื่อให้โมเดลหุ่นยนต์เก็บรวบรวมข้อมูลจากบุคคลที่ระบุตัวตนได้ เช่น ข้อมูลเสียง รูปภาพ และข้อมูลความเหมือน ("ข้อมูลส่วนบุคคล") หากเลือกที่จะใช้งานโมเดลหุ่นยนต์ในลักษณะที่เก็บรวบรวมข้อมูลส่วนตัว คุณตกลงที่จะไม่อนุญาตให้บุคคลที่ระบุตัวตนได้โต้ตอบหรืออยู่ในพื้นที่โดยรอบโมเดลหุ่นยนต์ เว้นแต่และจนกว่าบุคคลที่ระบุตัวตนได้ดังกล่าวจะได้รับการแจ้งเตือนอย่างเพียงพอและยินยอมให้ Google อาจให้และใช้ข้อมูลส่วนตัวของบุคคลดังกล่าวตามที่ระบุไว้ในข้อกำหนดในการให้บริการเพิ่มเติมของ Gemini API ที่ https://ai.google.dev/gemini-api/terms ("ข้อกำหนด") รวมถึงตามส่วนที่ชื่อว่า "วิธีที่ Google ใช้ข้อมูลของคุณ" คุณจะตรวจสอบว่าประกาศดังกล่าวอนุญาตให้เก็บรวบรวมและใช้ข้อมูลส่วนบุคคลตามที่ระบุไว้ในข้อกำหนด และคุณจะพยายามอย่างสมเหตุสมผลในเชิงพาณิชย์เพื่อลดการเก็บรวบรวมและการเผยแพร่ข้อมูลส่วนบุคคลโดยใช้เทคนิคต่างๆ เช่น การเบลอใบหน้า และการใช้งานโมเดลหุ่นยนต์ในพื้นที่ที่ไม่มีบุคคลที่ระบุตัวตนได้ตามขอบเขตที่สามารถทำได้
ราคา
ดูข้อมูลโดยละเอียดเกี่ยวกับการกำหนดราคาและภูมิภาคที่พร้อมให้บริการได้ในหน้าการกำหนดราคา
เวอร์ชันของโมเดล
Robotics-ER 1.6 เวอร์ชันตัวอย่าง
| พร็อพเพอร์ตี้ | คำอธิบาย |
|---|---|
| รหัสโมเดล | gemini-robotics-er-1.6-preview |
| ประเภทข้อมูลที่รองรับ |
อินพุต ข้อความ รูปภาพ วิดีโอ เสียง เอาต์พุต ข้อความ |
| ขีดจำกัดของโทเค็น[*] |
ขีดจำกัดโทเค็นอินพุต 131,072 ขีดจำกัดโทเค็นเอาต์พุต 65,536 |
| ความสามารถ |
การสร้างเสียง สิ่งที่ทำไม่ได้ Batch API สิ่งที่ทำได้ การแคช สิ่งที่ทำได้ การรันโค้ด สิ่งที่ทำได้ การใช้คอมพิวเตอร์ สิ่งที่ทำได้ ค้นหาไฟล์ สิ่งที่ทำได้ การอนุมานแบบยืดหยุ่น สิ่งที่ทำได้ การเรียกใช้ฟังก์ชัน สิ่งที่ทำได้ การเชื่อมต่อแหล่งข้อมูลกับ Google Maps สิ่งที่ทำได้ การสร้างรูปภาพ สิ่งที่ทำไม่ได้ Live API สิ่งที่ทำไม่ได้ การอนุมานตามลำดับความสำคัญ สิ่งที่ทำได้ การเชื่อมต่อแหล่งข้อมูลของ Search สิ่งที่ทำได้ เอาต์พุตที่มีโครงสร้าง สิ่งที่ทำได้ การคิด สิ่งที่ทำได้ บริบทของ URL สิ่งที่ทำได้ |
| เวอร์ชัน |
|
| การอัปเดตล่าสุด | ธันวาคม 2025 |
| การตัดข้อมูล | มกราคม 2025 |
ขั้นตอนถัดไป
- สำรวจความสามารถอื่นๆ และทดลองใช้พรอมต์และอินพุตต่างๆ ต่อไป เพื่อค้นพบแอปพลิเคชันอื่นๆ สำหรับ Gemini Robotics-ER 1.6 ดูตัวอย่างเพิ่มเติมได้ที่ Robotics getting started colab
- ดูข้อมูลเกี่ยวกับวิธีสร้างโมเดลหุ่นยนต์ Gemini โดยคำนึงถึงความปลอดภัยได้ที่หน้าความปลอดภัยด้านหุ่นยนต์ของ Google DeepMind
- อ่านข้อมูลอัปเดตล่าสุดเกี่ยวกับโมเดล Gemini Robotics ได้ที่หน้า Landing Page ของ Gemini Robotics