Gemini API, कोड एक्ज़ीक्यूशन का एक टूल उपलब्ध कराता है. इसकी मदद से, मॉडल Python कोड जनरेट और रन कर सकता है. इसके बाद, मॉडल कोड के चलने पर मिलने वाले नतीजों से बार-बार सीख सकता है. ऐसा तब तक किया जा सकता है, जब तक उसे फ़ाइनल आउटपुट न मिल जाए. कोड चलाने की सुविधा का इस्तेमाल करके, ऐसे ऐप्लिकेशन बनाए जा सकते हैं जिनमें कोड के आधार पर तर्क करने की सुविधा होती है. उदाहरण के लिए, कोड एक्ज़ीक्यूशन का इस्तेमाल करके, समीकरण हल किए जा सकते हैं या टेक्स्ट प्रोसेस किया जा सकता है. ज़्यादा खास टास्क पूरे करने के लिए, कोड एक्ज़ीक्यूशन एनवायरमेंट में शामिल लाइब्रेरी का भी इस्तेमाल किया जा सकता है.
Gemini, सिर्फ़ Python में कोड चला सकता है. हालांकि, Gemini से किसी दूसरी भाषा में कोड जनरेट करने के लिए कहा जा सकता है. हालांकि, मॉडल इसे रन करने के लिए, कोड चलाने के टूल का इस्तेमाल नहीं कर सकता.
कोड एक्ज़ीक्यूशन चालू करें
कोड एक्ज़ीक्यूशन की सुविधा चालू करने के लिए, मॉडल पर कोड एक्ज़ीक्यूशन टूल कॉन्फ़िगर करें. इससे मॉडल, कोड जनरेट और रन कर सकता है.
Python
from google import genai

client = genai.Client()

interaction = client.interactions.create(
    model="gemini-3.5-flash",
    input="What is the sum of the first 50 prime numbers? "
          "Generate and run code for the calculation, and make sure you get all 50.",
    tools=[{"type": "code_execution"}]
)

for step in interaction.steps:
    if step.type == "model_output":
        for content_block in step.content:
            if content_block.type == "text":
                print(content_block.text)
    elif step.type == "code_execution_call":
        print(step.arguments.code)
    elif step.type == "code_execution_result":
        print(step.result)
JavaScript
import { GoogleGenAI } from "@google/genai";

const client = new GoogleGenAI({});

const interaction = await client.interactions.create({
    model: "gemini-3.5-flash",
    input: "What is the sum of the first 50 prime numbers? " +
           "Generate and run code for the calculation, and make sure you get all 50.",
    tools: [{ type: "code_execution" }]
});

for (const step of interaction.steps) {
    if (step.type === "model_output") {
        for (const contentBlock of step.content) {
            if (contentBlock.type === "text") {
                console.log(contentBlock.text);
            }
        }
    } else if (step.type === "code_execution_call") {
        console.log(step.arguments.code);
    } else if (step.type === "code_execution_result") {
        console.log(step.result);
    }
}
REST
curl -X POST "https://generativelanguage.googleapis.com/v1beta/interactions" \
-H "x-goog-api-key: $GEMINI_API_KEY" \
-H 'Content-Type: application/json' \
-d '{
    "model": "gemini-3.5-flash",
    "input": "What is the sum of the first 50 prime numbers? Generate and run code for the calculation, and make sure you get all 50.",
    "tools": [{"type": "code_execution"}]
}'
आउटपुट कुछ इस तरह दिख सकता है. इसे पढ़ने में आसानी के लिए फ़ॉर्मैट किया गया है:
Okay, I need to calculate the sum of the first 50 prime numbers. Here's how I'll
approach this:

1.  **Generate Prime Numbers:** I'll use an iterative method to find prime
    numbers. I'll start with 2 and check if each subsequent number is divisible
    by any number between 2 and its square root. If not, it's a prime.
2.  **Store Primes:** I'll store the prime numbers in a list until I have 50 of
    them.
3.  **Calculate the Sum:**  Finally, I'll sum the prime numbers in the list.

Here's the Python code to do this:

def is_prime(n):
  """Efficiently checks if a number is prime."""
  if n <= 1:
    return False
  if n <= 3:
    return True
  if n % 2 == 0 or n % 3 == 0:
    return False
  i = 5
  while i * i <= n:
    if n % i == 0 or n % (i + 2) == 0:
      return False
    i += 6
  return True

primes = []
num = 2
while len(primes) < 50:
  if is_prime(num):
    primes.append(num)
  num += 1

sum_of_primes = sum(primes)
print(f'{primes=}')
print(f'{sum_of_primes=}')

primes=[2, 3, 5, 7, 11, 13, 17, 19, 23, 29, 31, 37, 41, 43, 47, 53, 59, 61, 67,
71, 73, 79, 83, 89, 97, 101, 103, 107, 109, 113, 127, 131, 137, 139, 149, 151,
157, 163, 167, 173, 179, 181, 191, 193, 197, 199, 211, 223, 227, 229]
sum_of_primes=5117

The sum of the first 50 prime numbers is 5117.
इस आउटपुट में, कॉन्टेंट के कई हिस्से शामिल हैं. ये हिस्से, मॉडल कोड चलाने की सुविधा का इस्तेमाल करने पर दिखाता है:
text: मॉडल से जनरेट किया गया इनलाइन टेक्स्टcode_execution_call: मॉडल से जनरेट किया गया कोड, जिसे रन किया जाना हैcode_execution_result: रन किए जा सकने वाले कोड का नतीजा
इमेज के साथ कोड चलाना (Gemini 3)
Gemini 3 Flash मॉडल, अब Python कोड लिख और रन कर सकता है. इससे इमेज में बदलाव किया जा सकता है और उनकी जांच की जा सकती है.
इस्तेमाल के उदाहरण
- ज़ूम करना और जांच करना: मॉडल, यह अपने-आप पता लगा लेता है कि कब कोई जानकारी बहुत छोटी है उदाहरण के लिए, दूर से किसी गेज को पढ़ना. इसके बाद, मॉडल, इमेज को क्रॉप करने और ज़्यादा रिज़ॉल्यूशन पर उस हिस्से की फिर से जांच करने के लिए कोड लिखता है.
- विज़ुअल मैथ: मॉडल, कोड का इस्तेमाल करके कई चरणों वाली कैलकुलेशन कर सकता है. उदाहरण के लिए, रसीद पर मौजूद लाइन आइटम को जोड़ना.
- इमेज में एनोटेशन जोड़ना: मॉडल, सवालों के जवाब देने के लिए इमेज में एनोटेशन जोड़ सकता है. उदाहरण के लिए, संबंधों को दिखाने के लिए तीर बनाना.
इमेज के साथ कोड चलाने की सुविधा चालू करना
Gemini 3 Flash में, इमेज के साथ कोड चलाने की सुविधा आधिकारिक तौर पर उपलब्ध है. इस सुविधा को चालू करने के लिए, कोड चलाने की सुविधा और सूझ-बूझ से जवाब तैयार करने की सुविधा, दोनों को चालू करें.
Python
from google import genai
import requests
import base64
from PIL import Image
import io

image_path = "https://goo.gle/instrument-img"
image_bytes = requests.get(image_path).content

client = genai.Client()

interaction = client.interactions.create(
    model="gemini-3.5-flash",
    input=[
        {"type": "image", "data": base64.b64encode(image_bytes).decode('\utf-8'), "mime_type": "image/jpeg"},
        {"type": "text", "text": "Zoom into the expression pedals and tell me how many pedals are there?"}
    ],
    tools=[{"type": "code_execution"}]
)

for step in interaction.steps:
    if step.type == "model_output":
        for content_block in step.content:
            if content_block.type == "text":
                print(content_block.text)
            elif content_block.type == "image":
                display(Image.open(io.BytesIO(base64.b64decode(content_block.data))))
    elif step.type == "code_execution_call":
        print(step.arguments.code)
    elif step.type == "code_execution_result":
        print(step.result)
JavaScript
import { GoogleGenAI } from "@google/genai";

async function main() {
  const client = new GoogleGenAI({});

  const imageUrl = "https://goo.gle/instrument-img";
  const response = await fetch(imageUrl);
  const imageArrayBuffer = await response.arrayBuffer();
  const base64ImageData = Buffer.from(imageArrayBuffer).toString('base64');

  const interaction = await client.interactions.create({
    model: "gemini-3.5-flash",
    input: [
      {
        type: "image",
        data: base64ImageData,
        mime_type: "image/jpeg"
      },
      { type: "text", text: "Zoom into the expression pedals and tell me how many pedals are there?" }
    ],
    tools: [{ type: "code_execution" }]
  });

  for (const step of interaction.steps) {
    if (step.type === "model_output") {
      for (const contentBlock of step.content) {
        if (contentBlock.type === "text") {
          console.log("Text:", contentBlock.text);
        }
      }
    } else if (step.type === "code_execution_call") {
      console.log(`\nGenerated Code:\n`, step.arguments.code);
    } else if (step.type === "code_execution_result") {
      console.log(`\nExecution Output:\n`, step.result);
    }
  }
}

main();
REST
IMG_URL="https://goo.gle/instrument-img"
MODEL="gemini-3.5-flash"

MIME_TYPE=$(curl -sIL "$IMG_URL" | grep -i '^content-type:' | awk -F ': ' '{print $2}' | sed 's/\r$//' | head -n 1)
if [[ -z "$MIME_TYPE" || ! "$MIME_TYPE" == image/* ]]; then
  MIME_TYPE="image/jpeg"
fi

if [[ "$(uname)" == "Darwin" ]]; then
  IMAGE_B64=$(curl -sL "$IMG_URL" | base64 -b 0)
elif [[ "$(base64 --version 2>&1)" = *"FreeBSD"* ]]; then
  IMAGE_B64=$(curl -sL "$IMG_URL" | base64)
else
  IMAGE_B64=$(curl -sL "$IMG_URL" | base64 -w0)
fi

# Use jq to create the JSON payload to avoid "Argument list too long" error with large base64 strings
echo -n "$IMAGE_B64" > image_b64.txt
jq -n \
  --rawfile b64 image_b64.txt \
  --arg mime "$MIME_TYPE" \
  '{
    model: "gemini-3.5-flash",
    input: [
      {type: "image", data: $b64, mime_type: $mime},
      {type: "text", text: "Zoom into the expression pedals and tell me how many pedals are there?"}
    ],
    tools: [{type: "code_execution"}]
  }' > payload.json

curl -X POST "https://generativelanguage.googleapis.com/v1beta/interactions" \
    -H "x-goog-api-key: $GEMINI_API_KEY" \
    -H 'Content-Type: application/json' \
    -d @payload.json
सिलसिलेवार बातचीत में कोड एक्ज़ीक्यूशन का इस्तेमाल करना
previous_interaction_id का इस्तेमाल करके, सिलसिलेवार बातचीत के दौरान भी कोड एक्ज़ीक्यूशन की सुविधा का इस्तेमाल किया जा सकता है.
Python
from google import genai

client = genai.Client()

interaction1 = client.interactions.create(
    model="gemini-3.5-flash",
    input="I have a math question for you.",
    tools=[{"type": "code_execution"}]
)
print(interaction1.output_text)

interaction2 = client.interactions.create(
    model="gemini-3.5-flash",
    previous_interaction_id=interaction1.id,
    input="What is the sum of the first 50 prime numbers? "
          "Generate and run code for the calculation, and make sure you get all 50.",
    tools=[{"type": "code_execution"}]
)

for step in interaction2.steps:
    if step.type == "model_output":
        for content_block in step.content:
            if content_block.type == "text":
                print(content_block.text)
    elif step.type == "code_execution_call":
        print(step.arguments.code)
    elif step.type == "code_execution_result":
        print(step.result)
JavaScript
import { GoogleGenAI } from "@google/genai";

const client = new GoogleGenAI({});

const interaction1 = await client.interactions.create({
    model: "gemini-3.5-flash",
    input: "I have a math question for you.",
    tools: [{ type: "code_execution" }]
});
console.log(interaction1.output_text);

const interaction2 = await client.interactions.create({
    model: "gemini-3.5-flash",
    previous_interaction_id: interaction1.id,
    input: "What is the sum of the first 50 prime numbers? " +
           "Generate and run code for the calculation, and make sure you get all 50.",
    tools: [{ type: "code_execution" }]
});

for (const step of interaction2.steps) {
    if (step.type === "model_output") {
        for (const contentBlock of step.content) {
            if (contentBlock.type === "text") {
                console.log(contentBlock.text);
            }
        }
    } else if (step.type === "code_execution_call") {
        console.log(step.arguments.code);
    } else if (step.type === "code_execution_result") {
        console.log(step.result);
    }
}
REST
# First turn
RESPONSE1=$(curl -s -X POST "https://generativelanguage.googleapis.com/v1beta/interactions" \
-H "x-goog-api-key: $GEMINI_API_KEY" \
-H 'Content-Type: application/json' \
-d '{
    "model": "gemini-3.5-flash",
    "input": "I have a math question for you.",
    "tools": [{"type": "code_execution"}]
}')

INTERACTION_ID=$(echo $RESPONSE1 | jq -r '.id')

# Second turn with previous_interaction_id
curl -X POST "https://generativelanguage.googleapis.com/v1beta/interactions" \
-H "x-goog-api-key: $GEMINI_API_KEY" \
-H 'Content-Type: application/json' \
-d '{
    "model": "gemini-3.5-flash",
    "previous_interaction_id": "'"$INTERACTION_ID"'",
    "input": "What is the sum of the first 50 prime numbers? Generate and run code for the calculation, and make sure you get all 50.",
    "tools": [{"type": "code_execution"}]
}'
इनपुट/आउटपुट (I/O)
Gemini 2.0 Flash से, कोड चलाने की सुविधा में फ़ाइल इनपुट और ग्राफ़ आउटपुट की सुविधा मिलती है. इनपुट और आउटपुट की इन सुविधाओं का इस्तेमाल करके, CSV और टेक्स्ट फ़ाइलें अपलोड की जा सकती हैं. साथ ही, इन फ़ाइलों के बारे में सवाल पूछे जा सकते हैं. इसके अलावा, जवाब के तौर पर Matplotlib ग्राफ़ जनरेट किए जा सकते हैं. आउटपुट फ़ाइलें, जवाब में इनलाइन इमेज के तौर पर दिखती हैं.
I/O की कीमत
कोड एक्ज़ीक्यूशन I/O का इस्तेमाल करने पर, आपसे इनपुट टोकन और आउटपुट टोकन के लिए शुल्क लिया जाता है:
इनपुट टोकन:
- उपयोगकर्ता का प्रॉम्प्ट
आउटपुट टोकन:
- मॉडल से जनरेट किया गया कोड
- कोड एनवायरमेंट में कोड एक्ज़ीक्यूशन का आउटपुट
- सूझ-बूझ से जवाब तैयार करने के टोकन
- मॉडल से जनरेट की गई खास जानकारी
I/O की जानकारी
कोड एक्ज़ीक्यूशन I/O का इस्तेमाल करते समय, इन तकनीकी जानकारी का ध्यान रखें:
- कोड एनवायरमेंट का ज़्यादा से ज़्यादा रनटाइम 30 सेकंड है.
- अगर कोड एनवायरमेंट में कोई गड़बड़ी होती है, तो मॉडल, कोड आउटपुट को फिर से जनरेट कर सकता है. ऐसा ज़्यादा से ज़्यादा पांच बार हो सकता है.
- फ़ाइल इनपुट का ज़्यादा से ज़्यादा साइज़, मॉडल टोकन विंडो से तय होता है. अगर कोई ऐसी फ़ाइल अपलोड की जाती है जिसका साइज़, मॉडल की ज़्यादा से ज़्यादा कॉन्टेक्स्ट विंडो से ज़्यादा है, तो एपीआई एक गड़बड़ी दिखाएगा.
- कोड एक्ज़ीक्यूशन, टेक्स्ट और CSV फ़ाइलों के साथ सबसे अच्छी तरह काम करता है.
- इनपुट फ़ाइल को इनलाइन डेटा के तौर पर पास किया जा सकता है या Files API, का इस्तेमाल करके अपलोड किया जा सकता है. वहीं, आउटपुट फ़ाइल हमेशा इनलाइन डेटा के तौर पर दिखती है.
बिलिंग
Gemini API से कोड एक्ज़ीक्यूशन की सुविधा चालू करने के लिए, अलग से शुल्क नहीं लिया जाता. जिस Gemini मॉडल का इस्तेमाल किया जा रहा है उसके आधार पर, आपसे इनपुट और आउटपुट टोकन की मौजूदा दर के हिसाब से शुल्क लिया जाएगा.
कोड एक्ज़ीक्यूशन के लिए बिलिंग के बारे में कुछ अन्य बातें:
- मॉडल को पास किए गए इनपुट टोकन के लिए, आपसे सिर्फ़ एक बार शुल्क लिया जाता है. वहीं, मॉडल से मिले फ़ाइनल आउटपुट टोकन के लिए, आपसे शुल्क लिया जाता है.
- जनरेट किए गए कोड को दिखाने वाले टोकन, आउटपुट टोकन के तौर पर गिने जाते हैं. जनरेट किए गए कोड में, टेक्स्ट और मल्टीमॉडल आउटपुट शामिल हो सकता है. जैसे, इमेज.
- कोड एक्ज़ीक्यूशन के नतीजों को भी आउटपुट टोकन के तौर पर गिना जाता है.
बिलिंग मॉडल को इस डायग्राम में दिखाया गया है:
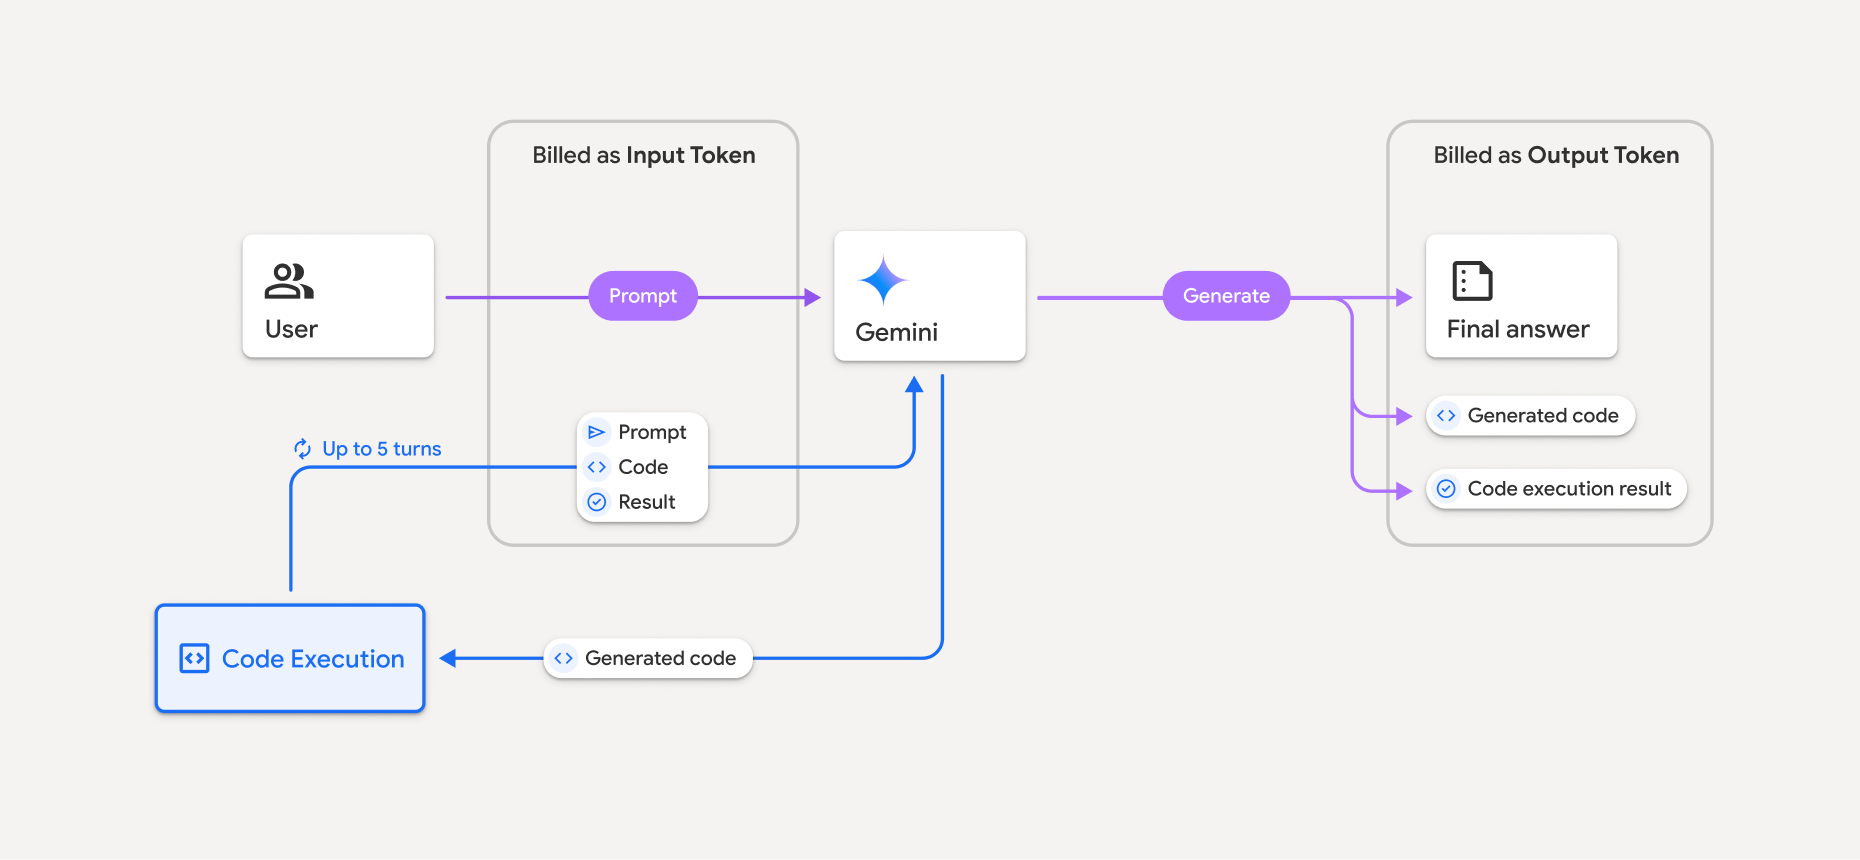
- जिस Gemini मॉडल का इस्तेमाल किया जा रहा है उसके आधार पर, आपसे इनपुट और आउटपुट टोकन की मौजूदा दर के हिसाब से शुल्क लिया जाएगा.
- अगर Gemini, जवाब जनरेट करते समय कोड एक्ज़ीक्यूशन का इस्तेमाल करता है, तो ओरिजनल प्रॉम्प्ट, जनरेट किया गया कोड, और रन किए गए कोड का नतीजा, इंटरमीडिएट टोकन के तौर पर लेबल किए जाते हैं. साथ ही, इनके लिए इनपुट टोकन के तौर पर शुल्क लिया जाता है.
- इसके बाद, Gemini एक खास जानकारी जनरेट करता है. साथ ही, जनरेट किया गया कोड, रन किए गए कोड का नतीजा, और फ़ाइनल खास जानकारी दिखाता है. इनके लिए आउटपुट टोकन के तौर पर शुल्क लिया जाता है.
- Gemini API, एपीआई के जवाब में इंटरमीडिएट टोकन की संख्या दिखाता है. इससे आपको पता चलता है कि शुरुआती प्रॉम्प्ट के अलावा, आपसे अतिरिक्त इनपुट टोकन के लिए शुल्क क्यों लिया जा रहा है.
सीमाएं
- मॉडल, सिर्फ़ कोड जनरेट और रन कर सकता है. यह मीडिया फ़ाइलों जैसे अन्य आर्टफ़ैक्ट नहीं दिखा सकता.
- कुछ मामलों में, कोड एक्ज़ीक्यूशन चालू करने से, मॉडल आउटपुट के अन्य हिस्सों में समस्याएं आ सकती हैं. उदाहरण के लिए, कहानी लिखना.
- अलग-अलग मॉडल के लिए, कोड चलाने की सुविधा का इस्तेमाल करके टास्क पूरा करने की क्षमता में कुछ अंतर होता है.
टूल के साथ काम करने की सुविधा
ज़्यादा मुश्किल टास्क पूरे करने के लिए, कोड एक्ज़ीक्यूशन को Google Search से सटीक जानकारी पाने की सुविधा के साथ जोड़ा जा सकता है.
Gemini 3 मॉडल, बिल्ट-इन टूल (जैसे, कोड चलाने की सुविधा) को कस्टम टूल (फ़ंक्शन कॉल) के साथ जोड़ने की सुविधा देते हैं.
इस्तेमाल की जा सकने वाली लाइब्रेरी
कोड एक्ज़ीक्यूशन एनवायरमेंट में ये लाइब्रेरी शामिल हैं:
- attrs
- chess
- contourpy
- fpdf
- geopandas
- imageio
- jinja2
- joblib
- jsonschema
- jsonschema-specifications
- lxml
- matplotlib
- mpmath
- numpy
- opencv-python
- openpyxl
- packaging
- pandas
- pillow
- protobuf
- pylatex
- pyparsing
- PyPDF2
- python-dateutil
- python-docx
- python-pptx
- reportlab
- scikit-learn
- scipy
- seaborn
- six
- striprtf
- sympy
- tabulate
- tensorflow
- toolz
- xlrd
अपनी लाइब्रेरी इंस्टॉल नहीं की जा सकतीं.
आगे क्या करना है
- कोशिश करें
- Gemini API के अन्य टूल के बारे में जानें: