LangGraph 框架可用於建構有狀態的 LLM 應用程式,因此很適合建構 ReAct (推論和行動) 代理程式。
ReAct 代理會結合 LLM 推論與動作執行。AI 助理會反覆思考、使用工具,並根據觀察結果採取行動,以達成使用者目標,同時動態調整做法。這項模式於 2023 年的「ReAct:Synergizing Reasoning and Acting in Language Models」一文中推出,旨在模擬人類的彈性問題解決方式,而非僵化的工作流程。
LangGraph 提供預先建構的 ReAct 代理程式 (
create_react_agent),
當您需要對 ReAct 實作項目進行更多控制和自訂時,這個代理程式就能派上用場。本指南將說明簡化版。
LangGraph 會使用三個主要元件,將代理程式建模為圖表:
State:共用資料結構 (通常為TypedDict或Pydantic BaseModel),代表應用程式目前的快照。Nodes:對代理程式的邏輯進行編碼。這些函式會接收目前的狀態做為輸入內容、執行一些運算或副作用,並傳回更新後的狀態,例如 LLM 呼叫或工具呼叫。Edges:根據目前的State定義要執行的下一個Node,允許條件式邏輯和固定轉換。
如果還沒有 API 金鑰,可以前往 Google AI Studio 取得。
pip install langgraph langchain-google-genai geopy requests
在環境變數 GEMINI_API_KEY 中設定 API 金鑰。
import os

# Read your API key from the environment variable or set it manually
api_key = os.getenv("GEMINI_API_KEY")
為協助您進一步瞭解如何使用 LangGraph 實作 ReAct 代理程式,本指南將逐步說明實用範例。您將建立一個代理程式,目標是使用工具尋找指定地點的目前天氣。
以這個天氣服務專員為例,State 會維護持續進行的對話記錄 (以訊息清單的形式),以及所採取步驟數的計數器 (以整數形式),以供說明之用。
LangGraph 提供輔助函式 add_messages,可更新狀態訊息清單。這個函式會做為 reducer,接收目前的清單和新訊息,並傳回合併清單。這項功能會依訊息 ID 處理更新,並預設為新訊息和未讀訊息採用「僅附加」行為。
from typing import Annotated,Sequence, TypedDict

from langchain_core.messages import BaseMessage
from langgraph.graph.message import add_messages  # helper function to add messages to the state

class AgentState(TypedDict):
    """The state of the agent."""
    messages: Annotated[Sequence[BaseMessage], add_messages]
    number_of_steps: int
接著定義天氣工具。
from langchain_core.tools import tool
from geopy.geocoders import Nominatim
from pydantic import BaseModel, Field
import requests

geolocator = Nominatim(user_agent="weather-app")

class SearchInput(BaseModel):
    location:str = Field(description="The city and state, e.g., San Francisco")
    date:str = Field(description="the forecasting date for when to get the weather format (yyyy-mm-dd)")

@tool("get_weather_forecast", args_schema=SearchInput, return_direct=True)
def get_weather_forecast(location: str, date: str):
    """Retrieves the weather using Open-Meteo API.

    Takes a given location (city) and a date (yyyy-mm-dd).

    Returns:
        A dict with the time and temperature for each hour.
    """
    # Note that Colab may experience rate limiting on this service. If this
    # happens, use a machine to which you have exclusive access.
    location = geolocator.geocode(location)
    if location:
        try:
            response = requests.get(f"https://api.open-meteo.com/v1/forecast?latitude={location.latitude}&longitude={location.longitude}&hourly=temperature_2m&start_date={date}&end_date={date}")
            data = response.json()
            return dict(zip(data["hourly"]["time"], data["hourly"]["temperature_2m"]))
        except Exception as e:
            return {"error": str(e)}
    else:
        return {"error": "Location not found"}

tools = [get_weather_forecast]
現在請初始化模型,並將工具繫結至模型。
from datetime import datetime
from langchain_google_genai import ChatGoogleGenerativeAI

# Create LLM class
llm = ChatGoogleGenerativeAI(
    model= "gemini-3.5-flash",
    temperature=1.0,
    max_retries=2,
    google_api_key=api_key,
)

# Bind tools to the model
model = llm.bind_tools([get_weather_forecast])

# Test the model with tools
res=model.invoke(f"What is the weather in Berlin on {datetime.today()}?")

print(res)
定義節點和邊緣是執行代理程式前的最後一個步驟。 在這個範例中,您有兩個節點和一個邊緣。
call_tool節點,用於執行工具方法。LangGraph 具有預先建構的節點,稱為 ToolNode。call_model節點,使用model_with_tools呼叫模型。should_continue邊緣,決定要呼叫工具或模型。
節點和邊緣的數量不固定。您可以視需要在圖表中新增任意數量的節點和邊緣。舉例來說,您可以新增節點來新增結構化輸出內容,或是新增自我驗證/反思節點,在呼叫工具或模型前檢查模型輸出內容。
from langchain_core.messages import ToolMessage
from langchain_core.runnables import RunnableConfig

tools_by_name = {tool.name: tool for tool in tools}

# Define our tool node
def call_tool(state: AgentState):
    outputs = []
    # Iterate over the tool calls in the last message
    for tool_call in state["messages"][-1].tool_calls:
        # Get the tool by name
        tool_result = tools_by_name[tool_call["name"]].invoke(tool_call["args"])
        outputs.append(
            ToolMessage(
                content=tool_result,
                name=tool_call["name"],
                tool_call_id=tool_call["id"],
            )
        )
    return {"messages": outputs}

def call_model(
    state: AgentState,
    config: RunnableConfig,
):
    # Invoke the model with the system prompt and the messages
    response = model.invoke(state["messages"], config)
    # This returns a list, which combines with the existing messages state
    # using the add_messages reducer.
    return {"messages": [response]}

# Define the conditional edge that determines whether to continue or not
def should_continue(state: AgentState):
    messages = state["messages"]
    # If the last message is not a tool call, then finish
    if not messages[-1].tool_calls:
        return "end"
    # default to continue
    return "continue"
所有代理程式元件都準備就緒後,即可組裝。
from langgraph.graph import StateGraph, END

# Define a new graph with our state
workflow = StateGraph(AgentState)

# 1. Add the nodes
workflow.add_node("llm", call_model)
workflow.add_node("tools",  call_tool)
# 2. Set the entrypoint as `agent`, this is the first node called
workflow.set_entry_point("llm")
# 3. Add a conditional edge after the `llm` node is called.
workflow.add_conditional_edges(
    # Edge is used after the `llm` node is called.
    "llm",
    # The function that will determine which node is called next.
    should_continue,
    # Mapping for where to go next, keys are strings from the function return,
    # and the values are other nodes.
    # END is a special node marking that the graph is finish.
    {
        # If `tools`, then we call the tool node.
        "continue": "tools",
        # Otherwise we finish.
        "end": END,
    },
)
# 4. Add a normal edge after `tools` is called, `llm` node is called next.
workflow.add_edge("tools", "llm")

# Now we can compile and visualize our graph
graph = workflow.compile()
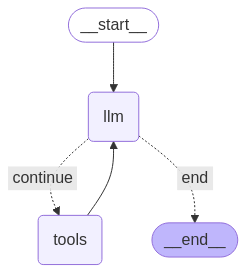
您可以使用 draw_mermaid_png 方法將圖表視覺化。
from IPython.display import Image, display

display(Image(graph.get_graph().draw_mermaid_png()))
現在執行代理程式。
from datetime import datetime
# Create our initial message dictionary
inputs = {"messages": [("user", f"What is the weather in Berlin on {datetime.today()}?")]}

# call our graph with streaming to see the steps
for state in graph.stream(inputs, stream_mode="values"):
    last_message = state["messages"][-1]
    last_message.pretty_print()
現在可以繼續對話、詢問其他城市的天氣,或是要求比較。
state["messages"].append(("user", "Would it be warmer in Munich?"))

for state in graph.stream(state, stream_mode="values"):
    last_message = state["messages"][-1]
    last_message.pretty_print()