LangGraph — это фреймворк для создания приложений LLM с сохранением состояния, что делает его хорошим выбором для построения агентов ReAct (рассуждения и действия).
Агенты ReAct сочетают рассуждения на уровне языковых моделей с выполнением действий. Они итеративно мыслят, используют инструменты и действуют на основе наблюдений для достижения целей пользователя, динамически адаптируя свой подход. Этот шаблон, представленный в статье "ReAct: Synergizing Reasoning and Acting in Language Models" (2023), стремится имитировать человекоподобное, гибкое решение проблем, а не жесткие рабочие процессы.
LangGraph предлагает готовый агент ReAct ( create_react_agent ), который отлично подходит, когда вам требуется больше контроля и возможностей для настройки ваших реализаций ReAct. В этом руководстве мы покажем вам упрощенную версию.
В LangGraph агенты моделируются как графы с использованием трех ключевых компонентов:
-
State: Общая структура данных (обычноTypedDictилиPydantic BaseModel), представляющая текущий снимок состояния приложения. -
Nodes: Кодируют логику ваших агентов. Они получают текущее состояние в качестве входных данных, выполняют некоторые вычисления или побочные эффекты и возвращают обновленное состояние, например, вызовы LLM или вызовы инструментов. -
Edges: Определяют следующийNodeдля выполнения на основе текущегоState, допуская условную логику и фиксированные переходы.
Если у вас еще нет ключа API, вы можете получить его в Google AI Studio .
pip install langgraph langchain-google-genai geopy requests
Укажите свой API-ключ в переменной среды GEMINI_API_KEY .
import os

# Read your API key from the environment variable or set it manually
api_key = os.getenv("GEMINI_API_KEY")
Чтобы лучше понять, как реализовать агента ReAct с использованием LangGraph, в этом руководстве мы рассмотрим практический пример. Вы создадите агента, цель которого — использовать инструмент для определения текущей погоды в указанном месте.
Для этого метеорологического агента State будет вести историю текущих разговоров (в виде списка сообщений) и счетчик (в виде целого числа) количества пройденных шагов, в иллюстративных целях.
LangGraph предоставляет вспомогательную функцию add_messages для обновления списков сообщений в состоянии. Она функционирует как редуктор , принимая текущий список плюс новые сообщения и возвращая объединенный список. Она обрабатывает обновления по идентификатору сообщения и по умолчанию использует поведение "только добавление" для новых, ранее не встречавшихся сообщений.
from typing import Annotated,Sequence, TypedDict

from langchain_core.messages import BaseMessage
from langgraph.graph.message import add_messages  # helper function to add messages to the state

class AgentState(TypedDict):
    """The state of the agent."""
    messages: Annotated[Sequence[BaseMessage], add_messages]
    number_of_steps: int
Далее, определите, какой инструмент для прогноза погоды вам нужен.
from langchain_core.tools import tool
from geopy.geocoders import Nominatim
from pydantic import BaseModel, Field
import requests

geolocator = Nominatim(user_agent="weather-app")

class SearchInput(BaseModel):
    location:str = Field(description="The city and state, e.g., San Francisco")
    date:str = Field(description="the forecasting date for when to get the weather format (yyyy-mm-dd)")

@tool("get_weather_forecast", args_schema=SearchInput, return_direct=True)
def get_weather_forecast(location: str, date: str):
    """Retrieves the weather using Open-Meteo API.

    Takes a given location (city) and a date (yyyy-mm-dd).

    Returns:
        A dict with the time and temperature for each hour.
    """
    # Note that Colab may experience rate limiting on this service. If this
    # happens, use a machine to which you have exclusive access.
    location = geolocator.geocode(location)
    if location:
        try:
            response = requests.get(f"https://api.open-meteo.com/v1/forecast?latitude={location.latitude}&longitude={location.longitude}&hourly=temperature_2m&start_date={date}&end_date={date}")
            data = response.json()
            return dict(zip(data["hourly"]["time"], data["hourly"]["temperature_2m"]))
        except Exception as e:
            return {"error": str(e)}
    else:
        return {"error": "Location not found"}

tools = [get_weather_forecast]
Теперь инициализируйте модель и привяжите инструменты к модели.
from datetime import datetime
from langchain_google_genai import ChatGoogleGenerativeAI

# Create LLM class
llm = ChatGoogleGenerativeAI(
    model= "gemini-3.5-flash",
    temperature=1.0,
    max_retries=2,
    google_api_key=api_key,
)

# Bind tools to the model
model = llm.bind_tools([get_weather_forecast])

# Test the model with tools
res=model.invoke(f"What is the weather in Berlin on {datetime.today()}?")

print(res)
Последний шаг перед запуском агента — определение узлов и ребер. В этом примере у вас два узла и одно ребро.
- Узел
call_tool, который выполняет ваш метод инструмента. В LangGraph есть встроенный узел для этого, называемый ToolNode . - Узел
call_model, который используетmodel_with_toolsдля вызова модели. -
should_continueэто ребро, определяющее, следует ли вызывать инструмент или модель.
Количество узлов и ребер не фиксировано. Вы можете добавить в свой граф столько узлов и ребер, сколько хотите. Например, вы можете добавить узел для добавления структурированного вывода или узел самопроверки/рефлексии для проверки выходных данных модели перед вызовом инструмента или самой модели.
from langchain_core.messages import ToolMessage
from langchain_core.runnables import RunnableConfig

tools_by_name = {tool.name: tool for tool in tools}

# Define our tool node
def call_tool(state: AgentState):
    outputs = []
    # Iterate over the tool calls in the last message
    for tool_call in state["messages"][-1].tool_calls:
        # Get the tool by name
        tool_result = tools_by_name[tool_call["name"]].invoke(tool_call["args"])
        outputs.append(
            ToolMessage(
                content=tool_result,
                name=tool_call["name"],
                tool_call_id=tool_call["id"],
            )
        )
    return {"messages": outputs}

def call_model(
    state: AgentState,
    config: RunnableConfig,
):
    # Invoke the model with the system prompt and the messages
    response = model.invoke(state["messages"], config)
    # This returns a list, which combines with the existing messages state
    # using the add_messages reducer.
    return {"messages": [response]}

# Define the conditional edge that determines whether to continue or not
def should_continue(state: AgentState):
    messages = state["messages"]
    # If the last message is not a tool call, then finish
    if not messages[-1].tool_calls:
        return "end"
    # default to continue
    return "continue"
Теперь, когда все компоненты агента готовы, вы можете их собрать.
from langgraph.graph import StateGraph, END

# Define a new graph with our state
workflow = StateGraph(AgentState)

# 1. Add the nodes
workflow.add_node("llm", call_model)
workflow.add_node("tools",  call_tool)
# 2. Set the entrypoint as `agent`, this is the first node called
workflow.set_entry_point("llm")
# 3. Add a conditional edge after the `llm` node is called.
workflow.add_conditional_edges(
    # Edge is used after the `llm` node is called.
    "llm",
    # The function that will determine which node is called next.
    should_continue,
    # Mapping for where to go next, keys are strings from the function return,
    # and the values are other nodes.
    # END is a special node marking that the graph is finish.
    {
        # If `tools`, then we call the tool node.
        "continue": "tools",
        # Otherwise we finish.
        "end": END,
    },
)
# 4. Add a normal edge after `tools` is called, `llm` node is called next.
workflow.add_edge("tools", "llm")

# Now we can compile and visualize our graph
graph = workflow.compile()
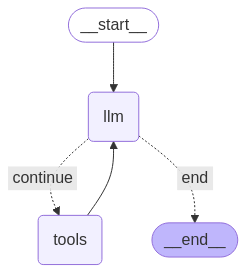
Вы можете визуализировать свой график, используя метод draw_mermaid_png .
from IPython.display import Image, display

display(Image(graph.get_graph().draw_mermaid_png()))
Теперь запустите агент.
from datetime import datetime
# Create our initial message dictionary
inputs = {"messages": [("user", f"What is the weather in Berlin on {datetime.today()}?")]}

# call our graph with streaming to see the steps
for state in graph.stream(inputs, stream_mode="values"):
    last_message = state["messages"][-1]
    last_message.pretty_print()
Теперь вы можете продолжить разговор, узнать погоду в другом городе или запросить сравнение прогнозов.
state["messages"].append(("user", "Would it be warmer in Munich?"))

for state in graph.stream(state, stream_mode="values"):
    last_message = state["messages"][-1]
    last_message.pretty_print()