

Gemini Omni Flash(gemini-omni-1.1-flash)は、高速な動画生成、編集、映画のようなコントロールを実現するように設計された高性能のマルチモーダル モデルです。Gemini Omni は、以前の動画モデルとは異なる次のコア機能を基盤として構築されています。
- ネイティブ マルチモーダル: テキスト、画像、音声、動画を同時に処理し、より一貫性があり、制御可能な出力を得ることができます。
- 話して編集: Interactions API によって有効になります。自然言語の会話を通じて動画を繰り返し調整、編集できます。変更したい内容を説明すると、モデルが編集を適用し、残したい動画の部分はそのまま残ります。
- 実世界の知識: 物理法則に関する理解に加えて、歴史、科学、文化的背景に関する Gemini の知識を組み合わせることで、写実的な表現と意味のあるストーリーテリングとの間のギャップを埋めます。
テキストから動画を生成
テキスト プロンプトから動画を生成します。モデルは、テキストの説明に基づいて音声付きの動画を生成します。最適な結果を得るには、シーンの説明、カメラの動き、照明、ムードなどの詳細を含むプロンプトを作成します。
Python
import base64
from google import genai

client = genai.Client()

interaction = client.interactions.create(
    model="gemini-omni-1.1-flash",
    input="A marble rolling fast on a chain reaction style track, continuous smooth shot."
)
with open("marble.mp4", "wb") as f:
    f.write(base64.b64decode(interaction.output_video.data))
JavaScript
import { GoogleGenAI } from '@google/genai';
import * as fs from 'fs';
const ai = new GoogleGenAI({});

const interaction = await ai.interactions.create({
  model: 'gemini-omni-1.1-flash',
  input: 'A marble rolling fast on a chain reaction style track, continuous smooth shot.',
});

if (interaction.output_video?.data) {
  fs.writeFileSync('marble.mp4', Buffer.from(interaction.output_video.data, 'base64'));
}
Java
import com.google.genai.Client;
import com.google.genai.gaos.models.interactions.CreateModelInteraction;
import com.google.genai.gaos.models.interactions.Interaction;
import com.google.genai.gaos.models.interactions.InteractionsInput;
import com.google.genai.gaos.models.interactions.Model;
import com.google.genai.gaos.models.operations.CreateInteractionRequestBody;
import java.nio.file.Files;
import java.nio.file.Paths;
import java.util.Base64;

Client client = new Client();

CreateModelInteraction params =
    CreateModelInteraction.builder()
        .model(Model.of("gemini-omni-1.1-flash"))
        .input(
            InteractionsInput.of(
                "A marble rolling fast on a chain reaction style track, continuous smooth shot."))
        .build();

Interaction interaction =
    client.interactions.create(CreateInteractionRequestBody.of(params)).interaction().get();

if (interaction.outputVideo().isPresent() && interaction.outputVideo().get().data().isPresent()) {
  byte[] videoBytes = Base64.getDecoder().decode(interaction.outputVideo().get().data().get());
  Files.write(Paths.get("marble.mp4"), videoBytes);
}
Go
package main

import (
    "context"
    "encoding/base64"
    "log"
    "os"

    "google.golang.org/genai"
    "google.golang.org/genai/interactions/models/interactions"
    "google.golang.org/genai/interactions/models/operations"
)

func main() {
    ctx := context.Background()
    client, err := genai.NewClient(ctx, nil)
    if err != nil {
        log.Fatal(err)
    }

    res, err := client.Interactions.Create(ctx, operations.CreateInteractionRequest{
        Body: operations.NewCreateInteractionRequestBody(interactions.CreateModelInteraction{
            Model: interactions.Model("gemini-omni-1.1-flash"),
            Input: interactions.NewInteractionsInput(
                "A marble rolling fast on a chain reaction style track, continuous smooth shot.",
            ),
        }),
    })
    if err != nil {
        log.Fatal(err)
    }

    if res.Interaction.OutputVideo != nil && res.Interaction.OutputVideo.Data != nil {
        videoBytes, err := base64.StdEncoding.DecodeString(*res.Interaction.OutputVideo.Data)
        if err != nil {
            log.Fatal(err)
        }
        if err := os.WriteFile("marble.mp4", videoBytes, 0644); err != nil {
            log.Fatal(err)
        }
    }
}
REST
curl -X POST "https://generativelanguage.googleapis.com/v1beta/interactions?key=$API_KEY" \
-H "Content-Type: application/json" \
-d '{
 "model": "gemini-omni-1.1-flash",
 "input": "A marble rolling fast on a chain reaction style track, continuous smooth shot."
}'
REST レスポンス スキーマ
便宜上のフィールド interaction.output_video は SDK 専用です。REST API を直接使用する場合は、steps 配列から動画出力を取得します。
未加工の REST JSON 構造:
{
  "steps": [
    { "type": "user_input", "content": [{"type": "text", "text": "..."}] },
    { "type": "thought", "content": [{"text": "...", "type": "thought"}] },
    {
      "type": "model_output",
      "content": [
        {
          "type": "video",
          "mime_type": "video/mp4",
          "data": "AAAAIGZ0eXBpc29t..." // Base64 encoded video data
        }
      ]
    }
  ],
  "id": "v1_...",
  "status": "completed",
  "model": "gemini-omni-1.1-flash",
  "object": "interaction"
}
アスペクト比を制御する
aspect_ratio を "9:16" に設定して、縦向きの動画を作成します。デフォルトは横向き(16:9)です。
Python
import base64
from google import genai

client = genai.Client()

interaction = client.interactions.create(
    model="gemini-omni-1.1-flash",
    input="A futuristic city with neon lights and flying cars, cyberpunk style",
    response_format={
        "type": "video",  # optional
        "aspect_ratio": "9:16"  # Supported values: "9:16", "16:9"
    }
)
with open("example.mp4", "wb") as f:
    f.write(base64.b64decode(interaction.output_video.data))
JavaScript
import { GoogleGenAI } from '@google/genai';
import * as fs from 'fs';
const ai = new GoogleGenAI({});

const interaction = await ai.interactions.create({
  model: 'gemini-omni-1.1-flash',
  input: 'A futuristic city with neon lights and flying cars, cyberpunk style',
  response_format: {
    type: 'video', // optional
    aspect_ratio: '9:16' // Supported values: '9:16', '16:9'
  },
});

if (interaction.output_video?.data) {
  fs.writeFileSync('example.mp4', Buffer.from(interaction.output_video.data, 'base64'));
}
Java
import com.google.genai.Client;
import com.google.genai.gaos.models.interactions.CreateModelInteraction;
import com.google.genai.gaos.models.interactions.CreateModelInteractionResponseFormat;
import com.google.genai.gaos.models.interactions.Interaction;
import com.google.genai.gaos.models.interactions.InteractionsInput;
import com.google.genai.gaos.models.interactions.Model;
import com.google.genai.gaos.models.interactions.ResponseFormat;
import com.google.genai.gaos.models.interactions.VideoResponseFormat;
import com.google.genai.gaos.models.interactions.VideoResponseFormatAspectRatio;
import com.google.genai.gaos.models.operations.CreateInteractionRequestBody;
import java.nio.file.Files;
import java.nio.file.Paths;
import java.util.Base64;

Client client = new Client();

VideoResponseFormat videoFormat =
    VideoResponseFormat.builder()
        .aspectRatio(VideoResponseFormatAspectRatio.of("9:16"))
        .build();

CreateModelInteraction params =
    CreateModelInteraction.builder()
        .model(Model.of("gemini-omni-1.1-flash"))
        .input(
            InteractionsInput.of(
                "A futuristic city with neon lights and flying cars, cyberpunk style"))
        .responseFormat(CreateModelInteractionResponseFormat.of(ResponseFormat.of(videoFormat)))
        .build();

Interaction interaction =
    client.interactions.create(CreateInteractionRequestBody.of(params)).interaction().get();

if (interaction.outputVideo().isPresent() && interaction.outputVideo().get().data().isPresent()) {
  byte[] videoBytes = Base64.getDecoder().decode(interaction.outputVideo().get().data().get());
  Files.write(Paths.get("example.mp4"), videoBytes);
}
Go
package main

import (
    "context"
    "encoding/base64"
    "log"
    "os"

    "google.golang.org/genai"
    "google.golang.org/genai/interactions/models/interactions"
    "google.golang.org/genai/interactions/models/operations"
)

func main() {
    ctx := context.Background()
    client, err := genai.NewClient(ctx, nil)
    if err != nil {
        log.Fatal(err)
    }

    videoFormat := interactions.VideoResponseFormat{
        AspectRatio: interactions.VideoResponseFormatAspectRatioNineHundredAndSixteen.ToPointer(),
    }

    res, err := client.Interactions.Create(ctx, operations.CreateInteractionRequest{
        Body: operations.NewCreateInteractionRequestBody(interactions.CreateModelInteraction{
            Model: interactions.Model("gemini-omni-1.1-flash"),
            Input: interactions.NewInteractionsInput(
                "A futuristic city with neon lights and flying cars, cyberpunk style",
            ),
            ResponseFormat: genai.Ptr(interactions.NewCreateModelInteractionResponseFormat(
                interactions.NewResponseFormat(videoFormat),
            )),
        }),
    })
    if err != nil {
        log.Fatal(err)
    }

    if res.Interaction.OutputVideo != nil && res.Interaction.OutputVideo.Data != nil {
        videoBytes, err := base64.StdEncoding.DecodeString(*res.Interaction.OutputVideo.Data)
        if err != nil {
            log.Fatal(err)
        }
        if err := os.WriteFile("example.mp4", videoBytes, 0644); err != nil {
            log.Fatal(err)
        }
    }
}
REST
curl -X POST "https://generativelanguage.googleapis.com/v1beta/interactions?key=$API_KEY" \
-H "Content-Type: application/json" \
-d '{
 "model": "gemini-omni-1.1-flash",
 "input": "A futuristic city with neon lights and flying cars, cyberpunk style",
 "response_format": {
   "type": "video",
   "aspect_ratio": "9:16"
 }
}'
出力解像度
response_format の resolution パラメータを使用して、生成された動画の出力解像度を制御します。デフォルトの解像度は 720p です。
| 値 | 説明 |
|---|---|
360p |
360p の出力解像度 |
720p |
720p 出力解像度(デフォルト) |
1080p |
1080p 出力(アップスケール) |
4k |
4K 出力(アップスケール) |
Python
import base64
from google import genai

client = genai.Client()

interaction = client.interactions.create(
    model="gemini-omni-1.1-flash",
    input="A drone shot of a mountain landscape at sunrise.",
    response_format={
        "type": "video",
        "resolution": "1080p",
    },
)
with open("hires.mp4", "wb") as f:
    f.write(base64.b64decode(interaction.output_video.data))
JavaScript
import { GoogleGenAI } from '@google/genai';
import * as fs from 'fs';
const ai = new GoogleGenAI({});

const interaction = await ai.interactions.create({
  model: 'gemini-omni-1.1-flash',
  input: 'A drone shot of a mountain landscape at sunrise.',
  response_format: {
    type: 'video',
    resolution: '1080p',
  },
});

if (interaction.output_video?.data) {
  fs.writeFileSync('hires.mp4', Buffer.from(interaction.output_video.data, 'base64'));
}
Java
import com.google.genai.Client;
import com.google.genai.gaos.models.interactions.CreateModelInteraction;
import com.google.genai.gaos.models.interactions.CreateModelInteractionResponseFormat;
import com.google.genai.gaos.models.interactions.Interaction;
import com.google.genai.gaos.models.interactions.InteractionsInput;
import com.google.genai.gaos.models.interactions.Model;
import com.google.genai.gaos.models.interactions.Resolution;
import com.google.genai.gaos.models.interactions.ResponseFormat;
import com.google.genai.gaos.models.interactions.VideoResponseFormat;
import com.google.genai.gaos.models.operations.CreateInteractionRequestBody;
import java.nio.file.Files;
import java.nio.file.Paths;
import java.util.Base64;

Client client = new Client();

VideoResponseFormat videoFormat =
    VideoResponseFormat.builder()
        .resolution(Resolution.of("1080p"))
        .build();

CreateModelInteraction params =
    CreateModelInteraction.builder()
        .model(Model.of("gemini-omni-1.1-flash"))
        .input(InteractionsInput.of("A drone shot of a mountain landscape at sunrise."))
        .responseFormat(CreateModelInteractionResponseFormat.of(ResponseFormat.of(videoFormat)))
        .build();

Interaction interaction =
    client.interactions.create(CreateInteractionRequestBody.of(params)).interaction().get();

if (interaction.outputVideo().isPresent() && interaction.outputVideo().get().data().isPresent()) {
  byte[] videoBytes = Base64.getDecoder().decode(interaction.outputVideo().get().data().get());
  Files.write(Paths.get("hires.mp4"), videoBytes);
}
Go
package main

import (
    "context"
    "encoding/base64"
    "log"
    "os"

    "google.golang.org/genai"
    "google.golang.org/genai/interactions/models/interactions"
    "google.golang.org/genai/interactions/models/operations"
)

func main() {
    ctx := context.Background()
    client, err := genai.NewClient(ctx, nil)
    if err != nil {
        log.Fatal(err)
    }

    videoFormat := interactions.VideoResponseFormat{
        Resolution: interactions.ResolutionOneThousandAndEightyp.ToPointer(),
    }

    res, err := client.Interactions.Create(ctx, operations.CreateInteractionRequest{
        Body: operations.NewCreateInteractionRequestBody(interactions.CreateModelInteraction{
            Model: interactions.Model("gemini-omni-1.1-flash"),
            Input: interactions.NewInteractionsInput("A drone shot of a mountain landscape at sunrise."),
            ResponseFormat: genai.Ptr(interactions.NewCreateModelInteractionResponseFormat(
                interactions.NewResponseFormat(videoFormat),
            )),
        }),
    })
    if err != nil {
        log.Fatal(err)
    }

    if res.Interaction.OutputVideo != nil && res.Interaction.OutputVideo.Data != nil {
        videoBytes, err := base64.StdEncoding.DecodeString(*res.Interaction.OutputVideo.Data)
        if err != nil {
            log.Fatal(err)
        }
        if err := os.WriteFile("hires.mp4", videoBytes, 0644); err != nil {
            log.Fatal(err)
        }
    }
}
REST
curl -X POST "https://generativelanguage.googleapis.com/v1beta/interactions?key=$API_KEY" \
-H "Content-Type: application/json" \
-d '{
 "model": "gemini-omni-1.1-flash",
 "input": "A drone shot of a mountain landscape at sunrise.",
 "response_format": {
   "type": "video",
   "resolution": "1080p"
 }
}'
画像から動画を生成する
テキスト プロンプトとともに参照画像を指定できます。プロンプトに応じて、モデルは画像の使用方法を決定します。これは、商品写真、イラスト、写真を生き生きと表現するのに便利です。
次の例は、水から飛び出す魚の絵の参照画像を使用する方法を示しています。
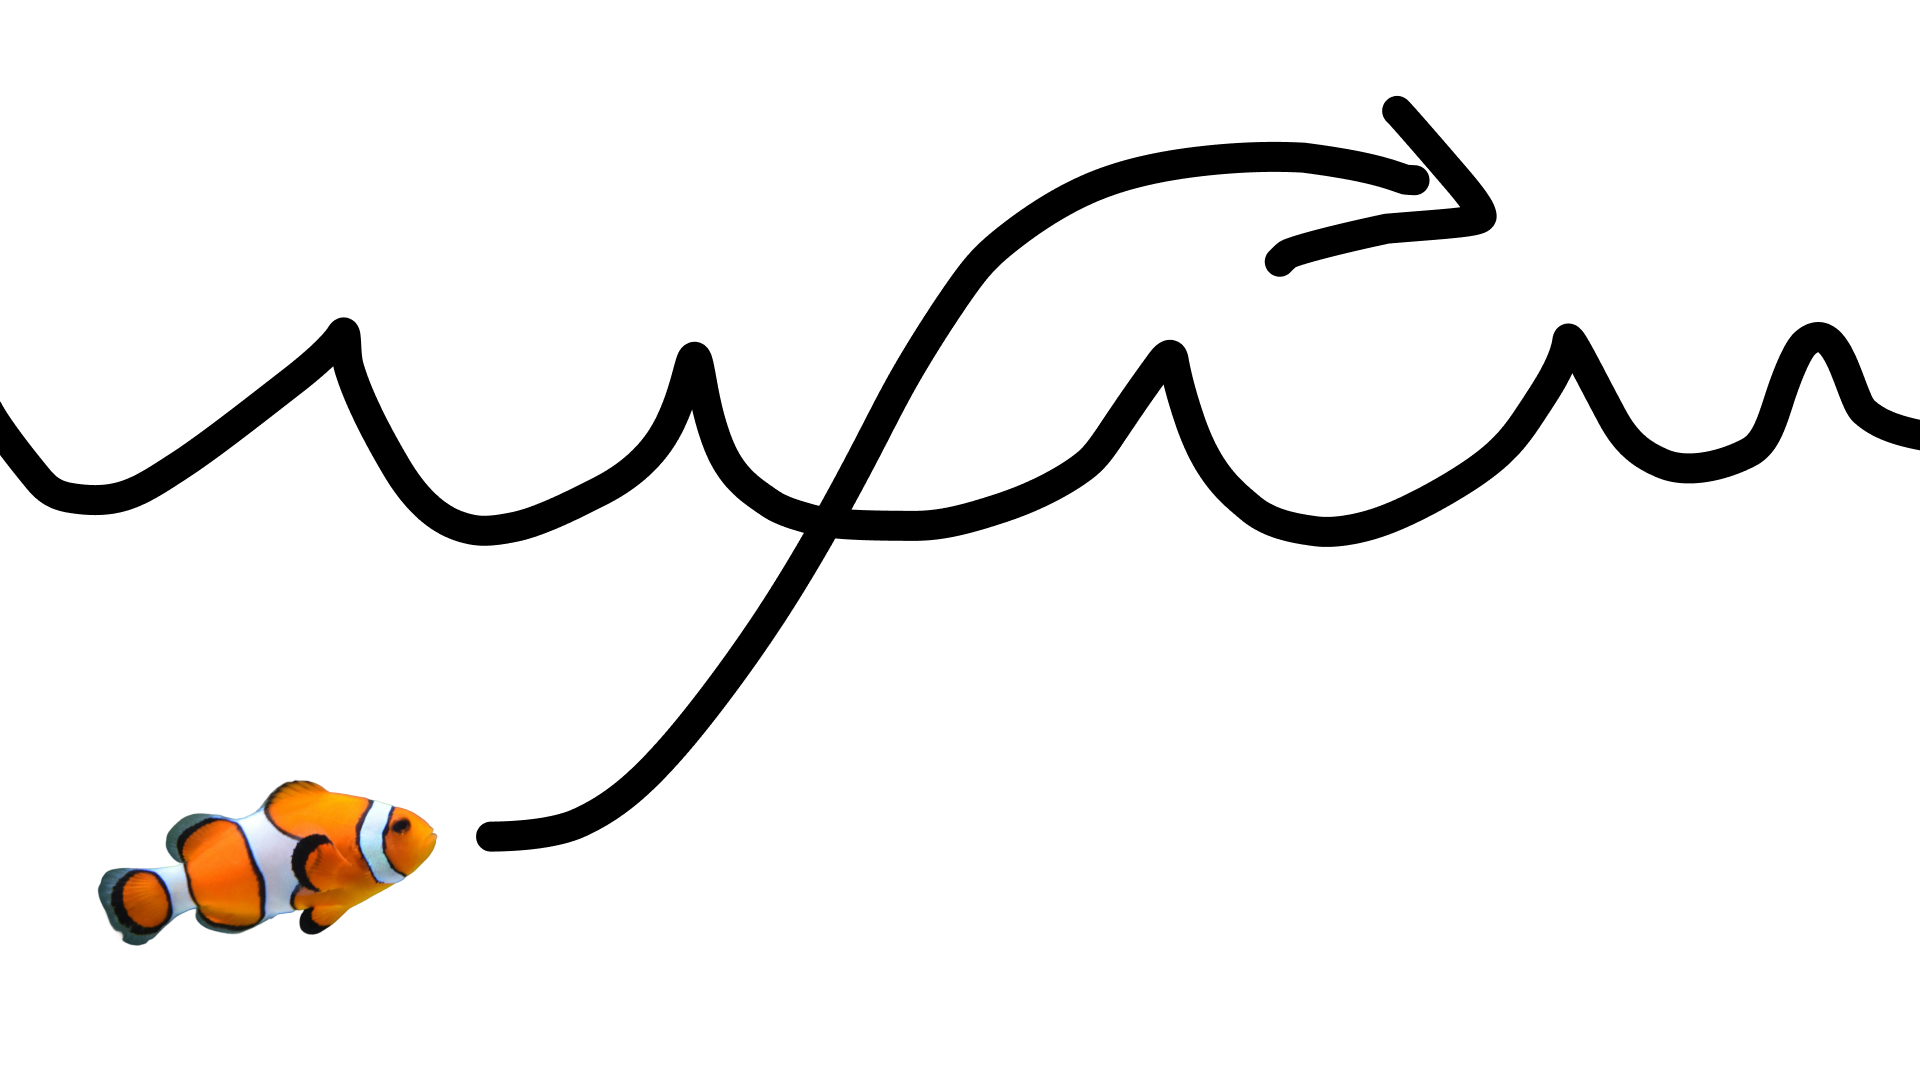
次のプロンプトを使用します。
turn this into realistic footage, using the drawing only as a guide for movement, do not show the drawing in the final video
描画のリアルな動画を生成する。
Python
import base64
from google import genai

client = genai.Client()

interaction = client.interactions.create(
    model="gemini-omni-1.1-flash",
    input=[
        {"type": "image", "data": base64_image, "mime_type": "image/jpeg"},
        {"type": "text", "text": "turn this into realistic footage, using the drawing only as a guide for movement, do not show the drawing in the final video"}
    ],
)
with open("clownfish.mp4", "wb") as f:
    f.write(base64.b64decode(interaction.output_video.data))
JavaScript
import { GoogleGenAI } from '@google/genai';
import * as fs from 'fs';
const ai = new GoogleGenAI({});

const interaction = await ai.interactions.create({
  model: 'gemini-omni-1.1-flash',
  input: [
    { type: 'image', data: base64Image, mime_type: 'image/jpeg' },
    { type: 'text', text: 'turn this into realistic footage, using the drawing only as a guide for movement, do not show the drawing in the final video' }
  ]
});

if (interaction.output_video?.data) {
  fs.writeFileSync('clownfish.mp4', Buffer.from(interaction.output_video.data, 'base64'));
}
Java
import com.google.genai.Client;
import com.google.genai.gaos.models.interactions.Content;
import com.google.genai.gaos.models.interactions.CreateModelInteraction;
import com.google.genai.gaos.models.interactions.ImageContent;
import com.google.genai.gaos.models.interactions.ImageContentMimeType;
import com.google.genai.gaos.models.interactions.Interaction;
import com.google.genai.gaos.models.interactions.InteractionsInput;
import com.google.genai.gaos.models.interactions.Model;
import com.google.genai.gaos.models.interactions.TextContent;
import com.google.genai.gaos.models.operations.CreateInteractionRequestBody;
import java.nio.file.Files;
import java.nio.file.Paths;
import java.util.Arrays;
import java.util.Base64;
import java.util.List;

Client client = new Client();

byte[] imageBytes = Files.readAllBytes(Paths.get("drawing.jpg"));
String base64Image = Base64.getEncoder().encodeToString(imageBytes);

Content imageContent =
    ImageContent.builder()
        .data(base64Image)
        .mimeType(ImageContentMimeType.IMAGE_JPEG)
        .build();

Content textContent =
    TextContent.builder()
        .text(
            "turn this into realistic footage, using the drawing only as a guide for movement, do not show the drawing in the final video")
        .build();

List<Content> contents = Arrays.asList(imageContent, textContent);

CreateModelInteraction params =
    CreateModelInteraction.builder()
        .model(Model.of("gemini-omni-1.1-flash"))
        .input(InteractionsInput.ofContent(contents))
        .build();

Interaction interaction =
    client.interactions.create(CreateInteractionRequestBody.of(params)).interaction().get();

if (interaction.outputVideo().isPresent() && interaction.outputVideo().get().data().isPresent()) {
  byte[] videoBytes = Base64.getDecoder().decode(interaction.outputVideo().get().data().get());
  Files.write(Paths.get("clownfish.mp4"), videoBytes);
}
Go
package main

import (
    "context"
    "encoding/base64"
    "log"
    "os"

    "google.golang.org/genai"
    "google.golang.org/genai/interactions/models/interactions"
    "google.golang.org/genai/interactions/models/operations"
)

func main() {
    ctx := context.Background()
    client, err := genai.NewClient(ctx, nil)
    if err != nil {
        log.Fatal(err)
    }

    imageBytes, err := os.ReadFile("drawing.jpg")
    if err != nil {
        log.Fatal(err)
    }
    base64Image := base64.StdEncoding.EncodeToString(imageBytes)

    contents := []interactions.Content{
        interactions.NewContent(interactions.ImageContent{
            Data:     genai.Ptr(base64Image),
            MimeType: interactions.ImageContentMimeTypeImageJpeg.ToPointer(),
        }),
        interactions.NewContent(interactions.TextContent{
            Text: "turn this into realistic footage, using the drawing only as a guide for movement, do not show the drawing in the final video",
        }),
    }

    res, err := client.Interactions.Create(ctx, operations.CreateInteractionRequest{
        Body: operations.NewCreateInteractionRequestBody(interactions.CreateModelInteraction{
            Model: interactions.Model("gemini-omni-1.1-flash"),
            Input: interactions.NewInteractionsInput(contents),
        }),
    })
    if err != nil {
        log.Fatal(err)
    }

    if res.Interaction.OutputVideo != nil && res.Interaction.OutputVideo.Data != nil {
        videoBytes, err := base64.StdEncoding.DecodeString(*res.Interaction.OutputVideo.Data)
        if err != nil {
            log.Fatal(err)
        }
        if err := os.WriteFile("clownfish.mp4", videoBytes, 0644); err != nil {
            log.Fatal(err)
        }
    }
}
REST
curl -X POST "https://generativelanguage.googleapis.com/v1beta/interactions?key=$API_KEY" \
-H "Content-Type: application/json" \
-d '{
 "model": "gemini-omni-1.1-flash",
 "input": [
   {"type": "image", "data": "'"$BASE64_IMAGE"'", "mime_type": "image/jpeg"},
   {"type": "text", "text": "turn this into realistic footage, using the drawing only as a guide for movement, do not show the drawing in the final video"}
 ]
}'
最初と最後のフレームの補間
Gemini Omni Flash は動画の補間をサポートしており、開始画像(最初のフレーム)と終了画像(最後のフレーム)の間をスムーズに移行する動画を生成できます。
input リストに 2 つの画像を指定し、プロンプトで目的のトランジションを説明します。モデルは、最初のフレームから最後のフレームまでシーンをアニメーション化します。
Python
import base64
from google import genai

client = genai.Client()

interaction = client.interactions.create(
    model="gemini-omni-1.1-flash",
    input=[
        {"type": "image", "data": first_frame_b64, "mime_type": "image/jpeg"},
        {"type": "image", "data": last_frame_b64, "mime_type": "image/jpeg"},
        {"type": "text", "text": "A smooth cinematic transition from a lush green forest at sunrise to a snowy forest under a starry night sky."}
    ],
)
with open("interpolation.mp4", "wb") as f:
    f.write(base64.b64decode(interaction.output_video.data))
JavaScript
import { GoogleGenAI } from '@google/genai';
import * as fs from 'fs';
const ai = new GoogleGenAI({});

const interaction = await ai.interactions.create({
  model: 'gemini-omni-1.1-flash',
  input: [
    { type: 'image', data: firstFrameB64, mime_type: 'image/jpeg' },
    { type: 'image', data: lastFrameB64, mime_type: 'image/jpeg' },
    { type: 'text', text: 'A smooth cinematic transition from a lush green forest at sunrise to a snowy forest under a starry night sky.' }
  ]
});

if (interaction.output_video?.data) {
  fs.writeFileSync('interpolation.mp4', Buffer.from(interaction.output_video.data, 'base64'));
}
Java
import com.google.genai.Client;
import com.google.genai.gaos.models.interactions.Content;
import com.google.genai.gaos.models.interactions.CreateModelInteraction;
import com.google.genai.gaos.models.interactions.ImageContent;
import com.google.genai.gaos.models.interactions.ImageContentMimeType;
import com.google.genai.gaos.models.interactions.Interaction;
import com.google.genai.gaos.models.interactions.InteractionsInput;
import com.google.genai.gaos.models.interactions.Model;
import com.google.genai.gaos.models.interactions.TextContent;
import com.google.genai.gaos.models.operations.CreateInteractionRequestBody;
import java.nio.file.Files;
import java.nio.file.Paths;
import java.util.Arrays;
import java.util.Base64;
import java.util.List;

Client client = new Client();

String firstFrameB64 =
    Base64.getEncoder().encodeToString(Files.readAllBytes(Paths.get("first_frame.jpg")));
String lastFrameB64 =
    Base64.getEncoder().encodeToString(Files.readAllBytes(Paths.get("last_frame.jpg")));

Content firstFrame =
    ImageContent.builder()
        .data(firstFrameB64)
        .mimeType(ImageContentMimeType.IMAGE_JPEG)
        .build();

Content lastFrame =
    ImageContent.builder()
        .data(lastFrameB64)
        .mimeType(ImageContentMimeType.IMAGE_JPEG)
        .build();

Content prompt =
    TextContent.builder()
        .text(
            "A smooth cinematic transition from a lush green forest at sunrise to a snowy forest under a starry night sky.")
        .build();

List<Content> contents = Arrays.asList(firstFrame, lastFrame, prompt);

CreateModelInteraction params =
    CreateModelInteraction.builder()
        .model(Model.of("gemini-omni-1.1-flash"))
        .input(InteractionsInput.ofContent(contents))
        .build();

Interaction interaction =
    client.interactions.create(CreateInteractionRequestBody.of(params)).interaction().get();

if (interaction.outputVideo().isPresent() && interaction.outputVideo().get().data().isPresent()) {
  byte[] videoBytes = Base64.getDecoder().decode(interaction.outputVideo().get().data().get());
  Files.write(Paths.get("interpolation.mp4"), videoBytes);
}
Go
package main

import (
    "context"
    "encoding/base64"
    "log"
    "os"

    "google.golang.org/genai"
    "google.golang.org/genai/interactions/models/interactions"
    "google.golang.org/genai/interactions/models/operations"
)

func main() {
    ctx := context.Background()
    client, err := genai.NewClient(ctx, nil)
    if err != nil {
        log.Fatal(err)
    }

    firstBytes, err := os.ReadFile("first_frame.jpg")
    if err != nil {
        log.Fatal(err)
    }
    lastBytes, err := os.ReadFile("last_frame.jpg")
    if err != nil {
        log.Fatal(err)
    }

    firstFrameB64 := base64.StdEncoding.EncodeToString(firstBytes)
    lastFrameB64 := base64.StdEncoding.EncodeToString(lastBytes)

    contents := []interactions.Content{
        interactions.NewContent(interactions.ImageContent{
            Data:     genai.Ptr(firstFrameB64),
            MimeType: interactions.ImageContentMimeTypeImageJpeg.ToPointer(),
        }),
        interactions.NewContent(interactions.ImageContent{
            Data:     genai.Ptr(lastFrameB64),
            MimeType: interactions.ImageContentMimeTypeImageJpeg.ToPointer(),
        }),
        interactions.NewContent(interactions.TextContent{
            Text: "A smooth cinematic transition from a lush green forest at sunrise to a snowy forest under a starry night sky.",
        }),
    }

    res, err := client.Interactions.Create(ctx, operations.CreateInteractionRequest{
        Body: operations.NewCreateInteractionRequestBody(interactions.CreateModelInteraction{
            Model: interactions.Model("gemini-omni-1.1-flash"),
            Input: interactions.NewInteractionsInput(contents),
        }),
    })
    if err != nil {
        log.Fatal(err)
    }

    if res.Interaction.OutputVideo != nil && res.Interaction.OutputVideo.Data != nil {
        videoBytes, err := base64.StdEncoding.DecodeString(*res.Interaction.OutputVideo.Data)
        if err != nil {
            log.Fatal(err)
        }
        if err := os.WriteFile("interpolation.mp4", videoBytes, 0644); err != nil {
            log.Fatal(err)
        }
    }
}
REST
curl -X POST "https://generativelanguage.googleapis.com/v1beta/interactions?key=$API_KEY" \
-H "Content-Type: application/json" \
-d '{
 "model": "gemini-omni-1.1-flash",
 "input": [
   {"type": "image", "data": "'"$FIRST_FRAME_B64"'", "mime_type": "image/jpeg"},
   {"type": "image", "data": "'"$LAST_FRAME_B64"'", "mime_type": "image/jpeg"},
   {"type": "text", "text": "A smooth cinematic transition from a lush green forest at sunrise to a snowy forest under a starry night sky."}
 ]
}'
被写体参照
参照画像として提供された特定の被写体を取り込んだ動画を生成できます。たとえば、次のコードは、猫と毛糸の 2 枚の画像を提供して、猫が毛糸で遊んでいる動画を生成する方法を示しています。
Python
import base64
from google import genai

client = genai.Client()

interaction = client.interactions.create(
    model="gemini-omni-1.1-flash",
    input=[
        {"type": "image", "data": cat_b64, "mime_type": "image/png"},
        {"type": "image", "data": yarn_b64, "mime_type": "image/png"},
        {"type": "text", "text": "A cat playfully batting at a ball of yarn."}
    ],
)
with open("cat.mp4", "wb") as f:
    f.write(base64.b64decode(interaction.output_video.data))
JavaScript
import { GoogleGenAI } from '@google/genai';
import * as fs from 'fs';
const ai = new GoogleGenAI({});

const interaction = await ai.interactions.create({
  model: 'gemini-omni-1.1-flash',
  input: [
    { type: 'image', data: catData, mime_type: 'image/png' },
    { type: 'image', data: yarnData, mime_type: 'image/png' },
    { type: 'text', text: 'A cat playfully batting at a ball of yarn.' }
  ]
});

if (interaction.output_video?.data) {
  fs.writeFileSync('cat.mp4', Buffer.from(interaction.output_video.data, 'base64'));
}
Java
import com.google.genai.Client;
import com.google.genai.gaos.models.interactions.Content;
import com.google.genai.gaos.models.interactions.CreateModelInteraction;
import com.google.genai.gaos.models.interactions.ImageContent;
import com.google.genai.gaos.models.interactions.ImageContentMimeType;
import com.google.genai.gaos.models.interactions.Interaction;
import com.google.genai.gaos.models.interactions.InteractionsInput;
import com.google.genai.gaos.models.interactions.Model;
import com.google.genai.gaos.models.interactions.TextContent;
import com.google.genai.gaos.models.operations.CreateInteractionRequestBody;
import java.nio.file.Files;
import java.nio.file.Paths;
import java.util.Arrays;
import java.util.Base64;
import java.util.List;

Client client = new Client();

String catB64 = Base64.getEncoder().encodeToString(Files.readAllBytes(Paths.get("cat.png")));
String yarnB64 = Base64.getEncoder().encodeToString(Files.readAllBytes(Paths.get("yarn.png")));

Content catImage =
    ImageContent.builder()
        .data(catB64)
        .mimeType(ImageContentMimeType.IMAGE_PNG)
        .build();

Content yarnImage =
    ImageContent.builder()
        .data(yarnB64)
        .mimeType(ImageContentMimeType.IMAGE_PNG)
        .build();

Content textContent =
    TextContent.builder()
        .text("A cat playfully batting at a ball of yarn.")
        .build();

List<Content> contents = Arrays.asList(catImage, yarnImage, textContent);

CreateModelInteraction params =
    CreateModelInteraction.builder()
        .model(Model.of("gemini-omni-1.1-flash"))
        .input(InteractionsInput.ofContent(contents))
        .build();

Interaction interaction =
    client.interactions.create(CreateInteractionRequestBody.of(params)).interaction().get();

if (interaction.outputVideo().isPresent() && interaction.outputVideo().get().data().isPresent()) {
  byte[] videoBytes = Base64.getDecoder().decode(interaction.outputVideo().get().data().get());
  Files.write(Paths.get("cat.mp4"), videoBytes);
}
Go
package main

import (
    "context"
    "encoding/base64"
    "log"
    "os"

    "google.golang.org/genai"
    "google.golang.org/genai/interactions/models/interactions"
    "google.golang.org/genai/interactions/models/operations"
)

func main() {
    ctx := context.Background()
    client, err := genai.NewClient(ctx, nil)
    if err != nil {
        log.Fatal(err)
    }

    catBytes, err := os.ReadFile("cat.png")
    if err != nil {
        log.Fatal(err)
    }
    yarnBytes, err := os.ReadFile("yarn.png")
    if err != nil {
        log.Fatal(err)
    }

    catB64 := base64.StdEncoding.EncodeToString(catBytes)
    yarnB64 := base64.StdEncoding.EncodeToString(yarnBytes)

    contents := []interactions.Content{
        interactions.NewContent(interactions.ImageContent{
            Data:     genai.Ptr(catB64),
            MimeType: interactions.ImageContentMimeTypeImagePng.ToPointer(),
        }),
        interactions.NewContent(interactions.ImageContent{
            Data:     genai.Ptr(yarnB64),
            MimeType: interactions.ImageContentMimeTypeImagePng.ToPointer(),
        }),
        interactions.NewContent(interactions.TextContent{
            Text: "A cat playfully batting at a ball of yarn.",
        }),
    }

    res, err := client.Interactions.Create(ctx, operations.CreateInteractionRequest{
        Body: operations.NewCreateInteractionRequestBody(interactions.CreateModelInteraction{
            Model: interactions.Model("gemini-omni-1.1-flash"),
            Input: interactions.NewInteractionsInput(contents),
        }),
    })
    if err != nil {
        log.Fatal(err)
    }

    if res.Interaction.OutputVideo != nil && res.Interaction.OutputVideo.Data != nil {
        videoBytes, err := base64.StdEncoding.DecodeString(*res.Interaction.OutputVideo.Data)
        if err != nil {
            log.Fatal(err)
        }
        if err := os.WriteFile("cat.mp4", videoBytes, 0644); err != nil {
            log.Fatal(err)
        }
    }
}
REST
curl -X POST "https://generativelanguage.googleapis.com/v1beta/interactions?key=$API_KEY" \
-H "Content-Type: application/json" \
-d '{
 "model": "gemini-omni-1.1-flash",
 "input": [
   {"type": "image", "data": "'"$CAT_B64"'", "mime_type": "image/png"},
   {"type": "image", "data": "'"$YARN_B64"'", "mime_type": "image/png"},
   {"type": "text", "text": "A cat playfully batting at a ball of yarn."}
 ]
}'
Tasks パラメータ
video_config の task パラメータを使用して、目的の動作を明示的に指定します。たとえば、モデルに画像から動画を生成させる場合は、パラメータを image_to_video に設定します。設定されていない場合、モデルはプロンプトから必要なものを推測します。
使用できる値は次のとおりです。
text_to_videoimage_to_videoreference_to_videoeditextend
次の例は、前述の画像から動画への例でこれを設定する方法を示しています。
Python
import base64
from google import genai

client = genai.Client()

interaction = client.interactions.create(
    model="gemini-omni-1.1-flash",
    input=[
        {"type": "image", "data": base64_image, "mime_type": "image/jpeg"},
        {"type": "text", "text": "turn this into realistic footage, using the drawing only as a guide for movement, do not show the drawing in the final video"}
    ],
    generation_config={
      "video_config": {
        "task": "image_to_video",
      }
    },
)
with open("example.mp4", "wb") as f:
    f.write(base64.b64decode(interaction.output_video.data))
JavaScript
import { GoogleGenAI } from "@google/genai";
import * as fs from 'fs';
const ai = new GoogleGenAI({});

const interaction = await ai.interactions.create({
  model: 'gemini-omni-1.1-flash',
  input: [
    { type: 'image', data: base64Image, mime_type: 'image/jpeg' },
    { type: 'text', text: 'turn this into realistic footage, using the drawing only as a guide for movement, do not show the drawing in the final video' }
  ],
  generationConfig: {
    videoConfig: {
      task: 'image_to_video',
    }
  }
});

if (interaction.output_video?.data) {
  fs.writeFileSync('example.mp4', Buffer.from(interaction.output_video.data, 'base64'));
}
Java
import com.google.genai.Client;
import com.google.genai.gaos.models.interactions.Content;
import com.google.genai.gaos.models.interactions.CreateModelInteraction;
import com.google.genai.gaos.models.interactions.GenerationConfig;
import com.google.genai.gaos.models.interactions.ImageContent;
import com.google.genai.gaos.models.interactions.ImageContentMimeType;
import com.google.genai.gaos.models.interactions.Interaction;
import com.google.genai.gaos.models.interactions.InteractionsInput;
import com.google.genai.gaos.models.interactions.Model;
import com.google.genai.gaos.models.interactions.Task;
import com.google.genai.gaos.models.interactions.TextContent;
import com.google.genai.gaos.models.interactions.VideoConfig;
import com.google.genai.gaos.models.operations.CreateInteractionRequestBody;
import java.nio.file.Files;
import java.nio.file.Paths;
import java.util.Arrays;
import java.util.Base64;
import java.util.List;

Client client = new Client();

byte[] imageBytes = Files.readAllBytes(Paths.get("drawing.jpg"));
String base64Image = Base64.getEncoder().encodeToString(imageBytes);

Content imageContent =
    ImageContent.builder()
        .data(base64Image)
        .mimeType(ImageContentMimeType.IMAGE_JPEG)
        .build();

Content textContent =
    TextContent.builder()
        .text(
            "turn this into realistic footage, using the drawing only as a guide for movement, do not show the drawing in the final video")
        .build();

List<Content> contents = Arrays.asList(imageContent, textContent);

GenerationConfig generationConfig =
    GenerationConfig.builder()
        .videoConfig(VideoConfig.builder().task(Task.IMAGE_TO_VIDEO).build())
        .build();

CreateModelInteraction params =
    CreateModelInteraction.builder()
        .model(Model.of("gemini-omni-1.1-flash"))
        .input(InteractionsInput.ofContent(contents))
        .generationConfig(generationConfig)
        .build();

Interaction interaction =
    client.interactions.create(CreateInteractionRequestBody.of(params)).interaction().get();

if (interaction.outputVideo().isPresent() && interaction.outputVideo().get().data().isPresent()) {
  byte[] videoBytes = Base64.getDecoder().decode(interaction.outputVideo().get().data().get());
  Files.write(Paths.get("example.mp4"), videoBytes);
}
Go
package main

import (
    "context"
    "encoding/base64"
    "log"
    "os"

    "google.golang.org/genai"
    "google.golang.org/genai/interactions/models/interactions"
    "google.golang.org/genai/interactions/models/operations"
)

func main() {
    ctx := context.Background()
    client, err := genai.NewClient(ctx, nil)
    if err != nil {
        log.Fatal(err)
    }

    imageBytes, err := os.ReadFile("drawing.jpg")
    if err != nil {
        log.Fatal(err)
    }
    base64Image := base64.StdEncoding.EncodeToString(imageBytes)

    contents := []interactions.Content{
        interactions.NewContent(interactions.ImageContent{
            Data:     genai.Ptr(base64Image),
            MimeType: interactions.ImageContentMimeTypeImageJpeg.ToPointer(),
        }),
        interactions.NewContent(interactions.TextContent{
            Text: "turn this into realistic footage, using the drawing only as a guide for movement, do not show the drawing in the final video",
        }),
    }

    generationConfig := &interactions.GenerationConfig{
        VideoConfig: &interactions.VideoConfig{
            Task: interactions.TaskImageToVideo.ToPointer(),
        },
    }

    res, err := client.Interactions.Create(ctx, operations.CreateInteractionRequest{
        Body: operations.NewCreateInteractionRequestBody(interactions.CreateModelInteraction{
            Model:            interactions.Model("gemini-omni-1.1-flash"),
            Input:            interactions.NewInteractionsInput(contents),
            GenerationConfig: generationConfig,
        }),
    })
    if err != nil {
        log.Fatal(err)
    }

    if res.Interaction.OutputVideo != nil && res.Interaction.OutputVideo.Data != nil {
        videoBytes, err := base64.StdEncoding.DecodeString(*res.Interaction.OutputVideo.Data)
        if err != nil {
            log.Fatal(err)
        }
        if err := os.WriteFile("example.mp4", videoBytes, 0644); err != nil {
            log.Fatal(err)
        }
    }
}
REST
curl -X POST "https://generativelanguage.googleapis.com/v1beta/interactions" \
  -H "x-goog-api-key: $GEMINI_API_KEY" \
  -H "Content-Type: application/json" \
  -d '{
    "model": "gemini-omni-1.1-flash",
    "input": [
      {
        "type": "image",
        "data": "'"$BASE64_IMAGE"'",
        "mime_type": "image/jpeg"
      },
      {
        "type": "text",
        "text": "turn this into realistic footage, using the drawing only as a guide for movement, do not show the drawing in the final video"
      }
    ],
    "generation_config": {
      "video_config": {
        "task": "image_to_video"
      }
    }
  }'
ステートフル動画編集
動画を生成し、フォローアップ プロンプトを使用して繰り返し編集します。各ターンは前の結果に基づいて構築されます。モデルは動画のコンテキストを記憶し、変更を適用しながら、言及しなかった要素を保持します。previous_interaction_id を使用して、以前の動画を再アップロードすることなく、会話履歴と生成された動画の状態を追跡します。
次の例は、最初の動画を生成してから編集する方法を示しています。
Python
import base64
from google import genai

client = genai.Client()

# Turn 1: Generate initial video
res1 = client.interactions.create(model="gemini-omni-1.1-flash", input="A woman playing violin outdoors.")

# Turn 2: Edit the previous video
res2 = client.interactions.create(
    model="gemini-omni-1.1-flash",
    previous_interaction_id=res1.id,
    input="Make the violin invisible."
)
with open("example.mp4", "wb") as f:
    f.write(base64.b64decode(res2.output_video.data))
JavaScript
import { GoogleGenAI } from '@google/genai';
import * as fs from 'fs';
const ai = new GoogleGenAI({});

// Turn 1: Generate initial video
const res1 = await ai.interactions.create({
  model: 'gemini-omni-1.1-flash',
  input: 'A woman playing violin outdoors.',
});

// Turn 2: Edit the previous video
const res2 = await ai.interactions.create({
  model: 'gemini-omni-1.1-flash',
  previous_interaction_id: res1.id,
  input: 'Make the violin invisible.',
});

if (res2.output_video?.data) {
  fs.writeFileSync('example.mp4', Buffer.from(res2.output_video.data, 'base64'));
}
Java
import com.google.genai.Client;
import com.google.genai.gaos.models.interactions.CreateModelInteraction;
import com.google.genai.gaos.models.interactions.Interaction;
import com.google.genai.gaos.models.interactions.InteractionsInput;
import com.google.genai.gaos.models.interactions.Model;
import com.google.genai.gaos.models.operations.CreateInteractionRequestBody;
import java.nio.file.Files;
import java.nio.file.Paths;
import java.util.Base64;

Client client = new Client();

// Turn 1: Generate initial video
CreateModelInteraction turn1Params =
    CreateModelInteraction.builder()
        .model(Model.of("gemini-omni-1.1-flash"))
        .input(InteractionsInput.of("A woman playing violin outdoors."))
        .build();

Interaction res1 =
    client.interactions.create(CreateInteractionRequestBody.of(turn1Params)).interaction().get();

// Turn 2: Edit the previous video
CreateModelInteraction turn2Params =
    CreateModelInteraction.builder()
        .model(Model.of("gemini-omni-1.1-flash"))
        .previousInteractionId(res1.id().get())
        .input(InteractionsInput.of("Make the violin invisible."))
        .build();

Interaction res2 =
    client.interactions.create(CreateInteractionRequestBody.of(turn2Params)).interaction().get();

if (res2.outputVideo().isPresent() && res2.outputVideo().get().data().isPresent()) {
  byte[] videoBytes = Base64.getDecoder().decode(res2.outputVideo().get().data().get());
  Files.write(Paths.get("example.mp4"), videoBytes);
}
Go
package main

import (
    "context"
    "encoding/base64"
    "log"
    "os"

    "google.golang.org/genai"
    "google.golang.org/genai/interactions/models/interactions"
    "google.golang.org/genai/interactions/models/operations"
)

func main() {
    ctx := context.Background()
    client, err := genai.NewClient(ctx, nil)
    if err != nil {
        log.Fatal(err)
    }

    // Turn 1: Generate initial video
    res1, err := client.Interactions.Create(ctx, operations.CreateInteractionRequest{
        Body: operations.NewCreateInteractionRequestBody(interactions.CreateModelInteraction{
            Model: interactions.Model("gemini-omni-1.1-flash"),
            Input: interactions.NewInteractionsInput("A woman playing violin outdoors."),
        }),
    })
    if err != nil {
        log.Fatal(err)
    }

    // Turn 2: Edit the previous video
    res2, err := client.Interactions.Create(ctx, operations.CreateInteractionRequest{
        Body: operations.NewCreateInteractionRequestBody(interactions.CreateModelInteraction{
            Model:                 interactions.Model("gemini-omni-1.1-flash"),
            PreviousInteractionID: res1.Interaction.ID,
            Input:                 interactions.NewInteractionsInput("Make the violin invisible."),
        }),
    })
    if err != nil {
        log.Fatal(err)
    }

    if res2.Interaction.OutputVideo != nil && res2.Interaction.OutputVideo.Data != nil {
        videoBytes, err := base64.StdEncoding.DecodeString(*res2.Interaction.OutputVideo.Data)
        if err != nil {
            log.Fatal(err)
        }
        if err := os.WriteFile("example.mp4", videoBytes, 0644); err != nil {
            log.Fatal(err)
        }
    }
}
REST
curl -X POST "https://generativelanguage.googleapis.com/v1beta/interactions?key=$API_KEY" \
-H "Content-Type: application/json" \
-d '{
 "model": "gemini-omni-1.1-flash",
 "previous_interaction_id": "'"$PREVIOUS_ID"'",
 "input": "Make the violin invisible."
}'
最初の動画の例:
編集済み動画の例:
会話のターンごとに新しい動画が生成されます。このモデルは以前のターンのコンテキストを理解しているため、シーン全体を再記述しなくても、照明の調整や背景の入れ替えなどの増分変更を行うことができます。
自分の動画を編集する
Files API を使用して動画をアップロードし、Gemini Omni Flash で編集します。
次の例は、元の動画を編集する方法を示しています。
Python
import time
import base64
from google import genai

client = genai.Client()

# Upload video using the file API
video_file = client.files.upload(file="Video.mp4")

while video_file.state == "PROCESSING":
    print('Waiting for video to be processed.')
    time.sleep(10)
    video_file = client.files.get(name=video_file.name)

if video_file.state == "FAILED":
  raise ValueError(video_file.state)
print(f'Video processing complete: ' + video_file.uri)

# Edit your video
interaction = client.interactions.create(
    model="gemini-omni-1.1-flash",
    input=[
        {"type": "video", "uri": video_file.uri},
        {"type": "text", "text": "When the person touches the mirror, make the mirror ripple beautifully like liquid, and the person's arm turns into reflective mirror material"}
    ],
)
with open("example.mp4", "wb") as f:
    f.write(base64.b64decode(interaction.output_video.data))
JavaScript
import { GoogleGenAI } from '@google/genai';
import * as fs from 'fs';
const ai = new GoogleGenAI({});

// Upload video using the file API
let videoFile = await ai.files.upload({
  file: 'Video.mp4',
});

while (videoFile.state === 'PROCESSING') {
  console.log('Waiting for video to be processed.');
  await new Promise(r => setTimeout(r, 10000));
  videoFile = await ai.files.get({ name: videoFile.name });
}

if (videoFile.state === 'FAILED') {
  throw new Error(videoFile.state);
}
console.log('Video processing complete: ' + videoFile.uri);

// Edit your video
const interaction = await ai.interactions.create({
  model: 'gemini-omni-1.1-flash',
  input: [
    { type: 'video', uri: videoFile.uri },
    { type: 'text', text: "When the person touches the mirror, make the mirror ripple beautifully like liquid, and the person's arm turns into reflective mirror material" }
  ],
});

if (interaction.output_video?.data) {
  fs.writeFileSync('example.mp4', Buffer.from(interaction.output_video.data, 'base64'));
}
Java
import com.google.genai.Client;
import com.google.genai.gaos.models.interactions.Content;
import com.google.genai.gaos.models.interactions.CreateModelInteraction;
import com.google.genai.gaos.models.interactions.Interaction;
import com.google.genai.gaos.models.interactions.InteractionsInput;
import com.google.genai.gaos.models.interactions.Model;
import com.google.genai.gaos.models.interactions.TextContent;
import com.google.genai.gaos.models.interactions.VideoContent;
import com.google.genai.gaos.models.operations.CreateInteractionRequestBody;
import com.google.genai.types.File;
import com.google.genai.types.FileState;
import com.google.genai.types.UploadFileConfig;
import java.nio.file.Files;
import java.nio.file.Paths;
import java.util.Arrays;
import java.util.Base64;
import java.util.List;

Client client = new Client();

// Upload video using the file API
File videoFile =
    client.files.upload("Video.mp4", UploadFileConfig.builder().mimeType("video/mp4").build());

while (videoFile.state().isPresent()
    && videoFile.state().get().knownEnum() == FileState.Known.PROCESSING) {
  System.out.println("Waiting for video to be processed.");
  Thread.sleep(10000);
  videoFile = client.files.get(videoFile.name().get(), null);
}

if (videoFile.state().isPresent()
    && videoFile.state().get().knownEnum() == FileState.Known.FAILED) {
  throw new IllegalStateException("Video processing failed: " + videoFile.state().get());
}
System.out.println("Video processing complete: " + videoFile.uri().orElse(""));

// Edit your video
Content videoContent = VideoContent.builder().uri(videoFile.uri().get()).build();
Content textContent =
    TextContent.builder()
        .text(
            "When the person touches the mirror, make the mirror ripple beautifully like liquid, and the person's arm turns into reflective mirror material")
        .build();

List<Content> contents = Arrays.asList(videoContent, textContent);

CreateModelInteraction params =
    CreateModelInteraction.builder()
        .model(Model.of("gemini-omni-1.1-flash"))
        .input(InteractionsInput.ofContent(contents))
        .build();

Interaction interaction =
    client.interactions.create(CreateInteractionRequestBody.of(params)).interaction().get();

if (interaction.outputVideo().isPresent() && interaction.outputVideo().get().data().isPresent()) {
  byte[] videoBytes = Base64.getDecoder().decode(interaction.outputVideo().get().data().get());
  Files.write(Paths.get("example.mp4"), videoBytes);
}
Go
package main

import (
    "context"
    "encoding/base64"
    "fmt"
    "log"
    "os"
    "time"

    "google.golang.org/genai"
    "google.golang.org/genai/interactions/models/interactions"
    "google.golang.org/genai/interactions/models/operations"
)

func main() {
    ctx := context.Background()
    client, err := genai.NewClient(ctx, nil)
    if err != nil {
        log.Fatal(err)
    }

    // Upload video using the file API
    videoFile, err := client.Files.UploadFromPath(ctx, "Video.mp4", &genai.UploadFileConfig{
        MIMEType: "video/mp4",
    })
    if err != nil {
        log.Fatal(err)
    }

    for videoFile.State == genai.FileStateProcessing {
        fmt.Println("Waiting for video to be processed.")
        time.Sleep(10 * time.Second)
        videoFile, err = client.Files.Get(ctx, videoFile.Name, nil)
        if err != nil {
            log.Fatal(err)
        }
    }

    if videoFile.State == genai.FileStateFailed {
        log.Fatalf("Video processing failed: %s", videoFile.State)
    }
    fmt.Printf("Video processing complete: %s\n", videoFile.URI)

    // Edit your video
    contents := []interactions.Content{
        interactions.NewContent(interactions.VideoContent{
            URI: genai.Ptr(videoFile.URI),
        }),
        interactions.NewContent(interactions.TextContent{
            Text: "When the person touches the mirror, make the mirror ripple beautifully like liquid, and the person's arm turns into reflective mirror material",
        }),
    }

    res, err := client.Interactions.Create(ctx, operations.CreateInteractionRequest{
        Body: operations.NewCreateInteractionRequestBody(interactions.CreateModelInteraction{
            Model: interactions.Model("gemini-omni-1.1-flash"),
            Input: interactions.NewInteractionsInput(contents),
        }),
    })
    if err != nil {
        log.Fatal(err)
    }

    if res.Interaction.OutputVideo != nil && res.Interaction.OutputVideo.Data != nil {
        videoBytes, err := base64.StdEncoding.DecodeString(*res.Interaction.OutputVideo.Data)
        if err != nil {
            log.Fatal(err)
        }
        if err := os.WriteFile("example.mp4", videoBytes, 0644); err != nil {
            log.Fatal(err)
        }
    }
}
REST
#!/bin/bash
VIDEO_B64=$(encode_file "$VIDEO_FILE")

curl -sS -w "\n[HTTP %{http_code}]\n" "https://generativelanguage.googleapis.com/v1beta/interactions" \
  -H "x-goog-api-key: ${API_KEY}" \
  -H "Content-Type: application/json" \
  -d @- <<EOF > video_editing_response.json
{
  "model": "gemini-omni-1.1-flash",
  "input": [
    {
      "type": "user_input",
      "content": [
        {
          "type": "video",
          "mime_type": "video/mp4",
          "data": "$VIDEO_B64"
        },
        {
          "type": "text",
          "text": "When the person touches the mirror, make the mirror ripple beautifully like liquid, and the person's arm turns into reflective mirror material"
        }
      ]
    }
  ],
  "response_format": { "type": "video" }
}
EOF
編集済み動画の例:
URI を使用して動画を取得する
response_format の delivery="uri" パラメータを使用して、4 MB を超える生成された動画を取得します。これにより、動画が ACTIVE になるまでポーリングできる Google がホストする URI が返されます。
Python
import time
from google import genai

client = genai.Client()

# 1. Request video via URI delivery
interaction = client.interactions.create(
    model="gemini-omni-1.1-flash",
    input="A beautiful sunset.",
    response_format={"type": "video", "delivery": "uri"}
)

# 2. Extract file name and poll for ACTIVE state
video_output = interaction.output_video
file_name = video_output.uri.split("/")[-1] # Extract ID

print("Waiting for video processing...")
while True:
    f_info = client.files.get(name=f"files/{file_name}")
    if f_info.state.name == "ACTIVE":
        break
    elif f_info.state.name == "FAILED":
        raise RuntimeError("Generation failed.")
    time.sleep(5)

# 3. Download the final video
client.files.download(file=video_output.uri, destination="output.mp4")
JavaScript
import { GoogleGenAI } from '@google/genai';
const ai = new GoogleGenAI({});

// 1. Request video using URI delivery
const interaction = await ai.interactions.create({
  model: 'gemini-omni-1.1-flash',
  input: 'A beautiful sunset.',
  response_format: { type: 'video', delivery: 'uri' },
});

// 2. Extract filename and poll for ACTIVE state
const videoOutput = interaction.output_video;
const fileId = videoOutput.uri.match(/files\/([a-zA-Z0-9]+)/)[1];
const name = `files/${fileId}`;

console.log("Waiting for video processing...");
while (true) {
  const fInfo = await ai.files.get({ name });
  if (fInfo.state.name === 'ACTIVE') break;
  if (fInfo.state.name === 'FAILED') throw new Error("Generation failed.");
  await new Promise(r => setTimeout(r, 5000));
}

// 3. Download the final video
await ai.files.download({
  file: videoOutput,
  downloadPath: 'output.mp4',
});
console.log("💾 Saved video to output.mp4");
Java
import com.google.genai.Client;
import com.google.genai.gaos.models.interactions.CreateModelInteraction;
import com.google.genai.gaos.models.interactions.CreateModelInteractionResponseFormat;
import com.google.genai.gaos.models.interactions.Interaction;
import com.google.genai.gaos.models.interactions.InteractionsInput;
import com.google.genai.gaos.models.interactions.Model;
import com.google.genai.gaos.models.interactions.ResponseFormat;
import com.google.genai.gaos.models.interactions.VideoContent;
import com.google.genai.gaos.models.interactions.VideoResponseFormat;
import com.google.genai.gaos.models.interactions.VideoResponseFormatDelivery;
import com.google.genai.gaos.models.operations.CreateInteractionRequestBody;
import com.google.genai.types.File;
import com.google.genai.types.FileState;

Client client = new Client();

// 1. Request video using URI delivery
VideoResponseFormat videoFormat =
    VideoResponseFormat.builder()
        .delivery(VideoResponseFormatDelivery.URI)
        .build();

CreateModelInteraction params =
    CreateModelInteraction.builder()
        .model(Model.of("gemini-omni-1.1-flash"))
        .input(InteractionsInput.of("A beautiful sunset."))
        .responseFormat(CreateModelInteractionResponseFormat.of(ResponseFormat.of(videoFormat)))
        .build();

Interaction interaction =
    client.interactions.create(CreateInteractionRequestBody.of(params)).interaction().get();

// 2. Extract filename and poll for ACTIVE state
VideoContent videoOutput = interaction.outputVideo().get();
String uri = videoOutput.uri().get();
String[] parts = uri.split("/");
String fileName = parts[parts.length - 1];

System.out.println("Waiting for video processing...");
while (true) {
  File fileInfo = client.files.get("files/" + fileName, null);
  if (fileInfo.state().isPresent()
      && fileInfo.state().get().knownEnum() == FileState.Known.ACTIVE) {
    break;
  } else if (fileInfo.state().isPresent()
      && fileInfo.state().get().knownEnum() == FileState.Known.FAILED) {
    throw new RuntimeException("Generation failed.");
  }
  Thread.sleep(5000);
}

// 3. Download the final video
client.files.download(uri, "output.mp4", null);
Go
package main

import (
    "context"
    "fmt"
    "log"
    "os"
    "strings"
    "time"

    "google.golang.org/genai"
    "google.golang.org/genai/interactions/models/interactions"
    "google.golang.org/genai/interactions/models/operations"
)

func main() {
    ctx := context.Background()
    client, err := genai.NewClient(ctx, nil)
    if err != nil {
        log.Fatal(err)
    }

    // 1. Request video using URI delivery
    videoFormat := interactions.VideoResponseFormat{
        Delivery: interactions.VideoResponseFormatDeliveryURI.ToPointer(),
    }

    res, err := client.Interactions.Create(ctx, operations.CreateInteractionRequest{
        Body: operations.NewCreateInteractionRequestBody(interactions.CreateModelInteraction{
            Model: interactions.Model("gemini-omni-1.1-flash"),
            Input: interactions.NewInteractionsInput("A beautiful sunset."),
            ResponseFormat: genai.Ptr(interactions.NewCreateModelInteractionResponseFormat(
                interactions.NewResponseFormat(videoFormat),
            )),
        }),
    })
    if err != nil {
        log.Fatal(err)
    }

    // 2. Extract filename and poll for ACTIVE state
    uri := *res.Interaction.OutputVideo.URI
    parts := strings.Split(uri, "/")
    fileName := parts[len(parts)-1]

    fmt.Println("Waiting for video processing...")
    var fileInfo *genai.File
    for {
        fileInfo, err = client.Files.Get(ctx, "files/"+fileName, nil)
        if err != nil {
            log.Fatal(err)
        }
        if fileInfo.State == genai.FileStateActive {
            break
        } else if fileInfo.State == genai.FileStateFailed {
            log.Fatal("Generation failed.")
        }
        time.Sleep(5 * time.Second)
    }

    // 3. Download the final video
    videoBytes, err := client.Files.Download(ctx, genai.NewDownloadURIFromFile(fileInfo), nil)
    if err != nil {
        log.Fatal(err)
    }
    if err := os.WriteFile("output.mp4", videoBytes, 0644); err != nil {
        log.Fatal(err)
    }
}
REST
#!/bin/bash

# 1. Initial request to generate the video
RESPONSE=$(curl -s -X POST "https://generativelanguage.googleapis.com/v1beta/interactions?key=$API_KEY" \
-H "Content-Type: application/json" \
-d '{
 "model": "gemini-omni-1.1-flash",
 "input": "A beautiful sunset over a calm ocean.",
 "response_format": {"type": "video", "delivery": "uri"}
}')

# Extract FILE_ID from the URI (e.g., "files/abc-123" -> "abc-123")
FILE_URI=$(echo $RESPONSE | jq -r '.output_video.uri')
FILE_ID=$(echo $FILE_URI | cut -d'/' -f2)

echo "Video requested (ID: $FILE_ID). Waiting for processing..."

# 2. Polling loop
while true; do
 # Get current file status
 STATUS_JSON=$(curl -s -X GET "https://generativelanguage.googleapis.com/v1beta/files/$FILE_ID?key=$API_KEY")
 STATE=$(echo $STATUS_JSON | jq -r '.state')

 if [ "$STATE" == "ACTIVE" ]; then
   echo "Processing complete! Downloading..."
   break
 elif [ "$STATE" == "FAILED" ]; then
   echo "Error: Generation failed."
   exit 1
 else
   echo "Current state: $STATE... (waiting 5s)"
   sleep 5
 fi
done

# 3. Final download
curl -L -X GET "https://generativelanguage.googleapis.com/v1beta/files/$FILE_ID:download?alt=media&key=$API_KEY" \
--output "output.mp4"

echo "Done! Video saved to output.mp4"
未加工の REST JSON 構造(URI):
{
  "steps": [
    { "type": "user_input", "content": [{"type": "text", "text": "..."}] },
    { "type": "thought", "content": [{"text": "...", "type": "thought"}] },
    {
      "type": "model_output",
      "content": [
        {
          "type": "video",
          "mime_type": "video/mp4",
          "uri": "https://generativelanguage.googleapis.com/v1beta/files/...:download?alt=media"
        }
      ]
    }
  ],
  "id": "v1_...",
  "status": "completed",
  "model": "gemini-omni-1.1-flash",
  "object": "interaction"
}
動画表示オプション
既存の動画を拡張し、クリップの末尾にシームレスな続きを生成します。プロンプトで、動画をどのように続けたいかを説明します(例: "Extend this video"、"Continue the scene: the camera pans across the mountains")。モデルは入力動画を分析して、3 ~ 10 秒の続きを生成します。
延長できるのは次のとおりです。
- モデルによって生成された動画(マルチターン): 以前に生成された動画の
previous_interaction_idを参照して、動画を拡張します。 アップロードされた動画: 拡張機能のプロンプトとともに、アップロードされた動画ファイル(Files API 経由)を提供します。
Python
import base64
from google import genai

client = genai.Client()

# Upload your video using the Files API
video_file = client.files.upload(file="my_video.mp4")

# Extend the video using prompt-based extension
interaction = client.interactions.create(
    model="gemini-omni-1.1-flash",
    input=[
        {"type": "video", "uri": video_file.uri},
        {"type": "text", "text": "Continue the scene."}
    ],
)
with open("extended.mp4", "wb") as f:
    f.write(base64.b64decode(interaction.output_video.data))
JavaScript
import { GoogleGenAI } from '@google/genai';
import * as fs from 'fs';
const ai = new GoogleGenAI({});

// Upload your video using the Files API
let videoFile = await ai.files.upload({
  file: 'my_video.mp4',
});

while (videoFile.state === 'PROCESSING') {
  await new Promise(r => setTimeout(r, 10000));
  videoFile = await ai.files.get({ name: videoFile.name });
}

// Extend the video using prompt-based extension
const interaction = await ai.interactions.create({
  model: 'gemini-omni-1.1-flash',
  input: [
    { type: 'video', uri: videoFile.uri },
    { type: 'text', text: 'Continue the scene.' }
  ],
});

if (interaction.output_video?.data) {
  fs.writeFileSync('extended.mp4', Buffer.from(interaction.output_video.data, 'base64'));
}
Java
import com.google.genai.Client;
import com.google.genai.gaos.models.interactions.Content;
import com.google.genai.gaos.models.interactions.CreateModelInteraction;
import com.google.genai.gaos.models.interactions.Interaction;
import com.google.genai.gaos.models.interactions.InteractionsInput;
import com.google.genai.gaos.models.interactions.Model;
import com.google.genai.gaos.models.interactions.TextContent;
import com.google.genai.gaos.models.interactions.VideoContent;
import com.google.genai.gaos.models.operations.CreateInteractionRequestBody;
import com.google.genai.types.File;
import com.google.genai.types.UploadFileConfig;
import java.nio.file.Files;
import java.nio.file.Paths;
import java.util.Arrays;
import java.util.Base64;
import java.util.List;

Client client = new Client();

// Upload your video using the Files API
File videoFile =
    client.files.upload(
        "my_video.mp4", UploadFileConfig.builder().mimeType("video/mp4").build());

// Extend the video using prompt-based extension
Content videoContent = VideoContent.builder().uri(videoFile.uri().get()).build();
Content textContent = TextContent.builder().text("Continue the scene.").build();

List<Content> contents = Arrays.asList(videoContent, textContent);

CreateModelInteraction params =
    CreateModelInteraction.builder()
        .model(Model.of("gemini-omni-1.1-flash"))
        .input(InteractionsInput.ofContent(contents))
        .build();

Interaction interaction =
    client.interactions.create(CreateInteractionRequestBody.of(params)).interaction().get();

if (interaction.outputVideo().isPresent() && interaction.outputVideo().get().data().isPresent()) {
  byte[] videoBytes = Base64.getDecoder().decode(interaction.outputVideo().get().data().get());
  Files.write(Paths.get("extended.mp4"), videoBytes);
}
Go
package main

import (
    "context"
    "encoding/base64"
    "log"
    "os"

    "google.golang.org/genai"
    "google.golang.org/genai/interactions/models/interactions"
    "google.golang.org/genai/interactions/models/operations"
)

func main() {
    ctx := context.Background()
    client, err := genai.NewClient(ctx, nil)
    if err != nil {
        log.Fatal(err)
    }

    // Upload your video using the Files API
    videoFile, err := client.Files.UploadFromPath(ctx, "my_video.mp4", &genai.UploadFileConfig{
        MIMEType: "video/mp4",
    })
    if err != nil {
        log.Fatal(err)
    }

    // Extend the video using prompt-based extension
    contents := []interactions.Content{
        interactions.NewContent(interactions.VideoContent{
            URI: genai.Ptr(videoFile.URI),
        }),
        interactions.NewContent(interactions.TextContent{
            Text: "Continue the scene.",
        }),
    }

    res, err := client.Interactions.Create(ctx, operations.CreateInteractionRequest{
        Body: operations.NewCreateInteractionRequestBody(interactions.CreateModelInteraction{
            Model: interactions.Model("gemini-omni-1.1-flash"),
            Input: interactions.NewInteractionsInput(contents),
        }),
    })
    if err != nil {
        log.Fatal(err)
    }

    if res.Interaction.OutputVideo != nil && res.Interaction.OutputVideo.Data != nil {
        videoBytes, err := base64.StdEncoding.DecodeString(*res.Interaction.OutputVideo.Data)
        if err != nil {
            log.Fatal(err)
        }
        if err := os.WriteFile("extended.mp4", videoBytes, 0644); err != nil {
            log.Fatal(err)
        }
    }
}
REST
curl -X POST "https://generativelanguage.googleapis.com/v1beta/interactions?key=$API_KEY"     -H "Content-Type: application/json"     -d '{
 "model": "gemini-omni-1.1-flash",
 "input": [
   {"type": "video", "uri": "'"$VIDEO_URI"'"},
   {"type": "text", "text": "Continue the scene."}
 ]
}'
参照メディアで拡張する
プロンプトとともに input 配列で参照画像を指定すると、新しいキャラクターや要素を拡張動画に導入できます。
Python
import base64
from google import genai

client = genai.Client()

# Upload base video and reference image using the Files API
video_file = client.files.upload(file="my_video.mp4")
character_img = client.files.upload(file="character.png")

# Extend the video while introducing the reference character
interaction = client.interactions.create(
    model="gemini-omni-1.1-flash",
    input=[
        {"type": "video", "uri": video_file.uri},
        {"type": "image", "uri": character_img.uri},
        {"type": "text", "text": "Extend this video: have the character shown in <IMAGE_REF_0> enter the scene and wave."}
    ],
)
with open("extended_with_character.mp4", "wb") as f:
    f.write(base64.b64decode(interaction.output_video.data))
JavaScript
import { GoogleGenAI } from '@google/genai';
import * as fs from 'fs';
const ai = new GoogleGenAI({});

// Upload base video and reference image using the Files API
let videoFile = await ai.files.upload({ file: 'my_video.mp4' });
let characterImg = await ai.files.upload({ file: 'character.png' });

while (videoFile.state === 'PROCESSING' || characterImg.state === 'PROCESSING') {
  await new Promise(r => setTimeout(r, 10000));
  videoFile = await ai.files.get({ name: videoFile.name });
  characterImg = await ai.files.get({ name: characterImg.name });
}

// Extend the video while introducing the reference character
const interaction = await ai.interactions.create({
  model: 'gemini-omni-1.1-flash',
  input: [
    { type: 'video', uri: videoFile.uri },
    { type: 'image', uri: characterImg.uri },
    { type: 'text', text: 'Extend this video: have the character shown in <IMAGE_REF_0> enter the scene and wave.' }
  ],
});

if (interaction.output_video?.data) {
  fs.writeFileSync('extended_with_character.mp4', Buffer.from(interaction.output_video.data, 'base64'));
}
Java
import com.google.genai.Client;
import com.google.genai.gaos.models.interactions.Content;
import com.google.genai.gaos.models.interactions.CreateModelInteraction;
import com.google.genai.gaos.models.interactions.ImageContent;
import com.google.genai.gaos.models.interactions.Interaction;
import com.google.genai.gaos.models.interactions.InteractionsInput;
import com.google.genai.gaos.models.interactions.Model;
import com.google.genai.gaos.models.interactions.TextContent;
import com.google.genai.gaos.models.interactions.VideoContent;
import com.google.genai.gaos.models.operations.CreateInteractionRequestBody;
import com.google.genai.types.File;
import com.google.genai.types.UploadFileConfig;
import java.nio.file.Files;
import java.nio.file.Paths;
import java.util.Arrays;
import java.util.Base64;
import java.util.List;

Client client = new Client();

// Upload base video and reference image using the Files API
File videoFile =
    client.files.upload(
        "my_video.mp4", UploadFileConfig.builder().mimeType("video/mp4").build());
File characterImg =
    client.files.upload(
        "character.png", UploadFileConfig.builder().mimeType("image/png").build());

// Extend the video while introducing the reference character
Content videoContent = VideoContent.builder().uri(videoFile.uri().get()).build();
Content imageContent = ImageContent.builder().uri(characterImg.uri().get()).build();
Content textContent =
    TextContent.builder()
        .text(
            "Extend this video: have the character shown in <IMAGE_REF_0> enter the scene and wave.")
        .build();

List<Content> contents = Arrays.asList(videoContent, imageContent, textContent);

CreateModelInteraction params =
    CreateModelInteraction.builder()
        .model(Model.of("gemini-omni-1.1-flash"))
        .input(InteractionsInput.ofContent(contents))
        .build();

Interaction interaction =
    client.interactions.create(CreateInteractionRequestBody.of(params)).interaction().get();

if (interaction.outputVideo().isPresent() && interaction.outputVideo().get().data().isPresent()) {
  byte[] videoBytes = Base64.getDecoder().decode(interaction.outputVideo().get().data().get());
  Files.write(Paths.get("extended_with_character.mp4"), videoBytes);
}
Go
package main

import (
    "context"
    "encoding/base64"
    "log"
    "os"

    "google.golang.org/genai"
    "google.golang.org/genai/interactions/models/interactions"
    "google.golang.org/genai/interactions/models/operations"
)

func main() {
    ctx := context.Background()
    client, err := genai.NewClient(ctx, nil)
    if err != nil {
        log.Fatal(err)
    }

    // Upload base video and reference image using the Files API
    videoFile, err := client.Files.UploadFromPath(ctx, "my_video.mp4", &genai.UploadFileConfig{
        MIMEType: "video/mp4",
    })
    if err != nil {
        log.Fatal(err)
    }
    characterImg, err := client.Files.UploadFromPath(ctx, "character.png", &genai.UploadFileConfig{
        MIMEType: "image/png",
    })
    if err != nil {
        log.Fatal(err)
    }

    // Extend the video while introducing the reference character
    contents := []interactions.Content{
        interactions.NewContent(interactions.VideoContent{
            URI: genai.Ptr(videoFile.URI),
        }),
        interactions.NewContent(interactions.ImageContent{
            URI: genai.Ptr(characterImg.URI),
        }),
        interactions.NewContent(interactions.TextContent{
            Text: "Extend this video: have the character shown in <IMAGE_REF_0> enter the scene and wave.",
        }),
    }

    res, err := client.Interactions.Create(ctx, operations.CreateInteractionRequest{
        Body: operations.NewCreateInteractionRequestBody(interactions.CreateModelInteraction{
            Model: interactions.Model("gemini-omni-1.1-flash"),
            Input: interactions.NewInteractionsInput(contents),
        }),
    })
    if err != nil {
        log.Fatal(err)
    }

    if res.Interaction.OutputVideo != nil && res.Interaction.OutputVideo.Data != nil {
        videoBytes, err := base64.StdEncoding.DecodeString(*res.Interaction.OutputVideo.Data)
        if err != nil {
            log.Fatal(err)
        }
        if err := os.WriteFile("extended_with_character.mp4", videoBytes, 0644); err != nil {
            log.Fatal(err)
        }
    }
}
REST
curl -X POST "https://generativelanguage.googleapis.com/v1beta/interactions?key=$API_KEY"     -H "Content-Type: application/json"     -d '{
 "model": "gemini-omni-1.1-flash",
  "input": [
    {"type": "video", "uri": "'$VIDEO_URI'"},
    {"type": "image", "uri": "'$CHARACTER_IMG_URI'"},
    {"type": "text", "text": "Extend this video: have the character shown in <IMAGE_REF_0> enter the scene and wave."}
  ]
}'
拡張機能の制約とガイドライン
動画を延長する際は、次のルールと制約に注意してください。
- アップロードされた動画の会話: 現在、アップロードされた動画で誰かが話している部分を延長して会話を追加することはできません(キャラクターが沈黙している場合や、プロンプトで会話が追加されない場合は可能です)。
- マルチターンの音声拡張: マルチターン(
previous_interaction_id)で以前に生成した動画を拡張する場合、会話や音声の生成がサポートされます。 - クリップの末尾のみ: 拡張機能は動画の末尾への追加に限定されます。クリップの先頭にコンテンツを追加したり、クリップの中間を延長したりすることはできません。
- 再生時間の制限: 拡張機能用の動画は、アップロード時に 10 秒以下である必要があります(マルチターンを使用する場合を除く)。
- 地域での提供状況: 現在、欧州経済領域(EEA)、スイス、英国にお住まいのユーザーは、アップロードした動画を延長することはできません(モデルによって生成された動画の延長は、利用可能なすべての地域でサポートされています)。
ベスト プラクティス
- 大きな動画には URI 配信を使用する: 4 MB を超える動画(720p 超の動画が利用可能な場合)では、
response_formatのdelivery="uri"を使用して、ペイロード サイズの上限を超えないようにします。 - パフォーマンスの最適化: より高速な同期単項生成のために、
background=false、store=false、stream=falseを設定します。store=falseを設定すると、生成された動画はprevious_interaction_idを使用して後続のターンで編集できなくなります。 - プロンプトの精度: 詳しくは、プロンプトのガイダンスをご覧ください。
制限事項
- 欧州経済領域、スイス、英国では、未成年者が写っている画像のアップロードと編集は対象外です。
- 特定の人物が写っている画像をアップロードしたり編集したりすることは対象外です。
- 現在、欧州経済領域(EEA)、スイス、英国にお住まいのユーザーは、アップロードした動画の編集や延長はご利用いただけません(モデルによって生成された動画の編集や延長はサポートされています)。
- 編集と拡張用の入力動画は、アップロード時に 10 秒以下である必要があります(マルチターンのモデルで生成された動画を拡張する場合を除く)。
- 動画の延長は動画の末尾への追加に限定されます。クリップの先頭への追加やクリップの中間への延長は対象外です。
- アップロードした動画で誰かが話している場合、追加のセリフを追加することはできません(キャラクターは無言のままにすることも、
previous_interaction_idを使用してマルチターンの拡張を行うこともできます)。 - 音声編集はサポートされていません。
- 現在のバージョンの API では、音声リファレンスのアップロードはサポートされていません。
- 動画の参照は肖像権に最適です。動画の参照に含まれる音声は無視されます。動画リファレンスでは、最大 3 つのクリップ(それぞれ最大 3 秒)をサポートしています。
- 複数の動画を参照したり、複数の動画にわたって推論したりすることはできません。マルチ動画プロンプトを試すと、モデルのパフォーマンスが低下したり、予期しない出力が生成されたりする可能性があります。
- プロビジョンド スループットは対象外です。
- システム指示、温度、
top_p、停止シーケンス、否定的なプロンプトはサポートされていません(否定的なプロンプトは通常のプロンプトに入れることができます。例: 「X を行わないで」)。 - YouTube 動画をメディアソースとして使用することはできません。
詳細な技術情報
- 生成されたすべての動画には、SynthID の透かしが埋め込まれています。この透かしは視聴者には見えませんが、プログラムで検出して出所を確認できます。
- 動画の生成時間は、長さ、解像度、現在の API の負荷によって異なります。動画の長さが長く、解像度が高いほど、生成に時間がかかります。
- Omni は、入力プロンプトと生成された動画の両方にコンテンツ安全フィルタを適用します(地域によって異なります)。使用ポリシーに違反するプロンプトはブロックされます。
- 英語(EN)は完全にサポートされていますが、他の言語は評価されていないため、機能する可能性はありますが、結果は異なる場合があります。
Gemini Omni Flash プロンプト ガイド
このセクションでは、Gemini Omni Flash を効果的にプロンプトする方法に関するヒントと例を紹介します。
単一シーン
デフォルトでは、Omni Flash はいくつかの異なるショットを含む動画を作成しようとします。プロンプトに基づいて、興味深い物語を作成しようとします。
出力動画に 1 つのシーンを含める必要がある場合は、そのようにプロンプトする必要があります。
- 1 つの途切れないシーンで
- 連続した 1 回の撮影で
- シーンのカットなし
次に例を示します。
Continuous, unbroken handheld shot of a fluffy tabby cat sitting on a sunny windowsill, looking out into a leafy garden. The cat's tail twitches slowly, and its ears rotate slightly toward ambient noises. Sunbeams illuminate dust motes in the air. Sound design: Gentle breeze, distant bird chirps. No dialogue.
不要な要素を削除する
生成された動画に不要なものが含まれている場合は、簡単な否定プロンプトを追加して、それらが含まれないようにします。
- 会話なし
- 装飾なし
- 追加の効果音なし
編集のプロンプト
動画編集にはシンプルなプロンプトが最適です。プロンプトが過度に説明的であると、意図しない変更が発生する可能性があります。
以下に、簡単な編集プロンプトの例をいくつか示します。
- この動画をアニメ風にする
- この人物にファッショナブルな帽子をかぶせて
- 照明をドラマチックに変更して
- 看板のテキストを「Omni Flash」に変更して
動画の特定のアスペクトを編集する場合は、"Keep everything else the same" を含めて視覚的な一貫性を維持します。
この手法の適用方法を示す例を次に示します。
- 避けるべきこと:
In the video of the man sitting on the sofa, please add a small black cat that runs from the right side of the screen, jumps onto his lap, and then he starts to stroke its head while looking down.- シンプルにする:
Add a cat that jumps onto his lap, he begins to pet it.
Keep everything else the same.
- シンプルにする:
- 避けるべきこと:
Please remove the cell phone that the person is holding in their hand and fill in the background so it looks like they are just holding their hand empty.- シンプルにする:
Make the phone invisible. Keep everything else the
same.
- シンプルにする:
音声のプロンプト
デフォルトでは、モデルは動画に適した音声トラックを生成しようとします。この動作が常に望ましいとは限りません。プロンプトを使用して、必要な音声の種類を記述できます。これは、動画に音楽を使用する場合に特に重要です。
- 穏やかなバックグラウンド ミュージックを含める
- 動画にはエネルギッシュなテクノビートが使われています
- 音声は、バックグラウンドでラジオ放送が流れており、曲が再生されている
タイミング イベント
動画内の特定のタイミングで発生する事柄をプロンプトで指定できます。正確な構文は必要なく、自然言語を使用できます。これは、独自のシーン カット、リズム、連射シーケンスを作成する場合に特に便利です。例については、以下をご覧ください。
- 3 秒後、女性がシーンに入ります。
- 5 秒で、バックグラウンド オーディオでサビが始まります。
- 2 秒ごとに新しいフレームにカットします。
- ラピッド ファイア シーケンスでは、0.5 秒ごと(24 fps で 12 フレーム)にシーンを新しい場所に切り替えます。
タイムコード構文を使用することもできます。
[0-3s] A person is walking
[3-6s] They stop and turn around
[6-10s] They start running
メタプロンプト
Gemini Omni Flash に、動画生成の一般的な品質や原則に注意するよう指示できます。
- 微細なディテール、表情、タイミングを考慮して、非常に豊かで詳細でありながら、完全に自然なシーンを作成します。
- キャラクターと環境の説明は、非常に詳細に記述します。キャラクターに衣装デザインの原則を適用します。シーン内の人物、アイテム、オブジェクトを具体的に指定します。
- 背景要素に適切な詳細をたくさん含めて、シーンをリアルで自然なものにします。
- 1 秒ごとに異なるレアな
[thing]を表示する、アップビートな音楽が流れる動画を作成し、テキストでラベルを付けます。
動画内のテキスト
動画にテキストを含めるようにプロンプトを入力すると、Gemini Omni が正しく読みやすいようにレンダリングします。動画内にテキストが自然に表示される場合(背景要素など)、そのテキストの内容を定義しておくとよいでしょう。
- 画面に一度に 1 単語ずつ表示される: 「did, you, know, that, Omni, can, do, awesome, text?」各単語は 1 秒間表示され、アニメーション スタイルはそれぞれ異なります。セリフなし。
- 「This is an AI generation by Omni」と書かれた道路標識、店舗の看板に「All you need AI」と書かれている、ナンバープレートに「OMNI1.1」と書かれた車がある
動画の続きを生成するためのプロンプト
Gemini Omni 1.1 Flash を使用すると、"Extend this video" や "The scene continues" などのプロンプトで動画を延長できます。動画は 10 秒ずつ延長でき、合計 40 秒まで延長できます。
Omni は、元の動画の最後の 10 秒をコンテキストとして使用して、動画、モーション、キャラクター、音声の整合性を維持する拡張機能を作成します。入力動画の最後のフレームの一部が編集され、トランジションがシームレスになります。
拡張する場合、このガイドの Omni プロンプトのヒントはすべて引き続き適用されます。
- 拡張シーンの音声について説明します。特に、変更が必要な場合は説明してください。
"The music continues into the chorus" - シーンが継続するか、新しいシーンにカットされるか(同じキャラクターが登場する可能性もあります)を説明します。
"Show the same characters in the next scene" - 拡張時に画像や動画を参照として含めると、出力の精度を高めたり、新しいキャラクターを導入したりできます。
"The person shown in the reference image enters the scene"、"The dog in the reference video <VIDEO_REF_0> jumps onto the sofa" - タイムスタンプまたはタイムコード構文を使用している場合、0 秒は動画の拡張部分の開始を指します。10 秒の動画を延長する場合、このプロンプトのシーンカットは 12 秒後に行われます。
"After 2s cut to a new scene with the same characters"
プロンプトでタグを使用して画像と動画の役割を設定する
タグを使用すると、アップロードしたメディアを特定の生成ロールにバインドできます。これにより、各画像または動画が開始フレーム、最終フレーム、参照のいずれであるかを指定できます。
1. シンプルなタグ(推奨)
プロンプトからメディアの役割が明確にわかる単純なケースでは、画像と動画を役割に直接バインドできます。
<FIRST_FRAME>: 画像を動画の開始フレームとして使用します。例:<FIRST_FRAME> a woman is walking<LAST_FRAME>: 画像を動画の最後のフレームとして使用し、そのフレームに移行します。<FIRST_FRAME>と併用する必要があります(例:<FIRST_FRAME> <LAST_FRAME> a woman is walking)。<IMAGE_REF_N>: 画像を参照として使用します。例:in the style of <IMAGE_REF_0> a woman <IMAGE_REF_1> is walking(最初の画像のスタイル参照と 2 番目の画像の被写体参照を組み合わせます)。画像参照は 0 から始まります。<VIDEO_REF_N>: 動画をキャラクターまたはオブジェクトの参照として使用します(例:the person in <VIDEO_REF_0> is playing the violin)。動画の参照も 0 から始まります。
6 つの参照画像を含む例を次に示します。
[0-3s] A studio fashion sequence. Starting with woman <IMAGE_REF_0>, she is holding <IMAGE_REF_1>
[3-6s] Then we see the man <IMAGE_REF_2> holding <IMAGE_REF_3>
[6-10s] And finally another woman <IMAGE_REF_4> who is holding <IMAGE_REF_5> while walking.
2. ソースとリファレンスの宣言
複数のメディア入力と複数のロールがある複雑なケースでは、自然言語の指示と明示的な接頭辞タグを組み合わせて使用できます。これらのソースと参照は、プロンプトの冒頭で宣言する必要があります。
[# Sources <FIRST_FRAME>@Image1]は最初の画像を最初のフレームとして使用します。[# Sources <FIRST_FRAME>@Image1 <LAST_FRAME>@Image2]は、最初の画像を開始フレームとして、2 番目の画像を最終フレームとして使用します。[# Sources <FIRST_FRAME>@Image1 <LAST_FRAME>@Image1]は最初の画像を最初と最後のフレームの両方として使用し、ループする動画を作成します。[# Sources <FIRST_FRAME>@Image1] [# References <IMAGE_REF_0>@Image2]は、最初の画像を開始フレームとして、2 番目の画像を参照として使用します。[# Sources <VIDEO_0>@Video1]は、動画を編集または変更するためのプライマリ ソース動画として使用します。[# Sources <PREVIOUS_VIDEO>@Video1]は、前のターンの動画を使用して拡張します。[# References <IMAGE_REF_0>@Image1]は最初の画像をリファレンスとして使用します。[# References <IMAGE_REF_1>@Image2]は 2 つ目の画像を参照として使用します。[# References <IMAGE_REF_0>@Image1 <IMAGE_REF_1>@Image2]は両方の画像を参考資料として使用します。[# References <VIDEO_REF_0>@Video1]は最初の動画を参照として使用します。[# References <IMAGE_REF_0>@Image1 <VIDEO_REF_0>@Video1]は画像と動画の両方を参照として使用します。
プロンプトの末尾に次の指示を追加します。
- 開始フレームの場合:
"Use this image as the starting frame." - 開始フレームと終了フレームによるループ動画の場合:
"Use this image as the first frame and the last frame." - 参照画像の場合:
"Use the given image(s) as references for video generation. The images should not be used as literal initial frames." - 参考動画の場合:
"Use the given video(s) as references. Do not use them as a source for video editing."
ソースと参照の宣言を含むプロンプトの例を次に示します。
開始フレームと参照画像を組み合わせた場合:
[# Sources <FIRST_FRAME>@Image1] [# References <IMAGE_REF_0>@Image2] a woman <IMAGE_REF_0> is walking. Use Image1 as the starting frame. Use Image2 as a reference for the video generation.
キャラクター参照動画とオブジェクト参照画像を組み合わせた場合:
[# References <IMAGE_REF_0>@Image1 <VIDEO_REF_0>@Video1] The woman in <VIDEO_REF_0> is playing the violin shown in <IMAGE_REF_0>. Use Video1 as a character reference and Image1 as an object reference.
次のステップ
- Gemini Omni Flash を使ってみるには、Omni クイックスタートの Colab でテストします。
- プロンプト設計の概要で、より優れたプロンプトを作成する方法をご確認ください。