

Gemini Omni Flash (gemini-omni-1.1-flash) एक मल्टीमॉडल है. यह तेज़ी से वीडियो जनरेट करने, वीडियो में बदलाव करने, और वीडियो को सिनेमाई लुक देने के लिए डिज़ाइन किया गया है.
Gemini Omni को इन मुख्य सुविधाओं के साथ बनाया गया है. ये सुविधाएँ, इसे वीडियो जनरेट करने वाले पिछले मॉडल से अलग बनाती हैं:
- मल्टीमॉडल की सुविधा: यह टेक्स्ट, इमेज, ऑडियो, और वीडियो को एक साथ प्रोसेस करता है. इससे आपको ज़्यादा सटीक, एक जैसा, और कंट्रोल किया जा सकने वाला आउटपुट मिलता है.
- बातचीत करके वीडियो में बदलाव करना: यह सुविधा, Interactions API की मदद से काम करती है. इसकी मदद से, नैचुरल लैंग्वेज में बातचीत करके, वीडियो में बार-बार बदलाव किया जा सकता है. आपको जो बदलाव करने हैं उनके बारे में बताएं. मॉडल, वीडियो के उन हिस्सों को सुरक्षित रखते हुए बदलाव करेगा जिन्हें आपको रखना है.
- दुनिया के बारे में जानकारी: Gemini Omni, फ़िज़िक्स की समझ को इतिहास, विज्ञान, और सांस्कृतिक संदर्भ के बारे में Gemini की जानकारी के साथ जोड़ता है. इससे फ़ोटो को ज़्यादा असली दिखाने से लेकर, कहानी को ज़्यादा दिलचस्प बनाने तक के काम किए जा सकते हैं.
टेक्स्ट से वीडियो जनरेट करने की सुविधा
टेक्स्ट प्रॉम्प्ट की मदद से वीडियो जनरेट करें. मॉडल, आपके दिए गए टेक्स्ट के ब्यौरे के आधार पर ऑडियो के साथ एक वीडियो जनरेट करता है. बेहतर नतीजों के लिए, सीन के बारे में जानकारी, कैमरा मूवमेंट, रोशनी, और मूड जैसी जानकारी के साथ प्रॉम्प्ट लिखें.
Python
import base64
from google import genai

client = genai.Client()

interaction = client.interactions.create(
    model="gemini-omni-1.1-flash",
    input="A marble rolling fast on a chain reaction style track, continuous smooth shot."
)
with open("marble.mp4", "wb") as f:
    f.write(base64.b64decode(interaction.output_video.data))
JavaScript
import { GoogleGenAI } from '@google/genai';
import * as fs from 'fs';
const ai = new GoogleGenAI({});

const interaction = await ai.interactions.create({
  model: 'gemini-omni-1.1-flash',
  input: 'A marble rolling fast on a chain reaction style track, continuous smooth shot.',
});

if (interaction.output_video?.data) {
  fs.writeFileSync('marble.mp4', Buffer.from(interaction.output_video.data, 'base64'));
}
REST
curl -X POST "https://generativelanguage.googleapis.com/v1beta/interactions?key=$API_KEY" \
-H "Content-Type: application/json" \
-d '{
 "model": "gemini-omni-1.1-flash",
 "input": "A marble rolling fast on a chain reaction style track, continuous smooth shot."
}'
REST रिस्पॉन्स स्कीमा
सुविधा के हिसाब से तय की गई कीमत वाला फ़ील्ड interaction.output_video, एसडीके टूल के लिए ही उपलब्ध है.
REST API का सीधे तौर पर इस्तेमाल करते समय, steps ऐरे से वीडियो आउटपुट पाएं.
REST JSON का रॉ स्ट्रक्चर:
{
  "steps": [
    { "type": "user_input", "content": [{"type": "text", "text": "..."}] },
    { "type": "thought", "content": [{"text": "...", "type": "thought"}] },
    {
      "type": "model_output",
      "content": [
        {
          "type": "video",
          "mime_type": "video/mp4",
          "data": "AAAAIGZ0eXBpc29t..." // Base64 encoded video data
        }
      ]
    }
  ],
  "id": "v1_...",
  "status": "completed",
  "model": "gemini-omni-1.1-flash",
  "object": "interaction"
}
आस्पेक्ट रेशियो कंट्रोल करना
पोर्ट्रेट वीडियो बनाने के लिए, aspect_ratio को "9:16" पर सेट करें. लैंडस्केप (16:9) डिफ़ॉल्ट रूप से सेट होता है.
Python
import base64
from google import genai

client = genai.Client()

interaction = client.interactions.create(
    model="gemini-omni-1.1-flash",
    input="A futuristic city with neon lights and flying cars, cyberpunk style",
    response_format={
        "type": "video",  # optional
        "aspect_ratio": "9:16"  # Supported values: "9:16", "16:9"
    }
)
with open("example.mp4", "wb") as f:
    f.write(base64.b64decode(interaction.output_video.data))
JavaScript
import { GoogleGenAI } from '@google/genai';
import * as fs from 'fs';
const ai = new GoogleGenAI({});

const interaction = await ai.interactions.create({
  model: 'gemini-omni-1.1-flash',
  input: 'A futuristic city with neon lights and flying cars, cyberpunk style',
  response_format: {
    type: 'video', // optional
    aspect_ratio: '9:16' // Supported values: '9:16', '16:9'
  },
});

if (interaction.output_video?.data) {
  fs.writeFileSync('example.mp4', Buffer.from(interaction.output_video.data, 'base64'));
}
REST
curl -X POST "https://generativelanguage.googleapis.com/v1beta/interactions?key=$API_KEY" \
-H "Content-Type: application/json" \
-d '{
 "model": "gemini-omni-1.1-flash",
 "input": "A futuristic city with neon lights and flying cars, cyberpunk style",
 "response_format": {
   "type": "video",
   "aspect_ratio": "9:16"
 }
}'
आउटपुट रिज़ॉल्यूशन
response_format में resolution पैरामीटर का इस्तेमाल करके, जनरेट किए गए वीडियो के आउटपुट रिज़ॉल्यूशन को कंट्रोल करें. डिफ़ॉल्ट रिज़ॉल्यूशन 720 पिक्सल होता है.
| मान | ब्यौरा |
|---|---|
360p |
360 पिक्सल का आउटपुट रिज़ॉल्यूशन |
720p |
720 पिक्सल का आउटपुट रिज़ॉल्यूशन (डिफ़ॉल्ट) |
1080p |
1080 पिक्सल का आउटपुट (अपस्केल किया गया) |
4k |
4K आउटपुट (बेहतर क्वालिटी) |
Python
import base64
from google import genai

client = genai.Client()

interaction = client.interactions.create(
    model="gemini-omni-1.1-flash",
    input="A drone shot of a mountain landscape at sunrise.",
    response_format={
        "type": "video",
        "resolution": "1080p",
    },
)
with open("hires.mp4", "wb") as f:
    f.write(base64.b64decode(interaction.output_video.data))
JavaScript
import { GoogleGenAI } from '@google/genai';
import * as fs from 'fs';
const ai = new GoogleGenAI({});

const interaction = await ai.interactions.create({
  model: 'gemini-omni-1.1-flash',
  input: 'A drone shot of a mountain landscape at sunrise.',
  response_format: {
    type: 'video',
    resolution: '1080p',
  },
});

if (interaction.output_video?.data) {
  fs.writeFileSync('hires.mp4', Buffer.from(interaction.output_video.data, 'base64'));
}
REST
curl -X POST "https://generativelanguage.googleapis.com/v1beta/interactions?key=$API_KEY" \
-H "Content-Type: application/json" \
-d '{
 "model": "gemini-omni-1.1-flash",
 "input": "A drone shot of a mountain landscape at sunrise.",
 "response_format": {
   "type": "video",
   "resolution": "1080p"
 }
}'
इमेज से वीडियो जनरेट करने की सुविधा
टेक्स्ट प्रॉम्प्ट के साथ रेफ़रंस के लिए इमेज दी जा सकती है. आपके प्रॉम्प्ट के आधार पर, मॉडल यह तय करेगा कि इमेज का इस्तेमाल कैसे करना है. यह प्रॉडक्ट की फ़ोटो, इलस्ट्रेशन या फ़ोटोग्राफ़ को बेहतर बनाने के लिए काम आता है.
यहां दिए गए उदाहरण में, पानी से बाहर कूदती हुई मछली की ड्राइंग की रेफ़रंस इमेज का इस्तेमाल करने का तरीका बताया गया है:
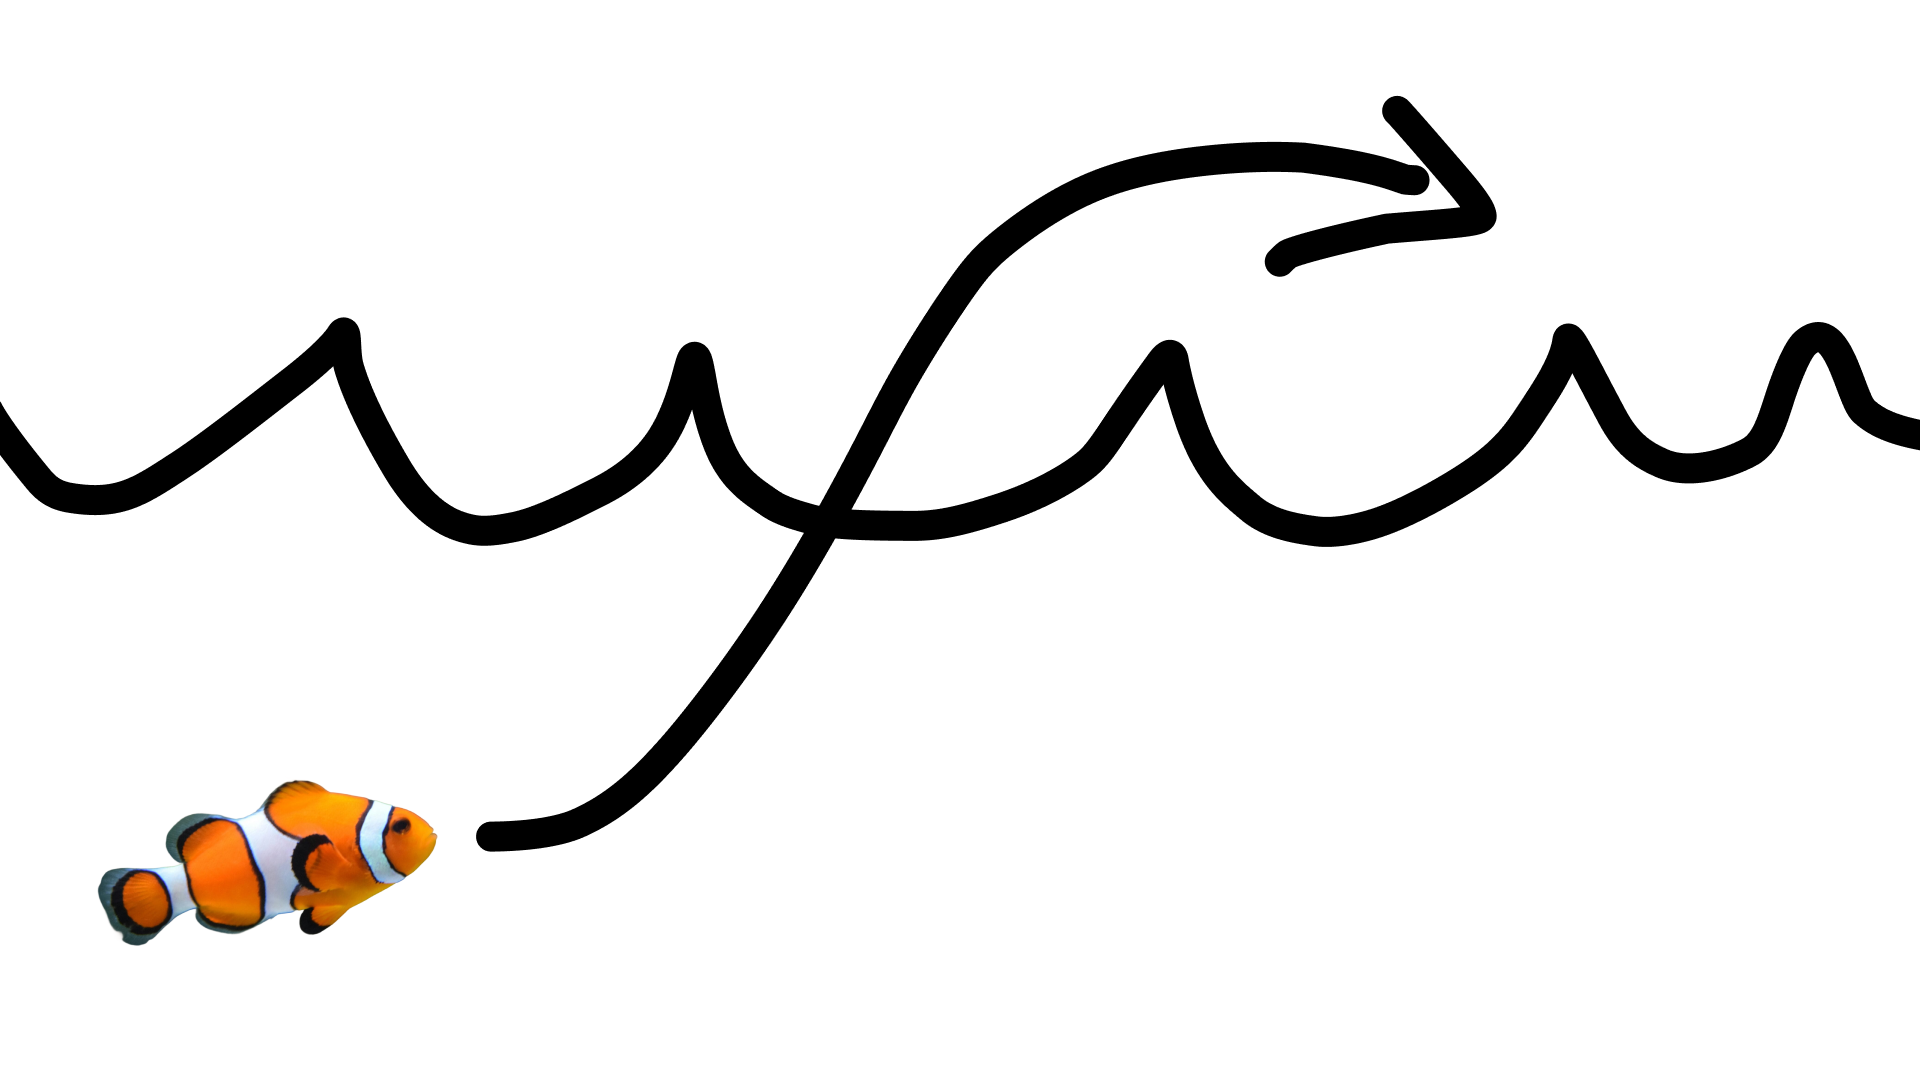
इस प्रॉम्प्ट का इस्तेमाल करके:
turn this into realistic footage, using the drawing only as a guide for movement, do not show the drawing in the final video
ड्राइंग का असली जैसा दिखने वाला वीडियो जनरेट करने के लिए.
Python
import base64
from google import genai

client = genai.Client()

interaction = client.interactions.create(
    model="gemini-omni-1.1-flash",
    input=[
        {"type": "image", "data": base64_image, "mime_type": "image/jpeg"},
        {"type": "text", "text": "turn this into realistic footage, using the drawing only as a guide for movement, do not show the drawing in the final video"}
    ],
)
with open("clownfish.mp4", "wb") as f:
    f.write(base64.b64decode(interaction.output_video.data))
JavaScript
import { GoogleGenAI } from '@google/genai';
import * as fs from 'fs';
const ai = new GoogleGenAI({});

const interaction = await ai.interactions.create({
  model: 'gemini-omni-1.1-flash',
  input: [
    { type: 'image', data: base64Image, mime_type: 'image/jpeg' },
    { type: 'text', text: 'turn this into realistic footage, using the drawing only as a guide for movement, do not show the drawing in the final video' }
  ]
});

if (interaction.output_video?.data) {
  fs.writeFileSync('clownfish.mp4', Buffer.from(interaction.output_video.data, 'base64'));
}
REST
curl -X POST "https://generativelanguage.googleapis.com/v1beta/interactions?key=$API_KEY" \
-H "Content-Type: application/json" \
-d '{
 "model": "gemini-omni-1.1-flash",
 "input": [
   {"type": "image", "data": "'"$BASE64_IMAGE"'", "mime_type": "image/jpeg"},
   {"type": "text", "text": "turn this into realistic footage, using the drawing only as a guide for movement, do not show the drawing in the final video"}
 ]
}'
पहले और आखिरी फ़्रेम के बीच फ़्रेम इंटरपोलेशन
Gemini Omni Flash, वीडियो इंटरपोलेशन की सुविधा के साथ काम करता है. इसकी मदद से, ऐसा वीडियो जनरेट किया जा सकता है जो शुरुआती इमेज (पहला फ़्रेम) और आखिरी इमेज (आखिरी फ़्रेम) के बीच आसानी से ट्रांज़िशन करता है.
input सूची में दो इमेज दें और अपने प्रॉम्प्ट में, मनचाहे ट्रांज़िशन के बारे में बताएं. मॉडल, सीन को पहले फ़्रेम से लेकर आखिरी फ़्रेम तक ऐनिमेट करेगा.
Python
import base64
from google import genai

client = genai.Client()

interaction = client.interactions.create(
    model="gemini-omni-1.1-flash",
    input=[
        {"type": "image", "data": first_frame_b64, "mime_type": "image/jpeg"},
        {"type": "image", "data": last_frame_b64, "mime_type": "image/jpeg"},
        {"type": "text", "text": "A smooth cinematic transition from a lush green forest at sunrise to a snowy forest under a starry night sky."}
    ],
)
with open("interpolation.mp4", "wb") as f:
    f.write(base64.b64decode(interaction.output_video.data))
JavaScript
import { GoogleGenAI } from '@google/genai';
import * as fs from 'fs';
const ai = new GoogleGenAI({});

const interaction = await ai.interactions.create({
  model: 'gemini-omni-1.1-flash',
  input: [
    { type: 'image', data: firstFrameB64, mime_type: 'image/jpeg' },
    { type: 'image', data: lastFrameB64, mime_type: 'image/jpeg' },
    { type: 'text', text: 'A smooth cinematic transition from a lush green forest at sunrise to a snowy forest under a starry night sky.' }
  ]
});

if (interaction.output_video?.data) {
  fs.writeFileSync('interpolation.mp4', Buffer.from(interaction.output_video.data, 'base64'));
}
REST
curl -X POST "https://generativelanguage.googleapis.com/v1beta/interactions?key=$API_KEY" \
-H "Content-Type: application/json" \
-d '{
 "model": "gemini-omni-1.1-flash",
 "input": [
   {"type": "image", "data": "'"$FIRST_FRAME_B64"'", "mime_type": "image/jpeg"},
   {"type": "image", "data": "'"$LAST_FRAME_B64"'", "mime_type": "image/jpeg"},
   {"type": "text", "text": "A smooth cinematic transition from a lush green forest at sunrise to a snowy forest under a starry night sky."}
 ]
}'
विषय का रेफ़रंस
रेफ़रंस इमेज के तौर पर दिए गए विषयों को शामिल करके, वीडियो जनरेट किया जा सकता है. उदाहरण के लिए, यहाँ दिए गए कोड में बिल्ली और ऊन की दो इमेज दी गई हैं. इससे बिल्ली के ऊन से खेलने का वीडियो जनरेट किया जा सकता है.
Python
import base64
from google import genai

client = genai.Client()

interaction = client.interactions.create(
    model="gemini-omni-1.1-flash",
    input=[
        {"type": "image", "data": cat_b64, "mime_type": "image/png"},
        {"type": "image", "data": yarn_b64, "mime_type": "image/png"},
        {"type": "text", "text": "A cat playfully batting at a ball of yarn."}
    ],
)
with open("cat.mp4", "wb") as f:
    f.write(base64.b64decode(interaction.output_video.data))
JavaScript
import { GoogleGenAI } from '@google/genai';
import * as fs from 'fs';
const ai = new GoogleGenAI({});

const interaction = await ai.interactions.create({
  model: 'gemini-omni-1.1-flash',
  input: [
    { type: 'image', data: catData, mime_type: 'image/png' },
    { type: 'image', data: yarnData, mime_type: 'image/png' },
    { type: 'text', text: 'A cat playfully batting at a ball of yarn.' }
  ]
});

if (interaction.output_video?.data) {
  fs.writeFileSync('cat.mp4', Buffer.from(interaction.output_video.data, 'base64'));
}
REST
curl -X POST "https://generativelanguage.googleapis.com/v1beta/interactions?key=$API_KEY" \
-H "Content-Type: application/json" \
-d '{
 "model": "gemini-omni-1.1-flash",
 "input": [
   {"type": "image", "data": "'"$CAT_B64"'", "mime_type": "image/png"},
   {"type": "image", "data": "'"$YARN_B64"'", "mime_type": "image/png"},
   {"type": "text", "text": "A cat playfully batting at a ball of yarn."}
 ]
}'
टास्क पैरामीटर
video_config में task पैरामीटर का इस्तेमाल करके, मॉडल के व्यवहार के बारे में साफ़ तौर पर बताएं. उदाहरण के लिए, अगर आपको मॉडल से किसी इमेज का वीडियो जनरेट कराना है, तो पैरामीटर को image_to_video पर सेट करें. अगर इसे सेट नहीं किया जाता है, तो मॉडल प्रॉम्प्ट से यह अनुमान लगाएगा कि आपको क्या चाहिए.
ये वैल्यू इस्तेमाल की जा सकती हैं:
text_to_videoimage_to_videoreference_to_videoeditextend
यहां दिए गए उदाहरण में, वीडियो के उदाहरण के तौर पर पहले दिखाई गई इमेज के लिए इसे सेट करने का तरीका बताया गया है.
Python
import base64
from google import genai

client = genai.Client()

interaction = client.interactions.create(
    model="gemini-omni-1.1-flash",
    input=[
        {"type": "image", "data": base64_image, "mime_type": "image/jpeg"},
        {"type": "text", "text": "turn this into realistic footage, using the drawing only as a guide for movement, do not show the drawing in the final video"}
    ],
    generation_config={
      "video_config": {
        "task": "image_to_video",
      }
    },
)
with open("example.mp4", "wb") as f:
    f.write(base64.b64decode(interaction.output_video.data))
JavaScript
import { GoogleGenAI } from "@google/genai";
import * as fs from 'fs';
const ai = new GoogleGenAI({});

const interaction = await ai.interactions.create({
  model: 'gemini-omni-1.1-flash',
  input: [
    { type: 'image', data: base64Image, mime_type: 'image/jpeg' },
    { type: 'text', text: 'turn this into realistic footage, using the drawing only as a guide for movement, do not show the drawing in the final video' }
  ],
  generationConfig: {
    videoConfig: {
      task: 'image_to_video',
    }
  }
});

if (interaction.output_video?.data) {
  fs.writeFileSync('example.mp4', Buffer.from(interaction.output_video.data, 'base64'));
}
REST
curl -X POST "https://generativelanguage.googleapis.com/v1beta/interactions" \
  -H "x-goog-api-key: $GEMINI_API_KEY" \
  -H "Content-Type: application/json" \
  -d '{
    "model": "gemini-omni-1.1-flash",
    "input": [
      {
        "type": "image",
        "data": "'"$BASE64_IMAGE"'",
        "mime_type": "image/jpeg"
      },
      {
        "type": "text",
        "text": "turn this into realistic footage, using the drawing only as a guide for movement, do not show the drawing in the final video"
      }
    ],
    "generation_config": {
      "video_config": {
        "task": "image_to_video"
      }
    }
  }'
स्टेटफ़ुल वीडियो एडिटिंग
कोई वीडियो जनरेट करें और फ़ॉलो-अप प्रॉम्प्ट का इस्तेमाल करके, उसमें बार-बार बदलाव करें. हर जवाब, पिछले जवाब के आधार पर तैयार किया जाता है. मॉडल को वीडियो के कॉन्टेक्स्ट के बारे में पता होता है. इसलिए, यह आपके बदलावों को लागू करता है. साथ ही, उन एलिमेंट को बनाए रखता है जिनके बारे में आपने नहीं बताया है. पिछला वीडियो फिर से अपलोड किए बिना, बातचीत के इतिहास और जनरेट किए गए वीडियो की स्थिति को ट्रैक करने के लिए, previous_interaction_id का इस्तेमाल करें.
यहां दिए गए उदाहरण में, पहला वीडियो जनरेट करने और फिर उसमें बदलाव करने का तरीका बताया गया है:
Python
import base64
from google import genai

client = genai.Client()

# Turn 1: Generate initial video
res1 = client.interactions.create(model="gemini-omni-1.1-flash", input="A woman playing violin outdoors.")

# Turn 2: Edit the previous video
res2 = client.interactions.create(
    model="gemini-omni-1.1-flash",
    previous_interaction_id=res1.id,
    input="Make the violin invisible."
)
with open("example.mp4", "wb") as f:
    f.write(base64.b64decode(res2.output_video.data))
JavaScript
import { GoogleGenAI } from '@google/genai';
import * as fs from 'fs';
const ai = new GoogleGenAI({});

// Turn 1: Generate initial video
const res1 = await ai.interactions.create({
  model: 'gemini-omni-1.1-flash',
  input: 'A woman playing violin outdoors.',
});

// Turn 2: Edit the previous video
const res2 = await ai.interactions.create({
  model: 'gemini-omni-1.1-flash',
  previous_interaction_id: res1.id,
  input: 'Make the violin invisible.',
});

if (res2.output_video?.data) {
  fs.writeFileSync('example.mp4', Buffer.from(res2.output_video.data, 'base64'));
}
REST
curl -X POST "https://generativelanguage.googleapis.com/v1beta/interactions?key=$API_KEY" \
-H "Content-Type: application/json" \
-d '{
 "model": "gemini-omni-1.1-flash",
 "previous_interaction_id": "'"$PREVIOUS_ID"'",
 "input": "Make the violin invisible."
}'
शुरुआती वीडियो का उदाहरण:
बदलाव किए गए वीडियो का उदाहरण:
बातचीत के हर टर्न में, एक नया वीडियो जनरेट होता है. मॉडल को पिछले टर्न से कॉन्टेक्स्ट समझ में आता है. इससे आपको पूरी सीन को फिर से डिस्क्राइब किए बिना, रोशनी को अडजस्ट करने और बैकग्राउंड बदलने जैसे छोटे-छोटे बदलाव करने में मदद मिलती है.
अपने वीडियो में बदलाव करना
Gemini Omni Flash की मदद से वीडियो में बदलाव करने के लिए, Files API का इस्तेमाल करके वीडियो अपलोड करें.
यहां दिए गए उदाहरण में, इस ओरिजनल वीडियो में बदलाव करने का तरीका बताया गया है:
Python
import time
import base64
from google import genai

client = genai.Client()

# Upload video using the file API
video_file = client.files.upload(file="Video.mp4")

while video_file.state == "PROCESSING":
    print('Waiting for video to be processed.')
    time.sleep(10)
    video_file = client.files.get(name=video_file.name)

if video_file.state == "FAILED":
  raise ValueError(video_file.state)
print(f'Video processing complete: ' + video_file.uri)

# Edit your video
interaction = client.interactions.create(
    model="gemini-omni-1.1-flash",
    input=[
        {"type": "document", "uri": video_file.uri},
        {"type": "text", "text": "When the person touches the mirror, make the mirror ripple beautifully like liquid, and the person's arm turns into reflective mirror material"}
    ],
)
with open("example.mp4", "wb") as f:
    f.write(base64.b64decode(interaction.output_video.data))
JavaScript
import { GoogleGenAI } from '@google/genai';
import * as fs from 'fs';
const ai = new GoogleGenAI({});

// Upload video using the file API
let videoFile = await ai.files.upload({
  file: 'Video.mp4',
});

while (videoFile.state === 'PROCESSING') {
  console.log('Waiting for video to be processed.');
  await new Promise(r => setTimeout(r, 10000));
  videoFile = await ai.files.get({ name: videoFile.name });
}

if (videoFile.state === 'FAILED') {
  throw new Error(videoFile.state);
}
console.log('Video processing complete: ' + videoFile.uri);

// Edit your video
const interaction = await ai.interactions.create({
  model: 'gemini-omni-1.1-flash',
  input: [
    { type: 'document', uri: videoFile.uri },
    { type: 'text', text: "When the person touches the mirror, make the mirror ripple beautifully like liquid, and the person's arm turns into reflective mirror material" }
  ],
});

if (interaction.output_video?.data) {
  fs.writeFileSync('example.mp4', Buffer.from(interaction.output_video.data, 'base64'));
}
REST
#!/bin/bash
VIDEO_B64=$(encode_file "$VIDEO_FILE")

curl -sS -w "\n[HTTP %{http_code}]\n" "https://generativelanguage.googleapis.com/v1beta/interactions" \
  -H "x-goog-api-key: ${API_KEY}" \
  -H "Content-Type: application/json" \
  -d @- <<EOF > video_editing_response.json
{
  "model": "gemini-omni-1.1-flash",
  "input": [
    {
      "type": "user_input",
      "content": [
        {
          "type": "video",
          "mime_type": "video/mp4",
          "data": "$VIDEO_B64"
        },
        {
          "type": "text",
          "text": "When the person touches the mirror, make the mirror ripple beautifully like liquid, and the person's arm turns into reflective mirror material"
        }
      ]
    }
  ],
  "response_format": { "type": "video" }
}
EOF
बदलाव किए गए वीडियो का उदाहरण:
यूआरआई की मदद से वीडियो वापस पाना
4 एमबी से ज़्यादा साइज़ वाले जनरेट किए गए वीडियो वापस पाने के लिए, delivery="uri" पैरामीटर
response_format का इस्तेमाल करें.
इससे Google से होस्ट किया गया यूआरआई मिलता है. इसे तब तक पोल किया जा सकता है, जब तक वीडियो डाउनलोड करने से पहले ACTIVE न हो जाए.
Python
import time
from google import genai

client = genai.Client()

# 1. Request video via URI delivery
interaction = client.interactions.create(
    model="gemini-omni-1.1-flash",
    input="A beautiful sunset.",
    response_format={"type": "video", "delivery": "uri"}
)

# 2. Extract file name and poll for ACTIVE state
video_output = interaction.output_video
file_name = video_output.uri.split("/")[-1] # Extract ID

print("Waiting for video processing...")
while True:
    f_info = client.files.get(name=f"files/{file_name}")
    if f_info.state.name == "ACTIVE":
        break
    elif f_info.state.name == "FAILED":
        raise RuntimeError("Generation failed.")
    time.sleep(5)

# 3. Download the final video
client.files.download(file=video_output.uri, destination="output.mp4")
JavaScript
import { GoogleGenAI } from '@google/genai';
const ai = new GoogleGenAI({});

// 1. Request video via URI delivery
const interaction = await ai.interactions.create({
  model: 'gemini-omni-1.1-flash',
  input: 'A beautiful sunset.',
  response_format: { type: 'video', delivery: 'uri' },
});

// 2. Extract file name and poll for ACTIVE state
const videoOutput = interaction.output_video;
const fileId = videoOutput.uri.match(/files\/([a-zA-Z0-9]+)/)[1];
const name = `files/${fileId}`;

console.log("Waiting for video processing...");
while (true) {
  const fInfo = await ai.files.get({ name });
  if (fInfo.state.name === 'ACTIVE') break;
  if (fInfo.state.name === 'FAILED') throw new Error("Generation failed.");
  await new Promise(r => setTimeout(r, 5000));
}

// 3. Download the final video
await ai.files.download({
  file: videoOutput,
  downloadPath: 'output.mp4',
});
console.log("💾 Saved video to output.mp4");
REST
#!/bin/bash

# 1. Initial request to generate the video
RESPONSE=$(curl -s -X POST "https://generativelanguage.googleapis.com/v1beta/interactions?key=$API_KEY" \
-H "Content-Type: application/json" \
-d '{
 "model": "gemini-omni-1.1-flash",
 "input": "A beautiful sunset over a calm ocean.",
 "response_format": {"type": "video", "delivery": "uri"}
}')

# Extract FILE_ID from the URI (e.g., "files/abc-123" -> "abc-123")
FILE_URI=$(echo $RESPONSE | jq -r '.output_video.uri')
FILE_ID=$(echo $FILE_URI | cut -d'/' -f2)

echo "Video requested (ID: $FILE_ID). Waiting for processing..."

# 2. Polling loop
while true; do
 # Get current file status
 STATUS_JSON=$(curl -s -X GET "https://generativelanguage.googleapis.com/v1beta/files/$FILE_ID?key=$API_KEY")
 STATE=$(echo $STATUS_JSON | jq -r '.state')

 if [ "$STATE" == "ACTIVE" ]; then
   echo "Processing complete! Downloading..."
   break
 elif [ "$STATE" == "FAILED" ]; then
   echo "Error: Generation failed."
   exit 1
 else
   echo "Current state: $STATE... (waiting 5s)"
   sleep 5
 fi
done

# 3. Final download
curl -L -X GET "https://generativelanguage.googleapis.com/v1beta/files/$FILE_ID:download?alt=media&key=$API_KEY" \
--output "output.mp4"

echo "Done! Video saved to output.mp4"
REST JSON का रॉ स्ट्रक्चर (यूआरआई):
{
  "steps": [
    { "type": "user_input", "content": [{"type": "text", "text": "..."}] },
    { "type": "thought", "content": [{"text": "...", "type": "thought"}] },
    {
      "type": "model_output",
      "content": [
        {
          "type": "video",
          "mime_type": "video/mp4",
          "uri": "https://generativelanguage.googleapis.com/v1beta/files/...:download?alt=media"
        }
      ]
    }
  ],
  "id": "v1_...",
  "status": "completed",
  "model": "gemini-omni-1.1-flash",
  "object": "interaction"
}
वीडियो एक्सटेंशन
किसी मौजूदा वीडियो को लंबा करें. इसके लिए, क्लिप के आखिर में एक ऐसा हिस्सा जनरेट करें जो मूल वीडियो के साथ आसानी से जुड़ जाए. अपने प्रॉम्प्ट में बताएं कि आपको वीडियो को किस तरह से आगे बढ़ाना है. उदाहरण के लिए, "Extend this video" या "Continue the scene: the camera pans across the mountains".
मॉडल, इनपुट वीडियो का विश्लेषण करके, 3 से 10 सेकंड का वीडियो जनरेट करता है.
इनकी समयसीमा बढ़ाई जा सकती है:
- मॉडल से जनरेट किए गए वीडियो (सिलसिलेवार बातचीत): पहले से जनरेट किए गए वीडियो को उसके
previous_interaction_idका रेफ़रंस देकर बड़ा करें. अपलोड किए गए वीडियो: एक्सटेंशन के प्रॉम्प्ट के साथ, अपलोड की गई वीडियो फ़ाइल (Files API के ज़रिए) उपलब्ध कराएं.
Python
import base64
from google import genai

client = genai.Client()

# Upload your video using the Files API
video_file = client.files.upload(file="my_video.mp4")

# Extend the video using prompt-based extension
interaction = client.interactions.create(
    model="gemini-omni-1.1-flash",
    input=[
        {"type": "document", "uri": video_file.uri},
        {"type": "text", "text": "Continue the scene."}
    ],
)
with open("extended.mp4", "wb") as f:
    f.write(base64.b64decode(interaction.output_video.data))
JavaScript
import { GoogleGenAI } from '@google/genai';
import * as fs from 'fs';
const ai = new GoogleGenAI({});

// Upload your video using the Files API
let videoFile = await ai.files.upload({
  file: 'my_video.mp4',
});

while (videoFile.state === 'PROCESSING') {
  await new Promise(r => setTimeout(r, 10000));
  videoFile = await ai.files.get({ name: videoFile.name });
}

// Extend the video using prompt-based extension
const interaction = await ai.interactions.create({
  model: 'gemini-omni-1.1-flash',
  input: [
    { type: 'document', uri: videoFile.uri },
    { type: 'text', text: 'Continue the scene.' }
  ],
});

if (interaction.output_video?.data) {
  fs.writeFileSync('extended.mp4', Buffer.from(interaction.output_video.data, 'base64'));
}
REST
curl -X POST "https://generativelanguage.googleapis.com/v1beta/interactions?key=$API_KEY"     -H "Content-Type: application/json"     -d '{
 "model": "gemini-omni-1.1-flash",
 "input": [
   {"type": "document", "uri": "'"$VIDEO_URI"'"},
   {"type": "text", "text": "Continue the scene."}
 ]
}'
रेफ़रंस मीडिया की मदद से एक्सटेंड करना
एक्सटेंड किए गए वीडियो में नए कैरेक्टर या एलिमेंट जोड़ने के लिए, अपने प्रॉम्प्ट के साथ input ऐरे में रेफ़रंस इमेज दी जा सकती हैं:
Python
import base64
from google import genai

client = genai.Client()

# Upload base video and reference image using the Files API
video_file = client.files.upload(file="my_video.mp4")
character_img = client.files.upload(file="character.png")

# Extend the video while introducing the reference character
interaction = client.interactions.create(
    model="gemini-omni-1.1-flash",
    input=[
        {"type": "document", "uri": video_file.uri},
        {"type": "document", "uri": character_img.uri},
        {"type": "text", "text": "Extend this video: have the character shown in <IMAGE_REF_0> enter the scene and wave."}
    ],
)
with open("extended_with_character.mp4", "wb") as f:
    f.write(base64.b64decode(interaction.output_video.data))
JavaScript
import { GoogleGenAI } from '@google/genai';
import * as fs from 'fs';
const ai = new GoogleGenAI({});

// Upload base video and reference image using the Files API
let videoFile = await ai.files.upload({ file: 'my_video.mp4' });
let characterImg = await ai.files.upload({ file: 'character.png' });

while (videoFile.state === 'PROCESSING' || characterImg.state === 'PROCESSING') {
  await new Promise(r => setTimeout(r, 10000));
  videoFile = await ai.files.get({ name: videoFile.name });
  characterImg = await ai.files.get({ name: characterImg.name });
}

// Extend the video while introducing the reference character
const interaction = await ai.interactions.create({
  model: 'gemini-omni-1.1-flash',
  input: [
    { type: 'document', uri: videoFile.uri },
    { type: 'document', uri: characterImg.uri },
    { type: 'text', text: 'Extend this video: have the character shown in <IMAGE_REF_0> enter the scene and wave.' }
  ],
});

if (interaction.output_video?.data) {
  fs.writeFileSync('extended_with_character.mp4', Buffer.from(interaction.output_video.data, 'base64'));
}
REST
curl -X POST "https://generativelanguage.googleapis.com/v1beta/interactions?key=$API_KEY"     -H "Content-Type: application/json"     -d '{
 "model": "gemini-omni-1.1-flash",
 "input": [
   {"type": "document", "uri": "'$VIDEO_URI'"},
   {"type": "document", "uri": "'$CHARACTER_IMG_URI'"},
   {"type": "text", "text": "Extend this video: have the character shown in <IMAGE_REF_0> enter the scene and wave."}
 ]
}'
एक्सटेंशन से जुड़ी पाबंदियां और दिशा-निर्देश
वीडियो की अवधि बढ़ाने के दौरान, इन नियमों और शर्तों का ध्यान रखें:
- अपलोड किए गए वीडियो में बोले गए डायलॉग: फ़िलहाल, अपलोड किए गए किसी ऐसे वीडियो की अवधि नहीं बढ़ाई जा सकती जिसमें कोई किरदार बोल रहा हो. ऐसा इसलिए, ताकि उसमें अतिरिक्त डायलॉग जोड़े जा सकें. हालांकि, अगर किरदार चुप रहता है या प्रॉम्प्ट में डायलॉग नहीं जोड़ा जाता है, तो ऐसा किया जा सकता है.
- सिलसिलेवार बातचीत से आवाज़ का एक्सटेंशन: सिलसिलेवार बातचीत (
previous_interaction_id) से जनरेट किए गए वीडियो को एक्सटेंड करते समय, बोले गए डायलॉग या स्पीच को जनरेट करने की सुविधा काम करती है. - सिर्फ़ क्लिप के आखिर में: एक्सटेंशन को सिर्फ़ वीडियो के आखिर में जोड़ा जा सकता है. क्लिप के शुरू में कॉन्टेंट नहीं जोड़ा जा सकता या क्लिप के बीच में कॉन्टेंट नहीं बढ़ाया जा सकता.
- अवधि की सीमा: एक्सटेंशन के लिए इनपुट वीडियो की अवधि अपलोड करते समय 10 सेकंड या उससे कम होनी चाहिए (जब तक सिलसिलेवार बातचीत का इस्तेमाल न किया जाए).
- देश/इलाके के हिसाब से उपलब्धता: फ़िलहाल, अपलोड किए गए वीडियो की अवधि बढ़ाने की सुविधा, यूरोपियन इकनॉमिक एरिया (ईईए), स्विट्ज़रलैंड, और यूनाइटेड किंगडम में रहने वाले लोगों के लिए उपलब्ध नहीं है. हालांकि, मॉडल से जनरेट किए गए वीडियो की अवधि बढ़ाने की सुविधा, सभी उपलब्ध देशों/इलाकों में काम करती है.
सबसे सही तरीके
- बड़े वीडियो के लिए यूआरआई डिलीवरी का इस्तेमाल करें: अगर वीडियो का साइज़ 4 एमबी से ज़्यादा है (उपलब्ध होने पर >720p), तो पेलोड के साइज़ की सीमा से बचने के लिए,
response_formatमेंdelivery="uri"का इस्तेमाल करें. - ऑप्टिमाइज़ की गई परफ़ॉर्मेंस: तेज़ी से और सिंक्रोनस तरीके से यूनेरी जनरेट करने के लिए,
background=false,store=false, औरstream=falseसेट करें. ध्यान दें किstore=falseसेटिंग का मतलब है कि जनरेट किए गए वीडियो में,previous_interaction_idका इस्तेमाल करके बाद के चरणों में बदलाव नहीं किया जा सकेगा. - प्रॉम्प्ट की सटीक जानकारी: ज़्यादा जानकारी के लिए, प्रॉम्प्ट के लिए दिशा-निर्देश सेक्शन देखें.
सीमाएं
- यूरोपियन इकनॉमिक एरिया, स्विट्ज़रलैंड, और यूनाइटेड किंगडम में, नाबालिगों की इमेज अपलोड करने और उनमें बदलाव करने की सुविधा उपलब्ध नहीं है.
- पहचाने जा सकने वाले कुछ लोगों की इमेज अपलोड करने और उनमें बदलाव करने की सुविधा उपलब्ध नहीं है.
- फ़िलहाल, यूरोपियन इकनॉमिक एरिया (ईईए), स्विट्ज़रलैंड, और यूनाइटेड किंगडम में रहने वाले लोग, अपलोड किए गए वीडियो में बदलाव नहीं कर सकते या उनकी अवधि नहीं बढ़ा सकते. हालांकि, मॉडल से जनरेट किए गए वीडियो में बदलाव किया जा सकता है या उनकी अवधि बढ़ाई जा सकती है.
- बदलाव करने और बढ़ाने के लिए, अपलोड किए जाने वाले वीडियो की अवधि 10 सेकंड या इससे कम होनी चाहिए. हालांकि, अगर सिलसिलेवार बातचीत में मॉडल से जनरेट किए गए वीडियो की अवधि बढ़ाई जा रही है, तो यह ज़रूरी नहीं है.
- वीडियो एक्सटेंशन को सिर्फ़ वीडियो के आखिर में जोड़ा जा सकता है. वीडियो की शुरुआत में या बीच में किसी क्लिप को जोड़ने की सुविधा उपलब्ध नहीं है.
- अपलोड किए गए किसी ऐसे वीडियो की अवधि नहीं बढ़ाई जा सकती जिसमें कोई व्यक्ति बोल रहा हो. ऐसा इसलिए, ताकि उसमें कोई और डायलॉग जोड़ा जा सके. हालांकि, ऐसा किया जा सकता है कि वीडियो में मौजूद किरदार चुप रहें या
previous_interaction_idके साथ सिलसिलेवार बातचीत एक्सटेंशन का इस्तेमाल किया जाए. - आवाज़ में बदलाव करने की सुविधा मौजूद नहीं है.
- एपीआई के मौजूदा वर्शन में, ऑडियो रेफ़रंस अपलोड करने की सुविधा उपलब्ध नहीं है.
- वीडियो के रेफ़रंस, मिलते-जुलते चेहरों के साथ सबसे सही तरीके से काम करते हैं. वीडियो के रेफ़रंस में मौजूद किसी भी ऑडियो को अनदेखा कर दिया जाता है. वीडियो के रेफ़रंस में ज़्यादा से ज़्यादा तीन क्लिप जोड़ी जा सकती हैं. हर क्लिप की अवधि तीन सेकंड से ज़्यादा नहीं होनी चाहिए.
- एक से ज़्यादा वीडियो के कॉन्टेंट का हवाला देने या उनके बारे में तर्क देने की सुविधा उपलब्ध नहीं है. एक साथ कई वीडियो का इस्तेमाल करने पर, मॉडल की परफ़ॉर्मेंस खराब हो सकती है या अनचाहे नतीजे मिल सकते हैं.
- प्रोविज़न किए गए थ्रूपुट की सुविधा काम नहीं करती.
- सिस्टम के निर्देशों, टेंपरेचर,
top_p, स्टॉप सीक्वेंस, और नेगेटिव प्रॉम्प्ट मौजूद नहीं हैं (आप अपने नेगेटिव को सामान्य प्रॉम्प्ट में डाल सकते हैं: जैसे, "X मत करो"). - मीडिया सोर्स के तौर पर YouTube वीडियो का इस्तेमाल नहीं किया जा सकता.
तकनीकी जानकारी
- जनरेट किए गए सभी वीडियो में SynthID वॉटरमार्क शामिल होता है. यह दर्शकों को दिखता नहीं है, लेकिन इसकी पहचान प्रोग्राम के हिसाब से की जा सकती है, ताकि वीडियो के सोर्स की पुष्टि की जा सके.
- वीडियो जनरेट होने में लगने वाला समय, वीडियो की अवधि, रिज़ॉल्यूशन, और मौजूदा एपीआई लोड के आधार पर अलग-अलग होता है. ज़्यादा अवधि और बेहतर रिज़ॉल्यूशन वाले वीडियो जनरेट होने में ज़्यादा समय लगता है.
- Omni, इनपुट प्रॉम्प्ट और जनरेट किए गए वीडियो, दोनों पर कॉन्टेंट की सुरक्षा से जुड़े फ़िल्टर लागू करता है. ये फ़िल्टर, देश/इलाके के हिसाब से अलग-अलग होते हैं. इस्तेमाल से जुड़ी नीतियों का उल्लंघन करने वाले प्रॉम्प्ट ब्लॉक कर दिए जाते हैं.
- अंग्रेज़ी (EN) पूरी तरह से काम करती है. हालांकि, अन्य भाषाओं का आकलन नहीं किया गया है. इसलिए, हो सकता है कि वे काम करें, लेकिन नतीजे अलग-अलग हो सकते हैं.
Gemini Omni Flash के लिए प्रॉम्प्ट के लिए गाइड
इस सेक्शन में, Gemini Omni Flash को असरदार तरीके से प्रॉम्प्ट करने के बारे में सुझाव और उदाहरण दिए गए हैं.
एक सीन
डिफ़ॉल्ट रूप से, Omni Flash कुछ अलग-अलग शॉट वाला वीडियो बनाने की कोशिश करेगा. यह प्रॉम्प्ट के आधार पर, दिलचस्प कहानी बनाने की कोशिश करेगा.
अगर आपको आउटपुट वीडियो में सिर्फ़ एक सीन चाहिए, तो आपको इसके लिए प्रॉम्प्ट देना होगा:
- एक ही सीन में बिना किसी रुकावट के
- एक ही वीडियो में लगातार रिकॉर्ड किया गया हो
- सीन में कोई कट नहीं है
उदाहरण के लिए:
Continuous, unbroken handheld shot of a fluffy tabby cat sitting on a sunny windowsill, looking out into a leafy garden. The cat's tail twitches slowly, and its ears rotate slightly toward ambient noises. Sunbeams illuminate dust motes in the air. Sound design: Gentle breeze, distant bird chirps. No dialogue.
अनचाहे एलिमेंट हटाना
अगर जनरेट किए गए वीडियो में ऐसी चीज़ें शामिल हैं जो आपको नहीं चाहिए, तो उन्हें हटाने के लिए आसान नेगेटिव प्रॉम्प्ट शामिल करें:
- कोई डायलॉग नहीं है
- कोई भी सजावटी आइटम नहीं
- कोई अतिरिक्त साउंड इफ़ेक्ट नहीं
बदलाव करने के लिए प्रॉम्प्ट
वीडियो में बदलाव करने के लिए, सामान्य प्रॉम्प्ट सबसे सही तरीके से काम करते हैं. ज़्यादा जानकारी वाले प्रॉम्प्ट से, अनचाहे बदलाव हो सकते हैं.
यहां सामान्य एडिटिंग के प्रॉम्प्ट के कुछ और उदाहरण दिए गए हैं:
- इस वीडियो को ऐनिमे में बदलो
- इस व्यक्ति को फ़ैशन वाली टोपी पहनाओ
- रोशनी में बदलाव करके इसे और ज़्यादा नाटकीय बनाओ
- साइन पर मौजूद टेक्स्ट को बदलकर "Omni Flash" लिखो
वीडियो के किसी पहलू में बदलाव करते समय, "Keep everything else the same" को शामिल करें, ताकि विज़ुअल में एकरूपता बनी रहे.
इस तकनीक को लागू करने का तरीका दिखाने के लिए, यहां कुछ उदाहरण दिए गए हैं:
- ऐसा करने से बचें:
In the video of the man sitting on the sofa, please add a small black cat that runs from the right side of the screen, jumps onto his lap, and then he starts to stroke its head while looking down.- आसान बनाएं:
Add a cat that jumps onto his lap, he begins to pet it.
Keep everything else the same.
- आसान बनाएं:
- ऐसा करने से बचें:
Please remove the cell phone that the person is holding in their hand and fill in the background so it looks like they are just holding their hand empty.- आसान बनाएं:
Make the phone invisible. Keep everything else the
same.
- आसान बनाएं:
ऑडियो के लिए प्रॉम्प्ट देना
डिफ़ॉल्ट रूप से, मॉडल किसी वीडियो के लिए सही ऑडियो ट्रैक जनरेट करने की कोशिश करेगा. ऐसा हो सकता है कि आपको हमेशा इस तरह के सुझाव न चाहिए हों. अपने प्रॉम्प्ट का इस्तेमाल करके, आपको जिस तरह का ऑडियो चाहिए उसके बारे में बताया जा सकता है. अगर आपको अपने वीडियो में संगीत जोड़ना है, तो ऐसा करना खास तौर पर ज़रूरी है:
- बैकग्राउंड में शांत संगीत शामिल करें
- वीडियो में हाई एनर्जी टेक्नो बीट है
- बैकग्राउंड में रेडियो ब्रॉडकास्ट का ऑडियो चल रहा है. इसमें एक गाना बज रहा है. ऑडियो की क्वालिटी बहुत खराब है
समय इवेंट
वीडियो में किसी खास समय पर होने वाली चीज़ों के लिए प्रॉम्प्ट दिया जा सकता है. इसके लिए, सटीक सिंटैक्स की ज़रूरत नहीं होती. साथ ही, नैचुरल लैंग्वेज का इस्तेमाल किया जा सकता है. यह सुविधा, सीन कट, रिदम या रैपिड फ़ायर सीक्वेंस बनाने में खास तौर पर मददगार होती है. उदाहरणों के लिए, यहां दिया गया लेख पढ़ें:
- तीन सेकंड बाद, एक महिला सीन में दिखती है.
- पांच सेकंड पर, बैकग्राउंड ऑडियो में कोरस शुरू होता है.
- हर दो सेकंड में एक नया फ़्रेम दिखता है.
- तेज़ी से सीन बदलने वाले सीक्वेंस में, हर आधे सेकंड (24fps पर 12 फ़्रेम) में सीन को नई जगह पर बदलें.
टाइमकोड सिंटैक्स का भी इस्तेमाल किया जा सकता है:
[0-3s] A person is walking
[3-6s] They stop and turn around
[6-10s] They start running
मेटा प्रॉम्प्टिंग
Gemini Omni Flash को वीडियो जनरेट करने के सामान्य सिद्धांतों या क्वालिटी पर ध्यान देने के लिए कहा जा सकता है:
- बारीकियों, एक्सप्रेशन, और टाइमिंग का ध्यान रखें, ताकि आपको बहुत शानदार और बारीकियों से भरपूर, लेकिन पूरी तरह से नैचुरल सीन मिल सके.
- किरदारों और माहौल के बारे में ज़्यादा से ज़्यादा जानकारी दें. किरदारों के लिए, कॉस्ट्यूम डिज़ाइन के सिद्धांतों को लागू करना. सीन में मौजूद लोगों, चीज़ों, और ऑब्जेक्ट के बारे में सटीक जानकारी दें.
- बैकग्राउंड के एलिमेंट में ज़्यादा से ज़्यादा जानकारी शामिल करें, ताकि सीन असली और नैचुरल लगे.
- एक ऐसा वीडियो बनाओ जिसमें हर सेकंड में अलग-अलग रेयर
[thing]दिखें. वीडियो में तेज़ संगीत हो और टेक्स्ट शामिल करके, हर चीज़ को लेबल किया गया हो.
वीडियो में मौजूद टेक्स्ट
वीडियो में टेक्स्ट शामिल करने के लिए प्रॉम्प्ट दिया जा सकता है. Gemini Omni, टेक्स्ट को इस तरह से रेंडर करेगा कि वह सही और पढ़ने लायक हो. अगर आपके वीडियो में टेक्स्ट अपने-आप जनरेट होता है, तो आपको यह तय करने में मदद मिल सकती है कि टेक्स्ट में क्या लिखा होना चाहिए. भले ही, यह टेक्स्ट बैकग्राउंड में मौजूद एलिमेंट में हो.
- स्क्रीन पर एक बार में एक शब्द: "क्या, आपको, पता, है, कि, Omni, कमाल, का, टेक्स्ट, लिख, सकता, है?" हर शब्द, ऐनिमेशन की अलग-अलग स्टाइल में एक सेकंड के लिए दिखता है. कोई जवाब नहीं दिया गया.
- सड़क के किनारे लगे एक साइनबोर्ड पर लिखा है: "यह इमेज, Omni ने एआई की मदद से जनरेट की है". एक दुकान के फ़्रंट पर लिखा है: "एआई से जुड़ी आपकी सभी ज़रूरतें पूरी होंगी". एक कार की नंबर प्लेट पर लिखा है: "OMNI1.1"
वीडियो की अवधि बढ़ाने के लिए प्रॉम्प्ट
Gemini Omni 1.1 Flash की मदद से, वीडियो की अवधि बढ़ाई जा सकती है. इसके लिए, "Extend this video" या "The scene continues" जैसे प्रॉम्प्ट का इस्तेमाल करें. वीडियो की अवधि को 10 सेकंड तक बढ़ाया जा सकता है. हालांकि, वीडियो की कुल अवधि 40 सेकंड से ज़्यादा नहीं होनी चाहिए.
Omni, एक एक्सटेंशन बनाता है. इसमें आपके ओरिजनल वीडियो के आखिरी 10 सेकंड के हिस्से को कॉन्टेक्स्ट के तौर पर इस्तेमाल किया जाता है. इससे वीडियो, मोशन, किरदार, और ऑडियो को एक साथ रखा जाता है. आपके इनपुट वीडियो के कुछ फ़ाइनल फ़्रेम में बदलाव किया जाएगा, ताकि ट्रांज़िशन को बेहतर बनाया जा सके.
एक्सटेंड करते समय, इस गाइड में दिए गए ओम्नी प्रॉम्प्टिंग से जुड़े सभी सुझाव लागू होते हैं:
- अपने एक्सटेंड किए गए सीन में ऑडियो के बारे में बताएं. खास तौर पर, अगर आपको इसमें बदलाव करना है, तो:
"The music continues into the chorus" - बताएं कि सीन जारी है या किसी नए सीन पर कट किया गया है. ऐसा हो सकता है कि नए सीन में वही किरदार हों:
"Show the same characters in the next scene" - जवाब को ज़्यादा सटीक बनाने या नए किरदार जोड़ने के लिए, इमेज और वीडियो को रेफ़रंस के तौर पर शामिल करें:
"The person shown in the reference image enters the scene","The dog in the reference video <VIDEO_REF_0> jumps onto the sofa" - अगर टाइमस्टैंप या टाइमकोड सिंटैक्स का इस्तेमाल किया जा रहा है, तो 0 सेकंड का मतलब है कि वीडियो के एक्सटेंड किए गए हिस्से की शुरुआत. अगर 10 सेकंड के वीडियो की अवधि बढ़ानी है, तो इस प्रॉम्प्ट में सीन कट 12 सेकंड के बाद होगा:
"After 2s cut to a new scene with the same characters"
इमेज और वीडियो की भूमिकाएं सेट करने के लिए, प्रॉम्प्ट में टैग इस्तेमाल करना
टैग का इस्तेमाल करके, अपलोड किए गए मीडिया को जनरेशन की खास भूमिकाओं से जोड़ा जा सकता है. इससे यह तय किया जा सकता है कि हर इमेज या वीडियो, शुरुआती फ़्रेम है, आखिरी फ़्रेम है या रेफ़रंस है.
1. सामान्य टैग (सुझाए गए)
अगर प्रॉम्प्ट से मीडिया की भूमिकाएं साफ़ तौर पर पता चल रही हैं, तो इमेज और वीडियो को सीधे तौर पर भूमिकाओं से बाइंड किया जा सकता है:
<FIRST_FRAME>: वीडियो के शुरुआती फ़्रेम के तौर पर इमेज का इस्तेमाल करें. उदाहरण के लिए:<FIRST_FRAME> a woman is walking<LAST_FRAME>: वीडियो के आखिरी फ़्रेम के तौर पर इमेज का इस्तेमाल करें, ताकि वीडियो को ट्रांज़िशन किया जा सके. इसका इस्तेमाल<FIRST_FRAME>के साथ किया जाना चाहिए. उदाहरण के लिए:<FIRST_FRAME> <LAST_FRAME> a woman is walking<IMAGE_REF_N>: इमेज का इस्तेमाल रेफ़रंस के तौर पर करें. उदाहरण के लिए:in the style of <IMAGE_REF_0> a woman <IMAGE_REF_1> is walking(पहली इमेज से स्टाइल का रेफ़रंस और दूसरी इमेज से सब्जेक्ट का रेफ़रंस मिलाता है). इमेज के रेफ़रंस 0 से शुरू होते हैं.<VIDEO_REF_N>: वीडियो का इस्तेमाल, किसी किरदार या ऑब्जेक्ट के रेफ़रंस के तौर पर करें. उदाहरण के लिए:the person in <VIDEO_REF_0> is playing the violin. वीडियो के रेफ़रंस भी 0 से शुरू होते हैं.
यहां छह रेफ़रंस इमेज वाला एक उदाहरण दिया गया है:
[0-3s] A studio fashion sequence. Starting with woman <IMAGE_REF_0>, she is holding <IMAGE_REF_1>
[3-6s] Then we see the man <IMAGE_REF_2> holding <IMAGE_REF_3>
[6-10s] And finally another woman <IMAGE_REF_4> who is holding <IMAGE_REF_5> while walking.
2. सोर्स और रेफ़रंस के बारे में जानकारी देना
एक से ज़्यादा मीडिया इनपुट और एक से ज़्यादा भूमिकाओं वाले ज़्यादा जटिल मामलों के लिए, साफ़ तौर पर बताए गए प्रीफ़िक्स टैग का इस्तेमाल किया जा सकता है. इसके साथ ही, नैचुरल लैंग्वेज में दिए गए निर्देशों का भी इस्तेमाल किया जा सकता है. आपको अपने प्रॉम्प्ट की शुरुआत में ही इन स्रोतों और रेफ़रंस के बारे में बताना चाहिए.
[# Sources <FIRST_FRAME>@Image1]पहली इमेज को शुरुआती फ़्रेम के तौर पर इस्तेमाल करेगा.[# Sources <FIRST_FRAME>@Image1 <LAST_FRAME>@Image2]पहली इमेज को शुरुआती फ़्रेम और दूसरी इमेज को आखिरी फ़्रेम के तौर पर इस्तेमाल करेगा.[# Sources <FIRST_FRAME>@Image1 <LAST_FRAME>@Image1]पहली इमेज को पहले और आखिरी, दोनों फ़्रेम के तौर पर इस्तेमाल करेगा. इससे एक ऐसा वीडियो बनेगा जो लूप में चलेगा.[# Sources <FIRST_FRAME>@Image1] [# References <IMAGE_REF_0>@Image2]पहली इमेज को शुरुआती फ़्रेम के तौर पर और दूसरी इमेज को रेफ़रंस के तौर पर इस्तेमाल करेगा.[# Sources <VIDEO_0>@Video1]वीडियो का इस्तेमाल, बदलाव करने या उसे बदलने के लिए मुख्य सोर्स वीडियो के तौर पर करेगा.[# Sources <PREVIOUS_VIDEO>@Video1]वीडियो की अवधि बढ़ाने के लिए, पिछले टर्न के वीडियो का इस्तेमाल करेगा.[# References <IMAGE_REF_0>@Image1]पहली इमेज को रेफ़रंस के तौर पर इस्तेमाल करेगा.[# References <IMAGE_REF_1>@Image2]दूसरी इमेज को रेफ़रंस के तौर पर इस्तेमाल करेगा.[# References <IMAGE_REF_0>@Image1 <IMAGE_REF_1>@Image2], दोनों इमेज को रेफ़रंस के तौर पर इस्तेमाल करेगा.[# References <VIDEO_REF_0>@Video1]पहले वीडियो को रेफ़रंस के तौर पर इस्तेमाल करेगा.[# References <IMAGE_REF_0>@Image1 <VIDEO_REF_0>@Video1], रेफ़रंस के तौर पर इमेज और वीडियो, दोनों का इस्तेमाल करेगा.
अपने प्रॉम्प्ट के आखिर में, निर्देश जोड़ें:
- शुरुआत के फ़्रेम के लिए:
"Use this image as the starting frame." - शुरू और खत्म होने वाले फ़्रेम के ज़रिए लूपिंग वीडियो के लिए:
"Use this image as the first frame and the last frame." - रेफ़रंस इमेज के लिए:
"Use the given image(s) as references for video generation. The images should not be used as literal initial frames." - रेफ़रंस वीडियो के लिए:
"Use the given video(s) as references. Do not use them as a source for video editing."
सोर्स और रेफ़रंस के बारे में जानकारी देने वाले प्रॉम्प्ट के कुछ उदाहरण:
रेफ़रंस के लिए इमेज के साथ शुरुआत का फ़्रेम:
[# Sources <FIRST_FRAME>@Image1] [# References <IMAGE_REF_0>@Image2] a woman <IMAGE_REF_0> is walking. Use Image1 as the starting frame. Use Image2 as a reference for the video generation.
किसी किरदार के रेफ़रंस वीडियो के साथ किसी ऑब्जेक्ट की रेफ़रंस इमेज:
[# References <IMAGE_REF_0>@Image1 <VIDEO_REF_0>@Video1] The woman in <VIDEO_REF_0> is playing the violin shown in <IMAGE_REF_0>. Use Video1 as a character reference and Image1 as an object reference.
आगे क्या करना है
- Omni Quickstart Colab में एक्सपेरिमेंट करके, Gemini Omni Flash का इस्तेमाल शुरू करें.
- प्रॉम्प्ट डिज़ाइन के बारे में जानकारी लेख पढ़कर, और भी बेहतर प्रॉम्प्ट लिखने का तरीका जानें.