

Gemini Omni Flash (gemini-omni-1.1-flash) เป็นโมเดลแบบหลายรูปแบบที่มีประสิทธิภาพสูง
ซึ่งออกแบบมาเพื่อการสร้าง การตัดต่อ และการควบคุมวิดีโอระดับภาพยนตร์ด้วยความเร็วสูง
Gemini Omni สร้างขึ้นจากความสามารถหลักต่อไปนี้ที่ทำให้แตกต่างจาก
โมเดลวิดีโอก่อนหน้า
- ความสามารถในการประมวลผลข้อมูลหลายรูปแบบในตัว: ประมวลผลข้อความ รูปภาพ เสียง และวิดีโอ พร้อมกัน ทำให้คุณได้เอาต์พุตที่สอดคล้องกัน ควบคุมได้ และมีความสม่ำเสมอมากขึ้น
- การแก้ไขโดยใช้การสนทนา: เปิดใช้โดย Interactions API ซึ่งช่วยให้คุณปรับแต่ง และแก้ไขวิดีโอซ้ำๆ ได้ผ่านการสนทนาด้วยภาษาธรรมชาติ อธิบายสิ่งที่คุณต้องการเปลี่ยนแปลง แล้วโมเดลจะใช้การแก้ไขพร้อมทั้งรักษา ส่วนของวิดีโอที่คุณต้องการเก็บไว้
- ความรู้เกี่ยวกับโลก: Gemini Omni ผสานความเข้าใจด้าน ฟิสิกส์เข้ากับความรู้ด้านประวัติศาสตร์ วิทยาศาสตร์ และบริบททางวัฒนธรรมของ Gemini เพื่อเชื่อมช่องว่างจากภาพถ่ายสมจริงไปสู่การเล่าเรื่องที่มีความหมาย
การสร้างวิดีโอจากข้อความ
สร้างวิดีโอจากพรอมต์ข้อความ โมเดลจะสร้างวิดีโอพร้อมเสียง โดยอิงตามคำอธิบายข้อความของคุณ เขียนพรอมต์โดยระบุรายละเอียด เช่น คำอธิบายฉาก การเคลื่อนไหวของกล้อง แสง และอารมณ์ เพื่อให้ได้ผลลัพธ์ที่ดีที่สุด
Python
import base64
from google import genai

client = genai.Client()

interaction = client.interactions.create(
    model="gemini-omni-1.1-flash",
    input="A marble rolling fast on a chain reaction style track, continuous smooth shot."
)
with open("marble.mp4", "wb") as f:
    f.write(base64.b64decode(interaction.output_video.data))
JavaScript
import { GoogleGenAI } from '@google/genai';
import * as fs from 'fs';
const ai = new GoogleGenAI({});

const interaction = await ai.interactions.create({
  model: 'gemini-omni-1.1-flash',
  input: 'A marble rolling fast on a chain reaction style track, continuous smooth shot.',
});

if (interaction.output_video?.data) {
  fs.writeFileSync('marble.mp4', Buffer.from(interaction.output_video.data, 'base64'));
}
REST
curl -X POST "https://generativelanguage.googleapis.com/v1beta/interactions?key=$API_KEY" \
-H "Content-Type: application/json" \
-d '{
 "model": "gemini-omni-1.1-flash",
 "input": "A marble rolling fast on a chain reaction style track, continuous smooth shot."
}'
สคีมาการตอบกลับ REST
ฟิลด์ความสะดวก interaction.output_video เป็นSDK เท่านั้น
รับเอาต์พุตวิดีโอจากอาร์เรย์ steps เมื่อใช้ REST API โดยตรง
โครงสร้าง JSON ของ REST แบบดิบ:
{
  "steps": [
    { "type": "user_input", "content": [{"type": "text", "text": "..."}] },
    { "type": "thought", "content": [{"text": "...", "type": "thought"}] },
    {
      "type": "model_output",
      "content": [
        {
          "type": "video",
          "mime_type": "video/mp4",
          "data": "AAAAIGZ0eXBpc29t..." // Base64 encoded video data
        }
      ]
    }
  ],
  "id": "v1_...",
  "status": "completed",
  "model": "gemini-omni-1.1-flash",
  "object": "interaction"
}
ควบคุมสัดส่วนภาพ
ตั้งค่า aspect_ratio เป็น "9:16" เพื่อสร้างวิดีโอแนวตั้ง โดยมีค่าเริ่มต้นเป็นแนวนอน (16:9)
Python
import base64
from google import genai

client = genai.Client()

interaction = client.interactions.create(
    model="gemini-omni-1.1-flash",
    input="A futuristic city with neon lights and flying cars, cyberpunk style",
    response_format={
        "type": "video",  # optional
        "aspect_ratio": "9:16"  # Supported values: "9:16", "16:9"
    }
)
with open("example.mp4", "wb") as f:
    f.write(base64.b64decode(interaction.output_video.data))
JavaScript
import { GoogleGenAI } from '@google/genai';
import * as fs from 'fs';
const ai = new GoogleGenAI({});

const interaction = await ai.interactions.create({
  model: 'gemini-omni-1.1-flash',
  input: 'A futuristic city with neon lights and flying cars, cyberpunk style',
  response_format: {
    type: 'video', // optional
    aspect_ratio: '9:16' // Supported values: '9:16', '16:9'
  },
});

if (interaction.output_video?.data) {
  fs.writeFileSync('example.mp4', Buffer.from(interaction.output_video.data, 'base64'));
}
REST
curl -X POST "https://generativelanguage.googleapis.com/v1beta/interactions?key=$API_KEY" \
-H "Content-Type: application/json" \
-d '{
 "model": "gemini-omni-1.1-flash",
 "input": "A futuristic city with neon lights and flying cars, cyberpunk style",
 "response_format": {
   "type": "video",
   "aspect_ratio": "9:16"
 }
}'
ความละเอียดเอาต์พุต
ควบคุมความละเอียดเอาต์พุตของวิดีโอที่สร้างขึ้นโดยใช้พารามิเตอร์ resolution
ใน response_format ความละเอียดเริ่มต้นคือ 720p
| ค่า | คำอธิบาย |
|---|---|
360p |
ความละเอียดเอาต์พุต 360p |
720p |
ความละเอียดเอาต์พุต 720p (ค่าเริ่มต้น) |
1080p |
เอาต์พุต 1080p (เพิ่มความละเอียด) |
4k |
เอาต์พุต 4K (เพิ่มความละเอียด) |
Python
import base64
from google import genai

client = genai.Client()

interaction = client.interactions.create(
    model="gemini-omni-1.1-flash",
    input="A drone shot of a mountain landscape at sunrise.",
    response_format={
        "type": "video",
        "resolution": "1080p",
    },
)
with open("hires.mp4", "wb") as f:
    f.write(base64.b64decode(interaction.output_video.data))
JavaScript
import { GoogleGenAI } from '@google/genai';
import * as fs from 'fs';
const ai = new GoogleGenAI({});

const interaction = await ai.interactions.create({
  model: 'gemini-omni-1.1-flash',
  input: 'A drone shot of a mountain landscape at sunrise.',
  response_format: {
    type: 'video',
    resolution: '1080p',
  },
});

if (interaction.output_video?.data) {
  fs.writeFileSync('hires.mp4', Buffer.from(interaction.output_video.data, 'base64'));
}
REST
curl -X POST "https://generativelanguage.googleapis.com/v1beta/interactions?key=$API_KEY" \
-H "Content-Type: application/json" \
-d '{
 "model": "gemini-omni-1.1-flash",
 "input": "A drone shot of a mountain landscape at sunrise.",
 "response_format": {
   "type": "video",
   "resolution": "1080p"
 }
}'
การสร้างวิดีโอจากรูปภาพ
คุณระบุรูปภาพอ้างอิงพร้อมกับพรอมต์ข้อความได้ โมเดลจะตัดสินใจวิธีใช้รูปภาพตามพรอมต์ของคุณ ซึ่งมีประโยชน์ในการทำให้ภาพผลิตภัณฑ์ ภาพวาด หรือภาพถ่ายดูมีชีวิตชีวา
ตัวอย่างต่อไปนี้แสดงวิธีใช้รูปภาพอ้างอิงของภาพวาด ปลาที่กระโดดขึ้นจากน้ำ
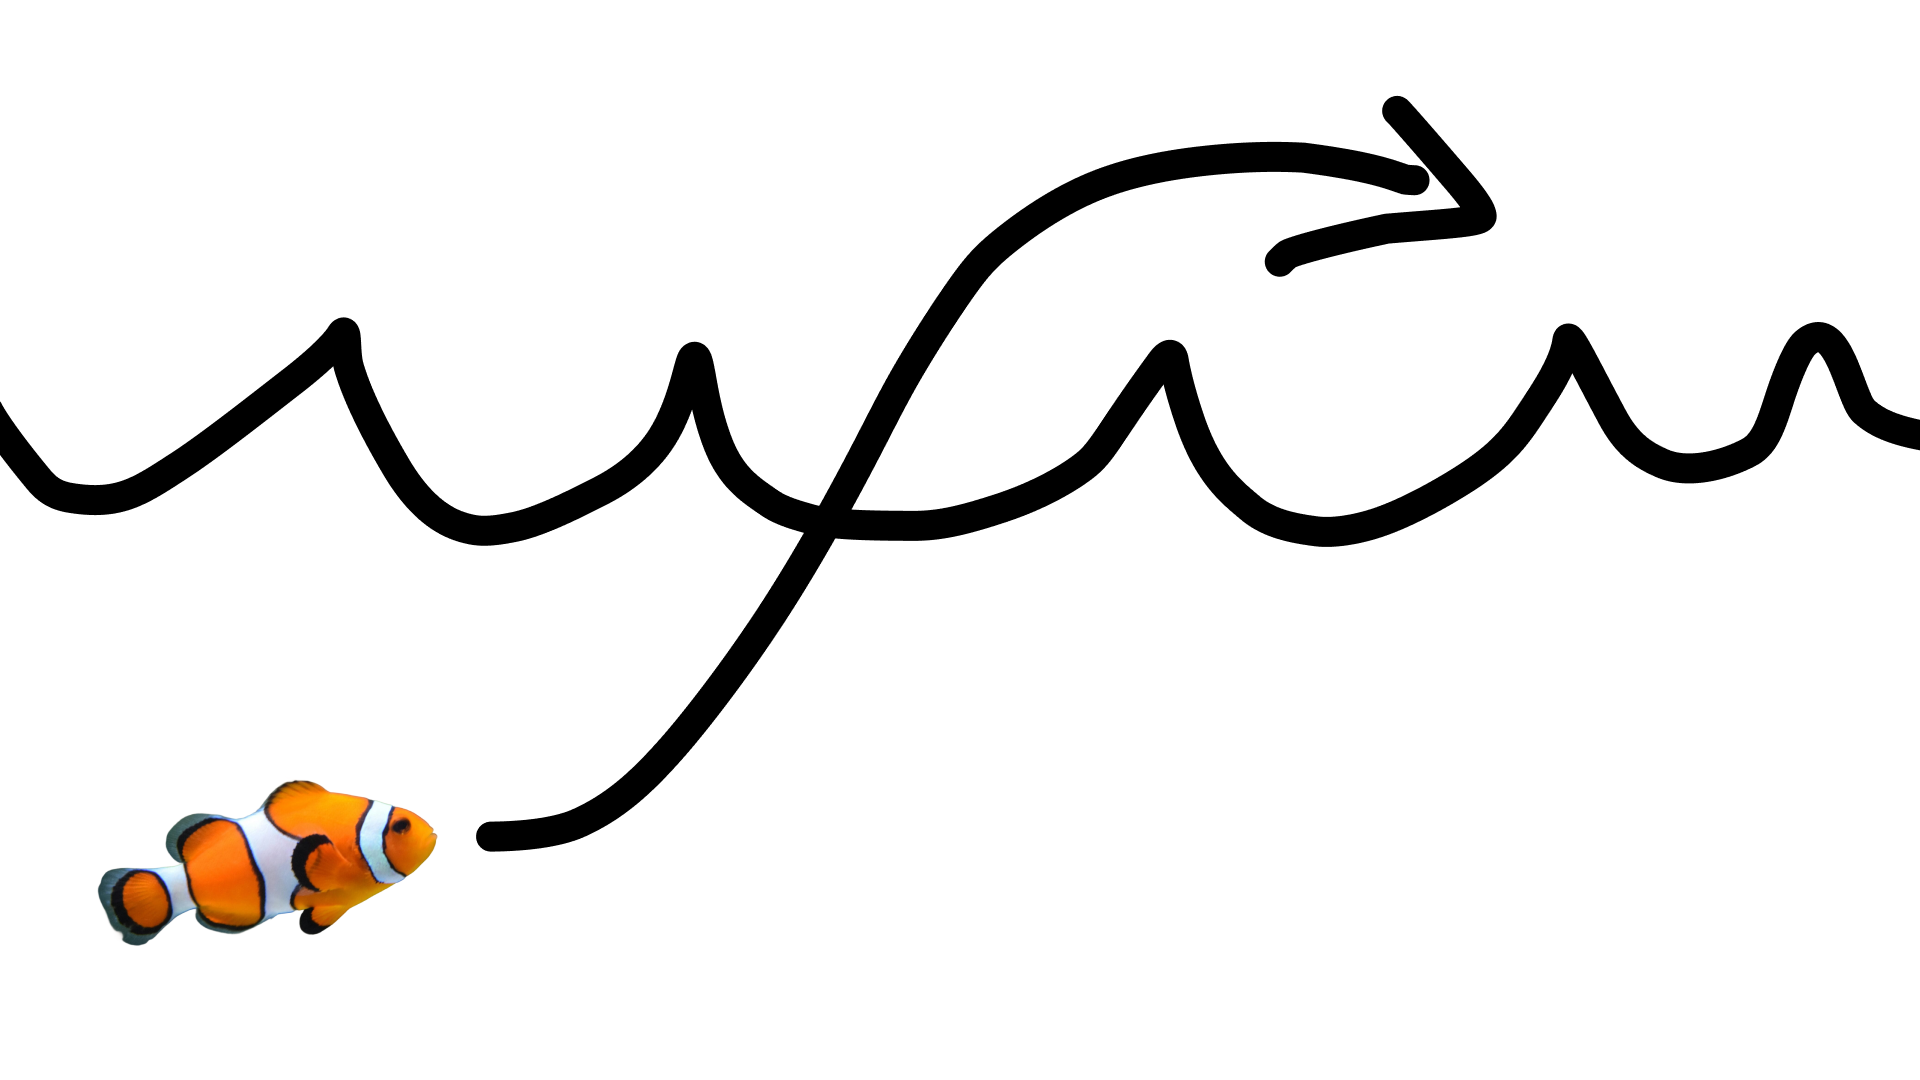
ด้วยพรอมต์ต่อไปนี้
turn this into realistic footage, using the drawing only as a guide for movement, do not show the drawing in the final video
เพื่อสร้างวิดีโอภาพวาดที่สมจริง
Python
import base64
from google import genai

client = genai.Client()

interaction = client.interactions.create(
    model="gemini-omni-1.1-flash",
    input=[
        {"type": "image", "data": base64_image, "mime_type": "image/jpeg"},
        {"type": "text", "text": "turn this into realistic footage, using the drawing only as a guide for movement, do not show the drawing in the final video"}
    ],
)
with open("clownfish.mp4", "wb") as f:
    f.write(base64.b64decode(interaction.output_video.data))
JavaScript
import { GoogleGenAI } from '@google/genai';
import * as fs from 'fs';
const ai = new GoogleGenAI({});

const interaction = await ai.interactions.create({
  model: 'gemini-omni-1.1-flash',
  input: [
    { type: 'image', data: base64Image, mime_type: 'image/jpeg' },
    { type: 'text', text: 'turn this into realistic footage, using the drawing only as a guide for movement, do not show the drawing in the final video' }
  ]
});

if (interaction.output_video?.data) {
  fs.writeFileSync('clownfish.mp4', Buffer.from(interaction.output_video.data, 'base64'));
}
REST
curl -X POST "https://generativelanguage.googleapis.com/v1beta/interactions?key=$API_KEY" \
-H "Content-Type: application/json" \
-d '{
 "model": "gemini-omni-1.1-flash",
 "input": [
   {"type": "image", "data": "'"$BASE64_IMAGE"'", "mime_type": "image/jpeg"},
   {"type": "text", "text": "turn this into realistic footage, using the drawing only as a guide for movement, do not show the drawing in the final video"}
 ]
}'
การแทรกเฟรมแรกและเฟรมสุดท้าย
Gemini Omni Flash รองรับการประมาณค่าวิดีโอ ซึ่งช่วยให้คุณสร้างวิดีโอที่เปลี่ยนผ่านระหว่างรูปภาพเริ่มต้น (เฟรมแรก) กับรูปภาพสิ้นสุด (เฟรมสุดท้าย) ได้อย่างราบรื่น
ระบุรูปภาพ 2 รูปในรายการ input และอธิบายการเปลี่ยนฉากที่ต้องการในพรอมต์ โมเดลจะสร้างภาพเคลื่อนไหวของฉากตั้งแต่เฟรมแรกจนถึง
เฟรมสุดท้าย
Python
import base64
from google import genai

client = genai.Client()

interaction = client.interactions.create(
    model="gemini-omni-1.1-flash",
    input=[
        {"type": "image", "data": first_frame_b64, "mime_type": "image/jpeg"},
        {"type": "image", "data": last_frame_b64, "mime_type": "image/jpeg"},
        {"type": "text", "text": "A smooth cinematic transition from a lush green forest at sunrise to a snowy forest under a starry night sky."}
    ],
)
with open("interpolation.mp4", "wb") as f:
    f.write(base64.b64decode(interaction.output_video.data))
JavaScript
import { GoogleGenAI } from '@google/genai';
import * as fs from 'fs';
const ai = new GoogleGenAI({});

const interaction = await ai.interactions.create({
  model: 'gemini-omni-1.1-flash',
  input: [
    { type: 'image', data: firstFrameB64, mime_type: 'image/jpeg' },
    { type: 'image', data: lastFrameB64, mime_type: 'image/jpeg' },
    { type: 'text', text: 'A smooth cinematic transition from a lush green forest at sunrise to a snowy forest under a starry night sky.' }
  ]
});

if (interaction.output_video?.data) {
  fs.writeFileSync('interpolation.mp4', Buffer.from(interaction.output_video.data, 'base64'));
}
REST
curl -X POST "https://generativelanguage.googleapis.com/v1beta/interactions?key=$API_KEY" \
-H "Content-Type: application/json" \
-d '{
 "model": "gemini-omni-1.1-flash",
 "input": [
   {"type": "image", "data": "'"$FIRST_FRAME_B64"'", "mime_type": "image/jpeg"},
   {"type": "image", "data": "'"$LAST_FRAME_B64"'", "mime_type": "image/jpeg"},
   {"type": "text", "text": "A smooth cinematic transition from a lush green forest at sunrise to a snowy forest under a starry night sky."}
 ]
}'
การอ้างอิงหัวเรื่อง
คุณสร้างวิดีโอโดยใช้ตัวละคร/ตัวแบบที่เฉพาะเจาะจงซึ่งระบุเป็นรูปภาพอ้างอิงได้ ตัวอย่างเช่น โค้ดต่อไปนี้แสดงวิธีระบุรูปภาพแมวและเส้นด้าย 2 รูป เพื่อสร้างวิดีโอแมวเล่นกับเส้นด้าย
Python
import base64
from google import genai

client = genai.Client()

interaction = client.interactions.create(
    model="gemini-omni-1.1-flash",
    input=[
        {"type": "image", "data": cat_b64, "mime_type": "image/png"},
        {"type": "image", "data": yarn_b64, "mime_type": "image/png"},
        {"type": "text", "text": "A cat playfully batting at a ball of yarn."}
    ],
)
with open("cat.mp4", "wb") as f:
    f.write(base64.b64decode(interaction.output_video.data))
JavaScript
import { GoogleGenAI } from '@google/genai';
import * as fs from 'fs';
const ai = new GoogleGenAI({});

const interaction = await ai.interactions.create({
  model: 'gemini-omni-1.1-flash',
  input: [
    { type: 'image', data: catData, mime_type: 'image/png' },
    { type: 'image', data: yarnData, mime_type: 'image/png' },
    { type: 'text', text: 'A cat playfully batting at a ball of yarn.' }
  ]
});

if (interaction.output_video?.data) {
  fs.writeFileSync('cat.mp4', Buffer.from(interaction.output_video.data, 'base64'));
}
REST
curl -X POST "https://generativelanguage.googleapis.com/v1beta/interactions?key=$API_KEY" \
-H "Content-Type: application/json" \
-d '{
 "model": "gemini-omni-1.1-flash",
 "input": [
   {"type": "image", "data": "'"$CAT_B64"'", "mime_type": "image/png"},
   {"type": "image", "data": "'"$YARN_B64"'", "mime_type": "image/png"},
   {"type": "text", "text": "A cat playfully batting at a ball of yarn."}
 ]
}'
พารามิเตอร์งาน
ใช้พารามิเตอร์ task ใน video_config เพื่อระบุลักษณะการทำงานที่ต้องการอย่างชัดเจน เช่น หากต้องการให้โมเดลสร้างวิดีโอจากรูปภาพ คุณสามารถตั้งค่าพารามิเตอร์เป็น image_to_video หากไม่ได้ตั้งค่านี้ไว้
โมเดลจะอนุมานสิ่งที่คุณต้องการจากพรอมต์
ค่าที่ใช้ได้มีดังนี้
text_to_videoimage_to_videoreference_to_videoeditextend
ตัวอย่างต่อไปนี้แสดงวิธีตั้งค่านี้สำหรับรูปภาพที่แสดงก่อนหน้านี้ เป็นตัวอย่างวิดีโอ
Python
import base64
from google import genai

client = genai.Client()

interaction = client.interactions.create(
    model="gemini-omni-1.1-flash",
    input=[
        {"type": "image", "data": base64_image, "mime_type": "image/jpeg"},
        {"type": "text", "text": "turn this into realistic footage, using the drawing only as a guide for movement, do not show the drawing in the final video"}
    ],
    generation_config={
      "video_config": {
        "task": "image_to_video",
      }
    },
)
with open("example.mp4", "wb") as f:
    f.write(base64.b64decode(interaction.output_video.data))
JavaScript
import { GoogleGenAI } from "@google/genai";
import * as fs from 'fs';
const ai = new GoogleGenAI({});

const interaction = await ai.interactions.create({
  model: 'gemini-omni-1.1-flash',
  input: [
    { type: 'image', data: base64Image, mime_type: 'image/jpeg' },
    { type: 'text', text: 'turn this into realistic footage, using the drawing only as a guide for movement, do not show the drawing in the final video' }
  ],
  generationConfig: {
    videoConfig: {
      task: 'image_to_video',
    }
  }
});

if (interaction.output_video?.data) {
  fs.writeFileSync('example.mp4', Buffer.from(interaction.output_video.data, 'base64'));
}
REST
curl -X POST "https://generativelanguage.googleapis.com/v1beta/interactions" \
  -H "x-goog-api-key: $GEMINI_API_KEY" \
  -H "Content-Type: application/json" \
  -d '{
    "model": "gemini-omni-1.1-flash",
    "input": [
      {
        "type": "image",
        "data": "'"$BASE64_IMAGE"'",
        "mime_type": "image/jpeg"
      },
      {
        "type": "text",
        "text": "turn this into realistic footage, using the drawing only as a guide for movement, do not show the drawing in the final video"
      }
    ],
    "generation_config": {
      "video_config": {
        "task": "image_to_video"
      }
    }
  }'
การตัดต่อวิดีโอแบบมีสถานะ
สร้างวิดีโอและแก้ไขซ้ำๆ โดยใช้พรอมต์ต่อเนื่อง แต่ละรอบ
จะอิงตามผลลัพธ์ก่อนหน้า โมเดลจะจดจำบริบทของวิดีโอและใช้การเปลี่ยนแปลงของคุณพร้อมทั้งรักษาองค์ประกอบที่คุณไม่ได้กล่าวถึง ใช้
previous_interaction_id เพื่อติดตามประวัติการสนทนาและสถานะวิดีโอที่สร้างขึ้น
โดยไม่ต้องอัปโหลดวิดีโอก่อนหน้าซ้ำ
ตัวอย่างต่อไปนี้แสดงวิธีสร้างวิดีโอแรกแล้วแก้ไข
Python
import base64
from google import genai

client = genai.Client()

# Turn 1: Generate initial video
res1 = client.interactions.create(model="gemini-omni-1.1-flash", input="A woman playing violin outdoors.")

# Turn 2: Edit the previous video
res2 = client.interactions.create(
    model="gemini-omni-1.1-flash",
    previous_interaction_id=res1.id,
    input="Make the violin invisible."
)
with open("example.mp4", "wb") as f:
    f.write(base64.b64decode(res2.output_video.data))
JavaScript
import { GoogleGenAI } from '@google/genai';
import * as fs from 'fs';
const ai = new GoogleGenAI({});

// Turn 1: Generate initial video
const res1 = await ai.interactions.create({
  model: 'gemini-omni-1.1-flash',
  input: 'A woman playing violin outdoors.',
});

// Turn 2: Edit the previous video
const res2 = await ai.interactions.create({
  model: 'gemini-omni-1.1-flash',
  previous_interaction_id: res1.id,
  input: 'Make the violin invisible.',
});

if (res2.output_video?.data) {
  fs.writeFileSync('example.mp4', Buffer.from(res2.output_video.data, 'base64'));
}
REST
curl -X POST "https://generativelanguage.googleapis.com/v1beta/interactions?key=$API_KEY" \
-H "Content-Type: application/json" \
-d '{
 "model": "gemini-omni-1.1-flash",
 "previous_interaction_id": "'"$PREVIOUS_ID"'",
 "input": "Make the violin invisible."
}'
ตัวอย่างวิดีโอเริ่มต้น
ตัวอย่างวิดีโอที่แก้ไขแล้ว
การสนทนาแต่ละรอบจะสร้างวิดีโอใหม่ โมเดลจะเข้าใจบริบทจากรอบก่อนๆ ซึ่งช่วยให้คุณทำการเปลี่ยนแปลงทีละน้อยได้ เช่น การปรับแสงและการสลับพื้นหลัง โดยไม่ต้องอธิบายฉากทั้งหมดอีกครั้ง
แก้ไขวิดีโอของคุณเอง
อัปโหลดวิดีโอโดยใช้ Files API เพื่อแก้ไขด้วย Gemini Omni Flash
ตัวอย่างต่อไปนี้แสดงวิธีแก้ไขวิดีโอต้นฉบับต่อไปนี้
Python
import time
import base64
from google import genai

client = genai.Client()

# Upload video using the file API
video_file = client.files.upload(file="Video.mp4")

while video_file.state == "PROCESSING":
    print('Waiting for video to be processed.')
    time.sleep(10)
    video_file = client.files.get(name=video_file.name)

if video_file.state == "FAILED":
  raise ValueError(video_file.state)
print(f'Video processing complete: ' + video_file.uri)

# Edit your video
interaction = client.interactions.create(
    model="gemini-omni-1.1-flash",
    input=[
        {"type": "document", "uri": video_file.uri},
        {"type": "text", "text": "When the person touches the mirror, make the mirror ripple beautifully like liquid, and the person's arm turns into reflective mirror material"}
    ],
)
with open("example.mp4", "wb") as f:
    f.write(base64.b64decode(interaction.output_video.data))
JavaScript
import { GoogleGenAI } from '@google/genai';
import * as fs from 'fs';
const ai = new GoogleGenAI({});

// Upload video using the file API
let videoFile = await ai.files.upload({
  file: 'Video.mp4',
});

while (videoFile.state === 'PROCESSING') {
  console.log('Waiting for video to be processed.');
  await new Promise(r => setTimeout(r, 10000));
  videoFile = await ai.files.get({ name: videoFile.name });
}

if (videoFile.state === 'FAILED') {
  throw new Error(videoFile.state);
}
console.log('Video processing complete: ' + videoFile.uri);

// Edit your video
const interaction = await ai.interactions.create({
  model: 'gemini-omni-1.1-flash',
  input: [
    { type: 'document', uri: videoFile.uri },
    { type: 'text', text: "When the person touches the mirror, make the mirror ripple beautifully like liquid, and the person's arm turns into reflective mirror material" }
  ],
});

if (interaction.output_video?.data) {
  fs.writeFileSync('example.mp4', Buffer.from(interaction.output_video.data, 'base64'));
}
REST
#!/bin/bash
VIDEO_B64=$(encode_file "$VIDEO_FILE")

curl -sS -w "\n[HTTP %{http_code}]\n" "https://generativelanguage.googleapis.com/v1beta/interactions" \
  -H "x-goog-api-key: ${API_KEY}" \
  -H "Content-Type: application/json" \
  -d @- <<EOF > video_editing_response.json
{
  "model": "gemini-omni-1.1-flash",
  "input": [
    {
      "type": "user_input",
      "content": [
        {
          "type": "video",
          "mime_type": "video/mp4",
          "data": "$VIDEO_B64"
        },
        {
          "type": "text",
          "text": "When the person touches the mirror, make the mirror ripple beautifully like liquid, and the person's arm turns into reflective mirror material"
        }
      ]
    }
  ],
  "response_format": { "type": "video" }
}
EOF
ตัวอย่างวิดีโอที่แก้ไขแล้ว
การดึงข้อมูลวิดีโอด้วย URI
ใช้พารามิเตอร์ delivery="uri" ใน
response_format เพื่อเรียกข้อมูลวิดีโอที่สร้างขึ้นซึ่งมีขนาดใหญ่กว่า 4 MB
ซึ่งจะแสดง URI ที่โฮสต์โดย Google ซึ่งคุณสามารถสำรวจได้จนกว่าวิดีโอจะACTIVEก่อนดาวน์โหลด
Python
import time
from google import genai

client = genai.Client()

# 1. Request video via URI delivery
interaction = client.interactions.create(
    model="gemini-omni-1.1-flash",
    input="A beautiful sunset.",
    response_format={"type": "video", "delivery": "uri"}
)

# 2. Extract file name and poll for ACTIVE state
video_output = interaction.output_video
file_name = video_output.uri.split("/")[-1] # Extract ID

print("Waiting for video processing...")
while True:
    f_info = client.files.get(name=f"files/{file_name}")
    if f_info.state.name == "ACTIVE":
        break
    elif f_info.state.name == "FAILED":
        raise RuntimeError("Generation failed.")
    time.sleep(5)

# 3. Download the final video
client.files.download(file=video_output.uri, destination="output.mp4")
JavaScript
import { GoogleGenAI } from '@google/genai';
const ai = new GoogleGenAI({});

// 1. Request video via URI delivery
const interaction = await ai.interactions.create({
  model: 'gemini-omni-1.1-flash',
  input: 'A beautiful sunset.',
  response_format: { type: 'video', delivery: 'uri' },
});

// 2. Extract file name and poll for ACTIVE state
const videoOutput = interaction.output_video;
const fileId = videoOutput.uri.match(/files\/([a-zA-Z0-9]+)/)[1];
const name = `files/${fileId}`;

console.log("Waiting for video processing...");
while (true) {
  const fInfo = await ai.files.get({ name });
  if (fInfo.state.name === 'ACTIVE') break;
  if (fInfo.state.name === 'FAILED') throw new Error("Generation failed.");
  await new Promise(r => setTimeout(r, 5000));
}

// 3. Download the final video
await ai.files.download({
  file: videoOutput,
  downloadPath: 'output.mp4',
});
console.log("💾 Saved video to output.mp4");
REST
#!/bin/bash

# 1. Initial request to generate the video
RESPONSE=$(curl -s -X POST "https://generativelanguage.googleapis.com/v1beta/interactions?key=$API_KEY" \
-H "Content-Type: application/json" \
-d '{
 "model": "gemini-omni-1.1-flash",
 "input": "A beautiful sunset over a calm ocean.",
 "response_format": {"type": "video", "delivery": "uri"}
}')

# Extract FILE_ID from the URI (e.g., "files/abc-123" -> "abc-123")
FILE_URI=$(echo $RESPONSE | jq -r '.output_video.uri')
FILE_ID=$(echo $FILE_URI | cut -d'/' -f2)

echo "Video requested (ID: $FILE_ID). Waiting for processing..."

# 2. Polling loop
while true; do
 # Get current file status
 STATUS_JSON=$(curl -s -X GET "https://generativelanguage.googleapis.com/v1beta/files/$FILE_ID?key=$API_KEY")
 STATE=$(echo $STATUS_JSON | jq -r '.state')

 if [ "$STATE" == "ACTIVE" ]; then
   echo "Processing complete! Downloading..."
   break
 elif [ "$STATE" == "FAILED" ]; then
   echo "Error: Generation failed."
   exit 1
 else
   echo "Current state: $STATE... (waiting 5s)"
   sleep 5
 fi
done

# 3. Final download
curl -L -X GET "https://generativelanguage.googleapis.com/v1beta/files/$FILE_ID:download?alt=media&key=$API_KEY" \
--output "output.mp4"

echo "Done! Video saved to output.mp4"
โครงสร้าง JSON ของ REST แบบดิบ (URI):
{
  "steps": [
    { "type": "user_input", "content": [{"type": "text", "text": "..."}] },
    { "type": "thought", "content": [{"text": "...", "type": "thought"}] },
    {
      "type": "model_output",
      "content": [
        {
          "type": "video",
          "mime_type": "video/mp4",
          "uri": "https://generativelanguage.googleapis.com/v1beta/files/...:download?alt=media"
        }
      ]
    }
  ],
  "id": "v1_...",
  "status": "completed",
  "model": "gemini-omni-1.1-flash",
  "object": "interaction"
}
ส่วนขยายวิดีโอ
ขยายวิดีโอที่มีอยู่ด้วยการสร้างส่วนต่อเนื่องที่ราบรื่นที่ท้ายคลิป
อธิบายว่าคุณต้องการให้วิดีโอดำเนินต่อไปอย่างไรในพรอมต์ เช่น
"Extend this video" หรือ "Continue the scene: the camera pans across the mountains"
โมเดลจะวิเคราะห์วิดีโออินพุตเพื่อสร้างวิดีโอต่อเนื่องความยาว 3-10 วินาที
คุณขยายเวลาได้ดังนี้
- วิดีโอที่โมเดลสร้างขึ้น (การสนทนาไปมา): ขยายวิดีโอที่สร้างขึ้นก่อนหน้านี้
โดยอ้างอิง
previous_interaction_id วิดีโอที่อัปโหลด: ระบุไฟล์วิดีโอที่อัปโหลด (ผ่าน Files API) พร้อมกับพรอมต์ของส่วนขยาย
Python
import base64
from google import genai

client = genai.Client()

# Upload your video using the Files API
video_file = client.files.upload(file="my_video.mp4")

# Extend the video using prompt-based extension
interaction = client.interactions.create(
    model="gemini-omni-1.1-flash",
    input=[
        {"type": "document", "uri": video_file.uri},
        {"type": "text", "text": "Continue the scene."}
    ],
)
with open("extended.mp4", "wb") as f:
    f.write(base64.b64decode(interaction.output_video.data))
JavaScript
import { GoogleGenAI } from '@google/genai';
import * as fs from 'fs';
const ai = new GoogleGenAI({});

// Upload your video using the Files API
let videoFile = await ai.files.upload({
  file: 'my_video.mp4',
});

while (videoFile.state === 'PROCESSING') {
  await new Promise(r => setTimeout(r, 10000));
  videoFile = await ai.files.get({ name: videoFile.name });
}

// Extend the video using prompt-based extension
const interaction = await ai.interactions.create({
  model: 'gemini-omni-1.1-flash',
  input: [
    { type: 'document', uri: videoFile.uri },
    { type: 'text', text: 'Continue the scene.' }
  ],
});

if (interaction.output_video?.data) {
  fs.writeFileSync('extended.mp4', Buffer.from(interaction.output_video.data, 'base64'));
}
REST
curl -X POST "https://generativelanguage.googleapis.com/v1beta/interactions?key=$API_KEY"     -H "Content-Type: application/json"     -d '{
 "model": "gemini-omni-1.1-flash",
 "input": [
   {"type": "document", "uri": "'"$VIDEO_URI"'"},
   {"type": "text", "text": "Continue the scene."}
 ]
}'
การขยายด้วยสื่ออ้างอิง
คุณระบุรูปภาพอ้างอิงในinputอาร์เรย์พร้อมกับพรอมต์เพื่อ
แนะนำตัวละครหรือองค์ประกอบใหม่ๆ ลงในวิดีโอแบบขยายได้โดยทำดังนี้
Python
import base64
from google import genai

client = genai.Client()

# Upload base video and reference image using the Files API
video_file = client.files.upload(file="my_video.mp4")
character_img = client.files.upload(file="character.png")

# Extend the video while introducing the reference character
interaction = client.interactions.create(
    model="gemini-omni-1.1-flash",
    input=[
        {"type": "document", "uri": video_file.uri},
        {"type": "document", "uri": character_img.uri},
        {"type": "text", "text": "Extend this video: have the character shown in <IMAGE_REF_0> enter the scene and wave."}
    ],
)
with open("extended_with_character.mp4", "wb") as f:
    f.write(base64.b64decode(interaction.output_video.data))
JavaScript
import { GoogleGenAI } from '@google/genai';
import * as fs from 'fs';
const ai = new GoogleGenAI({});

// Upload base video and reference image using the Files API
let videoFile = await ai.files.upload({ file: 'my_video.mp4' });
let characterImg = await ai.files.upload({ file: 'character.png' });

while (videoFile.state === 'PROCESSING' || characterImg.state === 'PROCESSING') {
  await new Promise(r => setTimeout(r, 10000));
  videoFile = await ai.files.get({ name: videoFile.name });
  characterImg = await ai.files.get({ name: characterImg.name });
}

// Extend the video while introducing the reference character
const interaction = await ai.interactions.create({
  model: 'gemini-omni-1.1-flash',
  input: [
    { type: 'document', uri: videoFile.uri },
    { type: 'document', uri: characterImg.uri },
    { type: 'text', text: 'Extend this video: have the character shown in <IMAGE_REF_0> enter the scene and wave.' }
  ],
});

if (interaction.output_video?.data) {
  fs.writeFileSync('extended_with_character.mp4', Buffer.from(interaction.output_video.data, 'base64'));
}
REST
curl -X POST "https://generativelanguage.googleapis.com/v1beta/interactions?key=$API_KEY"     -H "Content-Type: application/json"     -d '{
 "model": "gemini-omni-1.1-flash",
 "input": [
   {"type": "document", "uri": "'$VIDEO_URI'"},
   {"type": "document", "uri": "'$CHARACTER_IMG_URI'"},
   {"type": "text", "text": "Extend this video: have the character shown in <IMAGE_REF_0> enter the scene and wave."}
 ]
}'
ข้อจำกัดและหลักเกณฑ์ของส่วนขยาย
โปรดคำนึงถึงกฎและข้อจำกัดต่อไปนี้เมื่อขยายวิดีโอ
- บทพูดในวิดีโอที่อัปโหลด: ปัจจุบันคุณไม่สามารถขยายวิดีโอที่อัปโหลดซึ่งมีคนพูดเพื่อเพิ่มบทพูดเพิ่มเติม (ระบบรองรับในกรณีที่ตัวละครยังคงเงียบหรือหากพรอมต์ไม่ได้เพิ่มบทพูด)
- การขยายเสียงแบบหลายรอบ: ระบบรองรับการสร้างบทสนทนาหรือคำพูดที่พูด
เมื่อขยายวิดีโอที่สร้างไว้ก่อนหน้าผ่านการสนทนาไปมา (
previous_interaction_id) - ท้ายคลิปเท่านั้น: ส่วนขยายจะจำกัดไว้ที่การต่อท้ายวิดีโอ คุณไม่สามารถเพิ่มเนื้อหาที่ด้านหน้าหรือขยายช่วงกลางของคลิปได้
- ขีดจำกัดระยะเวลา: วิดีโออินพุตสำหรับการขยายต้องมีความยาวไม่เกิน 10 วินาที เมื่ออัปโหลด (เว้นแต่จะใช้การสนทนาไปมา)
- ความพร้อมให้บริการในภูมิภาค: ขณะนี้การขยายวิดีโอที่อัปโหลดไม่พร้อมให้บริการ สำหรับผู้ใช้ในเขตเศรษฐกิจยุโรป (EEA), สวิตเซอร์แลนด์ และสหราชอาณาจักร (ระบบรองรับการขยายวิดีโอที่โมเดลสร้างขึ้นในทุกภูมิภาคที่พร้อมให้บริการ)
แนวทางปฏิบัติแนะนำ
- ใช้การนำส่ง URI สำหรับวิดีโอขนาดใหญ่: สำหรับวิดีโอที่มีขนาดใหญ่กว่า 4 MB (>720p
เมื่อพร้อมใช้งาน) ให้ใช้
delivery="uri"ในresponse_formatเพื่อหลีกเลี่ยงขีดจำกัดขนาด ของเพย์โหลด - ประสิทธิภาพที่เพิ่มขึ้น: ตั้งค่า
background=false,store=falseและstream=falseเพื่อสร้างคำตอบแบบเอกพจน์พร้อมกันได้เร็วขึ้น โปรดทราบว่าการตั้งค่าstore=falseหมายความว่าคุณจะแก้ไขวิดีโอที่สร้างขึ้นไม่ได้ใน เทิร์นถัดๆ ไปโดยใช้previous_interaction_id - ความแม่นยำของพรอมต์: ดูรายละเอียดในส่วนคำแนะนำในการใช้พรอมต์
ข้อจำกัด
- การอัปโหลดและแก้ไขรูปภาพที่มีผู้เยาว์ไม่รองรับในเขตเศรษฐกิจยุโรป สวิตเซอร์แลนด์ และสหราชอาณาจักร
- ระบบไม่รองรับการอัปโหลดและแก้ไขรูปภาพที่มีบุคคลที่ระบุตัวตนได้บางคน
- ขณะนี้การแก้ไขหรือขยายวิดีโอที่อัปโหลดไม่พร้อมให้บริการสำหรับผู้ใช้ในเขตเศรษฐกิจยุโรป (EEA), สวิตเซอร์แลนด์ และสหราชอาณาจักร (ระบบรองรับการแก้ไขหรือขยายวิดีโอที่โมเดลสร้างขึ้น)
- วิดีโออินพุตสำหรับการตัดต่อและการขยายต้องมีความยาวไม่เกิน 10 วินาทีเมื่ออัปโหลด (ยกเว้นการขยายวิดีโอที่โมเดลสร้างขึ้นในการสนทนาไปมา)
- การขยายวิดีโอจะจำกัดไว้ที่การต่อท้ายวิดีโอเท่านั้น ระบบไม่รองรับการต่อต้นหรือการขยายช่วงกลางของคลิป
- คุณไม่สามารถขยายวิดีโอที่อัปโหลดซึ่งมีคนพูดเพื่อเพิ่มบทสนทนา (ตัวละครอาจเงียบหรือใช้การสนทนาไปมาด้วย
previous_interaction_idได้) - ไม่รองรับการแก้ไขด้วยเสียง
- API เวอร์ชันปัจจุบันไม่รองรับการอัปโหลดข้อมูลอ้างอิงเสียง
- การอ้างอิงวิดีโอจะทำงานได้ดีที่สุดเมื่อใช้กับภาพเหมือน ระบบจะไม่สนใจเสียงใดๆ ในการอ้างอิงวิดีโอ การอ้างอิงวิดีโอรองรับคลิปได้สูงสุด 3 คลิป โดยแต่ละคลิปมีความยาวได้สูงสุด 3 วินาที
- ระบบไม่รองรับการอ้างอิงหรือการให้เหตุผลในวิดีโอหลายรายการ การพยายามใช้พรอมต์แบบหลายวิดีโออาจส่งผลให้ประสิทธิภาพของโมเดลลดลงหรือได้เอาต์พุตที่ไม่คาดคิด
- ไม่รองรับปริมาณงานที่จัดสรร
- ไม่รองรับคำสั่งของระบบ อุณหภูมิ
top_pลำดับการหยุด และพรอมต์เชิงลบ (คุณใส่พรอมต์เชิงลบในพรอมต์ปกติได้ เช่น "อย่าทำ X") - ไม่รองรับการใช้วิดีโอ YouTube เป็นแหล่งที่มาของสื่อ
รายละเอียดทางเทคนิค
- วิดีโอที่สร้างขึ้นทั้งหมดจะมีลายน้ำ SynthID ซึ่งผู้ชมมองไม่เห็น แต่สามารถตรวจจับได้โดยอัตโนมัติเพื่อการยืนยันแหล่งที่มา
- เวลาในการสร้างวิดีโอจะแตกต่างกันไปตามระยะเวลา ความละเอียด และการโหลด API ปัจจุบัน วิดีโอที่ยาวขึ้นและมีความละเอียดสูงขึ้นจะใช้เวลาในการสร้างนานขึ้น
- Omni ใช้ตัวกรองความปลอดภัยของเนื้อหากับทั้งพรอมต์อินพุตและวิดีโอที่สร้างขึ้น (ซึ่งจะแตกต่างกันไปตามภูมิภาค) ระบบจะบล็อกพรอมต์ที่ละเมิดนโยบายการใช้งาน
- ระบบรองรับภาษาอังกฤษ (EN) อย่างเต็มรูปแบบ แต่ยังไม่ได้ประเมินภาษาอื่นๆ ดังนั้นภาษาอื่นๆ อาจใช้งานได้ แต่ผลลัพธ์อาจแตกต่างกันไป
คู่มือการใช้พรอมต์สำหรับ Gemini Omni Flash
ส่วนนี้มีเคล็ดลับและตัวอย่างเกี่ยวกับวิธีพรอมต์ Gemini Omni Flash อย่างมีประสิทธิภาพ
ฉากเดียว
โดยค่าเริ่มต้น Omni Flash จะพยายามสร้างวิดีโอที่มีช็อตต่างๆ โดยจะพยายามสร้างเรื่องราวที่น่าสนใจตามพรอมต์
หากต้องการให้วิดีโอเอาต์พุตมีฉากเดียว คุณต้องป้อนพรอมต์ดังนี้
- ในฉากเดียวที่ไม่มีการตัดต่อ
- เป็นช็อตเดียวต่อเนื่อง
- ไม่มีการตัดฉาก
เช่น
Continuous, unbroken handheld shot of a fluffy tabby cat sitting on a sunny windowsill, looking out into a leafy garden. The cat's tail twitches slowly, and its ears rotate slightly toward ambient noises. Sunbeams illuminate dust motes in the air. Sound design: Gentle breeze, distant bird chirps. No dialogue.
การนำองค์ประกอบที่ไม่ต้องการออก
หากวิดีโอที่สร้างขึ้นมีสิ่งที่คุณไม่ต้องการ ให้ใส่พรอมต์เชิงลบแบบง่ายๆ เพื่อหลีกเลี่ยงสิ่งเหล่านั้น
- ไม่มีบทพูด
- ไม่มีการตกแต่ง
- ไม่มีซาวด์เอฟเฟ็กต์เพิ่มเติม
พรอมต์สำหรับการแก้ไข
พรอมต์ที่เรียบง่ายจะทำงานได้ดีที่สุดสำหรับการตัดต่อวิดีโอ พรอมต์ที่มีคำอธิบายมากเกินไปอาจทำให้เกิดการเปลี่ยนแปลงที่ไม่ต้องการ
ตัวอย่างเพิ่มเติมของพรอมต์การแก้ไขแบบง่ายมีดังนี้
- เปลี่ยนวิดีโอนี้ให้เป็นสไตล์อนิเมะ
- ใส่หมวกที่ดูดีให้บุคคลนี้
- เปลี่ยนแสงให้ดูน่าทึ่งมากขึ้น
- เปลี่ยนข้อความบนป้ายเป็น "Omni Flash"
เมื่อแก้ไขลักษณะเฉพาะของวิดีโอ ให้ใส่ "Keep everything else the same" เพื่อรักษาความสอดคล้องของภาพ
ตัวอย่างต่อไปนี้แสดงวิธีใช้เทคนิคนี้
- สิ่งที่ควรหลีกเลี่ยง
In the video of the man sitting on the sofa, please add a small black cat that runs from the right side of the screen, jumps onto his lap, and then he starts to stroke its head while looking down.- ปรับให้อ่านง่าย:
Add a cat that jumps onto his lap, he begins to pet it.
Keep everything else the same.
- ปรับให้อ่านง่าย:
- สิ่งที่ควรหลีกเลี่ยง
Please remove the cell phone that the person is holding in their hand and fill in the background so it looks like they are just holding their hand empty.- ปรับให้อ่านง่าย:
Make the phone invisible. Keep everything else the
same.
- ปรับให้อ่านง่าย:
การแจ้งเสียง
โดยค่าเริ่มต้น โมเดลจะพยายามสร้างแทร็กเสียงที่เหมาะสมสำหรับวิดีโอ ซึ่งอาจไม่ใช่สิ่งที่คุณต้องการเสมอไป คุณใช้พรอมต์เพื่อ อธิบายประเภทเสียงที่ต้องการได้ ซึ่งเป็นเรื่องที่สำคัญอย่างยิ่งหากคุณต้องการ ใช้เพลงในวิดีโอ
- ใส่เพลงบรรเลงเบาๆ
- วิดีโอมีบีทเทคโนสุดเร้าใจ
- เสียงเป็นเสียงวิทยุที่เบาและแหลมซึ่งเปิดอยู่เบื้องหลังและกำลังเล่นเพลง
ช่วงเวลาของเหตุการณ์
คุณสามารถแจ้งให้ระบบดำเนินการบางอย่างในวิดีโอในช่วงเวลาที่เฉพาะเจาะจงได้โดยไม่ต้องใช้ไวยากรณ์ที่ แน่นอนและใช้ภาษาธรรมชาติได้ ซึ่งมีประโยชน์อย่างยิ่งในการสร้างฉากตัด จังหวะ หรือลำดับภาพแบบรวดเร็วของคุณเอง โปรดดูตัวอย่างต่อไปนี้
- หลังจากผ่านไป 3 วินาที ผู้หญิงคนหนึ่งก็ปรากฏตัวขึ้น
- ที่ 5 วินาที ท่อนคอรัสจะเริ่มในเสียงเบื้องหลัง
- ตัดไปที่เฟรมใหม่ทุกๆ 2 วินาที
- ในฉากที่ยิงอย่างรวดเร็ว ให้เปลี่ยนฉากเป็นสถานที่ใหม่ทุกๆ ครึ่งวินาที (12 เฟรมที่ 24fps)
คุณยังใช้ไวยากรณ์รหัสเวลาได้ด้วย
[0-3s] A person is walking
[3-6s] They stop and turn around
[6-10s] They start running
การเขียนพรอมต์แบบเมตา
คุณขอให้ Gemini Omni Flash ให้ความสำคัญกับคุณภาพทั่วไปหรือ หลักการสร้างวิดีโอได้โดยทำดังนี้
- พิจารณารายละเอียดเล็กๆ น้อยๆ การแสดงออก และจังหวะเวลาเพื่อสร้างฉากที่สมบูรณ์และมีรายละเอียด แต่ดูเป็นธรรมชาติอย่างยิ่ง
- อธิบายตัวละครและสภาพแวดล้อมอย่างละเอียด ใช้หลักการออกแบบเครื่องแต่งกายกับตัวละคร ระบุรายละเอียดเกี่ยวกับ ผู้คน สิ่งของ และวัตถุในฉากให้ชัดเจน
- ใส่รายละเอียดที่เหมาะสมในองค์ประกอบฉากหลังให้เพียงพอเพื่อทำให้ ฉากดูสมจริงและเป็นธรรมชาติ
- สร้างวิดีโอแบบรัวๆ ที่แสดง
[thing]หายากที่แตกต่างกันทุกๆ 1 วินาที พร้อมเพลงสนุกๆ และใส่ข้อความเพื่อติดป้ายกำกับสิ่งนั้น
ข้อความในวิดีโอ
คุณสามารถป้อนพรอมต์ให้ใส่ข้อความในวิดีโอ แล้ว Gemini Omni จะแสดงข้อความในลักษณะที่ถูกต้องและอ่านได้ หากมีข้อความที่เกิดขึ้นตามธรรมชาติในวิดีโอ แม้จะเป็นองค์ประกอบพื้นหลัง ก็จะช่วยกำหนดสิ่งที่ควรพูดได้
- คำทีละคำบนหน้าจอ: "คุณ, รู้, ไหม, ว่า, Omni, ทำ, ข้อความ, สุด, เจ๋ง, ได้" คำแต่ละคำจะปรากฏเป็นเวลา 1 วินาทีพร้อมสไตล์ภาพเคลื่อนไหวที่แตกต่างกัน ไม่มี คำพูด
- มีป้ายถนนที่เขียนว่า "นี่คือภาพที่ AI สร้างขึ้นโดย Omni" มีหน้าร้านที่เขียนว่า "All you need AI" มีรถยนต์ที่มีป้ายทะเบียน "OMNI1.1"
พรอมต์สำหรับการขยายวิดีโอ
Gemini Omni 1.1 Flash ช่วยให้คุณขยายวิดีโอได้ด้วยพรอมต์ เช่น "Extend this video" หรือ "The scene continues" คุณขยายวิดีโอได้ครั้งละ 10 วินาที โดยมีความยาวรวมสูงสุด 40 วินาที
Omni จะสร้างส่วนขยายที่ทำให้วิดีโอ การเคลื่อนไหว ตัวละคร และเสียงสอดคล้องกันโดยใช้ 10 วินาทีสุดท้ายของวิดีโอต้นฉบับเป็นบริบท ระบบจะแก้ไขเฟรมสุดท้ายบางเฟรมในวิดีโออินพุตเพื่อให้การเปลี่ยนฉากเป็นไปอย่างราบรื่น
เมื่อขยายการทำงาน เคล็ดลับการแจ้ง Omni ทั้งหมดในคู่มือนี้จะยังคงใช้ได้
- อธิบายเสียงในฉากที่ขยาย โดยเฉพาะอย่างยิ่งหากคุณต้องการให้มีการเปลี่ยนแปลง
"The music continues into the chorus" - อธิบายว่าฉากดำเนินต่อไปหรือมีการตัดภาพไปยังฉากใหม่ (อาจมีตัวละครเดียวกัน):
"Show the same characters in the next scene" - ใส่รูปภาพและวิดีโอเป็นข้อมูลอ้างอิงเมื่อขยายความเพื่อช่วยให้เอาต์พุตมีความแม่นยำ หรือเพื่อแนะนำตัวละครใหม่:
"The person shown in the reference image enters the scene","The dog in the reference video <VIDEO_REF_0> jumps onto the sofa" - หากใช้ไทม์สแตมป์หรือไวยากรณ์รหัสเวลา 0s จะหมายถึงจุดเริ่มต้นของส่วนที่ขยายของวิดีโอ หากขยายวิดีโอ 10 วินาที การตัดฉากในพรอมต์นี้จะเกิดขึ้นหลังจากผ่านไป 12 วินาที:
"After 2s cut to a new scene with the same characters"
การใช้แท็กในพรอมต์เพื่อกำหนดบทบาทของรูปภาพและวิดีโอ
คุณใช้แท็กเพื่อเชื่อมโยงสื่อที่อัปโหลดกับบทบาทการสร้างที่เฉพาะเจาะจงได้ ซึ่งจะช่วยให้คุณระบุได้ว่ารูปภาพหรือวิดีโอแต่ละรายการเป็นเฟรมเริ่มต้น เฟรมสุดท้าย หรือเฟรมอ้างอิง
1. แท็กอย่างง่าย (แนะนำ)
ในกรณีที่ง่ายๆ ซึ่งบทบาทของสื่อชัดเจนจากพรอมต์ คุณสามารถเชื่อมโยง รูปภาพและวิดีโอกับบทบาทได้โดยตรง ดังนี้
<FIRST_FRAME>: ใช้รูปภาพเป็นเฟรมเริ่มต้นของวิดีโอ เช่น<FIRST_FRAME> a woman is walking<LAST_FRAME>: ใช้รูปภาพเป็นเฟรมสุดท้ายของวิดีโอเพื่อเปลี่ยนฉาก ต้องใช้กับ<FIRST_FRAME>เช่น<FIRST_FRAME> <LAST_FRAME> a woman is walking<IMAGE_REF_N>: ใช้รูปภาพเป็นข้อมูลอ้างอิง เช่นin the style of <IMAGE_REF_0> a woman <IMAGE_REF_1> is walking(รวมข้อมูลอ้างอิงสไตล์จากรูปภาพแรกและข้อมูลอ้างอิงเรื่องจากรูปภาพที่สอง) การอ้างอิงรูปภาพจะเริ่มจาก 0<VIDEO_REF_N>: ใช้เป็นข้อมูลอ้างอิงตัวละครหรือวัตถุ เช่นthe person in <VIDEO_REF_0> is playing the violinข้อมูลอ้างอิงวิดีโอจะเริ่มต้นจาก 0 ด้วย
ตัวอย่างต่อไปนี้มีรูปภาพอ้างอิง 6 ภาพ
[0-3s] A studio fashion sequence. Starting with woman <IMAGE_REF_0>, she is holding <IMAGE_REF_1>
[3-6s] Then we see the man <IMAGE_REF_2> holding <IMAGE_REF_3>
[6-10s] And finally another woman <IMAGE_REF_4> who is holding <IMAGE_REF_5> while walking.
2. การประกาศแหล่งที่มาและการอ้างอิง
สำหรับกรณีที่ซับซ้อนมากขึ้นซึ่งมีอินพุตสื่อหลายรายการและหลายบทบาท คุณสามารถใช้ แท็กคำนำหน้าที่ชัดเจนซึ่งจับคู่กับคำสั่งที่เป็นภาษาธรรมชาติ คุณควร ประกาศแหล่งที่มาและการอ้างอิงเหล่านี้ที่จุดเริ่มต้นของพรอมต์
[# Sources <FIRST_FRAME>@Image1]จะใช้รูปภาพแรกเป็นเฟรมเริ่มต้น[# Sources <FIRST_FRAME>@Image1 <LAST_FRAME>@Image2]จะใช้รูปภาพแรกเป็นเฟรมเริ่มต้นและรูปภาพที่ 2 เป็นเฟรมสุดท้าย[# Sources <FIRST_FRAME>@Image1 <LAST_FRAME>@Image1]จะใช้รูปภาพแรกเป็นทั้งเฟรมแรกและเฟรมสุดท้ายเพื่อสร้างวิดีโอที่เล่นซ้ำ[# Sources <FIRST_FRAME>@Image1] [# References <IMAGE_REF_0>@Image2]จะใช้รูปภาพแรกเป็นเฟรมเริ่มต้นและรูปภาพที่ 2 เป็นข้อมูลอ้างอิง[# Sources <VIDEO_0>@Video1]จะใช้วิดีโอเป็นวิดีโอต้นฉบับหลักในการแก้ไขหรือดัดแปลง[# Sources <PREVIOUS_VIDEO>@Video1]จะใช้วิดีโอจากเทิร์นก่อนหน้าเพื่อขยาย[# References <IMAGE_REF_0>@Image1]จะใช้รูปภาพแรกเป็นข้อมูลอ้างอิง[# References <IMAGE_REF_1>@Image2]จะใช้รูปภาพที่ 2 เป็นข้อมูลอ้างอิง[# References <IMAGE_REF_0>@Image1 <IMAGE_REF_1>@Image2]จะใช้รูปภาพทั้ง 2 รูปเป็นข้อมูลอ้างอิง[# References <VIDEO_REF_0>@Video1]จะใช้วิดีโอแรกเป็นข้อมูลอ้างอิง[# References <IMAGE_REF_0>@Image1 <VIDEO_REF_0>@Video1]จะใช้ทั้งรูปภาพและวิดีโอเป็นข้อมูลอ้างอิง
เพิ่มคำแนะนำที่ท้ายพรอมต์
- สำหรับเฟรมเริ่มต้น ให้ทำดังนี้
"Use this image as the starting frame." - สำหรับวิดีโอที่เล่นวนผ่านเฟรมเริ่มต้นและเฟรมสิ้นสุด ให้ทำดังนี้
"Use this image as the first frame and the last frame." - สำหรับรูปภาพอ้างอิง
"Use the given image(s) as references for video generation. The images should not be used as literal initial frames." - สำหรับวิดีโออ้างอิง:
"Use the given video(s) as references. Do not use them as a source for video editing."
ตัวอย่างพรอมต์ที่มีการประกาศแหล่งที่มาและการอ้างอิง
เฟรมเริ่มต้นที่รวมกับรูปภาพอ้างอิง:
[# Sources <FIRST_FRAME>@Image1] [# References <IMAGE_REF_0>@Image2] a woman <IMAGE_REF_0> is walking. Use Image1 as the starting frame. Use Image2 as a reference for the video generation.
วิดีโออ้างอิงตัวละครที่รวมกับรูปภาพอ้างอิงวัตถุ:
[# References <IMAGE_REF_0>@Image1 <VIDEO_REF_0>@Video1] The woman in <VIDEO_REF_0> is playing the violin shown in <IMAGE_REF_0>. Use Video1 as a character reference and Image1 as an object reference.
ขั้นตอนถัดไป
- เริ่มต้นใช้งาน Gemini Omni Flash โดยทดลองใช้ใน Omni Quickstart Colab
- ดูวิธีเขียนพรอมต์ให้ดียิ่งขึ้นด้วยข้อมูลเบื้องต้นเกี่ยวกับการออกแบบพรอมต์