

Gemini Robotics ER मॉडल, इमेज में बदलाव करने के लिए Python कोड लिख सकते हैं और उसे लागू कर सकते हैं. साथ ही, जवाब देने से पहले लॉजिक लागू कर सकते हैं. इस पेज पर, कोड को लागू करने के उदाहरण दिए गए हैं. जैसे, ज़ूम और क्रॉप करके ऑब्जेक्ट का पता लगाना, इंस्ट्रूमेंट रीडिंग, फ़्लूड मेज़रमेंट, सर्किट बोर्ड रीडिंग, और इमेज एनोटेशन.
इन उदाहरणों को अपने इस्तेमाल के हिसाब से बनाने के लिए, प्रॉम्प्ट टेक्स्ट और अपलोड की गई इमेज फ़ाइल को अपनी फ़ाइल से बदलें. आपके पास प्रॉम्प्ट में अनुरोध किए गए JSON स्कीमा में बदलाव करने का विकल्प भी होता है, ताकि वह आपके ऐप्लिकेशन की ज़रूरत के हिसाब से आउटपुट स्ट्रक्चर से मेल खाए. इसके अलावा, आउटपुट फ़ॉर्मैट और सटीक जानकारी देने के लिए, system_instruction जोड़ा जा सकता है.
पूरे रन करने लायक कोड के लिए, रोबोटिक्स कुकबुक देखें.
सूझ-बूझ वाले मॉडल का लेवल
मॉडल के सोचने के लेवल को कंट्रोल किया जा सकता है, ताकि सटीक जवाब पाने के लिए इंतज़ार का समय कम किया जा सके. स्पेशल टास्क, जैसे कि ऑब्जेक्ट डिटेक्शन, कम थिंकिंग लेवल पर अच्छी तरह से काम करते हैं. गिनती करने या वज़न का अनुमान लगाने जैसे मुश्किल टास्क के लिए, सूझ-बूझ वाले मॉडल का इस्तेमाल करना फ़ायदेमंद होता है.
यहां दिए गए उदाहरण में, गिनती के मुश्किल टास्क के लिए, सोचने का लेवल high पर सेट किया गया है:
Python
from google import genai

client = genai.Client()

uploaded_file = client.files.upload(file="scene.jpeg")

interaction = client.interactions.create(
    model="gemini-robotics-er-2-preview",
    input=[
        {
            "type": "image",
            "uri": uploaded_file.uri,
            "mime_type": uploaded_file.mime_type
        },
        {"type": "text", "text": "Identify and count all objects on the table."}
    ],
    generation_config={
        "thinking_level": "high"  # Use "minimal" or "low" for faster spatial tasks
    }
)

print(interaction.output_text)
ज़्यादा जानकारी के लिए, सोचना सेक्शन देखें.
ऑब्जेक्ट का पता लगाने की सुविधा (ज़ूम और क्रॉप करें)
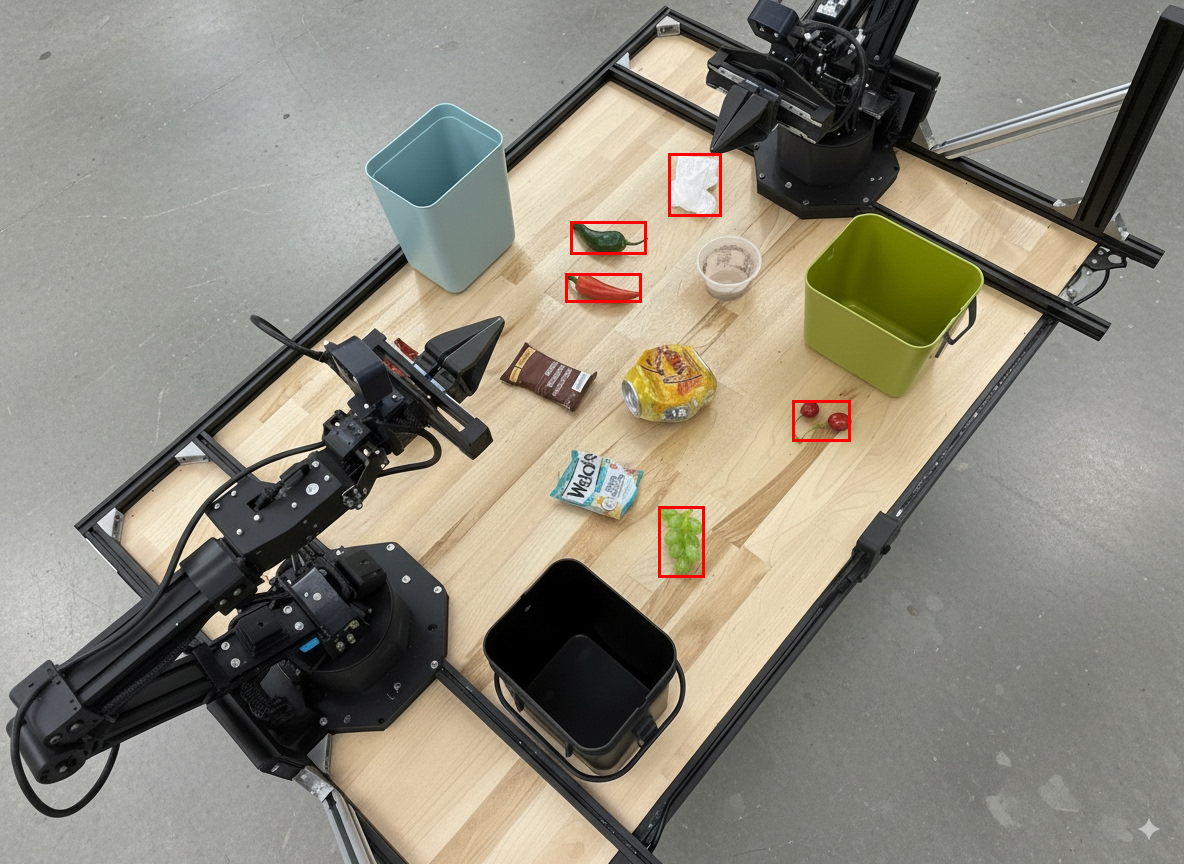
यहां दिए गए उदाहरण में, कोड एक्ज़ीक्यूशन का इस्तेमाल करके किसी इमेज को ज़ूम और क्रॉप किया गया है. इससे ऑब्जेक्ट का पता लगाने और बाउंडिंग बॉक्स दिखाने के दौरान, इमेज को ज़्यादा साफ़ तौर पर देखा जा सकता है.
Python
from google import genai

client = genai.Client()

uploaded_file = client.files.upload(file="sorting.jpeg")

prompt = """
Return JSON in the format {label: val, y: val, x: val, y2: val, x2: val} for
the compostable objects in this scene. Please Zoom and crop the image for a
clearer view. Return an annotated image of the final result with the bounding
boxes drawn on it to the API caller as a part of your process.
"""

interaction = client.interactions.create(
    model="gemini-robotics-er-2-preview",
    input=[
        {
            "type": "image",
            "uri": uploaded_file.uri,
            "mime_type": uploaded_file.mime_type
        },
        {"type": "text", "text": prompt}
    ],
    tools=[{"type": "code_execution"}]
)

print(interaction.output_text)
मॉडल आउटपुट, इस JSON रिस्पॉन्स से मिलता-जुलता होगा:
[
  {"label": "compostable", "y": 256, "x": 482, "y2": 295, "x2": 546},
  {"label": "compostable", "y": 317, "x": 478, "y2": 350, "x2": 542},
  {"label": "compostable", "y": 586, "x": 556, "y2": 668, "x2": 595},
  {"label": "compostable", "y": 463, "x": 669, "y2": 511, "x2": 718},
  {"label": "compostable", "y": 178, "x": 565, "y2": 250, "x2": 609}
]
इस इमेज में, मॉडल से मिले बॉक्स दिखाए गए हैं.
एनालॉग गेज को पढ़ना और लॉजिक लागू करना
यहां दिए गए उदाहरण में, मॉडल का इस्तेमाल करके ऐनलॉग गेज को पढ़ने और समय की गणना करने का तरीका बताया गया है. यह JSON आउटपुट को लागू करने के लिए, सिस्टम के निर्देश का इस्तेमाल करता है.
Python
from google import genai

client = genai.Client()

uploaded_file = client.files.upload(file="gauge.jpeg")

interaction = client.interactions.create(
    model="gemini-robotics-er-2-preview",
    system_instruction="Be precise. When JSON is requested, reply with ONLY that JSON (no preface, no code block).",
    input=[
        {
            "type": "image",
            "uri": uploaded_file.uri,
            "mime_type": uploaded_file.mime_type
        },
        {"type": "text", "text": """Read the current value from this gauge. Then, calculate how long
        it will take at the current rate for the value to reach maximum.
        Reply in JSON: {"current_value": val, "max_value": val,
        "time_to_max_minutes": val}"""}
    ],
    tools=[{"type": "code_execution"}]
)

print(interaction.output_text)
किसी कंटेनर में मौजूद तरल पदार्थ को मापना
इस उदाहरण में बताया गया है कि किसी कंटेनर में मौजूद फ़्लूड के लेवल का पता लगाने के लिए, कोड एक्ज़ीक्यूशन का इस्तेमाल कैसे किया जाता है.
Python
from google import genai

client = genai.Client()

uploaded_file = client.files.upload(file="fluid.jpeg")

interaction = client.interactions.create(
    model="gemini-robotics-er-2-preview",
    system_instruction="Be precise. When JSON is requested, reply with ONLY that JSON (no preface, no code block).",
    input=[
        {
            "type": "image",
            "uri": uploaded_file.uri,
            "mime_type": uploaded_file.mime_type
        },
        {"type": "text", "text": """Measure the amount of fluid in the container. Reply in JSON:
        {"fluid_level_ml": val, "container_capacity_ml": val,
        "percentage_full": val}"""}
    ],
    tools=[{"type": "code_execution"}]
)

print(interaction.output_text)
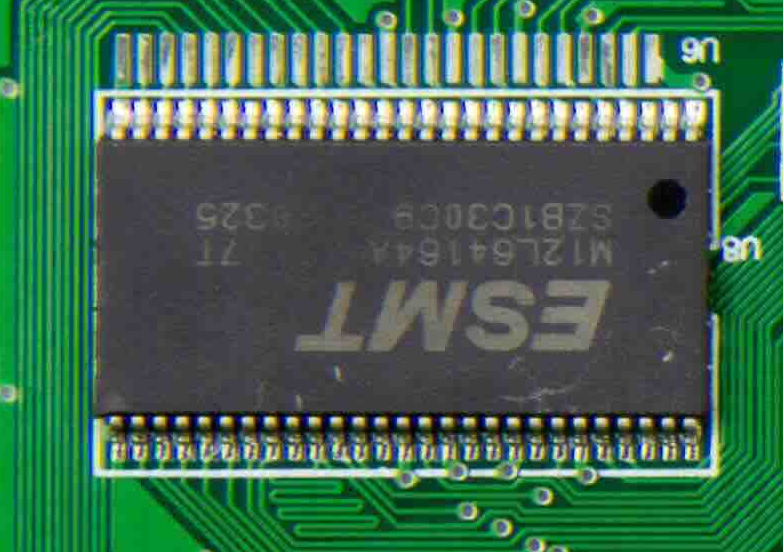
सर्किट बोर्ड पर मौजूद मार्किंग को पढ़ना
यहां दिए गए उदाहरण में, सर्किट बोर्ड पर मौजूद मार्किंग को पढ़ने के लिए, कोड को लागू करने का तरीका बताया गया है.
Python
from google import genai

client = genai.Client()

uploaded_file = client.files.upload(file="circuit_board.jpeg")

interaction = client.interactions.create(
    model="gemini-robotics-er-2-preview",
    system_instruction="Be precise. When JSON is requested, reply with ONLY that JSON (no preface, no code block).",
    input=[
        {
            "type": "image",
            "uri": uploaded_file.uri,
            "mime_type": uploaded_file.mime_type
        },
        {"type": "text", "text": """Read all visible component labels and markings on this circuit
        board. Reply in JSON: {"components": [{"label": val,
        "location": [y, x]}]}"""}
    ],
    tools=[{"type": "code_execution"}]
)

print(interaction.output_text)
इमेज एनोटेशन
नीचे दिए गए उदाहरण में बताया गया है कि कोड को एक्ज़ीक्यूट करने की सुविधा का इस्तेमाल करके, किसी इमेज में एनोटेशन कैसे जोड़ा जाता है.जैसे, डिस्पोज़ल के निर्देशों के लिए ऐरो बनाना. साथ ही, बदली गई इमेज को वापस पाना.
Python
from google import genai

client = genai.Client()

# Load your image
uploaded_file = client.files.upload(file="sorting.jpeg")

prompt = """
Look at this image and return it as an annotated version using arrows of
different colors to represent which items should go in which bins for
disposal. You must return the final image to the API caller.
"""

interaction = client.interactions.create(
    model="gemini-robotics-er-2-preview",
    input=[
        {
            "type": "image",
            "uri": uploaded_file.uri,
            "mime_type": uploaded_file.mime_type
        },
        {"type": "text", "text": prompt}
    ],
    tools=[{"type": "code_execution"}]
)

print(interaction.output_text)
इमेज के तौर पर दिए गए इनपुट का एक उदाहरण यहां दिया गया है.
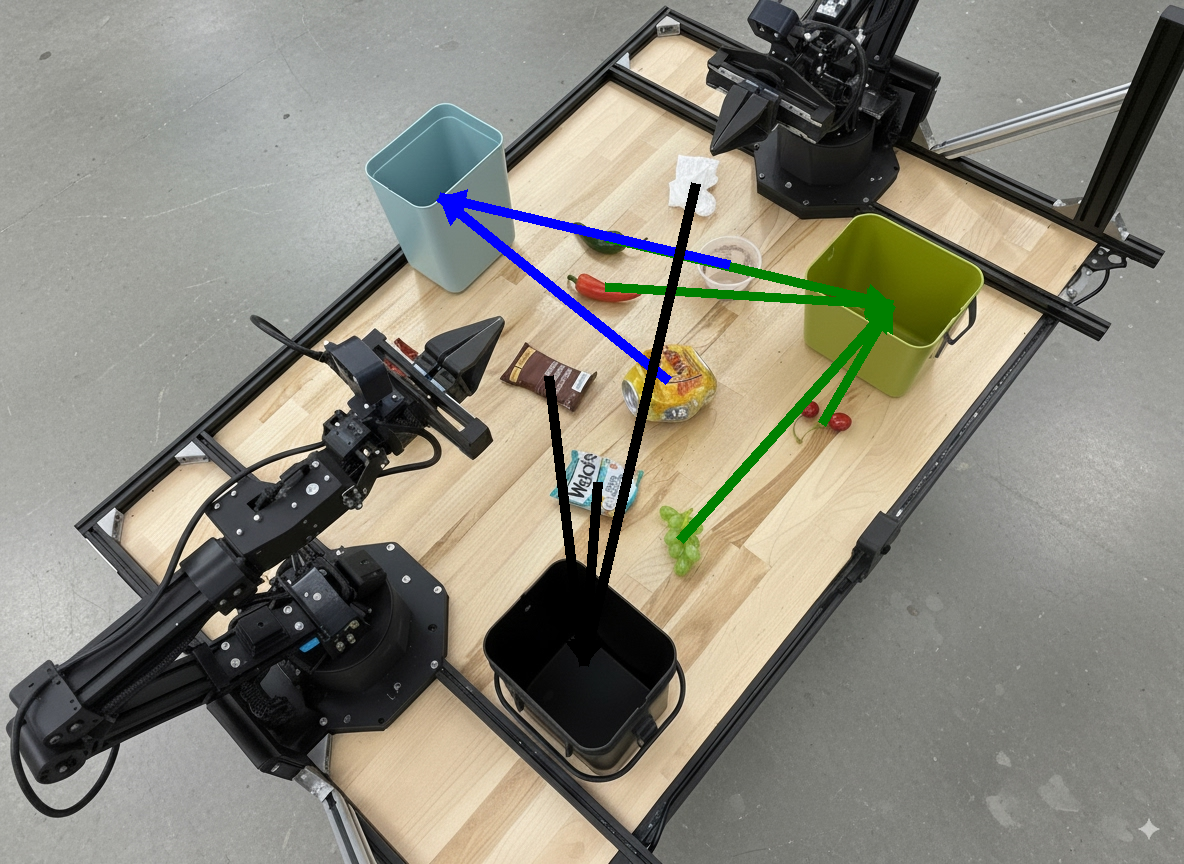
मॉडल का आउटपुट इस तरह का होगा:
  The annotated image shows the suggested disposal locations for the items on the table:
  - **Green bin (Compost/Organic)**: Green chili, red chili, grapes, and cherries.
  - **Blue bin (Recycling)**: Yellow crushed can and plastic container.
  - **Black bin (Trash)**: Chocolate bar wrapper, Welch's packet, and white tissue.
आगे क्या करना है
- टास्क ऑर्केस्ट्रेशन — कस्टम रोबोट एपीआई के साथ लंबे समय तक चलने वाले टास्क.
- स्ट्रीमिंग के साथ रोबोटिक्स — रीयल-टाइम में दोनों तरफ़ से स्ट्रीमिंग (सिर्फ़ Gemini Robotics ER 2 के लिए).
- वीडियो को समझना — वीडियो में किसी खास पल को ढूंढना और प्रोग्रेस को कैटगरी में बांटना (सिर्फ़ Gemini Robotics ER 2 के लिए).