

Gemini Robotics ER モデルは、オブジェクトを指し示したり、動画内でオブジェクトを追跡したり、境界ボックスでオブジェクトを検出したり、移動軌跡を生成したりできます。
実行可能な完全なコードについては、 ロボット工学のクックブックをご覧ください。
オブジェクトを指し示す
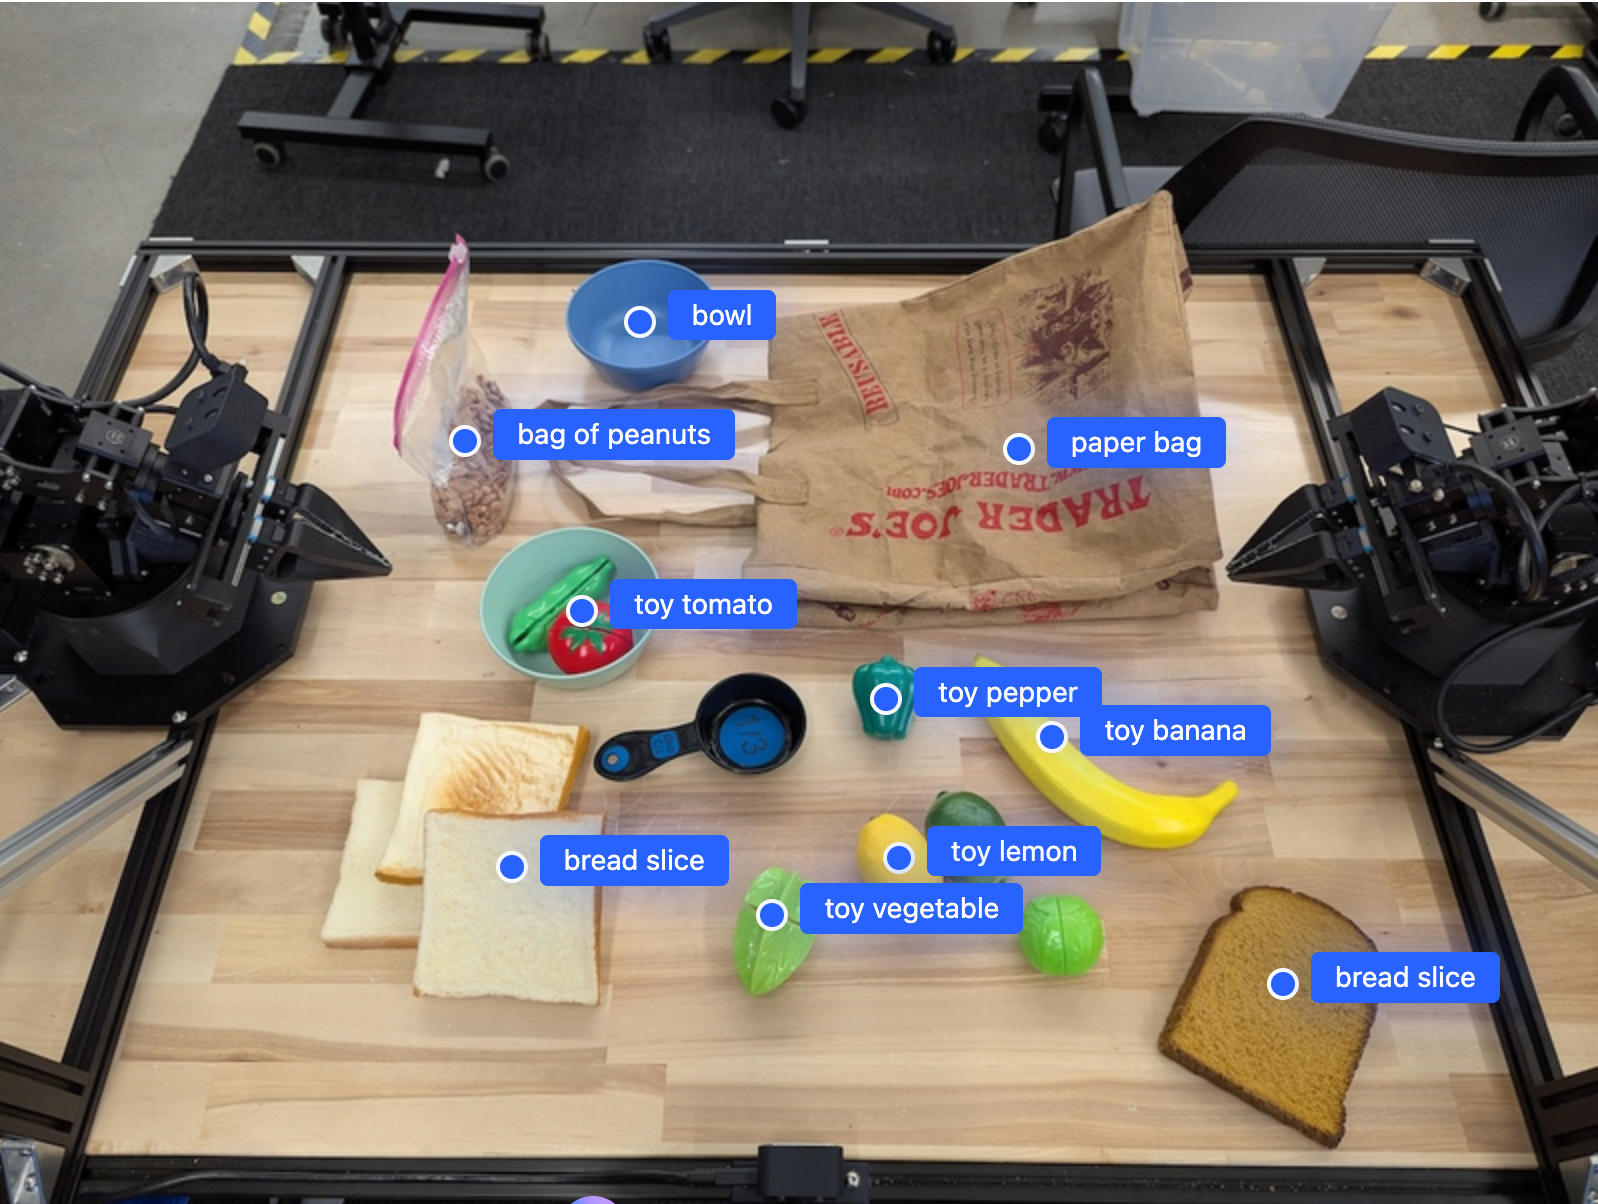
次の例では、画像内の特定のオブジェクトを検索し、正規化された [y, x] 座標を返します。
Python
from google import genai

PROMPT = """
          Point to no more than 10 items in the image. The label returned
          should be an identifying name for the object detected.
          The answer should follow the json format: [{"point": <point>,
          "label": <label1>}, ...]. The points are in [y, x] format
          normalized to 0-1000.
        """
client = genai.Client()

uploaded_file = client.files.upload(file="my-image.png")

image_response = client.interactions.create(
    model="gemini-robotics-er-2-preview",
    input=[
        {
            "type": "image",
            "uri": uploaded_file.uri,
            "mime_type": uploaded_file.mime_type
        },
        {"type": "text", "text": PROMPT}
    ],
    generation_config={"thinking_level": "high"},
)

print(image_response.output_text)
REST
# First, ensure you have the image file locally.
# Encode the image to base64
IMAGE_BASE64=$(base64 -w 0 my-image.png)

curl -X POST \
  "https://generativelanguage.googleapis.com/v1beta/interactions" \
  -H "x-goog-api-key: $GEMINI_API_KEY" \
  -H "Content-Type: application/json" \
  -d '{
    "model": "gemini-robotics-er-2-preview",
    "input": {
      "parts": [
        {
          "inlineData": {
            "mimeType": "image/png",
            "data": "'"${IMAGE_BASE64}"'"
          }
        },
        {
          "text": "Point to no more than 10 items in the image. The label returned should be an identifying name for the object detected. The answer should follow the json format: [{\"point\": [y, x], \"label\": <label1>}, ...]. The points are in [y, x] format normalized to 0-1000."
        }
      ]
    },
    "generation_config": {
      "thinking_config": {
        "thinking_level": "high"
      }
    }
  }'
出力は、オブジェクトを含む JSON 配列になります。各オブジェクトには、point(正規化された [y, x] 座標)と、オブジェクトを識別する label が含まれます。
JSON
[
  {"point": [376, 508], "label": "small banana"},
  {"point": [287, 609], "label": "larger banana"},
  {"point": [223, 303], "label": "pink starfruit"},
  {"point": [435, 172], "label": "paper bag"},
  {"point": [270, 786], "label": "green plastic bowl"},
  {"point": [488, 775], "label": "metal measuring cup"},
  {"point": [673, 580], "label": "dark blue bowl"},
  {"point": [471, 353], "label": "light blue bowl"},
  {"point": [492, 497], "label": "bread"},
  {"point": [525, 429], "label": "lime"}
]
次の画像は、これらの点を表示する方法の例です。
動画内のオブジェクトを追跡する
Gemini Robotics ER 2 では、動画フレームを分析して、オブジェクトを時間経過とともに追跡することもできます。サポートされている動画形式の一覧については、動画入力 をご覧ください。
Python
from google import genai

client = genai.Client()

uploaded_file = client.files.upload(file="my-video.mp4")

prompt = """
          Point to the red ball in every frame where it appears.
          The answer should follow the json format: [{"point": [y, x],
          "label": <label>}, ...]. The points are in [y, x] format
          normalized to 0-1000. Return one entry per frame that contains
          the object.
        """

image_response = client.interactions.create(
  model="gemini-robotics-er-2-preview",
  input=[
    {
        "type": "video",
        "uri": uploaded_file.uri,
        "mime_type": uploaded_file.mime_type
    },
    {"type": "text", "text": prompt}
  ],
)

print(image_response.output_text)
オブジェクト検出と境界ボックス
点に加えて、検出されたオブジェクトの空間的な詳細情報を提供する 2D 境界ボックスを返すようにモデルに指示することもできます。
Python
from google import genai

client = genai.Client()

uploaded_file = client.files.upload(file="my-image.png")

prompt = """
          Detect all objects in this image and return bounding boxes.
          The answer should follow the JSON format:
          [{"label": <label>, "y": <y_min>, "x": <x_min>,
            "y2": <y_max>, "x2": <x_max>}, ...]
          where coordinates are normalized to 0-1000.
        """

image_response = client.interactions.create(
  model="gemini-robotics-er-2-preview",
  input=[
    {
        "type": "image",
        "uri": uploaded_file.uri,
        "mime_type": uploaded_file.mime_type
    },
    {"type": "text", "text": prompt}
  ],
)

print(image_response.output_text)
軌跡
Gemini Robotics ER 2 は、軌跡を定義する点のシーケンスを生成できます。これは、ロボットの動きを誘導するのに役立ちます。
この例では、赤いペンをオーガナイザーに移動する軌跡をリクエストします。これには、中間ウェイポイントの推定が含まれます。コードはプロンプトのみを表示するように短縮されています。
Python
prompt = """
          Generate a trajectory for the robotic arm to pick up the red pen
          and place it in the organizer. Return a list of waypoints as JSON:
          [{"step": <int>, "point": [y, x], "action": <description>}, ...]
          where coordinates are normalized to 0-1000.
        """
ノートパソコンのスペースを作る
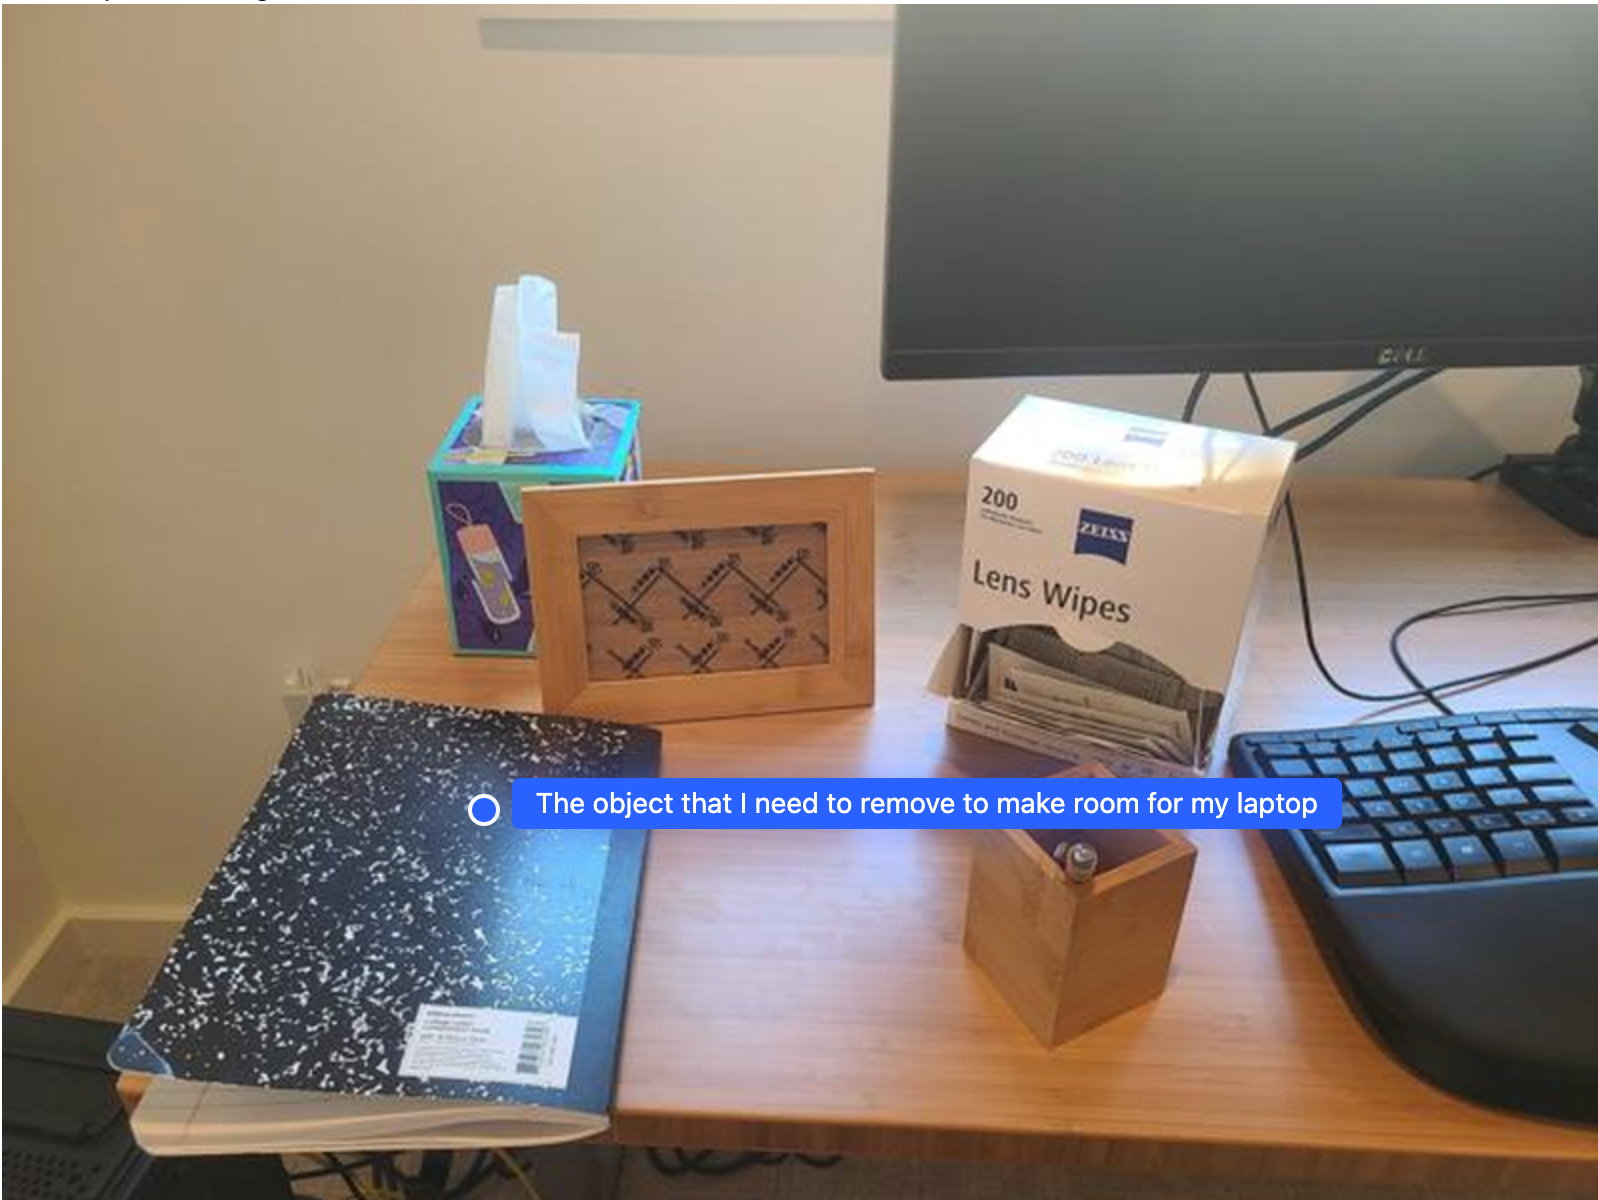
この例では、Gemini Robotics ER が空間について推論する方法を示します。プロンプトは、別のアイテムのスペースを作成するために移動する必要があるオブジェクトを特定するようにモデルに指示します。
Python
from google import genai

client = genai.Client()

uploaded_file = client.files.upload(file="path/to/image-with-objects.jpg")

prompt = """
          Point to the object that I need to remove to make room for my laptop
          The answer should follow the JSON format: [{"point": <point>,
          "label": <label1>}, ...]. The points are in [y, x] format normalized to 0-1000.
        """

image_response = client.interactions.create(
  model="gemini-robotics-er-2-preview",
  input=[
    {
        "type": "image",
        "uri": uploaded_file.uri,
        "mime_type": uploaded_file.mime_type
    },
    {"type": "text", "text": prompt}
  ],
)

print(image_response.output_text)
レスポンスには、ユーザーの質問に答えるオブジェクトの 2D 座標が含まれます。この場合、ノートパソコンのスペースを作るために移動する必要があるオブジェクトです。
[
  {"point": [672, 301], "label": "The object that I need to remove to make room for my laptop"}
]
ランチを詰める
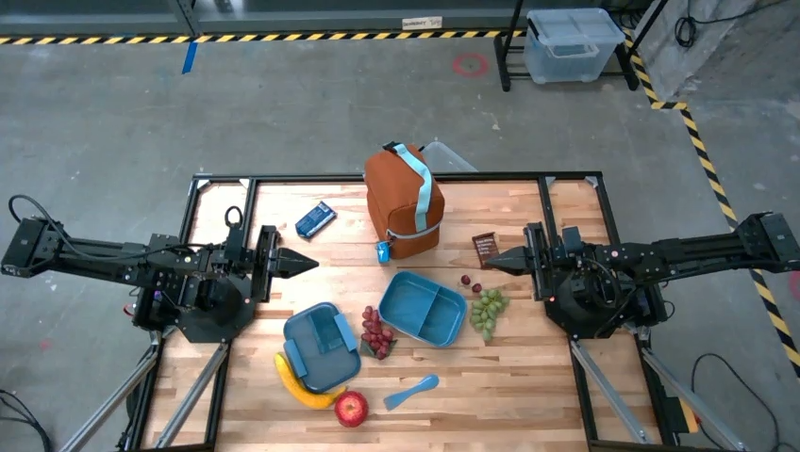
モデルは、複数ステップのタスクの手順を提供し、各ステップに関連するオブジェクトを指し示すこともできます。この例では、モデルがランチバッグを詰める一連のステップを計画する方法を示します。
Python
from google import genai

client = genai.Client()

uploaded_file = client.files.upload(file="path/to/image-of-lunch.jpg")

prompt = """
          Explain how to pack the lunch box and lunch bag. Point to each
          object that you refer to. Each point should be in the format:
          [{"point": [y, x], "label": }], where the coordinates are
          normalized between 0-1000.
        """

image_response = client.interactions.create(
  model="gemini-robotics-er-2-preview",
  input=[
    {
        "type": "image",
        "uri": uploaded_file.uri,
        "mime_type": uploaded_file.mime_type
    },
    {"type": "text", "text": prompt}
  ],
)

print(image_response.output_text)
このプロンプトのレスポンスは、画像入力からランチバッグを詰める方法に関するステップごとの手順です。
入力画像
モデル出力
Based on the image, here is a plan to pack the lunch box and lunch bag:

1.  **Pack the fruit into the lunch box.** Place the [apple](apple), [banana](banana), [red grapes](red grapes), and [green grapes](green grapes) into the [blue lunch box](blue lunch box).
2.  **Add the spoon to the lunch box.** Put the [blue spoon](blue spoon) inside the lunch box as well.
3.  **Close the lunch box.** Secure the lid on the [blue lunch box](blue lunch box).
4.  **Place the lunch box inside the lunch bag.** Put the closed [blue lunch box](blue lunch box) into the [brown lunch bag](brown lunch bag).
5.  **Pack the remaining items into the lunch bag.** Place the [blue snack bar](blue snack bar) and the [brown snack bar](brown snack bar) into the [brown lunch bag](brown lunch bag).

Here is the list of objects and their locations:
*   [{"point": [899, 440], "label": "apple"}]
*   [{"point": [814, 363], "label": "banana"}]
*   [{"point": [727, 470], "label": "red grapes"}]
*   [{"point": [675, 608], "label": "green grapes"}]
*   [{"point": [706, 529], "label": "blue lunch box"}]
*   [{"point": [864, 517], "label": "blue spoon"}]
*   [{"point": [499, 401], "label": "blue snack bar"}]
*   [{"point": [614, 705], "label": "brown snack bar"}]
*   [{"point": [448, 501], "label": "brown lunch bag"}]
次のステップ
- エージェント機能 - コード実行、機器の読み取り、画像の注釈。
- タスク オーケストレーション - カスタム ロボット API を使用した長期的なタスク。
- ストリーミングによるロボット工学 - リアルタイム双方向ストリーミング(Gemini Robotics ER 2 のみ)。
- 動画理解 - モーメントの検出と進捗状況の分類(Gemini Robotics ER 2 のみ)。