

โมเดล Gemini Robotics ER สามารถชี้ไปยังออบเจ็กต์ ติดตามออบเจ็กต์ในวิดีโอ ตรวจจับออบเจ็กต์ด้วยกรอบล้อมรอบ และสร้างวิถีการเคลื่อนไหว
ดูโค้ดที่เรียกใช้ได้ทั้งหมดที่ Cookbook สำหรับ Robotics
ชี้ไปยังออบเจ็กต์
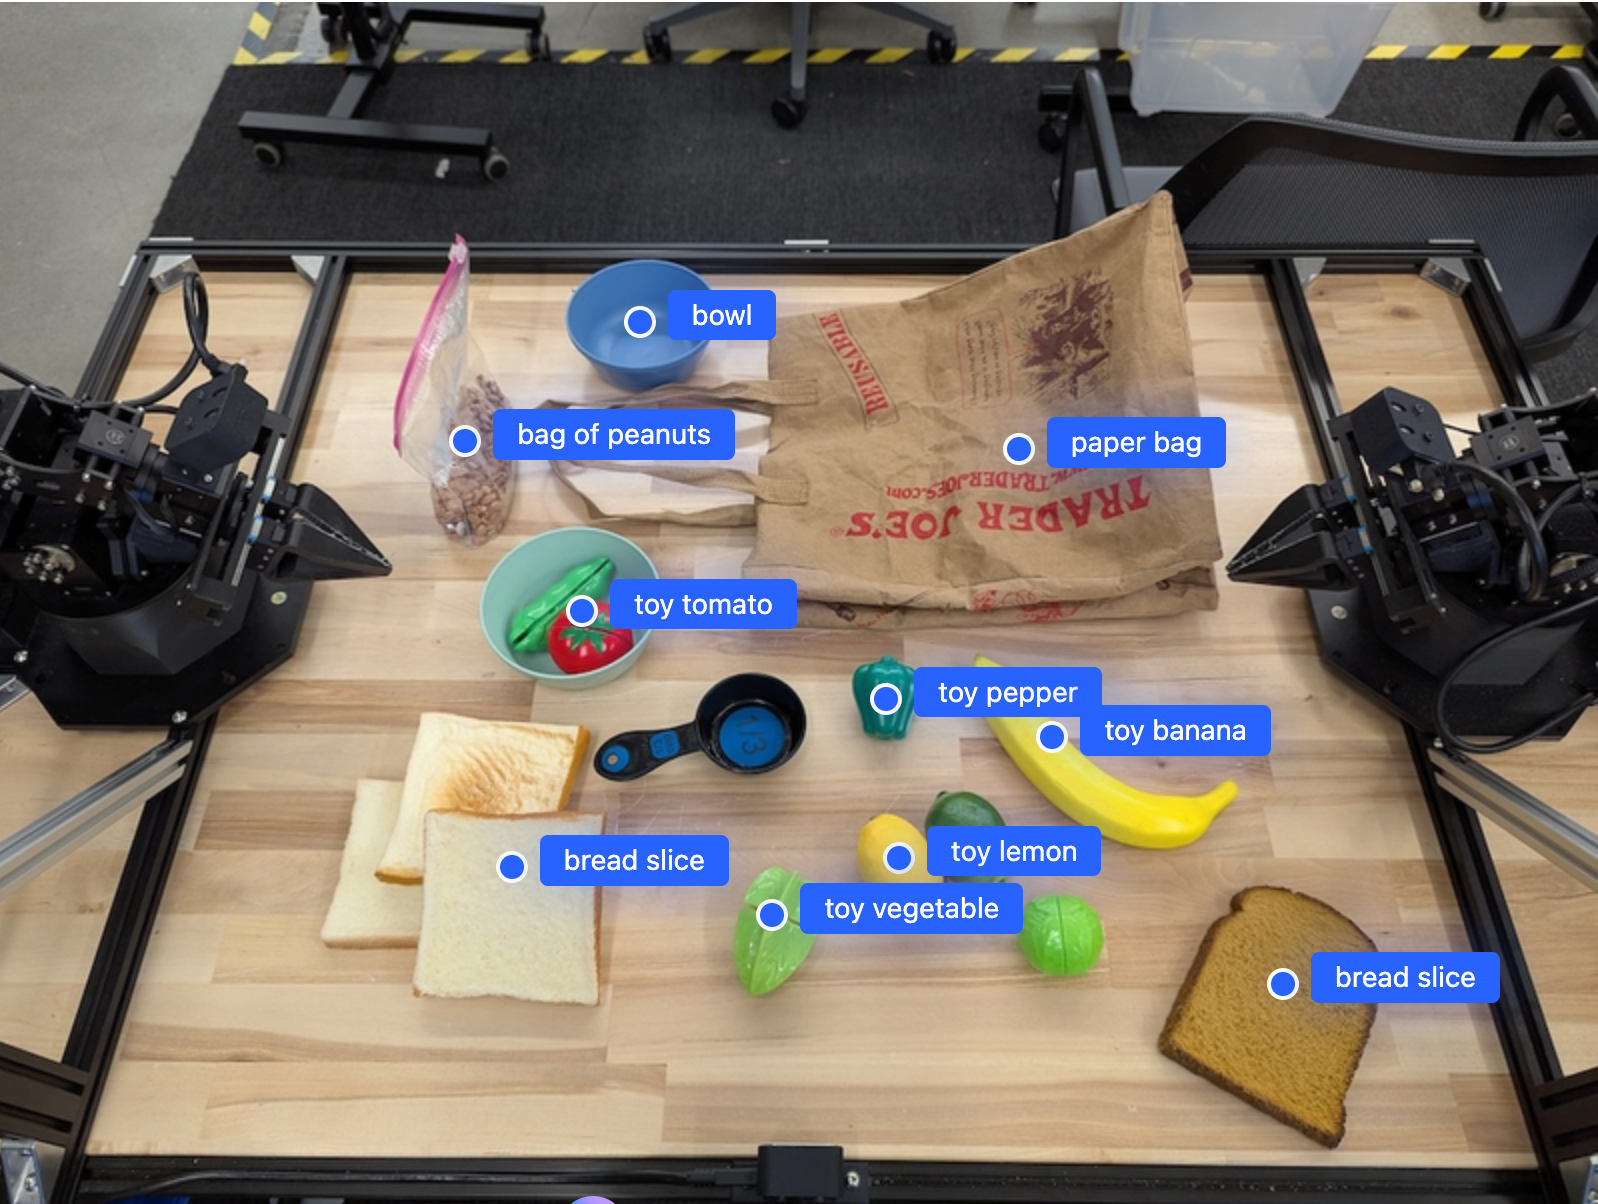
ตัวอย่างต่อไปนี้จะค้นหาออบเจ็กต์ที่เฉพาะเจาะจงในรูปภาพและแสดงผลพิกัด [y, x] ที่เป็นค่าปกติของออบเจ็กต์
Python
from google import genai

PROMPT = """
          Point to no more than 10 items in the image. The label returned
          should be an identifying name for the object detected.
          The answer should follow the json format: [{"point": <point>,
          "label": <label1>}, ...]. The points are in [y, x] format
          normalized to 0-1000.
        """
client = genai.Client()

uploaded_file = client.files.upload(file="my-image.png")

image_response = client.interactions.create(
    model="gemini-robotics-er-2-preview",
    input=[
        {
            "type": "image",
            "uri": uploaded_file.uri,
            "mime_type": uploaded_file.mime_type
        },
        {"type": "text", "text": PROMPT}
    ],
    generation_config={"thinking_level": "high"},
)

print(image_response.output_text)
REST
# First, ensure you have the image file locally.
# Encode the image to base64
IMAGE_BASE64=$(base64 -w 0 my-image.png)

curl -X POST \
  "https://generativelanguage.googleapis.com/v1beta/interactions" \
  -H "x-goog-api-key: $GEMINI_API_KEY" \
  -H "Content-Type: application/json" \
  -d '{
    "model": "gemini-robotics-er-2-preview",
    "input": {
      "parts": [
        {
          "inlineData": {
            "mimeType": "image/png",
            "data": "'"${IMAGE_BASE64}"'"
          }
        },
        {
          "text": "Point to no more than 10 items in the image. The label returned should be an identifying name for the object detected. The answer should follow the json format: [{\"point\": [y, x], \"label\": <label1>}, ...]. The points are in [y, x] format normalized to 0-1000."
        }
      ]
    },
    "generation_config": {
      "thinking_config": {
        "thinking_level": "high"
      }
    }
  }'
เอาต์พุตจะเป็นอาร์เรย์ JSON ที่มีออบเจ็กต์ ซึ่งแต่ละออบเจ็กต์จะมี point (พิกัด [y, x] ที่เป็นค่าปกติ) และ label ที่ระบุออบเจ็กต์
JSON
[
  {"point": [376, 508], "label": "small banana"},
  {"point": [287, 609], "label": "larger banana"},
  {"point": [223, 303], "label": "pink starfruit"},
  {"point": [435, 172], "label": "paper bag"},
  {"point": [270, 786], "label": "green plastic bowl"},
  {"point": [488, 775], "label": "metal measuring cup"},
  {"point": [673, 580], "label": "dark blue bowl"},
  {"point": [471, 353], "label": "light blue bowl"},
  {"point": [492, 497], "label": "bread"},
  {"point": [525, 429], "label": "lime"}
]
รูปภาพต่อไปนี้แสดงตัวอย่างวิธีแสดงจุดเหล่านี้
การติดตามออบเจ็กต์ในวิดีโอ
Gemini Robotics ER 2 ยังวิเคราะห์เฟรมวิดีโอเพื่อติดตามออบเจ็กต์เมื่อเวลาผ่านไปได้ด้วย ดูรายการรูปแบบวิดีโอที่รองรับได้ที่ อินพุตวิดีโอ
Python
from google import genai

client = genai.Client()

uploaded_file = client.files.upload(file="my-video.mp4")

prompt = """
          Point to the red ball in every frame where it appears.
          The answer should follow the json format: [{"point": [y, x],
          "label": <label>}, ...]. The points are in [y, x] format
          normalized to 0-1000. Return one entry per frame that contains
          the object.
        """

image_response = client.interactions.create(
  model="gemini-robotics-er-2-preview",
  input=[
    {
        "type": "video",
        "uri": uploaded_file.uri,
        "mime_type": uploaded_file.mime_type
    },
    {"type": "text", "text": prompt}
  ],
)

print(image_response.output_text)
การตรวจจับออบเจ็กต์และกรอบล้อมรอบ
นอกเหนือจากจุดแล้ว คุณยังแจ้งให้โมเดลแสดงผลกรอบล้อมรอบ 2 มิติ ซึ่งให้รายละเอียดเชิงพื้นที่เพิ่มเติมสำหรับออบเจ็กต์ที่ตรวจพบได้ด้วย
Python
from google import genai

client = genai.Client()

uploaded_file = client.files.upload(file="my-image.png")

prompt = """
          Detect all objects in this image and return bounding boxes.
          The answer should follow the JSON format:
          [{"label": <label>, "y": <y_min>, "x": <x_min>,
            "y2": <y_max>, "x2": <x_max>}, ...]
          where coordinates are normalized to 0-1000.
        """

image_response = client.interactions.create(
  model="gemini-robotics-er-2-preview",
  input=[
    {
        "type": "image",
        "uri": uploaded_file.uri,
        "mime_type": uploaded_file.mime_type
    },
    {"type": "text", "text": prompt}
  ],
)

print(image_response.output_text)
วิถี
Gemini Robotics ER 2 สามารถสร้างลำดับจุดที่กำหนดวิถี ซึ่งมีประโยชน์สำหรับการนำทางการเคลื่อนไหวของหุ่นยนต์
ตัวอย่างนี้ขอวิถีเพื่อย้ายปากกาสีแดงไปยังกล่องใส่เครื่องเขียน รวมถึงการประมาณจุดอ้างอิงระหว่างทาง เราได้ลดโค้ดลงเพื่อแสดงเฉพาะพรอมต์
Python
prompt = """
          Generate a trajectory for the robotic arm to pick up the red pen
          and place it in the organizer. Return a list of waypoints as JSON:
          [{"step": <int>, "point": [y, x], "action": <description>}, ...]
          where coordinates are normalized to 0-1000.
        """
การจัดพื้นที่สำหรับแล็ปท็อป
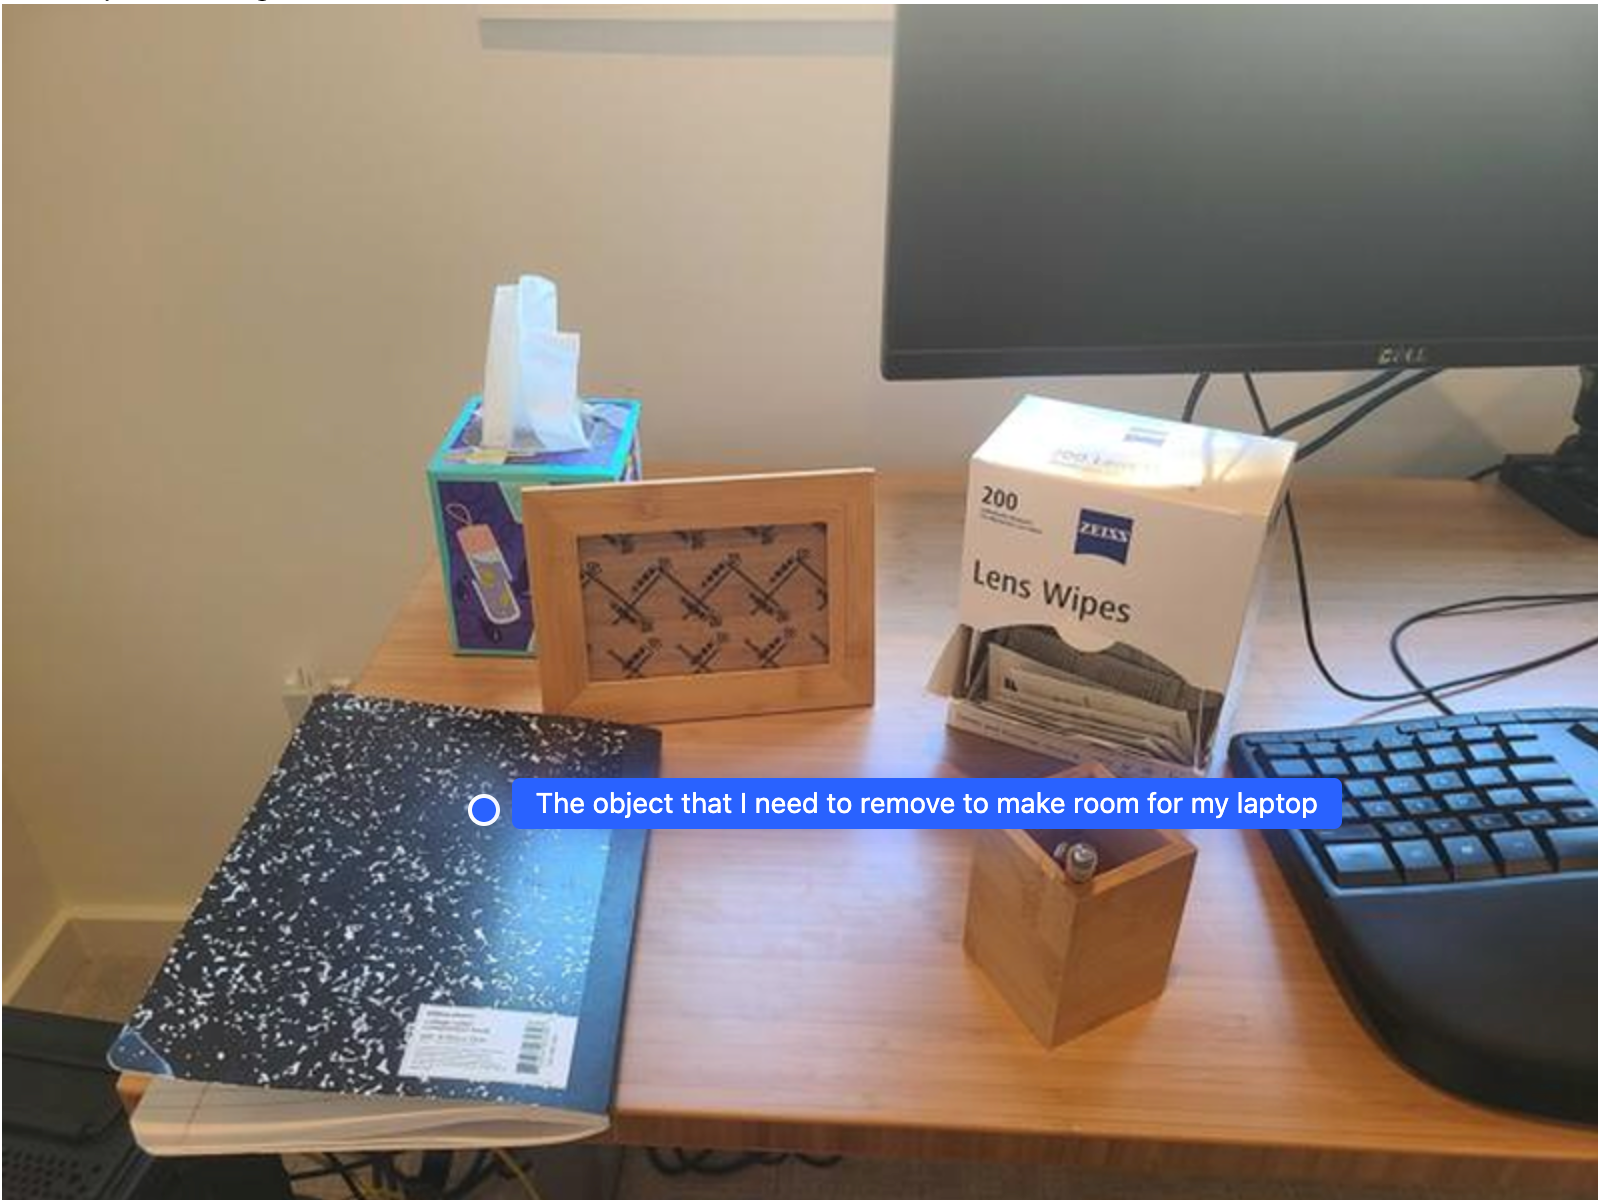
ตัวอย่างนี้แสดงวิธีที่ Gemini Robotics ER สามารถให้เหตุผลเกี่ยวกับพื้นที่ พรอมต์ขอให้โมเดลระบุออบเจ็กต์ที่ต้องย้ายเพื่อสร้างพื้นที่สำหรับรายการอื่น
Python
from google import genai

client = genai.Client()

uploaded_file = client.files.upload(file="path/to/image-with-objects.jpg")

prompt = """
          Point to the object that I need to remove to make room for my laptop
          The answer should follow the JSON format: [{"point": <point>,
          "label": <label1>}, ...]. The points are in [y, x] format normalized to 0-1000.
        """

image_response = client.interactions.create(
  model="gemini-robotics-er-2-preview",
  input=[
    {
        "type": "image",
        "uri": uploaded_file.uri,
        "mime_type": uploaded_file.mime_type
    },
    {"type": "text", "text": prompt}
  ],
)

print(image_response.output_text)
การตอบกลับจะมีพิกัด 2 มิติของออบเจ็กต์ที่ตอบคำถามของผู้ใช้ ซึ่งในกรณีนี้คือออบเจ็กต์ที่ควรย้ายเพื่อให้มีพื้นที่สำหรับแล็ปท็อป
[
  {"point": [672, 301], "label": "The object that I need to remove to make room for my laptop"}
]
การจัดเตรียมอาหารกลางวัน
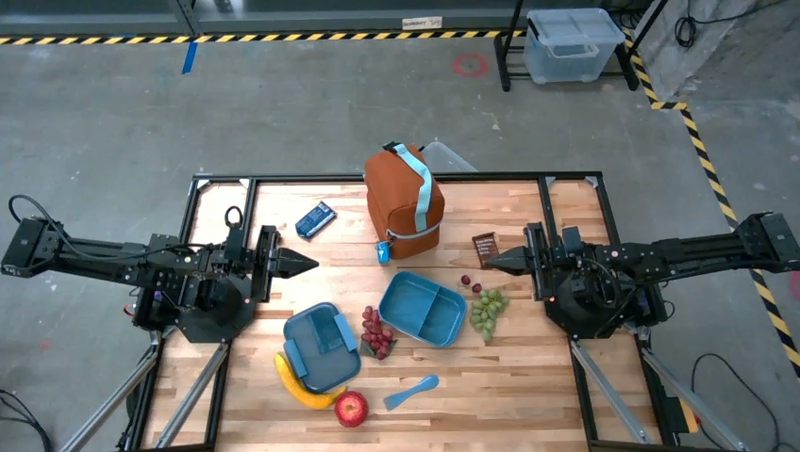
โมเดลยังให้คำแนะนำสำหรับงานหลายขั้นตอนและชี้ไปยังออบเจ็กต์ที่เกี่ยวข้องสำหรับแต่ละขั้นตอนได้ด้วย ตัวอย่างนี้แสดงวิธีที่โมเดลวางแผนชุดขั้นตอนเพื่อจัดเตรียมอาหารกลางวันใส่กระเป๋า
Python
from google import genai

client = genai.Client()

uploaded_file = client.files.upload(file="path/to/image-of-lunch.jpg")

prompt = """
          Explain how to pack the lunch box and lunch bag. Point to each
          object that you refer to. Each point should be in the format:
          [{"point": [y, x], "label": }], where the coordinates are
          normalized between 0-1000.
        """

image_response = client.interactions.create(
  model="gemini-robotics-er-2-preview",
  input=[
    {
        "type": "image",
        "uri": uploaded_file.uri,
        "mime_type": uploaded_file.mime_type
    },
    {"type": "text", "text": prompt}
  ],
)

print(image_response.output_text)
การตอบกลับของพรอมต์นี้คือชุดคำแนะนำทีละขั้นตอนเกี่ยวกับวิธีจัดเตรียมอาหารกลางวันใส่กระเป๋าจากอินพุตรูปภาพ
รูปภาพอินพุต
เอาต์พุตโมเดล
Based on the image, here is a plan to pack the lunch box and lunch bag:

1.  **Pack the fruit into the lunch box.** Place the [apple](apple), [banana](banana), [red grapes](red grapes), and [green grapes](green grapes) into the [blue lunch box](blue lunch box).
2.  **Add the spoon to the lunch box.** Put the [blue spoon](blue spoon) inside the lunch box as well.
3.  **Close the lunch box.** Secure the lid on the [blue lunch box](blue lunch box).
4.  **Place the lunch box inside the lunch bag.** Put the closed [blue lunch box](blue lunch box) into the [brown lunch bag](brown lunch bag).
5.  **Pack the remaining items into the lunch bag.** Place the [blue snack bar](blue snack bar) and the [brown snack bar](brown snack bar) into the [brown lunch bag](brown lunch bag).

Here is the list of objects and their locations:
*   [{"point": [899, 440], "label": "apple"}]
*   [{"point": [814, 363], "label": "banana"}]
*   [{"point": [727, 470], "label": "red grapes"}]
*   [{"point": [675, 608], "label": "green grapes"}]
*   [{"point": [706, 529], "label": "blue lunch box"}]
*   [{"point": [864, 517], "label": "blue spoon"}]
*   [{"point": [499, 401], "label": "blue snack bar"}]
*   [{"point": [614, 705], "label": "brown snack bar"}]
*   [{"point": [448, 501], "label": "brown lunch bag"}]
ขั้นตอนถัดไป
- ความสามารถด้าน Agentic AI — การเรียกใช้โค้ด การอ่านเครื่องมือ การใส่คำอธิบายประกอบรูปภาพ
- การจัดระเบียบงาน — งานระยะยาวที่มี API ของหุ่นยนต์ที่กำหนดเอง
- Robotics พร้อมการสตรีมมิง — การสตรีมมิงแบบสองทางแบบเรียลไทม์ (Gemini Robotics ER 2 เท่านั้น)
- ความเข้าใจวิดีโอ — การค้นหาช่วงเวลาและการจัดประเภทความคืบหน้า (Gemini Robotics ER 2 เท่านั้น)