
|
|
|
|
|
 צפייה במקור ב-GitHub צפייה במקור ב-GitHub
|
אתם יכולים להשתמש ב-Gemma 3 ובמודלים מתקדמים יותר כדי לנתח ולהבין את תוכן התמונות. היכולת הזו כוללת משימות כמו תיאור תוכן של תמונות, זיהוי אובייקטים, זיהוי סצנות ואפילו הסקת הקשר ממידע חזותי.
ריכזנו כאן כמה דוגמאות שממחישות את היכולות האלה.
ה-notebook הזה יפעל ב-GPU מסוג T4.
התקנת חבילות Python
מתקינים את הספריות של Hugging Face שנדרשות להרצת מודל Gemma ולשליחת בקשות.
# Install PyTorch & other librariespip install torch accelerate# Install the transformers librarypip install transformers
טעינת מודל
שימוש בספריית transformers כדי לטעון את צינור עיבוד הנתונים
MODEL_ID = "google/gemma-4-E2B-it" # @param ["google/gemma-4-E2B-it","google/gemma-4-E4B-it", "google/gemma-4-31B-it", "google/gemma-4-26B-A4B-it"]

from transformers import pipeline

vqa_pipe = pipeline(
    task="image-text-to-text",
    model=MODEL_ID,
    device_map="auto",
    dtype="auto"
)
Loading weights:   0%|          | 0/2011 [00:00<?, ?it/s]
processor_config.json: 0.00B [00:00, ?B/s]
שימוש בתבנית של הנחיה
בדוגמה הבאה אפשר לראות איך מספקים תמונה ושואלים עליה שאלה.
from PIL import Image
from IPython.display import display
import requests

from transformers import GenerationConfig
config = GenerationConfig.from_pretrained(MODEL_ID)
config.max_new_tokens = 512
gen_kwargs = dict(generation_config=config)

img_url = "https://raw.githubusercontent.com/google-gemma/cookbook/refs/heads/main/Demos/sample-data/GoldenGate.png"
input_image = Image.open(requests.get(img_url, stream=True).raw)
display(input_image)

messages = [
    {
        "role": "user", "content": [
            {"type": "image", "url": img_url},
            {"type": "text", "text": "What is shown in this image?"}
        ]
    }
]

output = vqa_pipe(messages, return_full_text=False, generate_kwargs=gen_kwargs)
print(output[0]['generated_text'])

This image shows the **Golden Gate Bridge** in San Francisco, California, spanning a body of water.

Here are the key elements visible in the picture:

*   **The Golden Gate Bridge:** The iconic red suspension bridge dominates the background.
*   **Water/Bay:** There is a large expanse of water in the foreground, likely the San Francisco Bay or the Pacific Ocean.
*   **Foreground:** The immediate foreground consists of dark water and a rocky outcrop or small island with a bird perched on it.
*   **Atmosphere:** The sky is clear and light blue, suggesting fair weather.

In summary, it is a scenic view of the Golden Gate Bridge from the water.
יצירת הנחיות עם כמה תמונות
אתם יכולים לספק כמה תמונות בהנחיה אחת על ידי הכללת תוכן של כמה תמונות בתבנית ההנחיה.
from PIL import Image
from IPython.display import display
import requests

from transformers import GenerationConfig
config = GenerationConfig.from_pretrained(MODEL_ID)
config.max_new_tokens = 512
gen_kwargs = dict(generation_config=config)

img_urls = [
    "https://ai.google.dev/gemma/docs/capabilities/vision/images/surprise.png",
    "https://ai.google.dev/gemma/docs/capabilities/vision/images/kitchen.jpg",
]
for img in img_urls:
    display(Image.open(requests.get(img, stream=True).raw))

messages = [
    {
        "role": "user", "content": [
            {"type": "image", "url": img_urls[0]},
            {"type": "image", "url": img_urls[1]},
            {"type": "text", "text": "Caption these images."}
        ]
    }
]

output = vqa_pipe(messages, return_full_text=False, generate_kwargs=gen_kwargs)
print(output[0]['generated_text'])
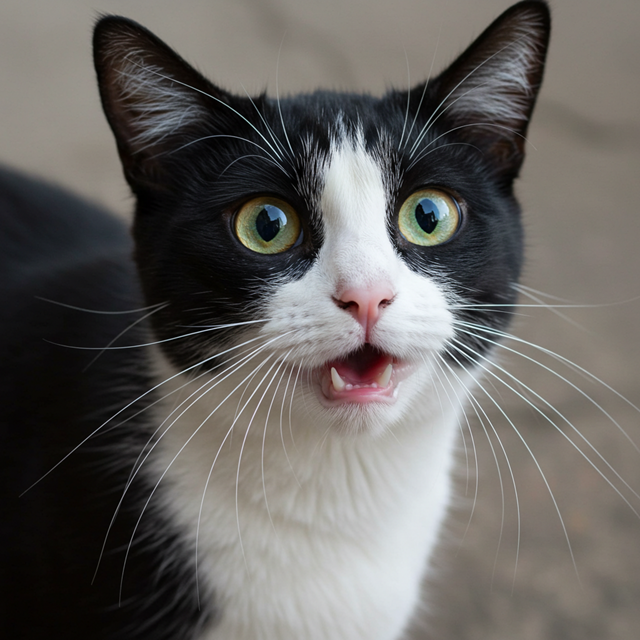
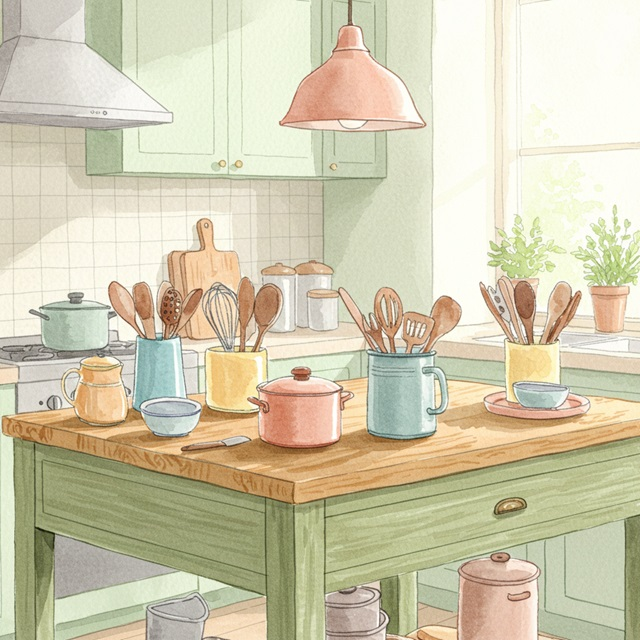
Here are a few caption options for each image, depending on the tone you're going for:

## Image 1: Black and White Cat

**Cute/Playful:**

* "Eyes that steal your heart."
* "Pure feline perfection."
* "Looking for trouble (and cuddles)."
* "The world, seen through emerald eyes."

**Descriptive/Sweet:**

* "A beautiful contrast of black and white."
* "Captivating gaze."
* "A portrait of feline elegance."

**Funny/Relatable:**

* "When you're judging your life choices."
* "The face of pure, unadulterated curiosity."
* "Ready for dinner or a nap, depending on the mood."

---

## Image 2: Kitchen Scene

**Cozy/Homely:**

* "Kitchen mornings and the scent of baking."
* "Where memories are made, one meal at a time."
* "Simple joys and rustic charm in the kitchen."
* "Gathering ingredients for something delicious."

**Aesthetic/Foodie:**

* "Rustic kitchen vibes and homemade goodness."
* "The art of cooking."
* "A warm, inviting space for culinary adventures."

**Simple/Direct:**

* "Kitchen life."
* "Cooking time."
* "Home is where the kitchen is."
OCR (זיהוי תווים אופטי)
המודלים יכולים לזהות טקסטים רב-לשוניים בתמונה.
from PIL import Image
from IPython.display import display
import requests

from transformers import GenerationConfig
config = GenerationConfig.from_pretrained(MODEL_ID)
config.max_new_tokens = 512
gen_kwargs = dict(generation_config=config)

img_url = "https://ai.google.dev/gemma/docs/capabilities/vision/images/cat.png"
input_image = Image.open(requests.get(img_url, stream=True).raw)
display(input_image)

messages = [
    {
        "role": "user", "content": [
            {"type": "image", "url": img_url},
            {"type": "text", "text": "What does the sign say?"}
        ]
    }
]

output = vqa_pipe(messages, return_full_text=False, generate_kwargs=gen_kwargs)
print(output[0]['generated_text'])
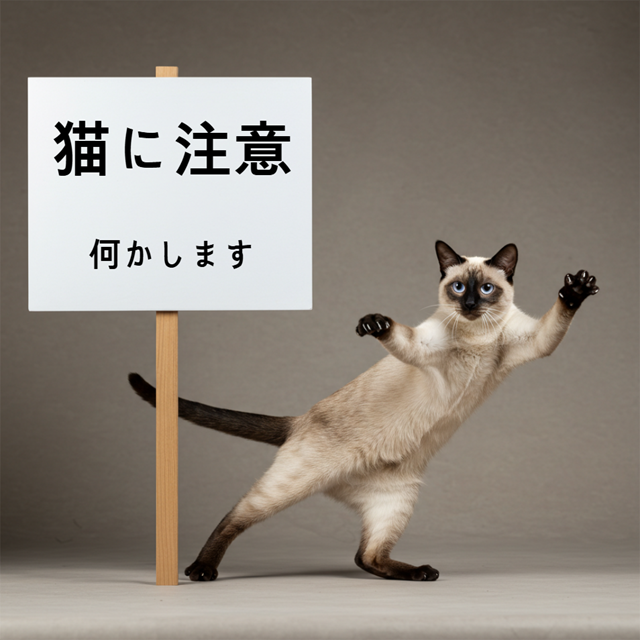
The sign says:

**猫に注意** (Neko ni chūi) - which means **"Caution: Cat"** or **"Watch out for cats"**.

Below that, it says:

**何かします** (Nanika shimasu) - which means **"I will do something"** or **"Something will happen"**.
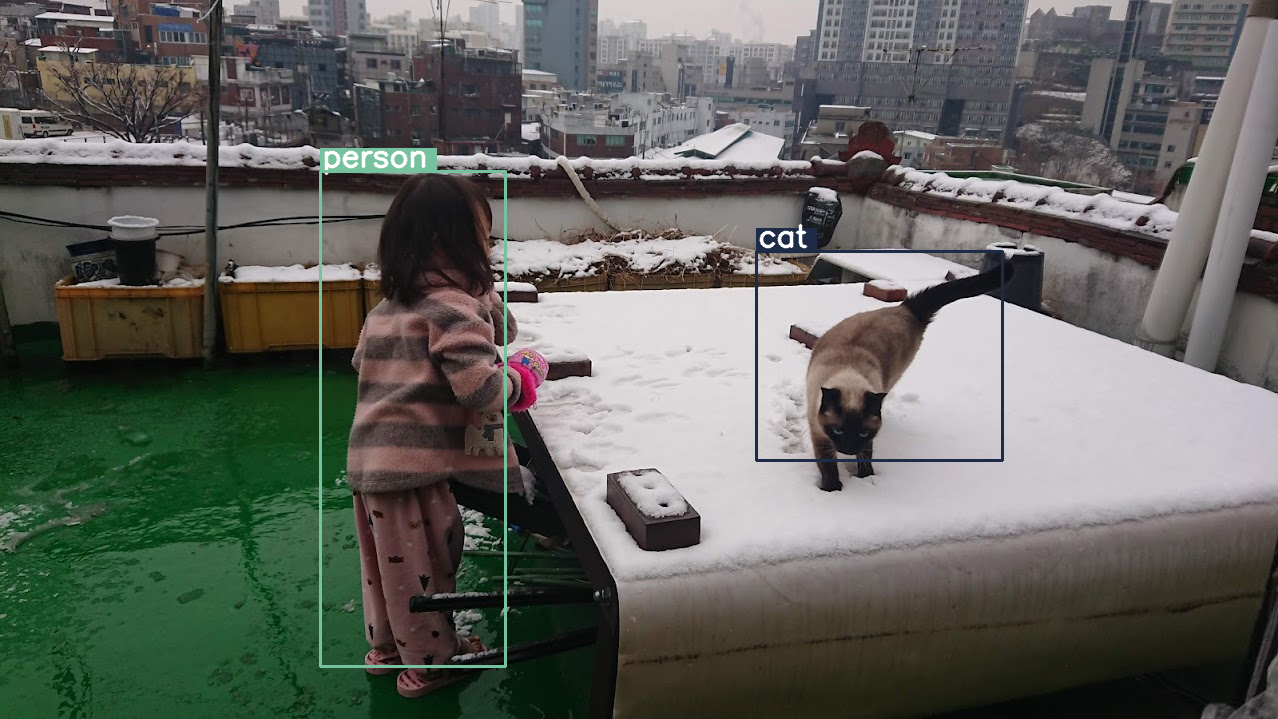
זיהוי אובייקטים
המודלים עוברים אימון לזיהוי אובייקטים בתמונה ולקבלת קואורדינטות של תיבת התוחמת שלהם. קואורדינטות של תיבת תוחמת מבוטאות כערכים מנורמלים ביחס לרשת של 1024x1024. צריך לשנות את קנה המידה של הקואורדינטות האלה בהתאם לגודל התמונה המקורית.
import numpy as np
from PIL import Image
from IPython.display import display
import requests

import cv2
import re, json

from transformers import GenerationConfig
config = GenerationConfig.from_pretrained(MODEL_ID)
config.max_new_tokens = 512
gen_kwargs = dict(generation_config=config)

# Load Image
img_url = "https://raw.githubusercontent.com/bebechien/gemma/refs/heads/main/PaliGemma_Demo.JPG"
input_image = Image.open(requests.get(img_url, stream=True).raw)

###############################
# some helper functions below #
###############################

def draw_bounding_box(image, coordinates, label, label_colors, width, height):
    y1, x1, y2, x2 = [int(coord)/1024 for coord in coordinates]
    y1, x1, y2, x2 = map(round, (y1*height, x1*width, y2*height, x2*width))

    text_size, _ = cv2.getTextSize(label, cv2.FONT_HERSHEY_SIMPLEX, 1, 3)
    text_width, text_height = text_size

    text_x = x1 + 2
    text_y = y1 - 5

    font_scale = 1
    label_rect_width = text_width + 8
    label_rect_height = int(text_height * font_scale)

    color = label_colors.get(label, None)
    if color is None:
        color = np.random.randint(0, 256, (3,)).tolist()
        label_colors[label] = color

    cv2.rectangle(image, (x1, y1 - label_rect_height), (x1 + label_rect_width, y1), color, -1)

    thickness = 2
    cv2.putText(image, label, (text_x, text_y), cv2.FONT_HERSHEY_SIMPLEX, font_scale, (255, 255, 255), thickness, cv2.LINE_AA)

    cv2.rectangle(image, (x1, y1), (x2, y2), color, 2)
    return image

def draw_results(text_content):
  match = re.search(r'```json\s+(.*?)\s+```', text_content, re.DOTALL)
  if match:
    json_string = match.group(1)
    # Parse the string into a Python list/object
    data_list = json.loads(json_string)

    labels = []
    label_colors = {}
    output_image = input_image
    output_img = np.array(input_image)

    for item in data_list:
      width = input_image.size[0]
      height = input_image.size[1]

      # Draw bounding boxes on the frame.
      image = cv2.cvtColor(np.array(input_image), cv2.COLOR_RGB2BGR)
      output_img = draw_bounding_box(output_img, item["box_2d"], item["label"], label_colors, width, height)

      output_image = Image.fromarray(output_img)

    return output_image
  else:
    print("No JSON code block found.")


messages = [
    {
        "role": "user", "content": [
            {"type": "image", "url": img_url},
            {"type": "text", "text": "detect person and cat"}
        ]
    }
]

output = vqa_pipe(messages, return_full_text=False, generate_kwargs=gen_kwargs)
print(output[0]['generated_text'])

draw_results(output[0]['generated_text'])
```json
[
  {"box_2d": [244, 256, 948, 405], "label": "person"},
  {"box_2d": [357, 606, 655, 803], "label": "cat"}
]
```
רזולוציה משתנה (תקציב טוקנים)
כל המודלים של Gemma 4 תומכים ברזולוציה משתנה, כלומר אפשר לעבד תמונות ברזולוציות שונות. בנוסף, אתם יכולים להחליט אם אתם רוצים לעבד תמונה מסוימת ברזולוציה גבוהה או נמוכה יותר. לדוגמה, אם אתם מבצעים זיהוי אובייקטים, יכול להיות שתרצו לעבד את התמונה ברזולוציה גבוהה יותר. לדוגמה, אפשר להשתמש ברזולוציה נמוכה יותר לכל פריים כדי להסיק מסקנות מהר יותר. בעצם, יש כאן פשרה בין מהירות ההסקה לבין הדיוק של ייצוגי התמונות.
הבחירה הזו נשלטת על ידי תקציב הטוקנים, שמייצג את המספר המקסימלי של טוקנים חזותיים (שנקראים גם הטמעות של טוקנים חזותיים) שנוצרים עבור תמונה מסוימת.
המשתמש יכול לבחור בין גדלי תקציב של 70, 140, 280, 560 או 1, 120 אסימונים. הגודל של הקלט משתנה בהתאם לתקציב. אם יש לכם תקציב גבוה יותר (למשל 1,120 טוקנים), התמונה יכולה לשמור על רזולוציה גבוהה יותר, וכתוצאה מכך יהיו הרבה יותר תיקונים לעיבוד. אם התקציב שלכם נמוך יותר (למשל 70 אסימונים), התמונה תוקטן ותצטרכו לעבד פחות תיקונים. עם תקציב גבוה יותר (ולכן יותר טוקנים), אפשר לקבל הרבה יותר מידע מאשר עם תקציב נמוך יותר.
התקציב הזה קובע את גודל התמונה. נניח שיש לכם תקציב של 280 אסימונים, אז מספר הטלאים המקסימלי יהיה 9 x 280 = 2,520. למה כפול 9? הסיבה לכך היא שבשלב הבא, כל בלוק של 3x3 טלאים סמוכים מאוחד להטמעה אחת על ידי חישוב הממוצע שלהם. ההטמעות שמתקבלות הן הטמעות של אסימונים חזותיים. ככל שיש לנו יותר הטמעות של טוקנים חזותיים, כך אפשר לחלץ מתמונה מידע מפורט יותר.
בואו נראה מה קורה אם מבצעים זיהוי אובייקטים בתמונה ומגדירים את גודל התקציב כנמוך מאוד (70):
import numpy as np
from PIL import Image
import requests, cv2, re, json

from transformers import GenerationConfig
config = GenerationConfig.from_pretrained(MODEL_ID)
config.max_new_tokens = 512
gen_kwargs = dict(generation_config=config)

img_url = "https://huggingface.co/datasets/Xenova/transformers.js-docs/resolve/main/city-streets.jpg"
input_image = Image.open(requests.get(img_url, stream=True).raw)

def draw_bounding_box(image, coordinates, label, label_colors, width, height):
    """Draw a bounding box based on input image and coordinates"""
    y1, x1, y2, x2 = [int(c) / 1024 for c in coordinates]
    y1, x1, y2, x2 = round(y1 * height), round(x1 * width), round(y2 * height), round(x2 * width)

    color = label_colors.setdefault(label, np.random.randint(0, 256, (3,)).tolist())
    text_size = cv2.getTextSize(label, cv2.FONT_HERSHEY_SIMPLEX, 1, 3)[0]

    cv2.rectangle(image, (x1, y1 - text_size[1]), (x1 + text_size[0] + 8, y1), color, -1)
    cv2.putText(image, label, (x1 + 2, y1 - 5), cv2.FONT_HERSHEY_SIMPLEX, 1, (255, 255, 255), 2, cv2.LINE_AA)
    cv2.rectangle(image, (x1, y1), (x2, y2), color, 2)
    return image

def draw_results(text_content):
    """Based on an input image, draw bounding boxes and labels"""
    # Extract JSON
    match = re.search(r'```json\s+(.*?)\s+```', text_content, re.DOTALL)
    if not match:
        print("No JSON code block found.")
        return None

    # Extract data
    data_list = json.loads(match.group(1))
    output_img = np.array(input_image)
    label_colors = {}
    w, h = input_image.size

    # Draw bounding boxes
    for item in data_list:
        output_img = draw_bounding_box(output_img, item["box_2d"], item["label"], label_colors, w, h)

    return Image.fromarray(output_img)


# Detect person, card, and traffic light
messages = [
    {
        "role": "user", "content": [
            {"type": "image", "url": img_url},
             {"type": "text", "text": "detect person and car, output only ```json"}
        ]
     }
]

# Run pipeline and set token budget to 70
vqa_pipe.image_processor.max_soft_tokens = 70
output = vqa_pipe(messages, return_full_text=False, generate_kwargs=gen_kwargs)
print(output[0]['generated_text'])
draw_results(output[0]['generated_text'])
```json
[
  {"box_2d": [413, 864, 537, 933], "label": "person"},
  {"box_2d": [553, 315, 666, 623], "label": "car"},
  {"box_2d": [743, 754, 843, 864], "label": "car"},
  {"box_2d": [743, 556, 843, 743], "label": "car"},
  {"box_2d": [733, 49, 853, 135], "label": "person"}
]
```
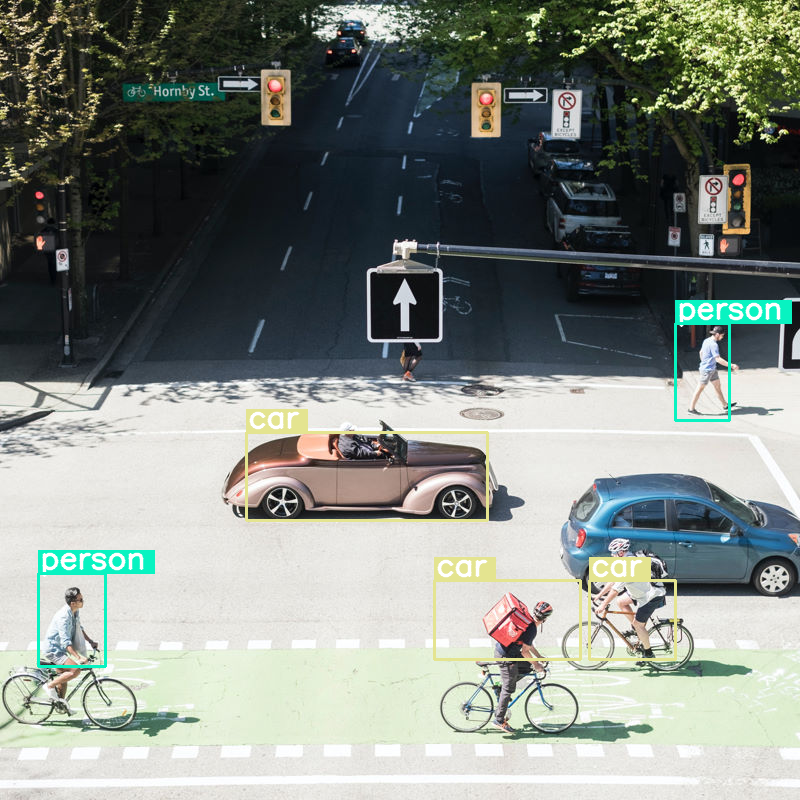
היא עושה עבודה סבירה, אבל ברור שהתמונה עוברת דחיסה משמעותית כי היא לא מזהה את כל המכוניות והאנשים. הגדלת תקציב האסימונים אמורה לפתור את הבעיה.
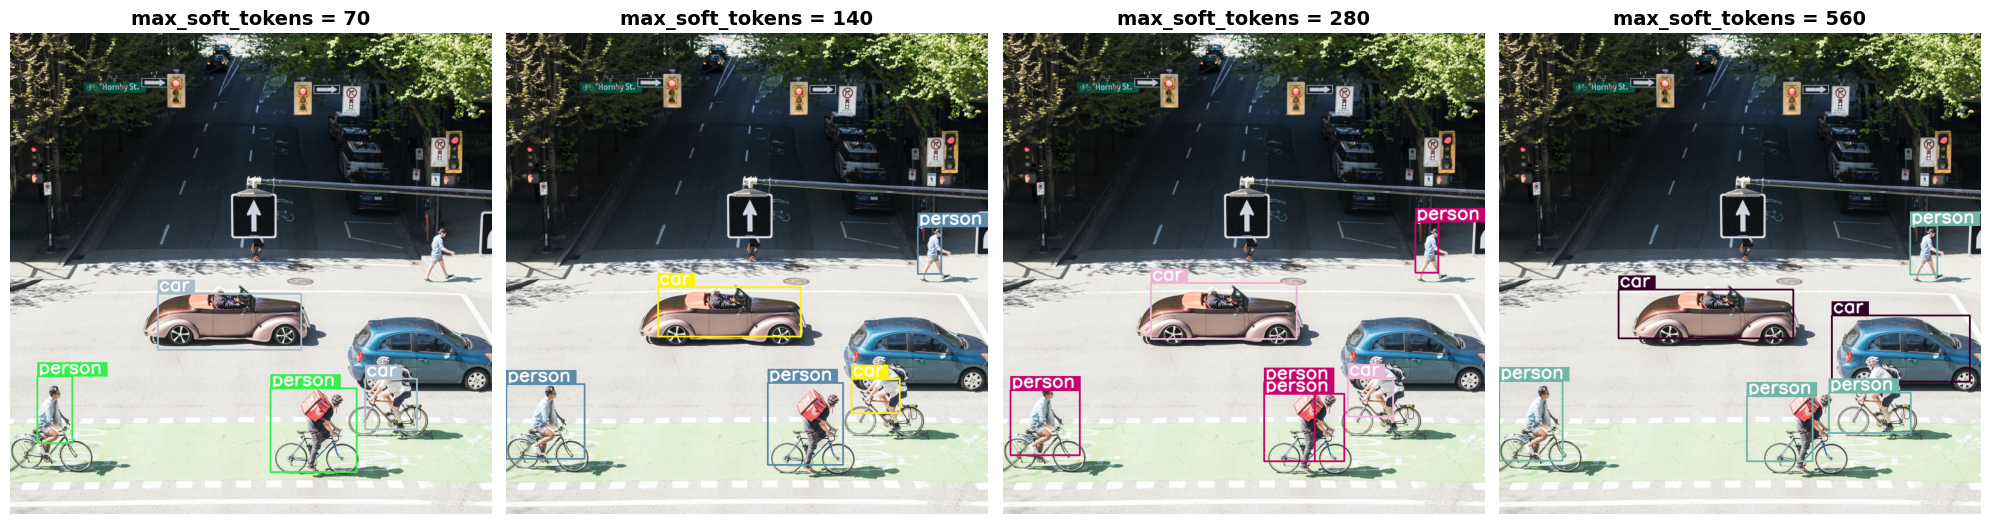
השוואה בין תקציבי טוקנים
בואו נראה מה קורה כשמגדילים את התקציבים. תקציב גדול יותר מוביל ליצירה ולעיבוד של יותר טוקנים רכים. הפעולה הזו אמורה לשפר את זיהוי האובייקטים.
import matplotlib.pyplot as plt

def count_tokens(processor, tokens):
    input_ids = tokens['input_ids'][0]  # Get input IDs from the tokenizer output

    img_counting = []
    img_count = 0

    aud_counting = []
    aud_count = 0

    for x in input_ids:  # Iterate over the token list
        # Use tokenizer.decode() to convert tokens back to words
        word = processor.decode([x])  # No need to convert to JAX array for decoding

        if x == processor.tokenizer.image_token_id:
            img_count = img_count + 1
        elif x == processor.tokenizer.audio_token_id:
            aud_count = aud_count + 1
        elif x == processor.tokenizer.eoi_token_id:
            img_counting.append(img_count)
            img_count = 0
        elif x == processor.tokenizer.eoa_token_id:
            aud_counting.append(aud_count)
            aud_count = 0

    for item in img_counting:
        print(f"# of Image Tokens: {item}")

    for item in aud_counting:
        print(f"# of Audio Tokens: {item}")

input_image.resize((2000, 2000))

# Detect person and car
messages = [
    {
        "role": "user", "content": [
            {"type": "image", "url": img_url},
             {"type": "text", "text": "detect person and car, output only ```json"}
        ]
     }
]


# Run for different budget sizes
budget_sizes = [70, 140, 280, 560]
# 1120 won't fit on T4, but works on L4 or highger
#budget_sizes = [70, 140, 280, 560, 1120]
results = {}

for budget in budget_sizes:
    print(f"Budget Size: {budget}")
    vqa_pipe.image_processor.max_soft_tokens = budget

    inputs = vqa_pipe.processor.apply_chat_template(messages, tokenize=True, return_dict=True, return_tensors="pt")
    count_tokens(vqa_pipe.processor, inputs)

    output = vqa_pipe(messages, return_full_text=False, generate_kwargs=gen_kwargs)
    result_text = output[0]['generated_text']
    print(output[0]['generated_text'])
    result_image = draw_results(result_text)
    if result_image:
        results[budget] = result_image

# Display side-by-side
fig, axes = plt.subplots(1, len(results), figsize=(5 * len(results), 6))
if len(results) == 1:
    axes = [axes]

for ax, (budget, img) in zip(axes, results.items()):
    ax.imshow(img)
    ax.set_title(f"max_soft_tokens = {budget}", fontsize=14, fontweight='bold')
    ax.axis('off')

plt.tight_layout()
plt.show()
Budget Size: 70
# of Image Tokens: 64

```json
[
  {"box_2d": [731, 57, 873, 132], "label": "person"},
  {"box_2d": [556, 314, 675, 618], "label": "car"},
  {"box_2d": [736, 754, 843, 864], "label": "car"},
  {"box_2d": [756, 553, 935, 736], "label": "person"}
]
```
Budget Size: 140
# of Image Tokens: 121

```json
[
  {"box_2d": [736, 734, 809, 836], "label": "car"},
  {"box_2d": [745, 556, 919, 715], "label": "person"},
  {"box_2d": [748, 0, 906, 166], "label": "person"},
  {"box_2d": [541, 322, 647, 626], "label": "car"},
  {"box_2d": [413, 874, 513, 924], "label": "person"}
]
```
Budget Size: 280
# of Image Tokens: 256

```json
[
  {"box_2d": [403, 876, 511, 924], "label": "person"},
  {"box_2d": [532, 313, 652, 623], "label": "car"},
  {"box_2d": [735, 732, 817, 828], "label": "car"},
  {"box_2d": [742, 554, 912, 662], "label": "person"},
  {"box_2d": [760, 15, 899, 163], "label": "person"},
  {"box_2d": [768, 554, 912, 724], "label": "person"}
]
```
Budget Size: 560
# of Image Tokens: 529

```json
[
  {"box_2d": [741, 0, 910, 135], "label": "person"},
  {"box_2d": [547, 254, 650, 624], "label": "car"},
  {"box_2d": [773, 526, 912, 666], "label": "person"},
  {"box_2d": [601, 707, 742, 1000], "label": "car"},
  {"box_2d": [411, 873, 515, 931], "label": "person"},
  {"box_2d": [765, 700, 851, 874], "label": "person"}
]
```
סיכום והשלבים הבאים
במדריך הזה למדתם איך להשתמש במודלים של Gemma 4 למשימות של הבנת תמונות. הדוגמאות כוללות יצירת טקסט מתמונות, שימוש בתבניות הנחיות לבדיקת איכות חזותית, עיבוד של כמה תמונות בו-זמנית, זיהוי תווים אופטי (OCR), זיהוי אובייקטים באמצעות תיבות תוחמות וניהול רזולוציות משתנות באמצעות מכסות טוקנים.
כדאי לעיין במקורות מידע נוספים.