
|
|
|
|
|
 ดูแหล่งข้อมูลใน GitHub ดูแหล่งข้อมูลใน GitHub
|
คุณใช้โมเดล Gemma 3 ขึ้นไปเพื่อวิเคราะห์และทำความเข้าใจเนื้อหาของรูปภาพได้ ความสามารถนี้รวมถึงงานต่างๆ เช่น การอธิบายเนื้อหารูปภาพ การระบุออบเจ็กต์ การจดจำฉาก และแม้แต่การอนุมานบริบทจากข้อมูลภาพ
ตัวอย่างต่อไปนี้แสดงให้เห็นความสามารถเหล่านี้
Notebook นี้จะทำงานบน GPU T4
ติดตั้งแพ็กเกจ Python
ติดตั้งไลบรารี Hugging Face ที่จำเป็นสำหรับการเรียกใช้โมเดล Gemma และส่งคำขอ
# Install PyTorch & other librariespip install torch accelerate# Install the transformers librarypip install transformers
โหลดโมเดล
ใช้ไลบรารี transformers เพื่อโหลดไปป์ไลน์
MODEL_ID = "google/gemma-4-E2B-it" # @param ["google/gemma-4-E2B-it","google/gemma-4-E4B-it", "google/gemma-4-31B-it", "google/gemma-4-26B-A4B-it"]

from transformers import pipeline

vqa_pipe = pipeline(
    task="image-text-to-text",
    model=MODEL_ID,
    device_map="auto",
    dtype="auto"
)
Loading weights:   0%|          | 0/2011 [00:00<?, ?it/s]
processor_config.json: 0.00B [00:00, ?B/s]
ใช้เทมเพลตพรอมต์
ตัวอย่างต่อไปนี้แสดงวิธีระบุรูปภาพและถามคำถามเกี่ยวกับรูปภาพนั้น
from PIL import Image
from IPython.display import display
import requests

from transformers import GenerationConfig
config = GenerationConfig.from_pretrained(MODEL_ID)
config.max_new_tokens = 512
gen_kwargs = dict(generation_config=config)

img_url = "https://raw.githubusercontent.com/google-gemma/cookbook/refs/heads/main/Demos/sample-data/GoldenGate.png"
input_image = Image.open(requests.get(img_url, stream=True).raw)
display(input_image)

messages = [
    {
        "role": "user", "content": [
            {"type": "image", "url": img_url},
            {"type": "text", "text": "What is shown in this image?"}
        ]
    }
]

output = vqa_pipe(messages, return_full_text=False, generate_kwargs=gen_kwargs)
print(output[0]['generated_text'])
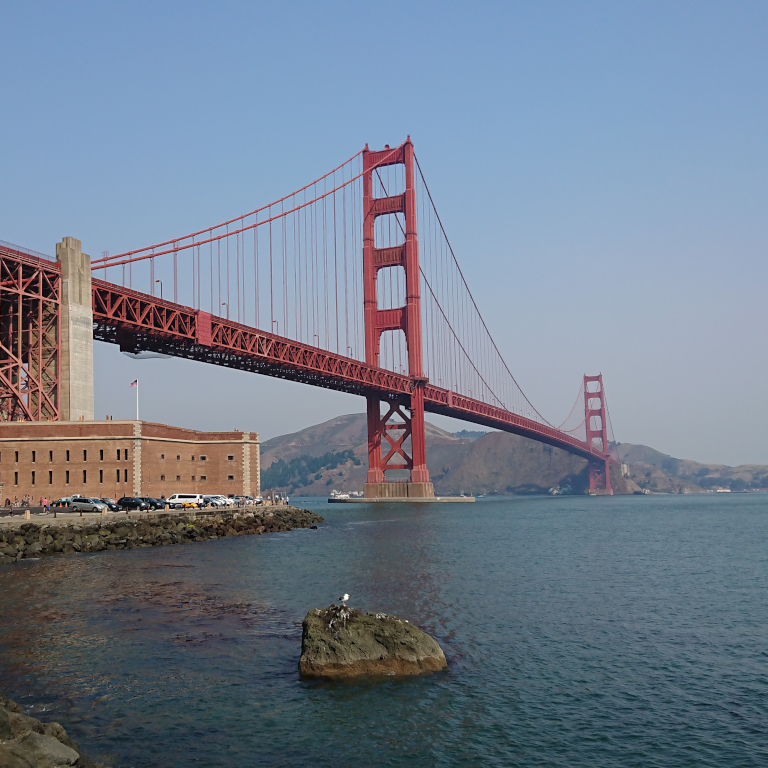
This image shows the **Golden Gate Bridge** in San Francisco, California, spanning a body of water.

Here are the key elements visible in the picture:

*   **The Golden Gate Bridge:** The iconic red suspension bridge dominates the background.
*   **Water/Bay:** There is a large expanse of water in the foreground, likely the San Francisco Bay or the Pacific Ocean.
*   **Foreground:** The immediate foreground consists of dark water and a rocky outcrop or small island with a bird perched on it.
*   **Atmosphere:** The sky is clear and light blue, suggesting fair weather.

In summary, it is a scenic view of the Golden Gate Bridge from the water.
การป้อนพรอมต์ด้วยรูปภาพหลายรูป
คุณระบุรูปภาพหลายรูปในพรอมต์เดียวได้โดยใส่เนื้อหารูปภาพหลายรายการในเทมเพลตพรอมต์
from PIL import Image
from IPython.display import display
import requests

from transformers import GenerationConfig
config = GenerationConfig.from_pretrained(MODEL_ID)
config.max_new_tokens = 512
gen_kwargs = dict(generation_config=config)

img_urls = [
    "https://ai.google.dev/gemma/docs/capabilities/vision/images/surprise.png",
    "https://ai.google.dev/gemma/docs/capabilities/vision/images/kitchen.jpg",
]
for img in img_urls:
    display(Image.open(requests.get(img, stream=True).raw))

messages = [
    {
        "role": "user", "content": [
            {"type": "image", "url": img_urls[0]},
            {"type": "image", "url": img_urls[1]},
            {"type": "text", "text": "Caption these images."}
        ]
    }
]

output = vqa_pipe(messages, return_full_text=False, generate_kwargs=gen_kwargs)
print(output[0]['generated_text'])
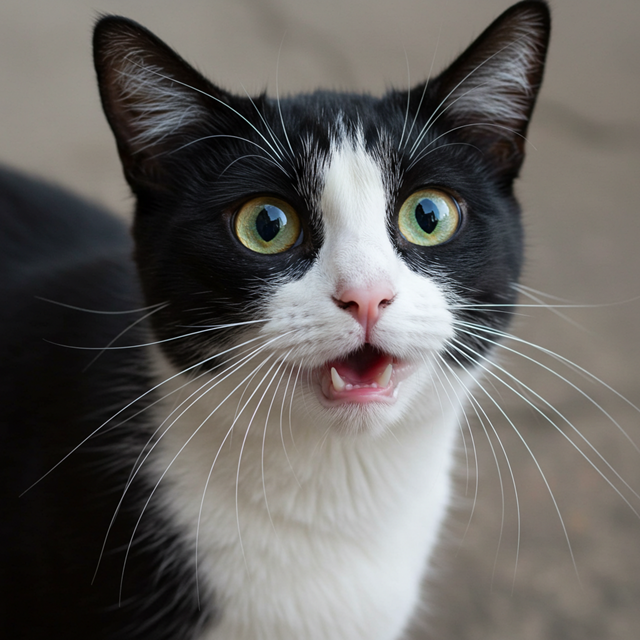
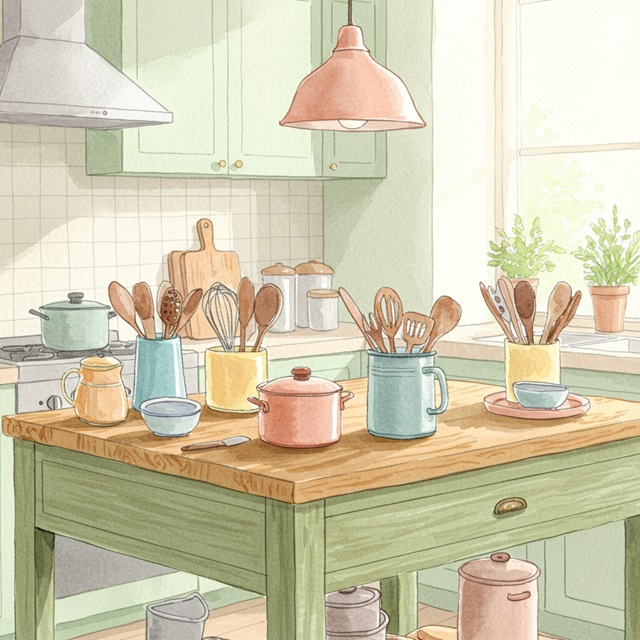
Here are a few caption options for each image, depending on the tone you're going for:

## Image 1: Black and White Cat

**Cute/Playful:**

* "Eyes that steal your heart."
* "Pure feline perfection."
* "Looking for trouble (and cuddles)."
* "The world, seen through emerald eyes."

**Descriptive/Sweet:**

* "A beautiful contrast of black and white."
* "Captivating gaze."
* "A portrait of feline elegance."

**Funny/Relatable:**

* "When you're judging your life choices."
* "The face of pure, unadulterated curiosity."
* "Ready for dinner or a nap, depending on the mood."

---

## Image 2: Kitchen Scene

**Cozy/Homely:**

* "Kitchen mornings and the scent of baking."
* "Where memories are made, one meal at a time."
* "Simple joys and rustic charm in the kitchen."
* "Gathering ingredients for something delicious."

**Aesthetic/Foodie:**

* "Rustic kitchen vibes and homemade goodness."
* "The art of cooking."
* "A warm, inviting space for culinary adventures."

**Simple/Direct:**

* "Kitchen life."
* "Cooking time."
* "Home is where the kitchen is."
OCR (การรู้จำอักขระด้วยภาพ)
โมเดลสามารถจดจำข้อความหลายภาษาในรูปภาพได้
from PIL import Image
from IPython.display import display
import requests

from transformers import GenerationConfig
config = GenerationConfig.from_pretrained(MODEL_ID)
config.max_new_tokens = 512
gen_kwargs = dict(generation_config=config)

img_url = "https://ai.google.dev/gemma/docs/capabilities/vision/images/cat.png"
input_image = Image.open(requests.get(img_url, stream=True).raw)
display(input_image)

messages = [
    {
        "role": "user", "content": [
            {"type": "image", "url": img_url},
            {"type": "text", "text": "What does the sign say?"}
        ]
    }
]

output = vqa_pipe(messages, return_full_text=False, generate_kwargs=gen_kwargs)
print(output[0]['generated_text'])
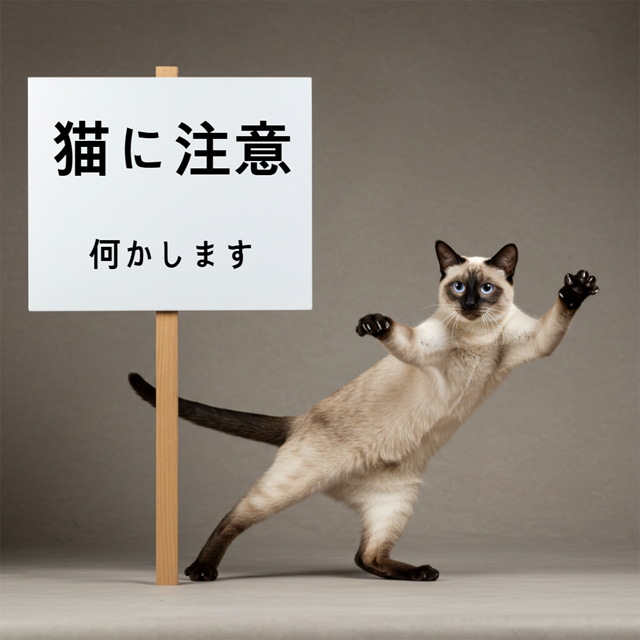
The sign says:

**猫に注意** (Neko ni chūi) - which means **"Caution: Cat"** or **"Watch out for cats"**.

Below that, it says:

**何かします** (Nanika shimasu) - which means **"I will do something"** or **"Something will happen"**.
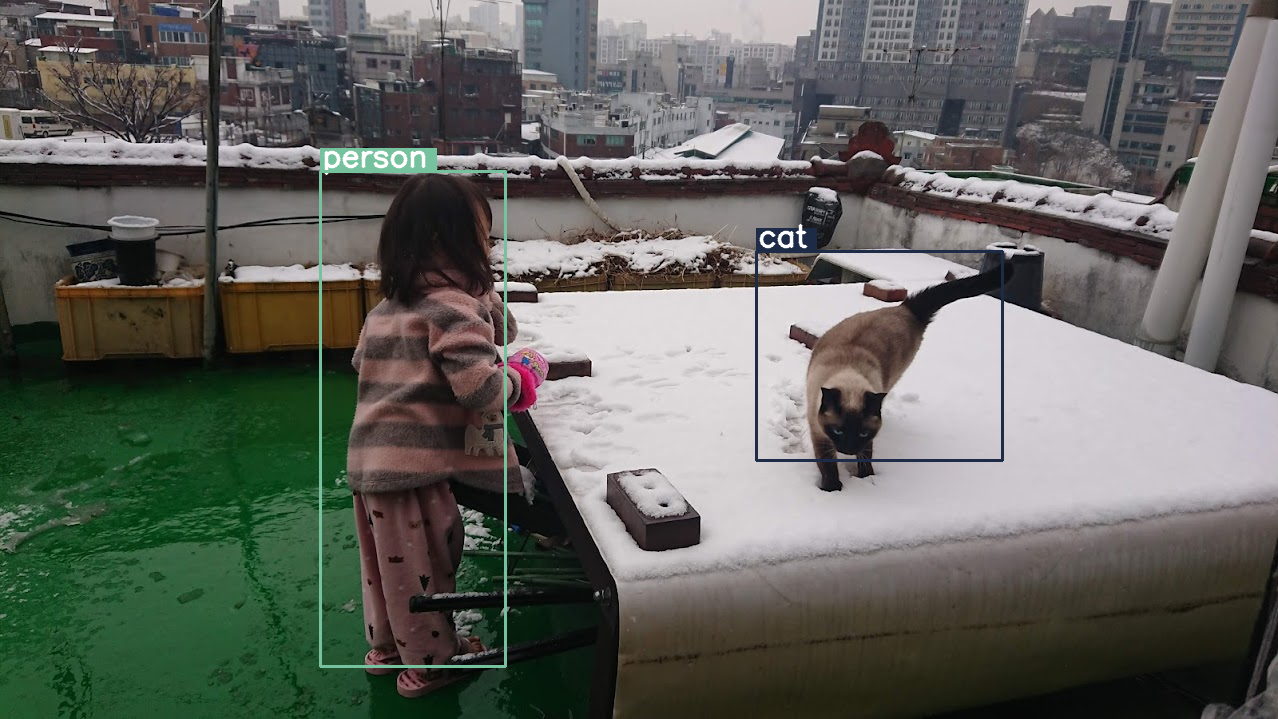
การตรวจหาวัตถุ
โมเดลได้รับการฝึกให้ตรวจจับออบเจ็กต์ในรูปภาพและรับพิกัดกรอบล้อมรอบของออบเจ็กต์ พิกัดกรอบล้อมรอบจะแสดงเป็นค่าที่ปรับให้เป็นมาตรฐานเทียบกับตารางกริดขนาด 1024x1024 คุณต้องยกเลิกการปรับขนาดพิกัดเหล่านี้ตามขนาดรูปภาพต้นฉบับ
import numpy as np
from PIL import Image
from IPython.display import display
import requests

import cv2
import re, json

from transformers import GenerationConfig
config = GenerationConfig.from_pretrained(MODEL_ID)
config.max_new_tokens = 512
gen_kwargs = dict(generation_config=config)

# Load Image
img_url = "https://raw.githubusercontent.com/bebechien/gemma/refs/heads/main/PaliGemma_Demo.JPG"
input_image = Image.open(requests.get(img_url, stream=True).raw)

###############################
# some helper functions below #
###############################

def draw_bounding_box(image, coordinates, label, label_colors, width, height):
    y1, x1, y2, x2 = [int(coord)/1024 for coord in coordinates]
    y1, x1, y2, x2 = map(round, (y1*height, x1*width, y2*height, x2*width))

    text_size, _ = cv2.getTextSize(label, cv2.FONT_HERSHEY_SIMPLEX, 1, 3)
    text_width, text_height = text_size

    text_x = x1 + 2
    text_y = y1 - 5

    font_scale = 1
    label_rect_width = text_width + 8
    label_rect_height = int(text_height * font_scale)

    color = label_colors.get(label, None)
    if color is None:
        color = np.random.randint(0, 256, (3,)).tolist()
        label_colors[label] = color

    cv2.rectangle(image, (x1, y1 - label_rect_height), (x1 + label_rect_width, y1), color, -1)

    thickness = 2
    cv2.putText(image, label, (text_x, text_y), cv2.FONT_HERSHEY_SIMPLEX, font_scale, (255, 255, 255), thickness, cv2.LINE_AA)

    cv2.rectangle(image, (x1, y1), (x2, y2), color, 2)
    return image

def draw_results(text_content):
  match = re.search(r'```json\s+(.*?)\s+```', text_content, re.DOTALL)
  if match:
    json_string = match.group(1)
    # Parse the string into a Python list/object
    data_list = json.loads(json_string)

    labels = []
    label_colors = {}
    output_image = input_image
    output_img = np.array(input_image)

    for item in data_list:
      width = input_image.size[0]
      height = input_image.size[1]

      # Draw bounding boxes on the frame.
      image = cv2.cvtColor(np.array(input_image), cv2.COLOR_RGB2BGR)
      output_img = draw_bounding_box(output_img, item["box_2d"], item["label"], label_colors, width, height)

      output_image = Image.fromarray(output_img)

    return output_image
  else:
    print("No JSON code block found.")


messages = [
    {
        "role": "user", "content": [
            {"type": "image", "url": img_url},
            {"type": "text", "text": "detect person and cat"}
        ]
    }
]

output = vqa_pipe(messages, return_full_text=False, generate_kwargs=gen_kwargs)
print(output[0]['generated_text'])

draw_results(output[0]['generated_text'])
```json
[
  {"box_2d": [244, 256, 948, 405], "label": "person"},
  {"box_2d": [357, 606, 655, 803], "label": "cat"}
]
```
ความละเอียดที่ปรับเปลี่ยนได้ (งบประมาณโทเค็น)
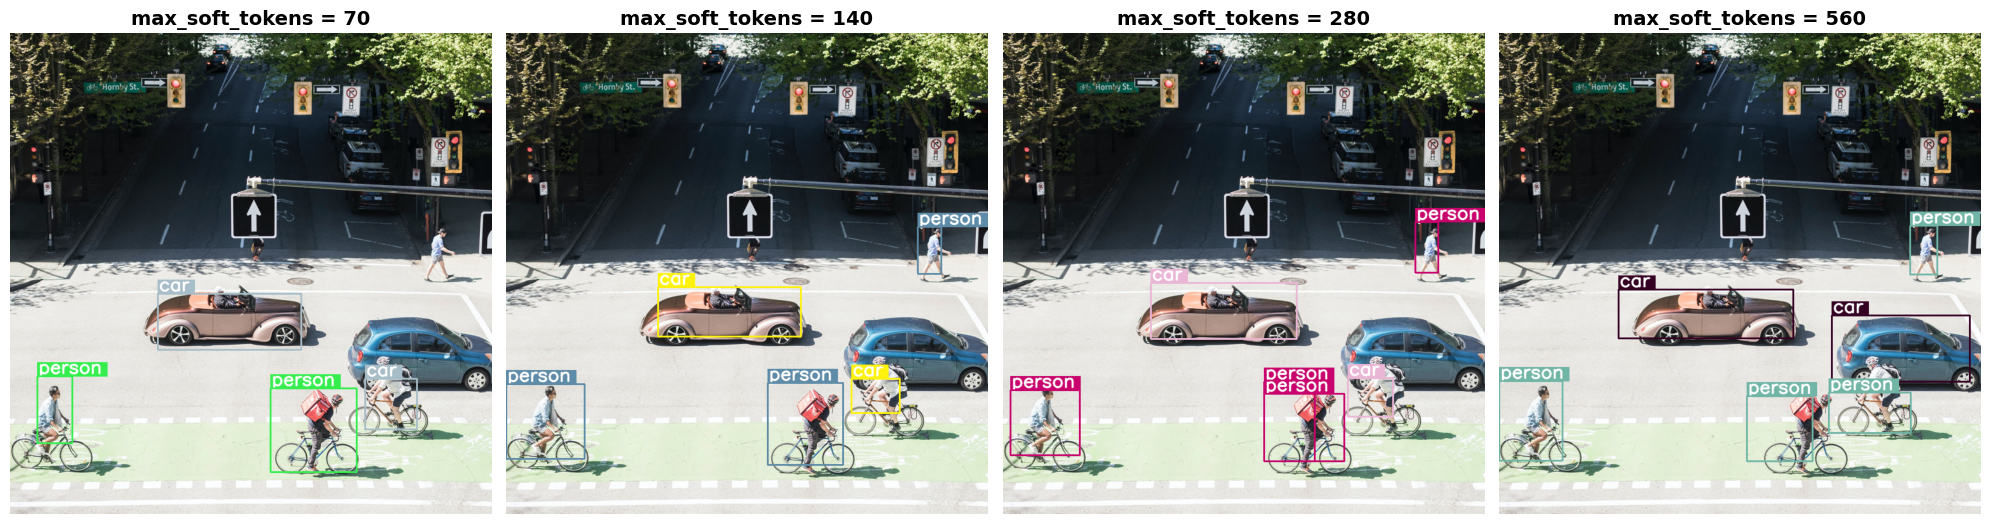
โมเดล Gemma 4 ทั้งหมดรองรับความละเอียดที่เปลี่ยนแปลงได้ ซึ่งหมายความว่าสามารถประมวลผลรูปภาพที่มีความละเอียดแตกต่างกันได้ นอกจากนี้ คุณยังเลือกได้ว่าจะประมวลผลรูปภาพที่ต้องการด้วยความละเอียดสูงหรือต่ำ เช่น หากคุณทำการตรวจจับออบเจ็กต์ คุณอาจต้องการประมวลผลรูปภาพด้วยความละเอียดที่สูงขึ้น เช่น การทำความเข้าใจวิดีโอสามารถทำได้ด้วยความละเอียดที่ต่ำกว่าสำหรับแต่ละเฟรมเพื่อเพิ่มความเร็วในการอนุมาน โดยพื้นฐานแล้ว การตั้งค่านี้เป็นการแลกเปลี่ยนระหว่างความเร็วในการอนุมานและความแม่นยำของการแสดงรูปภาพ
ตัวเลือกนี้ควบคุมโดยงบประมาณโทเค็น ซึ่งแสดงจํานวนโทเค็นภาพสูงสุด (เรียกอีกอย่างว่าการฝังโทเค็นภาพ) ที่สร้างขึ้นสําหรับรูปภาพที่กําหนด
ผู้ใช้สามารถเลือกขนาดงบประมาณได้ระหว่าง 70, 140, 280, 560 หรือ 1, 120 โทเค็น ระบบจะปรับขนาดอินพุตตามงบประมาณ หากมีงบประมาณสูงกว่า (เช่น 1,120 โทเค็น) รูปภาพจะมีความละเอียดสูงขึ้นและมีแพตช์จำนวนมากขึ้นให้ประมวลผล หากมีงบประมาณน้อยกว่า (เช่น 70 โทเค็น) คุณจะต้องลดขนาดรูปภาพลง และจะมีแพตช์ที่ต้องประมวลผลน้อยลง เมื่อมีงบประมาณสูงขึ้น (และมีโทเค็นมากขึ้น) คุณจะบันทึกข้อมูลได้มากกว่าเมื่อมีงบประมาณต่ำ
งบประมาณนี้จะกำหนดขนาดของรูปภาพที่จะปรับ สมมติว่าคุณมีโทเค็น 280 รายการ จำนวนแพตช์สูงสุดจะเป็น 9 x 280 = 2,520 ทำไมต้องคูณ 9 เนื่องจากในขั้นตอนถัดไป ระบบจะผสานรวมบล็อก 3x3 ของแพตช์ที่อยู่ติดกันทั้งหมดเป็น Embedding เดียวโดยการหาค่าเฉลี่ย การฝังที่ได้คือการฝังโทเค็นภาพ ยิ่งเรามีการฝังโทเค็นภาพมากเท่าใด ก็ยิ่งดึงข้อมูลที่ละเอียดยิ่งขึ้นจากรูปภาพได้มากเท่านั้น
มาดูกันว่าจะเกิดอะไรขึ้นหากเราทำการตรวจจับออบเจ็กต์ในรูปภาพและตั้งขนาดงบประมาณไว้ต่ำมาก (70)
import numpy as np
from PIL import Image
import requests, cv2, re, json

from transformers import GenerationConfig
config = GenerationConfig.from_pretrained(MODEL_ID)
config.max_new_tokens = 512
gen_kwargs = dict(generation_config=config)

img_url = "https://huggingface.co/datasets/Xenova/transformers.js-docs/resolve/main/city-streets.jpg"
input_image = Image.open(requests.get(img_url, stream=True).raw)

def draw_bounding_box(image, coordinates, label, label_colors, width, height):
    """Draw a bounding box based on input image and coordinates"""
    y1, x1, y2, x2 = [int(c) / 1024 for c in coordinates]
    y1, x1, y2, x2 = round(y1 * height), round(x1 * width), round(y2 * height), round(x2 * width)

    color = label_colors.setdefault(label, np.random.randint(0, 256, (3,)).tolist())
    text_size = cv2.getTextSize(label, cv2.FONT_HERSHEY_SIMPLEX, 1, 3)[0]

    cv2.rectangle(image, (x1, y1 - text_size[1]), (x1 + text_size[0] + 8, y1), color, -1)
    cv2.putText(image, label, (x1 + 2, y1 - 5), cv2.FONT_HERSHEY_SIMPLEX, 1, (255, 255, 255), 2, cv2.LINE_AA)
    cv2.rectangle(image, (x1, y1), (x2, y2), color, 2)
    return image

def draw_results(text_content):
    """Based on an input image, draw bounding boxes and labels"""
    # Extract JSON
    match = re.search(r'```json\s+(.*?)\s+```', text_content, re.DOTALL)
    if not match:
        print("No JSON code block found.")
        return None

    # Extract data
    data_list = json.loads(match.group(1))
    output_img = np.array(input_image)
    label_colors = {}
    w, h = input_image.size

    # Draw bounding boxes
    for item in data_list:
        output_img = draw_bounding_box(output_img, item["box_2d"], item["label"], label_colors, w, h)

    return Image.fromarray(output_img)


# Detect person, card, and traffic light
messages = [
    {
        "role": "user", "content": [
            {"type": "image", "url": img_url},
             {"type": "text", "text": "detect person and car, output only ```json"}
        ]
     }
]

# Run pipeline and set token budget to 70
vqa_pipe.image_processor.max_soft_tokens = 70
output = vqa_pipe(messages, return_full_text=False, generate_kwargs=gen_kwargs)
print(output[0]['generated_text'])
draw_results(output[0]['generated_text'])
```json
[
  {"box_2d": [413, 864, 537, 933], "label": "person"},
  {"box_2d": [553, 315, 666, 623], "label": "car"},
  {"box_2d": [743, 754, 843, 864], "label": "car"},
  {"box_2d": [743, 556, 843, 743], "label": "car"},
  {"box_2d": [733, 49, 853, 135], "label": "person"}
]
```
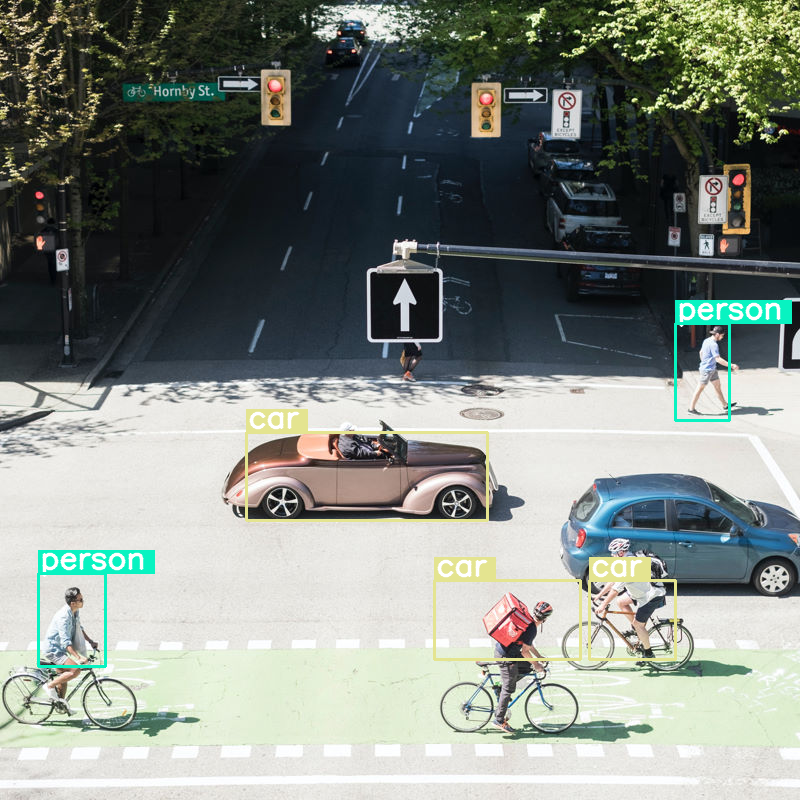
ซึ่งก็ใช้งานได้ดี แต่เห็นได้ชัดว่าระบบบีบอัดรูปภาพค่อนข้างมากเนื่องจากตรวจจับรถยนต์และบุคคลบางส่วนไม่ได้ การเพิ่มงบประมาณโทเค็นน่าจะช่วยแก้ปัญหานี้ได้
เปรียบเทียบงบประมาณโทเค็น
มาดูกันว่าเกิดอะไรขึ้นเมื่อเราเพิ่มขนาดงบประมาณ งบประมาณที่มากขึ้นจะส่งผลให้มีการสร้างและประมวลผลโทเค็นแบบไม่ตายตัวมากขึ้น ซึ่งจะช่วยปรับปรุงการตรวจจับออบเจ็กต์
import matplotlib.pyplot as plt

def count_tokens(processor, tokens):
    input_ids = tokens['input_ids'][0]  # Get input IDs from the tokenizer output

    img_counting = []
    img_count = 0

    aud_counting = []
    aud_count = 0

    for x in input_ids:  # Iterate over the token list
        # Use tokenizer.decode() to convert tokens back to words
        word = processor.decode([x])  # No need to convert to JAX array for decoding

        if x == processor.tokenizer.image_token_id:
            img_count = img_count + 1
        elif x == processor.tokenizer.audio_token_id:
            aud_count = aud_count + 1
        elif x == processor.tokenizer.eoi_token_id:
            img_counting.append(img_count)
            img_count = 0
        elif x == processor.tokenizer.eoa_token_id:
            aud_counting.append(aud_count)
            aud_count = 0

    for item in img_counting:
        print(f"# of Image Tokens: {item}")

    for item in aud_counting:
        print(f"# of Audio Tokens: {item}")

input_image.resize((2000, 2000))

# Detect person and car
messages = [
    {
        "role": "user", "content": [
            {"type": "image", "url": img_url},
             {"type": "text", "text": "detect person and car, output only ```json"}
        ]
     }
]


# Run for different budget sizes
budget_sizes = [70, 140, 280, 560]
# 1120 won't fit on T4, but works on L4 or highger
#budget_sizes = [70, 140, 280, 560, 1120]
results = {}

for budget in budget_sizes:
    print(f"Budget Size: {budget}")
    vqa_pipe.image_processor.max_soft_tokens = budget

    inputs = vqa_pipe.processor.apply_chat_template(messages, tokenize=True, return_dict=True, return_tensors="pt")
    count_tokens(vqa_pipe.processor, inputs)

    output = vqa_pipe(messages, return_full_text=False, generate_kwargs=gen_kwargs)
    result_text = output[0]['generated_text']
    print(output[0]['generated_text'])
    result_image = draw_results(result_text)
    if result_image:
        results[budget] = result_image

# Display side-by-side
fig, axes = plt.subplots(1, len(results), figsize=(5 * len(results), 6))
if len(results) == 1:
    axes = [axes]

for ax, (budget, img) in zip(axes, results.items()):
    ax.imshow(img)
    ax.set_title(f"max_soft_tokens = {budget}", fontsize=14, fontweight='bold')
    ax.axis('off')

plt.tight_layout()
plt.show()
Budget Size: 70
# of Image Tokens: 64

```json
[
  {"box_2d": [731, 57, 873, 132], "label": "person"},
  {"box_2d": [556, 314, 675, 618], "label": "car"},
  {"box_2d": [736, 754, 843, 864], "label": "car"},
  {"box_2d": [756, 553, 935, 736], "label": "person"}
]
```
Budget Size: 140
# of Image Tokens: 121

```json
[
  {"box_2d": [736, 734, 809, 836], "label": "car"},
  {"box_2d": [745, 556, 919, 715], "label": "person"},
  {"box_2d": [748, 0, 906, 166], "label": "person"},
  {"box_2d": [541, 322, 647, 626], "label": "car"},
  {"box_2d": [413, 874, 513, 924], "label": "person"}
]
```
Budget Size: 280
# of Image Tokens: 256

```json
[
  {"box_2d": [403, 876, 511, 924], "label": "person"},
  {"box_2d": [532, 313, 652, 623], "label": "car"},
  {"box_2d": [735, 732, 817, 828], "label": "car"},
  {"box_2d": [742, 554, 912, 662], "label": "person"},
  {"box_2d": [760, 15, 899, 163], "label": "person"},
  {"box_2d": [768, 554, 912, 724], "label": "person"}
]
```
Budget Size: 560
# of Image Tokens: 529

```json
[
  {"box_2d": [741, 0, 910, 135], "label": "person"},
  {"box_2d": [547, 254, 650, 624], "label": "car"},
  {"box_2d": [773, 526, 912, 666], "label": "person"},
  {"box_2d": [601, 707, 742, 1000], "label": "car"},
  {"box_2d": [411, 873, 515, 931], "label": "person"},
  {"box_2d": [765, 700, 851, 874], "label": "person"}
]
```
สรุปและขั้นตอนถัดไป
ในคู่มือนี้ คุณได้เรียนรู้วิธีใช้โมเดล Gemma 4 สำหรับงานทำความเข้าใจรูปภาพ ตัวอย่างที่ครอบคลุม ได้แก่ การสร้างข้อความจากรูปภาพ การใช้เทมเพลตพรอมต์สำหรับ QA แบบภาพ การประมวลผลรูปภาพหลายรูปพร้อมกัน การรู้จำอักขระด้วยภาพ (OCR) การตรวจหาออบเจ็กต์ด้วยกล่องขอบเขต และการจัดการความละเอียดที่เปลี่ยนแปลงได้โดยใช้โควต้าโทเค็น
ดูแหล่งข้อมูลอื่นๆ