
| | | | |  গিটহাবে উৎস দেখুন গিটহাবে উৎস দেখুন |
আপনি জেমা ৩ এবং এর পরবর্তী মডেলগুলো ব্যবহার করে ছবির বিষয়বস্তু বিশ্লেষণ ও বুঝতে পারেন। এই ক্ষমতার মধ্যে ছবির বিষয়বস্তু বর্ণনা করা, বস্তু শনাক্ত করা, দৃশ্য চেনা এবং এমনকি দৃশ্যমান তথ্য থেকে প্রেক্ষাপট অনুমান করার মতো কাজগুলো অন্তর্ভুক্ত।
এই সক্ষমতাগুলো প্রদর্শনকারী কিছু উদাহরণ নিচে দেওয়া হলো।
এই নোটবুকটি টি৪ জিপিইউ-তে চলবে।
পাইথন প্যাকেজ ইনস্টল করুন
জেমা মডেল চালানো এবং অনুরোধ পাঠানোর জন্য প্রয়োজনীয় হাগিং ফেস লাইব্রেরিগুলো ইনস্টল করুন।
# Install PyTorch & other librariespip install torch accelerate# Install the transformers librarypip install transformers
লোড মডেল
পাইপলাইন লোড করতে transformers লাইব্রেরি ব্যবহার করুন।
MODEL_ID = "google/gemma-4-E2B-it" # @param ["google/gemma-4-E2B-it","google/gemma-4-E4B-it", "google/gemma-4-31B-it", "google/gemma-4-26B-A4B-it"]

from transformers import pipeline

vqa_pipe = pipeline(
    task="image-text-to-text",
    model=MODEL_ID,
    device_map="auto",
    dtype="auto"
)
Loading weights:   0%|          | 0/2011 [00:00<?, ?it/s]
processor_config.json: 0.00B [00:00, ?B/s]
একটি প্রম্পট টেমপ্লেট ব্যবহার করুন
নিচের উদাহরণটিতে দেখানো হয়েছে কীভাবে একটি ছবি প্রদান করে সে সম্পর্কে প্রশ্ন করা যায়।
from PIL import Image
from IPython.display import display
import requests

from transformers import GenerationConfig
config = GenerationConfig.from_pretrained(MODEL_ID)
config.max_new_tokens = 512
gen_kwargs = dict(generation_config=config)

img_url = "https://raw.githubusercontent.com/google-gemma/cookbook/refs/heads/main/apps/sample-data/GoldenGate.png"
input_image = Image.open(requests.get(img_url, stream=True).raw)
display(input_image)

messages = [
    {
        "role": "user", "content": [
            {"type": "image", "url": img_url},
            {"type": "text", "text": "What is shown in this image?"}
        ]
    }
]

output = vqa_pipe(messages, return_full_text=False, generate_kwargs=gen_kwargs)
print(output[0]['generated_text'])
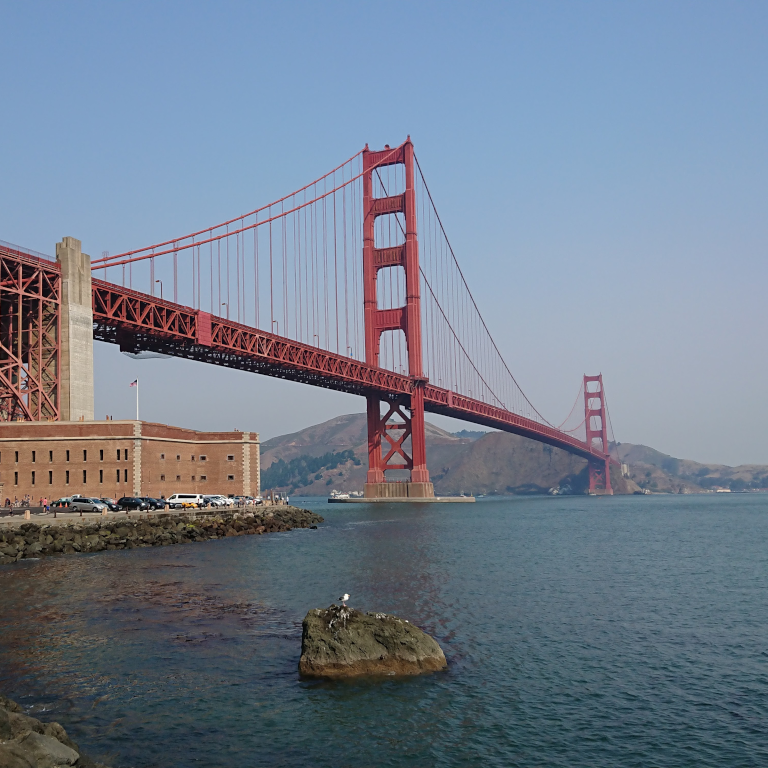
This image shows the **Golden Gate Bridge** in San Francisco, California, spanning a body of water.

Here are the key elements visible in the picture:

*   **The Golden Gate Bridge:** The iconic red suspension bridge dominates the background.
*   **Water/Bay:** There is a large expanse of water in the foreground, likely the San Francisco Bay or the Pacific Ocean.
*   **Foreground:** The immediate foreground consists of dark water and a rocky outcrop or small island with a bird perched on it.
*   **Atmosphere:** The sky is clear and light blue, suggesting fair weather.

In summary, it is a scenic view of the Golden Gate Bridge from the water.
একাধিক ছবি দিয়ে প্রম্পট করা
প্রম্পট টেমপ্লেটে একাধিক ছবির কন্টেন্ট অন্তর্ভুক্ত করার মাধ্যমে আপনি একটি প্রম্পটেই একাধিক ছবি দিতে পারেন।
from PIL import Image
from IPython.display import display
import requests

from transformers import GenerationConfig
config = GenerationConfig.from_pretrained(MODEL_ID)
config.max_new_tokens = 512
gen_kwargs = dict(generation_config=config)

img_urls = [
    "https://ai.google.dev/gemma/docs/capabilities/vision/images/surprise.png",
    "https://ai.google.dev/gemma/docs/capabilities/vision/images/kitchen.jpg",
]
for img in img_urls:
    display(Image.open(requests.get(img, stream=True).raw))

messages = [
    {
        "role": "user", "content": [
            {"type": "image", "url": img_urls[0]},
            {"type": "image", "url": img_urls[1]},
            {"type": "text", "text": "Caption these images."}
        ]
    }
]

output = vqa_pipe(messages, return_full_text=False, generate_kwargs=gen_kwargs)
print(output[0]['generated_text'])
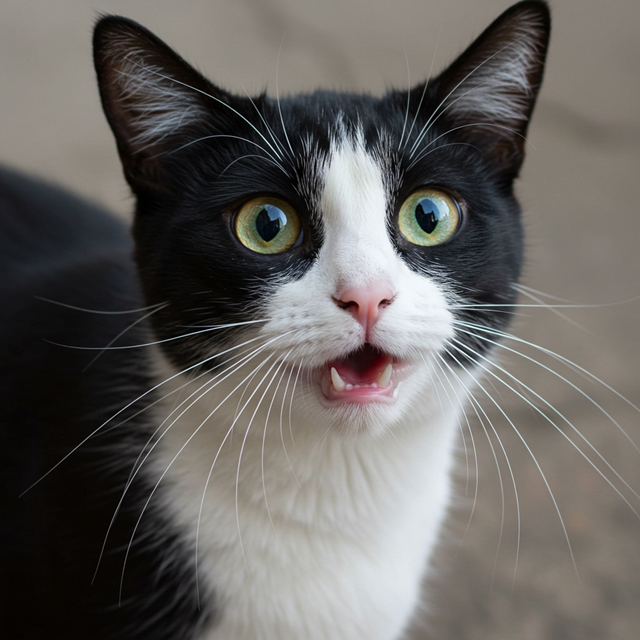
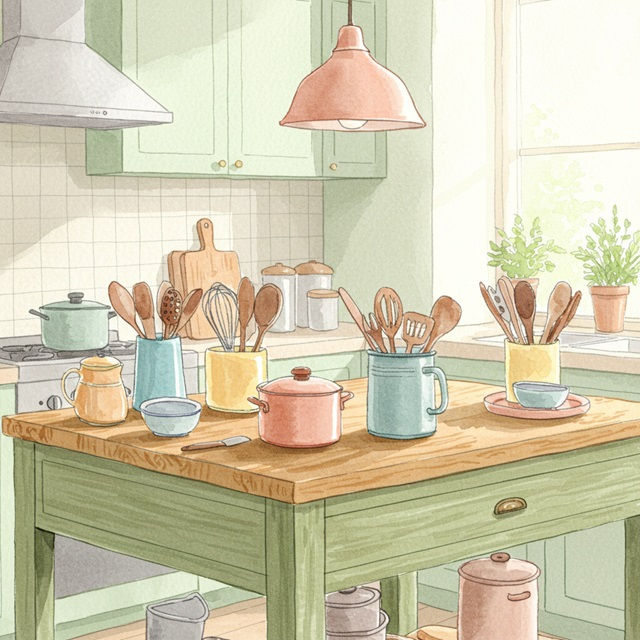
Here are a few caption options for each image, depending on the tone you're going for:

## Image 1: Black and White Cat

**Cute/Playful:**

* "Eyes that steal your heart."
* "Pure feline perfection."
* "Looking for trouble (and cuddles)."
* "The world, seen through emerald eyes."

**Descriptive/Sweet:**

* "A beautiful contrast of black and white."
* "Captivating gaze."
* "A portrait of feline elegance."

**Funny/Relatable:**

* "When you're judging your life choices."
* "The face of pure, unadulterated curiosity."
* "Ready for dinner or a nap, depending on the mood."

---

## Image 2: Kitchen Scene

**Cozy/Homely:**

* "Kitchen mornings and the scent of baking."
* "Where memories are made, one meal at a time."
* "Simple joys and rustic charm in the kitchen."
* "Gathering ingredients for something delicious."

**Aesthetic/Foodie:**

* "Rustic kitchen vibes and homemade goodness."
* "The art of cooking."
* "A warm, inviting space for culinary adventures."

**Simple/Direct:**

* "Kitchen life."
* "Cooking time."
* "Home is where the kitchen is."
OCR (অপটিক্যাল ক্যারেক্টার রিকগনিশন)
মডেলগুলো ছবিতে থাকা বহুভাষিক লেখা শনাক্ত করতে পারে।
from PIL import Image
from IPython.display import display
import requests

from transformers import GenerationConfig
config = GenerationConfig.from_pretrained(MODEL_ID)
config.max_new_tokens = 512
gen_kwargs = dict(generation_config=config)

img_url = "https://ai.google.dev/gemma/docs/capabilities/vision/images/cat.png"
input_image = Image.open(requests.get(img_url, stream=True).raw)
display(input_image)

messages = [
    {
        "role": "user", "content": [
            {"type": "image", "url": img_url},
            {"type": "text", "text": "What does the sign say?"}
        ]
    }
]

output = vqa_pipe(messages, return_full_text=False, generate_kwargs=gen_kwargs)
print(output[0]['generated_text'])
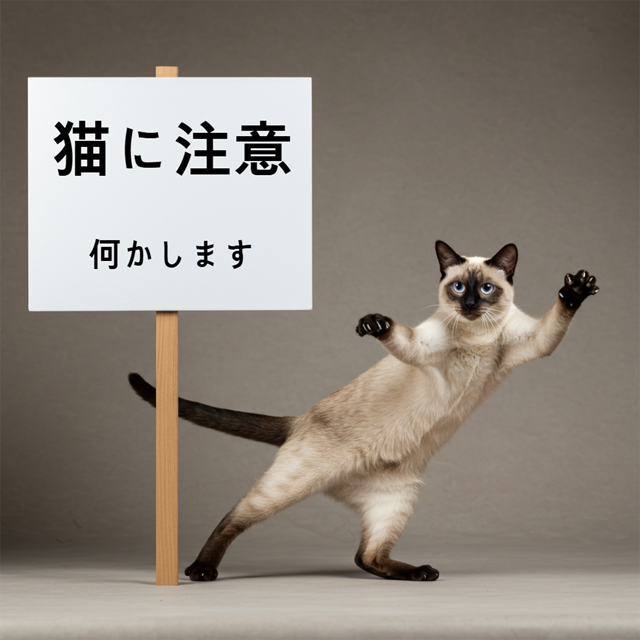
The sign says:

**猫に注意** (Neko ni chūi) - which means **"Caution: Cat"** or **"Watch out for cats"**.

Below that, it says:

**何かします** (Nanika shimasu) - which means **"I will do something"** or **"Something will happen"**.
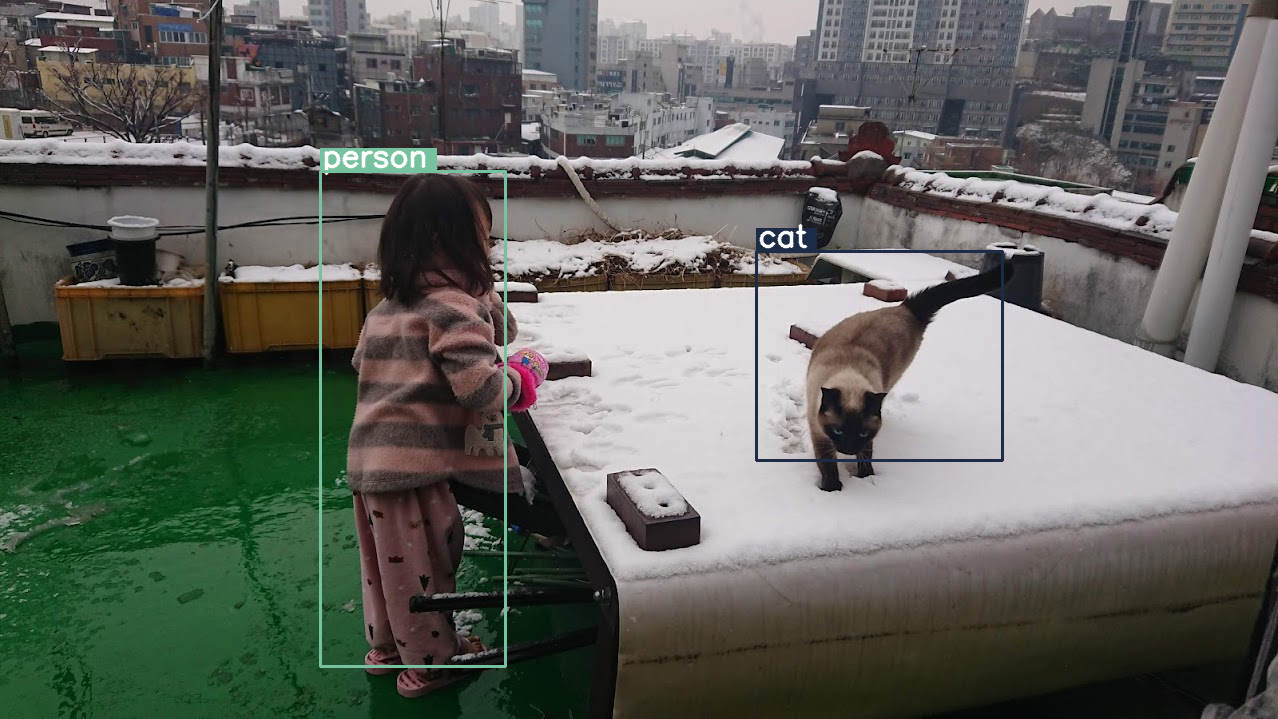
বস্তু সনাক্তকরণ
একটি ছবিতে বস্তু শনাক্ত করতে এবং সেগুলোর বাউন্ডিং বক্স স্থানাঙ্ক পেতে মডেলগুলোকে প্রশিক্ষণ দেওয়া হয়। বাউন্ডিং বক্স স্থানাঙ্কগুলো একটি ১০০০x১০০০ গ্রিডের সাপেক্ষে স্বাভাবিককৃত মান হিসেবে প্রকাশ করা হয়। আপনার মূল ছবির আকারের উপর ভিত্তি করে এই স্থানাঙ্কগুলোকে ডিস্কেল করতে হবে।
import numpy as np
from PIL import Image
from IPython.display import display
import requests

import cv2
import re, json

from transformers import GenerationConfig
config = GenerationConfig.from_pretrained(MODEL_ID)
config.max_new_tokens = 512
gen_kwargs = dict(generation_config=config)

# Load Image
img_url = "https://raw.githubusercontent.com/bebechien/gemma/refs/heads/main/PaliGemma_Demo.JPG"
input_image = Image.open(requests.get(img_url, stream=True).raw)

###############################
# some helper functions below #
###############################

def draw_bounding_box(image, coordinates, label, label_colors, width, height):
    y1, x1, y2, x2 = [int(coord)/1000 for coord in coordinates]
    y1, x1, y2, x2 = map(round, (y1*height, x1*width, y2*height, x2*width))

    text_size, _ = cv2.getTextSize(label, cv2.FONT_HERSHEY_SIMPLEX, 1, 3)
    text_width, text_height = text_size

    text_x = x1 + 2
    text_y = y1 - 5

    font_scale = 1
    label_rect_width = text_width + 8
    label_rect_height = int(text_height * font_scale)

    color = label_colors.get(label, None)
    if color is None:
        color = np.random.randint(0, 256, (3,)).tolist()
        label_colors[label] = color

    cv2.rectangle(image, (x1, y1 - label_rect_height), (x1 + label_rect_width, y1), color, -1)

    thickness = 2
    cv2.putText(image, label, (text_x, text_y), cv2.FONT_HERSHEY_SIMPLEX, font_scale, (255, 255, 255), thickness, cv2.LINE_AA)

    cv2.rectangle(image, (x1, y1), (x2, y2), color, 2)
    return image

def draw_results(text_content):
  match = re.search(r'```json\s+(.*?)\s+```', text_content, re.DOTALL)
  if match:
    json_string = match.group(1)
    # Parse the string into a Python list/object
    data_list = json.loads(json_string)

    labels = []
    label_colors = {}
    output_image = input_image
    output_img = np.array(input_image)

    for item in data_list:
      width = input_image.size[0]
      height = input_image.size[1]

      # Draw bounding boxes on the frame.
      image = cv2.cvtColor(np.array(input_image), cv2.COLOR_RGB2BGR)
      output_img = draw_bounding_box(output_img, item["box_2d"], item["label"], label_colors, width, height)

      output_image = Image.fromarray(output_img)

    return output_image
  else:
    print("No JSON code block found.")


messages = [
    {
        "role": "user", "content": [
            {"type": "image", "url": img_url},
            {"type": "text", "text": "detect person and cat"}
        ]
    }
]

output = vqa_pipe(messages, return_full_text=False, generate_kwargs=gen_kwargs)
print(output[0]['generated_text'])

draw_results(output[0]['generated_text'])
```json
[
  {"box_2d": [244, 256, 948, 405], "label": "person"},
  {"box_2d": [357, 606, 655, 803], "label": "cat"}
]
```
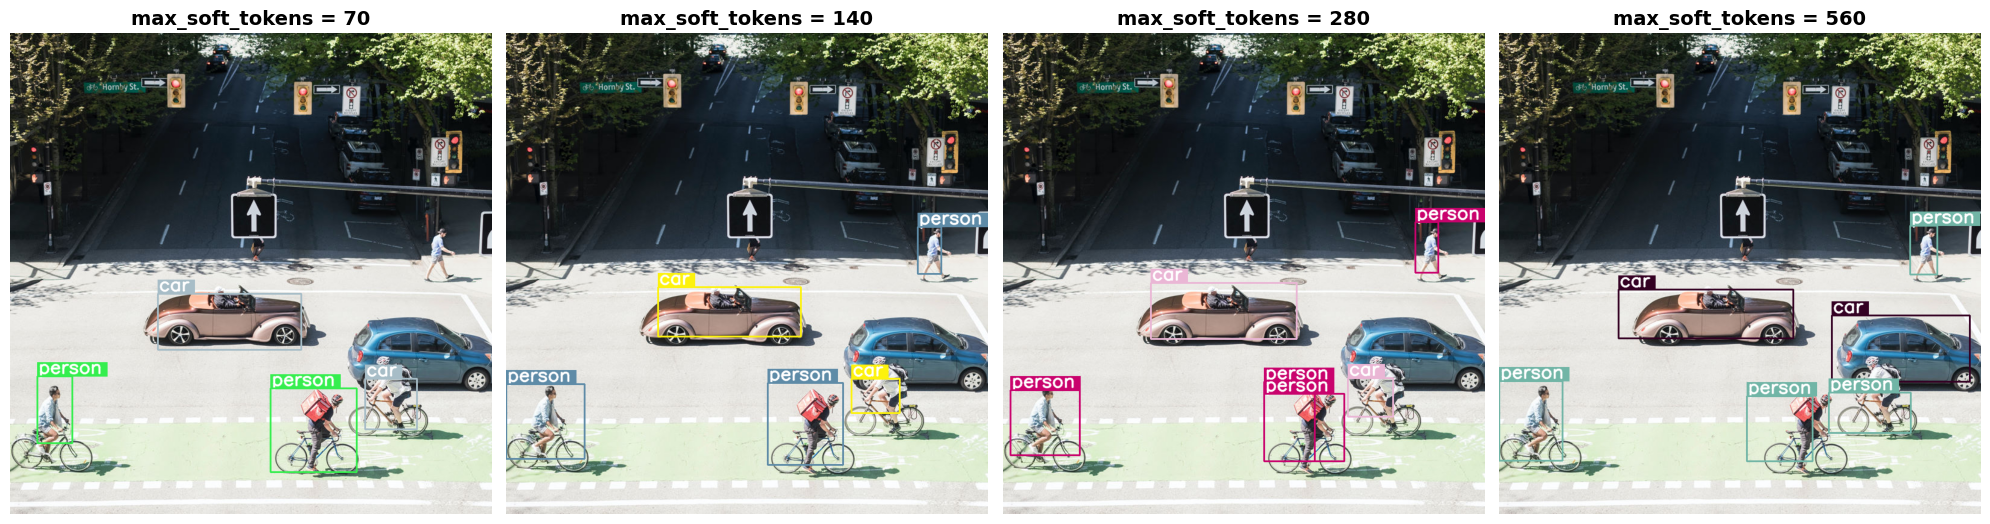
পরিবর্তনশীল রেজোলিউশন (নামমাত্র বাজেট)
সমস্ত জেমা ৪ মডেল পরিবর্তনশীল রেজোলিউশন সমর্থন করে, যার অর্থ হলো বিভিন্ন রেজোলিউশনের ছবি প্রসেস করা যায়। এছাড়াও, আপনি একটি নির্দিষ্ট ছবিকে উচ্চতর বা নিম্নতর রেজোলিউশনে প্রসেস করতে চান কিনা, তা স্থির করতে পারেন। উদাহরণস্বরূপ, আপনি যদি অবজেক্ট ডিটেকশন করেন, তবে আপনি ছবিটি উচ্চতর রেজোলিউশনে প্রসেস করতে চাইতে পারেন। যেমন, ইনফারেন্সের গতি বাড়ানোর জন্য ভিডিও আন্ডারস্ট্যান্ডিং-এর ক্ষেত্রে প্রতিটি ফ্রেম নিম্নতর রেজোলিউশনে করা যেতে পারে। মূলত, এটি ইনফারেন্সের গতি এবং ছবির উপস্থাপনার নির্ভুলতার মধ্যে একটি ভারসাম্য।
এই নির্বাচনটি টোকেন বাজেট দ্বারা নিয়ন্ত্রিত হয়, যা একটি নির্দিষ্ট ছবির জন্য তৈরি করা ভিজ্যুয়াল টোকেনের (যাকে ভিজ্যুয়াল টোকেন এমবেডিংও বলা হয়) সর্বোচ্চ সংখ্যাকে নির্দেশ করে।
ব্যবহারকারী ৭০, ১৪০, ২৮০, ৫৬০, বা ১১২০ টোকেনের মধ্যে যেকোনো একটি বাজেট বেছে নিতে পারেন। বাজেটের উপর নির্ভর করে ইনপুটটির আকার পরিবর্তন করা হয়। যদি আপনার বাজেট বেশি হয় (যেমন ১১২০ টোকেন), তাহলে আপনার ছবির রেজোলিউশন উচ্চতর থাকবে এবং ফলস্বরূপ প্রসেস করার জন্য এতে অনেক বেশি প্যাচ থাকবে। যদি আপনার বাজেট কম হয় (যেমন ৭০ টোকেন), তাহলে আপনার ছবিটিকে ডাউনস্কেল করতে হবে এবং প্রসেস করার জন্য কম প্যাচ থাকবে। বেশি বাজেট (এবং সেই কারণে বেশি টোকেন) দিয়ে, আপনি কম বাজেটের তুলনায় অনেক বেশি তথ্য ধারণ করতে পারেন।
এই বাজেট নির্ধারণ করে যে ছবিটি কতটা রিসাইজ করা হবে। ধরুন আপনার বাজেট ২৮০ টোকেন, তাহলে প্যাচের সর্বোচ্চ সংখ্যা হবে ৯ x ২৮০ = ২,৫২০। কেন ৯ দিয়ে গুণ করা হলো? কারণ পরবর্তী ধাপে, পাশাপাশি থাকা প্যাচগুলোর প্রতিটি ৩x৩ ব্লককে গড় করে একটি একক এমবেডিং-এ একীভূত করা হয়। এর ফলে প্রাপ্ত এমবেডিংগুলোই হলো ভিজ্যুয়াল টোকেন এমবেডিং। আমাদের যত বেশি ভিজ্যুয়াল টোকেন এমবেডিং থাকবে, একটি ছবি থেকে তত বেশি সূক্ষ্ম তথ্য বের করা যাবে।
আসুন দেখি একটি ছবিতে অবজেক্ট ডিটেকশন করলে এবং বাজেটের আকার খুব কম সেট করলে কী হয় (70):
import numpy as np
from PIL import Image
import requests, cv2, re, json

from transformers import GenerationConfig
config = GenerationConfig.from_pretrained(MODEL_ID)
config.max_new_tokens = 512
gen_kwargs = dict(generation_config=config)

img_url = "https://huggingface.co/datasets/Xenova/transformers.js-docs/resolve/main/city-streets.jpg"
input_image = Image.open(requests.get(img_url, stream=True).raw)

def draw_bounding_box(image, coordinates, label, label_colors, width, height):
    """Draw a bounding box based on input image and coordinates"""
    y1, x1, y2, x2 = [int(c) / 1000 for c in coordinates]
    y1, x1, y2, x2 = round(y1 * height), round(x1 * width), round(y2 * height), round(x2 * width)

    color = label_colors.setdefault(label, np.random.randint(0, 256, (3,)).tolist())
    text_size = cv2.getTextSize(label, cv2.FONT_HERSHEY_SIMPLEX, 1, 3)[0]

    cv2.rectangle(image, (x1, y1 - text_size[1]), (x1 + text_size[0] + 8, y1), color, -1)
    cv2.putText(image, label, (x1 + 2, y1 - 5), cv2.FONT_HERSHEY_SIMPLEX, 1, (255, 255, 255), 2, cv2.LINE_AA)
    cv2.rectangle(image, (x1, y1), (x2, y2), color, 2)
    return image

def draw_results(text_content):
    """Based on an input image, draw bounding boxes and labels"""
    # Extract JSON
    match = re.search(r'```json\s+(.*?)\s+```', text_content, re.DOTALL)
    if not match:
        print("No JSON code block found.")
        return None

    # Extract data
    data_list = json.loads(match.group(1))
    output_img = np.array(input_image)
    label_colors = {}
    w, h = input_image.size

    # Draw bounding boxes
    for item in data_list:
        output_img = draw_bounding_box(output_img, item["box_2d"], item["label"], label_colors, w, h)

    return Image.fromarray(output_img)


# Detect person, card, and traffic light
messages = [
    {
        "role": "user", "content": [
            {"type": "image", "url": img_url},
             {"type": "text", "text": "detect person and car, output only ```json"}
        ]
     }
]

# Run pipeline and set token budget to 70
vqa_pipe.image_processor.max_soft_tokens = 70
output = vqa_pipe(messages, return_full_text=False, generate_kwargs=gen_kwargs)
print(output[0]['generated_text'])
draw_results(output[0]['generated_text'])
```json
[
  {"box_2d": [413, 864, 537, 933], "label": "person"},
  {"box_2d": [553, 315, 666, 623], "label": "car"},
  {"box_2d": [743, 754, 843, 864], "label": "car"},
  {"box_2d": [743, 556, 843, 743], "label": "car"},
  {"box_2d": [733, 49, 853, 135], "label": "person"}
]
```
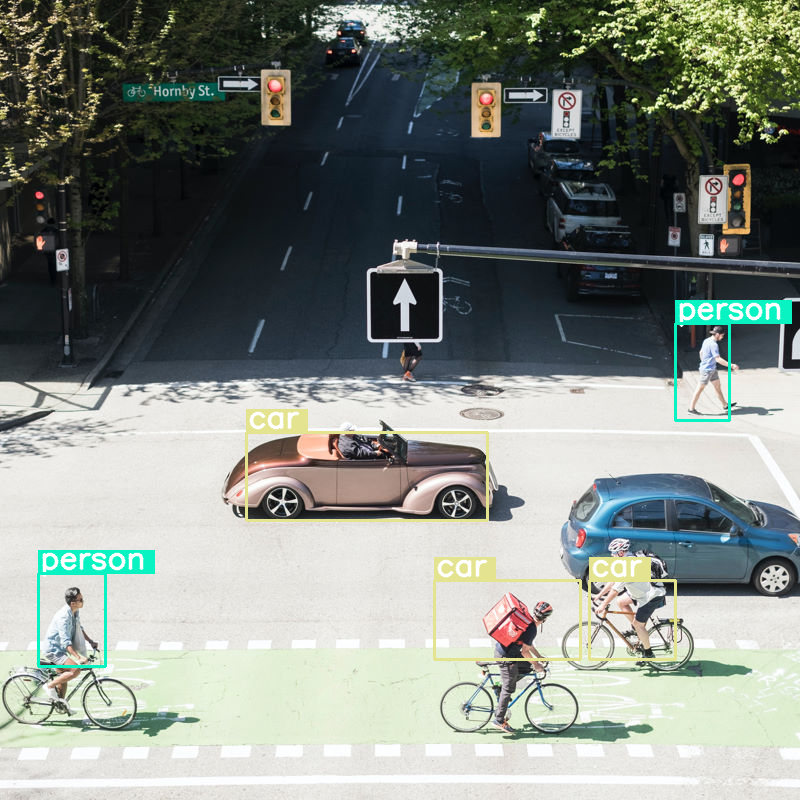
এটি মোটামুটি কাজ করে, কিন্তু এটা স্পষ্ট যে ছবিটি বেশ খানিকটা সংকুচিত হয়ে যাচ্ছে, কারণ এটি সব গাড়ি এবং ব্যক্তিকে শনাক্ত করতে পারে না। টোকেন বাজেট বাড়ালে এই সমস্যার সমাধান হবে!
টোকেন বাজেট তুলনা করুন
চলুন দেখি বাজেটের আকার বাড়ালে কী হয়! বাজেটের আকার বড় হলে আরও বেশি সফট টোকেন তৈরি ও প্রক্রিয়াজাত হয়। এর ফলে অবজেক্ট ডিটেকশন উন্নত হওয়া উচিত।
import matplotlib.pyplot as plt

def count_tokens(processor, tokens):
    input_ids = tokens['input_ids'][0]  # Get input IDs from the tokenizer output

    img_counting = []
    img_count = 0

    aud_counting = []
    aud_count = 0

    for x in input_ids:  # Iterate over the token list
        # Use tokenizer.decode() to convert tokens back to words
        word = processor.decode([x])  # No need to convert to JAX array for decoding

        if x == processor.tokenizer.image_token_id:
            img_count = img_count + 1
        elif x == processor.tokenizer.audio_token_id:
            aud_count = aud_count + 1
        elif x == processor.tokenizer.eoi_token_id:
            img_counting.append(img_count)
            img_count = 0
        elif x == processor.tokenizer.eoa_token_id:
            aud_counting.append(aud_count)
            aud_count = 0

    for item in img_counting:
        print(f"# of Image Tokens: {item}")

    for item in aud_counting:
        print(f"# of Audio Tokens: {item}")

input_image.resize((2000, 2000))

# Detect person and car
messages = [
    {
        "role": "user", "content": [
            {"type": "image", "url": img_url},
             {"type": "text", "text": "detect person and car, output only ```json"}
        ]
     }
]


# Run for different budget sizes
budget_sizes = [70, 140, 280, 560]
# 1120 won't fit on T4, but works on L4 or highger
#budget_sizes = [70, 140, 280, 560, 1120]
results = {}

for budget in budget_sizes:
    print(f"Budget Size: {budget}")
    vqa_pipe.image_processor.max_soft_tokens = budget

    inputs = vqa_pipe.processor.apply_chat_template(messages, tokenize=True, return_dict=True, return_tensors="pt")
    count_tokens(vqa_pipe.processor, inputs)

    output = vqa_pipe(messages, return_full_text=False, generate_kwargs=gen_kwargs)
    result_text = output[0]['generated_text']
    print(output[0]['generated_text'])
    result_image = draw_results(result_text)
    if result_image:
        results[budget] = result_image

# Display side-by-side
fig, axes = plt.subplots(1, len(results), figsize=(5 * len(results), 6))
if len(results) == 1:
    axes = [axes]

for ax, (budget, img) in zip(axes, results.items()):
    ax.imshow(img)
    ax.set_title(f"max_soft_tokens = {budget}", fontsize=14, fontweight='bold')
    ax.axis('off')

plt.tight_layout()
plt.show()
Budget Size: 70
# of Image Tokens: 64

```json
[
  {"box_2d": [731, 57, 873, 132], "label": "person"},
  {"box_2d": [556, 314, 675, 618], "label": "car"},
  {"box_2d": [736, 754, 843, 864], "label": "car"},
  {"box_2d": [756, 553, 935, 736], "label": "person"}
]
```
Budget Size: 140
# of Image Tokens: 121

```json
[
  {"box_2d": [736, 734, 809, 836], "label": "car"},
  {"box_2d": [745, 556, 919, 715], "label": "person"},
  {"box_2d": [748, 0, 906, 166], "label": "person"},
  {"box_2d": [541, 322, 647, 626], "label": "car"},
  {"box_2d": [413, 874, 513, 924], "label": "person"}
]
```
Budget Size: 280
# of Image Tokens: 256

```json
[
  {"box_2d": [403, 876, 511, 924], "label": "person"},
  {"box_2d": [532, 313, 652, 623], "label": "car"},
  {"box_2d": [735, 732, 817, 828], "label": "car"},
  {"box_2d": [742, 554, 912, 662], "label": "person"},
  {"box_2d": [760, 15, 899, 163], "label": "person"},
  {"box_2d": [768, 554, 912, 724], "label": "person"}
]
```
Budget Size: 560
# of Image Tokens: 529

```json
[
  {"box_2d": [741, 0, 910, 135], "label": "person"},
  {"box_2d": [547, 254, 650, 624], "label": "car"},
  {"box_2d": [773, 526, 912, 666], "label": "person"},
  {"box_2d": [601, 707, 742, 1000], "label": "car"},
  {"box_2d": [411, 873, 515, 931], "label": "person"},
  {"box_2d": [765, 700, 851, 874], "label": "person"}
]
```
সারসংক্ষেপ এবং পরবর্তী পদক্ষেপ
এই নির্দেশিকায়, আপনি ইমেজ আন্ডারস্ট্যান্ডিং টাস্কের জন্য জেমা ৪ মডেল কীভাবে ব্যবহার করতে হয় তা শিখেছেন। উদাহরণগুলিতে ইমেজ থেকে টেক্সট তৈরি করা, ভিজ্যুয়াল কিউএ-এর জন্য প্রম্পট টেমপ্লেট ব্যবহার করা, একই সাথে একাধিক ইমেজ প্রসেস করা, অপটিক্যাল ক্যারেক্টার রিকগনিশন (ওসিআর), বাউন্ডিং বক্সের সাহায্যে অবজেক্ট ডিটেকশন এবং টোকেন বাজেট ব্যবহার করে পরিবর্তনশীল রেজোলিউশন পরিচালনা করার বিষয়গুলো অন্তর্ভুক্ত ছিল।
অন্যান্য উৎসগুলো দেখুন।