
|
|
|
|
|
 Ver el código fuente en GitHub Ver el código fuente en GitHub
|
Puedes usar los modelos de Gemma 3 y versiones posteriores para analizar y comprender el contenido de las imágenes. Esta capacidad incluye tareas como describir el contenido de la imagen, identificar objetos, reconocer escenas e, incluso, inferir el contexto a partir de la información visual.
Estos son algunos ejemplos que demuestran estas capacidades.
Este notebook se ejecutará en la GPU T4.
Instala paquetes de Python
Instala las bibliotecas de Hugging Face necesarias para ejecutar el modelo de Gemma y realizar solicitudes.
# Install PyTorch & other librariespip install torch accelerate# Install the transformers librarypip install transformers
Carga el modelo
Usa la biblioteca transformers para cargar la canalización.
MODEL_ID = "google/gemma-4-E2B-it" # @param ["google/gemma-4-E2B-it","google/gemma-4-E4B-it", "google/gemma-4-31B-it", "google/gemma-4-26B-A4B-it"]

from transformers import pipeline

vqa_pipe = pipeline(
    task="image-text-to-text",
    model=MODEL_ID,
    device_map="auto",
    dtype="auto"
)
Loading weights:   0%|          | 0/2011 [00:00<?, ?it/s]
processor_config.json: 0.00B [00:00, ?B/s]
Usa una plantilla de instrucción
En el siguiente ejemplo, se muestra cómo proporcionar una imagen y hacer preguntas al respecto.
from PIL import Image
from IPython.display import display
import requests

from transformers import GenerationConfig
config = GenerationConfig.from_pretrained(MODEL_ID)
config.max_new_tokens = 512
gen_kwargs = dict(generation_config=config)

img_url = "https://raw.githubusercontent.com/google-gemma/cookbook/refs/heads/main/Demos/sample-data/GoldenGate.png"
input_image = Image.open(requests.get(img_url, stream=True).raw)
display(input_image)

messages = [
    {
        "role": "user", "content": [
            {"type": "image", "url": img_url},
            {"type": "text", "text": "What is shown in this image?"}
        ]
    }
]

output = vqa_pipe(messages, return_full_text=False, generate_kwargs=gen_kwargs)
print(output[0]['generated_text'])
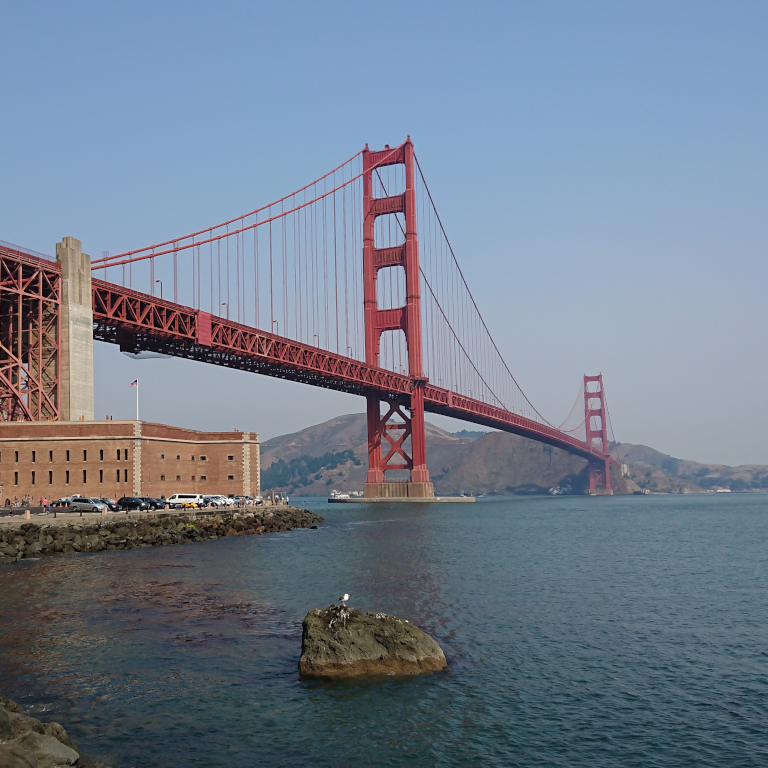
This image shows the **Golden Gate Bridge** in San Francisco, California, spanning a body of water.

Here are the key elements visible in the picture:

*   **The Golden Gate Bridge:** The iconic red suspension bridge dominates the background.
*   **Water/Bay:** There is a large expanse of water in the foreground, likely the San Francisco Bay or the Pacific Ocean.
*   **Foreground:** The immediate foreground consists of dark water and a rocky outcrop or small island with a bird perched on it.
*   **Atmosphere:** The sky is clear and light blue, suggesting fair weather.

In summary, it is a scenic view of the Golden Gate Bridge from the water.
Instrucciones con varias imágenes
Puedes proporcionar varias imágenes en una sola instrucción si incluyes contenido de varias imágenes en la plantilla de instrucción.
from PIL import Image
from IPython.display import display
import requests

from transformers import GenerationConfig
config = GenerationConfig.from_pretrained(MODEL_ID)
config.max_new_tokens = 512
gen_kwargs = dict(generation_config=config)

img_urls = [
    "https://ai.google.dev/gemma/docs/capabilities/vision/images/surprise.png",
    "https://ai.google.dev/gemma/docs/capabilities/vision/images/kitchen.jpg",
]
for img in img_urls:
    display(Image.open(requests.get(img, stream=True).raw))

messages = [
    {
        "role": "user", "content": [
            {"type": "image", "url": img_urls[0]},
            {"type": "image", "url": img_urls[1]},
            {"type": "text", "text": "Caption these images."}
        ]
    }
]

output = vqa_pipe(messages, return_full_text=False, generate_kwargs=gen_kwargs)
print(output[0]['generated_text'])
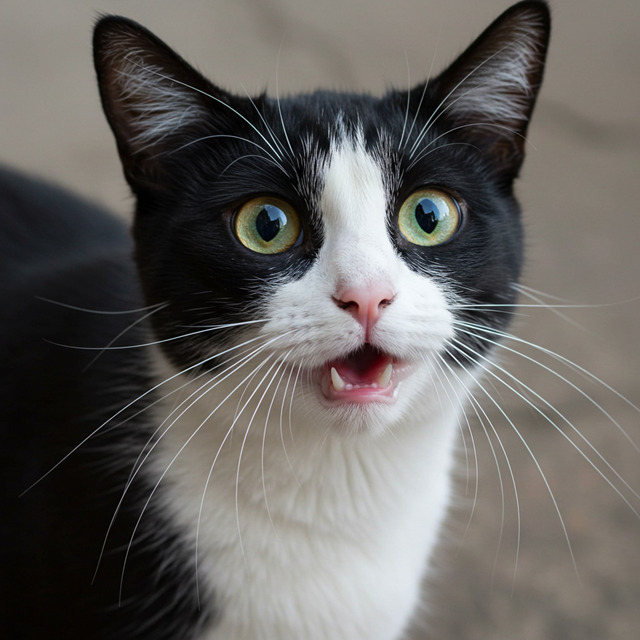
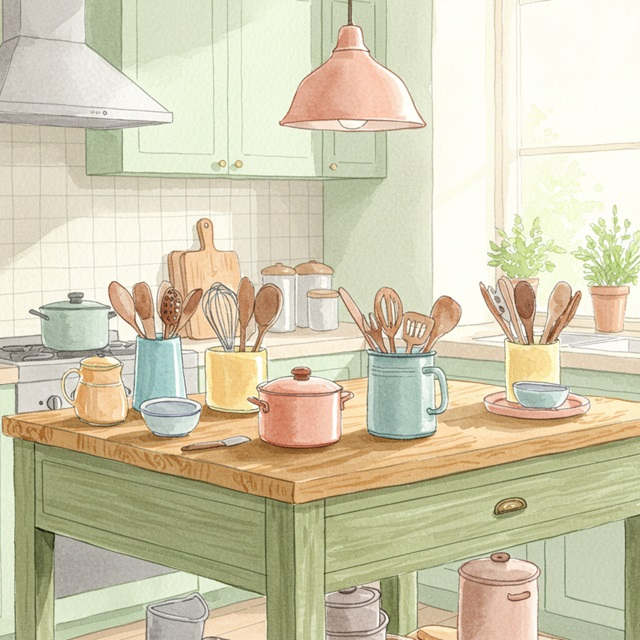
Here are a few caption options for each image, depending on the tone you're going for:

## Image 1: Black and White Cat

**Cute/Playful:**

* "Eyes that steal your heart."
* "Pure feline perfection."
* "Looking for trouble (and cuddles)."
* "The world, seen through emerald eyes."

**Descriptive/Sweet:**

* "A beautiful contrast of black and white."
* "Captivating gaze."
* "A portrait of feline elegance."

**Funny/Relatable:**

* "When you're judging your life choices."
* "The face of pure, unadulterated curiosity."
* "Ready for dinner or a nap, depending on the mood."

---

## Image 2: Kitchen Scene

**Cozy/Homely:**

* "Kitchen mornings and the scent of baking."
* "Where memories are made, one meal at a time."
* "Simple joys and rustic charm in the kitchen."
* "Gathering ingredients for something delicious."

**Aesthetic/Foodie:**

* "Rustic kitchen vibes and homemade goodness."
* "The art of cooking."
* "A warm, inviting space for culinary adventures."

**Simple/Direct:**

* "Kitchen life."
* "Cooking time."
* "Home is where the kitchen is."
OCR (reconocimiento óptico de caracteres)
Los modelos pueden reconocer textos multilingües en la imagen.
from PIL import Image
from IPython.display import display
import requests

from transformers import GenerationConfig
config = GenerationConfig.from_pretrained(MODEL_ID)
config.max_new_tokens = 512
gen_kwargs = dict(generation_config=config)

img_url = "https://ai.google.dev/gemma/docs/capabilities/vision/images/cat.png"
input_image = Image.open(requests.get(img_url, stream=True).raw)
display(input_image)

messages = [
    {
        "role": "user", "content": [
            {"type": "image", "url": img_url},
            {"type": "text", "text": "What does the sign say?"}
        ]
    }
]

output = vqa_pipe(messages, return_full_text=False, generate_kwargs=gen_kwargs)
print(output[0]['generated_text'])
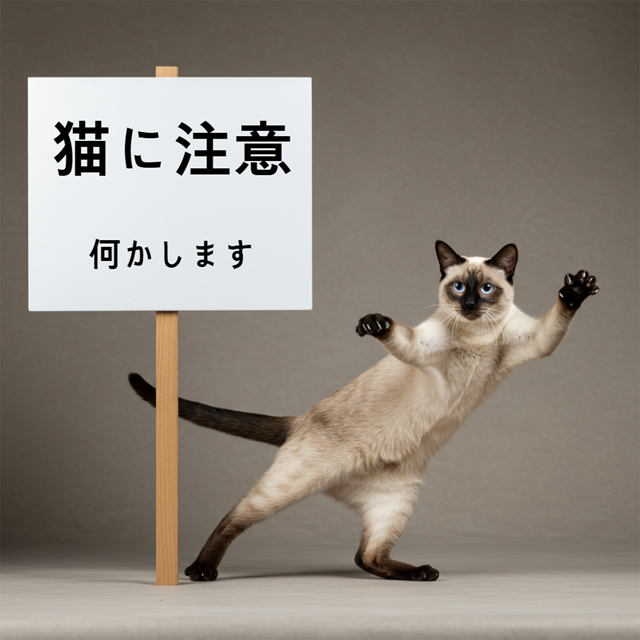
The sign says:

**猫に注意** (Neko ni chūi) - which means **"Caution: Cat"** or **"Watch out for cats"**.

Below that, it says:

**何かします** (Nanika shimasu) - which means **"I will do something"** or **"Something will happen"**.
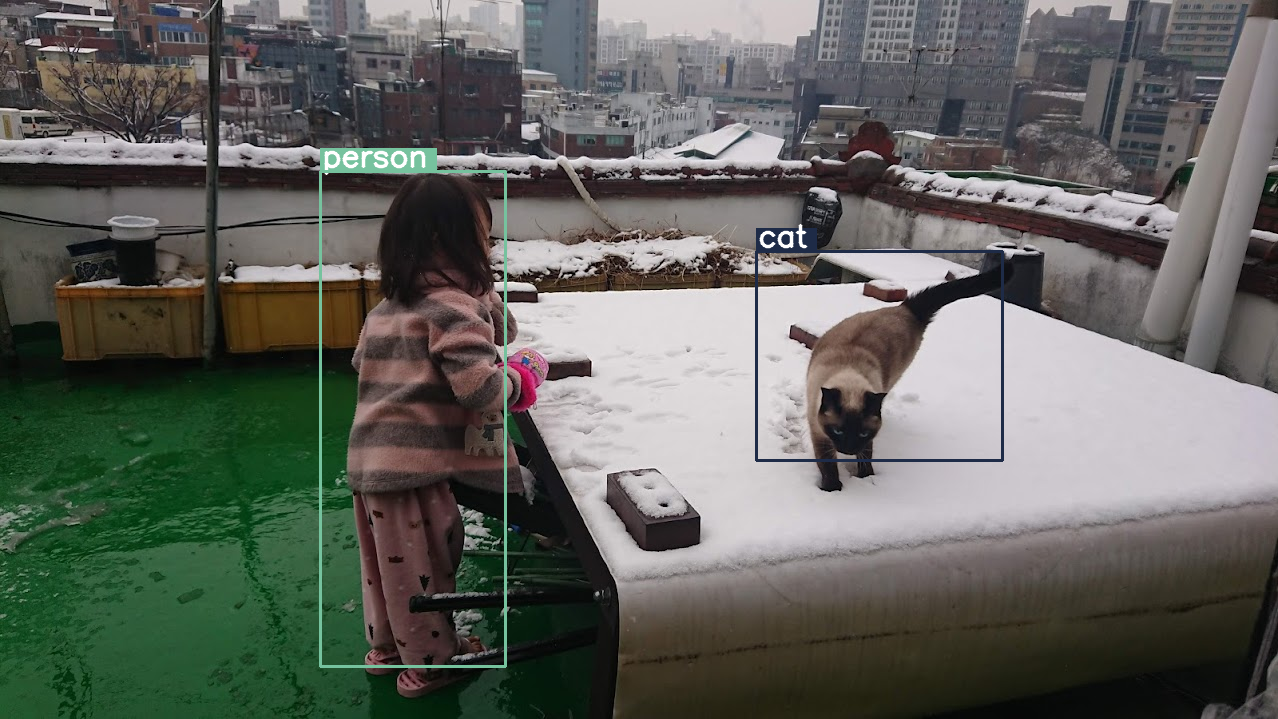
Detección de objetos
Los modelos se entrenan para detectar objetos en una imagen y obtener sus coordenadas de cuadro delimitador. Las coordenadas del cuadro delimitador se expresan como valores normalizados en relación con una cuadrícula de 1024 x 1024. Debes reducir la escala de estas coordenadas según el tamaño original de la imagen.
import numpy as np
from PIL import Image
from IPython.display import display
import requests

import cv2
import re, json

from transformers import GenerationConfig
config = GenerationConfig.from_pretrained(MODEL_ID)
config.max_new_tokens = 512
gen_kwargs = dict(generation_config=config)

# Load Image
img_url = "https://raw.githubusercontent.com/bebechien/gemma/refs/heads/main/PaliGemma_Demo.JPG"
input_image = Image.open(requests.get(img_url, stream=True).raw)

###############################
# some helper functions below #
###############################

def draw_bounding_box(image, coordinates, label, label_colors, width, height):
    y1, x1, y2, x2 = [int(coord)/1024 for coord in coordinates]
    y1, x1, y2, x2 = map(round, (y1*height, x1*width, y2*height, x2*width))

    text_size, _ = cv2.getTextSize(label, cv2.FONT_HERSHEY_SIMPLEX, 1, 3)
    text_width, text_height = text_size

    text_x = x1 + 2
    text_y = y1 - 5

    font_scale = 1
    label_rect_width = text_width + 8
    label_rect_height = int(text_height * font_scale)

    color = label_colors.get(label, None)
    if color is None:
        color = np.random.randint(0, 256, (3,)).tolist()
        label_colors[label] = color

    cv2.rectangle(image, (x1, y1 - label_rect_height), (x1 + label_rect_width, y1), color, -1)

    thickness = 2
    cv2.putText(image, label, (text_x, text_y), cv2.FONT_HERSHEY_SIMPLEX, font_scale, (255, 255, 255), thickness, cv2.LINE_AA)

    cv2.rectangle(image, (x1, y1), (x2, y2), color, 2)
    return image

def draw_results(text_content):
  match = re.search(r'```json\s+(.*?)\s+```', text_content, re.DOTALL)
  if match:
    json_string = match.group(1)
    # Parse the string into a Python list/object
    data_list = json.loads(json_string)

    labels = []
    label_colors = {}
    output_image = input_image
    output_img = np.array(input_image)

    for item in data_list:
      width = input_image.size[0]
      height = input_image.size[1]

      # Draw bounding boxes on the frame.
      image = cv2.cvtColor(np.array(input_image), cv2.COLOR_RGB2BGR)
      output_img = draw_bounding_box(output_img, item["box_2d"], item["label"], label_colors, width, height)

      output_image = Image.fromarray(output_img)

    return output_image
  else:
    print("No JSON code block found.")


messages = [
    {
        "role": "user", "content": [
            {"type": "image", "url": img_url},
            {"type": "text", "text": "detect person and cat"}
        ]
    }
]

output = vqa_pipe(messages, return_full_text=False, generate_kwargs=gen_kwargs)
print(output[0]['generated_text'])

draw_results(output[0]['generated_text'])
```json
[
  {"box_2d": [244, 256, 948, 405], "label": "person"},
  {"box_2d": [357, 606, 655, 803], "label": "cat"}
]
```
Resolución variable (presupuesto de tokens)
Todos los modelos de Gemma 4 admiten resolución variable, lo que significa que se pueden procesar imágenes de diferentes resoluciones. Además, puedes decidir si deseas procesar una imagen determinada con una resolución más alta o más baja. Si realizas la detección de objetos, por ejemplo, es posible que desees procesar la imagen con una resolución más alta. La comprensión de video, por ejemplo, se puede realizar con una resolución más baja para cada fotograma para acelerar la inferencia. Básicamente, es una compensación entre la velocidad de inferencia y la precisión de las representaciones de imágenes.
Esta elección se controla mediante el presupuesto de tokens, que representa la cantidad máxima de tokens visuales (también llamados incorporaciones de tokens visuales) que se generan para una imagen determinada.
El usuario puede decidir entre tamaños de presupuesto de 70, 140, 280, 560 o 1, 120 tokens. Según el presupuesto, se cambia el tamaño de la entrada. Si tienes un presupuesto más alto (como 1,120 tokens), tu imagen puede mantener una resolución más alta y, como resultado, tendrá muchos más parches para procesar. Si tienes un presupuesto más bajo (como 70 tokens), debes reducir la escala de la imagen y tendrás menos parches que necesiten procesarse. Con un presupuesto más alto (y, por lo tanto, más tokens), puedes capturar mucha más información que con un presupuesto más bajo.
Este presupuesto determina cuánto se cambia el tamaño de la imagen. Imagina que tienes un presupuesto de 280 tokens. Entonces, la cantidad máxima de parches será de 9 x 280 = 2,520. ¿Por qué 9? Esto se debe a que, en el siguiente paso, cada bloque de 3x3 de parches vecinos se combina en una sola incorporación promediándolos. Las incorporaciones resultantes son las incorporaciones de tokens visuales. Cuantas más incorporaciones de tokens visuales tengamos, más información detallada se podrá extraer de una imagen.
Exploremos qué sucede si realizamos la detección de objetos en una imagen y establecemos el tamaño del presupuesto muy bajo (70):
import numpy as np
from PIL import Image
import requests, cv2, re, json

from transformers import GenerationConfig
config = GenerationConfig.from_pretrained(MODEL_ID)
config.max_new_tokens = 512
gen_kwargs = dict(generation_config=config)

img_url = "https://huggingface.co/datasets/Xenova/transformers.js-docs/resolve/main/city-streets.jpg"
input_image = Image.open(requests.get(img_url, stream=True).raw)

def draw_bounding_box(image, coordinates, label, label_colors, width, height):
    """Draw a bounding box based on input image and coordinates"""
    y1, x1, y2, x2 = [int(c) / 1024 for c in coordinates]
    y1, x1, y2, x2 = round(y1 * height), round(x1 * width), round(y2 * height), round(x2 * width)

    color = label_colors.setdefault(label, np.random.randint(0, 256, (3,)).tolist())
    text_size = cv2.getTextSize(label, cv2.FONT_HERSHEY_SIMPLEX, 1, 3)[0]

    cv2.rectangle(image, (x1, y1 - text_size[1]), (x1 + text_size[0] + 8, y1), color, -1)
    cv2.putText(image, label, (x1 + 2, y1 - 5), cv2.FONT_HERSHEY_SIMPLEX, 1, (255, 255, 255), 2, cv2.LINE_AA)
    cv2.rectangle(image, (x1, y1), (x2, y2), color, 2)
    return image

def draw_results(text_content):
    """Based on an input image, draw bounding boxes and labels"""
    # Extract JSON
    match = re.search(r'```json\s+(.*?)\s+```', text_content, re.DOTALL)
    if not match:
        print("No JSON code block found.")
        return None

    # Extract data
    data_list = json.loads(match.group(1))
    output_img = np.array(input_image)
    label_colors = {}
    w, h = input_image.size

    # Draw bounding boxes
    for item in data_list:
        output_img = draw_bounding_box(output_img, item["box_2d"], item["label"], label_colors, w, h)

    return Image.fromarray(output_img)


# Detect person, card, and traffic light
messages = [
    {
        "role": "user", "content": [
            {"type": "image", "url": img_url},
             {"type": "text", "text": "detect person and car, output only ```json"}
        ]
     }
]

# Run pipeline and set token budget to 70
vqa_pipe.image_processor.max_soft_tokens = 70
output = vqa_pipe(messages, return_full_text=False, generate_kwargs=gen_kwargs)
print(output[0]['generated_text'])
draw_results(output[0]['generated_text'])
```json
[
  {"box_2d": [413, 864, 537, 933], "label": "person"},
  {"box_2d": [553, 315, 666, 623], "label": "car"},
  {"box_2d": [743, 754, 843, 864], "label": "car"},
  {"box_2d": [743, 556, 843, 743], "label": "car"},
  {"box_2d": [733, 49, 853, 135], "label": "person"}
]
```
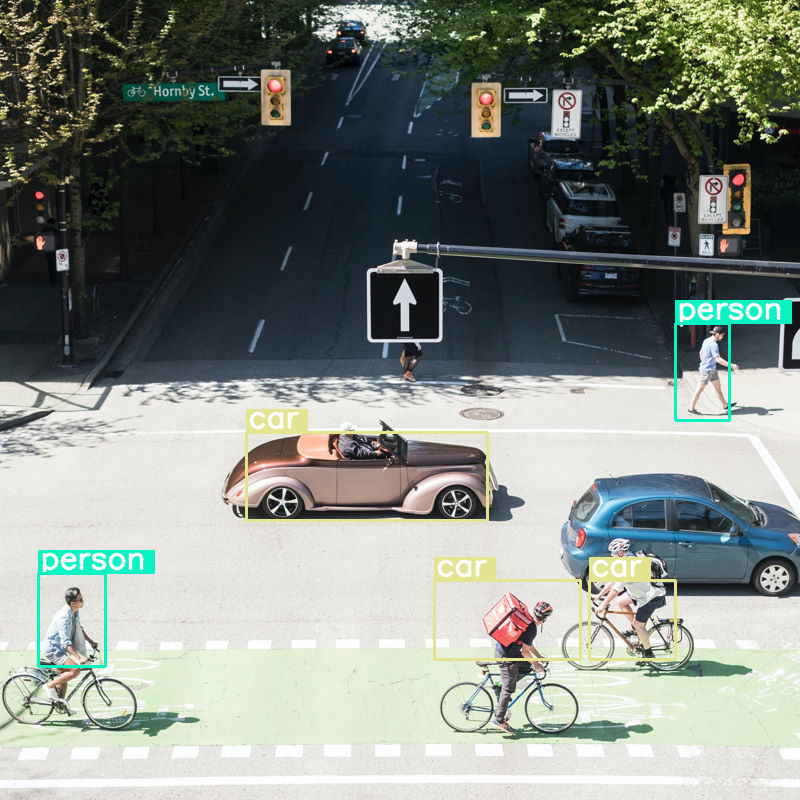
Funciona bien, pero es evidente que la imagen se comprime bastante, ya que no detecta todos los autos ni las personas. Un presupuesto de tokens más alto debería resolver este problema.
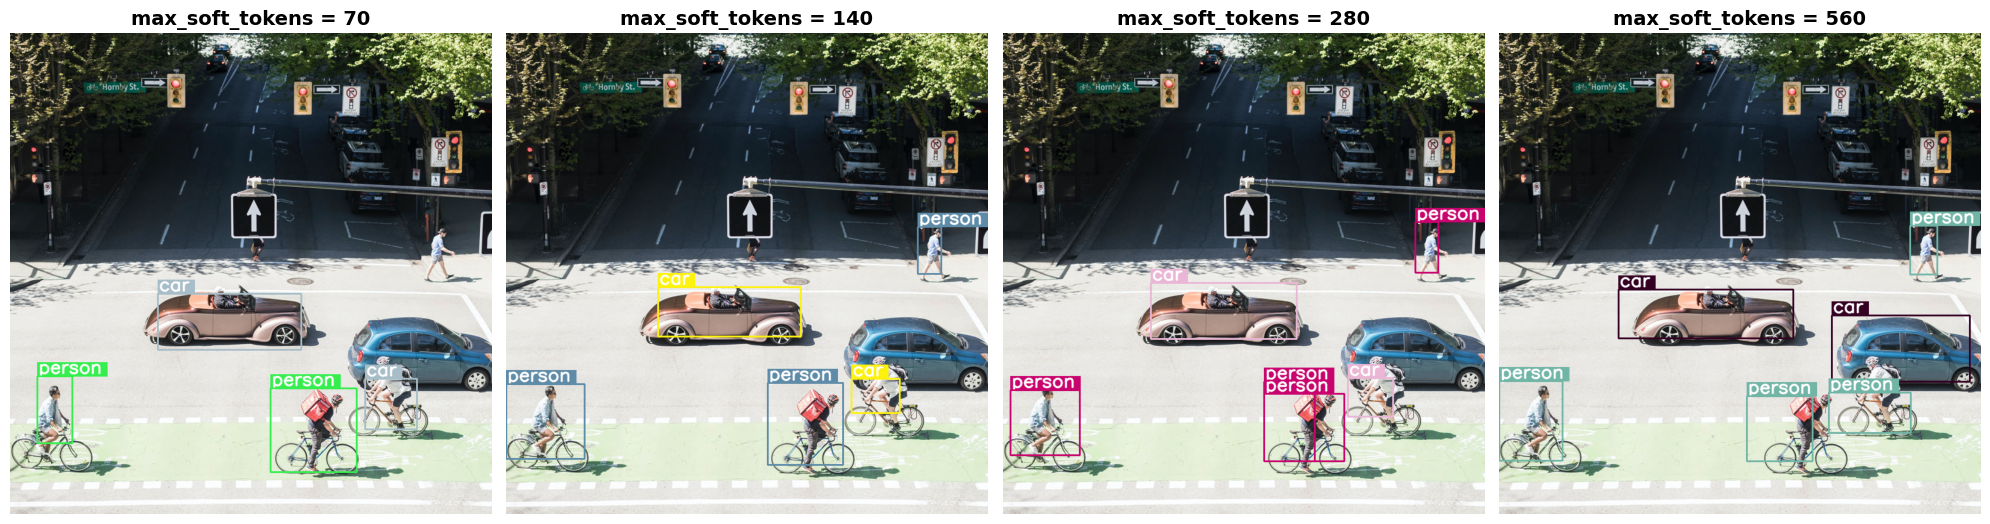
Compara los presupuestos de tokens
Exploremos qué sucede cuando aumentamos los tamaños del presupuesto. Un tamaño de presupuesto más grande genera y procesa más tokens flexibles. Esto debería mejorar la detección de objetos.
import matplotlib.pyplot as plt

def count_tokens(processor, tokens):
    input_ids = tokens['input_ids'][0]  # Get input IDs from the tokenizer output

    img_counting = []
    img_count = 0

    aud_counting = []
    aud_count = 0

    for x in input_ids:  # Iterate over the token list
        # Use tokenizer.decode() to convert tokens back to words
        word = processor.decode([x])  # No need to convert to JAX array for decoding

        if x == processor.tokenizer.image_token_id:
            img_count = img_count + 1
        elif x == processor.tokenizer.audio_token_id:
            aud_count = aud_count + 1
        elif x == processor.tokenizer.eoi_token_id:
            img_counting.append(img_count)
            img_count = 0
        elif x == processor.tokenizer.eoa_token_id:
            aud_counting.append(aud_count)
            aud_count = 0

    for item in img_counting:
        print(f"# of Image Tokens: {item}")

    for item in aud_counting:
        print(f"# of Audio Tokens: {item}")

input_image.resize((2000, 2000))

# Detect person and car
messages = [
    {
        "role": "user", "content": [
            {"type": "image", "url": img_url},
             {"type": "text", "text": "detect person and car, output only ```json"}
        ]
     }
]


# Run for different budget sizes
budget_sizes = [70, 140, 280, 560]
# 1120 won't fit on T4, but works on L4 or highger
#budget_sizes = [70, 140, 280, 560, 1120]
results = {}

for budget in budget_sizes:
    print(f"Budget Size: {budget}")
    vqa_pipe.image_processor.max_soft_tokens = budget

    inputs = vqa_pipe.processor.apply_chat_template(messages, tokenize=True, return_dict=True, return_tensors="pt")
    count_tokens(vqa_pipe.processor, inputs)

    output = vqa_pipe(messages, return_full_text=False, generate_kwargs=gen_kwargs)
    result_text = output[0]['generated_text']
    print(output[0]['generated_text'])
    result_image = draw_results(result_text)
    if result_image:
        results[budget] = result_image

# Display side-by-side
fig, axes = plt.subplots(1, len(results), figsize=(5 * len(results), 6))
if len(results) == 1:
    axes = [axes]

for ax, (budget, img) in zip(axes, results.items()):
    ax.imshow(img)
    ax.set_title(f"max_soft_tokens = {budget}", fontsize=14, fontweight='bold')
    ax.axis('off')

plt.tight_layout()
plt.show()
Budget Size: 70
# of Image Tokens: 64

```json
[
  {"box_2d": [731, 57, 873, 132], "label": "person"},
  {"box_2d": [556, 314, 675, 618], "label": "car"},
  {"box_2d": [736, 754, 843, 864], "label": "car"},
  {"box_2d": [756, 553, 935, 736], "label": "person"}
]
```
Budget Size: 140
# of Image Tokens: 121

```json
[
  {"box_2d": [736, 734, 809, 836], "label": "car"},
  {"box_2d": [745, 556, 919, 715], "label": "person"},
  {"box_2d": [748, 0, 906, 166], "label": "person"},
  {"box_2d": [541, 322, 647, 626], "label": "car"},
  {"box_2d": [413, 874, 513, 924], "label": "person"}
]
```
Budget Size: 280
# of Image Tokens: 256

```json
[
  {"box_2d": [403, 876, 511, 924], "label": "person"},
  {"box_2d": [532, 313, 652, 623], "label": "car"},
  {"box_2d": [735, 732, 817, 828], "label": "car"},
  {"box_2d": [742, 554, 912, 662], "label": "person"},
  {"box_2d": [760, 15, 899, 163], "label": "person"},
  {"box_2d": [768, 554, 912, 724], "label": "person"}
]
```
Budget Size: 560
# of Image Tokens: 529

```json
[
  {"box_2d": [741, 0, 910, 135], "label": "person"},
  {"box_2d": [547, 254, 650, 624], "label": "car"},
  {"box_2d": [773, 526, 912, 666], "label": "person"},
  {"box_2d": [601, 707, 742, 1000], "label": "car"},
  {"box_2d": [411, 873, 515, 931], "label": "person"},
  {"box_2d": [765, 700, 851, 874], "label": "person"}
]
```
Resumen y próximos pasos
En esta guía, aprendiste a usar los modelos de Gemma 4 para tareas de comprensión de imágenes. En los ejemplos, se abarcó la generación de texto a partir de imágenes, el uso de plantillas de instrucciones para el QA visual, el procesamiento de varias imágenes de forma simultánea, el reconocimiento óptico de caracteres (OCR), la detección de objetos con cuadros delimitadores y la administración de resoluciones variables mediante presupuestos de tokens.
Consulta otros recursos.