
画像セグメンテーション タスクを使用すると、事前定義されたカテゴリに基づいて画像を領域に分割し、背景のぼかしなどの視覚効果を適用できます。以下の手順では、iOS アプリで Image Segmenter を使用する方法について説明します。
これらの手順で説明するコードサンプルは GitHub で入手できます。
このタスクの動作を確認するには、ウェブデモをご覧ください。このタスクの機能、モデル、構成オプションの詳細については、概要をご覧ください。
サンプルコード
MediaPipe Tasks のコードサンプルには、iOS 向けの Image Segmenter アプリのシンプルな実装が含まれています。
このサンプルでは、カテゴリ マスクを出力する画像セグメンタを実装します。物理的な iOS デバイスのカメラを使用して、ライブカメラ フィードまたはデバイスのギャラリーにある画像や動画で画像セグメンテーションを行います。
このアプリは、独自の iOS アプリの開始点として使用できます。また、既存のアプリを変更する際にも参照できます。Image Segmenter のサンプルコードは GitHub でホストされています。
コードをダウンロードする
次の手順では、git コマンドライン ツールを使用してサンプルコードのローカルコピーを作成する方法について説明します。
サンプルコードをダウンロードするには:
次のコマンドを使用して、Git リポジトリのクローンを作成します。
git clone https://github.com/google-ai-edge/mediapipe-samples/必要に応じて、スパース チェックアウトを使用するように Git インスタンスを構成して、Image Segmenter サンプルアプリのファイルのみを取得します。
cd mediapipe-samples
git sparse-checkout init --cone
git sparse-checkout set examples/image_segmentation/ios/
ローカル バージョンのサンプルコードを作成したら、MediaPipe タスク ライブラリをインストールし、Xcode を使用してプロジェクトを開いてアプリを実行できます。手順については、iOS 用セットアップ ガイドをご覧ください。
主要コンポーネント
次のファイルには、Image Segmenter サンプル アプリケーションの重要なコードが含まれています。
- ImageSegmenterService.swift: Image Segmenter を初期化し、モデル選択を処理し、入力データに対して推論を実行します。
- CameraViewController.swift: ライブカメラ フィード入力モードの UI を実装し、結果を可視化します。
- MediaLibraryViewController.swift 静止画像と動画ファイルの入力モードの UI を実装し、結果を可視化します。
セットアップ
このセクションでは、Image Segmenter を使用するように開発環境とコード プロジェクトを設定する主な手順について説明します。プラットフォーム バージョンの要件など、MediaPipe タスクを使用する開発環境の設定に関する一般的な情報については、iOS 用セットアップ ガイドをご覧ください。
依存関係
Image Segmenter は MediaPipeTasksVision ライブラリを使用します。このライブラリは CocoaPods を使用してインストールする必要があります。このライブラリは Swift アプリと Objective-C アプリの両方に対応しており、言語固有の追加設定は必要ありません。
macOS に CocoaPods をインストールする手順については、CocoaPods インストール ガイドをご覧ください。アプリに必要な Pod を使用して Podfile を作成する方法については、CocoaPods の使用をご覧ください。
次のコードを使用して、Podfile に MediaPipeTasksVision Pod を追加します。
target 'MyImageSegmenterApp' do
  use_frameworks!
  pod 'MediaPipeTasksVision'
end
アプリに単体テスト ターゲットが含まれている場合は、Podfile の設定について詳しくは、iOS 用セットアップ ガイドをご覧ください。
モデル
MediaPipe Image Segmenter タスクには、このタスクと互換性のあるトレーニング済みモデルが必要です。Image Segmenter で使用可能なトレーニング済みモデルの詳細については、タスクの概要のモデルセクションをご覧ください。
モデルを選択してダウンロードし、Xcode を使用してプロジェクト ディレクトリに追加します。Xcode プロジェクトにファイルを追加する方法については、Xcode プロジェクト内のファイルとフォルダを管理するをご覧ください。
BaseOptions.modelAssetPath プロパティを使用して、アプリバンドルのモデルのパスを指定します。コード例については、次のセクションをご覧ください。
タスクを作成する
Image Segmenter タスクを作成するには、いずれかのイニシャライザを呼び出します。ImageSegmenter(options:) イニシャライザは、構成オプションの値を受け入れます。
カスタマイズされた構成オプションで初期化された Image Segmenter が不要な場合は、ImageSegmenter(modelPath:) イニシャライザを使用して、デフォルト オプションで Image Segmenter を作成できます。構成オプションの詳細については、構成の概要をご覧ください。
Image Segmenter タスクは、静止画像、動画ファイル、ライブ動画ストリームの 3 つの入力データ型をサポートしています。デフォルトでは、ImageSegmenter(modelPath:) は静止画像のタスクを初期化します。動画ファイルまたはライブ動画ストリームを処理するようにタスクを初期化する場合は、ImageSegmenter(options:) を使用して動画またはライブ配信の実行モードを指定します。ライブ配信モードでは、Image Segmenter が画像セグメンテーションの結果をデリゲータに非同期で配信できるように、imageSegmenterLiveStreamDelegate 構成オプションも追加する必要があります。
実行モードに対応するタブを選択して、タスクを作成し推論を実行する方法を確認します。
Swift
画像
import MediaPipeTasksVision

let modelPath = Bundle.main.path(forResource: "model",
                                      ofType: "tflite")

let options = ImageSegmenterOptions()
options.baseOptions.modelAssetPath = modelPath
options.runningMode = .image
options.shouldOutputCategoryMask = true
options.shouldOutputConfidenceMasks = false

let imageSegmenter = try ImageSegmenter(options: options)
動画
import MediaPipeTasksVision

let modelPath = Bundle.main.path(forResource: "model",
                                      ofType: "tflite")

let options = ImageSegmenterOptions()
options.baseOptions.modelAssetPath = modelPath
options.runningMode = .video
options.shouldOutputCategoryMask = true
options.shouldOutputConfidenceMasks = false

let imageSegmenter = try ImageSegmenter(options: options)
ライブ配信
import MediaPipeTasksVision

// Class that conforms to the `imageSegmenterLiveStreamDelegate` protocol and
// implements the method that the image segmenter calls once it finishes
// performing segmentation of each input frame.
class ImageSegmenterResultProcessor: NSObject, ImageSegmenterLiveStreamDelegate {

  func imageSegmenter(
    _ imageSegmenter: ImageSegmenter,
    didFinishSegmentation result: ImageSegmenterResult?,
    timestampInMilliseconds: Int,
    error: Error?) {

    // Process the image segmentation result or errors here.

  }
}

let modelPath = Bundle.main.path(forResource: "model",
                                      ofType: "tflite")

let options = ImageSegmenterOptions()
options.baseOptions.modelAssetPath = modelPath
options.runningMode = .liveStream
options.shouldOutputCategoryMask = true
options.shouldOutputConfidenceMasks = false

// Set `imageSegmenterLiveStreamDelegate` to the object of the class that
// confirms to the `ImageSegmenterLiveStreamDelegate` protocol.
let processor = ImageSegmenterResultProcessor()
options.imageSegmenterLiveStreamDelegate = processor

let imageSegmenter = try ImageSegmenter(options: options)
Objective-C
画像
@import MediaPipeTasksVision;

NSString *modelPath = [[NSBundle mainBundle] pathForResource:@"model"
                                                      ofType:@"tflite"];

MPPImageSegmenterOptions *options = [[MPPImageSegmenterOptions alloc] init];
options.baseOptions.modelAssetPath = modelPath;
options.runningMode = MPPRunningModeImage;
options.shouldOutputCategoryMask = YES;
options.shouldOutputConfidenceMasks = NO;

MPPImageSegmenter *imageSegmenter =
  [[MPPImageSegmenter alloc] initWithOptions:options error:nil];
動画
@import MediaPipeTasksVision;

NSString *modelPath = [[NSBundle mainBundle] pathForResource:@"model"
                                                      ofType:@"tflite"];

MPPImageSegmenterOptions *options = [[MPPImageSegmenterOptions alloc] init];
options.baseOptions.modelAssetPath = modelPath;
options.runningMode = MPPRunningModeVideo;
options.shouldOutputCategoryMask = YES;
options.shouldOutputConfidenceMasks = NO;

MPPImageSegmenter *imageSegmenter =
  [[MPPImageSegmenter alloc] initWithOptions:options error:nil];
ライブ配信
@import MediaPipeTasksVision; // Class that conforms to the `MPPImageSegmenterLiveStreamDelegate` protocol // and implements the method that the image segmenter calls once it finishes // performing segmentation of each input frame. @interface APPImageSegmenterResultProcessor : NSObject@end @implementation APPImageSegmenterResultProcessor - (void)imageSegmenter:(MPPImageSegmenter *)imageSegmenter didFinishSegmentationWithResult:(MPPImageSegmenterResult *)imageSegmenterResult timestampInMilliseconds:(NSInteger)timestampInMilliseconds error:(NSError *)error { // Process the image segmentation result or errors here. } @end NSString *modelPath = [[NSBundle mainBundle] pathForResource:@"model" ofType:@"tflite"]; MPPImageSegmenterOptions *options = [[MPPImageSegmenterOptions alloc] init]; options.baseOptions.modelAssetPath = modelPath; options.runningMode = MPPRunningModeLiveStream; options.shouldOutputCategoryMask = YES; options.shouldOutputConfidenceMasks = NO; // Set `imageSegmenterLiveStreamDelegate` to the object of the class that // confirms to the `MPPImageSegmenterLiveStreamDelegate` protocol. APPImageSegmenterResultProcessor *processor = [APPImageSegmenterResultProcessor new]; options.imageSegmenterLiveStreamDelegate = processor; MPPImageSegmenter *imageSegmenter = [[MPPImageSegmenter alloc] initWithOptions:options error:nil];
Image Segmenter のサンプルコードの実装では、ユーザーが処理モードを切り替えることができます。この方法ではタスク作成コードが複雑になり、ユースケースに適さない場合があります。
設定オプション
このタスクには、iOS アプリ用の次の構成オプションがあります。
| オプション名 | 説明 | 値の範囲 | デフォルト値 |
|---|---|---|---|
runningMode |
タスクの実行モードを設定します。モードは次の 3 つです。 IMAGE: 単一画像入力のモード。 動画: 動画のデコードされたフレームのモード。 LIVE_STREAM: カメラなどからの入力データのライブ配信モード。 このモードでは、セグメンテーションの結果を非同期で受信するために、 ImageSegmenterLiveStreamDelegate を実装するクラスのインスタンスに ImageSegmenterLiveStreamDelegate を設定する必要があります。 |
{RunningMode.image, RunningMode.video, RunningMode.liveStream} |
RunningMode.image |
shouldOutputCategoryMask |
True に設定すると、出力には uint8 画像としてセグメンテーション マスクが含まれます。各ピクセル値は、最も高いスコアのカテゴリ値を示します。 |
{True, False} |
False |
shouldOutputConfidenceMasks |
True に設定すると、出力には浮動小数点値画像としてセグメンテーション マスクが含まれます。各浮動小数点値は、カテゴリの信頼スコア マップを表します。 |
{True, False} |
True |
displayNamesLocale |
タスクのモデルのメタデータで指定されている表示名に使用するラベルの言語を設定します(利用可能な場合)。デフォルトは英語で en です。TensorFlow Lite Metadata Writer API を使用して、カスタムモデルのメタデータにローカライズされたラベルを追加できます。 |
言語 / 地域コード | en |
result_callback |
画像セグメンタが LIVE_STREAM モードのときに、セグメンテーション結果を非同期で受信するように結果リスナーを設定します。実行モードが LIVE_STREAM に設定されている場合にのみ使用できます。 |
なし | なし |
実行モードが LIVE_STREAM に設定されている場合、Image Segmenter には imageSegmenterLiveStreamDelegate 構成オプションが必要です。これにより、Image Segmenter は画像セグメンテーションの結果を非同期で提供できます。デリゲートには imageSegmenter(_:didFinishSegmentation:timestampInMilliseconds:error:) メソッドを実装する必要があります。このメソッドは、各フレームでセグメンテーションを実行した結果を処理した後に、Image Segmenter によって呼び出されます。
| オプション名 | 説明 | 値の範囲 | デフォルト値 |
|---|---|---|---|
imageSegmenterLiveStreamDelegate |
Image Segmenter がライブ配信モードで画像セグメンテーションを非同期で実行した結果を受信できるようにします。このプロパティにインスタンスが設定されているクラスは、imageSegmenter(_:didFinishSegmentation:timestampInMilliseconds:error:) メソッドを実装する必要があります。 |
該当なし | 未設定 |
データの準備
入力画像またはフレームを Image Segmenter に渡す前に、MPImage オブジェクトに変換する必要があります。MPImage はさまざまな種類の iOS 画像形式をサポートしており、推論の実行モードで使用できます。MPImage の詳細については、MPImage API をご覧ください。
ユースケースと、アプリに必要な実行モードに基づいて iOS イメージ形式を選択します。MPImage は、UIImage、CVPixelBuffer、CMSampleBuffer の iOS イメージ形式を受け入れます。
UIImage
UIImage 形式は、次の実行モードに適しています。
画像: アプリバンドル、ユーザー ギャラリー、または
UIImageイメージとしてフォーマットされたファイル システムの画像は、MPImageオブジェクトに変換できます。動画: AVAssetImageGenerator を使用して動画フレームを CGImage 形式に抽出し、
UIImage画像に変換します。
Swift
// Load an image on the user's device as an iOS `UIImage` object.

// Convert the `UIImage` object to a MediaPipe's Image object having the default
// orientation `UIImage.Orientation.up`.
let image = try MPImage(uiImage: image)
Objective-C
// Load an image on the user's device as an iOS `UIImage` object.

// Convert the `UIImage` object to a MediaPipe's Image object having the default
// orientation `UIImageOrientationUp`.
MPImage *image = [[MPPImage alloc] initWithUIImage:image error:nil];
この例では、デフォルトの UIImage.Orientation.Up の向きで MPImage を初期化しています。MPImage は、サポートされている UIImage.Orientation 値のいずれかで初期化できます。Image Segmenter は、.upMirrored、.downMirrored、.leftMirrored、.rightMirrored などのミラーリングされた向きをサポートしていません。
UIImage の詳細については、UIImage Apple デベロッパー ドキュメントをご覧ください。
CVPixelBuffer
CVPixelBuffer 形式は、フレームを生成し、iOS の CoreImage フレームワークを使用して処理するアプリケーションに適しています。
CVPixelBuffer 形式は、次の実行モードに適しています。
画像: iOS の
CoreImageフレームワークを使用して処理を行った後にCVPixelBuffer画像を生成するアプリは、画像実行モードで Image Segmenter に送信できます。動画: 動画フレームは処理用に
CVPixelBuffer形式に変換し、動画モードで Image Segmenter に送信できます。ライブ配信: iOS カメラを使用してフレームを生成するアプリは、ライブ配信モードで Image Segmenter に送信される前に、処理のために
CVPixelBuffer形式に変換される場合があります。
Swift
// Obtain a CVPixelBuffer.

// Convert the `CVPixelBuffer` object to a MediaPipe's Image object having the default
// orientation `UIImage.Orientation.up`.
let image = try MPImage(pixelBuffer: pixelBuffer)
Objective-C
// Obtain a CVPixelBuffer.

// Convert the `CVPixelBuffer` object to a MediaPipe's Image object having the
// default orientation `UIImageOrientationUp`.
MPImage *image = [[MPPImage alloc] initWithUIImage:image error:nil];
CVPixelBuffer の詳細については、CVPixelBuffer Apple デベロッパー ドキュメントをご覧ください。
CMSampleBuffer
CMSampleBuffer 形式は、統一されたメディアタイプのメディア サンプルを保存し、ライブ配信の実行モードに適しています。iOS カメラのライブフレームは、iOS の AVCaptureVideoDataOutput によって CMSampleBuffer 形式で非同期的に配信されます。
Swift
// Obtain a CMSampleBuffer.

// Convert the `CMSampleBuffer` object to a MediaPipe's Image object having the default
// orientation `UIImage.Orientation.up`.
let image = try MPImage(sampleBuffer: sampleBuffer)
Objective-C
// Obtain a `CMSampleBuffer`.

// Convert the `CMSampleBuffer` object to a MediaPipe's Image object having the
// default orientation `UIImageOrientationUp`.
MPImage *image = [[MPPImage alloc] initWithSampleBuffer:sampleBuffer error:nil];
CMSampleBuffer の詳細については、CMSampleBuffer Apple デベロッパー ドキュメントをご覧ください。
タスクを実行する
Image Segmenter を実行するには、割り当てられた実行モードに固有の segment() メソッドを使用します。
- 静止画像:
segment(image:) - 動画:
segment(videoFrame:timestampInMilliseconds:) - ライブ配信:
segmentAsync(image:timestampInMilliseconds:)
次のコードサンプルは、これらのさまざまな実行モードで Image Segmenter を実行する方法の簡単な例を示しています。
Swift
画像
let result = try imageSegmenter.segment(image: image)
動画
let result = try imageSegmenter.segment(
  videoFrame: image,
  timestampInMilliseconds: timestamp)
ライブ配信
try imageSegmenter.segmentAsync(
  image: image,
  timestampInMilliseconds: timestamp)
Objective-C
画像
MPPImageSegmenterResult *result =
  [imageSegmenter segmentImage:image error:nil];
動画
MPPImageSegmenterResult *result =
  [imageSegmenter segmentVideoFrame:image
            timestampInMilliseconds:timestamp
                              error:nil];
ライブ配信
BOOL success =
  [imageSegmenter segmentAsyncImage:image
            timestampInMilliseconds:timestamp
                              error:nil];
Image Segmenter のコード例では、これらのモード(segment(image:)、segment(videoFrame:timestampInMilliseconds:)、segmentAsync(image:timestampInMilliseconds:))の実装について詳しく説明しています。
次の点にご注意ください。
動画モードまたはライブ配信モードで実行する場合は、入力フレームのタイムスタンプを Image Segmenter タスクに指定する必要があります。
画像モードまたは動画モードで実行する場合、Image Segmenter タスクは、入力画像またはフレームの処理が完了するまで現在のスレッドをブロックします。現在のスレッドをブロックしないようにするには、iOS の Dispatch フレームワークまたは NSOperation フレームワークを使用して、バックグラウンド スレッドで処理を実行します。
ライブ配信モードで実行すると、Image Segmenter タスクはすぐに返され、現在のスレッドはブロックされません。各入力フレームを処理した後、画像セグメンタで
imageSegmenter(_:didFinishSegmentation:timestampInMilliseconds:error:)メソッドを呼び出します。Image Segmenter は、専用のシリアル ディスパッチ キューでこのメソッドを非同期で呼び出します。結果をユーザー インターフェースに表示するには、結果を処理した後に結果をメインキューにディスパッチします。Image Segmenter タスクが別のフレームの処理でビジー状態になっているときにsegmentAsync関数が呼び出されると、Image Segmenter は新しい入力フレームを無視します。
結果を処理して表示する
推論を実行すると、Image Segmenter タスクは、セグメンテーション タスクの結果を含む ImageSegmenterResult オブジェクトを返します。出力のコンテンツは、タスクの構成時に設定した出力タイプによって異なります。
次の画像は、カテゴリ値マスクのタスク出力の可視化を示しています。カテゴリ マスクの範囲は [0, 255] で、各ピクセル値はモデル出力の勝者カテゴリ インデックスを表します。勝ちのカテゴリ インデックスは、モデルが認識できるカテゴリの中で最も高いスコアです。
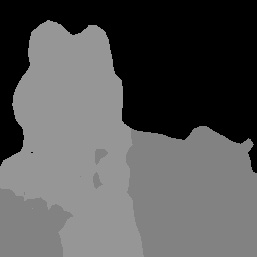
元の画像とカテゴリ マスクの出力。Pascal VOC 2012 データセットのソース画像。
Image Segmenter のサンプルコードは、Image Segmenter の結果を表示する方法を示しています。詳細については、コードサンプルをご覧ください。