Gemini 모델은 처음부터 멀티모달로 빌드되어 특수 ML 모델을 학습시키지 않고도 이미지 캡셔닝, 분류, 시각적 질의 응답을 비롯한 다양한 이미지 처리 및 컴퓨터 비전 작업을 수행할 수 있습니다.
Gemini 모델은 일반적인 멀티모달 기능 외에도 추가 학습을 통해 객체 감지 및 세분화와 같은 특정 사용 사례에 대해 향상된 정확성을 제공합니다.
Gemini에 이미지 전달
여러 가지 방법을 사용하여 Gemini에 이미지를 입력으로 제공할 수 있습니다.
- URL을 사용하여 이미지 전달: 공개적으로 액세스할 수 있는 이미지에 적합합니다.
- 인라인 이미지 데이터 전달: base64로 인코딩된 이미지 데이터의 경우
- File API를 사용하여 이미지 업로드: 대용량 파일 또는 여러 요청에서 이미지를 재사용하는 데 권장됩니다.
URL을 사용하여 이미지 전달
Files API를 사용하여 이미지를 업로드하고 요청에 전달할 수 있습니다 .
Python
from google import genai

client = genai.Client()

uploaded_file = client.files.upload(file="path/to/organ.jpg")

interaction = client.interactions.create(
    model="gemini-3.5-flash",
    input=[
        {"type": "text", "text": "Caption this image."},
        {
            "type": "image",
            "uri": uploaded_file.uri,
            "mime_type": uploaded_file.mime_type
        }
    ]
)
print(interaction.output_text)
JavaScript
import { GoogleGenAI } from "@google/genai";

const client = new GoogleGenAI({});

const uploadedFile = await client.files.upload({
    file: "path/to/organ.jpg",
    config: { mime_type: "image/jpeg" }
});

const interaction = await client.interactions.create({
    model: "gemini-3.5-flash",
    input: [
        {type: "text", text: "Caption this image."},
        {
            type: "image",
            uri: uploadedFile.uri,
            mime_type: uploadedFile.mimeType
        }
    ]
});
console.log(interaction.output_text);
REST
# First upload the file using the Files API, then use the URI:
curl -X POST "https://generativelanguage.googleapis.com/v1beta/interactions" \
  -H "x-goog-api-key: $GEMINI_API_KEY" \
  -H 'Content-Type: application/json' \
  -d '{
    "model": "gemini-3.5-flash",
    "input": [
      {"type": "text", "text": "Caption this image."},
      {
        "type": "image",
        "uri": "YOUR_FILE_URI",
        "mime_type": "image/jpeg"
      }
    ]
  }'
인라인 이미지 데이터 전달
이미지 데이터를 base64로 인코딩된 문자열로 제공할 수 있습니다.
Python
import base64
from google import genai

with open('path/to/small-sample.jpg', 'rb') as f:
    image_bytes = f.read()

client = genai.Client()

interaction = client.interactions.create(
    model="gemini-3.5-flash",
    input=[
        {"type": "text", "text": "Caption this image."},
        {
            "type": "image",
            "data": base64.b64encode(image_bytes).decode('utf-8'),
            "mime_type": "image/jpeg"
        }
    ]
)
print(interaction.output_text)
JavaScript
import { GoogleGenAI } from "@google/genai";
import * as fs from "node:fs";

const client = new GoogleGenAI({});
const base64ImageFile = fs.readFileSync("path/to/small-sample.jpg", {
  encoding: "base64",
});

const interaction = await client.interactions.create({
    model: "gemini-3.5-flash",
    input: [
        {type: "text", text: "Caption this image."},
        {
            type: "image",
            data: base64ImageFile,
            mime_type: "image/jpeg"
        }
    ]
});
console.log(interaction.output_text);
REST
IMG_PATH="/path/to/your/image1.jpg"

if [[ "$(base64 --version 2>&1)" = *"FreeBSD"* ]]; then
  B64FLAGS="--input"
else
  B64FLAGS="-w0"
fi

curl -X POST "https://generativelanguage.googleapis.com/v1beta/interactions" \
  -H "x-goog-api-key: $GEMINI_API_KEY" \
  -H 'Content-Type: application/json' \
  -d '{
    "model": "gemini-3.5-flash",
    "input": [
      {"type": "text", "text": "Caption this image."},
      {
        "type": "image",
        "data": "'"$(base64 $B64FLAGS $IMG_PATH)"'",
        "mime_type": "image/jpeg"
      }
    ]
  }'
File API를 사용하여 이미지 업로드
대용량 파일의 경우 또는 동일한 이미지 파일을 반복적으로 사용하려면 Files API를 사용하세요. Files API 가이드를 참고하세요.
Python
from google import genai

client = genai.Client()

my_file = client.files.upload(file="path/to/sample.jpg")

interaction = client.interactions.create(
    model="gemini-3.5-flash",
    input=[
        {"type": "text", "text": "Caption this image."},
        {
            "type": "image",
            "uri": my_file.uri,
            "mime_type": my_file.mime_type
        }
    ]
)
print(interaction.output_text)
JavaScript
import { GoogleGenAI } from "@google/genai";

const client = new GoogleGenAI({});

const myfile = await client.files.upload({
    file: "path/to/sample.jpg",
    config: { mimeType: "image/jpeg" },
});

const interaction = await client.interactions.create({
    model: "gemini-3.5-flash",
    input: [
        {type: "text", text: "Caption this image."},
        {
            type: "image",
            uri: myfile.uri,
            mime_type: myfile.mimeType
        }
    ]
});
console.log(interaction.output_text);
REST
# First upload the file (see Files API guide for details)
# Then use the file URI in the request:

curl -X POST "https://generativelanguage.googleapis.com/v1beta/interactions" \
  -H "x-goog-api-key: $GEMINI_API_KEY" \
  -H 'Content-Type: application/json' \
  -d '{
    "model": "gemini-3.5-flash",
    "input": [
      {"type": "text", "text": "Caption this image."},
      {
        "type": "image",
        "uri": "YOUR_FILE_URI",
        "mime_type": "image/jpeg"
      }
    ]
  }'
여러 이미지로 프롬프트
input 배열에 여러 이미지 객체를 포함하여 단일 프롬프트에 여러 이미지를 제공할 수 있습니다.
Python
from google import genai

client = genai.Client()

interaction = client.interactions.create(
    model="gemini-3.5-flash",
    input=[
        {"type": "text", "text": "What is different between these two images?"},
        {
            "type": "image",
            "uri": "https://example.com/image1.jpg",
            "mime_type": "image/jpeg"
        },
        {
            "type": "image",
            "uri": "https://example.com/image2.jpg",
            "mime_type": "image/jpeg"
        }
    ]
)
print(interaction.output_text)
JavaScript
import { GoogleGenAI } from "@google/genai";

const client = new GoogleGenAI({});

const interaction = await client.interactions.create({
    model: "gemini-3.5-flash",
    input: [
        {type: "text", text: "What is different between these two images?"},
        {
            type: "image",
            uri: "https://example.com/image1.jpg",
            mime_type: "image/jpeg"
        },
        {
            type: "image",
            uri: "https://example.com/image2.jpg",
            mime_type: "image/jpeg"
        }
    ]
});
console.log(interaction.output_text);
REST
curl -X POST "https://generativelanguage.googleapis.com/v1beta/interactions" \
  -H "x-goog-api-key: $GEMINI_API_KEY" \
  -H 'Content-Type: application/json' \
  -d '{
    "model": "gemini-3.5-flash",
    "input": [
      {"type": "text", "text": "What is different between these two images?"},
      {
        "type": "image",
        "uri": "https://example.com/image1.jpg",
        "mime_type": "image/jpeg"
      },
      {
        "type": "image",
        "uri": "https://example.com/image2.jpg",
        "mime_type": "image/jpeg"
      }
    ]
  }'
객체 감지
모델은 이미지에서 객체를 감지하고 경계 상자 좌표를 가져오도록 학습됩니다. 이미지 크기에 상대적인 좌표는 [0, 1000]으로 확장됩니다. 원래 이미지 크기에 따라 이러한 좌표를 축소해야 합니다.
Python
from google import genai
from pydantic import BaseModel, Field
from typing import List
import json

client = genai.Client()
prompt = "Detect the all of the prominent items in the image. The box_2d should be [ymin, xmin, ymax, xmax] normalized to 0-1000."

class BoundingBox(BaseModel):
    box_2d: List[int] = Field(description="The 2D bounding box of the item as [ymin, xmin, ymax, xmax] normalized to 0-1000.")
    mask: List[List[int]] = Field(description="The segmentation mask of the item as a polygon of [x,y] coordinates, normalized to 0-1000.")
    label: str = Field(description="A descriptive label for the item.")

class BoundingBoxes(BaseModel):
    boxes: List[BoundingBox]

interaction = client.interactions.create(
    model="gemini-3.5-flash",
    input=[
        {"type": "text", "text": prompt},
        {
            "type": "image",
            "uri": "https://example.com/image.png",
            "mime_type": "image/png"
        }
    ],
    response_format={
        "type": "text",
        "mime_type": "application/json",
        "schema": BoundingBoxes.model_json_schema()
    }
)

bounding_boxes = BoundingBoxes.model_validate_json(interaction.output_text)
print(bounding_boxes)
JavaScript
import { GoogleGenAI } from "@google/genai";
import * as z from "zod";

const client = new GoogleGenAI({});
const prompt = "Detect the all of the prominent items in the image. The box_2d should be [ymin, xmin, ymax, xmax] normalized to 0-1000.";

const boundingBoxesSchema = z.object({
  boxes: z.array(z.object({
    box_2d: z.array(z.number()),
    mask: z.array(z.array(z.number())),
    label: z.string()
  }))
});

const interaction = await client.interactions.create({
  model: "gemini-3.5-flash",
  input: [
    { type: "text", text: prompt },
    {
      type: "image",
      uri: "https://example.com/image.png",
      mime_type: "image/png"
    }
  ],
  response_format: {
    type: 'text',
    mime_type: 'application/json',
    schema: z.toJSONSchema(boundingBoxesSchema)
  },
});

const result = boundingBoxesSchema.parse(JSON.parse(interaction.output_text));
console.log(result);
REST
curl -X POST "https://generativelanguage.googleapis.com/v1beta/interactions" \
  -H "x-goog-api-key: $GEMINI_API_KEY" \
  -H 'Content-Type: application/json' \
  -d '{
    "model": "gemini-3.5-flash",
    "input": [
      {"type": "text", "text": "Detect the all of the prominent items in the image. The box_2d should be [ymin, xmin, ymax, xmax] normalized to 0-1000."},
      {
        "type": "image",
        "uri": "https://example.com/image.png",
        "mime_type": "image/png"
      }
    ],
    "response_format": {
      "type": "text",
      "mime_type": "application/json",
      "schema": {
        "type": "object",
        "properties": {
          "boxes": {
            "type": "array",
            "items": {
              "type": "object",
              "properties": {
                "box_2d": { "type": "array", "items": { "type": "integer" } },
                "mask": { "type": "array", "items": { "type": "array", "items": { "type": "integer" } } },
                "label": { "type": "string" }
              },
              "required": ["box_2d", "mask", "label"]
            }
          }
        },
        "required": ["boxes"]
      }
    }
  }'
자세한 예는 Gemini Cookbook의 다음 노트북을 참고하세요.
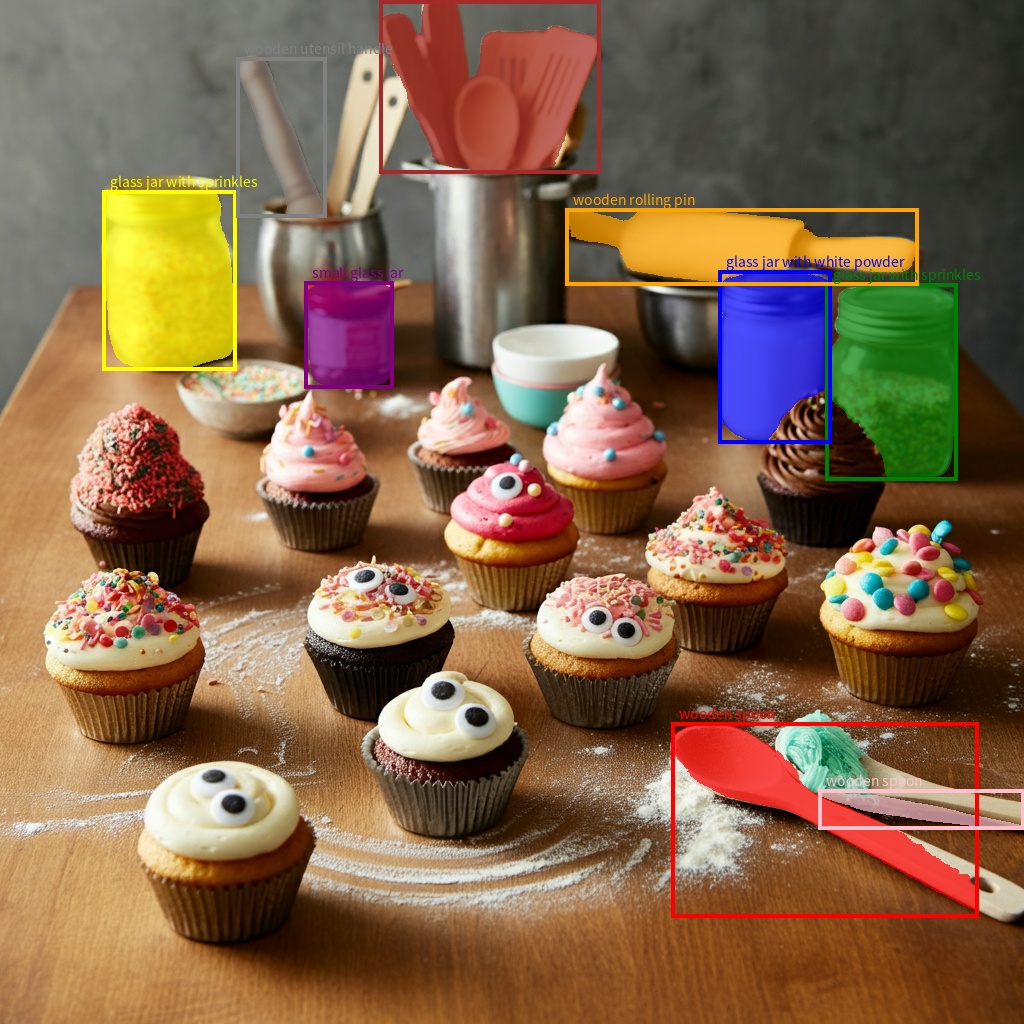
세분화
Gemini 2.5부터 모델은 항목을 감지할 뿐만 아니라 항목을 세분화하고 윤곽 마스크를 제공합니다.
모델은 각 항목이 세분화 마스크를 나타내는 JSON 목록을 예측합니다.
각 항목에는 0~1000 사이의 정규화된 좌표가 있는 [y0, x0, y1, x1] 형식의 경계 상자('box_2d'), 객체를 식별하는 라벨('label'), 마지막으로 경계 상자 내의 세분화 마스크(0~255 사이의 값을 갖는 확률 맵인 base64로 인코딩된 png)가 있습니다.
Python
from google import genai
from pydantic import BaseModel, Field
from typing import List
import json

client = genai.Client()

prompt = """
Give the segmentation masks for the wooden and glass items.
Output a JSON list of segmentation masks where each entry contains the 2D
bounding box in the key "box_2d", the segmentation mask in key "mask", and
the text label in the key "label". Use descriptive labels.
"""

class BoundingBox(BaseModel):
    box_2d: List[int] = Field(description="The 2D bounding box of the item as [ymin, xmin, ymax, xmax] normalized to 0-1000.")
    mask: List[List[int]] = Field(description="The segmentation mask of the item as a polygon of [x,y] coordinates, normalized to 0-1000.")
    label: str = Field(description="A descriptive label for the item.")

class BoundingBoxes(BaseModel):
    boxes: List[BoundingBox]

interaction = client.interactions.create(
    model="gemini-3.5-flash",
    input=[
        {"type": "text", "text": prompt},
        {
            "type": "image",
            "uri": "https://example.com/image.png",
            "mime_type": "image/png"
        }
    ],
    response_format={
        "type": "text",
        "mime_type": "application/json",
        "schema": BoundingBoxes.model_json_schema()
    },
    generation_config={
        "thinking_level": "minimal"
    }
)

items = BoundingBoxes.model_validate_json(interaction.output_text)
print("Segmentation results:", items)
JavaScript
import { GoogleGenAI } from "@google/genai";
import * as z from "zod";

const client = new GoogleGenAI({});
const prompt = `
Give the segmentation masks for the wooden and glass items.
Output a JSON list of segmentation masks where each entry contains the 2D
bounding box in the key "box_2d", the segmentation mask in key "mask", and
the text label in the key "label". Use descriptive labels.
`;

const boundingBoxesSchema = z.object({
  boxes: z.array(z.object({
    box_2d: z.array(z.number()),
    mask: z.array(z.array(z.number())),
    label: z.string()
  }))
});

const interaction = await client.interactions.create({
  model: "gemini-3.5-flash",
  input: [
    { type: "text", text: prompt },
    {
      type: "image",
      uri: "https://example.com/image.png",
      mime_type: "image/png"
    }
  ],
  response_format: {
    type: 'text',
    mime_type: 'application/json',
    schema: z.toJSONSchema(boundingBoxesSchema)
  },
  generation_config: {
    thinking_level: "minimal"
  }
});

const result = boundingBoxesSchema.parse(JSON.parse(interaction.output_text));
console.log(result);
REST
curl -X POST "https://generativelanguage.googleapis.com/v1beta/interactions" \
  -H "x-goog-api-key: $GEMINI_API_KEY" \
  -H 'Content-Type: application/json' \
  -d '{
    "model": "gemini-3.5-flash",
    "input": [
      {"type": "text", "text": "Give the segmentation masks for the wooden and glass items.\nOutput a JSON list of segmentation masks where each entry contains the 2D\nbounding box in the key \"box_2d\", the segmentation mask in key \"mask\", and\nthe text label in the key \"label\". Use descriptive labels."},
      {
        "type": "image",
        "uri": "https://example.com/image.png",
        "mime_type": "image/png"
      }
    ],
    "response_format": {
      "type": "text",
      "mime_type": "application/json",
      "schema": {
        "type": "object",
        "properties": {
          "boxes": {
            "type": "array",
            "items": {
              "type": "object",
              "properties": {
                "box_2d": { "type": "array", "items": { "type": "integer" } },
                "mask": { "type": "array", "items": { "type": "array", "items": { "type": "integer" } } },
                "label": { "type": "string" }
              },
              "required": ["box_2d", "mask", "label"]
            }
          }
        },
        "required": ["boxes"]
      }
    },
    "generation_config": {
      "thinking_level": "minimal"
    }
  }'
지원되는 이미지 형식
Gemini는 다음과 같은 이미지 형식 MIME 유형을 지원합니다.
- PNG -
image/png - JPEG -
image/jpeg - WEBP -
image/webp - HEIC -
image/heic - HEIF -
image/heif
다른 파일 입력 방법에 관해 알아보려면 파일 입력 방법 가이드를 참고하세요.
기능
모든 Gemini 모델 버전은 멀티모달이며 이미지 캡셔닝, 시각적 질의 응답, 이미지 분류, 객체 감지 및 세분화를 비롯한 다양한 이미지 처리 및 컴퓨터 비전 작업에 활용할 수 있습니다.
Gemini는 품질 및 성능 요구사항에 따라 특수 ML 모델을 사용할 필요성을 줄일 수 있습니다.
최신 모델 버전은 향상된 객체 감지 및 세분화와 같은 일반적인 기능 외에도 특수 작업의 정확성을 개선하도록 특별히 학습됩니다.
제한사항 및 주요 기술 정보
파일 한도
Gemini 모델은 요청당 최대 3,600개의 이미지 파일을 지원합니다.
토큰 계산
- 두 측정기준이 모두 384픽셀 이하인 경우 258개의 토큰 더 큰 이미지는 768x768픽셀 타일로 바둑판식으로 배열되며 각 타일은 258개의 토큰이 필요합니다.
타일 수를 계산하는 대략적인 공식은 다음과 같습니다.
- 대략
floor(min(width, height)/ 1.5)인 자르기 단위 크기를 계산합니다. - 각 측정기준을 자르기 단위 크기로 나누고 함께 곱하여 타일 수를 구합니다.
예를 들어 크기가 960x540인 이미지의 자르기 단위 크기는 360입니다. 각 측정기준을 360으로 나누면 타일 수는 3 * 2 = 6입니다.
미디어 해상도
Gemini 3는 media_resolution 파라미터를 통해 멀티모달 비전 처리에 대한 세밀한 제어 기능을 제공합니다. media_resolution 파라미터는 입력 이미지 또는 동영상 프레임당 할당되는 최대 토큰 수 를 결정합니다.
해상도가 높을수록 모델이 작은 텍스트를 읽거나 세부 요소를 식별하는 능력을 향상시키지만, 토큰 사용량과 지연 시간이 증가합니다.
팁 및 권장사항
- 이미지가 올바르게 회전되었는지 확인합니다.
- 선명하고 흐릿하지 않은 이미지를 사용합니다.
- 텍스트가 포함된 단일 이미지를 사용하는 경우
input배열에서 이미지 앞에 텍스트 프롬프트를 배치합니다.
다음 단계
이 가이드에서는 이미지 파일을 업로드하고 이미지 입력에서 텍스트 출력을 생성하는 방법을 보여줍니다. 자세한 내용은 다음 리소스를 참고하세요.
- Files API: Gemini에서 사용할 파일을 업로드하고 관리하는 방법을 자세히 알아보세요.
- 시스템 안내: 시스템 안내를 사용하면 특정 요구사항 및 사용 사례에 따라 모델의 동작을 조정할 수 있습니다.
- 파일 프롬프트 전략: Gemini API는 멀티모달 프롬프트 사용이라고도 하는 텍스트, 이미지, 오디오, 동영상 데이터로 프롬프트를 지원합니다.
- 안전 가이드: 생성형 AI 모델은 때때로 부정확하거나 편향되거나 불쾌감을 주는 출력과 같은 예기치 않은 출력을 생성합니다. 이러한 출력으로 인한 피해 위험을 제한하려면 후처리 및 인간 평가가 필수적입니다.