โมเดล Gemini สร้างขึ้นตั้งแต่เริ่มต้นให้ทำงานได้หลายรูปแบบ ซึ่งช่วยให้สามารถทำงานด้านการประมวลผลรูปภาพและคอมพิวเตอร์วิทัศน์ได้หลากหลาย รวมถึงแต่ไม่จำกัดเพียงการสร้างคำบรรยายรูปภาพ การจัดประเภท และการตอบคำถามด้วยภาพโดยไม่ต้องฝึกโมเดล ML เฉพาะทาง
นอกจากความสามารถแบบหลายรูปแบบทั่วไปแล้ว โมเดล Gemini ยังมีความแม่นยำที่ดียิ่งขึ้นสำหรับกรณีการใช้งานเฉพาะ เช่น การตรวจจับออบเจ็กต์และการแบ่งกลุ่มผ่านการฝึกเพิ่มเติม
การส่งรูปภาพไปยัง Gemini
คุณป้อนรูปภาพไปยัง Gemini ได้หลายวิธีดังนี้
- ส่งรูปภาพโดยใช้ URL: เหมาะสำหรับรูปภาพที่เข้าถึงได้แบบสาธารณะ
- การส่งข้อมูลรูปภาพในบรรทัด: สำหรับข้อมูลรูปภาพที่เข้ารหัส Base64
- การอัปโหลดรูปภาพโดยใช้ File API: แนะนำสำหรับ ไฟล์ขนาดใหญ่หรือสำหรับการนำรูปภาพกลับมาใช้ซ้ำในคำขอหลายรายการ
การส่งรูปภาพโดยใช้ URL
คุณอัปโหลดรูปภาพได้โดยใช้ Files API และส่งในคำขอ
Python
from google import genai

client = genai.Client()

uploaded_file = client.files.upload(file="path/to/organ.jpg")

interaction = client.interactions.create(
    model="gemini-3.5-flash",
    input=[
        {"type": "text", "text": "Caption this image."},
        {
            "type": "image",
            "uri": uploaded_file.uri,
            "mime_type": uploaded_file.mime_type
        }
    ]
)
print(interaction.output_text)
JavaScript
import { GoogleGenAI } from "@google/genai";

const client = new GoogleGenAI({});

const uploadedFile = await client.files.upload({
    file: "path/to/organ.jpg",
    config: { mime_type: "image/jpeg" }
});

const interaction = await client.interactions.create({
    model: "gemini-3.5-flash",
    input: [
        {type: "text", text: "Caption this image."},
        {
            type: "image",
            uri: uploadedFile.uri,
            mime_type: uploadedFile.mimeType
        }
    ]
});
console.log(interaction.output_text);
REST
# First upload the file using the Files API, then use the URI:
curl -X POST "https://generativelanguage.googleapis.com/v1beta/interactions" \
  -H "x-goog-api-key: $GEMINI_API_KEY" \
  -H 'Content-Type: application/json' \
  -d '{
    "model": "gemini-3.5-flash",
    "input": [
      {"type": "text", "text": "Caption this image."},
      {
        "type": "image",
        "uri": "YOUR_FILE_URI",
        "mime_type": "image/jpeg"
      }
    ]
  }'
การส่งข้อมูลรูปภาพในบรรทัด
คุณระบุข้อมูลรูปภาพเป็นสตริงที่เข้ารหัส Base64 ได้ดังนี้
Python
import base64
from google import genai

with open('path/to/small-sample.jpg', 'rb') as f:
    image_bytes = f.read()

client = genai.Client()

interaction = client.interactions.create(
    model="gemini-3.5-flash",
    input=[
        {"type": "text", "text": "Caption this image."},
        {
            "type": "image",
            "data": base64.b64encode(image_bytes).decode('utf-8'),
            "mime_type": "image/jpeg"
        }
    ]
)
print(interaction.output_text)
JavaScript
import { GoogleGenAI } from "@google/genai";
import * as fs from "node:fs";

const client = new GoogleGenAI({});
const base64ImageFile = fs.readFileSync("path/to/small-sample.jpg", {
  encoding: "base64",
});

const interaction = await client.interactions.create({
    model: "gemini-3.5-flash",
    input: [
        {type: "text", text: "Caption this image."},
        {
            type: "image",
            data: base64ImageFile,
            mime_type: "image/jpeg"
        }
    ]
});
console.log(interaction.output_text);
REST
IMG_PATH="/path/to/your/image1.jpg"

if [[ "$(base64 --version 2>&1)" = *"FreeBSD"* ]]; then
  B64FLAGS="--input"
else
  B64FLAGS="-w0"
fi

curl -X POST "https://generativelanguage.googleapis.com/v1beta/interactions" \
  -H "x-goog-api-key: $GEMINI_API_KEY" \
  -H 'Content-Type: application/json' \
  -d '{
    "model": "gemini-3.5-flash",
    "input": [
      {"type": "text", "text": "Caption this image."},
      {
        "type": "image",
        "data": "'"$(base64 $B64FLAGS $IMG_PATH)"'",
        "mime_type": "image/jpeg"
      }
    ]
  }'
การอัปโหลดรูปภาพโดยใช้ File API
หากต้องการใช้ไฟล์ขนาดใหญ่หรือใช้ไฟล์รูปภาพเดียวกันซ้ำๆ ให้ใช้ Files API ดูคู่มือ Files API
Python
from google import genai

client = genai.Client()

my_file = client.files.upload(file="path/to/sample.jpg")

interaction = client.interactions.create(
    model="gemini-3.5-flash",
    input=[
        {"type": "text", "text": "Caption this image."},
        {
            "type": "image",
            "uri": my_file.uri,
            "mime_type": my_file.mime_type
        }
    ]
)
print(interaction.output_text)
JavaScript
import { GoogleGenAI } from "@google/genai";

const client = new GoogleGenAI({});

const myfile = await client.files.upload({
    file: "path/to/sample.jpg",
    config: { mimeType: "image/jpeg" },
});

const interaction = await client.interactions.create({
    model: "gemini-3.5-flash",
    input: [
        {type: "text", text: "Caption this image."},
        {
            type: "image",
            uri: myfile.uri,
            mime_type: myfile.mimeType
        }
    ]
});
console.log(interaction.output_text);
REST
# First upload the file (see Files API guide for details)
# Then use the file URI in the request:

curl -X POST "https://generativelanguage.googleapis.com/v1beta/interactions" \
  -H "x-goog-api-key: $GEMINI_API_KEY" \
  -H 'Content-Type: application/json' \
  -d '{
    "model": "gemini-3.5-flash",
    "input": [
      {"type": "text", "text": "Caption this image."},
      {
        "type": "image",
        "uri": "YOUR_FILE_URI",
        "mime_type": "image/jpeg"
      }
    ]
  }'
การป้อนพรอมต์ด้วยรูปภาพหลายรูป
คุณระบุรูปภาพหลายรูปในพรอมต์เดียวได้โดยรวมออบเจ็กต์รูปภาพหลายรายการในอาร์เรย์ input ดังนี้
Python
from google import genai

client = genai.Client()

interaction = client.interactions.create(
    model="gemini-3.5-flash",
    input=[
        {"type": "text", "text": "What is different between these two images?"},
        {
            "type": "image",
            "uri": "https://example.com/image1.jpg",
            "mime_type": "image/jpeg"
        },
        {
            "type": "image",
            "uri": "https://example.com/image2.jpg",
            "mime_type": "image/jpeg"
        }
    ]
)
print(interaction.output_text)
JavaScript
import { GoogleGenAI } from "@google/genai";

const client = new GoogleGenAI({});

const interaction = await client.interactions.create({
    model: "gemini-3.5-flash",
    input: [
        {type: "text", text: "What is different between these two images?"},
        {
            type: "image",
            uri: "https://example.com/image1.jpg",
            mime_type: "image/jpeg"
        },
        {
            type: "image",
            uri: "https://example.com/image2.jpg",
            mime_type: "image/jpeg"
        }
    ]
});
console.log(interaction.output_text);
REST
curl -X POST "https://generativelanguage.googleapis.com/v1beta/interactions" \
  -H "x-goog-api-key: $GEMINI_API_KEY" \
  -H 'Content-Type: application/json' \
  -d '{
    "model": "gemini-3.5-flash",
    "input": [
      {"type": "text", "text": "What is different between these two images?"},
      {
        "type": "image",
        "uri": "https://example.com/image1.jpg",
        "mime_type": "image/jpeg"
      },
      {
        "type": "image",
        "uri": "https://example.com/image2.jpg",
        "mime_type": "image/jpeg"
      }
    ]
  }'
การตรวจจับออบเจ็กต์
โมเดลได้รับการฝึกให้ตรวจจับออบเจ็กต์ในรูปภาพและรับพิกัดกรอบล้อมรอบของออบเจ็กต์ พิกัดที่สัมพันธ์กับขนาดรูปภาพจะปรับขนาดเป็น [0, 1000] คุณต้องยกเลิกการปรับขนาดพิกัดเหล่านี้ตาม ขนาดรูปภาพต้นฉบับ
Python
from google import genai
from pydantic import BaseModel, Field
from typing import List
import json

client = genai.Client()
prompt = "Detect the all of the prominent items in the image. The box_2d should be [ymin, xmin, ymax, xmax] normalized to 0-1000."

class BoundingBox(BaseModel):
    box_2d: List[int] = Field(description="The 2D bounding box of the item as [ymin, xmin, ymax, xmax] normalized to 0-1000.")
    mask: List[List[int]] = Field(description="The segmentation mask of the item as a polygon of [x,y] coordinates, normalized to 0-1000.")
    label: str = Field(description="A descriptive label for the item.")

class BoundingBoxes(BaseModel):
    boxes: List[BoundingBox]

interaction = client.interactions.create(
    model="gemini-3.5-flash",
    input=[
        {"type": "text", "text": prompt},
        {
            "type": "image",
            "uri": "https://example.com/image.png",
            "mime_type": "image/png"
        }
    ],
    response_format={
        "type": "text",
        "mime_type": "application/json",
        "schema": BoundingBoxes.model_json_schema()
    }
)

bounding_boxes = BoundingBoxes.model_validate_json(interaction.output_text)
print(bounding_boxes)
JavaScript
import { GoogleGenAI } from "@google/genai";
import * as z from "zod";

const client = new GoogleGenAI({});
const prompt = "Detect the all of the prominent items in the image. The box_2d should be [ymin, xmin, ymax, xmax] normalized to 0-1000.";

const boundingBoxesSchema = z.object({
  boxes: z.array(z.object({
    box_2d: z.array(z.number()),
    mask: z.array(z.array(z.number())),
    label: z.string()
  }))
});

const interaction = await client.interactions.create({
  model: "gemini-3.5-flash",
  input: [
    { type: "text", text: prompt },
    {
      type: "image",
      uri: "https://example.com/image.png",
      mime_type: "image/png"
    }
  ],
  response_format: {
    type: 'text',
    mime_type: 'application/json',
    schema: z.toJSONSchema(boundingBoxesSchema)
  },
});

const result = boundingBoxesSchema.parse(JSON.parse(interaction.output_text));
console.log(result);
REST
curl -X POST "https://generativelanguage.googleapis.com/v1beta/interactions" \
  -H "x-goog-api-key: $GEMINI_API_KEY" \
  -H 'Content-Type: application/json' \
  -d '{
    "model": "gemini-3.5-flash",
    "input": [
      {"type": "text", "text": "Detect the all of the prominent items in the image. The box_2d should be [ymin, xmin, ymax, xmax] normalized to 0-1000."},
      {
        "type": "image",
        "uri": "https://example.com/image.png",
        "mime_type": "image/png"
      }
    ],
    "response_format": {
      "type": "text",
      "mime_type": "application/json",
      "schema": {
        "type": "object",
        "properties": {
          "boxes": {
            "type": "array",
            "items": {
              "type": "object",
              "properties": {
                "box_2d": { "type": "array", "items": { "type": "integer" } },
                "mask": { "type": "array", "items": { "type": "array", "items": { "type": "integer" } } },
                "label": { "type": "string" }
              },
              "required": ["box_2d", "mask", "label"]
            }
          }
        },
        "required": ["boxes"]
      }
    }
  }'
ดูตัวอย่างเพิ่มเติมได้ที่ Notebook ต่อไปนี้ในสูตรการแก้ปัญหาของ Gemini
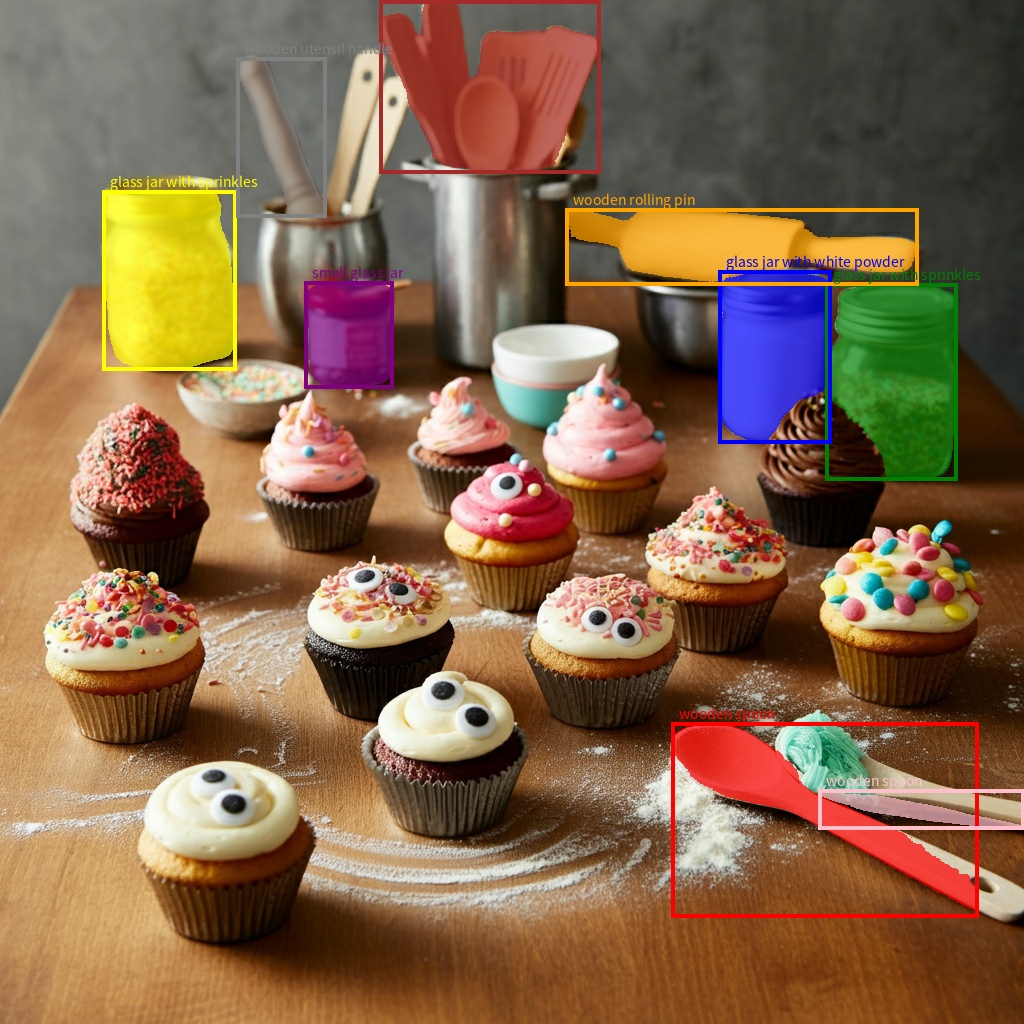
การแบ่งกลุ่ม
ตั้งแต่ Gemini 2.5 เป็นต้นไป โมเดลไม่เพียงตรวจจับรายการต่างๆ แต่ยังแบ่งกลุ่มรายการเหล่านั้น และระบุมาสก์รูปร่างของรายการด้วย
โมเดลจะคาดการณ์รายการ JSON โดยแต่ละรายการแสดงมาสก์การแบ่งกลุ่ม
แต่ละรายการมีกรอบล้อมรอบ ("box_2d") ในรูปแบบ [y0, x0, y1, x1] โดยมีพิกัดที่ทำให้เป็นมาตรฐานระหว่าง 0 ถึง 1000 ป้ายกำกับ ("label") ที่ระบุออบเจ็กต์ และสุดท้ายคือมาสก์การแบ่งกลุ่มภายในกรอบล้อมรอบเป็น png ที่เข้ารหัส base64 ซึ่งเป็นแผนที่ความน่าจะเป็นที่มีค่าระหว่าง 0 ถึง 255
Python
from google import genai
from pydantic import BaseModel, Field
from typing import List
import json

client = genai.Client()

prompt = """
Give the segmentation masks for the wooden and glass items.
Output a JSON list of segmentation masks where each entry contains the 2D
bounding box in the key "box_2d", the segmentation mask in key "mask", and
the text label in the key "label". Use descriptive labels.
"""

class BoundingBox(BaseModel):
    box_2d: List[int] = Field(description="The 2D bounding box of the item as [ymin, xmin, ymax, xmax] normalized to 0-1000.")
    mask: List[List[int]] = Field(description="The segmentation mask of the item as a polygon of [x,y] coordinates, normalized to 0-1000.")
    label: str = Field(description="A descriptive label for the item.")

class BoundingBoxes(BaseModel):
    boxes: List[BoundingBox]

interaction = client.interactions.create(
    model="gemini-3.5-flash",
    input=[
        {"type": "text", "text": prompt},
        {
            "type": "image",
            "uri": "https://example.com/image.png",
            "mime_type": "image/png"
        }
    ],
    response_format={
        "type": "text",
        "mime_type": "application/json",
        "schema": BoundingBoxes.model_json_schema()
    },
    generation_config={
        "thinking_level": "minimal"
    }
)

items = BoundingBoxes.model_validate_json(interaction.output_text)
print("Segmentation results:", items)
JavaScript
import { GoogleGenAI } from "@google/genai";
import * as z from "zod";

const client = new GoogleGenAI({});
const prompt = `
Give the segmentation masks for the wooden and glass items.
Output a JSON list of segmentation masks where each entry contains the 2D
bounding box in the key "box_2d", the segmentation mask in key "mask", and
the text label in the key "label". Use descriptive labels.
`;

const boundingBoxesSchema = z.object({
  boxes: z.array(z.object({
    box_2d: z.array(z.number()),
    mask: z.array(z.array(z.number())),
    label: z.string()
  }))
});

const interaction = await client.interactions.create({
  model: "gemini-3.5-flash",
  input: [
    { type: "text", text: prompt },
    {
      type: "image",
      uri: "https://example.com/image.png",
      mime_type: "image/png"
    }
  ],
  response_format: {
    type: 'text',
    mime_type: 'application/json',
    schema: z.toJSONSchema(boundingBoxesSchema)
  },
  generation_config: {
    thinking_level: "minimal"
  }
});

const result = boundingBoxesSchema.parse(JSON.parse(interaction.output_text));
console.log(result);
REST
curl -X POST "https://generativelanguage.googleapis.com/v1beta/interactions" \
  -H "x-goog-api-key: $GEMINI_API_KEY" \
  -H 'Content-Type: application/json' \
  -d '{
    "model": "gemini-3.5-flash",
    "input": [
      {"type": "text", "text": "Give the segmentation masks for the wooden and glass items.\nOutput a JSON list of segmentation masks where each entry contains the 2D\nbounding box in the key \"box_2d\", the segmentation mask in key \"mask\", and\nthe text label in the key \"label\". Use descriptive labels."},
      {
        "type": "image",
        "uri": "https://example.com/image.png",
        "mime_type": "image/png"
      }
    ],
    "response_format": {
      "type": "text",
      "mime_type": "application/json",
      "schema": {
        "type": "object",
        "properties": {
          "boxes": {
            "type": "array",
            "items": {
              "type": "object",
              "properties": {
                "box_2d": { "type": "array", "items": { "type": "integer" } },
                "mask": { "type": "array", "items": { "type": "array", "items": { "type": "integer" } } },
                "label": { "type": "string" }
              },
              "required": ["box_2d", "mask", "label"]
            }
          }
        },
        "required": ["boxes"]
      }
    },
    "generation_config": {
      "thinking_level": "minimal"
    }
  }'
รูปแบบรูปภาพที่รองรับ
Gemini รองรับประเภท MIME ของรูปแบบรูปภาพต่อไปนี้
- PNG -
image/png - JPEG -
image/jpeg - WEBP -
image/webp - HEIC -
image/heic - HEIF -
image/heif
ดูข้อมูลเกี่ยวกับวิธีการป้อนไฟล์อื่นๆ ได้ในคู่มือวิธีการป้อนไฟล์
ความสามารถ
โมเดล Gemini ทุกเวอร์ชันทำงานได้กับข้อมูลหลายรูปแบบและสามารถใช้ในงานประมวลผลรูปภาพและคอมพิวเตอร์วิทัศน์ได้หลากหลาย ซึ่งรวมถึงแต่ไม่จำกัดเพียงคำอธิบายภาพ คำถามและคำตอบเกี่ยวกับภาพ การจัดหมวดหมู่รูปภาพ การตรวจจับออบเจ็กต์ และการแบ่งส่วนออบเจ็กต์
Gemini สามารถลดความจำเป็นในการใช้โมเดล ML เฉพาะทางได้ ทั้งนี้ขึ้นอยู่กับข้อกำหนดด้านคุณภาพและประสิทธิภาพของคุณ
โมเดลเวอร์ชันล่าสุดได้รับการฝึกมาโดยเฉพาะเพื่อปรับปรุงความแม่นยำของงานเฉพาะทาง นอกเหนือจากความสามารถทั่วไป เช่น การตรวจจับออบเจ็กต์และการแบ่งกลุ่มที่ได้รับการปรับปรุง
ข้อจำกัดและข้อมูลทางเทคนิคที่สำคัญ
ขีดจำกัดไฟล์
โมเดล Gemini รองรับไฟล์รูปภาพสูงสุด 3,600 ไฟล์ต่อคำขอ
การคำนวณโทเค็น
- 258 โทเค็น หากทั้ง 2 ด้านมีขนาดไม่เกิน 384 พิกเซล รูปภาพขนาดใหญ่จะแบ่งเป็นไทล์ขนาด 768x768 พิกเซล โดยแต่ละไทล์มีค่าใช้จ่าย 258 โทเค็น
สูตรคร่าวๆ สำหรับคำนวณจำนวนไทล์มีดังนี้
- คำนวณขนาดหน่วยครอบตัดซึ่งโดยประมาณคือ
floor(min(width, height)/ 1.5) - หารแต่ละมิติข้อมูลด้วยขนาดหน่วยครอบตัด แล้วคูณกันเพื่อหา จำนวนไทล์
เช่น รูปภาพขนาด 960x540 จะมีขนาดหน่วยครอบตัดเป็น 360 หารแต่ละมิติข้อมูลด้วย 360 และจำนวนไทล์คือ 3 * 2 = 6
ความละเอียดของสื่อ
Gemini 3 เปิดตัวการควบคุมแบบละเอียดในการประมวลผลวิสัยทัศน์แบบมัลติโมดอลด้วยพารามิเตอร์ media_resolution
พารามิเตอร์ media_resolution จะกำหนดจำนวนโทเค็นสูงสุดที่จัดสรรต่อรูปภาพอินพุตหรือเฟรมวิดีโอ
ความละเอียดที่สูงขึ้นจะช่วยปรับปรุงความสามารถของโมเดลในการ
อ่านข้อความขนาดเล็กหรือระบุรายละเอียดเล็กๆ แต่จะเพิ่มการใช้โทเค็นและเวลาในการตอบสนอง
เคล็ดลับและแนวทางปฏิบัติที่ดีที่สุด
- ตรวจสอบว่ารูปภาพหมุนอย่างถูกต้อง
- ใช้รูปภาพที่ชัดเจนและไม่เบลอ
- เมื่อใช้รูปภาพเดียวที่มีข้อความ ให้วางพรอมต์ข้อความก่อนรูปภาพในอาร์เรย์
input
ขั้นตอนถัดไป
คู่มือนี้จะแสดงวิธีอัปโหลดไฟล์รูปภาพและสร้างเอาต์พุตข้อความ จากอินพุตรูปภาพ ดูข้อมูลเพิ่มเติมได้ที่แหล่งข้อมูลต่อไปนี้
- Files API: ดูข้อมูลเพิ่มเติมเกี่ยวกับการอัปโหลดและจัดการไฟล์เพื่อใช้กับ Gemini
- คำสั่งของระบบ: คำสั่งของระบบช่วยให้คุณกำหนดลักษณะการทำงานของโมเดลตามความต้องการ และกรณีการใช้งานที่เฉพาะเจาะจงได้
- กลยุทธ์การเขียนพรอมต์ด้วยไฟล์: Gemini API รองรับการเขียนพรอมต์ด้วยข้อมูลข้อความ รูปภาพ เสียง และวิดีโอ ซึ่งเรียกอีกอย่างว่าการเขียนพรอมต์แบบหลายรูปแบบ
- คำแนะนำด้านความปลอดภัย: บางครั้งโมเดล Generative AI อาจสร้างเอาต์พุตที่ไม่คาดคิด เช่น เอาต์พุตที่ไม่ถูกต้อง มีอคติ หรือไม่เหมาะสม การประมวลผลภายหลังและการประเมินโดยมนุษย์เป็นสิ่งจำเป็นเพื่อ จำกัดความเสี่ยงที่จะเกิดอันตรายจากเอาต์พุตดังกล่าว