מודלים של Gemini מבוססים על מולטי-מודאליות מההתחלה, ולכן הם מאפשרים לבצע מגוון רחב של משימות עיבוד תמונות וראייה ממוחשבת, כולל תיוג תמונות, סיווג תמונות ומענה לשאלות על תמונות, בלי צורך לאמן מודלים מיוחדים של למידת מכונה.
בנוסף ליכולות הכלליות של מודלים מרובי-מוֹדָלִים, מודלים של Gemini מציעים דיוק משופר בתרחישי שימוש ספציפיים כמו זיהוי אובייקטים ופילוח, באמצעות אימון נוסף.
העברת תמונות ל-Gemini
יש כמה דרכים לספק תמונות כקלט ל-Gemini:
- העברת תמונה באמצעות כתובת URL: מתאים לתמונות שזמינות לכולם.
- העברת נתוני תמונה בתוך השורה: נתוני תמונה בקידוד base64.
- העלאת תמונות באמצעות File API: מומלץ לקבצים גדולים יותר או לשימוש חוזר בתמונות בכמה בקשות.
העברת תמונה באמצעות כתובת URL
אפשר להעלות תמונה באמצעות Files API ולהעביר אותה בבקשה:
Python
from google import genai

client = genai.Client()

uploaded_file = client.files.upload(file="path/to/organ.jpg")

interaction = client.interactions.create(
    model="gemini-3.5-flash",
    input=[
        {"type": "text", "text": "Caption this image."},
        {
            "type": "image",
            "uri": uploaded_file.uri,
            "mime_type": uploaded_file.mime_type
        }
    ]
)
print(interaction.output_text)
JavaScript
import { GoogleGenAI } from "@google/genai";

const client = new GoogleGenAI({});

const uploadedFile = await client.files.upload({
    file: "path/to/organ.jpg",
    config: { mime_type: "image/jpeg" }
});

const interaction = await client.interactions.create({
    model: "gemini-3.5-flash",
    input: [
        {type: "text", text: "Caption this image."},
        {
            type: "image",
            uri: uploadedFile.uri,
            mime_type: uploadedFile.mimeType
        }
    ]
});
console.log(interaction.output_text);
REST
# First upload the file using the Files API, then use the URI:
curl -X POST "https://generativelanguage.googleapis.com/v1beta/interactions" \
  -H "x-goog-api-key: $GEMINI_API_KEY" \
  -H 'Content-Type: application/json' \
  -d '{
    "model": "gemini-3.5-flash",
    "input": [
      {"type": "text", "text": "Caption this image."},
      {
        "type": "image",
        "uri": "YOUR_FILE_URI",
        "mime_type": "image/jpeg"
      }
    ]
  }'
העברת נתוני תמונות מוטבעות
אפשר לספק נתוני תמונה כמחרוזות בקידוד Base64:
Python
import base64
from google import genai

with open('path/to/small-sample.jpg', 'rb') as f:
    image_bytes = f.read()

client = genai.Client()

interaction = client.interactions.create(
    model="gemini-3.5-flash",
    input=[
        {"type": "text", "text": "Caption this image."},
        {
            "type": "image",
            "data": base64.b64encode(image_bytes).decode('utf-8'),
            "mime_type": "image/jpeg"
        }
    ]
)
print(interaction.output_text)
JavaScript
import { GoogleGenAI } from "@google/genai";
import * as fs from "node:fs";

const client = new GoogleGenAI({});
const base64ImageFile = fs.readFileSync("path/to/small-sample.jpg", {
  encoding: "base64",
});

const interaction = await client.interactions.create({
    model: "gemini-3.5-flash",
    input: [
        {type: "text", text: "Caption this image."},
        {
            type: "image",
            data: base64ImageFile,
            mime_type: "image/jpeg"
        }
    ]
});
console.log(interaction.output_text);
REST
IMG_PATH="/path/to/your/image1.jpg"

if [[ "$(base64 --version 2>&1)" = *"FreeBSD"* ]]; then
  B64FLAGS="--input"
else
  B64FLAGS="-w0"
fi

curl -X POST "https://generativelanguage.googleapis.com/v1beta/interactions" \
  -H "x-goog-api-key: $GEMINI_API_KEY" \
  -H 'Content-Type: application/json' \
  -d '{
    "model": "gemini-3.5-flash",
    "input": [
      {"type": "text", "text": "Caption this image."},
      {
        "type": "image",
        "data": "'"$(base64 $B64FLAGS $IMG_PATH)"'",
        "mime_type": "image/jpeg"
      }
    ]
  }'
העלאת תמונות באמצעות File API
כדי להעלות קבצים גדולים או כדי להשתמש באותו קובץ תמונה שוב ושוב, צריך להשתמש ב-Files API. מידע נוסף מופיע במדריך לשימוש ב-Files API.
Python
from google import genai

client = genai.Client()

my_file = client.files.upload(file="path/to/sample.jpg")

interaction = client.interactions.create(
    model="gemini-3.5-flash",
    input=[
        {"type": "text", "text": "Caption this image."},
        {
            "type": "image",
            "uri": my_file.uri,
            "mime_type": my_file.mime_type
        }
    ]
)
print(interaction.output_text)
JavaScript
import { GoogleGenAI } from "@google/genai";

const client = new GoogleGenAI({});

const myfile = await client.files.upload({
    file: "path/to/sample.jpg",
    config: { mimeType: "image/jpeg" },
});

const interaction = await client.interactions.create({
    model: "gemini-3.5-flash",
    input: [
        {type: "text", text: "Caption this image."},
        {
            type: "image",
            uri: myfile.uri,
            mime_type: myfile.mimeType
        }
    ]
});
console.log(interaction.output_text);
REST
# First upload the file (see Files API guide for details)
# Then use the file URI in the request:

curl -X POST "https://generativelanguage.googleapis.com/v1beta/interactions" \
  -H "x-goog-api-key: $GEMINI_API_KEY" \
  -H 'Content-Type: application/json' \
  -d '{
    "model": "gemini-3.5-flash",
    "input": [
      {"type": "text", "text": "Caption this image."},
      {
        "type": "image",
        "uri": "YOUR_FILE_URI",
        "mime_type": "image/jpeg"
      }
    ]
  }'
יצירת הנחיה עם כמה תמונות
אפשר לספק כמה תמונות בהנחיה אחת על ידי הכללת כמה אובייקטים של תמונות במערך input:
Python
from google import genai

client = genai.Client()

interaction = client.interactions.create(
    model="gemini-3.5-flash",
    input=[
        {"type": "text", "text": "What is different between these two images?"},
        {
            "type": "image",
            "uri": "https://example.com/image1.jpg",
            "mime_type": "image/jpeg"
        },
        {
            "type": "image",
            "uri": "https://example.com/image2.jpg",
            "mime_type": "image/jpeg"
        }
    ]
)
print(interaction.output_text)
JavaScript
import { GoogleGenAI } from "@google/genai";

const client = new GoogleGenAI({});

const interaction = await client.interactions.create({
    model: "gemini-3.5-flash",
    input: [
        {type: "text", text: "What is different between these two images?"},
        {
            type: "image",
            uri: "https://example.com/image1.jpg",
            mime_type: "image/jpeg"
        },
        {
            type: "image",
            uri: "https://example.com/image2.jpg",
            mime_type: "image/jpeg"
        }
    ]
});
console.log(interaction.output_text);
REST
curl -X POST "https://generativelanguage.googleapis.com/v1beta/interactions" \
  -H "x-goog-api-key: $GEMINI_API_KEY" \
  -H 'Content-Type: application/json' \
  -d '{
    "model": "gemini-3.5-flash",
    "input": [
      {"type": "text", "text": "What is different between these two images?"},
      {
        "type": "image",
        "uri": "https://example.com/image1.jpg",
        "mime_type": "image/jpeg"
      },
      {
        "type": "image",
        "uri": "https://example.com/image2.jpg",
        "mime_type": "image/jpeg"
      }
    ]
  }'
זיהוי אובייקטים
המודלים מאומנים לזהות אובייקטים בתמונה ולקבל את הקואורדינטות של התיבה התוחמת שלהם. הקואורדינטות, ביחס לממדי התמונה, מותאמות לטווח [0, 1000]. צריך לבטל את שינוי הגודל של הקואורדינטות האלה על סמך גודל התמונה המקורי.
Python
from google import genai
from pydantic import BaseModel, Field
from typing import List
import json

client = genai.Client()
prompt = "Detect the all of the prominent items in the image. The box_2d should be [ymin, xmin, ymax, xmax] normalized to 0-1000."

class BoundingBox(BaseModel):
    box_2d: List[int] = Field(description="The 2D bounding box of the item as [ymin, xmin, ymax, xmax] normalized to 0-1000.")
    mask: List[List[int]] = Field(description="The segmentation mask of the item as a polygon of [x,y] coordinates, normalized to 0-1000.")
    label: str = Field(description="A descriptive label for the item.")

class BoundingBoxes(BaseModel):
    boxes: List[BoundingBox]

interaction = client.interactions.create(
    model="gemini-3.5-flash",
    input=[
        {"type": "text", "text": prompt},
        {
            "type": "image",
            "uri": "https://example.com/image.png",
            "mime_type": "image/png"
        }
    ],
    response_format={
        "type": "text",
        "mime_type": "application/json",
        "schema": BoundingBoxes.model_json_schema()
    }
)

bounding_boxes = BoundingBoxes.model_validate_json(interaction.output_text)
print(bounding_boxes)
JavaScript
import { GoogleGenAI } from "@google/genai";
import * as z from "zod";

const client = new GoogleGenAI({});
const prompt = "Detect the all of the prominent items in the image. The box_2d should be [ymin, xmin, ymax, xmax] normalized to 0-1000.";

const boundingBoxesSchema = z.object({
  boxes: z.array(z.object({
    box_2d: z.array(z.number()),
    mask: z.array(z.array(z.number())),
    label: z.string()
  }))
});

const interaction = await client.interactions.create({
  model: "gemini-3.5-flash",
  input: [
    { type: "text", text: prompt },
    {
      type: "image",
      uri: "https://example.com/image.png",
      mime_type: "image/png"
    }
  ],
  response_format: {
    type: 'text',
    mime_type: 'application/json',
    schema: z.toJSONSchema(boundingBoxesSchema)
  },
});

const result = boundingBoxesSchema.parse(JSON.parse(interaction.output_text));
console.log(result);
REST
curl -X POST "https://generativelanguage.googleapis.com/v1beta/interactions" \
  -H "x-goog-api-key: $GEMINI_API_KEY" \
  -H 'Content-Type: application/json' \
  -d '{
    "model": "gemini-3.5-flash",
    "input": [
      {"type": "text", "text": "Detect the all of the prominent items in the image. The box_2d should be [ymin, xmin, ymax, xmax] normalized to 0-1000."},
      {
        "type": "image",
        "uri": "https://example.com/image.png",
        "mime_type": "image/png"
      }
    ],
    "response_format": {
      "type": "text",
      "mime_type": "application/json",
      "schema": {
        "type": "object",
        "properties": {
          "boxes": {
            "type": "array",
            "items": {
              "type": "object",
              "properties": {
                "box_2d": { "type": "array", "items": { "type": "integer" } },
                "mask": { "type": "array", "items": { "type": "array", "items": { "type": "integer" } } },
                "label": { "type": "string" }
              },
              "required": ["box_2d", "mask", "label"]
            }
          }
        },
        "required": ["boxes"]
      }
    }
  }'
דוגמאות נוספות זמינות בתיקיות הבאות בספר המתכונים של Gemini:
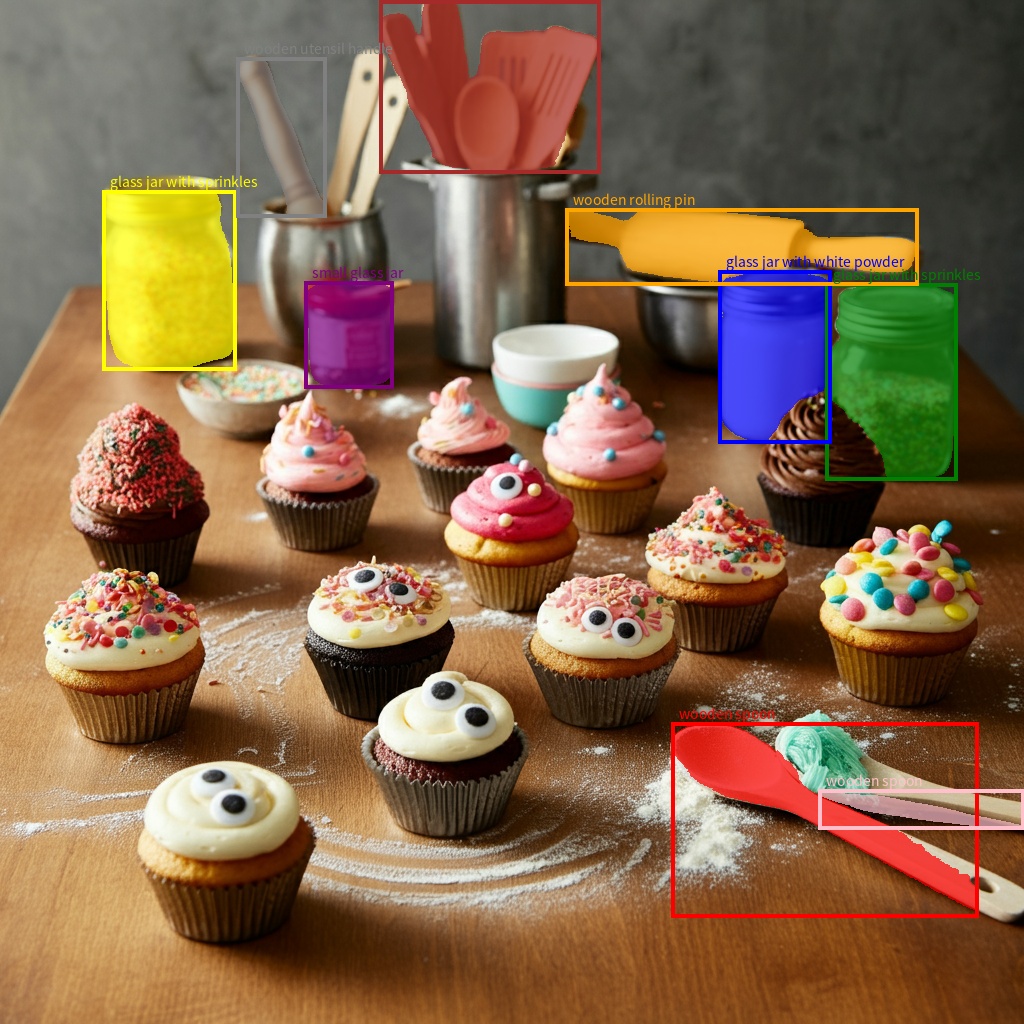
פילוח
החל מ-Gemini 2.5, המודלים לא רק מזהים פריטים אלא גם מבצעים פילוח שלהם ומספקים את מסכות המתאר שלהם.
המודל חוזה רשימת JSON, שבה כל פריט מייצג מסכת פילוח.
לכל פריט יש תיבת תוחמת ("box_2d") בפורמט [y0, x0, y1, x1] עם קואורדינטות מנורמלות בין 0 ל-1,000, תווית ("label") שמזהה את האובייקט, ולבסוף מסכת הפילוח בתוך התיבה התוחמת, כקובץ PNG עם קידוד base64 שהוא מפת הסתברות עם ערכים בין 0 ל-255.
Python
from google import genai
from pydantic import BaseModel, Field
from typing import List
import json

client = genai.Client()

prompt = """
Give the segmentation masks for the wooden and glass items.
Output a JSON list of segmentation masks where each entry contains the 2D
bounding box in the key "box_2d", the segmentation mask in key "mask", and
the text label in the key "label". Use descriptive labels.
"""

class BoundingBox(BaseModel):
    box_2d: List[int] = Field(description="The 2D bounding box of the item as [ymin, xmin, ymax, xmax] normalized to 0-1000.")
    mask: List[List[int]] = Field(description="The segmentation mask of the item as a polygon of [x,y] coordinates, normalized to 0-1000.")
    label: str = Field(description="A descriptive label for the item.")

class BoundingBoxes(BaseModel):
    boxes: List[BoundingBox]

interaction = client.interactions.create(
    model="gemini-3.5-flash",
    input=[
        {"type": "text", "text": prompt},
        {
            "type": "image",
            "uri": "https://example.com/image.png",
            "mime_type": "image/png"
        }
    ],
    response_format={
        "type": "text",
        "mime_type": "application/json",
        "schema": BoundingBoxes.model_json_schema()
    },
    generation_config={
        "thinking_level": "minimal"
    }
)

items = BoundingBoxes.model_validate_json(interaction.output_text)
print("Segmentation results:", items)
JavaScript
import { GoogleGenAI } from "@google/genai";
import * as z from "zod";

const client = new GoogleGenAI({});
const prompt = `
Give the segmentation masks for the wooden and glass items.
Output a JSON list of segmentation masks where each entry contains the 2D
bounding box in the key "box_2d", the segmentation mask in key "mask", and
the text label in the key "label". Use descriptive labels.
`;

const boundingBoxesSchema = z.object({
  boxes: z.array(z.object({
    box_2d: z.array(z.number()),
    mask: z.array(z.array(z.number())),
    label: z.string()
  }))
});

const interaction = await client.interactions.create({
  model: "gemini-3.5-flash",
  input: [
    { type: "text", text: prompt },
    {
      type: "image",
      uri: "https://example.com/image.png",
      mime_type: "image/png"
    }
  ],
  response_format: {
    type: 'text',
    mime_type: 'application/json',
    schema: z.toJSONSchema(boundingBoxesSchema)
  },
  generation_config: {
    thinking_level: "minimal"
  }
});

const result = boundingBoxesSchema.parse(JSON.parse(interaction.output_text));
console.log(result);
REST
curl -X POST "https://generativelanguage.googleapis.com/v1beta/interactions" \
  -H "x-goog-api-key: $GEMINI_API_KEY" \
  -H 'Content-Type: application/json' \
  -d '{
    "model": "gemini-3.5-flash",
    "input": [
      {"type": "text", "text": "Give the segmentation masks for the wooden and glass items.\nOutput a JSON list of segmentation masks where each entry contains the 2D\nbounding box in the key \"box_2d\", the segmentation mask in key \"mask\", and\nthe text label in the key \"label\". Use descriptive labels."},
      {
        "type": "image",
        "uri": "https://example.com/image.png",
        "mime_type": "image/png"
      }
    ],
    "response_format": {
      "type": "text",
      "mime_type": "application/json",
      "schema": {
        "type": "object",
        "properties": {
          "boxes": {
            "type": "array",
            "items": {
              "type": "object",
              "properties": {
                "box_2d": { "type": "array", "items": { "type": "integer" } },
                "mask": { "type": "array", "items": { "type": "array", "items": { "type": "integer" } } },
                "label": { "type": "string" }
              },
              "required": ["box_2d", "mask", "label"]
            }
          }
        },
        "required": ["boxes"]
      }
    },
    "generation_config": {
      "thinking_level": "minimal"
    }
  }'
אילו פורמטים של תמונות נתמכים?
Gemini תומך בסוגי ה-MIME של פורמטים התמונות הבאים:
- PNG –
image/png - JPEG –
image/jpeg - WEBP –
image/webp - HEIC -
image/heic - HEIF -
image/heif
מידע על שיטות אחרות להזנת קבצים זמין במדריך בנושא שיטות להזנת קבצים.
יכולות
כל הגרסאות של מודל Gemini הן מולטי-מודאליות, ואפשר להשתמש בהן במגוון רחב של משימות עיבוד תמונות וראייה ממוחשבת, כולל, בין היתר, כיתוב תמונות, מענה על שאלות שקשורות לאובייקטים חזותיים, סיווג תמונות, זיהוי ופילוח אובייקטים.
יכול להיות ש-Gemini יצמצם את הצורך בשימוש במודלים מיוחדים של ML, בהתאם לדרישות האיכות והביצועים שלכם.
הגרסאות העדכניות של המודלים אומנו במיוחד כדי לשפר את הדיוק של משימות ייעודיות, בנוסף ליכולות כלליות כמו זיהוי אובייקטים ופילוח משופרים.
מגבלות ומידע טכני חשוב
מכסת קבצים
מודלים של Gemini תומכים בעד 3,600 קובצי תמונות לכל בקשה.
חישוב הטוקנים
- 258 טוקנים אם שני המימדים הם 384 פיקסלים או פחות. תמונות גדולות יותר מחולקות למשבצות של 768x768 פיקסלים, וכל משבצת עולה 258 טוקנים.
נוסחה משוערת לחישוב מספר המשבצות:
- מחשבים את גודל יחידת החיתוך, שהוא בערך:
floor(min(width, height)חלקי 1.5). - מחלקים כל מאפיין בגודל יחידת החיתוך ומכפילים את התוצאה כדי לקבל את מספר האריחים.
לדוגמה, אם התמונה היא בגודל 960x540, גודל יחידת החיתוך יהיה 360. מחלקים כל מאפיין ב-360 ומקבלים 3 * 2 = 6 אריחים.
רזולוציית המדיה
Gemini 3 מציג שליטה מפורטת בעיבוד של ראייה מולטי-מודאלית באמצעות הפרמטר media_resolution. הפרמטר media_resolution קובע את המספר המקסימלי של טוקנים שמוקצים לכל תמונת קלט או פריים של סרטון.
רזולוציות גבוהות יותר משפרות את היכולת של המודל לקרוא טקסט קטן או לזהות פרטים קטנים, אבל הן מגדילות את השימוש בטוקנים ואת זמן האחזור.
טיפים ושיטות מומלצות
- מוודאים שהתמונות מסובבות בצורה נכונה.
- השתמשו בתמונות ברורות ולא מטושטשות.
- כשמשתמשים בתמונה אחת עם טקסט, צריך למקם את ההנחייה הטקסטואלית לפני התמונה במערך
input.
המאמרים הבאים
במדריך הזה מוסבר איך להעלות קובצי תמונות וליצור פלט טקסט מקלט תמונה. מידע נוסף זמין במקורות המידע הבאים:
- Files API: מידע נוסף על העלאה וניהול של קבצים לשימוש עם Gemini.
- System instructions: הוראות מערכת מאפשרות לכם לכוון את התנהגות המודל בהתאם לצרכים הספציפיים ולתרחישי השימוש שלכם.
- אסטרטגיות לכתיבת הנחיות לקבצים: Gemini API תומך בכתיבת הנחיות עם נתוני טקסט, תמונה, אודיו ווידאו, שנקראות גם כתיבת הנחיות מולטי-מודאליות.
- הנחיות בנושא בטיחות: לפעמים מודלים של AI גנרטיבי יוצרים תוצאות לא צפויות, כמו תוצאות לא מדויקות, מוטות או פוגעניות. עיבוד תמונה (Post Processing) והערכה אנושית חיוניים כדי לצמצם את הסיכון לנזק שעלול להיגרם מהתוצאות האלה.