Gemini मॉडल इस तरह डिज़ाइन किए गए हैं कि वे मल्टीमोडल की तरह काम कर सकें. इससे इमेज प्रोसेसिंग और कंप्यूटर विज़न से जुड़े कई टास्क किए जा सकते हैं. इनमें इमेज के लिए कैप्शन, क्लासिफ़िकेशन, और विज़ुअल सवालों के जवाब देना शामिल है. इसके लिए, एमएल के खास मॉडल को ट्रेन करने की ज़रूरत नहीं होती.
Gemini मॉडल, सामान्य मल्टीमोडल क्षमताओं के अलावा, कुछ खास इस्तेमाल के मामलों में ज़्यादा सटीक नतीजे देते हैं. जैसे, ऑब्जेक्ट का पता लगाने की सुविधा और सेगमेंटेशन. इसके लिए, उन्हें अतिरिक्त ट्रेनिंग दी जाती है.
Gemini को इमेज पास करना
Gemini को इनपुट के तौर पर इमेज पास करने के लिए, ये तरीके इस्तेमाल किए जा सकते हैं:
- यूआरएल का इस्तेमाल करके इमेज पास करना: यह तरीका, सार्वजनिक तौर पर ऐक्सेस की जा सकने वाली इमेज के लिए सबसे सही है.
- इनलाइन इमेज डेटा पास करना: यह तरीका, base64-encoded इमेज डेटा के लिए सबसे सही है.
- File API का इस्तेमाल करके इमेज अपलोड करना: यह तरीका, बड़ी फ़ाइलों के लिए या एक से ज़्यादा अनुरोधों में इमेज का फिर से इस्तेमाल करने के लिए सबसे सही है.
यूआरएल का इस्तेमाल करके इमेज पास करना
Files API का इस्तेमाल करके इमेज अपलोड की जा सकती है और इसे अनुरोध में पास किया जा सकता है:
Python
from google import genai

client = genai.Client()

uploaded_file = client.files.upload(file="path/to/organ.jpg")

interaction = client.interactions.create(
    model="gemini-3.5-flash",
    input=[
        {"type": "text", "text": "Caption this image."},
        {
            "type": "image",
            "uri": uploaded_file.uri,
            "mime_type": uploaded_file.mime_type
        }
    ]
)
print(interaction.output_text)
JavaScript
import { GoogleGenAI } from "@google/genai";

const client = new GoogleGenAI({});

const uploadedFile = await client.files.upload({
    file: "path/to/organ.jpg",
    config: { mime_type: "image/jpeg" }
});

const interaction = await client.interactions.create({
    model: "gemini-3.5-flash",
    input: [
        {type: "text", text: "Caption this image."},
        {
            type: "image",
            uri: uploadedFile.uri,
            mime_type: uploadedFile.mimeType
        }
    ]
});
console.log(interaction.output_text);
REST
# First upload the file using the Files API, then use the URI:
curl -X POST "https://generativelanguage.googleapis.com/v1beta/interactions" \
  -H "x-goog-api-key: $GEMINI_API_KEY" \
  -H 'Content-Type: application/json' \
  -d '{
    "model": "gemini-3.5-flash",
    "input": [
      {"type": "text", "text": "Caption this image."},
      {
        "type": "image",
        "uri": "YOUR_FILE_URI",
        "mime_type": "image/jpeg"
      }
    ]
  }'
इनलाइन इमेज डेटा पास करना
इमेज डेटा को base64-encoded स्ट्रिंग के तौर पर पास किया जा सकता है:
Python
import base64
from google import genai

with open('path/to/small-sample.jpg', 'rb') as f:
    image_bytes = f.read()

client = genai.Client()

interaction = client.interactions.create(
    model="gemini-3.5-flash",
    input=[
        {"type": "text", "text": "Caption this image."},
        {
            "type": "image",
            "data": base64.b64encode(image_bytes).decode('utf-8'),
            "mime_type": "image/jpeg"
        }
    ]
)
print(interaction.output_text)
JavaScript
import { GoogleGenAI } from "@google/genai";
import * as fs from "node:fs";

const client = new GoogleGenAI({});
const base64ImageFile = fs.readFileSync("path/to/small-sample.jpg", {
  encoding: "base64",
});

const interaction = await client.interactions.create({
    model: "gemini-3.5-flash",
    input: [
        {type: "text", text: "Caption this image."},
        {
            type: "image",
            data: base64ImageFile,
            mime_type: "image/jpeg"
        }
    ]
});
console.log(interaction.output_text);
REST
IMG_PATH="/path/to/your/image1.jpg"

if [[ "$(base64 --version 2>&1)" = *"FreeBSD"* ]]; then
  B64FLAGS="--input"
else
  B64FLAGS="-w0"
fi

curl -X POST "https://generativelanguage.googleapis.com/v1beta/interactions" \
  -H "x-goog-api-key: $GEMINI_API_KEY" \
  -H 'Content-Type: application/json' \
  -d '{
    "model": "gemini-3.5-flash",
    "input": [
      {"type": "text", "text": "Caption this image."},
      {
        "type": "image",
        "data": "'"$(base64 $B64FLAGS $IMG_PATH)"'",
        "mime_type": "image/jpeg"
      }
    ]
  }'
File API का इस्तेमाल करके इमेज अपलोड करना
बड़ी फ़ाइलों के लिए या एक ही इमेज फ़ाइल को बार-बार इस्तेमाल करने के लिए, Files API का इस्तेमाल करें. Files API की गाइड देखें.
Python
from google import genai

client = genai.Client()

my_file = client.files.upload(file="path/to/sample.jpg")

interaction = client.interactions.create(
    model="gemini-3.5-flash",
    input=[
        {"type": "text", "text": "Caption this image."},
        {
            "type": "image",
            "uri": my_file.uri,
            "mime_type": my_file.mime_type
        }
    ]
)
print(interaction.output_text)
JavaScript
import { GoogleGenAI } from "@google/genai";

const client = new GoogleGenAI({});

const myfile = await client.files.upload({
    file: "path/to/sample.jpg",
    config: { mimeType: "image/jpeg" },
});

const interaction = await client.interactions.create({
    model: "gemini-3.5-flash",
    input: [
        {type: "text", text: "Caption this image."},
        {
            type: "image",
            uri: myfile.uri,
            mime_type: myfile.mimeType
        }
    ]
});
console.log(interaction.output_text);
REST
# First upload the file (see Files API guide for details)
# Then use the file URI in the request:

curl -X POST "https://generativelanguage.googleapis.com/v1beta/interactions" \
  -H "x-goog-api-key: $GEMINI_API_KEY" \
  -H 'Content-Type: application/json' \
  -d '{
    "model": "gemini-3.5-flash",
    "input": [
      {"type": "text", "text": "Caption this image."},
      {
        "type": "image",
        "uri": "YOUR_FILE_URI",
        "mime_type": "image/jpeg"
      }
    ]
  }'
एक से ज़्यादा इमेज के साथ प्रॉम्प्ट करना
एक ही प्रॉम्प्ट में एक से ज़्यादा इमेज पास की जा सकती हैं. इसके लिए, input कलेक्शन में एक से ज़्यादा इमेज ऑब्जेक्ट शामिल करें:
Python
from google import genai

client = genai.Client()

interaction = client.interactions.create(
    model="gemini-3.5-flash",
    input=[
        {"type": "text", "text": "What is different between these two images?"},
        {
            "type": "image",
            "uri": "https://example.com/image1.jpg",
            "mime_type": "image/jpeg"
        },
        {
            "type": "image",
            "uri": "https://example.com/image2.jpg",
            "mime_type": "image/jpeg"
        }
    ]
)
print(interaction.output_text)
JavaScript
import { GoogleGenAI } from "@google/genai";

const client = new GoogleGenAI({});

const interaction = await client.interactions.create({
    model: "gemini-3.5-flash",
    input: [
        {type: "text", text: "What is different between these two images?"},
        {
            type: "image",
            uri: "https://example.com/image1.jpg",
            mime_type: "image/jpeg"
        },
        {
            type: "image",
            uri: "https://example.com/image2.jpg",
            mime_type: "image/jpeg"
        }
    ]
});
console.log(interaction.output_text);
REST
curl -X POST "https://generativelanguage.googleapis.com/v1beta/interactions" \
  -H "x-goog-api-key: $GEMINI_API_KEY" \
  -H 'Content-Type: application/json' \
  -d '{
    "model": "gemini-3.5-flash",
    "input": [
      {"type": "text", "text": "What is different between these two images?"},
      {
        "type": "image",
        "uri": "https://example.com/image1.jpg",
        "mime_type": "image/jpeg"
      },
      {
        "type": "image",
        "uri": "https://example.com/image2.jpg",
        "mime_type": "image/jpeg"
      }
    ]
  }'
ऑब्जेक्ट का पता लगाने की सुविधा
मॉडल को इस तरह ट्रेन किया जाता है कि वे किसी इमेज में मौजूद ऑब्जेक्ट का पता लगा सकें और उनके बाउंडिंग बॉक्स के कोऑर्डिनेट हासिल कर सकें. इमेज के डाइमेंशन के हिसाब से, कोऑर्डिनेट को [0, 1000] के स्केल पर दिखाया जाता है. आपको अपनी ओरिजनल इमेज के साइज़ के हिसाब से, इन कोऑर्डिनेट को डीस्केल करना होगा.
Python
from google import genai
from pydantic import BaseModel, Field
from typing import List
import json

client = genai.Client()
prompt = "Detect the all of the prominent items in the image. The box_2d should be [ymin, xmin, ymax, xmax] normalized to 0-1000."

class BoundingBox(BaseModel):
    box_2d: List[int] = Field(description="The 2D bounding box of the item as [ymin, xmin, ymax, xmax] normalized to 0-1000.")
    mask: List[List[int]] = Field(description="The segmentation mask of the item as a polygon of [x,y] coordinates, normalized to 0-1000.")
    label: str = Field(description="A descriptive label for the item.")

class BoundingBoxes(BaseModel):
    boxes: List[BoundingBox]

interaction = client.interactions.create(
    model="gemini-3.5-flash",
    input=[
        {"type": "text", "text": prompt},
        {
            "type": "image",
            "uri": "https://example.com/image.png",
            "mime_type": "image/png"
        }
    ],
    response_format={
        "type": "text",
        "mime_type": "application/json",
        "schema": BoundingBoxes.model_json_schema()
    }
)

bounding_boxes = BoundingBoxes.model_validate_json(interaction.output_text)
print(bounding_boxes)
JavaScript
import { GoogleGenAI } from "@google/genai";
import * as z from "zod";

const client = new GoogleGenAI({});
const prompt = "Detect the all of the prominent items in the image. The box_2d should be [ymin, xmin, ymax, xmax] normalized to 0-1000.";

const boundingBoxesSchema = z.object({
  boxes: z.array(z.object({
    box_2d: z.array(z.number()),
    mask: z.array(z.array(z.number())),
    label: z.string()
  }))
});

const interaction = await client.interactions.create({
  model: "gemini-3.5-flash",
  input: [
    { type: "text", text: prompt },
    {
      type: "image",
      uri: "https://example.com/image.png",
      mime_type: "image/png"
    }
  ],
  response_format: {
    type: 'text',
    mime_type: 'application/json',
    schema: z.toJSONSchema(boundingBoxesSchema)
  },
});

const result = boundingBoxesSchema.parse(JSON.parse(interaction.output_text));
console.log(result);
REST
curl -X POST "https://generativelanguage.googleapis.com/v1beta/interactions" \
  -H "x-goog-api-key: $GEMINI_API_KEY" \
  -H 'Content-Type: application/json' \
  -d '{
    "model": "gemini-3.5-flash",
    "input": [
      {"type": "text", "text": "Detect the all of the prominent items in the image. The box_2d should be [ymin, xmin, ymax, xmax] normalized to 0-1000."},
      {
        "type": "image",
        "uri": "https://example.com/image.png",
        "mime_type": "image/png"
      }
    ],
    "response_format": {
      "type": "text",
      "mime_type": "application/json",
      "schema": {
        "type": "object",
        "properties": {
          "boxes": {
            "type": "array",
            "items": {
              "type": "object",
              "properties": {
                "box_2d": { "type": "array", "items": { "type": "integer" } },
                "mask": { "type": "array", "items": { "type": "array", "items": { "type": "integer" } } },
                "label": { "type": "string" }
              },
              "required": ["box_2d", "mask", "label"]
            }
          }
        },
        "required": ["boxes"]
      }
    }
  }'
ज़्यादा उदाहरणों के लिए, Gemini Cookbook में ये नोटबुक देखें:
सेगमेंटेशन
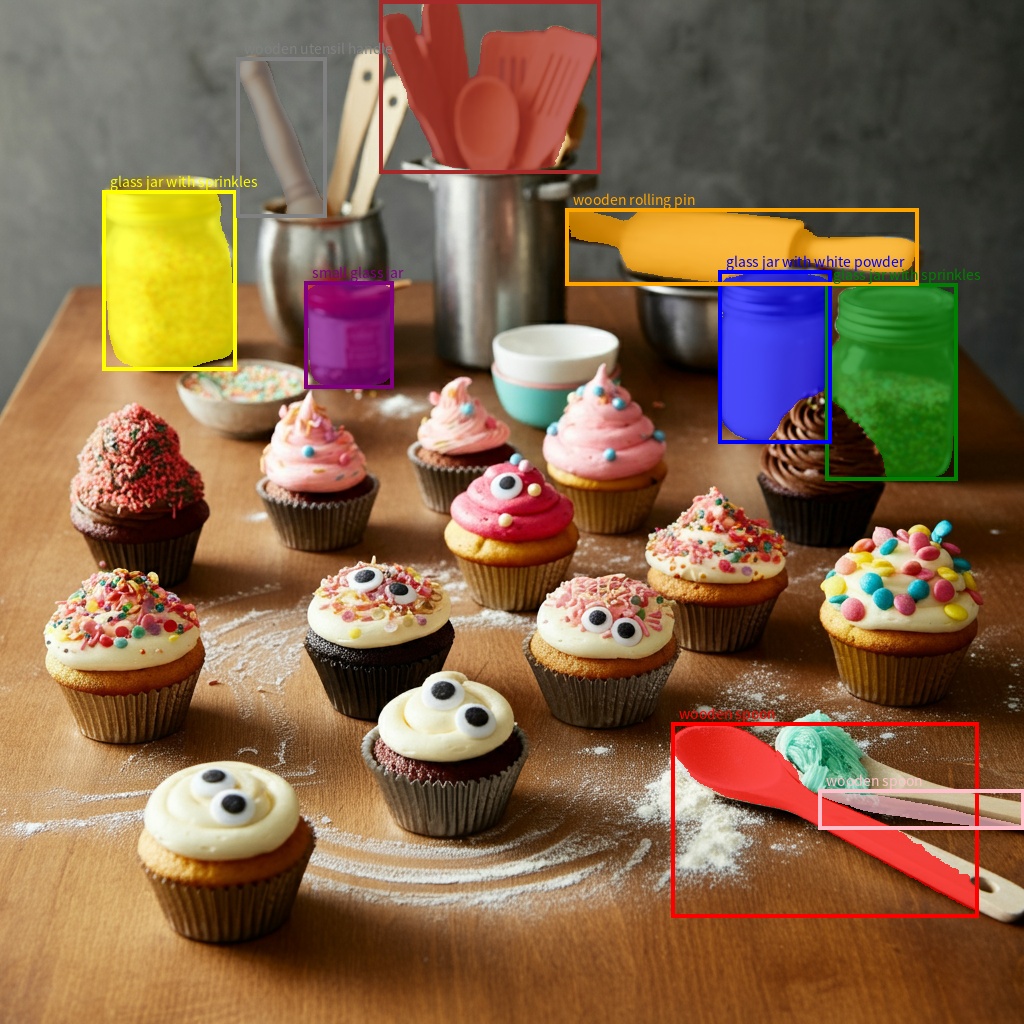
Gemini 2.5 से, मॉडल न सिर्फ़ आइटम का पता लगाते हैं, बल्कि उन्हें सेगमेंट में बांटते हैं और उनके कॉन्टूर मास्क भी उपलब्ध कराते हैं.
मॉडल, JSON की एक सूची का अनुमान लगाता है. इसमें हर आइटम, सेगमेंटेशन मास्क को दिखाता है.
हर आइटम में, बाउंडिंग बॉक्स ("box_2d") होता है. यह [y0, x0, y1, x1] फ़ॉर्मैट में होता है. इसमें 0 से 1000 के बीच सामान्य किए गए कोऑर्डिनेट होते हैं. साथ ही, एक लेबल ("label") होता है, जो ऑब्जेक्ट की पहचान करता है. आखिर में, बाउंडिंग बॉक्स के अंदर सेगमेंटेशन मास्क होता है. यह base64-encoded png के तौर पर होता है. यह एक प्रोबेबिलिटी मैप होता है, जिसकी वैल्यू 0 से 255 के बीच होती है.
Python
from google import genai
from pydantic import BaseModel, Field
from typing import List
import json

client = genai.Client()

prompt = """
Give the segmentation masks for the wooden and glass items.
Output a JSON list of segmentation masks where each entry contains the 2D
bounding box in the key "box_2d", the segmentation mask in key "mask", and
the text label in the key "label". Use descriptive labels.
"""

class BoundingBox(BaseModel):
    box_2d: List[int] = Field(description="The 2D bounding box of the item as [ymin, xmin, ymax, xmax] normalized to 0-1000.")
    mask: List[List[int]] = Field(description="The segmentation mask of the item as a polygon of [x,y] coordinates, normalized to 0-1000.")
    label: str = Field(description="A descriptive label for the item.")

class BoundingBoxes(BaseModel):
    boxes: List[BoundingBox]

interaction = client.interactions.create(
    model="gemini-3.5-flash",
    input=[
        {"type": "text", "text": prompt},
        {
            "type": "image",
            "uri": "https://example.com/image.png",
            "mime_type": "image/png"
        }
    ],
    response_format={
        "type": "text",
        "mime_type": "application/json",
        "schema": BoundingBoxes.model_json_schema()
    },
    generation_config={
        "thinking_level": "minimal"
    }
)

items = BoundingBoxes.model_validate_json(interaction.output_text)
print("Segmentation results:", items)
JavaScript
import { GoogleGenAI } from "@google/genai";
import * as z from "zod";

const client = new GoogleGenAI({});
const prompt = `
Give the segmentation masks for the wooden and glass items.
Output a JSON list of segmentation masks where each entry contains the 2D
bounding box in the key "box_2d", the segmentation mask in key "mask", and
the text label in the key "label". Use descriptive labels.
`;

const boundingBoxesSchema = z.object({
  boxes: z.array(z.object({
    box_2d: z.array(z.number()),
    mask: z.array(z.array(z.number())),
    label: z.string()
  }))
});

const interaction = await client.interactions.create({
  model: "gemini-3.5-flash",
  input: [
    { type: "text", text: prompt },
    {
      type: "image",
      uri: "https://example.com/image.png",
      mime_type: "image/png"
    }
  ],
  response_format: {
    type: 'text',
    mime_type: 'application/json',
    schema: z.toJSONSchema(boundingBoxesSchema)
  },
  generation_config: {
    thinking_level: "minimal"
  }
});

const result = boundingBoxesSchema.parse(JSON.parse(interaction.output_text));
console.log(result);
REST
curl -X POST "https://generativelanguage.googleapis.com/v1beta/interactions" \
  -H "x-goog-api-key: $GEMINI_API_KEY" \
  -H 'Content-Type: application/json' \
  -d '{
    "model": "gemini-3.5-flash",
    "input": [
      {"type": "text", "text": "Give the segmentation masks for the wooden and glass items.\nOutput a JSON list of segmentation masks where each entry contains the 2D\nbounding box in the key \"box_2d\", the segmentation mask in key \"mask\", and\nthe text label in the key \"label\". Use descriptive labels."},
      {
        "type": "image",
        "uri": "https://example.com/image.png",
        "mime_type": "image/png"
      }
    ],
    "response_format": {
      "type": "text",
      "mime_type": "application/json",
      "schema": {
        "type": "object",
        "properties": {
          "boxes": {
            "type": "array",
            "items": {
              "type": "object",
              "properties": {
                "box_2d": { "type": "array", "items": { "type": "integer" } },
                "mask": { "type": "array", "items": { "type": "array", "items": { "type": "integer" } } },
                "label": { "type": "string" }
              },
              "required": ["box_2d", "mask", "label"]
            }
          }
        },
        "required": ["boxes"]
      }
    },
    "generation_config": {
      "thinking_level": "minimal"
    }
  }'
Google Images पर काम करने वाले फ़ॉर्मैट
Gemini, इमेज के इन फ़ॉर्मैट के MIME टाइप के साथ काम करता है:
- PNG -
image/png - JPEG -
image/jpeg - WebP -
image/webp - HEIC -
image/heic - HEIF -
image/heif
फ़ाइल इनपुट के अन्य तरीकों के बारे में जानने के लिए, फ़ाइल इनपुट के तरीके वाली गाइड देखें.
क्षमताएं
Gemini मॉडल के सभी वर्शन मल्टीमोडल हैं. इनका इस्तेमाल, इमेज प्रोसेसिंग और कंप्यूटर विज़न से जुड़े कई टास्क के लिए किया जा सकता है. इनमें इमेज के लिए कैप्शन, विज़ुअल सवाल और जवाब, इमेज क्लासिफ़िकेशन, ऑब्जेक्ट का पता लगाने की सुविधा, और सेगमेंटेशन शामिल है. हालांकि, इन तक ही सीमित नहीं है.
क्वालिटी और परफ़ॉर्मेंस से जुड़ी आपकी ज़रूरतों के हिसाब से, Gemini की मदद से एमएल के खास मॉडल इस्तेमाल करने की ज़रूरत कम हो सकती है.
मॉडल के नए वर्शन को खास तौर पर, खास टास्क की सटीकता को बेहतर बनाने के लिए ट्रेन किया जाता है. इसके अलावा, इनमें सामान्य क्षमताएं भी होती हैं. जैसे, ऑब्जेक्ट का पता लगाने और सेगमेंटेशन की बेहतर सुविधा.
सीमाएं और अहम तकनीकी जानकारी
फ़ाइल की सीमा
Gemini मॉडल, हर अनुरोध के लिए ज़्यादा से ज़्यादा 3,600 इमेज फ़ाइलें इस्तेमाल कर सकते हैं.
टोकन की गिनती
- अगर दोनों डाइमेंशन 384 पिक्सल या उससे कम हैं, तो 258 टोकन. बड़ी इमेज को 768x768 पिक्सल के टाइल में बांटा जाता है. हर टाइल के लिए 258 टोकन लगते हैं.
टाइलों की संख्या कैलकुलेट करने के लिए, यह फ़ॉर्मूला इस्तेमाल किया जा सकता है:
- क्रॉप यूनिट का साइज़ कैलकुलेट करें. यह करीब-करीब:
floor(min(width, height)/ 1.5) होता है. - टाइलों की संख्या पाने के लिए, हर डाइमेंशन को क्रॉप यूनिट के साइज़ से भाग दें और फिर दोनों को गुणा करें.
उदाहरण के लिए, 960x540 डाइमेंशन वाली इमेज के लिए, क्रॉप यूनिट का साइज़ 360 होगा. हर डाइमेंशन को 360 से भाग दें. इसके बाद, टाइलों की संख्या 3 * 2 = 6 होगी.
मीडिया रिज़ॉल्यूशन
Gemini 3 में, media_resolution पैरामीटर की मदद से, मल्टीमोडल विज़न प्रोसेसिंग पर ज़्यादा कंट्रोल मिलता है. media_resolution पैरामीटर, हर इनपुट इमेज या वीडियो फ़्रेम के लिए, ज़्यादा से ज़्यादा टोकन की संख्या तय करता है.
ज़्यादा रिज़ॉल्यूशन से, मॉडल को बारीक टेक्स्ट पढ़ने या छोटी-छोटी बारीकियों की पहचान करने में मदद मिलती है. हालांकि, इससे टोकन का इस्तेमाल और इंतज़ार का समय बढ़ जाता है.
सलाह और सबसे सही तरीके
- पुष्टि करें कि इमेज सही तरीके से रोटेट की गई हैं.
- साफ़ और धुंधली न दिखने वाली इमेज का इस्तेमाल करें.
- टेक्स्ट के साथ एक इमेज का इस्तेमाल करते समय,
inputकलेक्शन में इमेज से पहले टेक्स्ट प्रॉम्प्ट रखें.
आगे क्या करना है
इस गाइड में, इमेज फ़ाइलें अपलोड करने और इमेज इनपुट से टेक्स्ट आउटपुट जनरेट करने का तरीका बताया गया है. ज़्यादा जानने के लिए, ये संसाधन देखें:
- Files API: Gemini के साथ इस्तेमाल करने के लिए, फ़ाइलें अपलोड और मैनेज करने के बारे में ज़्यादा जानें.
- सिस्टम के निर्देश: सिस्टम के निर्देशों की मदद से, अपनी खास ज़रूरतों और इस्तेमाल के मामलों के हिसाब से, मॉडल के व्यवहार को कंट्रोल किया जा सकता है.
- फ़ाइल प्रॉम्प्ट करने की रणनीतियां: Gemini API, टेक्स्ट, इमेज, ऑडियो, और वीडियो डेटा के साथ प्रॉम्प्ट करने की सुविधा देता है. इसे मल्टीमोडल प्रॉम्प्टिंग भी कहा जाता है.
- सुरक्षा से जुड़े दिशा-निर्देश: कभी-कभी, जनरेटिव एआई मॉडल से ऐसे आउटपुट मिलते हैं जिनकी उम्मीद नहीं होती. जैसे, गलत, पक्षपाती या आपत्तिजनक आउटपुट. ऐसे आउटपुट से होने वाले नुकसान के जोखिम को कम करने के लिए, पोस्ट-प्रोसेसिंग और लोगों से आकलन कराना ज़रूरी है.