Gemini モデルは、マルチモーダル AI として一から構築されています。そのため、画像キャプション、分類、視覚的な質問応答など、さまざまな画像処理タスクやコンピュータ ビジョン タスクを、専用の ML モデルをトレーニングすることなく実行できます。
Gemini モデルは、一般的なマルチモーダル機能に加えて、追加のトレーニングにより、オブジェクト検出やセグメンテーションなどの特定のユースケースで精度が向上しています。
Gemini に画像を渡す
Gemini への入力として画像を渡すには、次の複数の方法があります。
- URL を使用して画像を渡す: 一般公開されている画像に最適です。
- インライン画像データの受け渡し: base64 でエンコードされた画像データの場合。
- File API を使用した画像のアップロード: 大きいファイルや、複数のリクエストで画像を再利用する場合におすすめします。
URL を使用して画像を渡す
Files API を使用して画像をアップロードし、リクエストで渡すことができます。
Python
from google import genai

client = genai.Client()

uploaded_file = client.files.upload(file="path/to/organ.jpg")

interaction = client.interactions.create(
    model="gemini-3.5-flash",
    input=[
        {"type": "text", "text": "Caption this image."},
        {
            "type": "image",
            "uri": uploaded_file.uri,
            "mime_type": uploaded_file.mime_type
        }
    ]
)
print(interaction.output_text)
JavaScript
import { GoogleGenAI } from "@google/genai";

const client = new GoogleGenAI({});

const uploadedFile = await client.files.upload({
    file: "path/to/organ.jpg",
    config: { mime_type: "image/jpeg" }
});

const interaction = await client.interactions.create({
    model: "gemini-3.5-flash",
    input: [
        {type: "text", text: "Caption this image."},
        {
            type: "image",
            uri: uploadedFile.uri,
            mime_type: uploadedFile.mimeType
        }
    ]
});
console.log(interaction.output_text);
REST
# First upload the file using the Files API, then use the URI:
curl -X POST "https://generativelanguage.googleapis.com/v1beta/interactions" \
  -H "x-goog-api-key: $GEMINI_API_KEY" \
  -H 'Content-Type: application/json' \
  -d '{
    "model": "gemini-3.5-flash",
    "input": [
      {"type": "text", "text": "Caption this image."},
      {
        "type": "image",
        "uri": "YOUR_FILE_URI",
        "mime_type": "image/jpeg"
      }
    ]
  }'
インライン画像データを渡す
画像データは base64 エンコード文字列として指定できます。
Python
import base64
from google import genai

with open('path/to/small-sample.jpg', 'rb') as f:
    image_bytes = f.read()

client = genai.Client()

interaction = client.interactions.create(
    model="gemini-3.5-flash",
    input=[
        {"type": "text", "text": "Caption this image."},
        {
            "type": "image",
            "data": base64.b64encode(image_bytes).decode('utf-8'),
            "mime_type": "image/jpeg"
        }
    ]
)
print(interaction.output_text)
JavaScript
import { GoogleGenAI } from "@google/genai";
import * as fs from "node:fs";

const client = new GoogleGenAI({});
const base64ImageFile = fs.readFileSync("path/to/small-sample.jpg", {
  encoding: "base64",
});

const interaction = await client.interactions.create({
    model: "gemini-3.5-flash",
    input: [
        {type: "text", text: "Caption this image."},
        {
            type: "image",
            data: base64ImageFile,
            mime_type: "image/jpeg"
        }
    ]
});
console.log(interaction.output_text);
REST
IMG_PATH="/path/to/your/image1.jpg"

if [[ "$(base64 --version 2>&1)" = *"FreeBSD"* ]]; then
  B64FLAGS="--input"
else
  B64FLAGS="-w0"
fi

curl -X POST "https://generativelanguage.googleapis.com/v1beta/interactions" \
  -H "x-goog-api-key: $GEMINI_API_KEY" \
  -H 'Content-Type: application/json' \
  -d '{
    "model": "gemini-3.5-flash",
    "input": [
      {"type": "text", "text": "Caption this image."},
      {
        "type": "image",
        "data": "'"$(base64 $B64FLAGS $IMG_PATH)"'",
        "mime_type": "image/jpeg"
      }
    ]
  }'
File API を使用して画像をアップロードする
大きなファイルの場合や、同じ画像ファイルを繰り返し使用できるようにするには、Files API を使用します。Files API ガイドをご覧ください。
Python
from google import genai

client = genai.Client()

my_file = client.files.upload(file="path/to/sample.jpg")

interaction = client.interactions.create(
    model="gemini-3.5-flash",
    input=[
        {"type": "text", "text": "Caption this image."},
        {
            "type": "image",
            "uri": my_file.uri,
            "mime_type": my_file.mime_type
        }
    ]
)
print(interaction.output_text)
JavaScript
import { GoogleGenAI } from "@google/genai";

const client = new GoogleGenAI({});

const myfile = await client.files.upload({
    file: "path/to/sample.jpg",
    config: { mimeType: "image/jpeg" },
});

const interaction = await client.interactions.create({
    model: "gemini-3.5-flash",
    input: [
        {type: "text", text: "Caption this image."},
        {
            type: "image",
            uri: myfile.uri,
            mime_type: myfile.mimeType
        }
    ]
});
console.log(interaction.output_text);
REST
# First upload the file (see Files API guide for details)
# Then use the file URI in the request:

curl -X POST "https://generativelanguage.googleapis.com/v1beta/interactions" \
  -H "x-goog-api-key: $GEMINI_API_KEY" \
  -H 'Content-Type: application/json' \
  -d '{
    "model": "gemini-3.5-flash",
    "input": [
      {"type": "text", "text": "Caption this image."},
      {
        "type": "image",
        "uri": "YOUR_FILE_URI",
        "mime_type": "image/jpeg"
      }
    ]
  }'
複数の画像を使用したプロンプト
input 配列に複数の画像オブジェクトを含めることで、1 つのプロンプトで複数の画像を指定できます。
Python
from google import genai

client = genai.Client()

interaction = client.interactions.create(
    model="gemini-3.5-flash",
    input=[
        {"type": "text", "text": "What is different between these two images?"},
        {
            "type": "image",
            "uri": "https://example.com/image1.jpg",
            "mime_type": "image/jpeg"
        },
        {
            "type": "image",
            "uri": "https://example.com/image2.jpg",
            "mime_type": "image/jpeg"
        }
    ]
)
print(interaction.output_text)
JavaScript
import { GoogleGenAI } from "@google/genai";

const client = new GoogleGenAI({});

const interaction = await client.interactions.create({
    model: "gemini-3.5-flash",
    input: [
        {type: "text", text: "What is different between these two images?"},
        {
            type: "image",
            uri: "https://example.com/image1.jpg",
            mime_type: "image/jpeg"
        },
        {
            type: "image",
            uri: "https://example.com/image2.jpg",
            mime_type: "image/jpeg"
        }
    ]
});
console.log(interaction.output_text);
REST
curl -X POST "https://generativelanguage.googleapis.com/v1beta/interactions" \
  -H "x-goog-api-key: $GEMINI_API_KEY" \
  -H 'Content-Type: application/json' \
  -d '{
    "model": "gemini-3.5-flash",
    "input": [
      {"type": "text", "text": "What is different between these two images?"},
      {
        "type": "image",
        "uri": "https://example.com/image1.jpg",
        "mime_type": "image/jpeg"
      },
      {
        "type": "image",
        "uri": "https://example.com/image2.jpg",
        "mime_type": "image/jpeg"
      }
    ]
  }'
オブジェクト検出
モデルは、画像内のオブジェクトを検出し、その境界ボックスの座標を取得するようにトレーニングされます。画像の寸法を基準とした座標は、[0, 1000] にスケーリングされます。元の画像サイズに基づいて、これらの座標をスケールダウンする必要があります。
Python
from google import genai
from pydantic import BaseModel, Field
from typing import List
import json

client = genai.Client()
prompt = "Detect the all of the prominent items in the image. The box_2d should be [ymin, xmin, ymax, xmax] normalized to 0-1000."

class BoundingBox(BaseModel):
    box_2d: List[int] = Field(description="The 2D bounding box of the item as [ymin, xmin, ymax, xmax] normalized to 0-1000.")
    mask: List[List[int]] = Field(description="The segmentation mask of the item as a polygon of [x,y] coordinates, normalized to 0-1000.")
    label: str = Field(description="A descriptive label for the item.")

class BoundingBoxes(BaseModel):
    boxes: List[BoundingBox]

interaction = client.interactions.create(
    model="gemini-3.5-flash",
    input=[
        {"type": "text", "text": prompt},
        {
            "type": "image",
            "uri": "https://example.com/image.png",
            "mime_type": "image/png"
        }
    ],
    response_format={
        "type": "text",
        "mime_type": "application/json",
        "schema": BoundingBoxes.model_json_schema()
    }
)

bounding_boxes = BoundingBoxes.model_validate_json(interaction.output_text)
print(bounding_boxes)
JavaScript
import { GoogleGenAI } from "@google/genai";
import * as z from "zod";

const client = new GoogleGenAI({});
const prompt = "Detect the all of the prominent items in the image. The box_2d should be [ymin, xmin, ymax, xmax] normalized to 0-1000.";

const boundingBoxesSchema = z.object({
  boxes: z.array(z.object({
    box_2d: z.array(z.number()),
    mask: z.array(z.array(z.number())),
    label: z.string()
  }))
});

const interaction = await client.interactions.create({
  model: "gemini-3.5-flash",
  input: [
    { type: "text", text: prompt },
    {
      type: "image",
      uri: "https://example.com/image.png",
      mime_type: "image/png"
    }
  ],
  response_format: {
    type: 'text',
    mime_type: 'application/json',
    schema: z.toJSONSchema(boundingBoxesSchema)
  },
});

const result = boundingBoxesSchema.parse(JSON.parse(interaction.output_text));
console.log(result);
REST
curl -X POST "https://generativelanguage.googleapis.com/v1beta/interactions" \
  -H "x-goog-api-key: $GEMINI_API_KEY" \
  -H 'Content-Type: application/json' \
  -d '{
    "model": "gemini-3.5-flash",
    "input": [
      {"type": "text", "text": "Detect the all of the prominent items in the image. The box_2d should be [ymin, xmin, ymax, xmax] normalized to 0-1000."},
      {
        "type": "image",
        "uri": "https://example.com/image.png",
        "mime_type": "image/png"
      }
    ],
    "response_format": {
      "type": "text",
      "mime_type": "application/json",
      "schema": {
        "type": "object",
        "properties": {
          "boxes": {
            "type": "array",
            "items": {
              "type": "object",
              "properties": {
                "box_2d": { "type": "array", "items": { "type": "integer" } },
                "mask": { "type": "array", "items": { "type": "array", "items": { "type": "integer" } } },
                "label": { "type": "string" }
              },
              "required": ["box_2d", "mask", "label"]
            }
          }
        },
        "required": ["boxes"]
      }
    }
  }'
その他の例については、Gemini クックブックの次のノートブックをご覧ください。
セグメンテーション
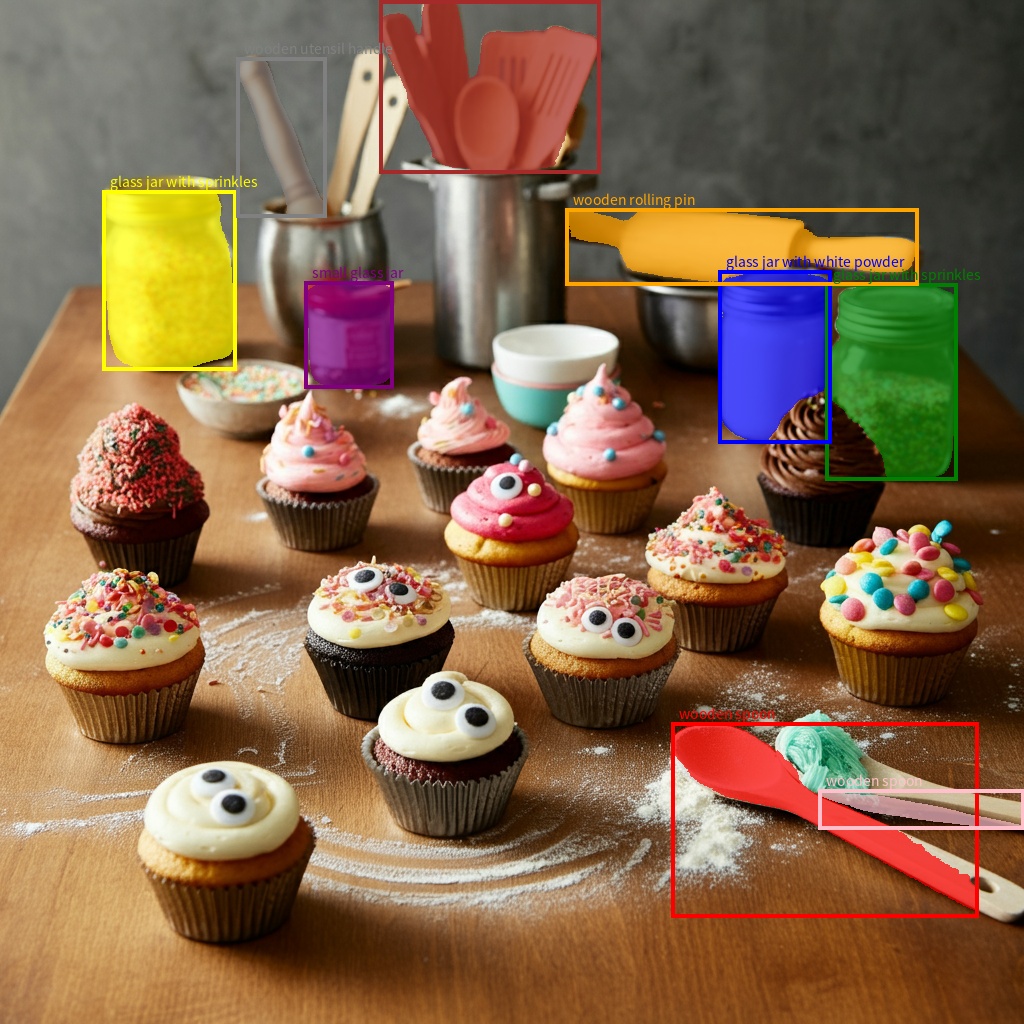
Gemini 2.5 以降では、モデルはアイテムを検出するだけでなく、セグメント化して輪郭マスクを提供します。
モデルは JSON リストを予測します。各項目はセグメンテーション マスクを表します。各アイテムには、0 ~ 1000 の正規化された座標を持つ [y0, x0, y1, x1] 形式の境界ボックス(「box_2d」)、オブジェクトを識別するラベル(「label」)、最後に境界ボックス内のセグメンテーション マスクがあります。これは、0 ~ 255 の値を持つ確率マップである base64 エンコードされた png です。
Python
from google import genai
from pydantic import BaseModel, Field
from typing import List
import json

client = genai.Client()

prompt = """
Give the segmentation masks for the wooden and glass items.
Output a JSON list of segmentation masks where each entry contains the 2D
bounding box in the key "box_2d", the segmentation mask in key "mask", and
the text label in the key "label". Use descriptive labels.
"""

class BoundingBox(BaseModel):
    box_2d: List[int] = Field(description="The 2D bounding box of the item as [ymin, xmin, ymax, xmax] normalized to 0-1000.")
    mask: List[List[int]] = Field(description="The segmentation mask of the item as a polygon of [x,y] coordinates, normalized to 0-1000.")
    label: str = Field(description="A descriptive label for the item.")

class BoundingBoxes(BaseModel):
    boxes: List[BoundingBox]

interaction = client.interactions.create(
    model="gemini-3.5-flash",
    input=[
        {"type": "text", "text": prompt},
        {
            "type": "image",
            "uri": "https://example.com/image.png",
            "mime_type": "image/png"
        }
    ],
    response_format={
        "type": "text",
        "mime_type": "application/json",
        "schema": BoundingBoxes.model_json_schema()
    },
    generation_config={
        "thinking_level": "minimal"
    }
)

items = BoundingBoxes.model_validate_json(interaction.output_text)
print("Segmentation results:", items)
JavaScript
import { GoogleGenAI } from "@google/genai";
import * as z from "zod";

const client = new GoogleGenAI({});
const prompt = `
Give the segmentation masks for the wooden and glass items.
Output a JSON list of segmentation masks where each entry contains the 2D
bounding box in the key "box_2d", the segmentation mask in key "mask", and
the text label in the key "label". Use descriptive labels.
`;

const boundingBoxesSchema = z.object({
  boxes: z.array(z.object({
    box_2d: z.array(z.number()),
    mask: z.array(z.array(z.number())),
    label: z.string()
  }))
});

const interaction = await client.interactions.create({
  model: "gemini-3.5-flash",
  input: [
    { type: "text", text: prompt },
    {
      type: "image",
      uri: "https://example.com/image.png",
      mime_type: "image/png"
    }
  ],
  response_format: {
    type: 'text',
    mime_type: 'application/json',
    schema: z.toJSONSchema(boundingBoxesSchema)
  },
  generation_config: {
    thinking_level: "minimal"
  }
});

const result = boundingBoxesSchema.parse(JSON.parse(interaction.output_text));
console.log(result);
REST
curl -X POST "https://generativelanguage.googleapis.com/v1beta/interactions" \
  -H "x-goog-api-key: $GEMINI_API_KEY" \
  -H 'Content-Type: application/json' \
  -d '{
    "model": "gemini-3.5-flash",
    "input": [
      {"type": "text", "text": "Give the segmentation masks for the wooden and glass items.\nOutput a JSON list of segmentation masks where each entry contains the 2D\nbounding box in the key \"box_2d\", the segmentation mask in key \"mask\", and\nthe text label in the key \"label\". Use descriptive labels."},
      {
        "type": "image",
        "uri": "https://example.com/image.png",
        "mime_type": "image/png"
      }
    ],
    "response_format": {
      "type": "text",
      "mime_type": "application/json",
      "schema": {
        "type": "object",
        "properties": {
          "boxes": {
            "type": "array",
            "items": {
              "type": "object",
              "properties": {
                "box_2d": { "type": "array", "items": { "type": "integer" } },
                "mask": { "type": "array", "items": { "type": "array", "items": { "type": "integer" } } },
                "label": { "type": "string" }
              },
              "required": ["box_2d", "mask", "label"]
            }
          }
        },
        "required": ["boxes"]
      }
    },
    "generation_config": {
      "thinking_level": "minimal"
    }
  }'
サポートされている画像形式
Gemini は、次の画像形式の MIME タイプをサポートしています。
- PNG -
image/png - JPEG -
image/jpeg - WEBP -
image/webp - HEIC -
image/heic - HEIF -
image/heif
その他のファイル入力方法については、ファイル入力方法ガイドをご覧ください。
機能
すべての Gemini モデル バージョンはマルチモーダルであり、画像キャプション、Visual Question & Answering、画像分類、オブジェクト検出、セグメンテーションなど、幅広い画像処理タスクやコンピュータ ビジョン タスクで使用できます。
Gemini は、品質とパフォーマンスの要件に応じて、特殊な ML モデルを使用する必要性を軽減できます。
最新のモデル バージョンは、汎用機能に加えて、オブジェクト検出やセグメンテーションなどの専門的なタスクの精度を向上させるように特別にトレーニングされています。
制限事項と主な技術情報
ファイルの上限
Gemini モデルは、リクエストあたり最大 3,600 個の画像ファイルをサポートしています。
トークンの計算
- 両方の寸法が 384 ピクセル以下の場合、258 個のトークン。大きな画像は 768x768 ピクセルのタイルに分割され、各タイルに 258 個のトークンが使用されます。
タイルの数を計算するおおよその式は次のとおりです。
- 切り抜き単位のサイズ(おおよそ
floor(min(width, height)/ 1.5)を計算します。 - 各ディメンションをクロップ単位サイズで割り、乗算してタイルの数を取得します。
たとえば、960x540 のサイズの画像の場合、切り抜き単位のサイズは 360 になります。各ディメンションを 360 で割ると、タイルの数は 3 * 2 = 6 になります。
メディアの解像度
Gemini 3 では、media_resolution パラメータを使用して、マルチモーダル ビジョン処理をきめ細かく制御できます。media_resolution パラメータは、入力画像または動画フレームごとに割り当てられるトークンの最大数を決定します。解像度が高いほど、モデルが細かいテキストを読み取ったり、小さな詳細を識別する能力が向上しますが、トークンの使用量とレイテンシが増加します。
おすすめの方法やお役立ち情報
- 画像が正しく回転することを確認します。
- 鮮明でぼやけていない画像を使用します。
- テキストを含む 1 つの画像を使用する場合は、
input配列の画像の前にテキスト プロンプトを配置します。
次のステップ
このガイドでは、画像ファイルをアップロードし、画像入力からテキスト出力を生成する方法について説明します。詳細については、次のリソースをご覧ください。
- Files API: Gemini で使用するファイルのアップロードと管理について説明します。
- システム指示: システム指示を使用すると、特定のニーズやユースケースに基づいてモデルの動作を制御できます。
- ファイル プロンプト戦略: Gemini API は、テキスト、画像、音声、動画データを使用したプロンプト(マルチモーダル プロンプトとも呼ばれます)をサポートしています。
- 安全に関するガイダンス: 生成 AI モデルは、不正確、偏見がある、不快な出力など、予期しない出力を生成することがあります。このような出力による危害のリスクを軽減するには、後処理と人間による評価が不可欠です。