

Gemini Robotics ER 模型可以指向物体,在视频中跟踪物体,用边界框检测物体,并生成运动轨迹。
如需查看完整的可运行代码,请参阅机器人技术食谱。
指向对象
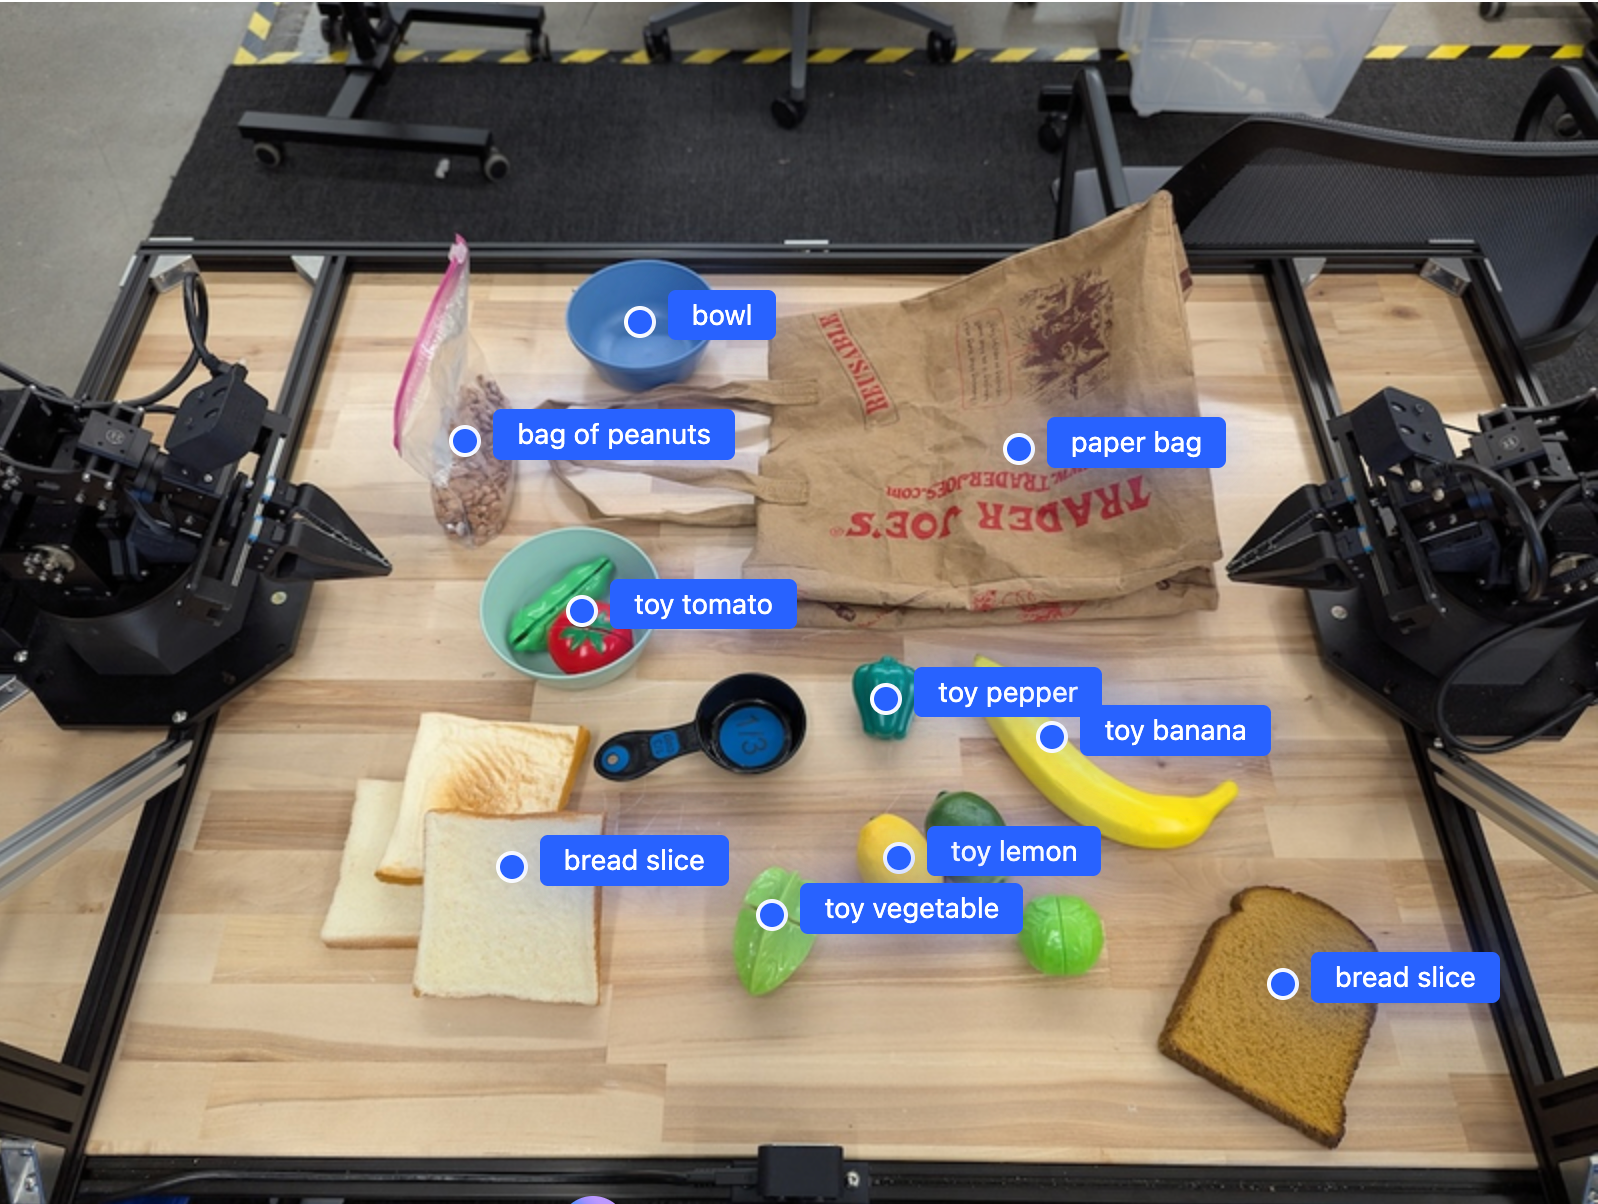
以下示例用于查找图片中的特定对象并返回其归一化的 [y, x] 坐标:
Python
from google import genai

PROMPT = """
          Point to no more than 10 items in the image. The label returned
          should be an identifying name for the object detected.
          The answer should follow the json format: [{"point": <point>,
          "label": <label1>}, ...]. The points are in [y, x] format
          normalized to 0-1000.
        """
client = genai.Client()

uploaded_file = client.files.upload(file="my-image.png")

image_response = client.interactions.create(
    model="gemini-robotics-er-2-preview",
    input=[
        {
            "type": "image",
            "uri": uploaded_file.uri,
            "mime_type": uploaded_file.mime_type
        },
        {"type": "text", "text": PROMPT}
    ],
    generation_config={"thinking_level": "high"},
)

print(image_response.output_text)
REST
# First, ensure you have the image file locally.
# Encode the image to base64
IMAGE_BASE64=$(base64 -w 0 my-image.png)

curl -X POST \
  "https://generativelanguage.googleapis.com/v1beta/interactions" \
  -H "x-goog-api-key: $GEMINI_API_KEY" \
  -H "Content-Type: application/json" \
  -d '{
    "model": "gemini-robotics-er-2-preview",
    "input": {
      "parts": [
        {
          "inlineData": {
            "mimeType": "image/png",
            "data": "'"${IMAGE_BASE64}"'"
          }
        },
        {
          "text": "Point to no more than 10 items in the image. The label returned should be an identifying name for the object detected. The answer should follow the json format: [{\"point\": [y, x], \"label\": <label1>}, ...]. The points are in [y, x] format normalized to 0-1000."
        }
      ]
    },
    "generation_config": {
      "thinking_config": {
        "thinking_level": "high"
      }
    }
  }'
输出将是一个包含对象的 JSON 数组,每个对象都包含一个 point(归一化的 [y, x] 坐标)和一个用于标识对象的 label。
JSON
[
  {"point": [376, 508], "label": "small banana"},
  {"point": [287, 609], "label": "larger banana"},
  {"point": [223, 303], "label": "pink starfruit"},
  {"point": [435, 172], "label": "paper bag"},
  {"point": [270, 786], "label": "green plastic bowl"},
  {"point": [488, 775], "label": "metal measuring cup"},
  {"point": [673, 580], "label": "dark blue bowl"},
  {"point": [471, 353], "label": "light blue bowl"},
  {"point": [492, 497], "label": "bread"},
  {"point": [525, 429], "label": "lime"}
]
下图展示了如何显示这些点:
跟踪视频中的对象
Gemini Robotics ER 2 还可以分析视频帧,以跟踪一段时间内的对象。如需查看支持的视频格式列表,请参阅视频输入。
Python
from google import genai

client = genai.Client()

uploaded_file = client.files.upload(file="my-video.mp4")

prompt = """
          Point to the red ball in every frame where it appears.
          The answer should follow the json format: [{"point": [y, x],
          "label": <label>}, ...]. The points are in [y, x] format
          normalized to 0-1000. Return one entry per frame that contains
          the object.
        """

image_response = client.interactions.create(
  model="gemini-robotics-er-2-preview",
  input=[
    {
        "type": "video",
        "uri": uploaded_file.uri,
        "mime_type": uploaded_file.mime_type
    },
    {"type": "text", "text": prompt}
  ],
)

print(image_response.output_text)
对象检测和边界框
除了点之外,您还可以提示模型返回 2D 边界框,从而为检测到的对象提供更多空间细节。
Python
from google import genai

client = genai.Client()

uploaded_file = client.files.upload(file="my-image.png")

prompt = """
          Detect all objects in this image and return bounding boxes.
          The answer should follow the JSON format:
          [{"label": <label>, "y": <y_min>, "x": <x_min>,
            "y2": <y_max>, "x2": <x_max>}, ...]
          where coordinates are normalized to 0-1000.
        """

image_response = client.interactions.create(
  model="gemini-robotics-er-2-preview",
  input=[
    {
        "type": "image",
        "uri": uploaded_file.uri,
        "mime_type": uploaded_file.mime_type
    },
    {"type": "text", "text": prompt}
  ],
)

print(image_response.output_text)
轨迹
Gemini Robotics ER 2 可以生成定义轨迹的点序列,有助于引导机器人运动。
此示例请求将红笔移动到整理器的轨迹,包括对中间途经点的估计。代码已缩减,仅显示提示。
Python
prompt = """
          Generate a trajectory for the robotic arm to pick up the red pen
          and place it in the organizer. Return a list of waypoints as JSON:
          [{"step": <int>, "point": [y, x], "action": <description>}, ...]
          where coordinates are normalized to 0-1000.
        """
为笔记本电脑腾出空间
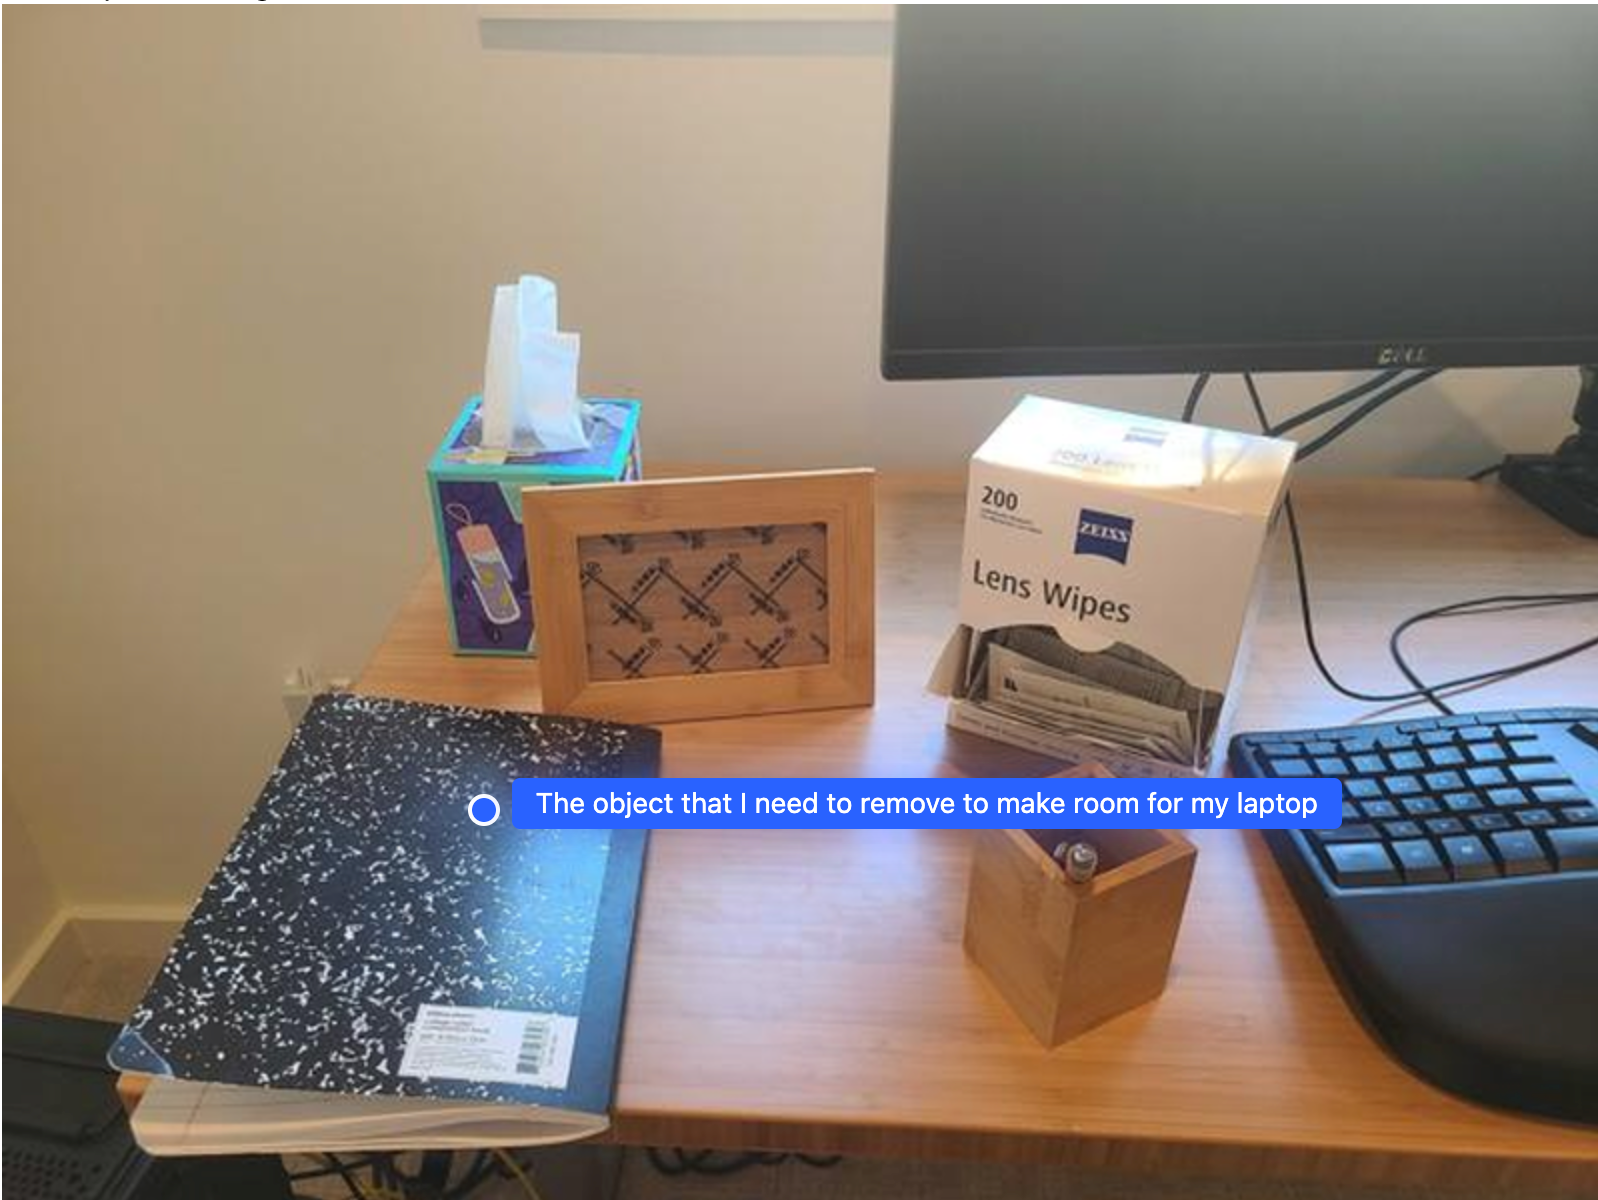
此示例展示了 Gemini Robotics ER 如何对空间进行推理。此提示要求模型确定需要移动哪个对象才能为另一项物品腾出空间。
Python
from google import genai

client = genai.Client()

uploaded_file = client.files.upload(file="path/to/image-with-objects.jpg")

prompt = """
          Point to the object that I need to remove to make room for my laptop
          The answer should follow the JSON format: [{"point": <point>,
          "label": <label1>}, ...]. The points are in [y, x] format normalized to 0-1000.
        """

image_response = client.interactions.create(
  model="gemini-robotics-er-2-preview",
  input=[
    {
        "type": "image",
        "uri": uploaded_file.uri,
        "mime_type": uploaded_file.mime_type
    },
    {"type": "text", "text": prompt}
  ],
)

print(image_response.output_text)
响应包含回答用户问题的对象的二维坐标,在本例中,该对象应移动以腾出空间放置笔记本电脑。
[
  {"point": [672, 301], "label": "The object that I need to remove to make room for my laptop"}
]
打包午餐
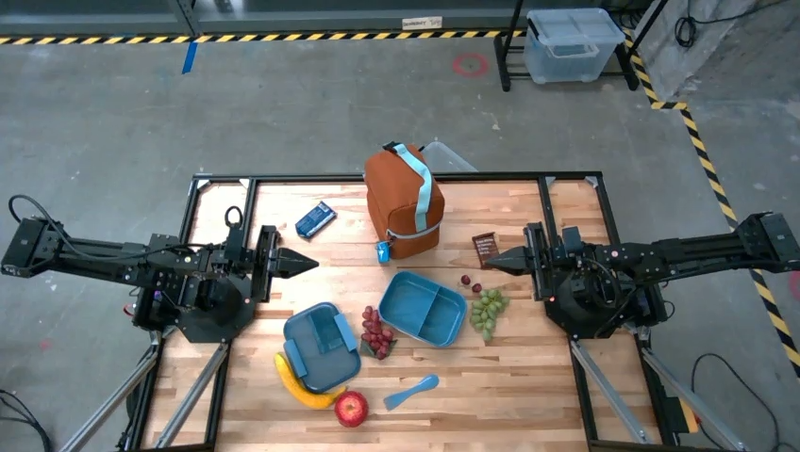
该模型还可以为多步骤任务提供指令,并指出每个步骤的相关对象。此示例展示了模型如何规划一系列步骤来打包午餐袋。
Python
from google import genai

client = genai.Client()

uploaded_file = client.files.upload(file="path/to/image-of-lunch.jpg")

prompt = """
          Explain how to pack the lunch box and lunch bag. Point to each
          object that you refer to. Each point should be in the format:
          [{"point": [y, x], "label": }], where the coordinates are
          normalized between 0-1000.
        """

image_response = client.interactions.create(
  model="gemini-robotics-er-2-preview",
  input=[
    {
        "type": "image",
        "uri": uploaded_file.uri,
        "mime_type": uploaded_file.mime_type
    },
    {"type": "text", "text": prompt}
  ],
)

print(image_response.output_text)
此提示的回答是一组关于如何打包图片输入中的午餐袋的分步说明。
输入图片
模型输出
Based on the image, here is a plan to pack the lunch box and lunch bag:

1.  **Pack the fruit into the lunch box.** Place the [apple](apple), [banana](banana), [red grapes](red grapes), and [green grapes](green grapes) into the [blue lunch box](blue lunch box).
2.  **Add the spoon to the lunch box.** Put the [blue spoon](blue spoon) inside the lunch box as well.
3.  **Close the lunch box.** Secure the lid on the [blue lunch box](blue lunch box).
4.  **Place the lunch box inside the lunch bag.** Put the closed [blue lunch box](blue lunch box) into the [brown lunch bag](brown lunch bag).
5.  **Pack the remaining items into the lunch bag.** Place the [blue snack bar](blue snack bar) and the [brown snack bar](brown snack bar) into the [brown lunch bag](brown lunch bag).

Here is the list of objects and their locations:
*   [{"point": [899, 440], "label": "apple"}]
*   [{"point": [814, 363], "label": "banana"}]
*   [{"point": [727, 470], "label": "red grapes"}]
*   [{"point": [675, 608], "label": "green grapes"}]
*   [{"point": [706, 529], "label": "blue lunch box"}]
*   [{"point": [864, 517], "label": "blue spoon"}]
*   [{"point": [499, 401], "label": "blue snack bar"}]
*   [{"point": [614, 705], "label": "brown snack bar"}]
*   [{"point": [448, 501], "label": "brown lunch bag"}]
后续步骤
- 智能体功能 - 代码执行、仪器读数、图片注释。
- 任务编排 - 使用自定义机器人 API 的长时程任务。
- 支持流式传输的机器人 - 实时双向流式传输(仅限 Gemini Robotics ER 2)。
- 视频理解 - 时刻查找和进度分类(仅限 Gemini Robotics ER 2)。