জেমিনি মডেলগুলো একেবারে গোড়া থেকেই মাল্টিমোডাল হিসেবে তৈরি করা হয়েছে, যা বিশেষায়িত এমএল মডেলকে প্রশিক্ষণ না দিয়েই ইমেজ ক্যাপশনিং, ক্লাসিফিকেশন এবং ভিজ্যুয়াল কোয়েশ্চেন অ্যানসারিং-এর মতো বিস্তৃত পরিসরের ইমেজ প্রসেসিং ও কম্পিউটার ভিশন টাস্ক সম্পাদনের সুযোগ করে দেয়।
তাদের সাধারণ মাল্টিমোডাল সক্ষমতার পাশাপাশি, জেমিনি মডেলগুলো অতিরিক্ত প্রশিক্ষণের মাধ্যমে অবজেক্ট ডিটেকশন এবং সেগমেন্টেশনের মতো নির্দিষ্ট ব্যবহারের ক্ষেত্রে উন্নততর নির্ভুলতা প্রদান করে।
মিথুন রাশিতে ছবি পাঠানো হচ্ছে
আপনি বিভিন্ন পদ্ধতি ব্যবহার করে জেমিনিতে ইনপুট হিসেবে ছবি সরবরাহ করতে পারেন:
- URL ব্যবহার করে ছবি পাঠানো : সর্বজনীনভাবে প্রবেশযোগ্য ছবির জন্য আদর্শ।
- ইনলাইন ইমেজ ডেটা প্রদান : বেস৬৪-এনকোডেড ইমেজ ডেটার জন্য।
- ফাইল এপিআই ব্যবহার করে ছবি আপলোড করা : বড় আকারের ফাইলের জন্য অথবা একাধিক অনুরোধে ছবি পুনরায় ব্যবহার করার জন্য এটি সুপারিশ করা হয়।
URL ব্যবহার করে ছবি পাঠানো
আপনি ফাইলস এপিআই (Files API) ব্যবহার করে একটি ছবি আপলোড করতে পারেন এবং অনুরোধে তা পাস করতে পারেন:
পাইথন
from google import genai

client = genai.Client()

uploaded_file = client.files.upload(file="path/to/organ.jpg")

interaction = client.interactions.create(
    model="gemini-3.5-flash",
    input=[
        {"type": "text", "text": "Caption this image."},
        {
            "type": "image",
            "uri": uploaded_file.uri,
            "mime_type": uploaded_file.mime_type
        }
    ]
)
print(interaction.output_text)
জাভাস্ক্রিপ্ট
import { GoogleGenAI } from "@google/genai";

const client = new GoogleGenAI({});

const uploadedFile = await client.files.upload({
    file: "path/to/organ.jpg",
    config: { mimeType: "image/jpeg" }
});

const interaction = await client.interactions.create({
    model: "gemini-3.5-flash",
    input: [
        {type: "text", text: "Caption this image."},
        {
            type: "image",
            uri: uploadedFile.uri,
            mime_type: uploadedFile.mimeType
        }
    ]
});
console.log(interaction.output_text);
বিশ্রাম
# First upload the file using the Files API, then use the URI:
curl -X POST "https://generativelanguage.googleapis.com/v1beta/interactions" \
  -H "x-goog-api-key: $GEMINI_API_KEY" \
  -H 'Content-Type: application/json' \
  -d '{
    "model": "gemini-3.5-flash",
    "input": [
      {"type": "text", "text": "Caption this image."},
      {
        "type": "image",
        "uri": "YOUR_FILE_URI",
        "mime_type": "image/jpeg"
      }
    ]
  }'
ইনলাইন ইমেজ ডেটা পাস করা
আপনি ছবির ডেটা বেস৬৪-এনকোডেড স্ট্রিং হিসেবে প্রদান করতে পারেন:
পাইথন
import base64
from google import genai

with open('path/to/small-sample.jpg', 'rb') as f:
    image_bytes = f.read()

client = genai.Client()

interaction = client.interactions.create(
    model="gemini-3.5-flash",
    input=[
        {"type": "text", "text": "Caption this image."},
        {
            "type": "image",
            "data": base64.b64encode(image_bytes).decode('utf-8'),
            "mime_type": "image/jpeg"
        }
    ]
)
print(interaction.output_text)
জাভাস্ক্রিপ্ট
import { GoogleGenAI } from "@google/genai";
import * as fs from "node:fs";

const client = new GoogleGenAI({});
const base64ImageFile = fs.readFileSync("path/to/small-sample.jpg", {
  encoding: "base64",
});

const interaction = await client.interactions.create({
    model: "gemini-3.5-flash",
    input: [
        {type: "text", text: "Caption this image."},
        {
            type: "image",
            data: base64ImageFile,
            mime_type: "image/jpeg"
        }
    ]
});
console.log(interaction.output_text);
বিশ্রাম
IMG_PATH="/path/to/your/image1.jpg"

if [[ "$(base64 --version 2>&1)" = *"FreeBSD"* ]]; then
  B64FLAGS="--input"
else
  B64FLAGS="-w0"
fi

curl -X POST "https://generativelanguage.googleapis.com/v1beta/interactions" \
  -H "x-goog-api-key: $GEMINI_API_KEY" \
  -H 'Content-Type: application/json' \
  -d '{
    "model": "gemini-3.5-flash",
    "input": [
      {"type": "text", "text": "Caption this image."},
      {
        "type": "image",
        "data": "'"$(base64 $B64FLAGS $IMG_PATH)"'",
        "mime_type": "image/jpeg"
      }
    ]
  }'
ফাইল এপিআই ব্যবহার করে ছবি আপলোড করা
বড় ফাইলের জন্য অথবা একই ইমেজ ফাইল বারবার ব্যবহার করার জন্য ফাইলস এপিআই (Files API) ব্যবহার করুন। ফাইলস এপিআই গাইডটি দেখুন।
পাইথন
from google import genai

client = genai.Client()

my_file = client.files.upload(file="path/to/sample.jpg")

interaction = client.interactions.create(
    model="gemini-3.5-flash",
    input=[
        {"type": "text", "text": "Caption this image."},
        {
            "type": "image",
            "uri": my_file.uri,
            "mime_type": my_file.mime_type
        }
    ]
)
print(interaction.output_text)
জাভাস্ক্রিপ্ট
import { GoogleGenAI } from "@google/genai";

const client = new GoogleGenAI({});

const myfile = await client.files.upload({
    file: "path/to/sample.jpg",
    config: { mimeType: "image/jpeg" },
});

const interaction = await client.interactions.create({
    model: "gemini-3.5-flash",
    input: [
        {type: "text", text: "Caption this image."},
        {
            type: "image",
            uri: myfile.uri,
            mime_type: myfile.mimeType
        }
    ]
});
console.log(interaction.output_text);
বিশ্রাম
# First upload the file (see Files API guide for details)
# Then use the file URI in the request:

curl -X POST "https://generativelanguage.googleapis.com/v1beta/interactions" \
  -H "x-goog-api-key: $GEMINI_API_KEY" \
  -H 'Content-Type: application/json' \
  -d '{
    "model": "gemini-3.5-flash",
    "input": [
      {"type": "text", "text": "Caption this image."},
      {
        "type": "image",
        "uri": "YOUR_FILE_URI",
        "mime_type": "image/jpeg"
      }
    ]
  }'
একাধিক ছবি দিয়ে প্রম্পট করা
input অ্যারেতে একাধিক ইমেজ অবজেক্ট অন্তর্ভুক্ত করার মাধ্যমে আপনি একটিমাত্র প্রম্পটে একাধিক ছবি প্রদান করতে পারেন:
পাইথন
from google import genai

client = genai.Client()

interaction = client.interactions.create(
    model="gemini-3.5-flash",
    input=[
        {"type": "text", "text": "What is different between these two images?"},
        {
            "type": "image",
            "uri": "https://example.com/image1.jpg",
            "mime_type": "image/jpeg"
        },
        {
            "type": "image",
            "uri": "https://example.com/image2.jpg",
            "mime_type": "image/jpeg"
        }
    ]
)
print(interaction.output_text)
জাভাস্ক্রিপ্ট
import { GoogleGenAI } from "@google/genai";

const client = new GoogleGenAI({});

const interaction = await client.interactions.create({
    model: "gemini-3.5-flash",
    input: [
        {type: "text", text: "What is different between these two images?"},
        {
            type: "image",
            uri: "https://example.com/image1.jpg",
            mime_type: "image/jpeg"
        },
        {
            type: "image",
            uri: "https://example.com/image2.jpg",
            mime_type: "image/jpeg"
        }
    ]
});
console.log(interaction.output_text);
বিশ্রাম
curl -X POST "https://generativelanguage.googleapis.com/v1beta/interactions" \
  -H "x-goog-api-key: $GEMINI_API_KEY" \
  -H 'Content-Type: application/json' \
  -d '{
    "model": "gemini-3.5-flash",
    "input": [
      {"type": "text", "text": "What is different between these two images?"},
      {
        "type": "image",
        "uri": "https://example.com/image1.jpg",
        "mime_type": "image/jpeg"
      },
      {
        "type": "image",
        "uri": "https://example.com/image2.jpg",
        "mime_type": "image/jpeg"
      }
    ]
  }'
বস্তু সনাক্তকরণ
একটি ছবিতে বস্তু শনাক্ত করতে এবং সেগুলোর বাউন্ডিং বক্সের স্থানাঙ্ক পেতে মডেলগুলোকে প্রশিক্ষণ দেওয়া হয়। ছবির আকারের সাপেক্ষে, এই স্থানাঙ্কগুলো [0, 1000] পরিসরে পরিবর্তিত হয়। আপনার মূল ছবির আকারের উপর ভিত্তি করে এই স্থানাঙ্কগুলোকে ডিস্কেল করতে হবে।
পাইথন
from google import genai
from pydantic import BaseModel, Field
from typing import List
import json

client = genai.Client()
prompt = "Detect the all of the prominent items in the image. The box_2d should be [ymin, xmin, ymax, xmax] normalized to 0-1000."

class BoundingBox(BaseModel):
    box_2d: List[int] = Field(description="The 2D bounding box of the item as [ymin, xmin, ymax, xmax] normalized to 0-1000.")
    mask: List[List[int]] = Field(description="The segmentation mask of the item as a polygon of [x,y] coordinates, normalized to 0-1000.")
    label: str = Field(description="A descriptive label for the item.")

class BoundingBoxes(BaseModel):
    boxes: List[BoundingBox]

interaction = client.interactions.create(
    model="gemini-3.5-flash",
    input=[
        {"type": "text", "text": prompt},
        {
            "type": "image",
            "uri": "https://example.com/image.png",
            "mime_type": "image/png"
        }
    ],
    response_format={
        "type": "text",
        "mime_type": "application/json",
        "schema": BoundingBoxes.model_json_schema()
    }
)

bounding_boxes = BoundingBoxes.model_validate_json(interaction.output_text)
print(bounding_boxes)
জাভাস্ক্রিপ্ট
import { GoogleGenAI } from "@google/genai";
import * as z from "zod";

const client = new GoogleGenAI({});
const prompt = "Detect the all of the prominent items in the image. The box_2d should be [ymin, xmin, ymax, xmax] normalized to 0-1000.";

const boundingBoxesSchema = z.object({
  boxes: z.array(z.object({
    box_2d: z.array(z.number()),
    mask: z.array(z.array(z.number())),
    label: z.string()
  }))
});

const interaction = await client.interactions.create({
  model: "gemini-3.5-flash",
  input: [
    { type: "text", text: prompt },
    {
      type: "image",
      uri: "https://example.com/image.png",
      mime_type: "image/png"
    }
  ],
  response_format: {
    type: 'text',
    mime_type: 'application/json',
    schema: z.toJSONSchema(boundingBoxesSchema)
  },
});

const result = boundingBoxesSchema.parse(JSON.parse(interaction.output_text));
console.log(result);
বিশ্রাম
curl -X POST "https://generativelanguage.googleapis.com/v1beta/interactions" \
  -H "x-goog-api-key: $GEMINI_API_KEY" \
  -H 'Content-Type: application/json' \
  -d '{
    "model": "gemini-3.5-flash",
    "input": [
      {"type": "text", "text": "Detect the all of the prominent items in the image. The box_2d should be [ymin, xmin, ymax, xmax] normalized to 0-1000."},
      {
        "type": "image",
        "uri": "https://example.com/image.png",
        "mime_type": "image/png"
      }
    ],
    "response_format": {
      "type": "text",
      "mime_type": "application/json",
      "schema": {
        "type": "object",
        "properties": {
          "boxes": {
            "type": "array",
            "items": {
              "type": "object",
              "properties": {
                "box_2d": { "type": "array", "items": { "type": "integer" } },
                "mask": { "type": "array", "items": { "type": "array", "items": { "type": "integer" } } },
                "label": { "type": "string" }
              },
              "required": ["box_2d", "mask", "label"]
            }
          }
        },
        "required": ["boxes"]
      }
    }
  }'
আরও উদাহরণের জন্য জেমিনি কুকবুক দেখুন।
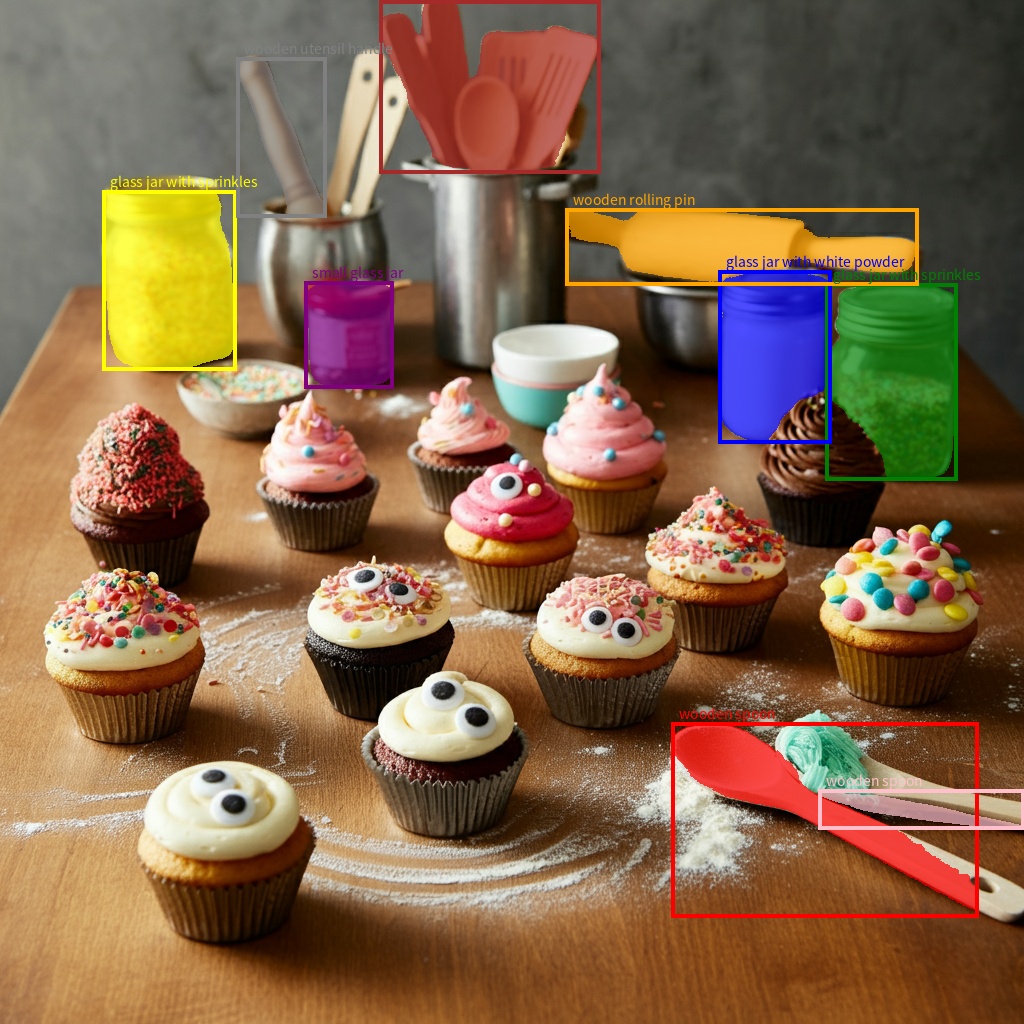
বিভাজন
জেমিনি মডেলগুলো শুধু বস্তু শনাক্তই করে না, বরং সেগুলোকে বিভক্ত করে এবং তাদের কনট্যুর মাস্কও প্রদান করে।
মডেলটি একটি JSON তালিকা প্রেডিক্ট করে, যেখানে প্রতিটি আইটেম একটি সেগমেন্টেশন মাস্ককে প্রতিনিধিত্ব করে। প্রতিটি আইটেমের একটি বাউন্ডিং বক্স (" box_2d ") থাকে, যা [ymin, xmin, ymax, xmax] ফরম্যাটে ০ থেকে ১০০০-এর মধ্যে নর্মালাইজড স্থানাঙ্ক সহ থাকে; একটি লেবেল (" label ") থাকে যা অবজেক্টটিকে শনাক্ত করে; এবং সবশেষে বাউন্ডিং বক্সের ভিতরে সেগমেন্টেশন মাস্কটি থাকে, যা ০-১০০০-এ নর্মালাইজড [x, y] স্থানাঙ্কের একটি বহুভুজ।
পাইথন
from google import genai
from pydantic import BaseModel, Field
from typing import List
import json

client = genai.Client()

prompt = """
Give the segmentation masks for the wooden and glass items.
Output a JSON list of segmentation masks where each entry contains the 2D
bounding box in the key "box_2d", the segmentation mask in key "mask", and
the text label in the key "label". Use descriptive labels.
"""

class BoundingBox(BaseModel):
    box_2d: List[int] = Field(description="The 2D bounding box of the item as [ymin, xmin, ymax, xmax] normalized to 0-1000.")
    mask: List[List[int]] = Field(description="The segmentation mask of the item as a polygon of [x,y] coordinates, normalized to 0-1000.")
    label: str = Field(description="A descriptive label for the item.")

class BoundingBoxes(BaseModel):
    boxes: List[BoundingBox]

interaction = client.interactions.create(
    model="gemini-3.5-flash",
    input=[
        {"type": "text", "text": prompt},
        {
            "type": "image",
            "uri": "https://example.com/image.png",
            "mime_type": "image/png"
        }
    ],
    response_format={
        "type": "text",
        "mime_type": "application/json",
        "schema": BoundingBoxes.model_json_schema()
    },
    generation_config={
        "thinking_level": "minimal"
    }
)

items = BoundingBoxes.model_validate_json(interaction.output_text)
print("Segmentation results:", items)
জাভাস্ক্রিপ্ট
import { GoogleGenAI } from "@google/genai";
import * as z from "zod";

const client = new GoogleGenAI({});
const prompt = `
Give the segmentation masks for the wooden and glass items.
Output a JSON list of segmentation masks where each entry contains the 2D
bounding box in the key "box_2d", the segmentation mask in key "mask", and
the text label in the key "label". Use descriptive labels.
`;

const boundingBoxesSchema = z.object({
  boxes: z.array(z.object({
    box_2d: z.array(z.number()),
    mask: z.array(z.array(z.number())),
    label: z.string()
  }))
});

const interaction = await client.interactions.create({
  model: "gemini-3.5-flash",
  input: [
    { type: "text", text: prompt },
    {
      type: "image",
      uri: "https://example.com/image.png",
      mime_type: "image/png"
    }
  ],
  response_format: {
    type: 'text',
    mime_type: 'application/json',
    schema: z.toJSONSchema(boundingBoxesSchema)
  },
  generation_config: {
    thinking_level: "minimal"
  }
});

const result = boundingBoxesSchema.parse(JSON.parse(interaction.output_text));
console.log(result);
বিশ্রাম
curl -X POST "https://generativelanguage.googleapis.com/v1beta/interactions" \
  -H "x-goog-api-key: $GEMINI_API_KEY" \
  -H 'Content-Type: application/json' \
  -d '{
    "model": "gemini-3.5-flash",
    "input": [
      {"type": "text", "text": "Give the segmentation masks for the wooden and glass items.\nOutput a JSON list of segmentation masks where each entry contains the 2D\nbounding box in the key \"box_2d\", the segmentation mask in key \"mask\", and\nthe text label in the key \"label\". Use descriptive labels."},
      {
        "type": "image",
        "uri": "https://example.com/image.png",
        "mime_type": "image/png"
      }
    ],
    "response_format": {
      "type": "text",
      "mime_type": "application/json",
      "schema": {
        "type": "object",
        "properties": {
          "boxes": {
            "type": "array",
            "items": {
              "type": "object",
              "properties": {
                "box_2d": { "type": "array", "items": { "type": "integer" } },
                "mask": { "type": "array", "items": { "type": "array", "items": { "type": "integer" } } },
                "label": { "type": "string" }
              },
              "required": ["box_2d", "mask", "label"]
            }
          }
        },
        "required": ["boxes"]
      }
    },
    "generation_config": {
      "thinking_level": "minimal"
    }
  }'
সমর্থিত ছবির ফরম্যাট
জেমিনি নিম্নলিখিত ইমেজ ফরম্যাট MIME টাইপগুলো সমর্থন করে:
- PNG -
image/png - JPEG -
image/jpeg - WEBP -
image/webp - HEIC -
image/heic - HEIF -
image/heif
অন্যান্য ফাইল ইনপুট পদ্ধতি সম্পর্কে জানতে, ফাইল ইনপুট পদ্ধতি নির্দেশিকাটি দেখুন।
সক্ষমতা
জেমিনি মডেলের সকল সংস্করণই মাল্টিমোডাল এবং এগুলোকে ইমেজ ক্যাপশনিং, ভিজ্যুয়াল প্রশ্নোত্তর, ইমেজ ক্লাসিফিকেশন, অবজেক্ট ডিটেকশন ও সেগমেন্টেশন সহ বিভিন্ন ধরনের ইমেজ প্রসেসিং এবং কম্পিউটার ভিশন কাজে ব্যবহার করা যায়।
আপনার গুণমান এবং কর্মক্ষমতার প্রয়োজনীয়তার উপর নির্ভর করে জেমিনি বিশেষায়িত এমএল মডেল ব্যবহারের প্রয়োজনীয়তা কমাতে পারে।
সর্বশেষ মডেল সংস্করণগুলিকে উন্নত বস্তু শনাক্তকরণ এবং বিভাজনের মতো সাধারণ সক্ষমতার পাশাপাশি বিশেষায়িত কাজগুলির নির্ভুলতা উন্নত করার জন্য বিশেষভাবে প্রশিক্ষণ দেওয়া হয়।
সীমাবদ্ধতা এবং মূল প্রযুক্তিগত তথ্য
ফাইলের সীমা
জেমিনি মডেলগুলো প্রতি অনুরোধে সর্বোচ্চ ৩,৬০০টি ইমেজ ফাইল সমর্থন করে।
টোকেন গণনা
- উভয় মাত্রা ৩৮৪ পিক্সেল বা তার কম হলে ২৫৮টি টোকেন প্রয়োজন। এর চেয়ে বড় ছবিগুলোকে ৭৬৮x৭৬৮ পিক্সেলের টাইলে ভাগ করা হয়, যার প্রতিটির জন্য ২৫৮টি টোকেন খরচ হয়।
টাইলসের সংখ্যা গণনা করার একটি মোটামুটি সূত্র নিচে দেওয়া হলো:
- শস্য এককের আকার গণনা করুন যা মোটামুটি:
floor(min(width, height)/ 1.5)। - প্রতিটি মাত্রাকে শস্য এককের আকার দিয়ে ভাগ করুন এবং টাইলসের সংখ্যা পেতে সেগুলোকে একসাথে গুণ করুন।
উদাহরণস্বরূপ, 960x540 মাপের একটি ছবির জন্য ক্রপ ইউনিট সাইজ হবে 360। প্রতিটি মাপকে 360 দিয়ে ভাগ করলে টাইলের সংখ্যা হবে 3 * 2 = 6।
মিডিয়া রেজোলিউশন
জেমিনি ৩, media_resolution প্যারামিটারের মাধ্যমে মাল্টিমোডাল ভিশন প্রসেসিংয়ের উপর সূক্ষ্ম নিয়ন্ত্রণ নিয়ে এসেছে। media_resolution প্যারামিটারটি প্রতিটি ইনপুট ইমেজ বা ভিডিও ফ্রেমের জন্য বরাদ্দকৃত টোকেনের সর্বোচ্চ সংখ্যা নির্ধারণ করে। উচ্চতর রেজোলিউশন সূক্ষ্ম লেখা পড়া বা ছোট ছোট বিবরণ শনাক্ত করার ক্ষেত্রে মডেলের সক্ষমতা বাড়ায়, কিন্তু এর ফলে টোকেনের ব্যবহার এবং ল্যাটেন্সি বৃদ্ধি পায়।
পরামর্শ ও সর্বোত্তম অনুশীলন
- ছবিগুলো সঠিকভাবে ঘোরানো হয়েছে কিনা তা যাচাই করুন।
- স্পষ্ট ও ঝাপসা নয় এমন ছবি ব্যবহার করুন।
- টেক্সট সহ একটিমাত্র ছবি ব্যবহার করার সময়,
inputঅ্যারেতে ছবির আগে টেক্সট প্রম্পটটি রাখুন।
এরপর কী?
এই নির্দেশিকাটি আপনাকে দেখাবে কীভাবে ইমেজ ফাইল আপলোড করতে হয় এবং ইমেজ ইনপুট থেকে টেক্সট আউটপুট তৈরি করতে হয়। আরও জানতে, নিম্নলিখিত রিসোর্সগুলো দেখুন:
- ফাইলস এপিআই : জেমিনির সাথে ব্যবহারের জন্য ফাইল আপলোড এবং পরিচালনা সম্পর্কে আরও জানুন।
- সিস্টেম নির্দেশাবলী : সিস্টেম নির্দেশাবলী আপনাকে আপনার নির্দিষ্ট প্রয়োজন এবং ব্যবহারের ক্ষেত্র অনুযায়ী মডেলের আচরণ নিয়ন্ত্রণ করতে দেয়।
- ফাইল প্রম্পটিং কৌশল : জেমিনি এপিআই টেক্সট, ছবি, অডিও এবং ভিডিও ডেটা দিয়ে প্রম্পটিং সমর্থন করে, যা মাল্টিমোডাল প্রম্পটিং নামেও পরিচিত।
- নিরাপত্তা নির্দেশিকা : কখনও কখনও জেনারেটিভ এআই মডেলগুলি অপ্রত্যাশিত আউটপুট তৈরি করে, যেমন ভুল, পক্ষপাতদুষ্ট বা আপত্তিকর আউটপুট। এই ধরনের আউটপুট থেকে ক্ষতির ঝুঁকি সীমিত করার জন্য পোস্ট-প্রসেসিং এবং মানুষের মূল্যায়ন অপরিহার্য।