

फ़ाइल खोजने की सुविधा
Gemini API, फ़ाइल खोजने वाले टूल की मदद से, Retrieval Augmented Generation ("RAG") की सुविधा देता है. फ़ाइल खोज की सुविधा, आपके डेटा को इंपोर्ट करती है, उसे छोटे-छोटे हिस्सों में बांटती है, और इंडेक्स करती है. इससे, दिए गए प्रॉम्प्ट के आधार पर, काम की जानकारी को तेज़ी से वापस पाने में मदद मिलती है. इसके बाद, इस जानकारी का इस्तेमाल मॉडल के लिए कॉन्टेक्स्ट के तौर पर किया जाता है. इससे मॉडल को ज़्यादा सटीक और काम के जवाब देने में मदद मिलती है. फ़ाइल खोजने की सुविधा में, टेक्स्ट एम्बेडिंग के साथ-साथ मल्टीमॉडल क्षमताओं को भी इस्तेमाल किया जा सकता है. टेक्स्ट एम्बेडिंग के लिए gemini-embedding-001 और इमेज/मल्टीमॉडल एम्बेडिंग के लिए gemini-embedding-2 का इस्तेमाल किया जाता है.
फ़ाइल स्टोरेज और क्वेरी के समय एम्बेडिंग जनरेट करने की सुविधा बिना किसी शुल्क के उपलब्ध है. आपको सिर्फ़ तब पेमेंट करना होगा, जब पहली बार अपनी फ़ाइलों को इंडेक्स किया जाता है और Gemini के सामान्य मॉडल के इनपुट / आउटपुट टोकन की सामान्य लागत लगती है. बिलिंग के इस नए मॉडल की वजह से, फ़ाइल खोजने वाले टूल को बनाना और उसे बड़े पैमाने पर इस्तेमाल करना, पहले से ज़्यादा आसान और किफ़ायती हो गया है. ज़्यादा जानकारी के लिए, कीमत सेक्शन देखें.
सीधे फ़ाइल खोज स्टोर में अपलोड करें
इस उदाहरण में, फ़ाइल सर्च स्टोर में फ़ाइल को सीधे अपलोड करने का तरीका बताया गया है:
Python
from google import genai
from google.genai import types
import time

client = genai.Client()

file_search_store = client.file_search_stores.create(
    config={
        'display_name': 'your-fileSearchStore-name',
        'embedding_model': 'models/gemini-embedding-2'
    }
)

operation = client.file_search_stores.upload_to_file_search_store(
  file='sample.txt',
  file_search_store_name=file_search_store.name,
  config={
      'display_name' : 'display-file-name',
  }
)

while not operation.done:
    time.sleep(5)
    operation = client.operations.get(operation)

interaction = client.interactions.create(
    model="gemini-3.5-flash",
    input="Can you tell me about [insert question]",
    tools=[{
        "type": "file_search",
        "file_search_store_names": [file_search_store.name]
    }]
)

for step in interaction.steps:
    if step.type == "model_output":
        for content_block in step.content:
            if content_block.type == "text":
                print(content_block.text)
                if content_block.annotations:
                    print("\nSources:")
                    for annotation in content_block.annotations:
                        if annotation.type == "file_citation":
                            print(f"  - {annotation.file_name}: {annotation.source}")
JavaScript
const { GoogleGenAI } = require('@google/genai');

const ai = new GoogleGenAI({});

async function run() {
  const fileSearchStore = await ai.fileSearchStores.create({
    config: {
      displayName: 'your-fileSearchStore-name',
      embeddingModel: 'models/gemini-embedding-2'
    }
  });

  let operation = await ai.fileSearchStores.uploadToFileSearchStore({
    file: 'file.txt',
    fileSearchStoreName: fileSearchStore.name,
    config: {
      displayName: 'file-name',
    }
  });

  while (!operation.done) {
    await new Promise(resolve => setTimeout(resolve, 5000));
    operation = await ai.operations.get({ operation });
  }

  const interaction = await ai.interactions.create({
    model: "gemini-3.5-flash",
    input: "Can you tell me about [insert question]",
    tools: [{
      type: "file_search",
      file_search_store_names: [fileSearchStore.name]
    }]
  });

  for (const step of interaction.steps) {
    if (step.type === 'model_output') {
      for (const contentBlock of step.content) {
        if (contentBlock.type === 'text') {
          console.log(contentBlock.text);
          if (contentBlock.annotations) {
            console.log("\nSources:");
            for (const annotation of contentBlock.annotations) {
              if (annotation.type === 'file_citation') {
                console.log(`  - ${annotation.file_name}: ${annotation.source}`);
              }
            }
          }
        }
      }
    }
  }
}

run();
ज़्यादा जानकारी के लिए, uploadToFileSearchStore का एपीआई रेफ़रंस देखें.
फ़ाइलें इंपोर्ट करना
इसके अलावा, आपके पास किसी मौजूदा फ़ाइल को अपलोड करने और उसे फ़ाइल खोजने की सुविधा वाले स्टोर में इंपोर्ट करने का विकल्प होता है:
Python
from google import genai
from google.genai import types
import time

client = genai.Client()

sample_file = client.files.upload(file='sample.txt', config={'display_name': 'display_file_name'})

file_search_store = client.file_search_stores.create(
    config={
        'display_name': 'your-fileSearchStore-name',
        'embedding_model': 'models/gemini-embedding-2'
    }
)

operation = client.file_search_stores.import_file(
    file_search_store_name=file_search_store.name,
    file_name=sample_file.name
)

while not operation.done:
    time.sleep(5)
    operation = client.operations.get(operation)

interaction = client.interactions.create(
    model="gemini-3.5-flash",
    input="Can you tell me about [insert question]",
    tools=[{
        "type": "file_search",
        "file_search_store_names": [file_search_store.name]
    }]
)

for step in interaction.steps:
    if step.type == "model_output":
        for content_block in step.content:
            if content_block.type == "text":
                print(content_block.text)
JavaScript
const { GoogleGenAI } = require('@google/genai');

const ai = new GoogleGenAI({});

async function run() {
  const sampleFile = await ai.files.upload({
    file: 'sample.txt',
    config: { displayName: 'file-name' }
  });

  const fileSearchStore = await ai.fileSearchStores.create({
    config: {
      displayName: 'your-fileSearchStore-name',
      embeddingModel: 'models/gemini-embedding-2'
    }
  });

  let operation = await ai.fileSearchStores.importFile({
    fileSearchStoreName: fileSearchStore.name,
    fileName: sampleFile.name
  });

  while (!operation.done) {
    await new Promise(resolve => setTimeout(resolve, 5000));
    operation = await ai.operations.get({ operation: operation });
  }

  const interaction = await ai.interactions.create({
    model: "gemini-3.5-flash",
    input: "Can you tell me about [insert question]",
    tools: [{
      type: "file_search",
      file_search_store_names: [fileSearchStore.name]
    }]
  });

  for (const step of interaction.steps) {
    if (step.type === 'model_output') {
      for (const contentBlock of step.content) {
        if (contentBlock.type === 'text') {
          console.log(contentBlock.text);
        }
      }
    }
  }
}

run();
ज़्यादा जानकारी के लिए, importFile का एपीआई रेफ़रंस देखें.
कॉन्फ़िगरेशन को हिस्सों में बांटना
किसी फ़ाइल को File Search स्टोर में इंपोर्ट करने पर, वह अपने-आप छोटे-छोटे हिस्सों में बंट जाती है. इसके बाद, उसे एंबेड किया जाता है, इंडेक्स किया जाता है, और File Search स्टोर में अपलोड किया जाता है. अगर आपको चंकिंग की रणनीति पर ज़्यादा कंट्रोल चाहिए, तो chunking_config सेटिंग का इस्तेमाल करें. इससे, हर चंक के लिए ज़्यादा से ज़्यादा टोकन और ओवरलैप होने वाले टोकन की ज़्यादा से ज़्यादा संख्या सेट की जा सकती है.
Python
from google import genai
from google.genai import types
import time

client = genai.Client()

operation = client.file_search_stores.upload_to_file_search_store(
    file_search_store_name=file_search_store.name,
    file='sample.txt',
    config={
        'chunking_config': {
          'white_space_config': {
            'max_tokens_per_chunk': 200,
            'max_overlap_tokens': 20
          }
        }
    }
)

while not operation.done:
    time.sleep(5)
    operation = client.operations.get(operation)

print("Custom chunking complete.")
JavaScript
const { GoogleGenAI } = require('@google/genai');

const ai = new GoogleGenAI({});

let operation = await ai.fileSearchStores.uploadToFileSearchStore({
  file: 'file.txt',
  fileSearchStoreName: fileSearchStore.name,
  config: {
    displayName: 'file-name',
    chunkingConfig: {
      whiteSpaceConfig: {
        maxTokensPerChunk: 200,
        maxOverlapTokens: 20
      }
    }
  }
});

while (!operation.done) {
  await new Promise(resolve => setTimeout(resolve, 5000));
  operation = await ai.operations.get({ operation });
}
console.log("Custom chunking complete.");
File Search स्टोर का इस्तेमाल करने के लिए, इसे interactions.create
तरीके के टूल के तौर पर पास करें. इसके लिए, अपलोड करें और इंपोर्ट करें के उदाहरण देखें.
यह कैसे काम करता है
फ़ाइल खोज, सिमैंटिक सर्च नाम की तकनीक का इस्तेमाल करके, उपयोगकर्ता के प्रॉम्प्ट से जुड़ी जानकारी ढूंढती है. कीवर्ड पर आधारित स्टैंडर्ड सर्च के उलट, सिमैंटिक सर्च आपकी क्वेरी के मतलब और कॉन्टेक्स्ट को समझती है.
किसी फ़ाइल को इंपोर्ट करने पर, उसे संख्या के तौर पर दिखाया जाता है. इसे एम्बेडिंग कहा जाता है. इससे अपलोड किए गए कॉन्टेंट का सिमैंटिक मतलब पता चलता है. इन एम्बेडिंग को, फ़ाइल खोज के खास डेटाबेस में सेव किया जाता है. क्वेरी करने पर, उसे भी एम्बेडिंग में बदल दिया जाता है. इसके बाद, सिस्टम फ़ाइल खोज की सुविधा का इस्तेमाल करके, फ़ाइल खोज के स्टोर से मिलते-जुलते और काम के दस्तावेज़ के हिस्सों को ढूंढता है.
एम्बेड किए गए डेटा के लिए, टाइम टू लिव (टीटीएल) की कोई सीमा नहीं होती. यह डेटा तब तक सेव रहता है, जब तक इसे मैन्युअल तरीके से मिटाया नहीं जाता या मॉडल को बंद नहीं कर दिया जाता. हालांकि, फ़ाइलें 48 घंटे बाद मिटा दी जाती हैं.
फ़ाइल खोजने की सुविधा वाले uploadToFileSearchStore एपीआई का इस्तेमाल करने की प्रोसेस के बारे में यहां बताया गया है:
फ़ाइल खोज स्टोर बनाएं: फ़ाइल खोज स्टोर में, आपकी फ़ाइलों से प्रोसेस किया गया डेटा होता है. यह एम्बेडिंग के लिए परसिस्टेंट कंटेनर है. इस पर सिमैंटिक सर्च काम करेगी.
कोई फ़ाइल अपलोड करना और उसे फ़ाइल खोजने की सुविधा वाले स्टोर में इंपोर्ट करना: एक साथ कोई फ़ाइल अपलोड करें और नतीजों को फ़ाइल खोजने की सुविधा वाले स्टोर में इंपोर्ट करें. इससे एक अस्थायी
Fileऑब्जेक्ट बनता है, जो आपके रॉ दस्तावेज़ का रेफ़रंस होता है. इसके बाद, उस डेटा को छोटे-छोटे हिस्सों में बांटा जाता है. साथ ही, उसे फ़ाइल खोजने की सुविधा के लिए एम्बेड किए गए डेटा में बदलकर इंडेक्स किया जाता है.Fileऑब्जेक्ट 48 घंटे बाद मिट जाता है. वहीं, फ़ाइल खोज में इंपोर्ट किया गया डेटा तब तक सेव रहेगा, जब तक आप उसे मिटाने का विकल्प नहीं चुनते.फ़ाइल खोजने की सुविधा के साथ क्वेरी: आखिर में,
generateContentकॉल मेंFileSearchटूल का इस्तेमाल किया जाता है. टूल कॉन्फ़िगरेशन में, आपको एकFileSearchRetrievalResourceतय करना होता है. यहFileSearchStoreकी ओर इशारा करता है, जिसे आपको खोजना है. इससे मॉडल को उस फ़ाइल सर्च स्टोर पर सिमैंटिक सर्च करने का निर्देश मिलता है, ताकि वह अपने जवाब के लिए काम की जानकारी ढूंढ सके.
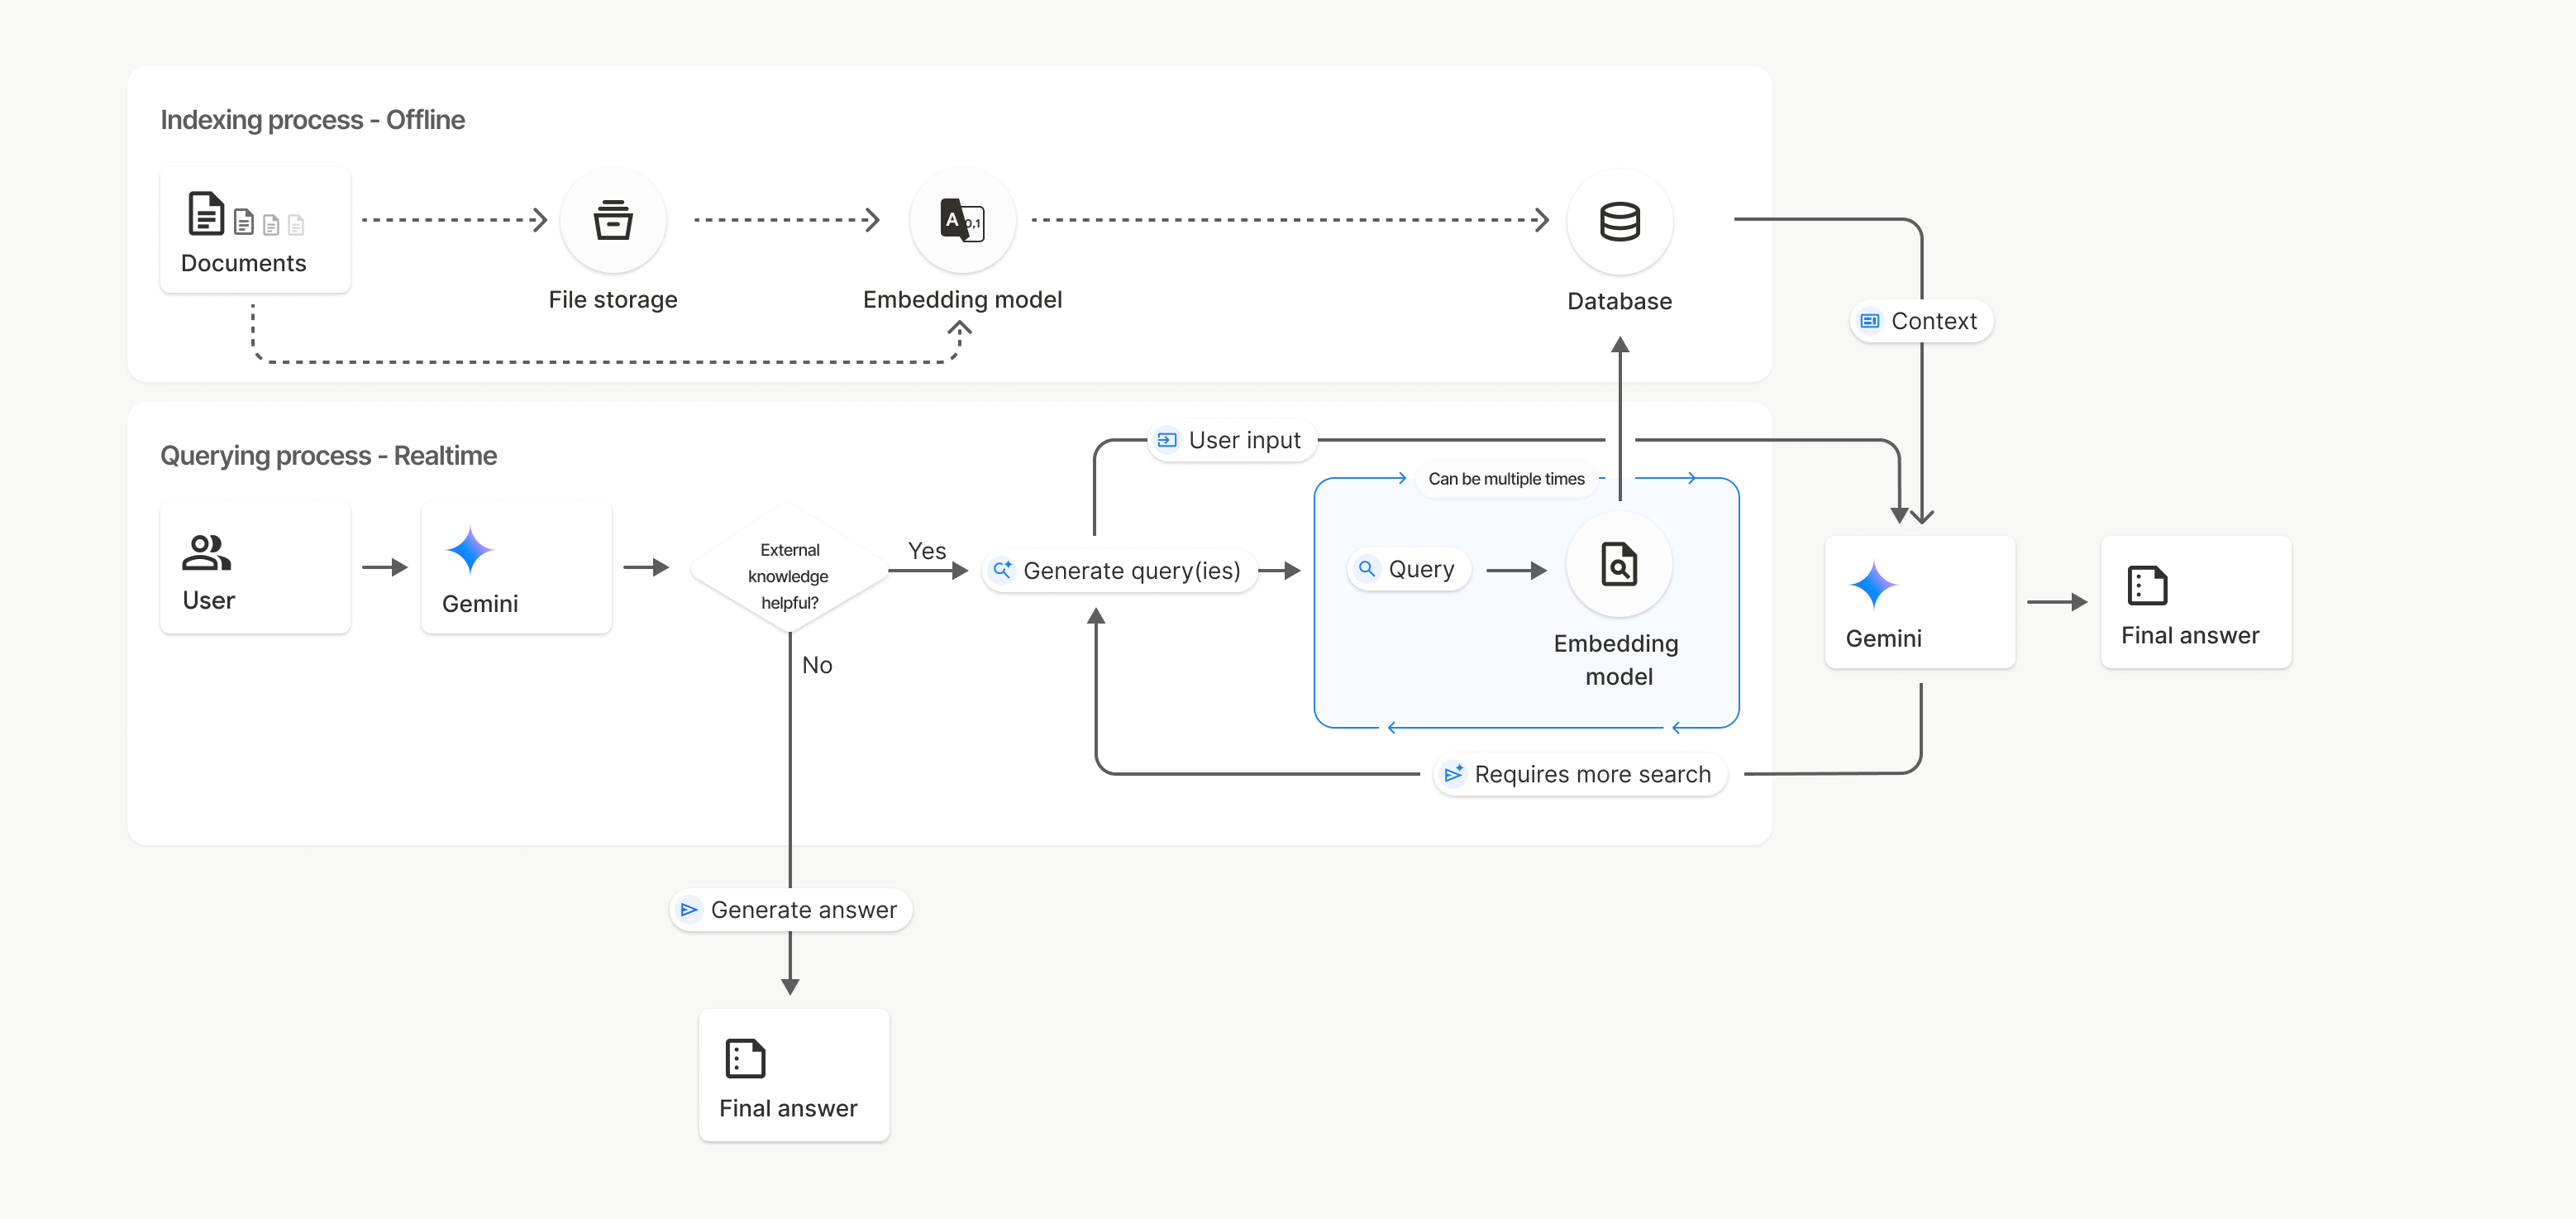
इस डायग्राम में, दस्तावेज़ से एम्बेडिंग मॉडल तक की डॉटेड लाइन (gemini-embedding-001 का इस्तेमाल करके) uploadToFileSearchStore एपीआई को दिखाती है. इसमें फ़ाइल स्टोरेज को बायपास किया जाता है.
इसके अलावा, Files API का इस्तेमाल करके, फ़ाइलों को अलग से बनाने और फिर इंपोर्ट करने से, इंडेक्सिंग की प्रोसेस Documents से File storage और फिर Embedding model पर चली जाती है.
फ़ाइल खोजें
फ़ाइल खोजने की सुविधा वाला स्टोर, आपके दस्तावेज़ों के एम्बेड किए गए वर्शन के लिए कंटेनर होता है. File API के ज़रिए अपलोड की गई रॉ फ़ाइलें, 48 घंटे बाद मिट जाती हैं. हालांकि, फ़ाइल सर्च स्टोर में इंपोर्ट किया गया डेटा तब तक सेव रहता है, जब तक उसे मैन्युअल तरीके से नहीं मिटाया जाता. अपने दस्तावेज़ों को व्यवस्थित करने के लिए, एक से ज़्यादा फ़ाइल खोज स्टोर बनाए जा सकते हैं. FileSearchStore API की मदद से, फ़ाइल खोज स्टोर को मैनेज करने के लिए, फ़ाइल खोज स्टोर बनाए जा सकते हैं, उनकी सूची बनाई जा सकती है, उन्हें पाया जा सकता है, और उन्हें मिटाया जा सकता है. फ़ाइल खोज में स्टोर के नाम, ग्लोबल लेवल पर उपलब्ध होते हैं.
यहां कुछ उदाहरण दिए गए हैं, जिनसे आपको File Search के स्टोर मैनेज करने के तरीके के बारे में जानकारी मिलेगी:
Python
file_search_store = client.file_search_stores.create(
    config={
        'display_name': 'my-file_search-store-123',
        'embedding_model': 'models/gemini-embedding-2'
    }
)

for file_search_store in client.file_search_stores.list():
    print(file_search_store)

my_file_search_store = client.file_search_stores.get(name='fileSearchStores/my-file_search-store-123')

client.file_search_stores.delete(name='fileSearchStores/my-file_search-store-123', config={'force': True})
JavaScript
const fileSearchStore = await ai.fileSearchStores.create({
  config: {
    displayName: 'my-file_search-store-123',
    embeddingModel: 'models/gemini-embedding-2'
  }
});

const fileSearchStores = await ai.fileSearchStores.list();
for await (const store of fileSearchStores) {
  console.log(store);
}

const myFileSearchStore = await ai.fileSearchStores.get({
  name: 'fileSearchStores/my-file_search-store-123'
});

await ai.fileSearchStores.delete({
  name: 'fileSearchStores/my-file_search-store-123',
  config: { force: true }
});
REST
curl -X POST "https://generativelanguage.googleapis.com/v1beta/fileSearchStores?key=${GEMINI_API_KEY}" \
    -H "Content-Type: application/json" \
    -d '{ "displayName": "My Store", "embedding_model": "models/gemini-embedding-2" }'

curl "https://generativelanguage.googleapis.com/v1beta/fileSearchStores?key=${GEMINI_API_KEY}" \

curl "https://generativelanguage.googleapis.com/v1beta/fileSearchStores/my-file_search-store-123?key=${GEMINI_API_KEY}"

curl -X DELETE "https://generativelanguage.googleapis.com/v1beta/fileSearchStores/my-file_search-store-123?key=${GEMINI_API_KEY}"
फ़ाइल खोज के दस्तावेज़
File Search Documents API की मदद से, फ़ाइल स्टोर में मौजूद अलग-अलग दस्तावेज़ों को मैनेज किया जा सकता है. इससे, फ़ाइल सर्च स्टोर में मौजूद list हर दस्तावेज़, get किसी दस्तावेज़ के बारे में जानकारी, और नाम के हिसाब से delete कोई दस्तावेज़ खोजा जा सकता है.
Python
for document_in_store in client.file_search_stores.documents.list(parent='fileSearchStores/my-file_search-store-123'):
  print(document_in_store)

file_search_document = client.file_search_stores.documents.get(name='fileSearchStores/my-file_search-store-123/documents/my_doc')
print(file_search_document)

client.file_search_stores.documents.delete(name='fileSearchStores/my-file_search-store-123/documents/my_doc', config={'force': True})
JavaScript
const documents = await ai.fileSearchStores.documents.list({
  parent: 'fileSearchStores/my-file_search-store-123'
});
for await (const doc of documents) {
  console.log(doc);
}

const fileSearchDocument = await ai.fileSearchStores.documents.get({
  name: 'fileSearchStores/my-file_search-store-123/documents/my_doc'
});

await ai.fileSearchStores.documents.delete({
  name: 'fileSearchStores/my-file_search-store-123/documents/my_doc'
});
REST
curl "https://generativelanguage.googleapis.com/v1beta/fileSearchStores/my-file_search-store-123/documents?key=${GEMINI_API_KEY}"

curl "https://generativelanguage.googleapis.com/v1beta/fileSearchStores/my-file_search-store-123/documents/my_doc?key=${GEMINI_API_KEY}"

curl -X DELETE "https://generativelanguage.googleapis.com/v1beta/fileSearchStores/my-file_search-store-123/documents/my_doc?key=${GEMINI_API_KEY}&force=true"
फ़ाइल का मेटाडेटा
फ़ाइलों को फ़िल्टर करने या उनके बारे में ज़्यादा जानकारी देने के लिए, उनमें कस्टम मेटाडेटा जोड़ा जा सकता है. मेटाडेटा, की-वैल्यू पेयर का एक सेट होता है.
Python
op = client.file_search_stores.import_file(
    file_search_store_name=file_search_store.name,
    file_name=sample_file.name,
    config={
        'custom_metadata': [
            {"key": "author", "string_value": "Robert Graves"},
            {"key": "year", "numeric_value": 1934}
        ]
    }
)
JavaScript
let operation = await ai.fileSearchStores.importFile({
  fileSearchStoreName: fileSearchStore.name,
  fileName: sampleFile.name,
  config: {
    customMetadata: [
      { key: "author", stringValue: "Robert Graves" },
      { key: "year", numericValue: 1934 }
    ]
  }
});
यह तब काम आता है, जब आपके पास फ़ाइल खोजने की सुविधा वाले स्टोर में कई दस्तावेज़ हों और आपको सिर्फ़ उनमें से कुछ दस्तावेज़ों को खोजना हो.
Python
interaction = client.interactions.create(
    model="gemini-3.5-flash",
    input="Tell me about the book 'I, Claudius'",
    tools=[{
        "type": "file_search",
        "file_search_store_names": [file_search_store.name],
        "metadata_filter": 'author="Robert Graves"',
    }]
)

for step in interaction.steps:
    if step.type == "model_output":
        for content_block in step.content:
            if content_block.type == "text":
                print(content_block.text)
JavaScript
const interaction = await ai.interactions.create({
  model: "gemini-3.5-flash",
  input: "Tell me about the book 'I, Claudius'",
  tools: [{
    type: "file_search",
    file_search_store_names: [fileSearchStore.name],
    metadata_filter: 'author="Robert Graves"',
  }]
});

for (const step of interaction.steps) {
  if (step.type === 'model_output') {
    for (const contentBlock of step.content) {
      if (contentBlock.type === 'text') {
        console.log(contentBlock.text);
      }
    }
  }
}
REST
curl "https://generativelanguage.googleapis.com/v1beta/interactions" \
    -H "x-goog-api-key: $GEMINI_API_KEY" \
    -H 'Content-Type: application/json' \
    -H "Api-Revision: 2026-05-20" \
    -X POST \
    -d '{
            "model": "gemini-3.5-flash",
            "input": [{"type": "text", "text": "Tell me about the book I, Claudius"}],
            "tools": [{
                "type": "file_search",
                "file_search_store_names": ["'$STORE_NAME'"],
                "metadata_filter": "author = \"Robert Graves\""
            }]
        }' 2> /dev/null > response.json

cat response.json
metadata_filter के लिए सूची फ़िल्टर सिंटैक्स लागू करने के बारे में दिशा-निर्देश, google.aip.dev/160 पर देखे जा सकते हैं
मल्टीमॉडल फ़ाइल खोजने की सुविधा
मल्टीमॉडल फ़ाइल सर्च की सुविधा की मदद से, इमेज को नेटिव तौर पर एम्बेड किया जा सकता है और उनमें खोज की जा सकती है. इससे मल्टीमॉडल RAG ऐप्लिकेशन को बेहतर बनाया जा सकता है.
एम्बेडिंग मॉडल को कॉन्फ़िगर करना
FileSearchStore बनाते समय, आपको टेक्स्ट, इमेज, और वीडियो वगैरह का इस्तेमाल करके क्वेरी करने वाले मॉडल का इस्तेमाल करने के लिए, सिर्फ़ टेक्स्ट वाले एम्बेडिंग मॉडल को बदलना होगा. टेक्स्ट और इमेज, दोनों को प्रोसेस करने के लिए models/gemini-embedding-2 का इस्तेमाल करें.
Python
store = client.file_search_stores.create(
    config={
        "display_name": "Multimodal Catalog",
        "embedding_model": "models/gemini-embedding-2",
    }
)
JavaScript
const fileSearchStore = await ai.fileSearchStores.create({
  config: {
    displayName: "Multimodal Catalog",
    embeddingModel: "models/gemini-embedding-2",
  },
});
REST
curl -X POST "https://generativelanguage.googleapis.com/v1beta/fileSearchStores?key=$GEMINI_API_KEY" \
    -H "Content-Type: application/json" \
    -d '{
      "display_name": "Multimodal Catalog",
      "embedding_model": "models/gemini-embedding-2"
    }'
इमेज अपलोड करें
मल्टीमॉडल एम्बेडिंग मॉडल की मदद से स्टोर बनाने के बाद, इमेज फ़ाइलें सीधे तौर पर अपलोड की जा सकती हैं. इसके लिए, फ़ाइल खोज वाले स्टोर में सीधे तौर पर अपलोड करें या फ़ाइलें इंपोर्ट करना में बताए गए अपलोड एपीआई का इस्तेमाल करें.
इमेज फ़ाइल के लिए ज़रूरी शर्तें:
- इमेज फ़ाइलों का रिज़ॉल्यूशन 4K x 4K पिक्सल से ज़्यादा नहीं होना चाहिए.
- PNG, JPEG फ़ॉर्मैट का इस्तेमाल किया जा सकता है.
उद्धरण
फ़ाइल खोज की सुविधा का इस्तेमाल करने पर, मॉडल के जवाब में ऐसे उद्धरण शामिल हो सकते हैं जिनमें यह बताया गया हो कि जवाब जनरेट करने के लिए, अपलोड किए गए दस्तावेज़ों के किन हिस्सों का इस्तेमाल किया गया है. इससे तथ्यों की जांच और पुष्टि करने में मदद मिलती है.
जवाब के model_output चरण के content ब्लॉक में मौजूद annotations एट्रिब्यूट के ज़रिए, उद्धरण की जानकारी ऐक्सेस की जा सकती है.
Python
for step in interaction.steps:
    if step.type == 'model_output':
        for content in step.content:
            if content.type == 'text' and content.annotations:
                print(content.annotations)
JavaScript
for (const step of interaction.steps) {
  if (step.type === 'model_output') {
    for (const contentBlock of step.content) {
      if (contentBlock.type === 'text' && contentBlock.annotations) {
        console.log(JSON.stringify(contentBlock.annotations, null, 2));
      }
    }
  }
}
उद्धरणों के स्ट्रक्चर के बारे में ज़्यादा जानकारी के लिए, इंटरैक्शन के लिए एपीआई रेफ़रंस देखें.
पेज नंबर
पेज वाले दस्तावेज़ों (जैसे, PDF) में फ़ाइल खोजने की सुविधा का इस्तेमाल करने पर, मॉडल के जवाब में उस पेज का नंबर शामिल हो सकता है जहां जानकारी मिली थी.
file_citation एनोटेशन के page_number एट्रिब्यूट के ज़रिए, इस जानकारी को ऐक्सेस किया जा सकता है.
Python
for step in interaction.steps:
    if step.type == "model_output":
        for content in step.content:
            if content.type == "text" and content.annotations:
                for annotation in content.annotations:
                    if annotation.type == "file_citation" and annotation.page_number:
                        print(f"Cited Page: {annotation.page_number}")
JavaScript
for (const step of interaction.steps) {
  if (step.type === 'model_output') {
    for (const block of step.content) {
      if (block.type === 'text' && block.annotations) {
        for (const annotation of block.annotations) {
          if (annotation.type === 'file_citation' && annotation.pageNumber) {
            console.log(`Cited Page: ${annotation.pageNumber}`);
          }
        }
      }
    }
  }
}
मीडिया उद्धरण
जब मॉडल, जनरेट करने के दौरान किसी इमेज चंक का रेफ़रंस देता है, तो एपीआई, एनोटेशन में file_citation टाइप का एनोटेशन दिखाता है. इसमें media_id शामिल होता है. इस आईडी का इस्तेमाल करके, इमेज का वह हिस्सा डाउनलोड किया जा सकता है जिसे मॉडल ने रेफ़रंस के तौर पर इस्तेमाल किया है. यह media_id कई खोज कॉल में बना रहता है. इससे आपको एक ही इमेज को भरोसेमंद तरीके से वापस पाने या आईडी का इस्तेमाल करके उसे कैश मेमोरी में सेव करने में मदद मिलती है.
यहां दिए गए स्निपेट में, REST रिस्पॉन्स के चरण का उदाहरण दिया गया है:
{
  "type": "model_output",
  "content": [
    {
      "type": "text",
      "text": "...",
      "annotations": [
        {
          "type": "file_citation",
          "file_name": "product_image",
          "media_id": "fileSearchStores/my-store-123/media/BlobId-456"
        }
      ]
    }
  ]
}
यहां दिए गए कोड स्निपेट में, media_id और मीडिया को वापस पाने और डाउनलोड करने का तरीका बताया गया है:
Python
for step in interaction.steps:
    if step.type == "model_output":
        for content in step.content:
            if content.type == "text" and content.annotations:
                for annotation in content.annotations:
                    if annotation.type == "file_citation" and annotation.media_id:
                        print(f"Cited Media ID: {annotation.media_id}")
                        blob_content = client.file_search_stores.download_media(
                            media_id=annotation.media_id
                        )
JavaScript
for (const step of interaction.steps) {
  if (step.type === 'model_output') {
    for (const block of step.content) {
      if (block.type === 'text' && block.annotations) {
        for (const annotation of block.annotations) {
          if (annotation.type === 'file_citation' && annotation.mediaId) {
            console.log(`Cited Media ID: ${annotation.mediaId}`);
            const blobContent = await ai.fileSearchStores.downloadMedia(annotation.mediaId);
          }
        }
      }
    }
  }
}
REST
curl -X GET "https://generativelanguage.googleapis.com/v1/fileSearchStores/my-store-123/media/BlobId-456" \
  -H "x-goog-api-key: $GEMINI_API_KEY"
कस्टम मेटाडेटा
अगर आपने अपनी फ़ाइलों में कस्टम मेटाडेटा जोड़ा है, तो मॉडल के जवाब की एनोटेशन में जाकर इसे ऐक्सेस किया जा सकता है. यह आपके सोर्स दस्तावेज़ों से, ऐप्लिकेशन लॉजिक में अतिरिक्त कॉन्टेक्स्ट (जैसे कि यूआरएल, पेज नंबर या लेखक) पास करने के लिए काम का है. file_citation टाइप के हर उद्धरण एनोटेशन में यह कस्टम मेटाडेटा शामिल होता है.
Python
interaction = client.interactions.create(
    model="gemini-3.5-flash",
    input="Tell me about [insert question]",
    tools=[{
        "type": "file_search",
        "file_search_store_names": [file_search_store.name]
    }]
)

for step in interaction.steps:
    if step.type == "model_output":
        for content_block in step.content:
            if content_block.annotations:
                for annotation in content_block.annotations:
                    print(annotation)
JavaScript
  const interaction = await ai.interactions.create({
    model: "gemini-3.5-flash",
    input: "Tell me about [insert question]",
    tools: [{
      type: "file_search",
      file_search_store_names: [fileSearchStore.name]
    }]
  });

  for (const step of interaction.steps) {
    if (step.type === 'model_output') {
      for (const contentBlock of step.content) {
        if (contentBlock.annotations) {
          contentBlock.annotations.forEach((annotation) => {
            console.log(annotation);
          });
        }
      }
    }
  }
REST
{
  "steps": [
    {
      "type": "model_output",
      "content": [
        {
          "type": "text",
          "text": "...",
          "annotations": [
            {
              "file_name": "...",
              "source": "...",
              "custom_metadata": [
                {
                  "key": "author",
                  "string_value": "Robert Graves"
                },
                {
                  "key": "year",
                  "numeric_value": 1934
                }
              ]
            }
          ]
        }
      ]
    }
  ]
}
स्ट्रक्चर्ड आउटपुट
Gemini 3 मॉडल से शुरू करके, फ़ाइल खोजने वाले टूल को स्ट्रक्चर्ड आउटपुट के साथ इस्तेमाल किया जा सकता है.
Python
from pydantic import BaseModel, Field

class Money(BaseModel):
    amount: str = Field(description="The numerical part of the amount.")
    currency: str = Field(description="The currency of amount.")

interaction = client.interactions.create(
    model="gemini-3.5-flash",
    input="What is the minimum hourly wage in Tokyo right now?",
    tools=[{
        "type": "file_search",
        "file_search_store_names": [file_search_store.name]
    }],
    response_format={
        "type": "text",
        "mime_type": "application/json",
        "schema": Money.model_json_schema()
    },
)
result = Money.model_validate_json(interaction.output_text)
print(result)
JavaScript
import { z } from "zod";

const moneyJsonSchema = {
  type: "object",
  properties: {
    amount: { type: "string", description: "The numerical part of the amount." },
    currency: { type: "string", description: "The currency of amount." }
  },
  required: ["amount", "currency"]
};

const moneySchema = z.fromJSONSchema(moneyJsonSchema);

async function run() {
  const interaction = await ai.interactions.create({
    model: "gemini-3.5-flash",
    input: "What is the minimum hourly wage in Tokyo right now?",
    tools: [{
      type: "file_search",
      file_search_store_names: [fileSearchStore.name],
    }],
    response_format: {
      type: 'text',
      mime_type: 'application/json',
      schema: moneyJsonSchema
    },
  });

  const result = moneySchema.parse(JSON.parse(interaction.output_text));
  console.log(result);
}

run();
REST
curl "https://generativelanguage.googleapis.com/v1beta/interactions" \
  -H "x-goog-api-key: $GEMINI_API_KEY" \
  -H 'Content-Type: application/json' \
  -H "Api-Revision: 2026-05-20" \
  -X POST \
  -d '{
    "model": "gemini-3.5-flash",
    "input": "What is the minimum hourly wage in Tokyo right now?",
    "tools": [{
      "type": "file_search",
      "file_search_store_names": ["$FILE_SEARCH_STORE_NAME"]
    }],
    "response_format": {
      "type": "text",
      "mime_type": "application/json",
      "schema": {
        "type": "object",
        "properties": {
          "amount": {"type": "string", "description": "The numerical part of the amount."},
          "currency": {"type": "string", "description": "The currency of amount."}
        },
        "required": ["amount", "currency"]
      }
    }
  }'
इन मॉडल के साथ काम करता है
फ़ाइल खोजने की सुविधा के साथ ये मॉडल काम करते हैं:
| मॉडल | फ़ाइल खोजने की सुविधा |
|---|---|
| Gemini 3.5 Flash | ✔️ |
| Gemini 3.1 Pro की झलक | ✔️ |
| Gemini 3.1 Flash-Lite | ✔️ |
| Gemini 3 Flash की झलक | ✔️ |
| Gemini 2.5 Pro | ✔️ |
| Gemini 2.5 Flash-Lite | ✔️ |
इस्तेमाल किए जा सकने वाले टूल कॉम्बिनेशन
Gemini 3 मॉडल, बिल्ट-इन टूल (जैसे, फ़ाइल खोजने की सुविधा) को कस्टम टूल (फ़ंक्शन कॉलिंग) के साथ इस्तेमाल करने की सुविधा देते हैं. टूल के कॉम्बिनेशन पेज पर जाकर, इस बारे में ज़्यादा जानें.
इस्तेमाल किए जा सकने वाले फ़ाइल टाइप
फ़ाइल खोजने की सुविधा, अलग-अलग तरह के फ़ाइल फ़ॉर्मैट के साथ काम करती है. इनकी जानकारी यहां दी गई है.
ऐप्लिकेशन फ़ाइल के टाइप
application/dartapplication/ecmascriptapplication/jsonapplication/ms-javaapplication/mswordapplication/pdfapplication/sqlapplication/typescriptapplication/vnd.curlapplication/vnd.dartapplication/vnd.ibm.secure-containerapplication/vnd.jupyterapplication/vnd.ms-excelapplication/vnd.oasis.opendocument.textapplication/vnd.openxmlformats-officedocument.presentationml.presentationapplication/vnd.openxmlformats-officedocument.spreadsheetml.sheetapplication/vnd.openxmlformats-officedocument.wordprocessingml.documentapplication/vnd.openxmlformats-officedocument.wordprocessingml.templateapplication/x-cshapplication/x-hwpapplication/x-hwp-v5application/x-latexapplication/x-phpapplication/x-powershellapplication/x-shapplication/x-shellscriptapplication/x-texapplication/x-zshapplication/xmlapplication/zip
टेक्स्ट फ़ाइल के टाइप
text/1d-interleaved-parityfectext/REDtext/SGMLtext/cache-manifesttext/calendartext/cqltext/cql-extensiontext/cql-identifiertext/csstext/csvtext/csv-schematext/dnstext/encaprtptext/enrichedtext/exampletext/fhirpathtext/flexfectext/fwdredtext/gff3text/grammar-ref-listtext/hl7v2text/htmltext/javascripttext/jcr-cndtext/jsxtext/markdowntext/mizartext/n3text/parameterstext/parityfectext/phptext/plaintext/provenance-notationtext/prs.fallenstein.rsttext/prs.lines.tagtext/prs.prop.logictext/raptorfectext/rfc822-headerstext/rtftext/rtp-enc-aescm128text/rtploopbacktext/rtxtext/sgmltext/shaclctext/shextext/spdxtext/stringstext/t140text/tab-separated-valuestext/texmacstext/trofftext/tsvtext/tsxtext/turtletext/ulpfectext/uri-listtext/vcardtext/vnd.DMClientScripttext/vnd.IPTC.NITFtext/vnd.IPTC.NewsMLtext/vnd.atext/vnd.abctext/vnd.ascii-arttext/vnd.curltext/vnd.debian.copyrighttext/vnd.dvb.subtitletext/vnd.esmertec.theme-descriptortext/vnd.exchangeabletext/vnd.familysearch.gedcomtext/vnd.ficlab.flttext/vnd.flytext/vnd.fmi.flexstortext/vnd.gmltext/vnd.graphviztext/vnd.hanstext/vnd.hgltext/vnd.in3d.3dmltext/vnd.in3d.spottext/vnd.latex-ztext/vnd.motorola.reflextext/vnd.ms-mediapackagetext/vnd.net2phone.commcenter.commandtext/vnd.radisys.msml-basic-layouttext/vnd.senx.warpscripttext/vnd.sositext/vnd.sun.j2me.app-descriptortext/vnd.trolltech.linguisttext/vnd.wap.sitext/vnd.wap.sltext/vnd.wap.wmltext/vnd.wap.wmlscripttext/vtttext/wgsltext/x-asmtext/x-bibtextext/x-bootext/x-ctext/x-c++hdrtext/x-c++srctext/x-cassandratext/x-chdrtext/x-coffeescripttext/x-componenttext/x-cshtext/x-csharptext/x-csrctext/x-cudatext/x-dtext/x-difftext/x-dsrctext/x-emacs-lisptext/x-erlangtext/x-gff3text/x-gotext/x-haskelltext/x-javatext/x-java-propertiestext/x-java-sourcetext/x-kotlintext/x-lilypondtext/x-lisptext/x-literate-haskelltext/x-luatext/x-moctext/x-objcsrctext/x-pascaltext/x-pcs-gcdtext/x-perltext/x-perl-scripttext/x-pythontext/x-python-scripttext/x-r-markdowntext/x-rsrctext/x-rsttext/x-ruby-scripttext/x-rusttext/x-sasstext/x-scalatext/x-schemetext/x-script.pythontext/x-scsstext/x-setexttext/x-sfvtext/x-shtext/x-siestatext/x-sostext/x-sqltext/x-swifttext/x-tcltext/x-textext/x-vbasictext/x-vcalendartext/xmltext/xml-dtdtext/xml-external-parsed-entitytext/yaml
सीमाएं
- Live API: Live API में, फ़ाइल खोजने की सुविधा काम नहीं करती.
- टूल के साथ काम न करना: फ़ाइल खोजने की सुविधा को फ़िलहाल, Google Search से मिली जानकारी का इस्तेमाल करके जवाब देने की सुविधा, यूआरएल के कॉन्टेक्स्ट जैसे अन्य टूल के साथ इस्तेमाल नहीं किया जा सकता.
तय सीमाएं
सेवा को बेहतर तरीके से काम करने के लिए, File Search API पर ये सीमाएं लागू होती हैं:
- फ़ाइल का ज़्यादा से ज़्यादा साइज़ / हर दस्तावेज़ के लिए तय सीमा: 100 एमबी
- प्रोजेक्ट फ़ाइल खोज के लिए उपलब्ध स्टोरेज का कुल साइज़ (उपयोगकर्ता के टियर के आधार पर):
- मुफ़्त: 1 जीबी
- टियर 1: 10 जीबी
- दूसरा टियर: 100 जीबी
- टियर 3: 1 टीबी
- सुझाव: हर फ़ाइल खोज स्टोर का साइज़ 20 जीबी से कम रखें, ताकि फ़ाइलें तुरंत मिल सकें.
कीमत
- इंडेक्सिंग के समय, मौजूदा एम्बेडिंग की कीमत के आधार पर, आपसे एम्बेडिंग के लिए शुल्क लिया जाता है.
- स्टोरेज की सुविधा बिना किसी शुल्क के मिलती है.
- क्वेरी टाइम एम्बेडिंग की सुविधा बिना किसी शुल्क के उपलब्ध है.
- फ़ेच किए गए दस्तावेज़ टोकन के लिए, सामान्य कॉन्टेक्स्ट टोकन के तौर पर शुल्क लिया जाता है.
आगे क्या करना है
- फ़ाइल खोजने की सुविधा वाले स्टोर और फ़ाइल खोजने की सुविधा वाले दस्तावेज़ों के लिए, एपीआई रेफ़रंस देखें.