
| | | | |  مشاهده منبع در گیتهاب مشاهده منبع در گیتهاب |
شما میتوانید از مدلهای Gemma 3 و بالاتر برای تحلیل و درک محتوای تصاویر استفاده کنید. این قابلیت شامل وظایفی مانند توصیف محتوای تصویر، شناسایی اشیاء، تشخیص صحنهها و حتی استنباط زمینه از اطلاعات بصری است.
در اینجا چند نمونه از این قابلیتها را نشان میدهیم.
این نوتبوک از پردازنده گرافیکی T4 بهره میبرد.
نصب بستههای پایتون
کتابخانههای Hugging Face مورد نیاز برای اجرای مدل Gemma و ارسال درخواستها را نصب کنید.
# Install PyTorch & other librariespip install torch accelerate# Install the transformers librarypip install transformers
مدل بار
برای بارگذاری خط لوله از کتابخانه transformers استفاده کنید
MODEL_ID = "google/gemma-4-E2B-it" # @param ["google/gemma-4-E2B-it","google/gemma-4-E4B-it", "google/gemma-4-31B-it", "google/gemma-4-26B-A4B-it"]

from transformers import pipeline

vqa_pipe = pipeline(
    task="image-text-to-text",
    model=MODEL_ID,
    device_map="auto",
    dtype="auto"
)
Loading weights:   0%|          | 0/2011 [00:00<?, ?it/s]
processor_config.json: 0.00B [00:00, ?B/s]
از یک الگوی آماده استفاده کنید
مثال زیر نحوه ارائه یک تصویر و پرسیدن سوال در مورد آن را نشان میدهد.
from PIL import Image
from IPython.display import display
import requests

from transformers import GenerationConfig
config = GenerationConfig.from_pretrained(MODEL_ID)
config.max_new_tokens = 512
gen_kwargs = dict(generation_config=config)

img_url = "https://raw.githubusercontent.com/google-gemma/cookbook/refs/heads/main/apps/sample-data/GoldenGate.png"
input_image = Image.open(requests.get(img_url, stream=True).raw)
display(input_image)

messages = [
    {
        "role": "user", "content": [
            {"type": "image", "url": img_url},
            {"type": "text", "text": "What is shown in this image?"}
        ]
    }
]

output = vqa_pipe(messages, return_full_text=False, generate_kwargs=gen_kwargs)
print(output[0]['generated_text'])
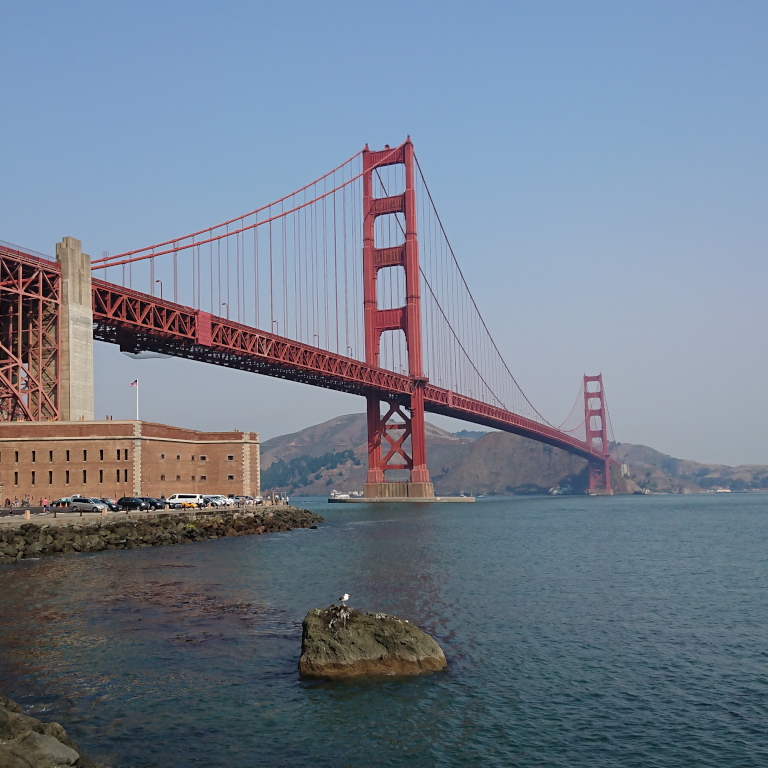
This image shows the **Golden Gate Bridge** in San Francisco, California, spanning a body of water.

Here are the key elements visible in the picture:

*   **The Golden Gate Bridge:** The iconic red suspension bridge dominates the background.
*   **Water/Bay:** There is a large expanse of water in the foreground, likely the San Francisco Bay or the Pacific Ocean.
*   **Foreground:** The immediate foreground consists of dark water and a rocky outcrop or small island with a bird perched on it.
*   **Atmosphere:** The sky is clear and light blue, suggesting fair weather.

In summary, it is a scenic view of the Golden Gate Bridge from the water.
ارسال پیام با چندین تصویر
شما میتوانید با گنجاندن چندین محتوای تصویری در قالب اعلان، چندین تصویر را در یک اعلان ارائه دهید.
from PIL import Image
from IPython.display import display
import requests

from transformers import GenerationConfig
config = GenerationConfig.from_pretrained(MODEL_ID)
config.max_new_tokens = 512
gen_kwargs = dict(generation_config=config)

img_urls = [
    "https://ai.google.dev/gemma/docs/capabilities/vision/images/surprise.png",
    "https://ai.google.dev/gemma/docs/capabilities/vision/images/kitchen.jpg",
]
for img in img_urls:
    display(Image.open(requests.get(img, stream=True).raw))

messages = [
    {
        "role": "user", "content": [
            {"type": "image", "url": img_urls[0]},
            {"type": "image", "url": img_urls[1]},
            {"type": "text", "text": "Caption these images."}
        ]
    }
]

output = vqa_pipe(messages, return_full_text=False, generate_kwargs=gen_kwargs)
print(output[0]['generated_text'])

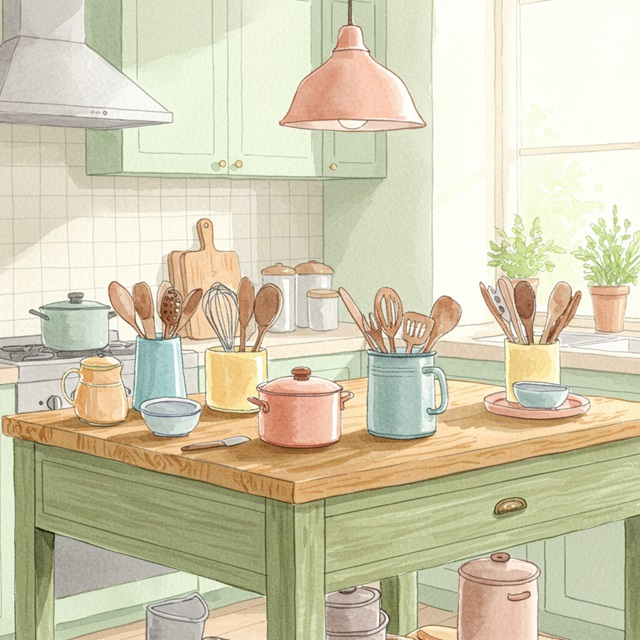
Here are a few caption options for each image, depending on the tone you're going for:

## Image 1: Black and White Cat

**Cute/Playful:**

* "Eyes that steal your heart."
* "Pure feline perfection."
* "Looking for trouble (and cuddles)."
* "The world, seen through emerald eyes."

**Descriptive/Sweet:**

* "A beautiful contrast of black and white."
* "Captivating gaze."
* "A portrait of feline elegance."

**Funny/Relatable:**

* "When you're judging your life choices."
* "The face of pure, unadulterated curiosity."
* "Ready for dinner or a nap, depending on the mood."

---

## Image 2: Kitchen Scene

**Cozy/Homely:**

* "Kitchen mornings and the scent of baking."
* "Where memories are made, one meal at a time."
* "Simple joys and rustic charm in the kitchen."
* "Gathering ingredients for something delicious."

**Aesthetic/Foodie:**

* "Rustic kitchen vibes and homemade goodness."
* "The art of cooking."
* "A warm, inviting space for culinary adventures."

**Simple/Direct:**

* "Kitchen life."
* "Cooking time."
* "Home is where the kitchen is."
OCR (تشخیص نوری کاراکتر)
مدلها میتوانند متون چندزبانه را در تصویر تشخیص دهند.
from PIL import Image
from IPython.display import display
import requests

from transformers import GenerationConfig
config = GenerationConfig.from_pretrained(MODEL_ID)
config.max_new_tokens = 512
gen_kwargs = dict(generation_config=config)

img_url = "https://ai.google.dev/gemma/docs/capabilities/vision/images/cat.png"
input_image = Image.open(requests.get(img_url, stream=True).raw)
display(input_image)

messages = [
    {
        "role": "user", "content": [
            {"type": "image", "url": img_url},
            {"type": "text", "text": "What does the sign say?"}
        ]
    }
]

output = vqa_pipe(messages, return_full_text=False, generate_kwargs=gen_kwargs)
print(output[0]['generated_text'])
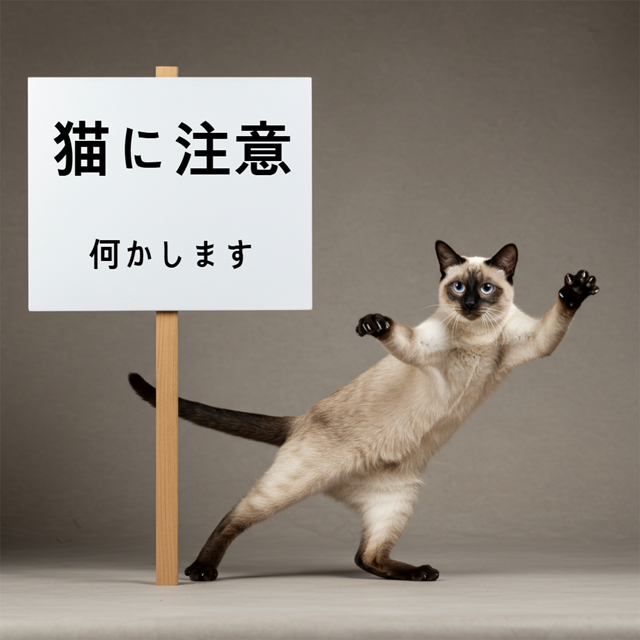
The sign says:

**猫に注意** (Neko ni chūi) - which means **"Caution: Cat"** or **"Watch out for cats"**.

Below that, it says:

**何かします** (Nanika shimasu) - which means **"I will do something"** or **"Something will happen"**.
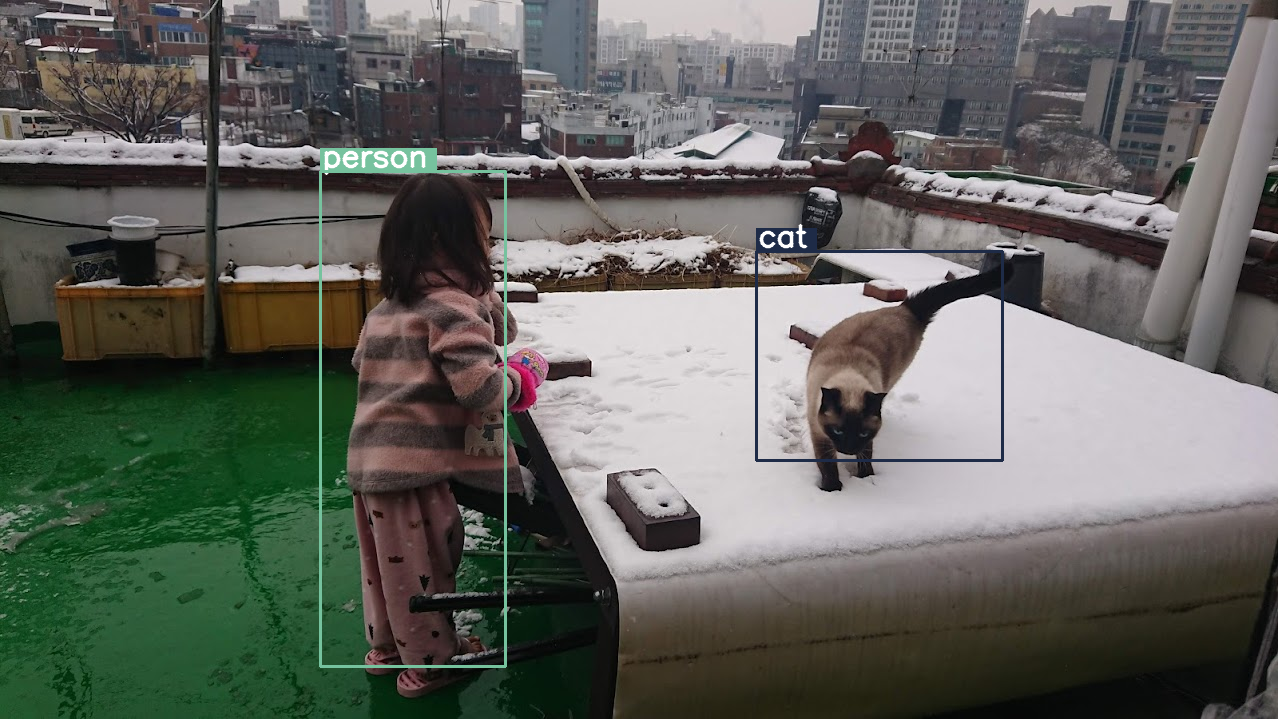
تشخیص شیء
مدلها برای تشخیص اشیاء در یک تصویر و دریافت مختصات جعبهی محصورکنندهی آنها آموزش داده میشوند. مختصات جعبهی محصورکننده به صورت مقادیر نرمالشده نسبت به یک شبکهی ۱۰۰۰x۱۰۰۰ بیان میشوند. شما باید این مختصات را بر اساس اندازهی تصویر اصلی خود، مقیاسزدایی کنید.
import numpy as np
from PIL import Image
from IPython.display import display
import requests

import cv2
import re, json

from transformers import GenerationConfig
config = GenerationConfig.from_pretrained(MODEL_ID)
config.max_new_tokens = 512
gen_kwargs = dict(generation_config=config)

# Load Image
img_url = "https://raw.githubusercontent.com/bebechien/gemma/refs/heads/main/PaliGemma_Demo.JPG"
input_image = Image.open(requests.get(img_url, stream=True).raw)

###############################
# some helper functions below #
###############################

def draw_bounding_box(image, coordinates, label, label_colors, width, height):
    y1, x1, y2, x2 = [int(coord)/1000 for coord in coordinates]
    y1, x1, y2, x2 = map(round, (y1*height, x1*width, y2*height, x2*width))

    text_size, _ = cv2.getTextSize(label, cv2.FONT_HERSHEY_SIMPLEX, 1, 3)
    text_width, text_height = text_size

    text_x = x1 + 2
    text_y = y1 - 5

    font_scale = 1
    label_rect_width = text_width + 8
    label_rect_height = int(text_height * font_scale)

    color = label_colors.get(label, None)
    if color is None:
        color = np.random.randint(0, 256, (3,)).tolist()
        label_colors[label] = color

    cv2.rectangle(image, (x1, y1 - label_rect_height), (x1 + label_rect_width, y1), color, -1)

    thickness = 2
    cv2.putText(image, label, (text_x, text_y), cv2.FONT_HERSHEY_SIMPLEX, font_scale, (255, 255, 255), thickness, cv2.LINE_AA)

    cv2.rectangle(image, (x1, y1), (x2, y2), color, 2)
    return image

def draw_results(text_content):
  match = re.search(r'```json\s+(.*?)\s+```', text_content, re.DOTALL)
  if match:
    json_string = match.group(1)
    # Parse the string into a Python list/object
    data_list = json.loads(json_string)

    labels = []
    label_colors = {}
    output_image = input_image
    output_img = np.array(input_image)

    for item in data_list:
      width = input_image.size[0]
      height = input_image.size[1]

      # Draw bounding boxes on the frame.
      image = cv2.cvtColor(np.array(input_image), cv2.COLOR_RGB2BGR)
      output_img = draw_bounding_box(output_img, item["box_2d"], item["label"], label_colors, width, height)

      output_image = Image.fromarray(output_img)

    return output_image
  else:
    print("No JSON code block found.")


messages = [
    {
        "role": "user", "content": [
            {"type": "image", "url": img_url},
            {"type": "text", "text": "detect person and cat"}
        ]
    }
]

output = vqa_pipe(messages, return_full_text=False, generate_kwargs=gen_kwargs)
print(output[0]['generated_text'])

draw_results(output[0]['generated_text'])
```json
[
  {"box_2d": [244, 256, 948, 405], "label": "person"},
  {"box_2d": [357, 606, 655, 803], "label": "cat"}
]
```
وضوح متغیر (بودجه توکن)
همه مدلهای Gemma 4 از وضوح متغیر پشتیبانی میکنند، به این معنی که تصاویر با وضوحهای مختلف قابل پردازش هستند. علاوه بر این، میتوانید تصمیم بگیرید که آیا میخواهید یک تصویر مشخص را با وضوح بالاتر یا پایینتر پردازش کنید. به عنوان مثال، اگر در حال انجام تشخیص شیء هستید، ممکن است بخواهید تصویر را با وضوح بالاتری پردازش کنید. به عنوان مثال، درک ویدیو میتواند با وضوح پایینتر برای هر فریم انجام شود تا سرعت استنتاج افزایش یابد. اساساً، این یک بدهبستان بین سرعت استنتاج و دقت نمایش تصویر است.
این انتخاب توسط بودجه توکن کنترل میشود، که نشان دهنده حداکثر تعداد توکنهای بصری (که به آن جاسازی توکن بصری نیز گفته میشود) است که برای یک تصویر مشخص تولید میشوند.
کاربر میتواند بین اندازههای بودجه ۷۰، ۱۴۰، ۲۸۰، ۵۶۰ یا ۱۱۲۰ توکن یکی را انتخاب کند. بسته به بودجه، اندازه ورودی تغییر میکند. اگر بودجه بالاتری داشته باشید (مثلاً ۱۱۲۰ توکن)، تصویر شما میتواند وضوح بالاتری را حفظ کند و در نتیجه تکههای بیشتری برای پردازش خواهد داشت. اگر بودجه کمتری داشته باشید (مثلاً ۷۰ توکن)، تصویر شما باید کوچکتر شود و تکههای کمتری برای پردازش خواهید داشت. با بودجه بالاتر (و بنابراین توکنهای بیشتر)، میتوانید اطلاعات بسیار بیشتری را نسبت به بودجه کمتر ثبت کنید.
این بودجه تعیین میکند که تصویر چقدر تغییر اندازه داده شود. تصور کنید بودجهای معادل ۲۸۰ توکن دارید، در این صورت حداکثر تعداد پچها ۹ × ۲۸۰ = ۲۵۲۰ خواهد بود. چرا ضربدر ۹؟ دلیلش این است که در مرحله بعد، هر بلوک ۳x۳ از پچهای همسایه با میانگینگیری از آنها در یک جاسازی واحد ادغام میشوند. جاسازیهای حاصل، جاسازیهای توکن بصری هستند. هرچه جاسازیهای توکن بصری بیشتری داشته باشیم، اطلاعات دقیقتری میتوان از یک تصویر استخراج کرد.
بیایید بررسی کنیم که اگر تشخیص شیء را روی یک تصویر انجام دهیم و اندازه بودجه را بسیار کم (70) تنظیم کنیم، چه اتفاقی میافتد:
import numpy as np
from PIL import Image
import requests, cv2, re, json

from transformers import GenerationConfig
config = GenerationConfig.from_pretrained(MODEL_ID)
config.max_new_tokens = 512
gen_kwargs = dict(generation_config=config)

img_url = "https://huggingface.co/datasets/Xenova/transformers.js-docs/resolve/main/city-streets.jpg"
input_image = Image.open(requests.get(img_url, stream=True).raw)

def draw_bounding_box(image, coordinates, label, label_colors, width, height):
    """Draw a bounding box based on input image and coordinates"""
    y1, x1, y2, x2 = [int(c) / 1000 for c in coordinates]
    y1, x1, y2, x2 = round(y1 * height), round(x1 * width), round(y2 * height), round(x2 * width)

    color = label_colors.setdefault(label, np.random.randint(0, 256, (3,)).tolist())
    text_size = cv2.getTextSize(label, cv2.FONT_HERSHEY_SIMPLEX, 1, 3)[0]

    cv2.rectangle(image, (x1, y1 - text_size[1]), (x1 + text_size[0] + 8, y1), color, -1)
    cv2.putText(image, label, (x1 + 2, y1 - 5), cv2.FONT_HERSHEY_SIMPLEX, 1, (255, 255, 255), 2, cv2.LINE_AA)
    cv2.rectangle(image, (x1, y1), (x2, y2), color, 2)
    return image

def draw_results(text_content):
    """Based on an input image, draw bounding boxes and labels"""
    # Extract JSON
    match = re.search(r'```json\s+(.*?)\s+```', text_content, re.DOTALL)
    if not match:
        print("No JSON code block found.")
        return None

    # Extract data
    data_list = json.loads(match.group(1))
    output_img = np.array(input_image)
    label_colors = {}
    w, h = input_image.size

    # Draw bounding boxes
    for item in data_list:
        output_img = draw_bounding_box(output_img, item["box_2d"], item["label"], label_colors, w, h)

    return Image.fromarray(output_img)


# Detect person, card, and traffic light
messages = [
    {
        "role": "user", "content": [
            {"type": "image", "url": img_url},
             {"type": "text", "text": "detect person and car, output only ```json"}
        ]
     }
]

# Run pipeline and set token budget to 70
vqa_pipe.image_processor.max_soft_tokens = 70
output = vqa_pipe(messages, return_full_text=False, generate_kwargs=gen_kwargs)
print(output[0]['generated_text'])
draw_results(output[0]['generated_text'])
```json
[
  {"box_2d": [413, 864, 537, 933], "label": "person"},
  {"box_2d": [553, 315, 666, 623], "label": "car"},
  {"box_2d": [743, 754, 843, 864], "label": "car"},
  {"box_2d": [743, 556, 843, 743], "label": "car"},
  {"box_2d": [733, 49, 853, 135], "label": "person"}
]
```
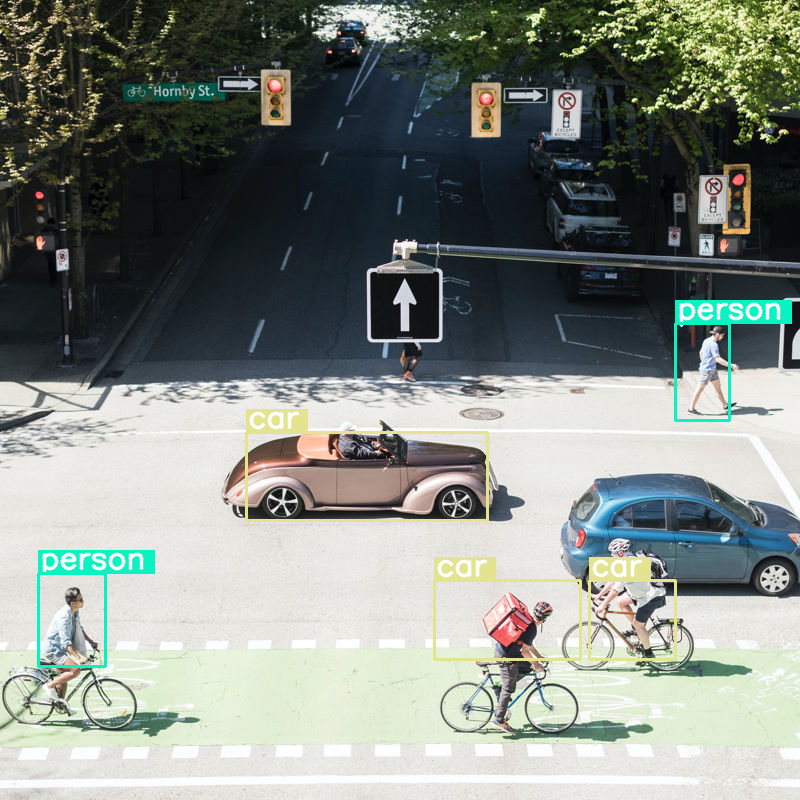
خوب کار میکند، اما واضح است که تصویر به دلیل عدم شناسایی همه ماشینها و افراد، فشرده شده است. بودجه توکن بالاتر باید این مشکل را حل کند!
مقایسه بودجههای توکن
بیایید بررسی کنیم که وقتی اندازه بودجه را افزایش میدهیم چه اتفاقی میافتد! اندازه بودجه بزرگتر منجر به تولید و پردازش توکنهای نرم بیشتری میشود. این باید تشخیص اشیا را بهبود بخشد.
import matplotlib.pyplot as plt

def count_tokens(processor, tokens):
    input_ids = tokens['input_ids'][0]  # Get input IDs from the tokenizer output

    img_counting = []
    img_count = 0

    aud_counting = []
    aud_count = 0

    for x in input_ids:  # Iterate over the token list
        # Use tokenizer.decode() to convert tokens back to words
        word = processor.decode([x])  # No need to convert to JAX array for decoding

        if x == processor.tokenizer.image_token_id:
            img_count = img_count + 1
        elif x == processor.tokenizer.audio_token_id:
            aud_count = aud_count + 1
        elif x == processor.tokenizer.eoi_token_id:
            img_counting.append(img_count)
            img_count = 0
        elif x == processor.tokenizer.eoa_token_id:
            aud_counting.append(aud_count)
            aud_count = 0

    for item in img_counting:
        print(f"# of Image Tokens: {item}")

    for item in aud_counting:
        print(f"# of Audio Tokens: {item}")

input_image.resize((2000, 2000))

# Detect person and car
messages = [
    {
        "role": "user", "content": [
            {"type": "image", "url": img_url},
             {"type": "text", "text": "detect person and car, output only ```json"}
        ]
     }
]


# Run for different budget sizes
budget_sizes = [70, 140, 280, 560]
# 1120 won't fit on T4, but works on L4 or highger
#budget_sizes = [70, 140, 280, 560, 1120]
results = {}

for budget in budget_sizes:
    print(f"Budget Size: {budget}")
    vqa_pipe.image_processor.max_soft_tokens = budget

    inputs = vqa_pipe.processor.apply_chat_template(messages, tokenize=True, return_dict=True, return_tensors="pt")
    count_tokens(vqa_pipe.processor, inputs)

    output = vqa_pipe(messages, return_full_text=False, generate_kwargs=gen_kwargs)
    result_text = output[0]['generated_text']
    print(output[0]['generated_text'])
    result_image = draw_results(result_text)
    if result_image:
        results[budget] = result_image

# Display side-by-side
fig, axes = plt.subplots(1, len(results), figsize=(5 * len(results), 6))
if len(results) == 1:
    axes = [axes]

for ax, (budget, img) in zip(axes, results.items()):
    ax.imshow(img)
    ax.set_title(f"max_soft_tokens = {budget}", fontsize=14, fontweight='bold')
    ax.axis('off')

plt.tight_layout()
plt.show()
Budget Size: 70
# of Image Tokens: 64

```json
[
  {"box_2d": [731, 57, 873, 132], "label": "person"},
  {"box_2d": [556, 314, 675, 618], "label": "car"},
  {"box_2d": [736, 754, 843, 864], "label": "car"},
  {"box_2d": [756, 553, 935, 736], "label": "person"}
]
```
Budget Size: 140
# of Image Tokens: 121

```json
[
  {"box_2d": [736, 734, 809, 836], "label": "car"},
  {"box_2d": [745, 556, 919, 715], "label": "person"},
  {"box_2d": [748, 0, 906, 166], "label": "person"},
  {"box_2d": [541, 322, 647, 626], "label": "car"},
  {"box_2d": [413, 874, 513, 924], "label": "person"}
]
```
Budget Size: 280
# of Image Tokens: 256

```json
[
  {"box_2d": [403, 876, 511, 924], "label": "person"},
  {"box_2d": [532, 313, 652, 623], "label": "car"},
  {"box_2d": [735, 732, 817, 828], "label": "car"},
  {"box_2d": [742, 554, 912, 662], "label": "person"},
  {"box_2d": [760, 15, 899, 163], "label": "person"},
  {"box_2d": [768, 554, 912, 724], "label": "person"}
]
```
Budget Size: 560
# of Image Tokens: 529

```json
[
  {"box_2d": [741, 0, 910, 135], "label": "person"},
  {"box_2d": [547, 254, 650, 624], "label": "car"},
  {"box_2d": [773, 526, 912, 666], "label": "person"},
  {"box_2d": [601, 707, 742, 1000], "label": "car"},
  {"box_2d": [411, 873, 515, 931], "label": "person"},
  {"box_2d": [765, 700, 851, 874], "label": "person"}
]
```

خلاصه و مراحل بعدی
در این راهنما، شما یاد گرفتید که چگونه از مدلهای Gemma 4 برای وظایف درک تصویر استفاده کنید. مثالها شامل تولید متن از تصاویر، استفاده از قالبهای سریع برای QA بصری، پردازش چندین تصویر به طور همزمان، تشخیص نوری کاراکتر (OCR)، تشخیص شیء با کادرهای محدودکننده و مدیریت وضوح متغیر با استفاده از بودجههای توکن بود.
منابع دیگر را بررسی کنید.